1
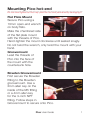
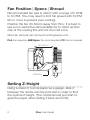
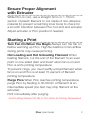
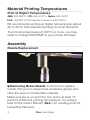
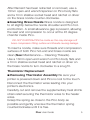
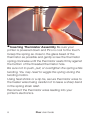
Hello. Read me first Visit the support page at B3innovations.com for more information Table of Contents Mounting Pico hot-end. . . . . . . . . . . . . . . . . . . . . . . . . . . . . 1 Fan Position | Specs | Shroud. . . . . . . . . . . . . . . . . . . . . . . . 2 Setting Z-Height. . . . . . . . . . . . . . . . . . . . . . . . . . . . . . . . . . 2 Ensure Proper Alignment with Extruder. . . . . . . . . . . . . . . . . 3 Starting a Print. . . . . . . . . . . . . . . . . . . . . . . . . . . . . . . . . . . 3 Material Printing Temperatures. . . . . . . . . . . . . . . . . . . . . . . 4 Assembly. . . . . . . . . . . . . . . . . . . . . . . . . . . . . . . . . . . . . . . 4 Maintenance. . . . . . . . . . . . . . . . . . . . . . . . . . . . . . . . . . . . . 7 Troubleshooting . . . . . . . . . . . . . . . . . . . . . . . . . . . . . . . . . . 8 DIY Kit . . . . . . . . . . . . . . . . . . . . . . . . . . . . . . . . . . . . . . . . . 9 Setup Notes se Marlin Thermistor Table No. 1 for the 300°C U (100K Thermistor) n Download the B3 500 Celsius Thermistor Table for the 500 Celsius Thermistor from the Downloads page on B3innovations.com n Before printing with Pico, tighten nozzle while Pico is at 250°C. Note: an intended small gap will be present. See Page 5 for further explanation n B3 highly recommends the use of the included filament filter to remove particulates from the surface of the filament before entering the extruder. A few drops of vegetable oil on the filter media will further reduce the likelihood of jams for PLA. n Two cylindrical foam filters are provided for your convenience. Use one for dry use and one for lubricated use. Mounting Pico hot-end Do not over-tighten as this may yield the hot-end permanently damaging it. Flat Plate Mount Secure Pico using a 13mm open-end wrench on body flats. Mate the chamfered side of the flat plate mount with the threads of Pico. Hand-tighten the mount clockwise until seated snugly. Do not twist the wrench, only twist the mount with your hand. Groovemount Lead the threads of Pico into the face of the mount with the countersunk hole. Bowden Groovemount First secure the Bowden fitting to the Bowden groovemount. Use a 2mm allen key on the inside of the M5 fitting or a 4mm allen key for the ⅛ inch NPT fitting. Follow steps in Groovemount to secure onto Pico. Pico User Guide 1 ONTAINED IN THIS LE PROPERTY OF NAME HERE>. ANY ART OR AS A WHOLE s Educational Edition. D CONFIDENTIAL FINISH MATERIAL COMMENTS: Fan Position | Specs | Shroud INTERPRET GEOMETRIC TOLERANCING PER: DIMENSIONS ARE IN INCHES TOLERANCES: FRACTIONAL ANGULAR: MACH BEND TWO PLACE DECIMAL THREE PLACE DECIMAL Q.A. MFG APPR. Recommended fan size is 40mm with a range of 5 CFM to 8 CFM. (You may need to limit fan speed with 6 CFM fan or more to prevent over-cooling). Position the fan 30-50mm away from Pico. It is best to use a non-restrictive shroud/deflector to direct air flow only at the cooling fins and not the melt zone. UNLESS OTHERWISE SPECIFIED: ENG APPR. CHECKED DRAWN NAME More fan shrouds can be found at thingiverse.com PLA: Fan required ABS/Nylon: Fan recommended PC: Fan not required 30-50mm Deflector Setting Z-Height Using a sheet of normal paper as a gauge, slide it between the nozzle and the print bed in order to find the optimal Z-height. (The nozzle should just start to grab the paper when sliding it back and forth). 2 Pico User Guide DATE Ensure Proper Alignment with Extruder While Pico is cool, use a straight 3mm or 1.75mm section of plastic filament or rod made of non-abrasive material (to prevent scratching inner bore) to check for a smooth transition between Pico hot-end and extruder. Adjust extruder or Pico position if needed. Starting a Print Turn Fan On When You Begin Always turn the fan on before warming up Pico. High fluctuations in fan airflow during prints may cause jamming. Hot Loading and Hot Unloading Filament When loading filament, cut the end of the filament to an even point or one-sided slant and insert when fan is on and Pico is at its printing temperature. To prevent clogs, you must swiftly unload filament when fan is on and Pico is at least 75 percent of filament printing temperature. Purge Pico When Pico reaches printing temperature, purge Pico by feeding in 30-60mm of filament at an intermediate speed (too fast may strip filament at the extruder). Print immediately after purging. Avoid Letting Filament Sit Idle In Pico When at Printing Temperature Pico User Guide 3 Material Printing Temperatures Print at Higher Temperatures ABS: 220-265°C PC: 260-310°C Nylon: 240-280°C PLA: 180-240°C (The majority is closer to 220-240°C) B3 recommends printing at higher temperatures (about 20 to 30°C) than standard printing for most filaments. To print at temperatures of 300°C or more, you may need to change MAXTEMP in your printer firmware. Assembly Nozzle Replacement n Removing Brass Nozzle To remove or replace nozzle, first put on proper heat protective gloves and clear the area of combustible material. Make sure fan is on and Pico hot-end is at least 75 percent of filament printing temperature. It is always best to first retract filament (See: Hot Loading and Hot Unloading Filament). 4 Pico User Guide After filament has been retracted or removed, use a 13mm open-end wrench/spanner on Pico body flats and a 7mm shallow socket head and ratchet or driver on the brass nozzle counter-clockwise. n Inserting Brass Nozzle Brass nozzle is designed to sit slightly below the nozzle shoulder and Pico hotend bottom. A small allowance gap is present, allowing the seat and compression to occur at the 45 degree chamfer inside Pico. Do not overtighten the nozzle as this may damage soft brass compression fitting surface and threads causing leakage. To insert a nozzle, make sure threads and compression surfaces of both Pico hot-end and brass nozzle are clean (See: Maintenance— Cleaning Threads). Use a 13mm open-end wrench on Pico body flats and a 7mm shallow socket head and ratchet or driver on the brass nozzle to turn clockwise to a snug fit. Thermistor Replacement n Removing Thermistor Assembly Be sure your printer is powered down and Pico is cool to the touch. Disconnect the thermistor wires leading into your printer’s electronics. Carefully cut and remove the supplementary heat shrink strain relief securing the thermistor wires to the heater wires. Grasp the spring as close to the Pico body as possible and gently unscrew the thermistor spring counterclockwise until it is free. Pico User Guide 5 Inserting Thermistor Assembly Be sure your printer is powered down and Pico is cool to the touch. Grasp the spring as close to the glass bead of the thermistor as possible and gently screw the thermistor spring clockwise until the thermistor seats firmly against the bottom of the threaded thermistor hole. Be sure not to push, pull, or overtighten the spring while twisting. You may need to wiggle the spring during the twisting motion. Using heat shrink or a zip tie, secure thermistor wires to the heater wires being careful not to leave a sharp bend in the spring strain relief. Reconnect the thermistor wires leading into your printer’s electronics. n 6 Pico User Guide Maintenance Cleaning threads Changing nozzles may require removing plastic from the brass and stainless steel threads to ensure a good seal between the nozzle and Pico body. This can be accomplished with a combination of acetone, tweezers, sharp objects (needle, toothpick, hobby knife etc.), and/or a spiral wire brush that can be found in any small gauge gun-cleaning kit. For Pico inner threads: it is best to leave Pico attached to your printer with the brass nozzle off, the heat on and Z axis raised high. With the aid of a mirror, use tools to clean plastic from between threads, being careful not to scratch the inner bore of Pico. For brass nozzle: it is best to soak the brass nozzle in acetone for at least 24 hours. Then use a wire brush or hobby knife to carefully scrape away soft plastic. Avoid contact with the chamfer as this will scratch the seal surface. Cleaning the inner bore of Pico Wear proper safety equipment. Conduct procedure in a well-ventilated area. Note: Autoignition of acetone is 465°C This process may be easier to complete while Pico is unmounted but still electrically connected and safely secured in a suitable open working area. Remove any loaded filament while Pico is hot (See: Starting a Print—Hot Loading and Hot Unloading Filament). Pico User Guide 7 Remove the nozzle while Pico is hot (See: Removing Brass Nozzle). Clear out any remaining filament (See: Removing nozzle and pushing filament through). Soak cotton stem (not plastic stem) from a cotton swab in acetone. (For 3mm Pico, some cotton may need to be removed from the end of a cotton swab. For 1.75mm Pico, all the cotton may need to be removed from the end of a cotton swab.) While Pico is still at printing temperature, swab the inner bores with soaked cotton swabs multiple times from both openings of Pico until clean. Troubleshooting How to clear a jam in upper portion of Pico If a jam occurs and no plastic is extruding, unload filament if possible. Turn the fan off and allow Pico to heat up 20-30 degrees above printing temperature of material (stay within rated thermistor temperature limits). Once heat creeps upwards (remove filament if you have not already) cut new filament to a point and load into Pico with aid of the extruder. Extrude at a continuous high rate while quickly dropping to print temperature and slowly ramping fan up to speed. 8 Pico User Guide Removing nozzle and pushing filament through to clear Pico Ensure Pico is at printing temperature with the fan off throughout this process. Remove nozzle with 7mm socket (See: Nozzle Replacement). Cut a generous amount of filament to use in clearing the bore, preferably PC. Never insert a metal object inside Pico. Quickly feed the cut portion of filament through the top of Pico. Once you see the solid (unmolten) portion of filament emerge from the bottom, quickly grab filament with pliers and pull remainder through the bottom. For more troubleshooting ideas visit B3innovations.com DIY Kit Installing the Cartridge Heater Feed the heater leads into Pico’s heater bore from the bottom leading into the cooling fins. Once the leads begin to emerge out the top of the bore and side cut out of fins, slide the fiberglass protective sleeve onto both leads before pulling leads through. This will help keep the heater leads from fraying due to rubbing against the cooling fins and top of heater bore. Once the heater nears the bore of Pico, cease pulling the leads. Pico User Guide 9 Align the heater with the Pico heater bore and firmly press the heater into its bore until the very tip of the heater is flush with the bottom of Pico. Some white anti-seize will scrape off during the process. Finally, ensure the fiberglass sleeve is seated at the top of the heater bore leading into the cooling fins. Assembling the Thermistor (300 & 500°C) Refer to technical assembly drawing for details Slide the unequal length fiberglass sleeves, one onto each lead of the thermistor until contacting the head Cut the protruding copper thermistor leads to leave 5mm for crimping on the ferrules Slide the spring over the leads ensuring the spaced portion of the spring is closest to the head of the thermistor (see drawing for detail). For 500C only: Press the spring firmly onto the head to snap it on over the white porcelain collar Place ferrules onto the 5mm exposed leads Place stripped wires into the other ends of the ferrules and crimp into place Heat shrink each individual ferrule connection Heat shrink both wires to the spring, overlapping the heat shrink 4.5 to 5.5mm onto the end of the spring See page 6 for thermistor installation. 10 Pico User Guide See page 4 for nozzle installation. See page 1 for mount installation. Pico User Guide 11 A product of B3 Innovations, LLC. Packaged and distributed by B3 Innovations, LLC, PO Box 381481, Cleveland, Ohio 44136 USA Toll free: 1(844) 238-4733 Email: [email protected] Web: www.b3innovations.com Pico User Manual Rev.2 12-2014