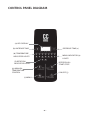
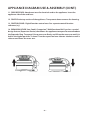
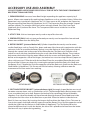
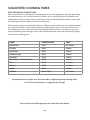
1
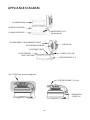
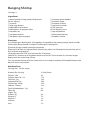
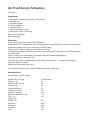
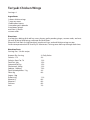
MULTIFUNCTIONAL AIR FRYER
WITH ROTISSERIE
Care & Use Manual
with Recipes by Deb Murray
PLEASE READ BEFORE USE AND SAVE THESE INSTRUCTIONS
Thank you for purchasing Cook’s Companion™ Multifunctional Air Fryer with Rotisserie. The
Cook’s Companion™ Multifunctional Air Fryer heats up quickly while the convection fan
circulates hot air internally to cook food uniformly and seals in the natural juices for full flavor
and aroma. The look while you cook lid, allows you to clearly see what you are cooking and
easily obtain the optimum cooking level for your meals. In addition to being your primary
cooking vessel, this appliance is so compact, it can be used as an extra warming vessel for
entertaining or in situations where space is limited. This Cook’s Companion™ product will
perform best when used as intended. To ensure the best performance please consistently
follow these instructions. This user’s manual contains information on the use and care of this
product. Please read this manual carefully before operation to ensure proper usage and
maintenance. Carefully following the directions in this booklet will enable you to optimize the
performance and lifespan of the appliance. The product you have purchased adheres to the
latest safety and technology standards; however, as with any electric appliance, there are
some potential risks. Only operate this oven in accordance with the instructions provided and
only for its intended household use.
-2-
IMPORTANT SAFEGUARDS
• Read all instructions and save for future reference.
• The Multifunctional Air Fryer is for domestic use only; It is not designed for commercial
operation.
• Do not operate in the presence of explosive and/or flammable fumes.
• This appliance is not intended for use by children. Keep children and pets away from this
product. Close adult supervision is necessary when any appliance is used by or near children.
• Always make sure that children cannot reach the product or any loose cables.
• Use on a secure and stable worktop. Do not place near the edge of the worktop.
• Do not place the product where it can either fall or be submerged into water or any other
liquid.
• Use the product for its intended household use only.
• Always place the pan shell and pan onto the base before plugging the power cord and
switching on. NEVER operate the oven without first placing it on the supplied base.
• Do not let the cord hang over the edge of the table or worktop, or make contact with hot
surfaces.
• Do not place the Multifunctional Air Fryer on or near a hot gas or electric cook top or in a
heated oven.
• Do not move the oven while in use.
• Surfaces become very hot during operation, and remain hot for some time after the unit is
switched off.
• All metal items in the Fryer, such as the accessory attachments, can get very hot during
cooking. Please be careful when removing these items from the oven. Always wear oven
gloves or use the tongs supplied.
• Never place unprotected hands inside the oven when in use.
• Never leave the product unattended while in use.
• Always open the lid away from you so that escaping steam is channeled away from your face.
• Take care when lifting the lid to avoid contact with hot liquid condensation that may have
collected on the inner surface of the lid.
-3-
IMPORTANT SAFEGUARDS (CONT.)
• Be sure to allow the oven body to cool off before cleaning.
• Be sure to unplug the oven when it is not in use, when cleaning the oven or whenever there
is a known power failure. Allow the unit to cool before putting on or taking off parts. Remove
the plug from the socket by pulling on the actual plug. Do not pull the plug out by the cable.
• Use extreme caution when removing any part from the Air Fryer.
• Be careful when disposing of hot liquids, particularly fat or oil.
•To protect against electrical shock, never immerse the cord, plug, lid/control panel or the
whole unit in water or other liquids.
• Regularly check the cable and plug for any signs of damage.
• Do not clean with metal scouring pads: Pieces may break off the pads and make contact with
electrical parts, increasing the risk of electrical shock.
• Never operate the Air Fryer if it has a damaged cord or plug or after the appliance has been
damaged in any manner.
• Do not use any other accessories or attachments not recommended by the manufacturer.
• Never use the cord to carry the product.
• Do not disassemble the product or attempt to modify the plug in any way. This item is not
equipped with any user serviceable parts.
•Extreme caution must be used when moving an appliance containing hot oil or other hot
liquids.
•Always attach plug to appliance first, then plug cord into the wall outlet. To disconnect, turn
any control to “off”, then remove plug from wall outlet.
NOTICE:
This appliance has a polarized plug (one blade is wider than the other). To reduce the risk of
electric shock, this plug is intended to fit into a polarized outlet only one way. If the plug does not
fit fully into the outlet, reverse the plug. If it still does not fit, contact a qualified electrician. Do not
modify the plug in any way.
-4-
APPLIANCE DIAGRAM
(4) INNER BOWL
(3) BOWL HOUSING
MICROSWITCH (1)
(inside base)
(2) MAIN HOUSING
(5) REMOVABLE TRANSPARENT DOME
(6) HEATING ELEMENT
AIR FAN (9)
(7) ROTARY DRIVE
COVER LOCK (10)
(8) ROTISSERIE
SHAFT HOLDER
CORD RECEIVER (11)
(12) COVER (see control diagram)
CONTROL PANEL (13) (a-j)
EXPANSION
LEVER (14)
-5-
CONTROL PANEL DIAGRAM
(a) LED DISPLAY
(b) INCREASE TIME
DECREASE TIME (c)
(d) TEMPERATURE
INDICATOR LIGHTS
MENU INDICATOR (e)
LIGHTS
(f ) ROTATION
INDICATOR LIGHTS
ROTATION (h)
START/STOP
(g) MANUAL
TEMPERATURE
CONTROL
ON/OFF (j)
(i) MENU
-6-
ACCESSORY ITEMS
1. EXPANSION RING
5. RECTANGLE ROTARY
BASKET
9(a). DUAL RACK
(low position)
2. UTILITY PAN
3. PERFORATED PAN
7. ROTISSERIE
FORKS
6. ROTISSERIE
SHAFT
9(b). DUAL RACK
(high position)
10. POULTRY RACK
-7-
4. ROTARY BASKET
8. LIFTER
11. VERTICAL RACK
APPLIANCE DIAGRAM USE & ASSEMBLY
1. MICRO SWITCH: A safety mechanism (located inside the base of the Main Housing) that
must be depressed by the Bowl Housing for the appliance to function. If the appliance
does not turn on check this connection to make sure it is depressed.
2. MAIN HOUSING: Outer support structure. Houses the Micro Switch, Heating Element,
Rotary Drive, Air Fan, Cover Lock, Cord Receiver, Cover, Control Panel and Expansion Lever.
3. BOWL HOUSING: Holds the Inner Bowl in place and surrounds the inner bowl with a
color, heat resistant outer shell. Place the Bowl Housing inside the Main Housing making
sure to insert the rotary drive through the round opening in the Bowl Housing.
4. INNER BOWL: Main cooking area coated with PTFE free nonstick coating. The Inner Bowl
nests inside the Bowl Housing. Align the round opening in the Inner Bowl with the Rotary
Drive and nest into the Bowl Housing.
5. REMOVABLE TRANSPARENT DOME: Look through area of the cover. The Dome is
removable for cleaning. To remove, grasp the dome and turn clockwise. To replace, align
grooves and turn counter clockwise.
6. HEATING ELEMENT: Heat source.
7. ROTARY DRIVE: Rotating connection for all rotisserie parts. This is the chrome circular
shaft that inserts through both the Bowl Housing and Inner Bowl.
8. ROTISSERIE SHAFT HOLDER
9. AIR FAN: Fan that circulates the air in side the appliance creating the convection
process.
10. COVER LOCK: Holds the cover in the open position at a 90° angle. While the button is in
position, the top lid is locked. To close the cover, press the button.
-8-
APPLIANCE DIAGRAM USE & ASSEMBLY (CONT.)
11. CORD RECEIVER: Attachment area for electrical cord to the appliance. Insert the
appliance side of the cord here.
12. COVER: Entire top section of the appliance. Transparent dome removes for cleaning.
13. CONTROL PANEL: Digital function control area. See separate control function
reference (a-j).
14. EXPANSION LEVER: Your Cook’s Companion™ Multifunctional Air Fryer has a special
design feature (Expansion Device) that allows the appliance to expand to accommodate
the Expander Ring. To expand: Grasp cover arm firmly, and lift up the cover arm until it is
held in the higher position. To lower: Turn the expansion lever counter-clockwise until it
releases and lower the cover arm.
-9-
CONTROL PANEL REFERENCE
(a) LED DISPLAY: Digital display.
(b) INCREASE TIME: Press button, at any time, to manually increase cooking time. It
increases by minutes. If pressed continually without release, it will increase up in 5 minute
increments.
(c) DECREASE TIME: Press button, at any time, to manually decrease cooking time. It
decreases by minutes. If pressed continually without release, it will decrease in 5-minute
increments.
(d) TEMPERATURE INCREMENT LIGHTS: Lights up to identify temperature setting.
(e) MENU INDICATOR LIGHTS: Lights up to identify item setting.
(f) ROTATION INDICATOR LIGHTS: Light up to identify if rotation is on/off.
(g) MANUAL TEMPERATURE CONTROL: Press to manually adjust temperature.
(h) ROTATION STOP/START CONTROL: Press to start/stop rotary function.
(i) MENU: Press to select DIY or Pre-settings.
(j) ON/OFF: Starts or stops power.
- 10 -
ACCESSORY USE AND ASSEMBLY
(All ACCESSORIES ARE DESIGNED SPECIFICALLY FOR USE WITH THE COOK’S COMPANION™
MULTIFUNCTIONAL AIR FRYER)
1. EXPANSION RING: Increases Inner Bowl height expanding the appliance capacity by 5
quarts. Allows extra capacity for cooking larger food items such as a whole chicken. Follow the
Expansion Lever instructions (Appliance Use 13). Open cover to 90° and place the Expansion
Ring on top of the Bowl Housing (Appliance Use 3). The Expansion Ring has triangle-shaped
caution symbols. The triangles point up Δ when correctly placed. Press the Cover Lock
(Appliance Use 9) to lower the cover. The Transparent Dome nests inside the rim of the
Expansion Ring.
2. UTILITY PAN: Stick resistant pan mostly used on top of the low rack.
3. PERFORATED PAN: Stick resistant perforated pan mostly used on top of the low rack and
allows more airflow than the Utility Pan.
4. ROTARY BASKET: (pictured below left) Cylinder shaped basket mostly used to rotate
smaller food items such as French fries, beans and more. Must be used in conjunction with the
rotisserie shaft. To assemble the Rotary Basket; insert the Rotisserie Shaft (6 Accessary Items)
through the square hole in the center of the Rotary Basket. The Rotisserie Shaft has small
indents on one side that should be facing the screw side of the Rotary Basket. These indents
help center the basket. Align the outer indents with the screws and hand tighten. Open the
basket on the opposites side of the hinges, the basket has a tension clasp that easily opens or
closes with pressure. Fill basket with desired food. Place the assembled Rotary Basket inside
the Inner Bowl (4 Accessory Items) by inserting the pointed end of the Rotisserie Shaft into
the Rotary Drive (7 Appliance). Rest the opposite end of the Rotisserie Shaft into the Rotisserie
Shaft Holder (8 Appliance). Tip: Do not over fill the basket, allowing sufficient room for
movement will ensure more even cooking.
ROTARY BASKET
RECTANGLE ROTARY BASKET
5. RECTANGLE ROTARY BASKET: (pictured above right) Rectangle shaped basket most used
to rotate narrower items such as sandwiches or fish. The Rectangle Rotary Basket comes with
a pre-assembled rotisserie shaft. Remove the basket lid by squeezing the top lid handles
together. One side of the handle will bend inward allowing removal. Place food item inside
and replace the lid as close to the food item as possible. Place the basket inside the Inner
Bowl (4 Accessory Items) by inserting the longer shaft end into the Rotary Drive. Take care to
line up the square shaft end with the square area of the Rotary Drive. Rest the opposite end of
the basket shaft into the Rotisserie Shaft Holder (8 Appliance). Tip: The Basket lid can be
placed at different levels inside the basket, the closer lid is placed to the food item the better
the item will stay in place during cooking.
- 11 -
ACCESSORY USE AND ASSEMBLY (CONT.)
6. ROTISSERIE SHAFT: (pictured below) Used in conjunction with the Rotary basket and
rotisserie forks.
7. ROTISSERIE FORKS: (pictured below) Use for roasting chicken, duck and roasts. Must be
used in conjunction with the rotisserie shaft. The Rotisserie forks need to attach to the
Rotisserie Shaft for use. Attach one fork to one side of the Rotisserie Shaft and tighten.
Skewer the food to be cooked with the Rotisserie Shaft and slide the food until it is
secured by the fork. Attach the other fork and slide until it secures the food and tighten
the screw to secure. Place the assembled Rotary Basket inside the Inner Bowl (4 Accessory
Items) by inserting the solid end of the Rotisserie Shaft into the Rotary Drive
(7 Appliance). Rest the opposite end of the Rotisserie Shaft into the Rotisserie Shaft
Holder (8 Appliance).
8. LIFTER: (pictured below) Use only for lifting the Dual Rack, the Utility Pan, and
Perforated Pan out of the Fryer. Place the Lifter ends around the outside edge of the rack
or pan, squeeze together and lift (as pictured). Note: Please use caution when using lifter,
as all pieces may be hot.
9. DUAL RACK: Recommend for maintaining the desired height between food and heat
source. This rack is reversible, with one side high and one side low. Please note there must
be at least ¾” between the heat source and the food.
10. POULTRY RACK: (pictured below left) Use in conjunction with the Dual Rack in the low
position. This rack allows for vertical roasting of poultry. Attach the Poultry Rack to the
Dual Rack, as pictured.
POULTRY RACK + DUAL RACK
VERTICAL RACK + DUAL RACK
11. VERTICAL RACK: (pictured above right) Use in conjunction with the Dual Rack in the
low position. Separates food and assists vertical cooking items such as garlic toast.
Vertical Rack rests on top of Dual Rack in low position, as pictured.
- 12 -
GETTING STARTED
Read the safety instructions found in this manual before operating. Before using this
appliance for the first time, follow these steps:
1. Remove all packing materials and literature from inside the oven. Make sure the oven is
in good condition and there are no missing parts or damage to any part.
2. Select a flat, heat-resistant, non-flammable surface to operate the Multifunctional Air
Fryer on making sure there is enough room to open the cover when cooking is complete.
3. Remove any dust or soil that may have accumulated on the surface of the product. Wipe
thoroughly with a clean damp cloth. Wash each washable part (Inner Bowl, Transparent
Dome, Accessories) in warm soapy water or in the dishwasher. Do not use any abrasive
cleaners or scouring pads. Dry thoroughly before use. NEVER submerge any non-washable
part in water or any other liquid.
4. Select desired parts and accessories to be used for cooking and take care to assemble
each part or accessory per the assembly instructions.
5. Lower the cover to the closed position and plug the appliance into the wall outlet.
6. Make sure the power cord is not touching any surface that is or will be hot.
7. Always have oven mitts or heat resistant glove available.
8. Before first use, heat up the empty appliance at 410° temperature for five minutes. This
will eliminate any odors from within the oven. This also will burn off any excess lubricants,
which were used during the manufacturing process. Allow the appliance to cool to room
temperature before first use. A slight amount of smoke may be produced during the first
few uses and is not considered a defect.
9. Always use wooden, silicone, heat-proof plastic or nylon utensils while cooking. Metal
utensils may scratch the bowl.
- 13 -
OPERATING INSTRUCTIONS
1. Place the desired accessory inside the Inner Bowl before placing food inside (unless the
accessory is pre-loaded with the food item). You may also cook directly in the bowl but it
is recommended to use at least one of the accessories to obtain better circulation and
distribution of hot air within the unit. For best results, keep food approximately 1” to 1.25”
from the wall and ¾” from the heating element to allow maximum air circulation. FOOD
CANNOT BE CLOSER THAN ¾” FROM THE HEATING ELEMENT. Foods may also be cooked
directly on the racks, on foil or in an oven-safe container.
2. Lower the cover securely on the bowl making sure that the food does not touch the
sides of the lid. If lid is not closed completely, the appliance will not turn on.
3. Press the Menu button for the desired pre-set function or DIY.
4. If using DIY, press the temperature button until the Temperature Indicator light
indicates your desired temperature.
5. If using DIY, press the timer +/- button until the desired time is indicated in the LED
Display.
6. If Rotisserie is desired, press the rotation start/stop button.
7. Press the On/Off button. Now you are Cooking!
Note: The interior heating element/light will cycle on and off during cooking. When the selected
temperature is reached, the heat will turn off and when the inner temperature drops below the
selected level, the interior light will turn back on for short periods of time, indicating that the oven
is heating up.
8. When the preset time period is completed, an alarm will sound to alert you that the
cooking time is over.
9. When the cooking time is over, unplug the device from the outlet. Lift the cover away
from you to allow any steam to exit and take out the food.
- 14 -
CLEANING AND MAINTENANCE
1. Unplug the oven and allow it to cool completely before performing any cleaning or
maintenance.
2. Once bowl has cooled completely, clean all parts thoroughly with warm soapy water
and a damp cloth. The Inner Bowl and Accessories are dishwasher safe, however, we
recommend hand washing to prolong the beauty and life of the Multifunctional Air Fryer.
3. To clean the fan cover, wipe clean with a damp cloth.
Note: spraying the bowl and racks with cooking oil prior to cooking may facilitate easier cleaning
CAUTION:
• Never immerse the lid, cord, or plug in water or any other liquid.
• If scrubbing is necessary, use a nylon or polyester mesh pad.
• Do not use a steel wool pad or abrasive material.
• Never use solvents or cleaning powder.
• Do not allow liquids to seep inside of the operating mechanism located on the underside of
the lid.
STORING
Allow the appliance to cool completely before storing. Store the appliance in a cool, dry
location and cover to protect from dust. Do not place any heavy items on top of this
appliance during storage as this may result in possible damage to the unit.
You may want to place the lid upside down on the bowl for a more compact storage and
to protect the lid from damage.
- 15 -
TROUBLE SHOOTING
Problem
OVEN WILL NOT TURN ON
Solution
• Make sure that the power cord is plugged in to the unit and outlet.
• Check by connecting another electric device, that the outlet is working properly.
• Check that the thermostat is set to desired temperature. Make sure the timer has been set.
If you select a temperature but do not set the timer, the oven will not turn on.
• Make sure the lid has been folded down.
• Make sure the Micro Switch is pressed.
Problem
OVEN WILL NOT HEAT UP
Solution
• Check the thermostat to see if it is set to high temperature.
• Make sure the timer has been set. If you select a temperature but do not set the timer, the
oven will not turn on.
Problem
ANY PART OR COMPONENT OF THE OVEN IS BROKEN
Solution
• Contact our Customer Service
Problem
I AM NOT SURE WHAT TYPE OF COOKING VESSEL CAN BE USED
INSIDE OF THE MULTIFUNCTIONAL AIR FRYER
Solution
• Any cooking vessel that is safe to use in a regular oven is also safe to use in this Air Fryer. If
unsure, check the cookware’s manual or contact the cookware manufacturer. Cookware
with plastic parts should not be used in any oven.
Problem
THE MAIN LIGHT INSIDE THE OVEN TURNED OFF
Solution
• When the oven reaches the desired temperature, the interior light will turn off. This is
normal operation. The light will only turn on when the temperature is lower than the one
selected on the control panel.
• Choose the maximum temperature level. If the light still does not turn on, contact our
customer service.
Problem
THE OVEN PRODUCES SMOKE
Solution
• The appearance of a small amount of smoke is normal during the first few uses. If after a
few uses it is still smoking, unplug the unit and clean any excess grease from the underside
of the lid and operating mechanism. If the problem persists, please discontinue use and
contact our customer service.
- 16 -
COOKING TIPS
• Using the Dual Rack in the high position allows food to be positioned closer to heat
source for additional crispness, browning or for foods to be cooked “well done”.
• It is not necessary to use oil for roasting, but you may do so for foods that tend to
become dry in an oven.
• 1⁄₂ Cup of oil is the maximum amount of oil to be used in your multi-functional Air Fryer.
• If oil is used, only a thin layer is necessary.
• When half the cooking time is up, flipping the food is recommended for even cooking.
• Brushing the rack with oil will help to avoid sticking.
• You may cover the bottom of the bowl with foil to catch fat and oil drippings. This will
make the oven easier to clean.
• Take special care in following baking recipes, as desserts are especially delicate and easy
to overcook. Lower the temperature slightly if too much browning occurs.
• Use the nonstick pan placed on the low rack.
• Once cooking is finished, promptly remove the lid from the cooking bowl, otherwise
steam may cause the food to become soggy instead of crispy.
• To steam, pour water or broth into the bottom of the cooking bowl using half a cup of
liquid for every pound of food, not to exceed 2 Cups of liquid. Use only water or broth.
WARNING: NEVER fill the bowl with oil. This appliance is not to be used as a deep fryer! Also, stop
cooking immediately if food begins to burn.
- 17 -
SUGGESTED COOKING TIMES
NOTE REGARDING COOKING TIMES:
Please note that these cooking times are approximate. Actual cooking times will vary depending
on several factors such as size of the pieces, thickness of cut, quality & freshness of product and
temperature of oven at start (if the oven has been used immediately before starting a new recipe,
the cooking time will be slightly shorter than indicated).
Please make sure you test the food for doneness before removing from oven. Use a food thermometer if possible. If food is under cooked when the cooking time is up, turn the oven back on for a
few additional minutes. Check on the food periodically while the oven is functioning; if you see
excessive browning of scorching on the surface, flip the food over, lower the temperature slightly,
or shorten the cooking time.
FOOD
TEMPERATURE
TIME
French fries
410°F
23-25min
Chicken
410°F
25min
Drumstick
410°F
15min
Chicken wings
410°F
14min
Spareribs
410°F
18min
New Orleans Chicken Wings
410°F
14min
Fish
360°F
8-10min
Shrimp
360°F
8-10min
Squid
360°F
10min
Shellfish
360°F-410°F
12-15min
Conventional oven recipes may also be used by slightly adjusting cooking times.
A 25-30% time reduction is suggested on average.
Please refer to the following pages for recipes from Deb Murray
- 18 -
Cheese Sticks
Servings: 4
Ingredients
6 mozzarella string cheese sticks
1⁄4 cup flour
2 large eggs, beaten
2 cups Italian seasoned bread crumbs
1⁄4 cup grated Parmesan cheese
parchment paper
olive oil, for spritzing
marinara sauce for dipping
Directions
Open the package of string cheese and separate the cheese sticks and freeze for two hours.
Place the flour in a large plastic bag, the beaten egg in a medium size bowl, and mix the bread
crumbs with the Parmesan and place on a shallow dish or pie pan.
Place the Dual Rack (in high position) into the air fryer. Place perforated pan on the rack and
cover with parchment.
When string cheese is frozen, shake the cheese in the bag of flour, then dip into beaten egg,
then press in the bread crumbs and place the cheese sticks on the parchment. Spritz with
olive oil. Lower the lid.
Set temperature to 410º, and set timer for 5 minutes.
When cook time is complete, turn the cheese sticks. Set the temperature to 410º and set timer
for 3 minutes.
Serve with marinara as a dipping sauce.
Nutrition Facts
Serving Size: 1/4 of a recipe.
Amount Per Serving
Calories: 298
Calories from Fat: 66
Total Fat: 7g
Saturated Fat: 2g
Cholesterol: 79mg
Sodium: 994mg
Total Carbohydrates: 46g
Fiber: 2g
Sugars: 2g
Protein: 13g
Vitamin A:
Vitamin C:
Calcium:
Iron:
% Daily Value
15%
10%
11%
10%
26%
41%
15%
8%
24%
2%
0%
18%
19%
Buffalo Chicken Stuffed Jalapeños
Wrapped in Bacon
Servings: 4
Ingredients
8 Jalapeño peppers
small brown paper bag
8 slices bacon
toothpicks
1⁄4 cup buffalo chicken dip (recipe on following page)
Directions
Place the Dual Rack (in high position) into the air fryer. Place the jalapenos on the rack.
Close the lid. Set temperature to 410º and cook for 12 minutes, turning once.
When the cook time is complete, place the jalapeños in the brown paper bag and close
tightly.
After 5 minutes of cooling, wear latex gloves to peel the skins off the jalapeños.
Slit the peppers lengthwise and scrape out the seeds and membranes. Rinse and place on
paper towels to dry.
Fill each jalapeño with buffalo chicken dip, and wrap each pepper with a piece of bacon.
Secure with a tooth pick.
Place the bacon-wrapped jalapeno back on the rack in the air fryer.
Close the lid, set the temperature for 360º, and set timer for 10 minutes.
Using tongs, turn the jalapenos after 5 minutes.
Depending on the type of bacon, you may need one or two minutes longer to be crispy.
Nutrition Facts
Serving Size: 1/4 of a recipe.
Amount Per Serving
Calories: 125
Calories from Fat: 110
Total Fat: 12g
Saturated Fat: 3g
Cholesterol: 15mg
Sodium: 320mg
Total Carbohydrates: 1g
Fiber: 0g
Sugars: 1g
Protein: 5g
Vitamin A:
Vitamin C:
Calcium:
Iron:
% Daily Value
6%
16%
18%
15%
5%
13%
0%
0%
9%
0%
0%
0%
0%
Buffalo Chicken Dip
Servings: 4
Ingredients
4 ounces whipped cream cheese
1⁄4 cup ranch dressing
1⁄4 cup cayenne pepper sauce (Frank’s Red Hot)
1⁄4 cup crumbled blue cheese
1 cup chicken cooked diced or shredded
Directions
Mix all the ingredients in a large bowl.
Serve hot or cold.
Nutrition Facts
Serving Size: 1/4 of a recipe.
Amount Per Serving
Calories: 26
Calories from Fat: 19
Total Fat: 2g
Saturated Fat: 1g
Cholesterol: 6mg
Sodium: 94mg
Total Carbohydrates: 0g
Fiber: 0g
Sugars: 0g
Protein: 1g
Vitamin A:
Vitamin C:
Calcium:
Iron:
% Daily Value
1%
3%
3%
5%
2%
4%
0%
0%
2%
1%
0%
4%
0%
Banging Shrimp
Servings: 4
Ingredients
1 pound jumbo shrimp, peeled & deveined
For the coating
1⁄2 cup milk
1 large, egg, beaten
2 tablespoons cornstarch
2 tablespoons all-purpose, flour
1 teaspoon salt
1⁄2 teaspoon paprika
1⁄2 teaspoon cayenne pepper
1⁄2 teaspoon garlic powder
1⁄2 teaspoon sugar
1⁄2 teaspoon Siracha
1⁄2 cup panko crumbs
oil, for spraying
For the dipping sauce
1⁄4 cup mayonnaise
1 tablespoon ketchup
1 teaspoon Siracha
Directions
In a shallow glass baking dish, mix together all ingredients for coating except panko crumbs.
Place panko bread crumbs in another shallow glass baking dish.
Dip each shrimp in batter then dip into panko.
Place the Dual Rack (in high position) into air fryer, place 8 to 10 coated shrimp on the rack in
fryer without overlapping.
Set temperature for 410º, and set timer for 10 minutes.
Cook for 4-5 minutes or until golden brown and curled. Turn and cook 4-5 minutes longer.
Repeat with the remaining shrimp.
Toss the cooked shrimp with the sauce and serve shrimp on a platter of shredded lettuce with
bowl of sauce in the center.
Nutrition Facts
Serving Size: 1/4 of a recipe.
Amount Per Serving
Calories: 169
Calories from Fat: 112
Total Fat: 12g
Saturated Fat: 2g
Cholesterol: 43mg
Sodium: 754mg
Total Carbohydrates: 11g
Fiber: 0g
Sugars: 3g
Protein: 2g
Vitamin A:
Vitamin C:
Calcium:
Iron:
% Daily Value
8%
17%
18%
10%
14%
31%
4%
0%
4%
7%
1%
4%
1%
Baked Potatoes
Servings: 3
Ingredients
3 medium russet potatoes
olive oil
sea salt
Directions
Wash the potatoes and rub with oil.
Sprinkle sea salt all over potatoes.
Place Dual Rack (in high position) into the air fryer.
Place the potatoes on the rack.
Close the lid. Set the temperature to 360º, and set the timer for 40 minutes.
Nutrition Facts
Serving Size: 1/3 of a recipe.
Amount Per Serving
Calories: 110
Calories from Fat: 0
Total Fat: 0g
Saturated Fat: 0g
Cholesterol: 0mg
Sodium: 10mg
Total Carbohydrates: 23g
Fiber: 3g
Sugars: 0g
Protein: 3g
Vitamin A:
Vitamin C:
Calcium:
Iron:
% Daily Value
6%
0%
0%
0%
0%
0%
8%
12%
5%
0%
50%
0%
8%
Air Fried Green Tomatoes
Servings: 2
Ingredients
2 large green tomatoes, cut into 1⁄4 inch rounds
1 teaspoon salt
1⁄2 teaspoon pepper
1⁄2 cup instant flour
1 cup buttermilk
1 cup Italian bread crumbs
1⁄2 tablespoon Cajun seasoning
olive oil, for spritzing
Ranch dressing
Directions
Season the tomato slices with salt and pepper.
Place the flour in a shallow dish, put the buttermilk in a shallow dish or pie pan, and then mix
the bread crumbs with Cajun seasoning in another dish.
Place the Dual Rack (in high position) into the air fryer.
Dredge each tomato in the flour then dip it in the buttermilk. Then press in the bread crumbs
into both sides.
Place as many slices of tomatoes you can on the rack without overlapping.
Spritz the tomatoes with olive oil.
Close the lid. Set the temperature to 410°, and set the timer for 12 minutes, turning the
tomatoes after 5 minutes.
Repeat with the remaining slices.
Serve with Ranch dressing seasoned with some of the Cajun spice
Nutrition Facts
Serving Size: 1/2 of a recipe.
Amount Per Serving
Calories: 185
Calories from Fat: 10
Total Fat: 1g
Saturated Fat: 1g
Cholesterol: 5mg
Sodium: 1470mg
Total Carbohydrates: 34g
Fiber: 1g
Sugars: 6g
Protein: 5g
Vitamin A:
Vitamin C:
Calcium:
Iron:
% Daily Value
9%
1%
2%
5%
2%
61%
11%
4%
9%
20%
40%
15%
8%
Teriyaki Chicken Wings
Servings: 4
Ingredients
1 dozen chicken wings
3⁄4 cup soy sauce
1 tablespoon honey
1 teaspoon garlic powder
2 teaspoons ginger
zest from 1⁄2 lemon
sesame seeds
Directions
In a low glass baking dish add soy sauce, honey, garlic powder, ginger, sesame seeds, and zest.
Stir well to blend. Add wings, marinate for 20 minutes.
Place the Dual Rack (in high position) into the air fryer, and add chicken wings on top.
Set the temperature to 410° and fry 25-30 minutes. Turning once half way through cook time.
Nutrition Facts
Serving Size: 1/4 of a recipe.
Amount Per Serving
Calories: 173
Calories from Fat: 78
Total Fat: 10g
Saturated Fat: 3g
Cholesterol: 36mg
Sodium: 1896mg
Total Carbohydrates: 11g
Fiber: 0g
Sugars: 10g
Protein: 6g
Vitamin A:
Vitamin C:
Calcium:
Iron:
% Daily Value
9%
12%
15%
15%
12%
79%
4%
0%
11%
0%
0%
0%
2%
Crunchy Eggplant Fries
Servings: 2
Ingredients
1 large eggplant
1 large egg, beaten
2 tablespoons milk
2 cups seasoned panko bread crumbs
1⁄2 cup shredded Parmesan cheese
parchment paper
Marinara sauce for dipping
Directions
Peel the eggplant and slice lengthwise into 1⁄2 inch slices. Then cut slices into fries.
In a shallow glass baking dish, beat egg and milk together.
In another dish, combine panko and cheese.
Dip each piece of eggplant in egg mixture and then press into panko mixture to coat well.
Place a 6 inch square of parchment on the Dual Rack (in high position) into the Air Fryer.
Carefully place coated eggplant on the parchment.
Lower the lid. Set temperature to 410°, and set timer for 5 minutes.
When cook time is complete, using tongs, turn the eggplant fries. Lower the lid.
Set temperature to 410°, and set timer for 7 minutes.
Serve with Marinara Sauce for dipping.
Nutrition Facts
Serving Size: 1/2 of a recipe.
Amount Per Serving
Calories: 591
Calories from Fat: 166
Total Fat: 17g
Saturated Fat: 7g
Cholesterol: 103mg
Sodium: 2199mg
Total Carbohydrates: 81g
Fiber: 4g
Sugars: 5g
Protein: 31g
Vitamin A:
Vitamin C:
Calcium:
Iron:
% Daily Value
30%
25%
26%
35%
34%
92%
27%
16%
56%
3%
0%
55%
33%
Crunchy Cod
Servings: 2
Ingredients
2 cod filets
1⁄2 cup buttermilk
1⁄2 cup quinoa flour
1⁄2 teaspoon salt
1⁄4 teaspoon pepper
olive oil, for spritzing
Directions
Soak the fish in the buttermilk for at least 1 hour.
Combine the quinoa flour and seasonings in shallow baking dish.
Place the Dual Rack (in high position) into air fryer.
Remove the fish from the buttermilk and dip into the seasoned flour.
Spritz with oil and place on the rack.
Lower the lid, set the temperature to 410°, and set timer for 12 minutes.
Press the “On” button.
Open the lid and turn the fish half way through cook time.
Nutrition Facts
Serving Size: 1/2 of a recipe.
Amount Per Serving
Calories: 125
Calories from Fat: 5
Total Fat: 1g
Saturated Fat: 0g
Cholesterol: 3mg
Sodium: 663mg
Total Carbohydrates: 25g
Fiber: 0g
Sugars: 3g
Protein: 2g
Vitamin A:
Vitamin C:
Calcium:
Iron:
% Daily Value
6%
1%
2%
0%
1%
28%
8%
0%
4%
0%
0%
8%
6%
Buttermilk Fried Chicken
Servings: 4
Ingredients
1⁄2 frying chicken, cut in pieces, rinsed, dried
1⁄4 cup buttermilk
2 cups crushed corn flakes
1 teaspoon salt
1 teaspoon thyme
1⁄2 teaspoon crushed red pepper flakes
1⁄4 teaspoon garlic powder
sprayer filled with olive oil
Directions
Soak the chicken pieces in buttermilk 1 hour to overnight.
Combine the corn flake crumbs, thyme, crushed pepper flakes, garlic powder and salt.
Place the Dual Rack (in low position) into the air fryer.
Press the chicken pieces into the corn flake crumbs.
Place chicken pieces on the rack.
Spray with olive oil.
Lower the lid. Set temperature to 410°, and set timer for 30 minutes.
Turn the chicken after 15 minutes.
Nutrition Facts
Serving Size: 1/4 of a recipe.
Amount Per Serving
Calories: 23
Calories from Fat: 3
Total Fat: 0g
Saturated Fat: 0g
Cholesterol: 9mg
Sodium: 28mg
Total Carbohydrates: 1g
Fiber: 0g
Sugars: 1g
Protein: 5g
Vitamin A:
Vitamin C:
Calcium:
Iron:
% Daily Value
1%
0%
0%
0%
3%
1%
0%
0%
9%
0%
0%
2%
1%
Crunchy Fries
Servings: 2
Ingredients
1 large russet potato
olive oil, for spritzing
sea salt
Directions
Peel the potato and cut into fries.
Place on a paper towel and cook fries in the microwave for 3 minutes.
Place the Dual Rack (in high position) into the air fryer.
Spritz the fries with oil and sprinkle with salt.
Place fries on the rack, careful not to overlap.
Lower lid. Set temperature for 410°, and set timer for 10 minutes.
Press the “On” button.
Open the lid and turn the fries half way through cook time.
Nutrition Facts
Serving Size: 1/2 of a recipe.
Amount Per Serving
Calories: 55
Calories from Fat: 0
Total Fat: 0g
Saturated Fat: 0g
Cholesterol: 0mg
Sodium: 5mg
Total Carbohydrates: 12g
Fiber: 2g
Sugars: 0g
Protein: 2g
Vitamin A:
Vitamin C:
Calcium:
Iron:
% Daily Value
3%
0%
0%
0%
0%
0%
4%
8%
4%
0%
25%
0%
4%
Crunchy Popcorn Chicken
Servings: 4
Ingredients
1 pound chicken tenders, cut into 1 inch pieces
1 large egg beaten
½ cup flour
2 tablespoons orange juice
1 cup quick cooking oats, uncooked
sprayer filled with olive oil
Directions
Wash Chicken tenders then pat dry.
Place the beaten egg in a bowl, in another dish add orange juice.
Dip chicken in orange juice, then roll in flour, then dip the chicken in the beaten egg, then roll
in the oats.
Place Dual Rack (in high position) into air fryer. Lay chicken pieces on top of rack.
Spray chicken pieces with oil.
Lower lid. Set temperature to 410º, and set timer for 20 minutes. Turn once during cooking.
Nutrition Facts
Serving Size: 1/4 of a recipe.
Amount Per Serving
Calories: 396
Calories from Fat: 194
Total Fat: 22g
Saturated Fat: 7g
Cholesterol: 976mg
Sodium: 295mg
Total Carbohydrates: 17g
Fiber: 2g
Sugars: 1g
Protein: 30g
Vitamin A:
Vitamin C:
Calcium:
Iron:
% Daily Value
20%
29%
34%
35%
325%
12%
6%
8%
55%
27%
4%
9%
23%
Crunchy Onion Rings
Servings: 4
Ingredients
1 onion, thick slices
1 1⁄4 cups corn flakes, crushed
1⁄4 cup plain bread crumbs
1 egg
1⁄4 cup milk
1⁄2 teaspoon salt
1⁄4 teaspoon black pepper
1⁄4 cup flour
Optional: sprayer filled with canola oil
Directions
In a shallow dish, combine corn flakes and bread crumbs.
In a small bowl, beat egg, milk, salt, pepper, and flour.
Dip onion rings in egg mixture then corn flake mix, press gently to coat.
Place the Dual Rack (in high position) into the air fryer.
Place the onions on the rack careful not to overlap. Spray or brush with canola oil.
Close the lid. Set the temperature to 410°, and set timer for 15 minutes.
Nutrition Facts
Serving Size: 1/4 of a recipe.
Amount Per Serving
Calories: 78
Calories from Fat: 13
Total Fat: 1g
Saturated Fat: 0g
Cholesterol: 37mg
Sodium: 424mg
Total Carbohydrates: 13g
Fiber: 1g
Sugars: 1g
Protein: 3g
Vitamin A:
Vitamin C:
Calcium:
Iron:
% Daily Value
4%
2%
2%
0%
12%
18%
4%
4%
5%
2%
5%
3%
5%
Deb’s Asian Inspired Chicken wings
Servings: 2
Ingredients
10 chicken wings
1 tablespoon sesame oil
1 teaspoon soy sauce
1 lime (zest and juice)
1⁄2 teaspoon fresh grated ginger
1 clove of garlic, minced
1 teaspoon sugar
1 teaspoon sesame seeds
1⁄2 teaspoon crushed red pepper flakes (optional)
3 tablespoons barbecue sauce (I prefer a Korean barbecue sauce)
Directions
Combine all the ingredients except for the Barbecue Sauce in a shallow dish.
Let marinade for 30 minutes, turning once.
Place the Dual Rack (in high position) into the air fryer, spray with nonstick spray.
Place the wings on the rack, careful not to overlap.
Close the lid. Set temperature to 410°, and set timer for 20 minutes. Turn the wings once
during cook time and pour more of the marinade over wings. When cook time is complete,
transfer wings onto the Utility Pan. Toss with barbecue sauce, and place the Utility Pan directly
onto the rack. Close the lid and cook for 5 minutes more at 410°.
Nutrition Facts
Serving Size: 1/2 of a recipe.
Amount Per Serving
Calories: 128
Calories from Fat: 60
Total Fat: 7g
Saturated Fat: 1g
Cholesterol: 0mg
Sodium: 343mg
Total Carbohydrates: 16g
Fiber: 2g
Sugars: 11g
Protein: 2g
Vitamin A:
Vitamin C:
Calcium:
Iron:
% Daily Value
6%
9%
11%
5%
0%
14%
5%
8%
4%
0%
18%
1%
1%
Crunchy Onion Straws
Servings: 4
Ingredients
1 large sweet onion sliced very thin
large bowl of ice water
1 cup self-rising flour
1 teaspoon salt
1⁄2 teaspoon pepper
1 teaspoon paprika
1⁄2 teaspoon garlic powder
canola spray
Directions
Let the onions soak in the ice water for at least 10 minutes.
In a large bowl, mix the flour with salt, pepper, paprika and garlic powder. Place the Dual Rack
(in high position) into air fryer.
Using a pair of tongs, remove the onions from the ice water and toss in the seasoned flour.
Shake all excess flour off and place an even row of onions on the rack. Do not over crowd.
Evenly spray the onions with canola spray.
Close the lid. Set the temperature to 410°, and set timer for 14 minutes.
After 7 minutes, turn the onions and spray again with oil.
These go great on salads, burgers and chicken sandwiches!
Nutrition Facts
Serving Size: 1/4 of a recipe.
Amount Per Serving
Calories: 103
Calories from Fat: 0
Total Fat: 0g
Saturated Fat: 0g
Cholesterol: 0mg
Sodium: 990mg
Total Carbohydrates: 23g
Fiber: 0g
Sugars: 0g
Protein: 3g
Vitamin A:
Vitamin C:
Calcium:
Iron:
% Daily Value
5%
0%
0%
0%
0%
41%
8%
0%
5%
10%
0%
6%
6%
Fried Chicken Tenders
Servings: 4
Ingredients
1 pound chicken tenders
1 tablespoon melted butter
1 cup cracker meal
1⁄2 teaspoon salt
1⁄4 teaspoon cracked black pepper
1 teaspoon thyme
1⁄2 teaspoon paprika
optional: sprayer filled with olive oil
Directions
In a shallow glass baking dish, combine cracker meal, salt, cracked black pepper, thyme, and
paprika.
Brush tenders with melted butter and roll in cracker meal mix, pressing slightly to coat.
Place chicken tenders in Rectangle Rotary Basket.
Secure the Rectangle Rotary Basket into the air fryer.
Spritz chicken with olive oil.
Close the lid. Set the temperature to 410°, and set timer for 20 minutes.
Press the “Rotation” function.
Press the “On” button.
Nutrition Facts
Serving Size: 1/4 of a recipe.
Amount Per Serving
Calories: 77
Calories from Fat: 12
Total Fat: 1g
Saturated Fat: 0g
Cholesterol: 25mg
Sodium: 445mg
Total Carbohydrates: 1g
Fiber: 0g
Sugars: 0g
Protein: 15g
Vitamin A:
Vitamin C:
Calcium:
Iron:
% Daily Value
4%
2%
2%
0%
8%
19%
0%
0%
27%
5%
0%
0%
0%
Stuffed Mushrooms with Crabmeat
Servings: 4
Ingredients
8 ounces mushrooms, stems removed, cleaned
1 cup cooked crabmeat
2 tablespoons panko crumbs (or any other bread crumb)
1 garlic clove, minced
1 tablespoon chopped parsley
1⁄2 teaspoon salt
1⁄4 teaspoon cracked black pepper
1 egg
2 tablespoons butter, melted
1 lemon, cut into wedges
Directions
In a medium mixing bowl, combine crabmeat, bread crumbs, garlic, parsley, salt, and pepper.
Mix in egg and butter.
Stuff each mushroom with crabmeat mixture.
Place the Dual Rack (in high position) into the air fryer.
Place the stuffed mushrooms in the Perforated Pan and place pan onto rack.
Close the lid. Set temperature to 410°, and set timer for 10 minutes.
Press the “On” button.
Serve with lemon wedges.
Nutrition Facts
Serving Size: 1/4 of a recipe.
Amount Per Serving
Calories: 98
Calories from Fat: 61
Total Fat: 7g
Saturated Fat: 0g
Cholesterol: 77mg
Sodium: 503mg
Total Carbohydrates: 2g
Fiber: 0g
Sugars: 0g
Protein: 7g
Vitamin A:
Vitamin C:
Calcium:
Iron:
% Daily Value
5%
9%
11%
0%
26%
21%
1%
0%
13%
5%
1%
1%
3%
Shrimp Egg Rolls
Servings: 6
Ingredients
8 large shrimp: cooked, peeled, deveined
4 scallions, sliced
1⁄2 head green cabbage, sliced thin
1 1⁄2 teaspoons ground ginger
2 cloves garlic, chopped
1⁄4 teaspoon pepper
1⁄4 cup soy sauce
2 teaspoons sweet chili sauce
12 store bought egg roll wraps
1 tablespoon olive oil for brushing egg rolls
Directions
Heat oil in a large skillet or wok over medium heat. Add scallions, cabbage, ginger, garlic, and
pepper. Sauté 3 minutes. Add shrimp, and cook an additional 1 minute.
Add soy sauce and chili sauce, stir to blend. Remove from heat.
Prepare egg rolls: On a clean work surface, lay out one egg roll wrap. Place 2 tablespoons of
mixture in center. Fold bottom corner up over filling, fold in the 2 outside corners.
Roll egg roll over to seal. Repeat with remaining egg rolls. Brush finished rolls with olive oil.
Place the Dual Rack (in high position) into the air fryer. Spritz rack with olive oil.
Lay 6 egg rolls on rack.
Close the lid. Set temperature to 410°, and set timer for 20 minutes. Turn halfway through
cook time.
Repeat with remaining egg rolls.
Nutrition Facts
Serving Size: 1/6 of a recipe.
Amount Per Serving
Calories: 96
Calories from Fat: 27
Total Fat: 3g
Saturated Fat: 1g
Cholesterol: 9mg
Sodium: 616mg
Total Carbohydrates: 13g
Fiber: 2g
Sugars: 3g
Protein: 5g
Vitamin A:
Vitamin C:
Calcium:
Iron:
% Daily Value
5%
4%
5%
5%
3%
26%
4%
8%
9%
2%
47%
4%
3%
Sugar Pecans
Servings: 4
Ingredients
1⁄2 cup (1 stick) butter, melted
3 large egg whites
1 cup sugar
1 teaspoon ground cinnamon
4 cups pecan halves
parchment paper
Directions
Line the Utility Pan with a sheet of parchment paper. Pour the butter onto the lined pan.
Place the Dual Rack (in high position) into the air fryer.
In a large bowl, mix the egg whites, sugar and cinnamon. Add the pecan halves and toss until
they are fully coated.
Spread the pecan mixture onto the Utility Pan, and place pan onto rack.
Close the lid. Set the temperature to 360º, and set timer for 30 minutes.
Cook for 30 minutes, stirring the pecans every 10 minutes.
Let cool for 10 to 15 minutes before serving.
Nutrition Facts
Serving Size: 1/4 of a recipe.
Amount Per Serving
Calories: 1071
Calories from Fat: 807
Total Fat: 93g
Saturated Fat: 5g
Cholesterol: 60mg
Sodium: 221mg
Total Carbohydrates: 63g
Fiber: 11g
Sugars: 48g
Protein: 13g
Vitamin A:
Vitamin C:
Calcium:
Iron:
% Daily Value
54%
121%
143%
25%
20%
9%
21%
44%
24%
23%
0%
7%
14%
Potato Skins
Servings: 4
Ingredients
6 medium Yukon gold potatoes
olive oil
salt
6 strips of bacon
1⁄2 cup shredded cheddar
1⁄3 cup sour cream
2 green onions, chopped fine
Directions
Scrub the potatoes. Rub with olive oil and sprinkle well with salt.
Place the Dual Rack (in high position) into the air fryer. Place the potatoes on the rack.
Secure the lid and set the temperature to 410° and time to 35 minutes.
After 35 minutes, make sure the potatoes give when you squeeze them.
Remove the potatoes from the air fryer, place the bacon strips on the rack, careful not to
overlap.
Close the lid. Set the temperature to 410°, and set timer for 5 minutes. You want bacon to be
golden brown and cooked through. Depending on the type of bacon you choose, it can vary a
minute or two. When bacon is cooked crisp, remove from the air fryer and let bacon cool.
Cut the potatoes in half horizontally and scoop out most of the potato.
Place the potato skins, skin side up on Dual Rack (in high position) and spritz with oil.
Close the lid. Set temperature to 410°, and set timer for 3 minutes.
After 3 minutes, turn the potatoes and spritz again and cook for 3 more minutes. Remove and
repeat with remaining potato skins.
Fill each potato with cheddar cheese and crumble a half piece of bacon over each potato.
Place skins back on the rack and cook on 410º until cheese melts well, about 2 minutes.
Repeat with remaining potato skins.
Garnish with sour cream and onions.
Nutrition Facts
Serving Size: 1/4 of a recipe.
Amount Per Serving
Calories: 1071
Calories from Fat: 807
Total Fat: 93g
Saturated Fat: 5g
Cholesterol: 60mg
Sodium: 221mg
Total Carbohydrates: 63g
Fiber: 11g
Sugars: 48g
Protein: 13g
Vitamin A:
Vitamin C:
Calcium:
Iron:
% Daily Value
54%
121%
143%
25%
20%
9%
21%
44%
24%
23%
0%
7%
14%
Balsamic Glazed Brussels Sprouts
Servings: 4
Ingredients
10 ounces Brussels sprouts
1 teaspoon salt
1 teaspoon sugar
1⁄2 teaspoon pepper
1 tablespoon olive oil
1 small red onion , thinly sliced lengthwise
2 tablespoons balsamic vinegar reduction
optional: pomegranate seeds
Directions
Trim outer leaves and stems from Brussels sprouts, and discard.
Toss the Brussels sprouts with salt, sugar, pepper, onions and oil.
Place sprouts in the Rotary Basket, and close.
Secure basket in the air fryer.
Close the lid. Set temperature to 360º, and set the timer for 15 minutes.
Remove the Brussels sprouts, and drizzle with balsamic reduction.
Optional: sprinkle with pomegranate seeds.
Nutrition Facts
Serving Size: 1/4 of a recipe.
Amount Per Serving
Calories: 71
Calories from Fat: 30
Total Fat: 4g
Saturated Fat: 1g
Cholesterol: 0mg
Sodium: 611mg
Total Carbohydrates: 7g
Fiber: 3g
Sugars: 3g
Protein: 3g
Vitamin A:
Vitamin C:
Calcium:
Iron:
% Daily Value
4%
4%
6%
5%
0%
25%
2%
12%
5%
5%
66%
2%
2%
Delicious Rotisserie Chicken
Servings: 4
Ingredients
3-4 pound chicken
1 tablespoon olive oil
1⁄2 teaspoon sea salt
1⁄4 teaspoon fresh ground black pepper
1⁄2 teaspoon smoked paprika
1⁄4 teaspoon onion salt
1⁄4 teaspoon garlic salt
1 teaspoon honey
Directions
Prepare the chicken for the rotisserie according to the instructions on the following page.
After trussing, rub the chicken with olive oil and honey, combine the seasoning and sprinkle
liberally over entire chicken.
Close the lid. Set temperature to 360º, and set timer to 1 hour.
Press the “Rotation” button.
Press the “On” button.
When cook time is complete, using an instant read thermometer, make sure the thigh joint
reads at least 165º.
Remove from air fryer and let rest for at least 10 minutes before carving.
Nutrition Facts
Serving Size: 1/4 of a recipe.
Amount Per Serving
Calories: 245
Calories from Fat: 60
Total Fat: 7g
Saturated Fat: 1g
Cholesterol: 75mg
Sodium: 938mg
Total Carbohydrates: 1g
Fiber: 0g
Sugars: 1g
Protein: 45g
Vitamin A:
Vitamin C:
Calcium:
Iron:
% Daily Value
12%
9%
11%
5%
25%
39%
0%
0%
82%
5%
0%
0%
1%
How to Prepare Your Rotisserie Chicken
Remove the chicken from its packaging. Make sure it is completely thawed if previously
frozen.
Check the cavity of the chicken to remove the neck and giblets. Check at the tail end to see if
the kidneys have been removed. The kidneys are the dark reddish-colored objects located on
the back side of the cavity near the tail. If they have not been removed, use your thumbs or
fingers to force them out.
The chicken should then be rinsed thoroughly inside and out with cold water. Pat dry with
paper towels.
The chicken needs to be placed on the Rotisserie Shaft so that it is centered and evenly
balanced. It must also be held in place by the Rotisserie Forks so it does not move around as it
is cooking.
Slide the Rotisserie Shaft through the neck opening of the chicken and out the bottom end.
Place the chicken so it is in the center of the shaft.
Keep the shaft running through the center of the chicken and attach the Rotisserie Forks into
the breast end. Once in place, secure the Fork on the Rotisserie Shaft by tightening the screw.
Then attach the other Fork at the tail end in the same manner. When the forks are attached,
the Shaft should be centered through the chicken so that it is evenly balanced. It is important
for the chicken to be balanced so that it rotates smoothly on the rotisserie unit.
Make sure the forks are pushed in so they are holding the chicken securely and that the screw
on both forks has been tightened.
Cut a length of kitchen twine. Cross the chicken legs and wrap the twine around the legs
several times.
Use another piece of twine to wrap around the breast area to hold the wings in close to the
body of the chicken.
Finish by rubbing with oil and add any desired seasonings.
Follow the Assembly Instructions (fig. #7: ROTISSERIE FORKS) to place the prepared chicken
into the Air Fryer.
Rotisserie Baby Back Ribs
Servings: 1
Ingredients
1⁄2 slab baby back ribs
1 tablespoon sweet paprika
1 teaspoon chili powder
1 teaspoon ground cumin
2 teaspoons brown sugar
1 teaspoon kosher salt
1⁄2 teaspoon ground black pepper
1⁄4 teaspoon ground white pepper
1⁄4 teaspoon cayenne pepper
optional: BBQ sauce
Directions
Rinse the ribs and pat dry with paper towels.
Combine spices.
Rub spices all over the ribs, and let rest at room temperature for 1 hour.
Spray the Rectangle Rotary Basket well with nonstick spray.
Place the ribs in the basket and secure the top.
Secure the basket into the air fryer.
Close the lid. Set the temperature to 360º, and set the timer for 1 hour.
Press the “Rotation” function.
Press the “On” button.
Nutrition Facts
Serving Size: 1 prepared recipe.
Amount Per Serving
Calories: 30
Calories from Fat: 0
Total Fat: 0g
Saturated Fat: 0g
Cholesterol: 0mg
Sodium: 2500mg
Total Carbohydrates: 8g
Fiber: 0g
Sugars: 8g
Protein: 0g
Vitamin A:
Vitamin C:
Calcium:
Iron:
% Daily Value
2%
0%
0%
0%
0%
104%
3%
0%
0%
144%
0%
0%
4%
Rotisserie Cuban Style Pork
Servings: 6
Ingredients
12 medium garlic cloves
1 medium orange (juice and zest)
2 medium limes (juice and zest)
2 tablespoons olive oil
1⁄2 tablespoon dried oregano
1 tablespoon kosher salt
1 teaspoon ground cumin
1 teaspoon freshly ground black pepper
4 pound boneless pork loin
Directions
Place all the ingredients (except the pork) in a blender and puree till smooth.
Marinade the pork roast for up to 12 hours in the mixture.
Insert the Rotisserie Shaft through the pork roast horizontally.
Secure each end with the Rotisserie Forks, and tighten screws at each end.
Insert the prepared pork loin into the air fryer.
Close the lid. Set temperature to 360º, and set timer for 1 hour.
Turn on “Rotisserie” Function. Press the “On” button.
After 30 minutes, open air fryer and drizzle additional marinade.
When cook time is complete, use an instant-read thermometer in the center to make sure
roast is 160º.
Let rest for at least 15 minutes before carving.
Nutrition Facts
Serving Size: 1/6 of a recipe.
Amount Per Serving
Calories: 144
Calories from Fat: 71
Total Fat: 8g
Saturated Fat: 2g
Cholesterol: 40mg
Sodium: 1492mg
Total Carbohydrates: 2g
Fiber: 1g
Sugars: 0g
Protein: 17g
Vitamin A:
Vitamin C:
Calcium:
Iron:
% Daily Value
7%
11%
12%
10%
13%
62%
1%
4%
31%
0%
12%
1%
4%
1 Year Limited Warranty
Course Housewares, LLC warrants this Cook’s Companion™ product to be free from manufacturer
defect for up to 1 year from the original date of purchase. If a defect is found to exist,
Course Housewares will, at its option, either repair or replace the product or the defective
component, including labor. Replacement will be made with new or rebuilt product or
components. This warranty does NOT cover (a) ordinary wear and tear (such as scratches,
dents or stains), (b) impact damage or breakage, (c) heat discoloration, minor imperfections
and slight color variations which are a normal part of the craftsmanship, (d) improper cleaning
methods causing scratches, or (e) any unit that has been tampered with, (f) damages incurred
through improper use and care and (g) faulty packaging by you or mishandling by any
common carrier. Failure to follow the accompanying Care and Use instructions or commercial
use will void this warranty.
Course Housewares’ sole obligation and your exclusive remedy under this warranty is limited
to repair or replacement, at its option, of the defective product. You will be responsible for any
shipping and handling fees. Products returned to us that are not found to be defective in
material or workmanship will be returned to you. If your particular product is found defective
but is no longer available and cannot be repaired, a comparable product, at our discretion,
will be sent as a replacement. This warranty extends only to the product’s original purchaser,
US residents only and does not cover damage caused by improper use or accidental damage.
COURSE HOUSEWARES, LLC., MAKES NO OTHER WARRANTIES, EITHER EXPRESSED OR IMPLIED,
REGARDING THE PRODUCT OR RELATING TO ITS QUALITY. PERFORMANCE, MERCHANTABILITY,
OR FITNESS FOR A PARTICULAR PURPOSE, COURSE HOUSEWARES, LLC SHALL NOT BE LIABLE
FOR INDIRECT, CONSEQUENTIAL OR SPECIAL DAMAGES WHETHER A CLAIM BASED ON
CONTRACT, TORT, WARRANTY OR OTHERWISE, IN NO EVENT WILL LIABILITY EXCEED THE
ORIGINAL PURCHASE PRICE OF THE PRODUCT. THE DURATION OF ANY IMPLIED WARRANTY
WHATSOEVER, INCLUDING BUT NOT LIMITED TO THE WARRANTIES OF MERCHANTABILITY AND
FITNESS FOR A PARTICULAR PURPOSE, SHALL BE LIMITED TO THE DURATION OF THE EXPRESS
WARRANTY PROVIDED HEREIN. COURSE HOUSEWARES SHALL NOT BE LIABLE FOR ANY
INCIDENTAL OR CONSEQUENTIAL DAMAGES WHATSOEVER.
Some states do not allow limitations on how long an implied warranty lasts or the exclusion
or limitation of incidental or consequential damages, so the above limitation or exclusion may
not apply to you. This warranty gives you specific legal rights, and you may have other legal
rights, which vary from State to State.
To Process a claim:
Do not return the product to the retailer from which it was purchased. Your retailer has no
liability for this warranty. Please contact Course Housewares’ customer service department for
assistance and to ensure the fastest possible resolution to the problem. Please have your
purchase information available to speed this process.
OR
Send your name, physical address, phone number, original purchase receipt and the safely
packaged item prepaid to:
Course Housewares, LLC
1715 Lake Drive West
Chanhassen, MN 55317
(866) 325-1659
Return shipping and handling charges may apply.
MADE IN CHINA