1
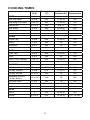
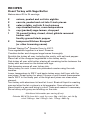
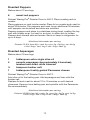
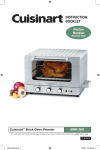
PROFESSIONAL 18-QUART
ROASTER OVEN
RO18B
For your safety and continued enjoyment of this product,
always read the instruction book carefully before using.
Contents
Important Safeguards. . . . . . . . . . . . . . . . . . . . . . . . . . 2
Introduction . . . . . . . . . . . . . . . . . . . . . . . . . . . . . . . 3
Parts. . . . . . . . . . . . . . . . . . . . . . . . . . . . . . . . . . 4 – 5
Before Using for the First Time . . . . . . . . . . . . . . . . . . . . . 6
Operation . . . . . . . . . . . . . . . . . . . . . . . . . . . . . . . . 6
Care and Cleaning . . . . . . . . . . . . . . . . . . . . . . . . . . . . 7
Helpful Hints. . . . . . . . . . . . . . . . . . . . . . . . . . . . . . . 8
Cooking Times . . . . . . . . . . . . . . . . . . . . . . . . . . . . . . 9
Recipes . . . . . . . . . . . . . . . . . . . . . . . . . . . . . . 10 – 18
Congratulations!
Congratulations on the purchase of your new Waring Pro® Roaster
Oven! Please spend a few minutes reviewing this instruction book.
By doing so, you will learn how to get the most satisfaction out of your
Waring Pro® Roaster Oven.
IMPORTANT SAFEGUARDS
When using electrical appliances basic safety precautions should
always be followed, including the following:
1. READ ALL INSTRUCTIONS.
2. Do not touch hot surfaces. Use handles or knobs.
3. Always plug appliance cord into the wall outlet, then adjust
temperature control to the desired temperature. To disconnect,
turn control to Off, then remove plug from wall outlet.
4. To protect against electrical shock, do not immerse this
appliance, including cord and plug, in water or other liquid.
5. Close supervision is necessary when any appliance is used by
or near children.
6. Unplug from outlet when appliance is not in use and before
cleaning. Allow to cool completely before putting on or taking
off parts, and before cleaning.
7. Do not operate any appliance with a damaged cord or plug or
after the appliance malfunctions or has been damaged in any
manner. Return appliance to your nearest Waring Pro Service
Center for examination, repair or adjustment.
8. The use of accessory attachments not recommended by the
manufacturer may cause injuries.
9. Do not use outdoors.
10. Do not let cord hang over edge of table or counter or touch hot
surfaces.
11. Do not place on or near a hot gas or electric burner or in a
heated oven.
12. Extreme caution must be used when moving an appliance
containing hot oil or hot liquids.
13. Do not use appliance for other than its intended use, as
described in this manual.
14. Do not use metal scouring pads on the exterior surface of the
roaster oven. Pieces can break off the pads and touch electrical
parts, creating a shock hazard.
15. Always place the roaster oven on a nonflammable,
nonburnable, heat-resistant surface when cooking. Never
place it on carpet, furniture, or other combustible materials.
Operate oven in a well-ventilated area away from walls and
other combustible materials.
SAVE THESE INSTRUCTIONS
FOR HOUSEHOLD USE ONLY
A short power supply cord is provided to reduce the risk of entanglement or tripping. Longer detachable cords are available and may be
used if extreme care is exercised. If a longer cord is used, its marked
electrical rating should be at least as great as that of the appliance,
and the cord should be placed safely out of the reach of children.
INTRODUCTION
With the purchase of your new 18-quart Waring Pro® Roaster Oven,
you are about to unlock new ways to make mouth-watering, healthy
meals while enjoying the convenience and versatility of this portable
electric cooking appliance.
For best results please read through this guide, which contains a series
of helpful tips for using the roaster oven, as well as a selection of fun
and delicious recipes.
Parts
1. Cover
Heavy-gauge stainless steel cover is designed to control heat and
moisture efficiently. Two venting holes are provided to allow just
the right amount of moisture to escape during cooking. During
the cooking process, steam will accumulate inside the roaster
oven body. Always stand to the side when removing the cover
and always tilt the cover away to divert escaping steam.
2. Wire Roasting Rack
Chrome plated steel provides cooking flexibility. The rack fits into
the roaster oven body and has convenient lift-out handles.
3. Removable Roasting Pan
The porcelain enamel roasting pan has a full 18-quart capacity.
It is removable for easy cleanup in the dishwasher or sink, or for
food storage in the refrigerator.
4. Roaster Oven Body
The sides of the 18-quart roaster oven contain the heating
elements for even, moist cooking, plus the added advantages
of thick insulation and a full-range automatic oven temperature
control. NEVER PLACE FOOD OR WATER DIRECTLY IN THE
ROASTER OVEN BODY.
5. Automatic Temperature Control
Regulates cooking temperature from 150ºF to 450ºF.
Parts continued
1
1. Cover
2. Wire Roasting
Rack
3. Removable
Roasting Pan
2
4. Roaster Oven
Body
5.Automatic
Temperature
Control
3
4
5
Note: As an added convenience
either before or after baking,
roaster cover can rest in angled
position by placing end of cover
under metal brackets located on
left handle.
BEFORE USING FOR THE FIRST TIME
1. Unpack your Waring Pro® Roaster Oven completely. Remove the
cover, wire roasting rack, removable roasting pan and roaster
oven body from Styrofoam® inserts. Remove all packing and
printed materials.
2. Place the roaster oven in a well-ventilated area or on a heatresistant surface. Set the temperature control dial to the off
setting. Plug the cord into a 120 volt AC outlet and set the
control dial to its maximum setting of 450ºF. Operate the roaster
with oven empty (without roasting pan and cover) for about 60
minutes, or until any odor or smoke disappears. Some smoke
and odor is a normal part of “curing” the heating element and will
not occur after curing is done. When curing is completed, turn the
temperature control to the off setting, unplug the unit and
allow to cool.
3. Wash the cover, roasting pan and rack in warm, sudsy water.
Rinse and dry. See Care and Cleaning section (next page) for
complete cleaning instructions.
OPERATION
1. Place the roasting pan in the roaster body. Always use the
roaster pan for food. NEVER PLACE FOOD OR WATER
DIRECTLY IN THE ROASTER OVEN BODY.
2. Preheating is recommended. To preheat, place the roaster pan
in the roaster body and cover. Do not preheat unit with wire
rack inside oven. Be sure the temperature control is in the off
position. Plug the roaster oven cord into a 120 volt AC outlet.
Set the temperature control to desired temperature. Preheat for
20 minutes. Insert wire rack when ready to cook. Carefully, using
hot pads, add food to the roaster pan.
3. The rack may be used for baking or fat-free roasting. Other foods,
such as meats, soups and stews, can be prepared without using
the wire rack.
4. Replace the cover. Always cook with the cover in place.
5. Cook the food for the desired amount of time. When finished, turn
the temperature control to the off position and unplug the cord
from the 120 volt AC outlet. During the cooking process, steam
will accumulate inside the roaster oven body. Always stand to
the side when removing the cover and always tilt the cover away
to divert escaping steam. Note: Please use oven mitts when
removing the cover after or during the cooking process in order
to avoid contact with any escaping steam. Allow the roaster oven
to cool, and clean as recommended.
6. A turkey cooked in the roaster oven is moist and juicy, but does
not brown like a turkey roasted in a conventional oven. If you
would like browned skin, we recommend using a browning sauce.
See recipe section.
NOTE: ROASTING PAN, ROASTER OVEN BODY,
COVER AND ACCUMULATED STEAM WILL BE
HOT. USE CAUTION AND HOT PADS TO LIFT
COVER AND TO REMOVE ROASTING PAN FROM
ROASTER OVEN BODY.
Care and Cleaning
1. After the roaster oven has cooled, remove cover, rack (if used)
and roasting pan. Wash rack and roasting pan in warm sudsy
water or wash in the dishwasher. The enamel roaster pan has a
strong finish and provides easy cleaning and years of use. It will
not stain and stays attractive even when used often. However, it
will chip if subjected to sharp blows or is mistreated. Water spots
or mineral deposits (characterized by a white film on surface) may
be removed with household vinegar or nonabrasive cleansers.
2. The nonstick roasting pan is made of durable porcelain enamel.
In order to maintain the porcelain enamel surface, the use of
rubber, plastic or wooden utensils is recommended. Avoid cutting
food in the roasting pan. Use of a nonstick spray on the interior
surfaces is optional. Avoid storing items in the roaster pan which
may scratch the surface. When roasting or baking at high
temperature, you may note an irregular band of discoloration
around the sides of the roasting pan. This discoloration is
characteristic of the tough porcelain coating used on the interior
of the roasting pan and in no way affects the performance or
durability of the finish.
3. Baked-on food may be removed by using a nonabrasive
cleaning pad and a nonabrasive cleanser, such as Soft Scrub®
or Bon Ami®. Do not use abrasive cleansers or steel wool as they
may scratch the finish. HINT: To remove baked-on food residue
easily, place roasting pan in roaster oven body, then fill roasting
pan with hot water. Cover and heat at 350ºF for 30 minutes.
Turn off and allow to cool completely. Wash roasting pan as
directed above.
4. Never immerse the roaster oven body in water. To clean, wipe
outside of roaster oven body with a damp cloth and dry. Do not
use abrasive cleansers or steel wool on exterior surface.
Roasting/Baking Hints
• Always preheat roaster prior to baking.
• Use the wire baking rack to place casserole dishes and baking
pans on during cooking time. This will allow for more even baking.
• Two loaf pans will fit into the roasting pan. A meat and a
vegetable may be baked at the same time.
• Line the baking rack with aluminum foil and use as a baking
sheet.
• Most 1- and 2-quart casserole dishes, 9-inch pie plates, and most
9 x 13-inch baking pans will fit into the roaster pan. Place dish on
baking rack for more even baking.
• Three 1½-quart pans fit into the roaster pan – ideal for preparing
meat, vegetables and potatoes at the same time. When baking
bread, either one or two loaf pans are recommended.
• Convenience foods can be baked in the roaster oven. Follow
package directions.
• Baking pans should always be placed on the rack. Do not place
pans on the bottom of the roaster pan.
• Metal pans are recommended for use in the roaster as they
provide better heat transfer and browning.
Steaming
• No fat is used when steaming, so it’s an easy way to cook tasty
and nutritious low calorie foods.
Slow Cooking
• To convert a standard recipe to slow cooking, slow cook
about 1½ hours at 200ºF to 250ºF for each 30 minutes required
in a standard recipe. Note that when slow cooking, it is not
necessary to use the rack. The low temperature prevents the
meat from sticking to the bottom of the roasting pan. Cover
before cooking.
Cooking Times
Weight
(lbs.)
Temperature
Time
Internal
(°F)
(minutes/lb.) Temperature
BEEF
Rib Eye Roast
6 to 8
350˚
15 to 18
135˚
Standing Rib Roast
8 to 10
325˚
20 to 25
135˚
Tenderloin
3½ to 4
450˚
8 to 12
125˚
Pot Roast
4 to 6
300˚
30 to 40
200°
Corned Beef
3 to 4
300˚
15 to 20
200°
Lamb Leg
5 to 8
350˚
18 to 20
140˚
Rack
1 to 2
400˚
18
135˚
Shoulder
3 to 4
350˚
25
200°
3 to 5
350˚
25 to 30
140˚
RIbs
3 to 5
400˚
35
180˚
Ham, Fully Cooked
5 to 10
325˚
20 to 25
160°
3 to 4
400˚
15
170˚
Turkey, Stuffed
3 to 8
375˚
15 to 20
180˚
Turkey, Brined
12 to 18
350˚
20
180˚
Boneless Stuffed
Turkey Breast
12 to 18
350°
18
180°
Cornish Hens
1 to 2
350˚
18
180˚
Duck
4 to 6
375˚ to 400˚
20 to 25
175˚ to 180˚
Rack
4
400°
30 to 35
155°
Roast
2.5 to 5
350°
30 to 35
155° to 180°
LAMB
PORK
Pork Loin
POULTRY
Chicken, Whole
VEAL
Recipes
Roast Turkey with Sage Butter
Makes about 20 to 24 servings
2
2
2
½
½
1
2
onions, peeled and cut into eighths
carrots, peeled and cut into 2-inch pieces
celery stalks, cut into 2-inch pieces
cup unsalted butter, room temperature
cup (packed) sage leaves, chopped
18-pound turkey, rinsed, dried, giblets removed
kosher salt freshly ground black pepper
teaspoons Kitchen Bouquet®
(or other browning sauce)
Preheat Waring Pro® Roaster Oven to 400°F.
Toss vegetables together in a bowl. Reserve.
Combine butter and chopped sage leaves thoroughly.
Sprinkle the turkey all over, including the cavity, with salt and pepper.
Place half of the chopped vegetables in the turkey cavity.
Rub turkey all over with butter, placing all remaining butter between the
turkey skin and meat on the breast and legs.
Rub browning sauce all over turkey skin.
Place turkey on rack. Lower into preheated roaster using the rack
handles.
Lower temperature to 375°F and baste turkey every half hour with the
pan juices. Roast turkey for about 3 hours or until a meat thermometer
reads 180°F in the fleshy part of the thigh and juices run clear when
pierced.
Tent turkey with aluminum foil and let it rest. Strain all liquid in roasting
pan and skim the fat or place in a fat separator. Once skimmed of fat,
place liquid in a pan and bring to a boil. Taste and season if necessary.
Serve turkey with gravy and stuffing on the side.
Nutritional information per serving (6 oz.):
Calories 550 (41% from fat) • carb. 2g • pro. 56g • fat 24g • sat. fat 9g
• chol. 356mg • sod. 219mg • calc. 112mg • fiber 0g
10
Roasted Chicken with Lemon
This simple chicken preparation makes a moist and delicious chicken
every time.
Serves 4 to 6
2
1½
1
2
2
4
2
3 to 3½ pound chickens, rinsed and patted dry
teaspoons kosher salt
teaspoon crushed black pepper
lemons, cut in half
sprigs rosemary
garlic cloves, smashed
tablespoons olive oil
Preheat Waring Pro® Roaster Oven to 450°F.
Place both chickens, rinsed and dried, on a work surface. Salt and
pepper the chickens well, including the cavities. Squeeze a lemon
all over outside and inside each chicken. Stuff each chicken with the
lemon halves, rosemary sprigs and garlic cloves. Finally, rub olive oil all
over the skin.
Insert wire rack in the roasting pan and carefully place chickens on
rack. Immediately reduce temperature to 400°F.
For browner skin, baste chickens every 15 minutes while roasting.
Roast for approximately 1 hour and 10 minutes,* until the juices run
clear when a thigh is pierced.
Nutritional information per serving (6 oz.):
Calories 306 (64% from fat) • carb. 5g • pro. 52g • fat 46g • sat. fat 13g • chol.
207mg • sod. 529mg • calc. 68mg
*If roasting one chicken, reduce roasting time by 20 minutes.
Rosemary and Mustard Pork Roast
Serves 8 to 12
¼
¼
1
3
¼
2
1
1
¼
cup kosher salt
cup granulated sugar
gallon water
garlic cloves, chopped
cup fresh rosemary, chopped
tablespoons Dijon mustard
tablespoon balsamic vinegar
teaspoon Italian seasoning
cup plus 1 teaspoon olive oil, divided
11
1
5 to 5½ pound pork roast
kosher salt
freshly ground pepper
Dissolve salt and sugar with the water in a stockpot that will fit into your
refrigerator. Submerge the roast in the brine solution and refrigerate up
to 4 hours.
While roast is soaking, prepare the marinade. In a small bowl whisk
together the chopped garlic, chopped rosemary, Dijon, vinegar, and
Italian seasoning. While whisking, slowly pour ¼ cup of olive oil into
mustard base until a homogenous marinade forms.
Rinse roast well under cold water and dry thoroughly. Generously
sprinkle the roast all over with kosher salt and freshly ground pepper.
Place a 12-inch skillet over medium-high heat. Add the remaining
teaspoon of olive oil. When the oil shimmers across the pan add the
seasoned roast. Brown each side of the roast well, about 8 minutes
per side.
Once roast is well browned on all sides, slather it with the mustard/
rosemary marinade on all sides, and place on roasting rack and set
aside.
Preheat Waring Pro® Roaster Oven to 400°F.
Lower roast into roaster, using the arms of the rack. Reduce
temperature to 375°F. Roast until a meat thermometer reads 140°F,
about 1 hour. Baste roast with extra marinade every 15 minutes while it
is roasting. Remove roast and let rest for 10 minutes before carving.
Nutritional information per serving (6 oz.):
Calories 279 (51% from fat) • carb. 1g • pro. 32g • fat 15g • sat. fat 5g
• chol. 90mg • sod. 118mg • calc. 24mg • fiber 0g
Roasted Barbecue Ribs
Makes 4 to 6 servings
2
1
2
1
1
1
¼
4
12
2
tablespoons chili powder
tablespoon paprika
teaspoons kosher salt
teaspoon garlic powder
teaspoon thyme
teaspoon oregano
teaspoon cayenne powder
pounds trimmed spareribs
ounces beer
cups prepared barbecue sauce
12
Combine spices in a small bowl. Rub spice blend all over ribs. Wrap in
plastic and refrigerate for up to 6 hours.
Preheat Waring Pro® Roaster Oven to 400°F.
Pour beer into roasting pan and place ribs on rack with the meat side
down. Baste ribs occasionally with the beer while roasting. After 1 hour,
carefully flip ribs. Continue basting and cook until meat is tender, about
an additional hour and a half. When ribs are tender start basting with
the barbecue sauce every 15 minutes for an additional hour.
Serve with extra barbecue sauce on the side.
Nutritional information per serving (6 oz.):
Calories 344 (50% from fat) • carb. 7g • pro. 34g • fat 19g • sat. fat 6g
• chol. 114mg • sod. 503mg • calc. 33mg • fiber 0g
Chicken with Three Peppers
Makes 4 servings
2
¾
¼
8
6
½
2
1
4
2
1
teaspoons olive oil
teaspoon kosher salt
teaspoon crushed black pepper
chicken thighs, approximately 3 pounds
ounces smoked Italian chicken sausage,
cut into slices
cup dry white wine
cups chopped onion (about 1 large onion)
red pepper, diced
garlic cloves, minced
cups mixed hot and sweet cherry peppers,
seeded and chopped
cup chicken stock
Preheat a 12-inch skillet for about 5 minutes over medium heat. Add
1 teaspoon of olive oil. Turn heat down if oil begins to smoke. Salt and
pepper both sides of chicken thighs. Add chicken thighs to pan, skin
side down. Be careful not to crowd pieces. Depending on the size of the
thighs, it may be necessary to cook chicken in more than one batch.
Brown the chicken well on both sides. Note that it is important not to
move the chicken while it is browning; leave the chicken for at least
8 minutes on the first side before checking and moving/turning the
thighs.
Once well browned, remove all chicken from pan and reserve in a large
plate or bowl.
13
Add sausage slices to pan and sauté until golden, about 4 to 5 minutes.
Remove and reserve with chicken.
Add wine to pan and with a wooden spoon scrape up all the brown bits
that are left behind. Pour onto the reserved chicken and sausage.
While chicken is browning, preheat Waring Pro® Roaster Oven to 400°F.
Add remaining teaspoon of olive oil to the roasting pan. Stir in onions
and red pepper and replace cover. Cook vegetables for 15 minutes until
soft. Stir in garlic, cherry peppers, browned chicken and sausage with
cooking liquid and chicken stock.
Reduce heat to 350°F and place cover on pan and let simmer for about
45 to 50 minutes. Taste for seasoning. Serve immediately.
Nutritional information per serving (6 oz.):
Calories 543 (50% from fat) • carb. 30g • pro. 57g • fat 41g
• sat. fat 10g • chol. 176mg • sod. 900mg • calc. 120 mg • fiber 6g
Chili
Makes about twenty-four 1-cup servings
2
1
3
3
6
5
½
1
3
2
½
3
1
tablespoons vegetable oil
large onion, chopped (about 2 cups)
jalapeño peppers, seeded and chopped
peppers (combination of red and yellow), chopped
garlic cloves, finely chopped
pounds ground sirloin
cup ground red chili powder
tablespoon paprika
teaspoons kosher salt, divided
teaspoons oregano
teaspoon cayenne pepper
cans (28 ounces each) plum tomatoes
can tomato paste
Preheat Waring Pro® Roaster Oven to 450°F.
Place oil in roasting pan. Add chopped onions, jalapeños, and peppers
to the pan and stir. Place lid on roaster and let vegetables sweat for
about 15 minutes until soft. Stir in chopped garlic and cook for about
2 minutes. Stir in ground sirloin with chili powder, paprika, 2 teaspoons
salt, oregano, and cayenne. Be sure to break meat apart well with a
wooden spoon. Close lid and turn
temperature down to 400°F. Cook until all meat has cooked through,
about another 10 to 15 minutes.
14
Place tomatoes in a bowl and crush them with your hands. Add to
roasting pan with tomato paste. Turn temperature down to 350°F and
allow to simmer for about an hour. Taste and add remaining salt if
necessary.
Nutritional information per serving:
Calories 267 (20% from fat) • carb. 28g • pro. 26g • fat 6g • sat. fat 2g
• chol. 49mg • sod. 330mg • calc. 90mg • fiber 7g
Old Fashioned Macaroni and Cheese
Makes about thirty 1-cup servings
2
1
¾
12
8
8
8
5
pounds elbow macaroni
cup unsalted butter
cup unbleached, all-purpose flour
cups whole milk
ounces Cheddar, shredded
ounces mozzarella, shredded
ounces Monterey Jack, shredded
cups prepared white bread croutons
Cook macaroni according to instructions on package. Drain pasta and
rinse under cold water. Toss with some oil to prevent sticking.
In a 12-quart stock pot melt the butter over medium heat. Once melted,
stir in the flour and blend well with the butter. Cook and stir the butter/
flour mixture together for about 2 minutes to cook away any raw flour
taste. While whisking, slowly pour the milk into the butter/flour mixture.
Turn heat up slightly and stir mixture occasionally. After about 15 minutes the mixture should start to thicken as it approaches boiling. Keep
stirring until the mixture becomes very thick. Once it does, stir in
shredded cheeses until sauce is homogenous. Stir in macaroni. Finally
stir in 4 cups of the croutons.
Preheat Waring Pro® Roaster Oven to 350°F.
Spray roasting pan with cooking spray and pour macaroni and cheese
into pan. Scatter the remaining croutons on the top.
Insert roasting pan with macaroni. Place lid on top of roaster and cook
for about 1 hour. Serve immediately.
Nutritional information per serving:
Calories 291 (59% from fat) • carb. 19g • pro. 11g • fat 19g • sat. fat 12g • chol.
59mg • sod. 199mg • calc. 272mg • fiber 1g
15
Roasted Red Potatoes
Makes about 20 servings
4
5
4
1
¼
tablespoons unsalted butter
pounds medium red potatoes, washed and dried,
cut in half lengthwise
garlic cloves, smashed
teaspoon kosher salt
cup chopped Italian flat leaf parsley
Preheat Waring Pro® Roaster Oven to 450°F.
Add butter to the baking pan. Stir in potatoes and toss with garlic
and salt.
Roast for about 40 to 45 minutes. Remove and toss with chopped
parsley.
Serve immediately.
Nutritional information per serving (6 oz.):
Calories 111 (19% from fat) • carb. 21g • pro. 2g • fat 2g • sat. fat 1g
• chol. 6mg • sod. 74mg • calc. 11mg • fiber 2g
Roasted Corn
Makes 6 servings
6
4
ears corn
cups water
Add water to roasting pan. Preheat Waring Pro® Roaster Oven to 450°F.
Place ears of corn on rack inside roaster. Place lid on roaster and roast
for about 35 minutes, until the husks turn slightly browned.
Remove corn from roaster. When cool enough to handle, husk corn and
serve immediately.
Nutritional information per serving:
Calories 77 (11% from fat) • carb. 17g • pro. 3g • fat 1g • sat. fat 0g
• chol. 0mg • sod. 14mg • calc. 2mg • fiber 3g
16
Roasted Peppers
Makes about 12 servings
6
sweet red peppers
Preheat Waring Pro® Roaster Oven to 450°F. Place roasting rack in
roaster.
Place peppers on rack inside roaster. Place lid on roaster and roast for
about 30 minutes. Flip peppers and roast for an additional 30 minutes,
until peppers are browned and skins are wrinkled.
Remove peppers and place in a stainless mixing bowl, sealing the top
well with plastic wrap. Let rest for an hour, to allow skin to loosen.
Remove and discard skin and seeds. Serve or keep in refrigerator for
up to 5 days.
Nutritional information per serving:
Calories 12 (6% from fat) • carb. 3g • pro. 0g • fat 0g • sat. fat 0g
• chol. 0mg • sod. 1mg • calc. 4mg • fiber 1g
Roasted Asparagus
Makes about 16 servings
1
4
¼
1
tablespoon extra virgin olive oil
pounds asparagus (approximately 4 bunches), washed and dried, ends trimmed
teaspoon kosher salt
tablespoon freshly grated Parmesan cheese
Preheat Waring Pro® Roaster Oven to 450°F.
Add olive oil to the baking pan. Add asparagus and toss with the
kosher salt.
Replace lid and roast for about 12 to 15 minutes or until desired
doneness. Remove from baking pan and sprinkle with the Parmesan.
Serve immediately.
Nutritional information per serving:
Calories 35 (25% from fat) • carb. 5g • pro. 3g • fat 1g • sat. fat 0g
• chol. 0mg • sod. 27mg • calc. 28mg • fiber 2g
17
Creamy Lemon Cheesecake
Makes about 12 servings, using a 9-inch springform pan
Graham Cracker Crust:
1½
2
½
6
cups graham cracker crumbs
tablespoons granulated sugar
teaspoon ground cinnamon
tablespoons unsalted butter
Filling:
3
1½
5
1
1
1½
packages (8 ounces each) cream cheese,
room temperature
cups granulated sugar
eggs, room temperature
teaspoon pure vanilla extract
teaspoon lemon zest
pints sour cream
Preheat Waring Pro® Roaster Oven to 325°F. Place roasting rack in the
roasting pan. Butter a 9-inch springform pan.
Place ingredients for crust in a food processor fitted with the metal
chopping blade. Process until mixture comes together. Pat crumb crust
evenly into prepared springform pan.
Cut each package of cream cheese into 6 pieces and place all in a
large stainless mixing bowl. Beat cream cheese in a mixer on low
speed until very smooth. Scrape bowl and beaters/paddle with a large
rubber spatula and continue to beat on low speed while adding the
sugar. Scrape bowl and beaters. Add eggs one at a time, making sure
each is incorporated into the batter before adding the next. Mix in
vanilla and lemon zest. With the large rubber spatula, carefully fold in
the sour cream in three additions; be sure the batter is homogenous.
Pour filling into prepared pan. Carefully wrap the bottom and sides of
pan with aluminum foil to prevent water from seeping into pan. Cover
the top of the pan with foil as well.
Pour 4 cups of water into roasting pan and lower wrapped cheesecake
into roaster. Place lid on roaster and bake for 1 hour and 15 minutes
and turn roaster off. Without lifting the lid keep cheesecake in roaster
for at least 1 hour. Remove cheesecake and place on a cooling rack.
Once completely cool wrap well with plastic and refrigerate for at least
6 hours before serving.
Serve with fresh berries and raspberry coulis.
Nutritional information per serving:
Calories 592 (62% from fat) • carb. 47g • pro. 10g • fat 41g • sat. fat 23g • chol.
186mg • sod. 346mg • calc. 119mg • fiber 0g
18
Any trademarks or service marks of third
parties used herein are the trademarks or
service marks of their respective owners.
Waring Consumer Products,
Division of Conair Corporation
150 Milford Road
East Windsor, NJ 08520
www.waringproducts.com
Printed in China
RO18B IB
08WR107
IB-8405