1
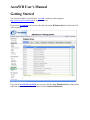
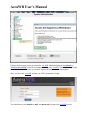
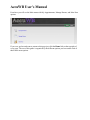
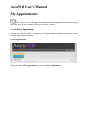
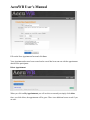
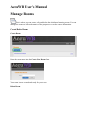
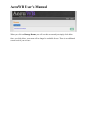
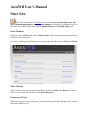
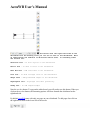
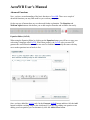
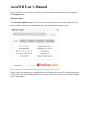
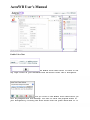
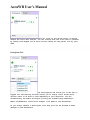
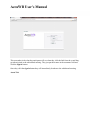
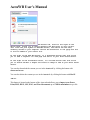
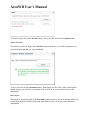
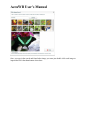
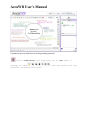
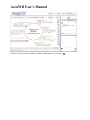
AccuWB User's Manual
www.accuwb.com
Integrated Whiteboard for AccuTrack, AccuSQL, and Accudemia
Revision 1.0.3 - Sept. 21, 2012
© 2002 - 2010 Engineerica Systems, Inc.
All Rights Reserved
AccuWB User's Manual
Getting Started
You can get started by accessing your AccuWB account by either typing in
http://www.accuwb.com/#Login in any web browser.
If you are an Accudemia user you can click the convenient Whiteboard link located in the leftside navigation.
If you are an AccuTrack/AccuSQL user you can click the Accu Whiteboard link at the bottom
left of the System Admin Screen and then click the Launch Whiteboard.
AccuWB User's Manual
If this is the first time you are accessing the AccuWB whiteboard through Accudemia or
AccuTrack/AccuSQL you will be prompted to enter your AccuWB Credentials so you do not
have to enter them every time you want to login to the online whiteboard program.
Once you get to the AccuWB website you will be prompted to Login.
You should enter your domain, e-mail, and password to login to the AccuWB service.
AccuWB User's Manual
From here you will see the Main menu with My Appointments, Manage Rooms, and Meet Now
options.
If you ever get lost and want to return to this page just click the Home link on the top right of
every page. The rest of this guide is organized by the different options you have under each of
these three menu options.
AccuWB User's Manual
My Appointments
This is where you can manage your whiteboard meeting appointments and even integrate
them into your Google calender or Microsoft Outlook calender.
Create/Delete Appointment
Coming soon! details on how to integrate your Google calender or Microsoft Outlook Calendar
with the Appointment Scheduler.
Create Appointment
When you click on My Appointments, click on Create Appointment.
AccuWB User's Manual
Fill-out the New Appointment form and click Save.
Your Appointment has now been created and an e-mail has been sent out with the appointment
details to the participants.
Delete Appointment
When you click on My Appointments you will see this screen and just simply click delete.
Once you click delete, the appointment will be gone. There is no additional screen to ask if you
are sure.
AccuWB User's Manual
Manage Rooms
This is where you can create, edit, and delete the whiteboard meeting rooms. You can
manage the rooms to reflect the names of the purposes or even the course information.
Create/Delete Room
Create Room
Enter the room name into the Create New Room form.
Your room is now created and ready for you to use.
Delete Room
AccuWB User's Manual
When you click on Manage Rooms you will see this screen and just simply click delete.
Once you click delete, your room will no longer be available for use. There is no additional
screen to ask if you are sure.
AccuWB User's Manual
Meet Now
This is the main portion of AccWB where you can access your meeting rooms, join
your scheduled appointments, and invite new members. Also there is explanation on how to
use some of the advanced functions like the Equation Editor and Wolfram Alpha tools.
Invite Members
When you click on Meet Now, click on Invite Others which will open your chosen mail client
to send an e-mail invitation.
If you have a chat open with someone you can also copy the link below the Title of the Room.
Enter Meeting
When you have sent out your invites then simply click on the Title of the Room you want to
enter or if you prefer you can also click the Enter Room link.
Features and Tools
Before you begin to work in your room, you will want to get familiar with some of the features
and tools available to you.
AccuWB User's Manual
In the upper right-hand corner are these buttons:
The Language drop-down will allow you to change the language. The Logout button will log
you out of your AccuWB.
The next row of buttons has several tools you are already familiar with if you use any of the
Microsoft Office Products and if you forget them you can just hover the mouse over them to
remind yourself.
From left to right buttons are the cut, copy, paste, undo, redo, delete, flip horizontal and flip
vertical buttons.
The lock/unlock buttons “freeze” and “unfreezes” the screen so the objects cannot be moved.
The next two buttons with the document/red X are the clear page and clear pages buttons.
The Camera button is used to capture a screenshot of the work on the whiteboard only.
The green arrow is a pointer shared by all members of the room.
The grid button can be pressed to show a grid to align objects evenly when placing them down.
The next two buttons will be described in further detail later under Advanced Functions but they
are the Equation button which allows you to add mathematic equations and the Wolfram Alpha
button which allows you to easily search for any article or theorem and instantly insert it on your
whiteboard.
The picture frame button allows you to chose a background color for your Whiteboard.
Finally, there is a drop-down menu is where you can chose, Scrolling, Fixed, or Scale options.
AccuWB User's Manual
The buttons down the right-hand side of the
whiteboard are the drawing tools you can use to work on the whiteboard. Most
of these button are familiar to Microsoft Office users. In ascending order
the buttons are:
Selection tool - To move objects on the whiteboard.
Pencil tool - To draw or write on the whiteboard.
Text Box tool - Add text boxes on the whiteboard.
Line tool - To draw straight lines on the whiteboard.
Shape tools - Add predefined shapes on the whiteboard.
Highlighter tool - Highlight text when presenting.
Stamp tool - To add shaped stamps.
Note the text box button. To type on the white board, you will need to use this button. When you
click on the text box button, the formatting options will show beneath the whiteboard on the
right-hand side.
By default AccuWB starts with only one page on your whiteboard. To add pages Just click on
the right arrow found in the lower left of the screen.
AccuWB User's Manual
Advanced Functions
Now, you have an understanding of the basic functions of AccuWB. There are a couple of
advanced functions you may find useful as you work on your project.
On the top row of buttons there are two that need further explanation. The Equation and
Wolfram Alpha buttons which allow you to add complex formulas and scientific data easily.
Equation Editor (LaTeX)
When using the Equation Editor by clicking on the Equation button you will have to type your
code using a language called LaTeX. When done properly, the LaTeX code you enter will
generate the actual formula written like one out of a textbook. It is actually the same code they
use to make equations in text books in fact.
Once you have added the LaTeX code, hit the Generate LaTeX button and then click the Add
button to add the resulting image to the whiteboard. If you are only adding one equation or are
adding your last equation you can alternatively click the Add & Close button.
AccuWB User's Manual
If you would like, you also have the ability to clear the equation and start again by pressing the
Clear Input button.
Wolfram Alpha
This Wolfram Alpha button gives you access to an encyclopedia of information that can easily
insert readable, formatted, accredited data into your whiteboard meeting in a snap.
Simply search for anything you can think of and it will display the results. To add the item to the
white board, click on the listing and close the window. Now you see the reference material right
in your presentation.
AccuWB User's Manual
Enable Voice Chat
The Enable Voice Chat button is found in the
top right corner of your whiteboard and the button looks like a microphone.
Once you click on the Enable Voice Chat button you
will be prompted with this message. You want to allow the program access to
your microphone by clicking the Allow button with the green check mark on it.
AccuWB User's Manual
Once you click on the Allow button it should
enable the voice chat feature. You can confirm that the voice chat is enabled
by seeing cone-shaped set of half circles coming off the person icon by your
name.
Participants Tab
The Participants tab allows you to see who is
logged into the meeting and also allows you to assign roles. Roles allow
certain users to do more or less depending on your selection. You are
automatically the Admin and anyone joining are automatically Moderators.
Admin and Moderator roles allow changes to be made to the whiteboard.
If you assign someone a Participant role they will not be allowed to make
changes to the whiteboard.
AccuWB User's Manual
This screenshot is the what the participants will see when they click the link from the e-mail they
get when invited to the whiteboard meeting. They just put their name in the username field and
click the Sign-in button.
Once they click the sign-in button they will immediately be taken to the whiteboard meeting.
Assets Tab
AccuWB User's Manual
The Assets tab, found to the right of the
white board, allows you to import graphics and PDF files to your project.
Just click the plus symbol or Add New button, and search for the file,
normally stored on your computer. Follow the directions in the popup box and
it will be added to your assets list.
To the right of the Add New button, is a Screenshot button that will allow
you to take a snapshot of a web page and add it to your white board assets.
To the right of the Screenshot button, is a flicker button that will allow
you to search Flicker's images and insert an image to add to your white board
assets.
You can also download the content you see in the Assets tab by clicking the button with
downward arrow.
You can also delete the content you see in the Assets tab by clicking the button with Red X.
Add New
This button is located at the bottom of the Asset tab and allows you to import your Power
Point, PDF, JPEG, GIF, PNG, and Word documents up to 5 MB in maximum size per file.
AccuWB User's Manual
To do this simply click on the browse button , select your file, and click the upload button.
Website Screenshot
This button is just to the right of the Add New button and allows you to take a snapshot of an
external website and add it to your whiteboard.
To do so just click on the screenshot button. Then simply type the URL of the website and in
about a minute you will have a screenshot of the website in your assets tab to insert on the
whiteboard.
Flickr Import
This button is just the the right of the Screenshot button and is a really neat tool that allows you
to search the millions of flickr images and insert them in a few clicks into your whiteboard
presentation.
AccuWB User's Manual
Once you type in the search and found what image you want just double click each image to
import then click the close button when done.
AccuWB User's Manual
Example Room
Let’s try an example by creating a mind map collaboratively online.
Draw a circle in the center of white board and label the concept you are
exploring - Let's look at effective online collaboration. Click on circle
button and then click on the center of your white board to create circle.
Click and drag to re-size circle.
Create a text box by clicking on the text button and then clicking in the
center of your circle to create a text box. Label your circle EFFECTIVE
ONLINE COLLABORATION.
Create several text boxes around your concept circle and have participants begin to identify
major themes connected to your concept.
To do this, click on the text button and click next to the circle to
create a text box. Have participants label the text box with themes. Use
different colors for each theme.
AccuWB User's Manual
Allow all participants to add further thoughts, ideas and clarifications to the supporting themes
using words, pictures, drawings etc. Participants can click on the text boxes and write their ideas
in them.
AccuWB User's Manual
Continue the process until ideas are no longer being generated.
Using the stamp button, have participants use the star symbol to
highlight the ideas
found most interesting and creative.
of other participants that they
AccuWB User's Manual
That's it! You have had an “Effective Online Collaboration” of your own!