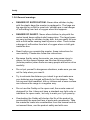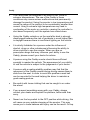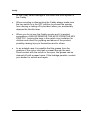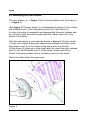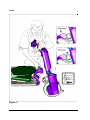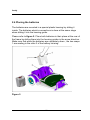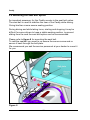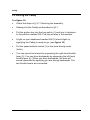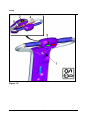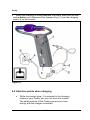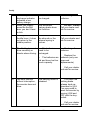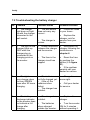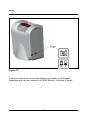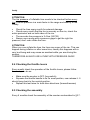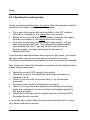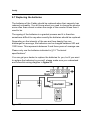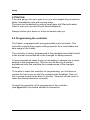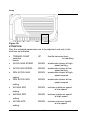
1
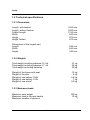
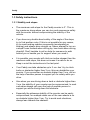
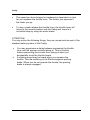
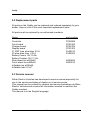
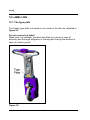
CaddySE Afiscooter P/N PRCA001 User Manual Caddy Cat No. - PRCA001 Edition 02 ( 2013 ) 1. INTRODUCTION ................................................................................. 4 1.1 General information........................................................................ 4 1.2 Technical specifications ................................................................. 6 1.2.1 Dimensions .............................................................................. 6 1.2.2 Weights.................................................................................... 6 1.2.3 Maximum loads ....................................................................... 6 1.2.4 Drive characteristics ................................................................ 7 1.2.5 Drive system and tires ............................................................. 7 1.2.6 Batteries and charger .............................................................. 8 1.2.7 General specifications ............................................................. 8 1.2.8 Options and accessories ......................................................... 8 1.3 Safety instructions ........................................................................ 10 1.3.1 Stability and slopes ............................................................... 10 1.3.2 Electromagnetic compatibility (EMC) .................................... 11 1.3.3 Batteries ................................................................................ 12 1.3.4 Hot areas ............................................................................... 13 1.3.5 Danger of pinching body parts .............................................. 13 1.3.6 General warnings .................................................................. 14 2. UNPACKING AND ASSEMBLY ........................................................ 17 2.1 Unpacking the box ....................................................................... 17 2.2 Mounting the rear wheels ............................................................. 19 2.3 Fixing the tiller to the frame .......................................................... 20 2.4 Placing the batteries..................................................................... 22 2.5 Unfolding the Seat to driving position .......................................... 23 2.6 Mounting the rear basket ............................................................. 25 2.7 Checking the assembly ................................................................ 26 2.8 Mounting the seat belt option ....................................................... 27 3. OPERATION AND USE OF THE CADDY......................................... 28 3.1 Seating into the Caddy ................................................................. 28 3.11 Tilting the handlebar forward and backward .............................. 28 3.2 Driving the Caddy......................................................................... 30 3.3 Speed control of the Caddy ......................................................... 33 3.4 Emergency stopping .................................................................... 33 3.5 The Caddy headlight .................................................................... 35 3.6 The Caddy horn ........................................................................... 35 3.7 The battery discharge indication .................................................. 35 3.8 Pushing the Caddy: the freewheel function ................................. 37 4. DISASSEMBLING FOR TRANSPORT IN A CAR ............................. 40 2 Caddy 4.1 Folding the Seat ........................................................................... 40 4.2 Removing the tiller from the frame ............................................... 42 4.3 Removing the basket ................................................................... 43 4.4 Removing the batteries ................................................................ 43 4.5 Removing the rear wheels ........................................................... 44 5. TRANSPORTING THE CADDY IN A CAR AND STORING THE CADDY AT HOME ................................................................................. 45 5.1 Transporting the Caddy in a car trunk .......................................... 45 5.2 Lifting heavy parts ........................................................................ 47 5.3 Storing the Caddy at home .......................................................... 48 6. CHARGING THE BATTERIES .......................................................... 49 6.1 Charging ....................................................................................... 49 6.2 Attention points when charging .................................................... 50 6.3 The external charger adapter (optional) ....................................... 51 7. TROUBLESHOOTING ....................................................................... 53 7.1 Troubleshooting the Caddy.............................................................. 54 7.2 Troubleshooting the battery charger ............................................ 56 8. SMALL MAINTENANCE AND PERIODIC CHECKS......................... 58 8.1 Cleaning ....................................................................................... 58 8.2 Checking the PU tires .................................................................. 59 8.3 Checking the inflatable tires ......................................................... 59 8.4 Checking the throttle levers .......................................................... 60 8.5 Checking the assembly ................................................................ 60 8.6 Checking the parking brake ......................................................... 61 8.7 Replacing the batteries ................................................................ 62 8.8 Discarding of old or damaged batteries ....................................... 63 8.8.1 Discarding of old batteries ..................................................... 63 8.8.2 Discarding of damaged batteries ........................................... 63 8.9 Programming the controller .......................................................... 64 9. SERVICE AND REPAIRS.................................................................. 67 9.1 Necessary annual maintenance. .................................................. 67 9.2 Replacement parts ....................................................................... 68 9.3 Service manual ............................................................................ 68 10 LABELLING ...................................................................................... 69 10.1 The type plate ............................................................................ 69 10.2 Other labels ................................................................................ 70 10.3 Labels and printing on the tiller .................................................. 71 11. EC DECLARATION OF CONFORMITY .......................................... 73 12. WARRANTY STATEMENT ............................................................. 74 3 Caddy 1. INTRODUCTION Thank you for choosing the Caddy transportable / foldable scooter by Afikim Electric Vehicles. The Caddy Scooter has been developed especially for those people with mobility problems. Mobility problems are generally problems with walking or with the stamina. Afikim Electric Vehicles has many years experience with the development of these kinds of vehicles and also markets different types of electric vehicles for a wide range of applications and needs. The Caddy scooter was developed especially for use in and around the house and to be taken along for trips. For this purpose the scooter can be folded and disassembled easily and the separate parts can be handled with ease. Please read this manual carefully before you start using the product, you will find there are many useful hints and instructions. Please give extra attention to reading the safety warnings. This manual will help you enjoy using your purchase safely and for a long time. ATTENTION: Give special attention to the SAFETY INSTRUCTIONS (§1.3), read them carefully and please study them again from time to time. No vehicle can be used without risk, risk both to yourself as the user as well as to others. This electric vehicle comes with some quite specific risk that you should be aware of before using the product. 1.1 General information The Caddy complies with the current European Union standards for this type of vehicle. They are formulated in the standard EN12184 (April 1999). The status of the scooter in the traffic laws and regulations will differ from one country to the next. Make sure you know the laws and regulations in the country you live in and act accordingly. 4 Caddy The maximum speed of the Caddy is 7,5 kilometres per hour (km/h). It possible to have your dealer adjust the drive electronics of the scooter to a lower speed. The Caddy has been developed for use in and around the house. According to the EU standard EN12184 this means the Caddy is a class A electric vehicle. The Caddy should not be used during rainfall, snowfall or in temperatures below 0°C or above 40°C. Despite harmonisation efforts in the EU, depending on the country you are in, you may have to buy insurance for the Caddy vehicle before you can use it outside. It is also possible that you have to pay a road tax or pass some sort of drive test. Please follow local rules and legislation. The Caddy was developed and tested for a maximum user weight of 100 Kg. including luggage. The user of the Caddy scooter should have sufficient physical abilities (hearing, sight, strength and mental abilities) to be able to use the scooter safely. If in doubt please consult your doctor. Please give special attention to §1.2 TECHNICAL SPECIFICATIONS and §1.3 SAFETY INSTRUCTIONS. 5 Caddy 1.2 Technical specifications 1.2.1 Dimensions Length with basket Length without basket Folded Length Width Height Height Folded 1250 mm. 1200 mm. 1150 mm. 640 mm. 970 mm. 470 mm. Dimensions of the largest part Length Width Height 930 mm. 640 mm. 340 mm. 1.2.2 Weights Total weight including batteries 12 Ah Total weight including batteries 17 Ah Total weight excluding batteries 31 kg. 36 kg. 22 kg. Weight of the frame with seat Weight of the tiller Weight of one battery 12Ah Weight of one battery 17Ah Weight of one wheel 13 kg. 9 kg. 4.5 kg. 7 kg. 0,9 kg. 1.2.3 Maximum loads Maximum user weight Maximum load in the rear basket Maximum number of persons 100 kg. 10 kg. 1 6 Caddy 1.2.4 Drive characteristics Speeds Maximum speed forward (hare symbol) Slow speed forward (tortoise symbol) Reverse speed 7,5 km/h. 4,5 km/h. 4,5 km/h. Turning radius Ground clearance Maximum obstacle height Maximum safe slope 75.0 cm. 8 cm. 3 cm. 3° Range according ISO 7176-4 20 km. (Range is dependant on the circumstances during use, it can be less i.e when hills, wind or loose surface such as gravel or sand. Range can also vary with the user weight) 1.2.5 Drive system and tires Drive system front wheel, worm wheel reduction direct drive Motor 24 Volt / 200 Watt. Motor controller (complies with ISO7176-14) 24 Volt / 60 Amp. programmable Brake systems - Regenerative motor brake - electro-magnetic parking brake Tires PU tire size Ø 250x50 Tire size (inflatable) Tube size (with right angle valve) Tire pressure (when using inflatable tires) 7 Ø 250x50 (10”x2”) ETRTO: 54-152 10”x2” ETRTO: 54-152 2,4 bar. Caddy 1.2.6 Batteries and charger Batteries; use only: Size LxWxH (mm.) Weight 12V 18,0 Ah.(20h.) / 15,8 Ah.(5h.) 181x76x167 6,7 Kg. each Size LxWxH Weight 12V 17,0 Ah.(20h.) / 14,4 Ah. (5h.) 181x76x167 6,7 Kg. each Battery charger (220/230V) Maximum charger current (RMS) Charging time to 80% charge Charging time to full charge (Data depending on charger used.) 24 Volt 2 Amp. 8 hours 12 hours 1.2.7 General specifications Seat width Backrest height Seat depth Armrest height from seat Seat height from scooter platform 460 mm. 430 mm. 420 mm. 180 mm. 480 mm. 1.2.8 Options and accessories Seat belt for additional stability Bag for front External charger adapter for charging batteries not mounted to the scooter. Car-charger: battery charger for connecting to the cigarette lighter contact in the car. Afikim Electric Vehicles has a policy of constant product improvement, as a consequence of this specifications may change without prior notice. The documentation may not represent the actual product in some details. 8 Caddy 9 Caddy 1.3 Safety instructions 1.3.1 Stability and slopes The maximum safe slope for the Caddy scooter is 3°. This is the maximum slope where you can turn and manoeuvre safely with the scooter without compromising the stability of the vehicle. If you have any doubts about safety of the angle of the slope, try to find another route. If this is not possible for any reason, try to avoid making sudden movements (accelerating or braking) and always drive straight up. Never attempt to turn on a slope! Lean forward when driving up, lean back when driving downhill. Don’t hesitate to call on help for someone to walk behind you or beside you for support when you need it. It is possible your scooter will climb an incline steeper than the maximum safe slope, this does not mean it is safe to do so. Keep in mind the instructions in the last point. Your Caddy can take obstacles up to 3 cm. don´t try to climb kerbs or obstacles higher than 3 cm. this can destabilize your scooter. If you encounter an obstacle higher than 3 cm. call on the help of another person to support you for safety while you drive. Also when you are driving down a kerb or obstacle higher than 3 cm. the stability of your scooter can be compromised. In such a situation always call upon the help of another person to support you while driving down this obstacle. Especially the sideways stability of the scooter can be easily compromised, for example when one of the rear wheels is on an obstacle higher than 3 cm. Try to avoid such situations, always lean towards the obstacle. 10 Caddy It is dangerous to use the Caddy on loose gravel or sand or on a very bumpy surface. Because of the sudden weight shifts the stability of the scooter can be easily compromised. In order to be able to push the scooter in case of a malfunction or low batteries the automatic parking brake can be dislodged. Dislodging the parking brake will put the vehicle in potentially unsafe state, for instance when you are at the top of a slope. When you are on the scooter at the top of an incline or slope always make sure the parking brake is active. Dislodging the parking brake may cause the vehicle to roll down a slope or incline uncontrolled. Always reduce speed in turns and going around curves. Making a sharp turn at full speed may cause the vehicle to turn over. 1.3.2 Electromagnetic compatibility (EMC) Most electric devices and machines create electromagnetic fields. These electromagnetic fields can influence the operation of other devices or machines causing them to malfunction or behave in an abnormal way. Machines and devices producing very strong electromagnetic fields are mobile phones and other radio transmitters such as 27MC transceivers and portable transceivers (walkie talkies). All scooters are to a certain degree sensitive to EM fields. Because they are vehicles there are rules and standards these scooters have to comply to in order to be admitted for use. The vehicles have to be submitted to a series of tests to establish the sensitivity (immunity) to and emission of EM fields. The Caddy complies with all European standards for EMC. It is possible that a certain device or machine produces an electromagnetic field stronger than the immunity level (sensitivity) of the scooter, in such a case the scooter may malfunction or may not respond to the control input in a normal way. Examples are: taking off suddenly, operation of the parking brake without you touching the throttle lever or intermittent driving (shocks). When this happens, immediately 11 Caddy switch off the scooter using the key switch. Try to find and eliminate the cause of the strange behaviour before you resume driving. I f you intend to use a mobile phone, portable transceiver or any other kind of radio transmitter while you are using the Caddy, we advise you to always switch off the scooter using the key switch before doing so. It is possible that some devices or machines are influenced by the electromagnetic field your scooter generates. Examples are automatic doors or anti-theft systems in shops. Try to be aware of problems like this and be extra careful in situations where there is a danger of injury to yourself or others like with automatic doors. 1.3.3 Batteries The Caddy scooter is delivered standard with two sealed maintenance-free lead-gel type batteries placed in a removable bracket. The battery housings are fully sealed and during normal use no gasses or liquids can escape from them. However the plastic housing of the batteries may be damaged! If the plastic housing of the batteries is damaged, for instance when you accidentally dropped it during dismantling the scooter or during an accident, be aware an ACID GEL may leak from the batteries. Do not touch the gel! If the gel contacts your skin or eyes strong irritation and acid burning can the result. If this happens rinse with water and contact a doctor or first aid centre immediately. Batteries contain substances that are harmful to the environment and they contain materials that can be recycled such as lead and plastics. If you replace the batteries, do not dispose of them in the environment, but hand them in at a government appointed collection point. Information about these collection points can usually be gotten from officials at your city council. 12 Caddy 1.3.4 Hot areas Some areas on your scooter may get hot during use. The motor can get hot after using for a certain period of time. This is in itself normal, but be aware never to touch the motor after you have used the scooter. There is a real danger of burning the skin of your fingers. If you decide to use your Caddy outside in sunny weather, it is possible that some surfaces such as the armrests, the plastic parts and the upholstery heat up from the direct sunlight possibly causing burning injuries to the bare skin. If you park the scooter outside, try to avoid parking it in the direct sunlight. 1.3.5 Danger of pinching body parts Some places on the Caddy are marked with this sticker: This sticker marks the places where there is a danger of pinching for the fingers or other body parts. The front frame at the location of the tiller pivot is such a place. Be aware especially when you are assembling and disassembling the scooter of the danger of pinching your fingers. When the seat is folded forward and down to the frame there is risk of pinching your fingers between the base of the seat base and the backrest and as well between the seat base and the frame . When folding down the tiller there is risk of pinching your fingers between the tiller and the motor cover . Please be aware of these problems . 13 Caddy 1.3.6 General warnings DANGER OF SUFFOCATION!: Never allow children to play with the plastic bags the scooter is packaged in. The bags are big enough for a child to crawl into: children are in real danger of suffocating from lack of oxygen when this happens. DANGER OF INJURY!: Never allow children to play with the carton board boxes without adult supervision. The large boxes are very inviting for children to play with, but can easily fall over with a child inside causing head injuries or other. There is also a danger of suffocation from lack of oxygen when a child gets inside the box. Read, before you operate the scooter, these instructions for use carefully. Please also follow the instructions. Be aware that by using the scooter you may cause injury to others, for this reason always use the slow-driving position (tortoise position) when there are many people around an drive carefully. Do not put yourself in dangerous situations, make sure you can call for help when you need it. Try to estimate the distance you intend to go and make sure your batteries are charged sufficiently for this distance. Take into account that headwind, hills or inclines and a loose surface can influence the range in a negative way. Do not use the Caddy on the open road, the scooter was not designed for this: it does not have a standard rear light units or indicators for open roads , but only to mark you if you pass by . Overloading the Caddy will shorten the life of the product by accelerating the wear and tear of parts and components. Take the maximum loads into consideration from this manual and do not exceed them, use the product safely and with care. 14 Caddy The Caddy was not designed to be used in rain, snow or extreme temperatures. The use of the Caddy in these conditions may cause serious malfunctions and permanently damage the product. Using the scooter in low temperatures will cause the range of the product to be considerably smaller than normal. Using in extreme high temperatures may lead to overheating of the motor or controller, causing the controller to shut down temporarily until the system has cooled down. Using the Caddy outside or on the road after dark is strongly discouraged because the risk of accidents is much higher than in daylight because there is insufficient lighting on the vehicle. It is strictly forbidden for a person under the influence of alcohol, drugs or other substances influencing the ability to drive a vehicle to use the scooter. When you are on prescription drugs that may influence your ability to use the Caddy, please consult your doctor for advice. A person using the Caddy scooter should have sufficient eyesight to master the vehicle. The assessment of your ability to use the vehicle is subject to the judgement of your doctor. A person with a seating stability problem may find that the movement of the Caddy scooter during driving causes them to slide from the seat. In order to avoid this problem a seat belt can be mounted to the seat helping the driver to maintain a good seating posture. Be careful with loose clothing that can be caught in or under the wheel. If you suspect something wrong with your Caddy, always contact your dealer and explain the problem, better safe than sorry. Never turn the key switch to the OFF position while driving, this will cause an very sudden stopping of the scooter. This may cause you to loose balance and injury can be the result. On top 15 Caddy of this it may cause damage to the motor and drive system of the Caddy. When mounting or dismounting the Caddy always make sure the key switch is in the OFF position to prevent the scooter from moving or taking off by accident when you accidentally depress the throttle lever. When you do not use the Caddy scooter and it is parked somewhere, ALWAYS REMOVE THE KEYS FROM THE KEY SWITCH !. Leaving the keys in the switch is an invitation for children and others for joyriding and abuse of the product, possibly causing injury to themselves and to others. In an isolated case it is possible that the grease from the gearbox of the motor may leak or sweat through the seal. Avoid contact with the mouth or the eyes, the grease can be cleaned off with a paper tissue. If the leakage persists, contact your dealer for service and repair. 16 Caddy 2. UNPACKING AND ASSEMBLY The Caddy can be delivered by your dealer fully pre-assembled, but it is also possible that the product comes to you in parts in the box it was packed in at the factory. The Caddy was designed to be assembled and disassembled by the user. Assembling the scooter is very easy and it is good to know the procedure in case you want to disassemble the scooter for instance if you want to take it with you in the back of a car. 2.1 Unpacking the box The Caddy will normally be delivered to you in a large carton box, please check if the box is not badly damaged. If this is the case you may want to refuse the delivery. If there is damage to the box always report it to the person delivering it and make sure the damage is noted on the shipping documents you sign before accepting the delivery. a. b. c. d. e. f. g. h. Place the box on the floor the right way up (the top is marked UP). Carefully cut the tape closing the box, make sure you don´t cut the contents of the box. Open lid and remove all the parts from the box, mind your back lifting some of the heavier parts out of the box. Put all parts on the floor and put the empty box away, you should find the following parts (see figure 1): The frame The tiller The rear basket Two batteries Two rear wheels A battery charger This manual Two armrest . 17 Caddy Figure 1 18 Caddy 2.2 Mounting the rear wheels The rear wheels (e - in figure 1) are to be assembled onto the frame (a - in figure 1). (See figure 2) The rear wheel (1) is assembled by means of a so called quick release axle (2) into the wheel mount (3) of the frame (4). In order to be able to assemble and disassemble the quick release axle you need to press the button underneath the rubber cover (5) in the centre of the wheel. Take the rear wheel in your hand as shown in figure 2. Grip the wheel (1) with your fingers through the spokes and depress the button under the rubber cover (5) at the centre of the wheel with your thumb. Lift the frame (4) using your other hand and fully insert the quick release axle (2) into the Wheel mount (3) of the frame, release the button. Check if the quick release axle is locked by pulling on the wheel. Mount the other wheel the same way. Figure 2 19 Caddy 2.3 Fixing the tiller to the frame The tiller (b - in figure 1) must be fixed to the frame (a - in figure 1). Refer to figure 3: The frame bushing (1) is inserted onto the tiller tapered block (2) . It is also the fixation of the tiller to the frame by means of a locking lever (3). We advise you to approach the frame from the left hand side (when you are right-handed. Take the tiller in your left hand, holding it at the frame tube just above the control panel. Make sure you hold it up straight and tilt it backwards slightly as indicated in figure 3. Lift the frame bushing (1) by mean of the lever (3) using your right hand as shown in figure 3 . Now place the frame bushing over the tapered block (2) of the tiller. Than after they attached together push the lever (3) forward and downward until it lock them together . Make sure that you hear a clicks that will ensure you completely secured connection. Please refer to figure 3 to the differences between the two positions : Released and Secured . Also make sure that the connection is done properly by means of tilting the tiller forward and backward . The electrical connections between the tiller and the frame is done at the same stage . 20 Caddy Figure 3 21 Caddy 2.4 Placing the batteries The batteries are mounted in a special plastic housing by sliding it inside. The batteries electric connections is done at the same stage when sliding it into the housing guide . Please refer to figure 5: Place both batteries in their place at the rear of the frame by sliding them into the housing guides in the arrow direction . Make sure that when the batteries are completely down , the two snaps 1 are seating in the slots 2 of the battery housing. Figure 5 22 Caddy 2.5 Unfolding the Seat to driving position To unfold the seat to driving position , pull the seat backrest upward as shown in figure 6a . Continue pulling the seat backrest all along upward and backward as shown in figure 6b . figure 6a figure 6b 23 Caddy At the final stage of unfolding the seat push the backrest backward until you hear a click . The click will indicates that the seat mechanism is locked . To make this stage easier , you may find id convenience to step with your shoe on the Caddy floor like it is shown in figure 6c . Figure 6c 24 Caddy 2.6 Mounting the rear basket See figure 7: Hang the rear basket with its anchors on the frame hooks under the seat. ATTENTION: Please be sure not to overload the rear basket, the maximum load for the rear basket is 10 kg. Figure 7 25 Caddy 2.7 Checking the assembly Please always check the following aspect of the assembly after you finish: Are any parts damaged? If so report the damage to your dealer without delay and ask for replacement parts or repair. Are all nuts and bolts tight, is the retaining spring for the tiller in place and are the wheels locked in place? Check without turning the scooter ON if the throttle levers move freely and return to the middle position when you depress and release them. ATTENTION: On delivery the batteries are only partially charged, do not operate the Caddy scooter until the batteries have been charged for at least 8 hours. Deep discharging and exhausting the batteries can cause damage to the batteries. See chapter 5 for instructions on charging batteries. 26 Caddy 2.8 Mounting the seat belt option An important accessory for the Caddy scooter is the seat belt option. The seat belt is used to stabilize the user of the Caddy while driving. Giving him/her a more secure seating position. During driving and while taking turns, starting and stopping it may be difficult for some drivers to keep a stable seating position, to prevent sliding from the seat the seat belt option can be recommended. Please refer to figure 8 for mounting the seat belt. To add the seatbelt you need to un secure the secure screw and re secure it back through the belt plate . We recommend you ask the service personnel at your dealer to mount it for you. Figure 8 27 Caddy 3. OPERATION AND USE OF THE CADDY ATTENTION: BEFORE OPERATING THE CADDY, ALWAYS READ THE SAFETY INSTRUCTIONS IN §1.3 3.1 Seating into the Caddy To make the Seating into the Caddy easier you may use the follow actions. 3.11 Tilting the handlebar forward and backward To tilt the handlebar (1) forward pull the lever (2) down as shown in figure 9 , than push the handlebar (1) forward while Keep pulling the lever (2) downward. When you like the handlebar (1) to be fixed and secured again , just leave the lever (2) at the desired position and it will be snap and secured nearest groove . After seating down into the seat , you should return the handlebar (1) to driving position by doing the same , pull the lever (2) down , than pull the handlebar (1) backward while Keep pulling the lever (2) downward and leave the lever (2) at the desired position to suit your comfort. 28 Caddy figure 9 Another helpful action is to turn the tiller to the other side , than the one you enter from . Also if your Caddy is equipped with armrest , you should fold them backward . Make sure you bring the armrest down again, the armrests provide you with important support sideways when you are driving. ATTENTION: When driving the Caddy, the vehicle moves and rocks in turns and when accelerating or braking. This may cause you to loose your balance and it can make you slide of the seat. If this is a problem for you, you may want to consider buying the seat belt option. 29 Caddy 3.2 Driving the Caddy See figure 10: Check the steps of § 2.7: Checking the assembly. Seating into the Caddy as described in §3.1 . Put the ignition key into the key switch (1) and turn it clockwise to the position marked ON. The key will stay in this position. A light on your dashboard marked ON (2) should light up signifying the Caddy is ready to go. (see figure 10) Put the speed selector switch (3) in the slow driving mode (turtle). You can now drive forward by squeezing the right hand throttle lever (4). You can drive backwards by squeezing the left hand throttle lever (5). When you drive backwards, the horn will sound intermittently signifying you are driving backwards. The two throttle levers are connected. 30 Caddy Figure 10 31 Caddy The speed you drive forward or backward is dependent on how far you squeeze the throttle lever. The further you squeeze it the faster you go. To stop, simple release the throttle lever, the throttle lever will return to the neutral position and the Caddy will come to a controlled stop by using the motor brake. ATTENTION: You may notice the following things, they are normal and are part of the standard safety system of the Caddy. You may experience a delay between squeezing the throttle lever and the scooter actually taking of. This is a safety feature preventing the scooter from taking of when you accidentally touch the throttle levers. A clicking sound may be heard when you squeeze the throttle. This the releasing of the Electromagnetic parking brake. When you do not operate the throttle, the parking brake is always engaged. 32 Caddy 3.3 Speed control of the Caddy One way to control the speed of the Caddy is by squeezing the throttle handles: The more you squeeze, the faster you will drive. Another way to limit the speed is by means of the speed selector switch (1) see figure 11. The Caddy has two positions to limit the maximum speed: The high speed setting indicated by the hare (2) on the speed selector switch (1) sets the Caddy to a maximum speed of 7,5 km/h. If the switch is in this position the green light should light up see figure 11. The slow speed setting indicated by the turtle (3) on the speed selector switch, sets the Caddy to a maximum speed of 4,5 km/h. In this position the green light on the switch is OFF. See figure11. The slow speed setting is used indoors and in confined spaces or for instance when you are driving among a crowd of pedestrians. In all other situations you can use the high speed setting. ATTENTION: During the first time it may be wise to use the slow speed setting while you get used to controlling the scooter. This way both you and your environment are at less risk. When driving downhill always use the low-speed setting. When driving uphill always use the high-speed setting. When driving over obstacles always use the high-speed setting. 3.4 Emergency stopping In case of an emergency you may need to stop the Caddy very quickly. The way to do this is by reversing the driving direction with the throttle lever by releasing the right (forward) hand side and squeezing the left (reverse). 33 Caddy ATTENTION: This method of stopping the scooter will cause a very abrupt stop, this may cause you to loose your balance and injure yourself. It may also cause damage to the drive system of the Caddy. ONLY USE THIS METHOD OF STOPPING IN CASE OF EMERGENCY! Emergency stopping when the scooter rolls downhill with the parking brake released. The Caddy is equipped with an emergency brake system that slows down the scooter when rolling downhill with the parking brake released, even when there are no batteries installed. Figure 11 34 Caddy 3.5 The Caddy headlight For extra safety and comfort the Caddy is equipped with a headlight. The headlight is intended to improve your visibility under dark circumstances. ATTENTION: The headlight on the Caddy does not comply with international road and traffic regulations: the Caddy was not designed to be used on the main road. See figure 12: To switch the headlight ON and OFF, use the red switch (1) on the right hand side of dashboard close to the handle. 3.6 The Caddy horn The Caddy is equipped with a horn (beeper), this is used to alert others to your presence. Use the horn only for your own safety and that of others. Please be aware that unnecessary use of the horn may cause aggravation with others. See figure 12: To use the horn press the horn button (2), if you release the button the horn will stop sounding. 3.7 The battery discharge indication See figure 12: The battery discharge indication (3) is part of the dashboard of your Caddy scooter. It consists of four rectangular lights, the light for the ON position is not part of the battery discharge indication. When all four light are lit, the batteries are full or almost full; when only one light is lit the batteries are (close to being) discharged. 35 Caddy ATTENTION: Never start a trip with discharged or semi/discharged batteries. Here is an indication discharge percentages: 4 lights charged 75% to 100% 3 lights charged 50% to 75% 2 lights charged 25% to 50% 1 light charged 0% to 25% ATTENTION: The battery discharge indication will be reset to four lit lights after the batteries have been charged fully. When the external charge adapter (available as an optional extra) is used to charge the batteries while they are taken off the scooter, the battery discharge indicator will not reset automatically. In order to reset the battery discharge indicator to four lit lights turn on the Caddy using the key switch and wait for 2 minutes without driving the scooter. We advise you to recharge your batteries every night when you use the Caddy daily. 36 Caddy Figure 12 3.8 Pushing the Caddy: the freewheel function There may be some situations when you want to be able to push the Caddy, for instance when the batteries are fully discharged or when a problem occurs. The Caddy is equipped standard with an electro/magnetic parking brake. This brake engages automatically when you release the throttle handle and is intended to prevent the scooter from running down an incline when you stop or park. The parking brake is always engaged when the key switch is in the OFF position or when the throttle handle is not depressed. See figure 13: in order to disengage the parking brake twist the parking brake release knob (1) clockwise (2) to the end position. To indicate your Caddy is in an unsafe state the horn will sound uninterrupted while the parking brake is released and the scooter is 37 Caddy turned ON . In this state the scooter drive system is switched OFF and you can’t operate the Caddy. You can now push the scooter. After pushing the scooter always return the brake release knob (1) to the original position. You may find that pushing the Caddy is heavier with the system switched ON, if you switch the drive system OFF using the key switch you will find pushing is much easier. This is a normal phenomenon. ATTENTION: Never use the parking brake release knob while you are on a slope or an incline, this may cause you to run down the slope uncontrollably and without means to stop the scooter. The Caddy is equipped with an emergency brake system that slows down the scooter when rolling downhill with the parking brake released, even when there are no batteries installed. ATTENTION: When this situation occurs, the freewheel knob should be returned to the drive position immediately. 38 Caddy Figure 13 39 Caddy 4. DISASSEMBLING FOR TRANSPORT IN A CAR 4.1 Folding the Seat To fold the Caddy seat , lift the seat few centimetres upward until you hear the seat locking mechanism released . Than continue folding the seat by pushing the seat back forward and downward as shown in figures 14a,14b,14c . figure 14a 40 Caddy figure 14b figure 14c 41 Caddy 4.2 Removing the tiller from the frame Removing the tiller from the frame is done opposite order then explained in §2.3 . As shown in figure 15 . Pull the lock lever upward and backward to release position . Now pull with the lever the frame bushing (1) upward to separate it from the tiller tapered block . The electrical disconnection is being done at the same action . ATTENTION: Danger of pinching your hand or fingers: the area between the tiller frame and the main frame is indicated as a potential pinch area. Be careful, the tiller frame wants to rotate to the left because of the weight of the motor, pinching your hand. Figure 15 42 Caddy 4.3 Removing the basket Remove the basket from the rear part of the Caddy . See figure 7. 4.4 Removing the batteries To remove the batteries from their housing , pull up each one of the batteries with it’s handle upward . This action will release the batteries securing snaps (1) from the housing slots (2). No need to connect any electric connection this is done at the same one action . For illustration see figure 16 ATTENTION: Danger of pinching your hand: please follow the instructions and make sure your hand does not get caught between the battery and other parts of the frame. The weight of the batteries represent an additional hazard when you are handling them. Figure 16 43 Caddy 4.5 Removing the rear wheels In case of need to remove the wheels from the frame to earn some more volume reduction of the Caddy , do is in opposite order than installing them . See figure 17 and §2.2 . figure 17 44 Caddy 5. TRANSPORTING THE CADDY IN A CAR AND STORING THE CADDY AT HOME 5.1 Transporting the Caddy in a car trunk See figure 18: The Caddy can easily be taken on trips in most cars because of its compact build and the ease of folding and disassembly into portable parts. Please follow these steps and make sure you read the warnings carefully when you want to take the Caddy in your car. Follow the instructions in chapter 4 to fold and disassemble the Caddy . You may want to consider leaving the rear wheels on the frame, but all other parts need to be taken off for storage in the trunk of a car. First place the frame at the bottom of the trunk. Place all other parts on top and around the frame. Take the wheels off the rear frame if necessary. ATTENTION: Never try to lift the complete scooter or a partially disassembled frame alone. The frame without the basket is still 13 kg. Mind your back when you are handling heavy objects. Different persons have different abilities: some parts of the Caddy may be too heavy for you to lift, when in doubt please ask for help! Make sure the parts of the Caddy don’t shift during the trip. When the car is accelerating or braking the parts of the scooter may shift and get damaged. Loose parts may cause serious injuries to yourself and others during an accident! Make sure you tie down the parts of the scooter to the floor of your car! 45 Caddy Figure 18 46 Caddy 5.2 Lifting heavy parts Parts of the scooter weighing more than 10 kg. Should be lifted by the indicated locations marked with arrows and numbered 1 & 2. (see figure 19) a. Tiller b. Frame Figure 19 47 Caddy 5.3 Storing the Caddy at home To allow the Caddy minimum storing volume and floor space while stored at home , it is recommended to fold both the seat and the handlebar and store it at one of the two position illustrated in figures 20a or 20b . Pay attention on the second option to lay the rear part of the Caddy on the rubber bumpers . For explanation about folding the seat see §4.1 . For explanation about folding the handlebar see §3.11 . Figure 20a Figure 20b 48 Caddy 6. CHARGING THE BATTERIES Your Caddy can be supplied standard with a battery charger. It is important you only use the charger supplied with the scooter for charging the batteries. The charger and batteries are an integral part of the electronic system of the scooter. The different parts of the electronic system are carefully selected and tuned into one another to get an optimal performance and lifetime from your batteries. By using only this charger other problems are prevented such as overcharging the batteries. ATTENTION: The charger does not have an on/off switch. 6.1 Charging See figure 21: for charging the batteries please follow these steps, make sure you follow them in the right sequence: Connect the charger plug (1) of the charger (2) to the charging socket (3) on the Caddy. The charging socket (3) is located on the right hand side on the tiller shrouds. Connect the power lead of the charger (4) to a wall socket (5). The colour of the status light (6) on the charger shows the status of the charger: - RED: - YELLOW: - GREEN: The charger is connected to the wall socket but not to the Caddy. The charger is charging the batteries The charging of the batteries is ready 49 Caddy When the charging is ready first take the power lead from the wall socket before you disconnect the charger plug (1) from the charging point (3) on the scooter. Figure 21 6.2 Attention points when charging While the charger plug (1) is inserted in the charging socket of your Caddy, you can not drive the scooter. The safety system of the Caddy prevents you from driving with the charger connected. 50 Caddy There is no need to disconnect the charger from the scooter immediately after the charging process is completed, however don’t leave the charger connected to your scooter for longer than two weeks. Under ideal circumstances the batteries will not loose their charge for a period of about 6 months. Please take into account that under most circumstances the batteries will gradually loose their charge over time even when the scooter is not used. When you intend not to use the Caddy for a longer period of time, it is recommended to fully charge the batteries for 12 hours prior to storing the scooter. The batteries will age and gradually loose their capacity usually noticeable after about two years. You will notice because the batteries will be empty faster than usual. There will be a point where you need to replace the batteries, always contact your AFIKIM dealer and use AFIKIM approved batteries for replacement. 6.3 The external charger adapter (optional) With the external charger adapter you can charge the batteries while they are taken of the scooter. You may need this adapter if there is no mains connection for the charger in the area where you park your Caddy. You may also need it when you buy an extra set of batteries for the Caddy to extend the range while on a trip. Before charging the batteries with the external charger adapter, you need to remove the batteries as described in §4.4 . Place the batteries on the charging rack . Connect the charger plug to the charging socket of the rack. Connect the power lead of the charger to a wall socket. Continue by following the instructions in §6.1. 51 Caddy ATTENTION: When the charging rack is used for charging the batteries, battery discharge indicator on the scooter does not automatically reset to full (4 lights lit). To reset the battery discharge indicator after you installed the batteries as described in §2.4 you should turn the Caddy ON using the key switch. Now wait for at least 2 minutes without operating the Caddy and the battery discharge indicator will reset to full. 52 Caddy 7. TROUBLESHOOTING There are a number of smaller problems and malfunctions that can easily be fixed by yourself using this guide. When you find you can not solve the problem, always call your AFIKIM dealer and ask for service. Do not open the any of the parts of the Caddy to attempt repairs by yourself, this is a specialized job. Small repairs and maintenance that can be done by yourself is described in chapter 8. 53 Caddy 7.1 Troubleshooting the Caddy Nr. Problem 1. The green light does not come on when you turn the key switch to the ON position. The green light is blinking. Possible cause Possible solution One or more connectors may be loose. Check all connectors and reconnect them. One of the reset fuses on the battery housing has popped. See figure 22: check the fuses on the battery housing and reset them by pressing them when popped (no more than 2 times) An electronic fault tripped the controller on start-up. Turn the scooter OFF using the key switch, turn it On again to reset the controller A fatal error in the control system has occurred. Call your dealer and explain the problem, ask for service 54 Caddy The battery discharge indicator indicates a low battery charge When you slightly press the throttle lever you don’t hear a click. The batteries need to Recharge the be charged. batteries. The automatic parking brake does not function. DO NOT DRIVE! Call you dealer and ask for service. 4. When you check the throttle lever, it does not return to the middle position. The lever is stuck on the shrouds or the internal spring is broken. DO NOT DRIVE! Call your dealer and ask for service. 5. The Caddy does not The batteries drive smoothly or need to be shocks when driving. recharged. 2. 3. Recharge the batteries. Replace the The batteries are batteries (only use old and have lost too approved much capacity. replacements) Call your dealer and ask for service. 6. The horn sounds without interruption, the scooter does not drive. The parking brake is released Turn back the parking brake release knob as described in §3.8. You may need to reset the scooter by turning it ON and OFF with the keyswitch. Call your dealer and ask for service. 55 Caddy 7.2 Troubleshooting the battery charger Nr. Problem 1. The charger light does not light up with the charger connected to the wall socket. Possible cause Possible solution The wall socket does not carry any current . Check the fuses in your home . The charger is broken. 2. 3. 4. Replace the charger, ask for service from your dealer. The light on the charger lights up RED while the charger plug is connected to the charging point on the scooter. A bad connection Reconnect the between the charger charger following the and the scooter. instructions in chapter 6. The fuse in the charger circuit has popped Reset the fuse by pushing the button (6 in figure 21). If the problem persists call your dealer for service. The light on your charger does not turn GREEN even after 20 hours charging. The batteries are not fully charged yet. (One of) the batteries is/are defect. The charger has a defect. Charge for one more night. The battery discharge indicator on the scooter does not indicate a full charge after charging. The charger has a defect. Replace the charger The batteries where charged outside the scooter. Turn the scooter ON for 2 minutes without operating it. 56 Call your dealer for service. Caddy Figure 22 A service manual for use by the dealer is available in the English language and can be ordered at AFIKIM Electric Vehicles in Israel. 57 Caddy 8. SMALL MAINTENANCE AND PERIODIC CHECKS By following these maintenance instructions you can keep the Caddy in good condition for a long period of time. These maintenance points can easily be done by yourself or someone without technical background. Here are the instructions for small maintenance, of course you can also choose to have this maintenance done by your dealer. We advice you to also have your Caddy checked by your dealer once every year, instructions on this can be found in chapter 9. There are two periods for these periodic checks and small maintenance: a monthly and a 6-monthly period. Some aspects need to be checked every time before you use the Caddy. Please take your Caddy to your dealer for a check-up and service turn at least once a year. 8.1 Cleaning The plastic parts and the upholstery of the seats and the tires can be cleaned with a car shampoo when necessary. The car shampoo can be purchased at most car accessory stores and gas stations. A car shampoo has the advantage of not leaving streaks and stripes after cleaning. It is ok to use an ordinary household cleaning agent, however the results may be less. ATTENTION: Never use any organic solvents such as paint thinner, white spirit or alcohol or aggressive agents such as chloride, ammonia or abrasive cleaners when cleaning. Doing so may cause permanent damage or disfiguration to the components of the Caddy. Use the car shampoo as indicated on the label, use a kitchen cloth or sponge. Wring it out well before after wetting so no water is dripping from the cloth or sponge. 58 Caddy ATTENTION: Don’t use excessive amounts of water when cleaning especially around the tiller where most of the electronics are located and around the batteries in the back. Electronics and water don’t mix. Never use a high pressure cleaner or hose to clean the Caddy. ATTENTION: If you suspect that water may have penetrated the electronic parts of the scooter, do not switch the scooter ON, put it away in a warm and dry place and wait a minimum of 12 hours to let the water dry before using the scooter again. 8.2 Checking the PU tires The condition of wear of the PU tires needs to be checked regularly. The Caddy is equipped standard with PU tires, these are tires made from a durable plastic foam. The advantage is that these tires don’t need to be inflated and they can’t be punctured. When you use the Caddy daily, check the condition of the PU tires every month. Check if the tires are damaged, are there any bits hanging loose or are there cracks in the wall of the tire. Check if the profile of the tires isn’t worn to much, the depth of the profile needs to be a minimum of 1 mm. 8.3 Checking the inflatable tires Some dealers or customers prefer to order the Caddy with standard inflatable tires and tubes. The advantage of inflatable tires is they are less expensive to replace and they have a somewhat lower roll resistance than the PU tires (when their pressure is maintained at the right level). 59 Caddy ATTENTION: The tire pressure of inflatable tires needs to be checked before every trip! The tire pressure is a main factor in the range and stability of the Caddy. Check the tires every month for external damage. Check every month that the tire is securely on the rim, check the entire perimeter and on both sides of the rim. The accurate tire pressure is 2.4 bar.(35 PSI) Always use a pump with a pressure gage to get the right tire pressure, don’t over-inflate the tires. ATTENTION: When you over-inflate the tires, the tires may come of the rim. This can happen during inflation or after some time, usually this happens with a very loud bang and may cause an accident while you are driving the scooter. THEREFORE ALWAYS USE A PUMP WITH PRESSURE GAGE! 8.4 Checking the throttle levers Every month check the operation of the throttle levers, please follow these steps to do so: Make sure the scooter is OFF (key-switch). Squeeze the throttle handle to its far most position, now release it. It should jump back to the neutral position. Repeat this test twice for both drive directions (forward/reverse) 8.5 Checking the assembly Every 6 months check the assembly of the scooter as described in §2.7. 60 Caddy 8.6 Checking the parking brake Check your parking brake every 6 months, check the operation and the condition of the brake, please follow these steps: Try to push the scooter with the key switch in the OFF position. This test is successful if you cannot push the scooter. Switch the scooter ON with the key switch, repeat the test, again the test is successful if you cannot push the scooter. Sit on the scooter and push the throttle lever slightly, until you hear the parking brake click. This indicates the parking brake was released correctly. If you did not hear the click sound, please try again, you may have missed it because of background noise. If one the tests described above did not get the right result, you should call your dealer and get a service person to repair the scooter. The brake automatically compensates for wear and cannot be adjusted. Now continue to check the freewheel mechanism for the parking brake, please follow these steps: Switch the scooter OFF using the key switch. Rotate the knob for the freewheel mechanism clockwise as indicated in §3.8. Check if you can push the scooter freely, if so the test was successful. Now switch the scooter ON using the key switch. Check if you hear the alarm signal sound indicating the parking brake was released. If you can hear the uninterrupted signal the test was successful. Rotate the knob back into the original position for driving (§3.8) the signal should now stop. If one of the above tests does not produce the desired result, contact your dealer and ask for service. 61 Caddy 8.7 Replacing the batteries The batteries of the Caddy should be replaced when their capacity has reduced noticeably. You will know when you need to charge the scooter more often than normal or when the range of the scooter is less than it used to be. The ageing of the batteries is a gradual process and it is therefore sometimes difficult to say when exactly the batteries should be replaced. Depending on the intensity of the use and how deeply they are discharged on average, the batteries can be charged between 500 and 1000 times. This represents between 2 and three years of average use. Please only use the batteries indicated in §1.2 “Technical specifications”. You can get your dealer to replace the batteries for you, but if you want to replace the batteries by yourself, please make sure you understand and follow this wiring diagram in figure 23 . figure 23 62 Caddy 8.8 Discarding of old or damaged batteries 8.8.1 Discarding of old batteries Old batteries contain several valuable materials that can be recycled, they also contain materials that are harmful to man and the environment. For this reason batteries should never be discarded in the environment, but handed in at government appointed collection points for chemical waste and batteries. Please check with your local authorities to get the address of the collection point near you. Please make sure the batteries don’t get thrown away in the environment or in the garbage, not only is this illegal, it can also cause severe damage to the environment and to persons working in the garbage disposal service. 8.8.2 Discarding of damaged batteries Be extra careful when batteries are damaged and their housing is ripped or broken. The batteries contain an acid gel that can cause acid burns on the skin and the eyes. Acid can also cause damage to clothing other materials causing holes, discolouration and corrosion. ATTENTION: Always wear rubber household gloves when you want to handle batteries. Also protect your eyes when the housing is damaged. Place the damaged battery in a thick Polyethylene bag or sheet and close the bag or wrap the sheet carefully around it. Close it using adhesive tape and transport the battery to the appointed waste disposal point in your area. Clean the gloves and other materials that have been in contact with the acid gel in running water, wear eye protection while cleaning and protect your clothing. 63 Caddy ATTENTION: If the acid gel got into your eyes or on your skin despite the precautions taken, immediately rinse with running water. The eyes can be washed by using a small glass half filled with water. Place it over your eye and tilt your head backwards. Always contact your doctor or a first aid centre near you. 8.9 Programming the controller The Caddy is equipped with a programmable motor controller. This controller contains the program settings specific for a comfortable and safe usage of the Caddy. The controller is factory programmed to the standard values that should under normal circumstances not be changed for safety reasons. In some exceptional cases it may be necessary to change one or more settings in the programming. This can only be done by a trained professional who can overview the consequences of the changed settings. To be able to reach the controller for programming, you first have to remove the front cover on the tiller containing the headlight. Take out the 6 screws located at the back of the tiller . Now pull out the cover to reach the internal electronic controller . Connect the connector of the programmer to the controller (see figure 24): the window shows the connection. 64 Caddy Figure 24 ATTENTION: Only the indicated parameters are to be adjusted, and only in the direction as indicated. UP throttle becomes less to trembling TREMOR COMP sensitive hands. ACCEL MAX SPEED DOWN ACCEL MIN SPEED DOWN REV ACCEL MAX DOWN accelerates slower at high speed setting. accelerates slower at low speed setting. accelerates slower at high speed reverse setting. REV ACCEL MIN DOWN accelerates slower at low speed reverse setting. M1 MAX SPD DOWN reduces maximum speed at low speed setting. M2 MAX SPD DOWN reduces maximum speed at high speed setting. M1 MIN SPD DOWN reduces minimum speed at low speed setting. 65 Caddy M2 MIN SPD DOWN reduces minimum speed at high speed setting. M1 REV MAX SPD DOWN reduces maximum speed at low speed reverse setting. M2 REV MAX SPD DOWN reduces minimum speed at high speed reverse setting. ATTENTION: Disregarding above instructions may lead to dangerous situations for the user of the vehicle! ATTENTION: Disregarding above instructions means all warranty will be void and the product liability of the manufacturer will be drastically reduced. The person making the changes to the programming of the controller will be held liable for the consequences of the changes made! 66 Caddy 9. SERVICE AND REPAIRS Chapter 8 indicated which small maintenance and repair jobs you can undertake yourself to keep your Caddy in good condition. This chapter describes the regular service and repair work that should be done by your dealers service workshop. We advise you to make an appointment once every year to have your Caddy checked by your dealer. For phone numbers and addresses of dealers or maintenance workshops in your area, you can contact Afikim Electric Vehicles, the phone number and address is printed on the last page of this booklet. 9.1 Necessary annual maintenance. The following list of items should be checked annually by your dealer: Tires, profile, damage Rear wheel ball bearings, lubrication and play Front castor bearings, adjustment, lubrication. Motor and gear box, check brushes, check for damage Light check operation. Check functioning of all control elements switches etc. Check functioning of the battery charger Check functioning of the battery discharge indicator Check reset fuses Check wiring for breakage or damage Check wiring connections to the batteries Check connectors for corrosion and damage Check frame and paintwork for damage and corrosion 67 Caddy 9.2 Replacement parts All parts on the Caddy can be replaced and ordered separately by your dealer. Here is a list of the most important replacement parts. All parts must be replaced by an authorised mechanic Name part number Controller Front board Charger board Display board F1 SMT fuse slow blow 2.5 A F2 slow blow fuse 1.25 A Battery Fiamm 12V 18 Ah. Battery Portalac 12V 17 Ah. Rear wheel tire ø250x50 Front wheel tire ø250x50 Inflatable tire ø250x50 Inflatable tube 10”x2” PC00099 PC00100 PC00106 PC00103 FU00010 FU00005 AS00656 AS00125 9.3 Service manual Afikim Electric Vehicles has developed a service manual especially for use in the service workshop of dealers or at service points. This manual can be ordered by dealers and service workshops at Afikim Electric Vehicles and contains all information needed to maintain the Caddy scooters. The manual is in the English language. 68 Caddy 10 LABELLING 10.1 The type plate The Caddy type plate is located on the inside of the tiller as indicated in figure 25. Do not remove this label! Make sure it is readable, the label identifies the vehicle in case of warranty and the legal obligation of tracking and tracing the product in case of a factory recall. Figure 25 69 Caddy 10.2 Other labels 1. ON/OFF key switch This key switch switches the power to the controller of the scooter On and OFF. 2. Freewheel knob for parking brake In case you need to push the scooter, this knob will release the parking brake. WARNING: never use this function when you are on or near an incline. You may roll down the incline with no way to stop the scooter. 3. Battery reset fuse If there is an electrical problem in the battery wiring, this fuse will pop out and brake the circuits from the batteries. You can attempt to reset the fuse by pushing it back in after 10 minutes. If the fuse pos out again, call the dealer for service. 4. Charger point At this location you can connect the battery charger. Insert the charger plug on the battery charger before inserting the mains connection in the wall socket. 5. Charger circuit reset fuse If there is an electrical problem in the charger circuit of the scooter or in the charger line from the charger to the scooter, this fuse will pop and brake the circuits. You can attempt to reset the fuse after 10 minutes. If the fuse pops again, call the dealer for service. 70 Caddy 6. Danger of pinching This label marks spots where a danger of pinching your hands or fingers exists. Be careful handling these spots and make sure you read the warnings printed in this manual. 7. Warning typical use and safe slope This label indicates the typical usage of the scooter (inhouse use), the maximum user weight (100 kg.) and the maximum safe slope (3°) 10.3 Labels and printing on the tiller 71 Caddy 8. ON/OFF light Green light is lit when you turn the key switch to the ON position. 9. Reverse driving This arrow indicates the left throttle handle is intended for reverse driving. 10. Forward driving This arrow indicates the right throttle handle is intended for forward driving. 11. Light symbol The light symbol indicates the location of the red light switch at the lower front of the panel below the symbol. 12. Trumpet symbol The trumpet symbol indicates the location of the yellow horn switch located at the lower front of the panel below the symbol. 13. Tortoise symbol This symbol indicates the low-speed setting of the high-speed/ lowspeed switch located below the symbols. 14 Hare symbol This symbol indicates the high-speed setting of the high-speed / lowspeed switch located below the symbols. 15. Battery discharge indication lights The four red lights with the triangular symbol underneath show the charge status of you batteries. 72 Caddy 11. CE DECLARATION OF CONFORMITY 11-12-2013 We "AFIKIM ELECTRIC VEHICLES" LOCATED IN kibbutz Afikim, Israel, Manufacturers Electric Powered Vehicles for elderly and physically challenged. As detailed hereunder, that are place in European market, Declares that our products conforms and meets the essential requirements set out in Annex I of the Medical device Directive EEC 93/42EEC. The product approved by TNO in accordance the safety standard of EN-12184. Product: CADDY Model: CA-1 With in those requirement we prepared the required technical documentation, put into place corrective action and vigilance procedures and have appointed MEDES Ltd. POB 231 From Stanmore, Middlesex, HA7 4YA England. Tel/Fax 44-181-95409964 To act as our Authorized Representative in the European Community and register us with the competent authorities in England. The Afikim Electric Vehicles Ref. Registration Number with the Competent Authority (UK) is: CA007430. By MEDICAL DEVICE AGENCY - London SEI 6TQ Tel: 02079728000 [email protected] Signature: Full name; Amnon Haviv. Date: 11.12.2013 AFIKIM ELECTRIC VEHICLES KIBBUTZ AFIKIM, 15148 ISRAEL 73 Caddy 12. WARRANTY STATEMENT Afikim Electric Vehicles strives to bring excellent products to the market, however from time to time problems may occur. This warranty covers all manufacturing faults and defects that may come to light in the parts and constructions of the product for a period of 24 months calculated from the date of shipment ex factory. In this case the date on the shipping bill. The warranty is limited to the value of the faulty parts or construction and the replacement thereof. It explicitly excludes any damage arising from the fault or defect. It is at the discretion of Afikim Electric Vehicles to decide if the product will be repaired or a replacement product will be offered. For the following parts the period of the warranty is not 24 months, but the warranty expires the moment the product is put into operation by the user (i.e. when the box has been opened): Tires and tubes, rubber parts, upholstery parts of the seat, plastic parts, the light unit and the light bulb, bumpers, paintwork and the floor plate. Batteries do not come under the general conditions of this warranty but come under the warranty of the battery supplier. Conditions of the warranty Shipments with damaged packaging should be reported without delay to Afikim Electric Vehicles and to the shipper or transportation company such that inspection of the goods by an insurance official can take place. Warranty claims should be made on the appropriate form. Forms will be made available by Afikim Electric Vehicles upon request. Warranty will be void if the vehicle has not been used in accordance with the limitations and instructions as described in this manual. Damage as a result of an accident, a collision in traffic or damage as a result of “force major”, war or a terrorist attack are also excluded from this warranty. 74