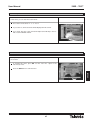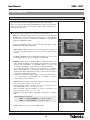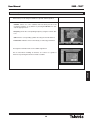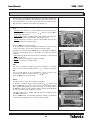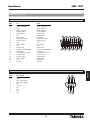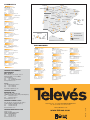
1
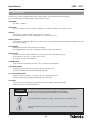
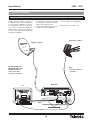
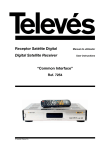
Receptor Satélite Digital
Instrucciones de uso
Digital Satellite Receiver
User manual
“RSD - 7297”
© Copyright, Televés, S.A.
User Manual
. . . . . . . . . . . . . . . . . . . . . . . . . . . . . . . . . . . . . . . . . . . . . . . . . . . . . . . . . . . . . . . . . . . . . . . . . . . . . . . Pág.
1.- Safety measures . . . . . . . . . . . . . . . . . . . . . . . . . . . . . . . . . . . . . . . . . . . . . . . . . . . . . . . . . . . . . . . . . . . . . . . . . . . . . .
32
2.- Before beginning . . . . . . . . . . . . . . . . . . . . . . . . . . . . . . . . . . . . . . . . . . . . . . . . . . . . . . . . . . . . . . . . . . . . . . . . . . . . . .
33
2.1.- Preface
.............................................................................
33
2.2.- General specifications . . . . . . . . . . . . . . . . . . . . . . . . . . . . . . . . . . . . . . . . . . . . . . . . . . . . . . . . . . . . . . . . . .
33
2.3.- Equipment . . . . . . . . . . . . . . . . . . . . . . . . . . . . . . . . . . . . . . . . . . . . . . . . . . . . . . . . . . . . . . . . . . . . . . . . . . .
33
3.- Description of panels and connections . . . . . . . . . . . . . . . . . . . . . . . . . . . . . . . . . . . . . . . . . . . . . . . . . . . . . . . . . . . . .
34
4.- Installation of equipment
36
4.1.- Connections
.......................................................................
.........................................................................
36
5.- Ready to begin . . . . . . . . . . . . . . . . . . . . . . . . . . . . . . . . . . . . . . . . . . . . . . . . . . . . . . . . . . . . . . . . . . . . . . . . . . . . . . . .
37
5.1.- How to start . . . . . . . . . . . . . . . . . . . . . . . . . . . . . . . . . . . . . . . . . . . . . . . . . . . . . . . . . . . . . . . . . . . . . . . . . .
37
5.2.- How to select TV or RADIO channels . . . . . . . . . . . . . . . . . . . . . . . . . . . . . . . . . . . . . . . . . . . . . . . . . . . . . .
37
5.3.- How to adjust the volume . . . . . . . . . . . . . . . . . . . . . . . . . . . . . . . . . . . . . . . . . . . . . . . . . . . . . . . . . . . . . . .
37
5.4.- Mute
...............................................................................
38
5.5.- Audio language . . . . . . . . . . . . . . . . . . . . . . . . . . . . . . . . . . . . . . . . . . . . . . . . . . . . . . . . . . . . . . . . . . . . . . .
38
5.6.- Recalling previous channel . . . . . . . . . . . . . . . . . . . . . . . . . . . . . . . . . . . . . . . . . . . . . . . . . . . . . . . . . . . . . .
38
5.7.- Recalling previous channel and auto-saving . . . . . . . . . . . . . . . . . . . . . . . . . . . . . . . . . . . . . . . . . . . . . . . . .
38
5.8.- Onscreen pause . . . . . . . . . . . . . . . . . . . . . . . . . . . . . . . . . . . . . . . . . . . . . . . . . . . . . . . . . . . . . . . . . . . . . . .
38
5.9.- Electronic Programming Guide (EPG) . . . . . . . . . . . . . . . . . . . . . . . . . . . . . . . . . . . . . . . . . . . . . . . . . . . . . .
39
5.10.- How to use the Favourite Channels List . . . . . . . . . . . . . . . . . . . . . . . . . . . . . . . . . . . . . . . . . . . . . . . . . . .
40
5.11.- Teletext function
.....................................................................
40
..................................................................................
41
6.- Main Menu
7.- OSD menu language . . . . . . . . . . . . . . . . . . . . . . . . . . . . . . . . . . . . . . . . . . . . . . . . . . . . . . . . . . . . . . . . . . . . . . . . . . .
41
8.- Box Setup menu . . . . . . . . . . . . . . . . . . . . . . . . . . . . . . . . . . . . . . . . . . . . . . . . . . . . . . . . . . . . . . . . . . . . . . . . . . . . . .
42
8.1.- Channels setup . . . . . . . . . . . . . . . . . . . . . . . . . . . . . . . . . . . . . . . . . . . . . . . . . . . . . . . . . . . . . . . . . . . . . . .
42
8.2.- Changing the Password (PIN) . . . . . . . . . . . . . . . . . . . . . . . . . . . . . . . . . . . . . . . . . . . . . . . . . . . . . . . . . . . .
44
8.3.- Ajdusting the clock . . . . . . . . . . . . . . . . . . . . . . . . . . . . . . . . . . . . . . . . . . . . . . . . . . . . . . . . . . . . . . . . . . . .
44
8.4.- VCR timer
45
...........................................................................
8.5.- Factory values (Restore default values) . . . . . . . . . . . . . . . . . . . . . . . . . . . . . . . . . . . . . . . . . . . . . . . . . . . . .
46
8.6.- Audio selection . . . . . . . . . . . . . . . . . . . . . . . . . . . . . . . . . . . . . . . . . . . . . . . . . . . . . . . . . . . . . . . . . . . . . . .
46
8.7.- TV Format . . . . . . . . . . . . . . . . . . . . . . . . . . . . . . . . . . . . . . . . . . . . . . . . . . . . . . . . . . . . . . . . . . . . . . . . . . .
47
8.8.- Box Info . . . . . . . . . . . . . . . . . . . . . . . . . . . . . . . . . . . . . . . . . . . . . . . . . . . . . . . . . . . . . . . . . . . . . . . . . . . . .
47
9.- System Setup menu . . . . . . . . . . . . . . . . . . . . . . . . . . . . . . . . . . . . . . . . . . . . . . . . . . . . . . . . . . . . . . . . . . . . . . . . . . . .
48
9.1.- LNB Setup
..........................................................................
48
9.2.- Dish Setup
..........................................................................
49
9.3.- Satellite Setup
.......................................................................
50
9.4.- Transponder Setup . . . . . . . . . . . . . . . . . . . . . . . . . . . . . . . . . . . . . . . . . . . . . . . . . . . . . . . . . . . . . . . . . . . .
51
9.5.- DiSEqC 1.2 . . . . . . . . . . . . . . . . . . . . . . . . . . . . . . . . . . . . . . . . . . . . . . . . . . . . . . . . . . . . . . . . . . . . . . . . . .
52
..............................................................
54
10.- Automatic scan . . . . . . . . . . . . . . . . . . . . . . . . . . . . . . . . . . . . . . . . . . . . . . . . . . . . . . . . . . . . . . . . . . . . . . . . . . . . . .
9.6.- Code download (software)
55
Menu structure . . . . . . . . . . . . . . . . . . . . . . . . . . . . . . . . . . . . . . . . . . . . . . . . . . . . . . . . . . . . . . . . . . . . . . . . . . . . . . . . . .
56
Connector description . . . . . . . . . . . . . . . . . . . . . . . . . . . . . . . . . . . . . . . . . . . . . . . . . . . . . . . . . . . . . . . . . . . . . . . . . . . .
57
Technical specifications . . . . . . . . . . . . . . . . . . . . . . . . . . . . . . . . . . . . . . . . . . . . . . . . . . . . . . . . . . . . . . . . . . . . . . . . . . .
58
Guarantee
59
..................................................................................
31
ENGLISH
ÍNDEX
“RSD - 7297”
User Manual
“RSD - 7297”
1.- Safety measures
The Receiver you have just purchased has been manufactured to meet international safety standards.
We recommend that you carefully read the safety instructions below.
POWERING:
90 - 260 V~ 50/60 Hz.
OVERLOAD:
Do not overload the sockets, extenders or adapters to avoid a fire hazard or risk of electric shock.
LIQUIDS:
Take care not to spill any liquids over the Receiver, or splash it.
Avoid placing recipients or objects with liquids on or next to the Receiver.
SMALL OBJECTS:
Avoid placing small metallic objets close to the unit. These could accidentally enter through the ventilation slots and
cause serious damage.
CLEANLINESS:
Unplug the Receiver from the mains before cleaning it.
Use a slightly damp, soft cloth (no detergent) to clean the outside of the Receiver.
VENTILATION:
Place the Receiver in a well-ventilated area so that the slots are not blocked in any way.
Avoid exposure to the sun or to other sources of heat.
Do not place on top of other equipment.
CONNECTIONS:
Carry out the recommended connections only to avoid any possible damage.
LNB CONNECTIONS:
Switch the Receiver off before connecting or disconnecting the LNB.
IF YOU DO NOT DO THIS, YOU MAY DAMAGE THE LNB.
TV or VCR CONNECTIONS:
Switch the Receiver off before connecting or disconnecting the TV or VCR.
IF YOU DO NOT DO THIS, YOU MAY DAMAGE THE TV OR VCR.
LOCATION:
Place the Receiver inside where it is protected from the rain, lightning and direct sunlight.
Install the Receiver in a horizaontal position.
WARNING
RISK ELECTRICAL SHOCK
DO NOT OPEN
TO REDUCE THE RISK OF ELECTRIC SHOCK, DO NOT TAKE THE COVER OFF.
NO PART OF THE RECEIVER CAN BE REPAIRED BY THE USER.
PLEASE CONSULT A QUALIFIED TECHNICIAN FOR ANY REPAIRS
This symbol indicates "dangerous voltage" - there is the risk of an electric shock.
This symbol indicates that there are some important instrutions for this particular
product.
32
User Manual
“RSD - 7297”
2.- Before beginning ...
2.1.- Preface
improve various different functions.
This manual also describes in detail a
series of functions that are only available in this Receiver, so that you can use
them properly.
Please be sure to read this manual so
that the Receiver is installed and used
correctly, and make sure to keep it in a
safe place for future reference.
- High quality video and audio.
- Remote control.
- Access control.
- User-friendly onscreen menu.
- It offers various types of LNB switching, output modes and monitors.
- Automatic
PAL/NTSC.
- Transponders that have been preprogrammed to various satellites.
- Auto-saving of previous channel and
auto-return.
- Displays the transponder information.
- 4 digit display.
- Scans for recently added transponders.
- Software upgrade function.
A Digital Satellite Receiver is a product
that enables you to see a large variety
of channels that are supplied by a satellite. This User manual explains everything from how to install the Receiver to
the steps that need to be taken to
2.2.- General specifications
- Favourite channels list.
- Compatible DiSEqC 1.2 / USALS.
- Channel control via the “move”,
“lock”, “favourites”, "delete" and
“add”.
- Program information on the EPG
(Electronic Programming Guide).
support
system
- Timer.
- Clock.
- Teletext function
ENGLISH
2.3.- Equipment
Check that all of the parts are in the
box:
1 - Satellite Receiver RSD-7297
1 - Remote control
2 - “AAA”, “LR03” or “AM-4” batteries
- - User manuals
33
User Manual
“RSD - 7297”
3.- Description of panels and connections
Fig. 1
-
Button
Display
Fig. 2
-
Name
LNB IN
IF OUT
TV
VCR
VIDEO
AUDIO R
AUDIO L
RS232
POWER
Fig. 3
-
Button
MUTE
ALT
M/A
TELETEXT
EXIT
MENU
FAV
P/L
, , ,
OK
,
PG-/PG+
0 ... 9
Front Panel
Function
It switches from normal operational mode to standby.
Goes up through the channels.
Goes down through the channels.
In normal mode, this displays the channel number; in STANDBY mode it displays the time.
Rear Panel
Function
Satellite antenna’s signal input.
Satellite signal output to connect to another receiver.
To connect to the TV via a SCART connector.
To connect to a VCR via a SCART connector.
Video signal output.
Audio output (Right channel).
Audio output (Left channel).
Connection to a serial port or another receiver to update the software.
ON/OFF switch.
Remote control
Function
Switches between normal operational mode and standby.
Switches between TV or RADIO channels. Switches between TV list and Radio list.
Switches the sound off.
Displays information on the channel that you are watching.
If you press it again, the Electronic Programming Guide appears onscreen.
Returns to the previous channel.
Selects the different types of audio.
Activate the Teletext menu, if this is emitted.
Returns to the previous menu within the larger menus.
Displays the main menu onscreen.
Activates the favourite channel list.
Activates a list with all of the locked channels.
The cursors to move through the menu options.
Executes the selected option in the menu and enters the value in any input mode or it displays the channel list while watching a program.
Increases or decreases the volume.
Goes up or down through the channel numbers.
Selection of a channel to watch. Direct input of data in the menu.
34
User Manual
“RSD - 7297”
Fig. -1-
Fig. -2-
> 50°C
Fig. -3-
35
< -5°C
ENGLISH
> 95 %
User Manual
“RSD - 7297”
4.- Installation of Equipment
4.1.- Connections
This section explains how to install the
satellite receiver. Please consult the
manual that comes with the equipment
to carry out the installation of the outdoor equipment such as the antenna.
If you want to add extra equipment,
please make sure that you read the
section of this manual that deals with
this type of installation.
1- Install the antenna and fix it so that it
is facing directly towards the satellite. After this, connect the antenna
cable to the satellite receiver.
2- Connect the satellite receiver tot he
TV and to the other equipment.
3- Set the receiver’s menu according to
the TV and the other equipment.
The receiver is now ready to use.
Terrestrial reception
Satellite reception
DO NOT PLUG THE
RECEIVER INTO THE
MAINS until all the
cables have been
correctly connected.
Note:
- All of the cables are
shielded.
RSD-7297
TV
VCR
(Recommended)
36
User Manual
“RSD - 7297”
5.- Ready to begin
5.1.- How to start
Switch the TV on as well as all the additional equipment that may be
connected to the system.
Switch the satellite receiver on, by pressing the ON button (
receiver or on the remote control.
Select the TV or Radio mode using the
) on the
button.
symbol and the
The TV mode channels can be identified by the
Radio mode channels can be identified by the
button.
(The default mode is the TV mode).
5.2.- How to select TV or RADIO channels
The TV/Radio channels can be selected using both the remote control and
the buttons on the receiver.
Press the
button to select the desired service mode (TV channels or radio channels).
When you can see the channel, press the PG+ button to select the following channel, or the PG- button to select the previous channel.
By pressing the i button, a window appears on the screen with information about the programme you are watching.
5.3.- How to adjust the volume
The volume can be adjusted using the remote control.
To increase the volume, press the
button, and to decrease it,
press the
button on thre remote control.
The volume levels can be seen on the indicator that appears
onscreen.
37
ENGLISH
The selected channels will appear straight away with the corresponding
information at the bottom of the screen.
User Manual
“RSD - 7297”
5.4.- Mute
Press the MUTE button to mute the sound.
To switch the sound back on again, pres the same button again.
The sound will return with the same volume as before.
To adjust the volume press the
or
buttons.
5.5.- Audio language
Some channels are transmitted in various audios. This depends on whether
this information is included in the signal that is sent to the Receiver.
In the case of TV channels, the different audios tend to correspond to the
different languages in which the channel is emited (for example, in the case
of “Euronews” - HOTBIRD, the Spanish language is received in the fifth
audio). As regards Radio programmes, each audio identifies a different radio
station (for example, the programme “Radio Esp” - ASTRA, contains 10
Spanish radio stations - 40 principales, M80, etc...-).
Press the M/A button to activate the menu that contains the different
transmission languages.
Select the desired audio from those available using the
buttons and press OK.
and
To exit this menu, press EXIT.
5.6.- Recalling previous channel
If you want to watch the channel that you were just previously watching but you cannot remember the channel
number, simplly press ALT.
5.7.- Recalling previous channel and auto-saving
If the flow of electricity is interrupted for any reason (the receiver is unplugged or the electricity supply interrupted),
when the receiver is connected once again to the current, the TV / RADIO channel that you were watching automatically appears onscreen with the Audio that was selected without having to press any buttons.
5.8.- Onscreen pause
If you wish to pause the image onscreen while watching a programme, press the 0 button. To return to the programme, press 0 again.
It is necessary to point out that when you pause an image onscreen, the programme that you were watching continues with its transmission as normal, so that during the time that the Pause is on, you will be missing the programme.
38
User Manual
“RSD - 7297”
5.9.- Electronic Program Guide (EPG)
The RSD-7297 receives and stores information on the TV and Radio channels that are being watched. This includes detailed information on the time
schedule of the next programme. This guide is very easy to use, as it displays all the information in a single window onscreen.
The information provided by this guide consists of the channel number, the
channel name, the programme name and the date and time of emission
(when it starts and when it finishes).
Using the
list.
button you can change from the TV list to the Radio
Press the i button while tuning the TV or Radio channels. The information window will appear with info on the channel that is selected at that
moment. Press the i button again while the information window is visible
and you will see the Electronic Programming Guide (EPG).
The EPG has three main sections. One of these is a list of the number
and name of the channels. With the
or
buttons, you can move
from one channel to another.
Immediately to the right, there is a small screen where you can see the
channel that you have selected in the list.
Finally, a window appears where you can see information on the programme that is on at the moment, as well as the starting and finishing
times.
By pressing the
button, you can access a list with all of the programmes that are transmitted by that channel as well as their transmission
times. To move through them, use the
or
buttons. To return to the
channel list, press the button.
Press the EXIT button to exit the EPG and access the selected channel.
Note:
- To receive the programme schedule correctly, you must first adjust the LOCAL TIME to the GMT (Greenwich Mean Time).
- The time that appears onscreen is provided by the supplier, so this information may be incorrect in certain channels.
39
ENGLISH
The information that appears in the guide comes with the signals transmitted by the service supplier. If a channel does not have any data for
the EPG, a message will appear onscreen indicating this.
User Manual
“RSD - 7297”
5.10.- How to use the Favourite Channels List
You can easily select your favourite TV or Radio channels using the
Favourite Channels List. This list only contains your personally selected
favourite TV or Radio channels.
Press the
button to select the TV or Radio channels list.
While watching a TV channel or listening to a Radio channel, press the
OK button to see the General Channels List. Next press the FAV button
to access the Favourite Channels List.
Select any channel using the
button to go to this channel.
and
buttons and press the OK
If there are no channels in the Favourites List, the favourites menu will
not appear onscreen and instead, the message "No preferred channels"
will appear.
Press the EXIT button to exit the Favourite Channel List.
See point 8.1.- “Channel Setup” from section 8.- “Box Setup Menu” to
find out how to create the Favourite Channels List.
5.11.- Teletext function
Press the TELETEXT button on the remote control to activate the
Teletext menu.
In this menu you can select all of the teletext services that are supplied
by the service supplier.
The teletext service will be displayed as normal.
Even if your TV does not dispose of a Teletext decoder, you can still see
it onscreen, as the Receiver decodes it automatically.
If your TV already has a Teletext decoder, you can also see it using the
TV remote control.
To exit the "Teletext" menu, press the EXIT button.
NOTE: Not all service providers supply this type of information.
40
User Manual
“RSD - 7297”
6.- Main Menu
Press the MENU button when watching a channel and the main menu
will appear onscreen.
Select one of the menu options and press OK to execute it.
Press the EXIT button to exit the main menu and return to the TV or
Radio channel you were watching.
7.- OSD Menu language
In this menu you can choose the language of the onscreen menus.
The languages that are available are: English, German, French, Spanish,
Italian, Portuguese, Polish and Turkish.
Press the MENU button on the remote control to activate the main
menu.
The first menu option that appears selected by default is the -Language
Setup-.
ENGLISH
You can see that a flag icon appears next to the chosen language.
If you want to change this language, press OK to access the languages.
With the
or
buttons, select the new language and press OK.
When you go through the different languages, the menu displays the
flag that corresponds to each one.
41
User Manual
“RSD - 7297”
8.- Box Setup Menu
8.1.- Channels Setup
This menu lets you create / edit the favourite channels list, it can move,
lock, delete and add new channels to the list.
After editing, the remaining channels are organised automatically.
The channels with the
symbol are scrambled.
Press the MENU button on the remote control to activate the main
menu.
button, select the -Box Setup- option and press OK
With the
or
to access this submenu. Select the -Channel Setup- option and press
OK. The menu “Channel Explorer” will appear, where you will see the
different editing options available and the list of all the channels that
have been stored in the receiver.
This menu is divided into two groups. To the left, -Channel Explorerwhere all of the channels that are available appear. To the right, -Listwhere the options that you have are displayed. You can move from one
group to the other by pressing the
and buttons.
If you are in either group, you can select the options within each group
by using the
and buttons.
The options for editing the channels are:
- Favourite channels: With the cursor on this option, move to the group
on the left-hand side with the button.
To add a channel to the List, press the OK button over the new channel. The symbol which indicates Favourite, will appear. To remove it
from the list, press the OK button again over the channel name.
The symbol (
) over a channel indicates that this channel belongs to
a favourite channels list.
All of the channels that you mark by pressing OK over them, will become part of the Favourite Channels List when you exit the menu.
To exit the menu, press EXIT.
- Lock channels: With the cursor on this option, move to the left using
the button.
To block a channel, press the OK button over the chosen channel. A
symbol will appear indicating this new status. If you wish to unblock it,
press OK again over the channel, and the symbol will disappear.
The symbol (
) over a channel indicates that this channel is blocked.
The channels’ new status will come into effect when you exit this
menu.
To exit the menu, press EXIT.
To access any channel that is blocked, you must enter the password.
42
User Manual
“RSD - 7297”
- Delete channels: With the cursor over this option, move to the left by
pressing the
button.
To erase a channel, press the OK button over the chosen channel. A
symbol will appear indicating its new status. You can select various
channels to erase in one go, by pressing OK over each one. By pressing OK again over a channel that was already marked, you de-select
the channel and it will not be erased.
To erase all channels of one alone time, press ALT key and all channels
will be marked by the symbol (
).
To erase channels that have been marked, press EXIT.
Whether you want to erase one channel, various channels or all of
them, a new window will appear asking for confirmation to erase them
(YES) or to exit the menu without carrying out any modifications (NO).
- Move channels: If you want to move a channel from its current position in the general list, you must first select this channel in the list and
then go to the right-hand side by pressing the button.
Place the cursor on the “Move” option, enter the number of the new
position of the channel into the remote control. Press OK.
To exit the menu press the EXIT button.
- Edit the PID and PCR values: If you want to modify the Audio and
Video PID parameters or the PCR of a channel, you can do so using
this menu.
Place the cursor on the “Video”, “Audio” or “PCR” option and enter the
new values for these option in the remote control.
To exit the menu press the EXIT button.
- Add PID (Manual Scan): If you want add a new channel to the list of
channels but you do not want to carry out an automatic search, this
option allows you to do so. First, you must know the Video PID, Audio
PID and PCR values of the new channel as well as the frequency, symbol rate and polarity.
To move through the options, use the
and
buttons. The
“Satellite name” and “Polarisation” values should be selected using
the
and buttons.
Once all of the values have been introduced, press OK. The new channel will be added to the list.
43
ENGLISH
Place the cursor on the -Add PID- option and press OK.
A new menu will appear where you will be able to enter the values
required in order to scan for the new channel.
User Manual
“RSD - 7297”
8.2.- Changing the Password
The password consists of 4 numbers, which will never appear onscreen.
Instead, some yellow icons appear and each time you enter a number, this
will change to green.
When you select any of the options in the menu that imply theuse of the
secret code (access to blocked channels, changing the channel list, etc.)
the message “Enter Code” will appear onscreen, asking you to enter your
password.
If the password that is entered is incorrect, the message “Invalid code” will
appear onscreen, which denies access.
To change the current code, enter the current code using the numeric
buttons on the remote control in the field “Enter Old Code”. The factoryset default value is “0 0 0 0”.
Enter the new password in the field “Enter New Code”.
Confirm the new password by entering it again in the field “Confirm New
Code”. If the two do not coincide, an error message will appear onscreen. If they do coincide however, the message “Password changed” will
appear.
From now on, you should always use the new code when this is required.
8.3.- Adjusting the clock
The receiver disposes of a Clock to indicate the time. This Clock adjusts
automatically to the information provided by the service supplier within the
actual satellite signal.
The service supplier sends two types of time information, one that is relativ
e to the current time (to be displayed by the Clock) and another that informs
the user of the time schedules of the different programmes (which is used
by the EPG).
Both types of information are sent in GMT format, so you must adjust the
Receiver by entering the time difference in your country.
By using the
and
buttons you can increase (+) or decrease (-) the
time as indicated in the “Hours” and “ Minutes” options as regards GMT.
The “Hours” option increases and decreases in one-hour steps, while
the “Minutes” option increase and decreases in thirty-minute steps.
Press OK button to store.
NOTE: Not all suppliers provide this type of information
44
User Manual
“RSD - 7297”
8.4.- VCR Timer
The receiver has a timer which can automatically switch the Receiver on
and off at a specified time. It has 8 positions, in which you can record the
same amount of programmes. You simply have to enter the following data.
This menu has two columns; the left-hand column -Service List- where the
list of all the available channels appears and the right-hand column -Timer
Settings - where you can enter the data that you wish.
By default, the cursor always appears on the channel list. First select the
channel that you want to see when you switch the receiver on. User the
or
buttons to do this. Press OK over the selected channel. The cursor
will now automatically appear on the right-hand column to enter the data:
- Timer no..- Select one of the 8 available programmes by using the
buttons.
or
- Timer Mode.- By default, this appear in “Once” mode (one time), but you
can select “Daily” (everyday), “Weekly” (once a week), “Monthly” (once a
month) or “Off” (de-activated). Select one of these options by using the
or buttons.
- Date.- By default the current day and month appear. You can change
this date by using the numeric buttons (0 .. 9) on the remote control.
- Start time.- Using the numeric buttons, enter the time that the programme starts.
Press OK to confirm all of the programme data. This will take you back to
the service list.
Repeat these same steps to record other programmes.
The “General List” / “Timer List” option lets you return to the general list
whenever you wish or else see a list of the timers set to record.
If you wish to eliminate any of these settings, you can do so by selecting it
from the programme list and pressing OK over the “Delete” option.
To exit this menu, press EXIT.
45
ENGLISH
- Duration.- Using the numeric buttons, enter the estimated duration of
the programme.
User Manual
“RSD - 7297”
8.5.- Factory values (Restore default values)
This option will change all of the parameters that you have entered back to
those established by default at the factory.
The receiver will carry out the following changes when you press OK
over the “Factory Default”:
- All of the specifications entered for the transponders, will return
back to the default values set at the factory.
- All of the channels on the list will be erased and replaced by those
pre-set at the factory.
- All of the options installed by the user will be replaced by those
pre-set at the factory.
When you select this option, a warning message will appear onscreen
requesting confirmation.
8.6.- Audio selection
In this menu, you can select the type of audio used by the loudspeakers.
Select one of the three options; “Stereo”, “Left Audio” or “Right Audio”
by using the
or
buttons.
If you want the audio that you have chosen to be permanent, press OK.
46
User Manual
“RSD - 7297”
8.7.- TV Setup
In this menu, you can select the screen format.
The screen format can be "4 : 3" or "16 : 9".
If you select 4:3, all the channels will be displayed in this format.
If you select 16:9, the screen format will adjust automatically to the format of each individual channel.
8.8.- Box Info
This option opens an onscreen window with some basic information about
the receiver.
To activate this menu, press OK over the “Box Info” option in the
-Box Setup- menu.
ENGLISH
Press the EXIT button to exit the menu.
47
User Manual
“RSD - 7297”
9.- System Setup menu
9.1.- LNB Setup
This menu lets you enter the configuration parameters of the system.
Access the menu by pressing with the OK button over the “System Setup”
option of the main menu. You can assign satellites, LNBs and switches to
16 antennas in this menu.
You can save up to 16 types of configuration for the antenna.
Select the “LNB Setup” option in the -System Setup- menu by pressing
the OK button over it. Use the numberic buttons or the
and
buttons to select the total nº of LNBs that are available in your installation
and press the OK button again.
Assign the appropriate values to each of the following options, which
correspond to each LNB configuration:
- Type of LNB: Indicate if the LNB located on the antenna is universal or
not. If it is, the “High Frequency” and “Low Frequency” option remain
inactive.
- Lo. Freq. / Hi. Freq.: Enter the appropriate frequency for each of the
bands (high and low) if you are not using a universal LNB.
- DiSEqC: If in the -Number of LNB’s- option you have selected “1”, the
option appears as DiSEqC 1.2 by default, corresonding to a motorised
antenna and controlled by a compatible DiSEqC 1.2 motor. The
“< DiSEqC 1.2 disabled >” option will become active immediately.
If in the -Number of LNB’s- option you have selected “2”, you will dispose of the “DiSEqC 1.0” or “Tone Burst” options, corresponding to a
fixed antenna and a multisatellite system; or else two fixed antennas
orientated towards different satellites.
Finally if in the -Number of LNB’s- option you have selected the LNB nº
> “3”, you will dispose of the “DiSEqC 1.0” or “DiSEqC 1.1” options,
corresponding to various antennas.
- Switch: With the -DiSEqC- option in “Tone Burst” mode you can select
one of the following options: “No”, “A” or “B”.
With the -DiSEqC- option in “DiSEqC 1.0” mode you can select one of
the following options “No”, “A”, “B”, “C” or “D”.
With the -DiSEqC- option in “DiSEqC 1.1” mode you can select one of
the following options “No”, “1”, “2”, ... “16”.
Regardless of the type of switch, each input corresponds to a specific
LNB.
Note: Default factory preset:
LNB1 => Satellite HOTBIRD => Port “A” of switch
LNB2 => Satellite ASTRA => Port “B” of switch
- Power: Select “On” or “Off” for the LNB powering.
48
User Manual
“RSD - 7297”
9.2.- Dish Setup
In this menu you can assign a satellite to a specific antenna position.
- Satellite: Select one of the satellites that have been pre-set in the
receiver by using the
,
buttons or pressing the OK button to activate the pop-up menu.
- Frequency: Enter the corresponding frequency using the numeric buttons.
- S/R: Enter the corresponding symbol rate using the numeric buttons.
- Polarisation: Indicates if it is horizontal (H) or vertical (V) polarisation.
The Signal Level window tells us the satellite signal level.
ENGLISH
This is useful when installing an antenna, as it serves as a guide for
when we are pointing the antenna towards a satellite.
49
User Manual
“RSD - 7297”
9.3.- Satellite Setup
This menu lets you modify the specifications concerning a satellite position. To do this, press OK over the -Satellite Setup- option. In the submenu that appears you can carry out a channel scan, modify the existing channels, or eliminate those that do not interest you.
Scan:
- Satellite name: Select one of the satellites that have been pre-programmed into the receiver using the
,
buttons or press OK to
activate the pop-up menu.
- LNB number: Assign an LNB number to that satellite. The LNB number depends on those created in the “LNB Setup” section.
- FTA/All: Indicate if you want to scan all of the satellite channels (ALL)
or only the free-to-air channels (FTA).
Press the OK button to save the data.
In the confirmation window that appears, indicate if you want to carry
out the scan (YES) or if you want to cancel the operation (NO).
During the scan, if you press the EXIT button, a small window will appear
where you must indicate what you would like to do with the scanning
operation:
- Skip: Eliminates all the data found until the cancellation command and
saves the rest.
- Cancel: Eliminates all the data found in the satellite.
- Continue: Continues to search for data.
Edit:
This lets you change the LNB that has been assigned to a satellite.
Select one of the active satellites with the
or
buttons and press
OK.
The cursor will appear on the “LNB Number” option so that you can
select which number you require using the
or buttons.
Press the OK button to save the data.
Delete:
This option lets you erase all of the data of a satellite.
To eliminate a satellite, select it in the list with the
or
buttons and
press the OK button over the one you have chosen. A mark will appear
with a symbol indicating its new status. If you wish to de-select it, press
the OK button again over the satellite, and the symbol should disappear. You can mark as many satellites as you wish.
The ( ) symbol over a satellite indicates that this satellite has been
selected for elimination.
Press the EXIT button. A small window appears asking for confirmation
to eliminate the satellite (YES) or cancel the operation (NO).
50
User Manual
“RSD - 7297”
9.4.- Transponder Setup
This menu lets you modify the specifications that correspond to a transponder. To do so, press OK over the -Transponder Setup- option. In the
submenu that appears you can add a new transponder, modify the existing transponders or eliminate those that you do not want.
Add:
- Satellite name: Select one of the satellites that have been pre-programmed in the receiver with the
,
buttons or press OK to activate the pop-up menu.
- Frequency: Using the numeric buttons, enter the frequency that
corresponds to that transponder.
- Symbol rate: Using the numeric buttons, enter the symbol rate that
corresponds to that transponder.
or
buttons, indicate the type of polarisa- Polarisation: Using the
tion that corresponds to that transponder.
Press the OK button to start the channel scan in the transponder.
During the search, if you press EXIT, you will be requested to enter your
secret code to cancel the operation.
Edit:
This lets you change the frequency, symbol rate and polarity that has
been assigned to a transponder
Select one of the transponders from the list with the
and press OK.
or
buttons
The cursor is situated in the first field so that you can enter the new
data. To do so use the numeric buttons or the
or
buttons. Go to
the next field by pressing the
or
buttons.
Delete:
This option lets you erase all the data of a transponder.
To eliminate a transponder, select it in the list with the
or
buttons
and press OK over it. It will now be marked with a symbol thereby indicating its new status. If you want to de-select it, press OK again over
the transponder and the symbol will disappear. You can mark as many
transponders as you wish.
The ( ) symbol over a transponder indicates that this transponder has
been selected for elimination.
To be able to check which channels belong to a specific transponder
before eliminating it, press the
button over that transponder. A list
will appear with all of the channels that are included in the transponder.
Press the EXIT button. A small window will appear requesting confirmation to eliminate the transponder (YES) or to cancel the operation
(NO).
51
ENGLISH
Press the OK button to save the data. A new scan will take place with
the new data.
User Manual
“RSD - 7297”
9.5.- DiSEqC 1.2 positioner
If in the -LNB number- option, you have selected “1”, the menu for the
DiSEqC 1.2 positioner will display the following options: “< DiSEqC 1.2
activated >”, “< DiSEqC USALS >” and “< DiSEqC 1.2 de-activated >”.
By pressing the OK button over each of the DiSEqC options, we can
access the area where we position the disk.
DiSEqC 1.2 activated
This menu lets you change the dish’s orientation so that you can select the
new orbital positions of the different satellites or correct the satellite positions that you have already saved.
- Satellite name. We should define the satellites that we are going to
use. To do so, use the or buttons.
- Position. Each satellite has a different position number. There are 50
positions. Assign a position number to the satellite.
- Specify the transponder that you will use to check the received signal
level by using the
or buttons.
- Drive East / Drive West. You can move the dish to the East or West by
using the
or
buttons. If you press the buttons once, this will
move the antenna just one step. If you keep the buttons pressed
down, the antenna will rotate smoothly. To save the position, press OK
over the “Store” option.
- Set East limit / Set West limit. These are the positions that limit the
orientation of the dish at each end of the arch.
This option will remain blocked as long as the "Limits Enable" option in
activated.
To set the limits after saving the orbital positions, select the limit that
you want to change (east or west) with the
or buttons.
Go to the “Drive East / Drive West” and with the
or
buttons,
move the dish until you have reached the desired limit. Press OK over
the “Store” option to set it.
Return to the “Set East limit / Set West limit” option, select the other
limit and repeat the process.
- Store / Reset / Recalculate.
The “Store” option saves the limits and positions of each satellite if you
press the OK button over it.
The "Reset" option directs the antenna towards the South.
The "Recalculate" option orders the positions after adding new ones or
eliminating existing ones.
- Enable limits / Disable limits. This activates or de-activates the use of
the limits. If you do not use the limits, you run the risk of damaging the
motor elements or the dish.
52
User Manual
“RSD - 7297”
DiSEqC USALS
This menu automatically orientates a dish towards a satellite by simply
knowing the orbital position of the satellite and the exact position (longitude/latitude) of where you are.
Use the
or
buttons to choose the different options.
- Satellite name. We should define the satellites that we are going to
use. To do so, use the or buttons.
- Specify the transponder that you will use to check the received signal
level by using the
or buttons.
- Angle. Indicate the angle that corresponds to the satellite’s orbital
position in degrees. Indicate if this is towards the East or towards the
West with the
or
buttons.
- Longitude. Indicate the exact longitude of where you are in degrees.
Indicate if this is towards the East or towards the West using the
or
buttons.
- Latitude. Indicate the exact latitude of where you are in degrees.
Indicate if this is towards the North or towards the South with the
or buttons.
Press the OK button to move the antenna to the satellite position.
ENGLISH
A bar will appear that indicates the signal level that is available in the
transponder.
53
User Manual
“RSD - 7297”
9.6.- Code upgrade (software)
Using this menu you can upgrade the receiver’s software directly from the
Internet using a PC.
You need to connect the receiver to a PC via an RS-232 cable and you
need to have the latest software version.
Press OK over the -Code upgrade- option. In the small window that
appears, you need to indicate if you wish to upgrade the software (YES)
or cancel the operation (NO).
If you press YES, the upgrading process will begin, and various progress
messages will appear onscreen.
After the receiver has been upgraded, it will begin to function.
Note: If you have only carried out an update of the channel list, you need to
execute the "Factory Default" option so that these become available.
If you would like to have the same software and the same channel list in
various receivers, you can duplicate this information (between the receivers)
if you dispose of a RS-232 cable (female - female).
On the MASTER receiver press the
button at the same time as switching the receiver on via the switch at the back of the equipment
(POWER). By doing this, the receiver has entered “Transmitir SW”
mode.
Configure the SLAVE receiver to receive the software. To do this, press
the
&
buttons at the same time as switching the receiver on via
the switch at the back of the equipment (POWER). By doing this, the
receiver has entered the “Actualizar SW” mode.
The duplicating process (copy) takes around 3 minutes and is over when
both receivers return to their normal operational mode.
The SLAVE receiver will finish the process a few seconds after the MASTER receiver.
54
User Manual
“RSD - 7297”
10.- Automatic scan
To carry out an automatic scan for the channels offered by the satellites in
your installation, press OK over the -Automatic scan- option in the main
menu.
You can carry out the channel scan in a satellite if the satellite that has been
selected in the -Dish Setup- menu has been correctly assigned to an antenna.
The options are:
- Add channels: To select one of the satellites use the
press OK to activate the pop-up menu.
/
buttons or
- Polarisation: Using the
or
buttons, select the type of polarity
that you wish to use to carry out the scan. The options are Horizontal
(H) , Vertical (V) and Horizontal + Vertical (H+V).
- Starting frequency: Using the numeric buttons, indicate the frequency
at which you want the scan to start.
- Ending frequency: Using the numeric buttons, indicate the frequency
at which you want to the scan to stop.
- 1/2/3 symbol rate: Using the numeric buttons, indicate the symbol
frequency that you are going to use for the scan. If you only want to
use one, you must enter a “0” in the rest.
If you want to stop the scanning process before it has finished, you must
press the EXIT button on the remote control.
55
ENGLISH
- FTA / All: Indicate if you want to search for all of the satellite channels
(ALL) or only for those that are free-to-air (FTA).
User Manual
“RSD - 7297”
Menu structure
Language Setup
English, Deutsch, Français, Español, Italiano, Português, Polska, Türkçe, ....
LNB Setup
No. of LNB's
Dish Setup
Satellite, Frequency, S/R, Polarity
Scan
Satellite Setup
Edit
Delete
System Setup
Add
Transponder Setup
Edit
Delete
DiSEqC 1.2 Enabled, DiSEqC 1.2 Disabled, DiSEqC - USALS
MAIN MENU
Code Download
Channel Setup
Favourite, Lock, Delete, Move, Add, ...
Password Setup
Old Code, New Code, Confirm New Code
Timer Setup
GMT Adjust, Hours, Minutes
VCR Timer Setup
Start Time, Duration, Channel, ...
Factory Default
Reset
Audio Mode Setup
Stereo, Left Audio, Right Audio
TV Setup
4:3, 16:9
Box Setup
Box Info
Auto Scan
Satellite, Polarity, Start Freq, End Freq, S/R, All, FTA, ...
56
User Manual
“RSD - 7297”
Connector description
SCARTs
PIN
TV
VCR
1
2
3
4
5
6
7
8
9
10
11
12
13
14
15
16
17
18
19
20
21
Audio output (D)
N/C
Audio output (I)
Ground: audio
Ground: blue
N/C
Blue output
Switching voltage
Ground: green
N/C
Green output
N/C
Ground: red
Ground: “Fast Blanking”
Red output
“Fast Blanking” output
Ground: video
Ground: video
Video output
N/C
Ground
Audio output (D)
Audio input (D)
Audio output (I)
Ground: audio
Ground: blue
Audio input (I)
Blue input
Switching voltage
Ground: green
N/C
Green input
N/C
Ground: red
Ground: “Fast Blanking”
Red input
“Fast Blanking” input
Ground: video
Ground: video
Video input
Video input
Ground
20
21
18
19
16
17
14
15
12
11
13
8
10
9
4
6
7
5
2
3
1
PIN
1
2
3
4
5
6
7
8
9
2
Description
1
N/C
RXD (Data input)
TXD (Data output)
N/C
Ground
N/C
N/C
N/C
N/C
6
57
4
3
7
5
8
9
ENGLISH
RS 232C
User Manual
“RSD - 7297”
Technical specifications
Fully compatible with DVB
Video decoder
MPEG-2 Main Profile @ Main Level
Process rate
> 15Mbits/s
Video format
4:3, 16:9
Audio decoder
MPEG-1 layer I & II (Musicam Audio)
Mono, Dual, Stereo, Joint Stereo
System
RAM
2 Mbyte
Flash memory
1 Mbyte
Graphics
720 x 576 (PAL)
720 x 480 (NTSC)
LNB input / tuner
Connector
2 x “F”
Input frequency
950 - 2150 MHz
LNB powering
13/18V, max. 350 mA
Band switching
22 KHz tone
DiSEqC switching
Version 1.0, Tone Burst A/B
Positioner
DiSEqC 1.2 / USALS
Demodulation
QPSK
Symbol rate
2 - 45 Msps
Covers the C and Ku bands
Covers SCPC and MCPC
TV scart
RGB, CVBS, Audio L/R
VCR scart
CVBS (input/output), Audio L/R (input/output)
Hi-Fi output
Connector
2 x RCA (L/R)
Serial data interface
Connector
9-pin D-sub
Signals
RS232 max.19.2K baud
Total connectors
2 x LNB input (F type)
2 x SCART (TV/VCR)
3 x jacks RCA (VIDEO, AUDIO L/R)
1 x RS232 (9-pin D-sub)
Powering
90 - 260V~, 50/60 Hz
Consumption
30W
Size
280 x 210 x 60 mm
Approx. weight
1.6 Kg
58
“RSD - 7297”
Garantía
Televés S.A. ofrece una garantía de 6 meses calculados a partir de la fecha de compra. Conserve la factura de compra para determinar esta fecha.
Durante el período de garantía, Televés S.A. se hace cargo de los fallos producidos por defecto del material o de fabricación. Televés S.A. cumple la garantía reparando o sustituyendo el equipo defectuoso según lo crea conveniente.
No están incluidos en la garantía los daños provocados por uso indebido, desgaste, manipulación por terceros, catástrofes o cualquier causa ajena al control de Televés S.A.
Guarantee
Televes S.A. offers a six-month guarantee, beginning from the date of purchase. Retain the receipt to determine this
date.
During the guarantee period, Televes S.A. is responsible for the faults produced due to the defects of the equipment or
manufacturing. Televes S.A. complies with the guarantee by repairing or substituting the faulty equipment as it believes
necessary.
The harm produced by improper usage, wear and tear, manipulation by a third party, catastrophes or any other cause
beyond the control of Televes S.A, is not included in the guarantee.
59
SUCURSALES
BARCELONA C.P. 08940
C/ Sant Ferrán, 27
Cornellá - Barcelona
Telfs.
93 377 08 62
93 474 29 50
Fax
93 474 50 06
E-mail
[email protected]
A CORUÑA
SANTIAGO
OURENSE
VIGO
TENERIFE C.P. 38108
Avda. El Paso, 25 - Los Majuelos
La Laguna.
Tfnos.
922 31 13 14/ 31 13 16
Fax
922 31 13 33
[email protected]
VALENCIA C.P. 46020
Plaza Jordi San Jordi s/n
Tfnos.
96 337 12 01/ 337 12 72
Fax
96 337 06 98
[email protected]
CACERES
BARCELONA
SORIA
TOLEDO
LISBOA
ZARAGOZA
TARRAGONA
TERUEL
CASTELLON
CUENCA
CIUDAD REAL
GIRONA
HUESCA
BURGOS
LA RIOJA
MADRID
VALENCIA
PALMA DE
MALLORCA
ALBACETE
BADAJOZ
ALICANTE
CORDOBA
JAEN
BALEARES
MURCIA
GRANADA
HUELVA
SEVILLA
ALMERIA
MALAGA
CADIZ
CANARIAS
SUCURSALES
TENERIFE
DELEGACIONES
CEUTA
LAS PALMAS
FABRICAS
MELILLA
DELEGACIONES
ALMERIA C.P. 04008
Campogrís 9.
Tfno.
950 23 14 43
Fax
950 23 14 43
[email protected]
JAEN C.P. 23007
Hermanos Pinzón, 8-bajo
Tfnos. 953 29 50 40 / 953 29 52 21
639 98 44 89
Fax
953 29 52 10
[email protected]
BURGOS C.P.09188
C/Real, s/n,
San Adrián de Juarros
Tfno.
947 56 04 58/
670 73 75 86
VIGO C.P. 36204
Escultor Gregorio Fernández, 5
Tfnos.
986 42 33 87/42 40 44
Fax
986 42 37 94
[email protected]
CACERES/ BADAJOZ
C.P. 06010
C/Jacobo Rodríguez
Pereira, nº11-Oficina
Tfno.
924 20 74 83
670 70 21 93
Fax.
924 20 01 15
[email protected]
TELEVES ELECTRONICA
PORTUGUESA
GIRONA C.P. 17190 (Salt)
Ramón Sambola. 9º Ent. 1ª.
Tfno.
972 23 25 43
607 23 88 40
[email protected]
MAIA - OPORTO
Via . Dr Francisco Sa Carneiro. Lote 17.
ZONA Ind. MAIA 1. Sector-X MAIA.
C.P. 4470 BARCA
Tel.
351 22 9418313
Fax
351 22 9488719/9416180
[email protected]
NAVARRA
SEGOVIA
SALAMANCA
GUADALAJARA
AVILA
OPORTO
LAS PALMAS C.P. 35006
Gral. Mas de Gaminde 26.
Tfnos.
928 23 11 22 / 23 12 42
Fax
928 23 13 66
[email protected]
SEVILLA C.P. 41008
Pol. Ind. Store - C/ A-6. Nave 5
Tfnos.
95 443 64 50 / 443 58 00
Fax
95 443 96 93
[email protected]
PALENCIA
VALLADOLID
A CORUÑA C.P. 15011
Gregorio Hernández 8.
Tfnos.
981 27 47 31 / 27 22 10
Fax
981 27 16 11
[email protected]
MURCIA C.P. 30010
Polígono Conver - C/ Rio Pliego 22.
Tfnos.
968 26 31 44 / 26 31 77
Fax
968 25 25 76
[email protected]
LEON
ZAMORA N
GUIPUZCOA
ALAVA
ZAMORA
BILBAO C.P. 48150
Iberre kalea, módulo 16, pabellón 15-B
Sangroniz-Sondika
Tfnos.
94 471 12 02/94 471 24 78
Fax
94 471 14 93
[email protected]
MADRID C.P. 28005
Paseo de los Pontones 11.
Tfnos.
91 474 52 21 / 474 52 22
Fax
91 474 54 21
[email protected]
BILBAO
CANTABRIA
OVIEDO
LUGO
GRANADA
Tfno.
958 13 78 29
Móvil: 609 62 70 96
[email protected]
OVIEDO C.P.33006
Avda. Buenavista 16.
Tfno.
98 524 43 33
Fax
98 524 41 44
[email protected]
LA RIOJA C.P. 26004
San Prudencio 19. bajo
Tfno.
941 23 35 24
Fax
941 25 50 78
[email protected]
PALMA DE MALLORCA
C.P. 07007
Ferrer de Pallares 45. bajo D.
Tfno.
971 24 70 02
Fax
971 24 53 42
[email protected]
MALAGA C.P.29004
Polígono de Santa Barbara
C/ Fidias 13.
Tfno.
95 223 98 81
Fax
95 217 37 30
[email protected]
SALAMANCA
ZAMORA
VALLADOLID C.P. 47008
C/ Arrecife 12.
Tfno.
983 22 36 66
Fax
983 22 36 66
[email protected]
MELILLA C.P.52006
Pº Marítimo Mir Berlanga, 17
Edif. Antares, C, 4ºB
Tfno.
600 45 35 13
Fax
600 43 35 14
[email protected]
HUESCA
ZARAGOZA
C.P. 50002
C/ Monasterio de Alahón 1-3.
Tfno.
976 41 12 73
Fax
976 59 86 86
[email protected]
NAVARRA C.P.(Pamplona) 31007
Avda. Sancho el Fuerte 9.
Tfno.
948 27 35 10
Fax
948 17 41 49
[email protected]
LISBOA
C.P. 1000 Rua Augusto Gil 21-A.
Tel.
351 21 7932537
Fax
351 21 7932418
[email protected]
TELEVES UNITED
KINGDOM LTD
Unit 11 Hill Street, Industrial State
CWMBRAN, GWENT NP44 7PG. (United Kingdom)
Tel.
44 01 633 87 58 21
Fax
44 01 633 86 63 11
[email protected]
TELEVES FRANCE S.A.R.L.
TELEVES MIDDLE EAST FZE
P.O. Box 17199
JEBEL ALI FREE ZONE DUBAI,
UNITED ARAB EMIRATES
Tel.
9714 88 343 44
Fax.
9714 88 346 44
[email protected]
Rúa B. de Conxo, 17 -15706 SANTIAGO DE COMPOSTELA
Tel. 981 52 22 00 Fax 981 52 22 62
[email protected]
www.televes.com
Miembro de número del
Empresa
Registrada
ER 224/1/94
103367/3 - 03-05
Parc des Arpents, 12 Rue du Pré des Aulnes.
77340 PONTAULT-COMBAULT.(France)
Tel.
33 01 60 18 30 40.
Fax
33 01 60 18 30 49.
[email protected]