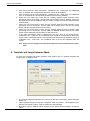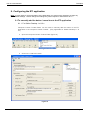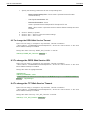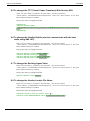
1
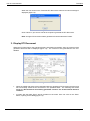
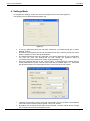
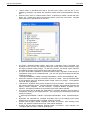
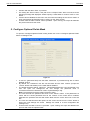
Travelport Enhanced Ticket Itinerary User Manual Version 2.0, Release 11.0.0111.0 11th Mar 2011 This document contains proprietary Travelport information ETI v2.0 User Manual Travelport ©2011 Travelport. All rights reserved. All Travelport logos and marks as well as all other Travelport proprietary materials depicted herein are the property of Travelport LP and/or its affiliates. 11-Mar-2011 Page 2 ETI v2.0 User Manual Travelport Document Control Sheet Document History Description of Change Authored/ Revised By JIRA ET# 5 Ranjeet Singh Ashish Jain Nisha Sagar 11 May ‟10 JIRA ET# 5 Ranjeet Singh Ashish Jain Nisha Sagar Savita Kumari Manjeet Sharma Nisha Sagar th 10.1.0110.0 17 Dec „10 TD109 Savita Kumari Manjeet Sharma Nisha Sagar th 11.0.0111.0 4 Mar „11 Savita Kumari Manjeet Sharma Nisha Sagar Abigail Lee Abigail Lee Ver. No. Release Date 10.0.0 6 April ‟10 10.0.0 th th th 10.1.0106.0 8 Dec „10 JIRA ETI-8 RQ#0031 RQ#0033 Section: 2.6 2.6.1 2.6.2 5 7 th 11.0.0111.0 11 Mar „11 Typos, grammar and Reviewed By Approved By Abigail Lee sentence structure correction 11-Mar-2011 Page 3 ETI v2.0 User Manual Travelport Table of Contents 1. To run the ETI application .............................................................................................. 5 1.1 Run from Viewpoint Custom Toolbar ...................................................................... 5 1.2 2. Pre-requisites to starting the ETI application ........................................................... 5 Messages returned by the ETI application ..................................................................... 5 2.1 Galileo Desktop is not signed in .............................................................................. 5 2.2 No PNR is retrieved ................................................................................................ 6 2.3 PNR does not contain any valid ticket ..................................................................... 6 2.4 Not able to retrieve information ............................................................................... 6 2.5 Error occurred while trying to generate the ETI Document ...................................... 7 2.6 Generating the ETI Document ................................................................................ 7 2.6.1 Single Ticket ......................................................................................................... 7 2.6.2 Multiple Ticket ....................................................................................................... 9 3. 4. 5. 6. 7. 8. Display ETI Document ................................................................................................. 10 Settings Mask .............................................................................................................. 12 Configure Optional Fields Mask ................................................................................... 14 Template and Image Uploader Mask ........................................................................... 15 Help Menu ................................................................................................................... 17 Configuring the ETI application .................................................................................... 18 8.1 To manually add the button / menu item to the ETI application ............................. 18 8.1.1 For Galileo Desktop 1.x & 2.x ............................................................................. 18 8.2 To change the DPDS Web Service Timeout .............................................................. 19 8.3 To change the DPDS Web Service URL .................................................................... 19 8.4 To change the TCT Web Service Timeout ................................................................. 19 8.5 To change the TCT (Travel Codes Translator) Web Service URL ............................. 20 8.6 To change the Identity Details (used to communicate with the host while using XML API) ................................................................................................................................. 20 8.7 To change the Booking Agent Value.......................................................................... 20 8.8 To change the Vendor Locator File Name ................................................................. 20 9. Frequently Asked Questions (FAQs) ............................................................................ 21 10. Appendix .................................................................................................................. 22 10.1 Mandatory ETI data .................................................................................................. 22 11-Mar-2011 Page 4 ETI v2.0 User Manual Travelport 1. To run the ETI application 1.1 Run from Viewpoint Custom Toolbar After installing the ETI application (refer to Installation manual for installing the ETI application), a new button (Figure 1) will be added / created in the Viewpoint Custom Toolbar of Galileo Desktop. To run the ETI application, a. Sign into Galileo Desktop b. Retrieve the PNR c. Then click on the ETI button to run the ETI application. Figure 1 1.2 Pre-requisites to starting the ETI application a. The user should be signed in to Galileo Desktop ver. 1.x/2.x. b. The PNR / Booking file should be retrieved in Galileo Desktop c. The PNR should have all the required information to generate the document for ETI. Please refer to the appendix for the list of mandatory data 2. Messages returned by the ETI application 2.1 Galileo Desktop is not signed in This message is displayed when the user clicks the Viewpoint Custom Toolbar ETI button to initiate the scripts and the user is not signed in to Galileo Desktop. (Figure 2) Figure 2 Click “OK” to close the error window and then a. Sign in to Galileo Desktop1.x/2.x b. Retrieve the PNR c. Then click on the ETI button to run the ETI application again. 11-Mar-2011 Page 5 ETI v2.0 User Manual Travelport 2.2 No PNR is retrieved When no PNR is retrieved in Galileo Desktop and the Viewpoint Custom toolbar ETI button is clicked, the following message is displayed. Figure 3 Click “OK” to close the error window and then retrieve a PNR. Click on the ETI button to run the ETI application again. 2.3 PNR does not contain any valid ticket This message is displayed when the PNR retrieved in Galileo Desktop does not contain any valid ticket. Figure 4 Click “OK” to close the error window and then retrieve a Valid PNR with Ticket Status (OPEN, USED, CKIN, and ARPT). Click on the ETI button to run the ETI application again. 2.4 Not able to retrieve information This message is displayed when ETI is not able to retrieve the PNR information. Figure 5 Click “OK” to close the error window and contact to the Help Desk to run the application should the problem persists. 11-Mar-2011 Page 6 ETI v2.0 User Manual Travelport 2.5 Error occurred while trying to generate the ETI Document This message would only be displayed when The TCT web service does not respond before time out The TCT web service respond with an error code The DPDS web service does not respond before time out The DPDS web service respond with an error code The script is not able to successfully save the Generated ETI Document in the predefined folder. Figure 6 Click “OK” to close the error window and contact to the Help Desk to run the application should the problem persists. 2.6 Generating the ETI Document 2.6.1 Single Ticket (1) If the check box for the field “Display Optional Fields Selection when generating the ETI Document” in “Configuration Optional Fields” file is checked and the PNR has a single ticket, then the ETI mask would be displayed with the option to select eTickets and select/unselect Optional Fields as per below (figure 7) Note: Please save the settings and restart the ETI application when modifications have been made. Figure 7 11-Mar-2011 Page 7 ETI v2.0 User Manual Travelport When the user clicks on the “Generate ETI Document” button then below message is displayed (figure 8) when ETI is generating the Document. Figure 8 Click “Cancel” if you want to cancel the request to generate the ETI Document. (2) If the check box of field “Display Optional Fields Selection when generating the ETI Document” in “Configuration Optional Field” file is unchecked and single ticket is available in an active PNR, then the document is directly generated. The below message is displayed (figure 9) when ETI is generating the Document Note: Please save the settings and restart the ETI application when modifications have been made. Figure 9 Click “Cancel” if you want to cancel the request to generate the ETI Document. 11-Mar-2011 Page 8 ETI v2.0 User Manual Travelport 2.6.2 Multiple Ticket (1) If the check box of field “Display Optional Fields Selection when generating the ETI Document” in “Configuration Optional Field” file is checked and the PNR has multiple tickets, then the ETI mask would be displayed with the option to select eTickets and select/unselect Optional Fields as per below (figure 10) Note: Please save the settings and restart the ETI application when modifications have been made. Figure 10 (2) If the check box of field “Display Optional Fields Selection when generating the ETI Document” in “Configuration “Optional Field” file is unchecked and the PNR has multiple tickets, then the ETI mask would be displayed with the option to select eTickets as per below (figure 11). Note: Please save the settings and restart the ETI application when modifications have been made. Figure 11 11-Mar-2011 Page 9 ETI v2.0 User Manual Travelport When the user clicks on the “Generate ETI Document” button then below message is displayed (figure 12). Figure 12 Click “Cancel” if you want to cancel the request to generate the ETI Document. Note: A single ETI Document will be generated for all the selected eTickets. 3. Display ETI Document When the ETI Document in the selected format is generated successfully, then the contents of the generated document will be displayed (figure 13). The contents of the generated ETI are noneditable. Figure 13 When the DPDS web service has responded with the generated ETI Document and the script has successfully saved the ETI document in the specified folder. The following text will be displayed “ETI Document successfully generated. Click on one of the buttons below to continue.” A button with the label “Save” will be provided on the mask. User can click on the “Save” button, opening a save dialog (figure 14). 11-Mar-2011 Page 10 ETI v2.0 User Manual Travelport Figure 14 Enter the file name and save the generated ETI Document in the desired location. A button with the label “Print” will be provided on the mask. By clicking on the “Print” button, the print dialog will open. Figure 15 11-Mar-2011 By clicking on the “OK” button of the print dialog, the generated ETI Document will be printed. A button with the label “Email” will be provided on the mask as well as a “Send as” option with a dropdown menu is provided. The dropdown menu has two options: Attachment & Inline. By default the “Attachment” option will be selected. The “Inline” option in the dropdown menu will only be available when the Output ETI Document Format is selected as “HTML”. In the case that the “Attachment” option is selected in the dropdown menu, and the user clicks on the “Email” button then a new mail window will be displayed (in the default email client for the user) with the Generated ETI Document as an attachment. All fields (To, CC, BCC, Subject, Body) of the mail will be blank; user will have to manually enter the details into these fields. Should the “Inline” option be selected in the dropdown menu, a new email (in the default email client for the user) with the Generated ETI Document as inline text is displayed. All fields (To, CC, BCC, Subject, Body) of the mail will be blank; user will have to manually enter the details into these fields. A button with the label “Cancel” is provided. Upon selecting “Cancel”, the script will abandon the process and close the mask. Page 11 ETI v2.0 User Manual Travelport 4. Settings Mask To navigate the “Settings” mask, user clicks on Settings menu of ETI mask (figure 6). The following screen will be displayed (figure 16). Figure 16 A text box (password field) with the label “Password” is provided along with a button labelled “Unlock. By default, the Password text box will be blank and all other controls (except the Unlock button & textbox) on the mask will be disabled. The default password would be “GALILEO. This default password is user configurable. The user can open the Settings.xml file and change the password value in <Password>GALILEO</Password> under <SystemSettings> tag. Enter the password and click on the “Unlock” button. If the password is a match with the stored password then all the controls of the mask will be enabled (figure 17). Otherwise the password textbox will remain blank and the cursor focused on the textbox. Figure 17 11-Mar-2011 “Output ETI Document Format” along with a dropdown menu is provided. The dropdown menu will have the following values (HTML, DOC, RTF & PDF). By default, the previously saved value will be selected. The user will be able to change the document format from the dropdown menu. Page 12 ETI v2.0 User Manual Travelport “Output Folder” is provided along with a text box and a button. The text box is noneditable by the agent. By default, the previously saved value will be populated in the text box. When the user clicks on “Output Folder” button, a “Browse For Folder” window will open (figure 18). Please select the ETI Document Folder & click on the “OK” button. The path of the folder will be populated in the text box. Figure 18 11-Mar-2011 The option “Selected Header Image” along with a dropdown menu is provided. The dropdown menu will have the following values (No Image, Agent Default Header Image and Agency Default Header Image). On the first execution, “No Image” will be selected. Thereafter by default, the previously saved value will be selected. The user will be able to disable the “Selected Header Image” dropdown control through a configuration setting in the configuration file. The user can open the Settings.xml file and modify accordingly. < SetImgControldisable >TRUE</ SetImgControldisable > under <SystemSettings> tag. Should the selected “Output ETI Document Format” be “HTML”, then the selected value for the dropdown menu for “Selected Header Image” will be “No Image”. The dropdown menu will also be disabled. “Selected ETI Template” along with a dropdown menu is provided. The dropdown menu will have the following values: Travelport Default Template, Agent Default Template and Agency Default Template. On first execution, “Travelport Default Template” will be selected. Thereafter by default, the previously saved value will be selected. The user will be able to disable the “Selected ETI Template” dropdown menu through a configuration setting in the configuration file. The user will open the Settings.xml file and modify accordingly. < SetTempControldisable >TRUE</ SetTempControldisable> under <SystemSettings> tag. By default, the “Selected ETI Template” dropdown menu on the settings mask will be disabled and “Travelport Default Template” would be selected. A button with the label “Upload Template and Image” is provided. Upon clicking on the button, the “Upload Template and Image” mask will be displayed. A button with the label “Configure Optional Fields” is provided. Upon selection, the “Configure Optional Fields” mask will be displayed. Page 13 ETI v2.0 User Manual Travelport A button with the label “Save” is provided. On clicking the “Save” button, if the path for the “Output Folder” does not exist, then the following message will displayed “Please specify a valid folder to continue” with an “OK” button. If all the above validations have been met, then save the settings of the current mask in a local configuration file (Settings.xml) by clicking on the “Save” button. A button with the label “Cancel” will be provided. Upon clicking, the script will abandon the process and close the mask. 5. Configure Optional Fields Mask To open the “Configure Optional Fields” mask, please click on the “Configure Optional Fields” button of Settings mask. Figure 19 11-Mar-2011 A text box (password field) with the label “Password” is provided along with a button labelled “Unlock. By default, the “Password” text box will be blank and all other controls (except the “Unlock” button and textbox) on the mask will be disabled. The default password will be “GALILEO. This default password is user configurable. The user can open the Settings.xml file and change the password value in <Password>GALILEO</Password> under <SystemSettings> tag. Note: The password for all the masks will be the same. The user will enter the password and click on the “Unlock” button. If the password is a match with the stored password then all the controls of the mask will be enabled. Otherwise the password text box will remain blank and the cursor will focus on the text box. The user can select/unselect the options on the screen and click on the “Save” button to ensure the new settings are saved. Settings are saved in a local configuration file (Settings.xml). A button with the label “Cancel” is provided. Upon clicking, the script will abandon the process and close the optional mask. Page 14 ETI v2.0 User Manual Travelport If the check boxes for “Fare Calculation”, “Published Fare”, “Total Fare" and “Additional Fare” is checked, the corresponding dropdown menus will be enabled. If the check box for the “Fare Calculation”, “Published Fare”, “Total Fare" and “Additional Fare” is unchecked, the corresponding dropdown menus will be disabled. When the user checks the check box for "Display Optional Fields Selection when generating the ETI Document" and the PNR has a Single Ticket or Multiple Ticket, the ETI Mask Screen will be displayed with the option to select eTickets and select/unselect Optional field. When the user unchecks the check box for "Display Optional Fields Selection when generating the ETI Document" and the PNR has a Single Ticket, then the ETI Mask Screen will directly generate the ETI Document. When the user unchecks the check box for "Display Optional Fields Selection when generating the ETI Document" and the PNR has Multiple Tickets, then the ETI Mask Screen will be displayed with the option to select eTickets. If the “Fare Calculation” value is changed by the user; then as per enhancement, “Published Fare”, “Total fare” and “Additional Fare” should be changed as per document. So if the user checks/unchecks the corresponding checkboxes and changed the values of “Published Fare”, “Total Fare” and “Additional Fare” then the last updated value will remain. Note: Please save the settings and restart the ETI application when modifications have been made. 6. Template and Image Uploader Mask To open the Template and Image Uploader mask, please click on “Upload Template and Image” button of Settings mask. Figure 20 The currently selected application (ETI) along with the label “Application” will be displayed (figure 20). “Select Upload Category” along with a dropdown menu is provided. The dropdown menu will have the following values: Agency Default and Agent Default. By default, “Agency Default” will be selected in the “Select Upload Category” dropdown menu. Page 15 11-Mar-2011 ETI v2.0 User Manual Travelport The “Select Upload Category” dropdown menu will be disabled once a file has been added to the “File(s) to Upload” list. The dropdown menu will be enabled again when there are no files in the “File(s) to Upload” list. “Select File to Upload” along with a text box and a button (labelled “..”) to select a file will be provided. The text box will be read only. By default, the text box will be blank. The user can click on the button with the label “..” to select a file. When the user clicks on the “..” button, the following screen will be displayed (figure 21). Figure 21 11-Mar-2011 Select the correct file, and then click on the “Open” button. The selected file name will be displayed in the corresponding textbox. “Upload As” with two dropdown menus will be provided. The first dropdown menu for “Upload As” will contain Template and Header Image. The second dropdown menu for “Upload As” will contain Main Template, Sub Template & Image. By default in the first dropdown menu, “Header Image” will be selected. In the second dropdown menu, “Main Template” will be selected. By default, the option for “Template” in the first dropdown menu will be disabled through the configuration file (Settings.xml) by changing the TemplateOption tag value 1. <DisableUploaderControl> <TemplateOption>1</TemplateOption> <HeaderImage>0</HeaderImage> </DisableUploaderControl> The user can enable the “Template” option in the first dropdown menu by changing the value 0 of the TemplateOption tag in the configuration file (Settings.xml). <DisableUploaderControl> <TemplateOption>0</TemplateOption> <HeaderImage>0</HeaderImage> </DisableUploaderControl> The user will also be able to enable / disable the option of “Header Image” in the first dropdown menu through a configuration file (Settings.xml) by changing the value of the HeaderImage tag. The second dropdown menu will only be enabled when “Template” is selected in the first dropdown menu. The option “Header Image” in the first dropdown menu will be disabled when a file for “Header Image” has been added to the “File(s) to Upload” list. Page 16 ETI v2.0 User Manual Travelport The option “Header Image” in the first dropdown menu will be enabled when a file for “Header Image” has been removed from the “File(s) to Upload” list. The option “Main Template” in the second dropdown menu will be disabled when a file for “Template – Main Template” has been added to the “File(s) to Upload” list. The option “Main Template” in the second dropdown menu will be enabled when a file for “Template – Main Template” has been removed from the “File(s) to Upload” list. The “Add File” button will only be enabled when a file is selected in the “Select File to upload”. On clicking on any of the icon (recycle bin) for the “File(s) to Upload” grid, the corresponding file will be removed from the list. On clicking the “Upload” button, the listed files in the “File(s) to Upload” grid will be processed and uploaded to the DPDS server. On clicking the “Cancel” button, “Upload Template and Image” mask will close . 7. Help Menu The Help Menu will have a sub-menu labelled “About ETI”. When the user clicks on the sub-menu “About ETI”, the following screen will be displayed. This gives details about ETI Product and Release Version (figure 22). Figure 22 Click on the “Ok” button and the above window will close. 11-Mar-2011 Page 17 ETI v2.0 User Manual Travelport 8. Configuring the ETI application Note: In most cases for normal operation of the application you would not be required to change any of the default settings. Please change the settings only when required or instructed to do so. 8.1 To manually add the button / menu item to the ETI application 8.1.1 For Galileo Desktop 1.x & 2.x Viewpoint Custom Toolbar Editor can be used to manually add the button to the ETI application in the Viewpoint Custom Toolbar. (Only applicable for Galileo Desktop 1.x & 2.x) a. Open the Viewpoint Custom Toolbar Editor (figure 23) Figure 23 b. Click on the “Add New” button. Figure 24 11-Mar-2011 Page 18 ETI v2.0 User Manual c. Travelport Specify the following parameters for the corresponding field. - Button Image Bitmap File: <Drive Letter>:\fp\swdir\Content\Toolbar Artwork\ETI.bmp - Tool Tip for this button: ETI - External Executable: <Drive Letter>:\fp\swdir\CustomViewpoint\ETI\Travelport.ETI.exe Note: <Drive Letter> represents the drive where Galileo Desktop has been installed. d. Click on “Modify” to update e. Click on “File” – “Save” to save the toolbar settings f. Click on “File” – “Exit” to exit. 8.2 To change the DPDS Web Service Timeout Open “ETI.exe.config” in notepad or any text editor. This file is located in “<Drive Name>: \FP\SWDIR\CustomViewpoint\ETI”, where the <Drive Name> is the drive where Galileo Desktop is installed. Change the value of the key “DPDS_WS_TimeOut ” in the file. <add key="DPDS_WS_TimeOut” value="2" /> 8.3 To change the DPDS Web Service URL Open “ETI.exe.config” in notepad or any text editor. This file is located in “<Drive Name>: \FP\SWDIR\CustomViewpoint\ETI”, where the <Drive Name> is the drive where Galileo Desktop is installed. Change the value as highlighted below. <appSettings> <add key="DPDSURL" value ="https://americas.webservices.travelport.com/B2BGateway/connect/DPDS/DPDSServi ce.svc" /> </appSettings> 8.4 To change the TCT Web Service Timeout Open “ETI.exe.config” in notepad or any text editor. This file is located in “<Drive Name>: \FP\SWDIR\CustomViewpoint\ETI”, where the <Drive Name> is the drive where Galileo Desktop is installed. Change the value of the key “TCT_WS_TimeOut ” in the file. <add key=" TCT_WS_TimeOut” value="2" /> 11-Mar-2011 Page 19 ETI v2.0 User Manual Travelport 8.5 To change the TCT (Travel Codes Translator) Web Service URL Open “ETI.exe.config” in notepad or any text editor. This file is located in “<Drive Name>: \FP\SWDIR\CustomViewpoint\ETI”, where the <Drive Name> is the drive where Galileo Desktop is installed. Change the value as highlighted below. <appSettings> <add key="TCTURL" value ="https://americas.webservices.travelport.com/B2BGateway/service/TravelCodesTrans lator" /> </appSettings> 8.6 To change the Identity Details (used to communicate with the host while using XML API) Open “ETI.exe.config” in notepad or any text editor. This file is located in “<Drive Name>: \FP\SWDIR\CustomViewpoint\ETI”, where the <Drive Name> is the drive where Galileo Desktop is installed. Change the value as highlighted below. <add key="XMLAPI_VendorId" value="XMDL" /> <add key="XMLAPI_VendorType" value="G" /> <add key="XMLAPI_SourceId" value="GASCTS" /> <add key="XMLAPI_SourceType" value="G" /> 8.7 To change the Booking Agent Value Open “ETI.exe.config” in notepad or any text editor. This file is located in “<Drive Name>: \FP\SWDIR\CustomViewpoint\ETI”, where the <Drive Name> is the drive where Galileo Desktop is installed. Change the value as highlighted below. <add key ="BKAGT" value="Galileo"/> 8.8 To change the Vendor Locator File Name Open “ETI.exe.config” in notepad or any text editor. This file is located in “<Drive Name>: \FP\SWDIR\CustomViewpoint\ETI”, where the <Drive Name> is the drive where Galileo Desktop is installed. Change the value as highlighted below. <add key="Frequency_Days_FF_VndLoc" value="1" /> <add key="VndLocDetailsFileName" value="C:\\eti\\VndLocDetails.xml" /> 11-Mar-2011 Page 20 ETI v2.0 User Manual Travelport 9. Frequently Asked Questions (FAQs) a. I keep getting “Error ccurred while trying to generate the ETI Document. Please try again later. If the problem persists please contact the Help Desk.” when I try to generate the PDF for ETI. One of the probable cause for this error message is a slow network or no network connection. Slow Network: The application has a pre-set time for which it waits for the PDF file to be generated. If the PDF file is not generated by that time, then the Time Out happens and this error message is displayed. If you feel you have a slow network, you can try to increase the Time Out period. Refer to section “6.2. To change the DPDS Web Service Timeout” for more details. No Network: If there is a breakage in the network connectivity, then the application would return this error message. Check your network connectivity and try again. If the above does not help you, then please contact Travelport Help desk for more troubleshooting. b. Setup did not create the button for the ETI application. Refer to section “6.1.To manually adds the button / menu item for the ETI application” for more details. c. What are the pre-requisites for installing and running the ETI application? Refer to the Installation Manual for more details for the Installation pre-requisites. Refer to section “1.2. Pre-requisites to starting the ETI Application” for more details on executing the ETI application. d. The PDF file is not opening on my system. You need to have Adobe Acrobat Reader 6.x above or a compatible PDF reader installed on your system in order to view the PDF file. e. When I used the application for the first time, the PDF file took a long time to generate on my system. The first time you try to create the PDF for ETI, it may take a little longer. This is because when you use the application for the first time, the application configures itself and this activity can take some time. f. Is there a maximum un-associated remarks line captured on ETI? ETI will print only the first top three lines of un-associated remarks field. g. Does ETI use Microsoft Outlook email function? Yes. ETI works on Microsoft Outlook as well as Outlook Express. 11-Mar-2011 Page 21 ETI v2.0 User Manual 10. Travelport Appendix 10.1 Mandatory ETI data The PNR / Booking File should contain the following data to be able to successfully generate the PDF for ETI. a. b. c. d. e. f. g. h. i. 11-Mar-2011 PNR number Airline Name Ticket Issue Date Ticket Number Last name and First name of the passenger From City To City Booking Class Fare Basis Page 22