1
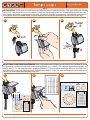
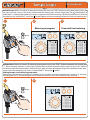
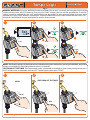
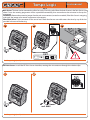
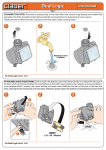
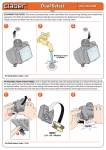
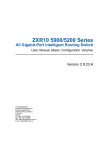
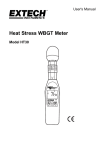
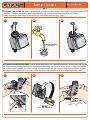
Tempo Logic
User manual
Pag. 1
CLEANING THE FILTER. The timer is protected by a wire mesh filter that ensures long-lasting and trouble-free
operation. The filter should be inspected periodically and washed at the beginning of every season.
Simply remove the filter from the connector and rinse clean under running water.
1
2
3
Washing at start
of season
For Tempo Logic (cod.): 8483
FITTING/REPLACING THE BATTERIES. To fit or replace the batteries, press the locking tab fully in to release the front part of
the timer, which can then be detached. Fit 2 new batteries in the holder, observing the correct polarity. As long as the batteries
are replaced within 2 minutes, the current settings will remain stored. Refit the front part of the timer to the back and press,
ensuring that the locking tab clicks into place. Important: always replace the batteries at the beginning of each season!
1
b
2
3
b
+
+
AA
AA
a
For Tempo Logic (cod.): 8483
NEW!
1,5V - AA - Alkaline
click!
Tempo Logic
User manual
Pag. 2
INSTALLATION. Fit the timer to a cold water tap, following these simple instructions. The spout of the tap should
have a 3/4" male thread (if not, use an adaptor). Screw the clamp collar of the 3/4" female fitting onto the tap. Caution: tighten the collar using hand pressure only. Do not use wrenches or other tools. Connect the watering line
to the quick-click or threaded fitting, using the appropriate connector. Remember to turn on the water tap!
1
2
3
ON!
b
3/4”
click!
a
For Tempo Logic (cod.): 8483
SELECTION OF WATERING PROGRAMME. Press any button once to light up the display. Press button “P” once
or repeatedly to select the desired watering programme: (e.g. 3 times). The selected programme appears in
display field “C” (3), the watering time is displayed in field “D”(1 min), and the watering frequency (the interval of
time between successive watering cycles) is displayed in field “E” (12h). The time and frequency of watering are
factory-set, and cannot be changed by the user.
1
2
Programs available:
m
h
C P E D
MANUAL
3 sec.
m
START
m
h
x6
ON / OFF
1
2
3
4
5
6
7
8
9
10
11
12
13
14
15
16
17
18
19
>
>
>
>
>
>
>
>
>
>
>
>
>
>
>
>
>
>
>
2
5
1
2
5
10
1
3
5
8
10
15
30
60
15
30
30
60
90
For Tempo Logic (cod.): 8483
min.
min.
min.
min.
min.
min.
min.
min.
min.
min.
min.
min.
min.
min.
min.
min.
min.
min.
min.
ever y
ever y
ever y
ever y
ever y
ever y
ever y
ever y
ever y
ever y
ever y
ever y
ever y
ever y
ever y
ever y
ever y
ever y
ever y
8 h
8 h
12 h
12 h
12 h
12 h
24 h
24 h
24 h
24 h
24 h
24 h
24 h
24 h
2 days
2 days
3 days
3 days
7 days
1
2
3
4
5
6
7
8
9
10
11
12
13
14
15
16
17
18
19
>
>
>
>
>
>
>
>
>
>
>
>
>
>
>
>
>
>
>
2
5
1
2
5
10
1
3
5
8
10
15
30
60
15
30
30
60
90
min.
min.
min.
min.
min.
min.
min.
min.
min.
min.
min.
min.
min.
min.
min.
min.
min.
min.
min.
ever y
ever y
ever y
ever y
ever y
ever y
ever y
ever y
ever y
ever y
ever y
ever y
ever y
ever y
ever y
ever y
ever y
ever y
ever y
8 h
8 h
12 h
12 h
12 h
12 h
24 h
24 h
24 h
24 h
24 h
24 h
24 h
24 h
2 days
2 days
3 days
3 days
7 days
3
MANUAL
3 sec.
m
START
m
h
ON / OFF
1
2
3
4
5
6
7
8
9
10
11
12
13
14
15
16
17
18
19
>
>
>
>
>
>
>
>
>
>
>
>
>
>
>
>
>
>
>
2
5
1
2
5
10
1
3
5
8
10
15
30
60
15
30
30
60
90
min.
min.
min.
min.
min.
min.
min.
min.
min.
min.
min.
min.
min.
min.
min.
min.
min.
min.
min.
ever y
ever y
ever y
ever y
ever y
ever y
ever y
ever y
ever y
ever y
ever y
ever y
ever y
ever y
ever y
ever y
ever y
ever y
ever y
8 h
8 h
12 h
12 h
12 h
12 h
24 h
24 h
24 h
24 h
24 h
24 h
24 h
24 h
2 days
2 days
3 days
3 days
7 days
Tempo Logic
User manual
Pag. 3
Immediate start. Within 10 seconds of selecting the programme, press the “START” button once only. Releasing the button, the
message "0 h" blinks 3 times in the display, and the automatic watering cycle will start straight away. The
symbol appears in
display field "C", indicating that watering is in progress, together with the time remaining until the end of the cycle. At the end of
the watering cycle, display field “C” shows the symbol together with time remaining until the start of the next watering cycle.
1
2
3
Watering in progress
MANUAL
3 sec.
10 sec.
m
Time until next watering
START
MANUAL
3 sec.
m
h
START
m
h
h
ON / OFF
ON / OFF
m
h
1
2
3
4
5
6
7
8
9
10
11
12
13
14
15
16
17
18
19
x1
>
>
>
>
>
>
>
>
>
>
>
>
>
>
>
>
>
>
>
2
5
1
2
5
10
1
3
5
8
10
15
30
60
15
30
30
60
90
min.
min.
min.
min.
min.
min.
min.
min.
min.
min.
min.
min.
min.
min.
min.
min.
min.
min.
min.
ever y
ever y
ever y
ever y
ever y
ever y
ever y
ever y
ever y
ever y
ever y
ever y
ever y
ever y
ever y
ever y
ever y
ever y
ever y
1
2
3
4
5
6
7
8
9
10
11
12
13
14
15
16
17
18
19
8 h
8 h
12 h
12 h
12 h
12 h
24 h
24 h
24 h
24 h
24 h
24 h
24 h
24 h
2 days
2 days
3 days
3 days
7 days
>
>
>
>
>
>
>
>
>
>
>
>
>
>
>
>
>
>
>
2
5
1
2
5
10
1
3
5
8
10
15
30
60
15
30
30
60
90
min.
min.
min.
min.
min.
min.
min.
min.
min.
min.
min.
min.
min.
min.
min.
min.
min.
min.
min.
ever y
ever y
ever y
ever y
ever y
ever y
ever y
ever y
ever y
ever y
ever y
ever y
ever y
ever y
ever y
ever y
ever y
ever y
ever y
8 h
8 h
12 h
12 h
12 h
12 h
24 h
24 h
24 h
24 h
24 h
24 h
24 h
24 h
2 days
2 days
3 days
3 days
7 days
For Tempo Logic (cod.): 8483
Delayed start. Within 10 seconds of selecting the programme, press the “START” button repeatedly until display field
“C” shows the delay, between 1 and 23 hours, before the start of the automatic watering cycle (e.g. 6 hours). Release
the button, and the number of hours will blink 3 times, after which the programme begins the countdown to the automatic start of the watering cycle, shown in display field “C” above the symbol.
Making changes to the watering programme
Repeat the programming procedure as indicated in the “selection of watering programme” section (e.g. changing
from program 3 to 5). The new programme will replace the previous one, with no further steps required.
1
2
MANUAL
10 sec.
3 sec.
h
START
m
h
ON / OFF
h
m
h
1... 23
For Tempo Logic (cod.): 8483
1
2
3
4
5
6
7
8
9
10
11
12
13
14
15
16
17
18
19
>
>
>
>
>
>
>
>
>
>
>
>
>
>
>
>
>
>
>
2
5
1
2
5
10
1
3
5
8
10
15
30
60
15
30
30
60
90
min.
min.
min.
min.
min.
min.
min.
min.
min.
min.
min.
min.
min.
min.
min.
min.
min.
min.
min.
ever y
ever y
ever y
ever y
ever y
ever y
ever y
ever y
ever y
ever y
ever y
ever y
ever y
ever y
ever y
ever y
ever y
ever y
ever y
8 h
8 h
12 h
12 h
12 h
12 h
24 h
24 h
24 h
24 h
24 h
24 h
24 h
24 h
2 days
2 days
3 days
3 days
7 days
Tempo Logic
User manual
Pag. 4
MANUAL WATERING. Press the “MANUAL” button and hold it for at least 3 seconds; the unit goes into manual
mode with the valve off (OFF blinking). Pressing the “START” button, the line will be activated for 5 minutes
(which cannot be changed by the user), confirmed by the
symbol. To stop watering before 5 minutes have
elapsed, press the “START” button a second time. To quit the manual function, make certain that the valve is OFF,
then press the “MANUAL” button and hold it for at least three seconds.
1
2
3
b
b
A
m
B
h
OFF
3 sec.
m
h
m
h
m
1
2
3
4
5
6
7
8
9
10
11
12
13
14
15
16
17
18
19
>
>
>
>
>
>
>
>
>
>
>
>
>
>
>
>
>
>
>
2
5
1
2
5
10
1
3
5
8
10
15
30
60
15
30
30
60
90
min.
min.
min.
min.
min.
min.
min.
min.
min.
min.
min.
min.
min.
min.
min.
min.
min.
min.
min.
a
ever y
ever y
ever y
ever y
ever y
ever y
ever y
ever y
ever y
ever y
ever y
ever y
ever y
ever y
ever y
ever y
ever y
ever y
ever y
m
h
mFF
5 min
8 h
8 h
12 h
12 h
12 h
12 h
24 h
24 h
24 h
24 h
24 h
24 h
24 h
24 h
2 days
2 days
3 days
3 days
7 days
m
h
O
a
a
d
mOFF
m
h
h
3 sec.
m
h
b
c
For Tempo Logic (cod.): 8483
RESET. The factory settings of the timer can be restored at any given moment by pressing the MANUAL and START
buttons simultaneously and holding them for at least 10 seconds.
SWITCHING OFF THE TIMER. If the timer needs to be switched off, for example to store it away during winter, press
the “P” button once, or repeatedly until the “OFF” symbol appears, then press “START”.
1
2
RESET
3
SWITCHING OFF THE TIMER
10 sec.
h
m
h
h
m
h
m
1...OFF
For Tempo Logic (cod.): 8483
m
h
Tempo Logic
User manual
Pag. 5
Rain Sensor. The timer can be connected to a Rain Sensor, by wire or by radio. When the level of water in the Rain Sensor rises
above 5 mm, the watering programme will be suspended automatically, then resumed once the rainwater in the cup has
evaporated.
Installation. Remove the protective jumper from the rain sensor contacts (no tools are needed). If the Rain Sensor is not going
to be used, the jumper must remain in place across the contacts.
Wired Rain Sensor. Fit the connector of the sensor lead. Check that the two-core cable enters the timer by way of the slot
provided in the rear of the housing.
1
cod. 90915
2
3
OK!!!
For Tempo Logic (cod.): 8483
RF Rain Sensor. Install the RF Rain Sensor Interface, routing the wire antenna through the relative clips.
1
2
cod. 90831
cod. 8480
For Tempo Logic (cod.): 8483
Tempo Logic
User manual
Pag. 6
PROTECTION IN WINTER. At the end of the watering season and before winter disconnect the timer from the tap,
remove the batteries and store the device indoors, protected from frost and damp. This will ensure that the timer
remains as good as new for many springs and summers to come!
1
2
3
OFF!
a
c
+
+
AA
AA
b
For Tempo Logic (cod.): 8483
For more information and further details, please consult the instruction manual supplied with the product.