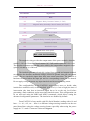
1
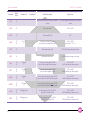
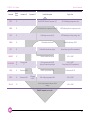
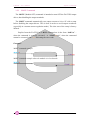
FAST-PS – User’s Manual FAST-PS MAGNET POWER SUPPLY SYSTEMS Current- and Voltage-Controlled Bipolar Digital Power Supply Series User’s Manual All Rights Reserved © CAEN ELS d.o.o. Rev. 1.0 – November 2015 1 FAST-PS – User’s Manual 2 FAST-PS – User’s Manual Table Of Contents 1. INTRODUCTION................................................................................................ 9 1.1 FAST-PS OVERVIEW ...................................................................................... 9 1.2 FAST-PS AT A GLANCE ................................................................................ 10 1.3 MODES OF OPERATION.................................................................................. 12 1.3.1 Regulation Mode ...................................................................................... 12 1.3.2 Control Mode ........................................................................................... 12 1.3.3 Update Mode ............................................................................................ 13 1.4 INSTALLATION .............................................................................................. 13 1.5 CONNECTORS ................................................................................................ 15 1.5.1 Remote Sensing ........................................................................................ 17 1.6 OPTIONS ........................................................................................................ 18 1.6.1 Analog Control Input ............................................................................... 18 1.6.1 Trigger Input ............................................................................................ 19 1.6.2 Front Panel Indicators ............................................................................. 21 1.7 EXTERNAL INTERLOCKS................................................................................ 21 1.7.1 Interlock Enable/Disable Mask................................................................ 22 1.7.2 Interlock Activation Level Mask .............................................................. 22 1.7.3 Interlock Intervention Time...................................................................... 23 1.7.4 Interlock Identification Name .................................................................. 23 1.8 INTERNAL PROTECTIONS ............................................................................... 23 1.8.1 Earth Leakage Current ............................................................................ 24 1.8.2 Earth Fuse ................................................................................................ 24 1.8.3 Regulation Fault ...................................................................................... 24 1.8.4 Input OVerCurrent - OVC ....................................................................... 25 1.8.5 OVerPower - OVP ................................................................................... 25 1.8.6 Crow-Bar ................................................................................................. 26 1.8.7 OVerTemperature - OVT ......................................................................... 26 1.8.8 DC-Link Undervoltage............................................................................. 26 1.9 WAVEFORM .................................................................................................. 27 1.10 STATUS REGISTER ......................................................................................... 28 2. LOCAL CONTROL .......................................................................................... 29 2.1 NAVIGATION SWITCH.................................................................................... 29 2.2 DISPLAY ........................................................................................................ 30 2.2.1 Power-up .................................................................................................. 30 2.2.2 Home Screen ............................................................................................ 31 2.2.3 Menu Page ............................................................................................... 33 2.2.3.1 Control Page..................................................................................... 34 2.2.3.2 Config Page ...................................................................................... 35 2.2.3.3 Advanced Page................................................................................. 36 3. SOFTWARE COMMANDS ............................................................................. 37 3.1 3.2 3.3 3.4 3.5 COMMAND SYNTAX ...................................................................................... 37 COMMAND REPLIES ...................................................................................... 38 ERROR TABLE ............................................................................................... 40 COMMAND TABLE......................................................................................... 41 BASIC COMMANDS ........................................................................................ 44 3 FAST-PS – User’s Manual 3.5.1 MON Command ....................................................................................... 44 3.5.2 MOFF Command ..................................................................................... 45 3.5.3 VER Command ......................................................................................... 46 3.5.4 MST Command......................................................................................... 47 3.5.5 MRESET Command ................................................................................. 48 3.5.6 MRI Command ......................................................................................... 49 3.5.7 MRV Command ........................................................................................ 50 3.5.8 LOOP Command ...................................................................................... 51 3.5.9 MWI Command ........................................................................................ 53 3.5.10 MWV Command ................................................................................... 54 3.5.11 MWIR Command .................................................................................. 55 3.5.12 MSRI Command ................................................................................... 57 3.5.13 MWVR Command................................................................................. 58 3.5.14 MSRV Command .................................................................................. 60 3.5.15 MRT Command .................................................................................... 61 3.5.16 MRW Command ................................................................................... 62 3.5.17 MGC Command ................................................................................... 63 3.5.18 MRID Command .................................................................................. 64 3.6 CONFIGURATION COMMANDS ....................................................................... 65 3.6.1 MRG Command ....................................................................................... 67 3.6.2 MWG Command....................................................................................... 68 3.6.3 PASSWORD Command ............................................................................ 69 3.6.4 MSAVE Command ................................................................................... 71 4. MECHANICAL DIMENSIONS....................................................................... 72 5. TECHNICAL SPECIFICATIONS .................................................................. 73 4 FAST-PS – User’s Manual Document Revisions Document Revision 0.3 1.0 Date October 7th 2015 November 26th 2015 Comment Draft Release First Public Release 5 FAST-PS – User’s Manual Safety information - Warnings CAEN ELS will repair or replace any product within the guarantee period if the Guarantor declares that the product is defective due to workmanship or materials and has not been caused by mishandling, negligence on behalf of the User, accident or any abnormal conditions or operations. Please read carefully the manual before operating any part of the instrument WARNING Do NOT open the boxes CAEN ELS d.o.o. declines all responsibility for damages or injuries caused by an improper use of the Modules due to negligence on behalf of the User. It is strongly recommended to read thoroughly this User's Manual before any kind of operation. CAEN ELS d.o.o. reserves the right to change partially or entirely the contents of this Manual at any time and without giving any notice. Disposal of the Product The product must never be dumped in the Municipal Waste. Please check your local regulations for disposal of electronics products. 6 FAST-PS – User’s Manual Read over the instruction manual carefully before using the instrument. The following precautions should be strictly observed before using the power supply: WARNING CAUTION Do not use this product in any manner not specified by the manufacturer. The protective features of this product may be impaired if it is used in a manner not specified in this manual. Do not use the device if it is damaged. Before you use the device, inspect the instrument for possible cracks or breaks before each use. Do not operate the device around explosives gas, vapor or dust. Always use the device with the cables provided. Turn off the device before establishing any connection. Do not operate the device with the cover removed or loosened. Do not install substitute parts or perform any unauthorized modification to the product. Return the product to the manufacturer for service and repair to ensure that safety features are maintained This instrument is designed for indoor use and in area with low condensation. 7 FAST-PS – User’s Manual The following table shows the general environmental requirements for a correct operation of the instrument: 8 Environmental Conditions Requirements Operating Temperature 0°C to 50°C Operating Humidity 30% to 85% RH (non-condensing) Storage Temperature -10°C to 60°C Storage Humidity 5% to 90% RH (non-condensing) FAST-PS – User’s Manual 1. Introduction This chapter describes the general characteristics and main features of the FASTPS bipolar power supply series. 1.1 FAST-PS Overview High performances, high efficiency, high stability, easiness of configuration and maintenance are the key features of the FAST-PS power supply series. The FAST-PS is an independent current- or voltage-controlled digital bipolar power supply module. There are available different models with different current and voltage ranges: Model Name Current Voltage Maximum Power FAST-PS 0520-100 ±5 A ±20 V 100 W FAST-PS 0540-200 ±5 A ±40 V 200 W FAST-PS 0580-400 ±5 A ±80 V 400 W FAST-PS 1020-200 ±10 A ±20 V 200 W FAST-PS 1040-400 ±10 A ±40 V 400 W FAST-PS 2020-400 ±20 A ±20 V 400 W FAST-PS 2040-600 ±20 A ±40 V 600 W FAST-PS 3020-600 ±30 A ±20 V 600 W Table 1: FAST-PS models The FAST-PS module is compact and fits in a single 19-inch 1U standard crate. The power unit implements a completely digital control loop with a Pulse Width Modulation (PWM) generation technique that allows to adapt the system to any load condition. The control board houses a dedicated FPGA with integrated dual-core ARM CPU. The loop regulation task is performed directly by the FPGA logic, in order to have high performance and deterministic loop control. On the ARM CPU it is 9 FAST-PS – User’s Manual installed an embedded Linux OS, that supervises all process as communication, diagnostics and local interface handling. Remote communication is guaranteed by means of an Ethernet 10/100/1000 autosensing socket present on the front panel of the power unit. The power supply can be also monitored and controlled via a navigation switch and a graphic high resolution color display featuring user-friendly menus. In addition to the standard Ethernet interface it is possible to communicate with the unit using the SFP-ports on the front panel. This interfaces allows to communicate with the unit using a proprietary packet structure with a very high update rate (more than 10 kHz). These ports are connected directly to the FPGA logic and so the given packet is elaborated directly by the hardware logic. This approach eliminates the software stratification that manages the packet and the computational time is smaller and deterministic, allowing a very high update rate of the setpoint, giving the user more flexibility and excellent rates for the digital control of the power supply. 1.2 FAST-PS at a glance The FAST-PS system is composed by a single 19-inch 1U crate. The FAST-PS unit and its I/O connections can be easily seen in Figure 1 (front view) and Figure 2 (rear view). Figure 1: FAST-PS front view On the front side of the FAST-PS unit are placed: a power switch, a colour graphic display with navigation switch for the local control of the module, three communication sockets (2 SFPs and one Ethernet ports), four status LEDs and one USB device connector. 10 FAST-PS – User’s Manual Figure 2: FAST-PS rear view On the rear side of the unit are placed: AC power line input, fuse holder, the output connection, the D-Sub 15 Female Pin I/O connector. From units of all models with SN ending in x010 and later, a separate connector for the voltage remote sensing is also present below the I/O connector. The used fuse by the FAST-PS series has the fast acting blow characteristic with 1A fuse current. Some models can mount one or two BNC connectors reserved for additional features of the power supply. 11 FAST-PS – User’s Manual 1.3 Modes of Operation The FAST-PS system has multiple features and multiple configurations that allow using the unit for a very widespread topology of applications. A brief summary of the basic configurations that the unit is able to handle are hereafter presented. 1.3.1 Regulation Mode The FAST-PS can be used as current-controlled or voltage-controlled bipolar units. The regulation types are: C.C. mode: it is the Constant Current regulation mode. The power supply regulates the output current set by the user; C.V. mode: it is the Constant Voltage regulation mode. The power supply regulates the output voltage set by the user. In C.V. mode it is possible to use the remote sensing terminals that allow regulating the output voltage directly on the load thus compensating the voltage drops on the output cables. The maximum voltage drop that the power supply is able to compensate is of 0.5V. 1.3.2 Control Mode The FAST-PS unit can be controlled in three main different ways, hereafter listed: 12 LOCAL control: the unit can be controlled directly via the front panel color display and the navigation switch. When the unit is set in LOCAL mode it is possible to perform readings and monitor from the remote interface but any setting command is denied; REMOTE control: the unit is controlled via the TCP-IP Ethernet interface. The setting and control of the unit can be performed exclusively via this interface while monitoring is still possible from the local display; FAST-INTERFACE control: this interface allows controlling the unit via a proprietary protocol over the SFP/SFP+ interfaces (optical or electrical) and it is meant to be used for very fast applications. Update rates of more than 10 kHz are reachable using this communication channel. FAST-PS – User’s Manual 1.3.3 Update Mode The current or voltage setting of the unit can also be performed in four different modes: NORMAL: the update of the set-point (current or voltage, depending on the operation mode) is performed as soon as a new set-point is received via the remote, local or fast interfaces; WAVEFORM: the update of the set-point is performed on a specific timing (defined as a “waveform” attribute, more information on the Waveform section) and it is done internally; TRIGGER: the set-point is updated by an external event – i.e. a hardware trigger coming from the rear BNC connector. Please note that this mode of operation is obtainable only on the units that have the external trigger input connector installed (ordering option – factory configurable); ANALOG INPUT: the unit is controlled by an external signal that is fed to the rear BNC connector. The unit acts as a C.C. or C.V. generator depending on the pre-set Regulation Mode. This option is only available in units that have been factory configured (ordering option). Please note that the last two Update Modes of operation are available only in models that have been factory configured at the time of purchase to have the Trigger Input and/or the Analog Control Input features. 1.4 Installation The FAST-PS-M module can be used either as a desktop unit or as a rackmount device since the unit form factor is designed to be installed it in a standard 19inch cabinet. The AC line input connector on the rear panel is a standard IEC male socket, as shown in Figure 3. The module is designed for universal AC input range since it can operate with voltage from 100V to 260V and input frequency ranging from 47 Hz to 63 Hz. All the FAST-PS-M units are directly shipped with the corresponding power cord (suitable for the destination country of the purchase). 13 FAST-PS – User’s Manual Figure 3: AC Power Line input socket For safety reasons, the mains supply voltage ratings should not exceed above voltage range. 14 FAST-PS – User’s Manual 1.5 Connectors The load needs to be connected to the output connector placed on the rear panel of the unit as shown in Figure 4. This type of connector offers a convenient and reliable form of connection; it is suggested to connect the wire directly to the connector. The suggested cross-sectional area of the cables is rated to be from AWG 24 to AWG 6. Figure 4: Output Connector The symbols “+” and “-” on the rear panel indicate the positive and negative polarity of the terminal respectively. The FAST-PS module has two configurable dry-contact input interlocks and output status signals that are directly available on the D-Sub 15 Pin Female connector on the rear panel (Figure 5). A mating connector, a standard D-Sub 15 Pin Male type, can be installed in order to use/access these available signals. Pin #8 Pin #1 Pin #15 Pin #9 Figure 5: I/O Connector The pin index of the D-Sub 15 rear connector is summarized in the following table: 15 FAST-PS – User’s Manual Pin Number Signal name #1 - #4 DNC #5 Magnetic Relay Common Contact (C-TAP) #6 Magnetic Relay Normally Closed Contact (NC-TAP) #7 Interlock #2 input #8 Interlock #1 return #9-#12 DNC #13 Magnetic Relay Normally Open Contact (NO-TAP) #14 Interlock #2 return #15 Interlock #1 input Table 2: D-sub 15 Pin pinout DNC = DO NOT CONNECT The magnetic relay provides the output status of the power module: when the module is ON, the Normally Closed contact (NC-TAP) switch opens and vice-versa. The absolute maximum current that can be sunk by the output status magnetic relays (pins #5, #6 and #13) is 200 mA. The interlock pins are galvanically isolated from ground and outputs terminal, nevertheless the absolute maximum voltage, referred to ground, that pins can sustain is 48V. The two interlocks inputs have their own return connection. The interlock is hardware-activated when the input pin and its corresponding return pin are shorted. Do not apply voltage between any input interlock and its corresponding return. The configurability of the FAST-PS series allows users to decide what interlock are enabled or not, set the interlock “trip” level (i.e. low or high), the time of intervention (the time that an interlock signal has to be at the trip level before generating a fault condition) and an associated interlock name. This configuration can be set and read using the MRG and MWG commands, which allows setting the advanced configuration parameters. The interlocks are disabled by default. From FAST-PS of any model with SN (Serial Number) ending with x10 and later – i.e. x11, x12, etc. – there is a different voltage-sensing connector on the rear panel that allows using the voltage sensing feature especially when using the power supply in C.V. mode. Connector is shown in Figure 6. 16 FAST-PS – User’s Manual Pin #1 Pin #4 Figure 6: Remote Sensing Connector 1.5.1 Remote Sensing The FAST-PS can be used in constant voltage (CV) mode and two remote sensing terminals are present on the corresponding connector on the rear panel: - VSENSE + on pin #1: +S; VOUT + on pin #2: +; VOUT - on pin #3: –; VSENSE – on pin #4: -S. By using these two “sensing” pins it is possible to sense the output voltage directly on the load, thus recovering possible voltage drops on the output cables up to 0.5V. It is strongly suggested to use twisted cables when using the remote sensing feature in order minimize possible noise pick-up. The FAST-PS is shipped with a mating connector for the remote sensing that short-circuits the +S and + pins and the –S and – pins respectively. This configuration performs the remote sensing directly at the output connector of the power unit. Leaving +S and –S pins disconnected will make the power supply sense the output voltage directly at the output terminal connections. When using the remote sensing feature leave pins #2 (+) and #3 (–) disconnected. In order to perform remote sensing at different points – e.g. the load terminals – it would be necessary to connect Pin #1 and Pin #4 as in Figure 7: FAST-PS Power Cables LOAD Output Connector + +S -S Sensing Cables Figure 7: Example of Remote Sensing 17 FAST-PS – User’s Manual 1.6 Options The FAST-PS can be configured with options that are factory-configured and can be found on the rear panel in places of connectors A and B. The standard version of the FAST-PS, on the rear panel, is as shown in the following Figure 8 and Figure 9. Figure 8: no options installed Figure 9: A and B options installed Options A and B are related to the following ordering codes (to be added at the time of the order): Ordering Code Description FASTPSACINXA Analog Control Input (±10V) on BNC connector - optional FASTPSTRINXA Trigger Input on BNC connector - optional A brief description of the two options is presented hereafter. 1.6.1 Analog Control Input An input that allows the FAST-PS to be controlled as an “amplifier” is provided on the rear panel on a BNC connector on the “A” socket. This input is labelled as “AN CTRL”. This input accepts signals ranging from -10V to +10V and generates an output which is proportional to the input signal, meaning a –Full-Scale for a -10V input, 0 for a 0V input and +Full-Scale for a +10V input. An example of the relation between the 18 FAST-PS – User’s Manual analog input signal and the output (can be either current or voltage, depending on the Regulation mode) is shown in Figure 10. Analog Control +100% +10V -10V AN CTRL OUTPUT -100% Figure 10: AN CTRL vs OUTPUT dependance 1.6.1 Trigger Input An input that allows the FAST-PS to be triggered is provided on the rear panel on a BNC connector on the “B” socket. This input is labelled as “TRG IN”. This input accepts TTL (5V) and LVTTL (3.3V) compatible signals and should be driven by a low-impedance source or generator. The logic levels are subject to a hysteresis that allows for this recognized values that guarantee correct operation of the trigger as listed in Table 3: Logic Level Value Low-to-HIGH > 2.2 V High-to-LOW < 0.7 V Table 3: Trigger Logic Levels 19 FAST-PS – User’s Manual The absolute maximum rating for the Trigger Input signal is of 5.5 V (a higher voltage level applied to this input can seriously damage the device). A visual representation of the voltage levels for the trigger operation is presented in the following Figure 11: Trigger Input 6 ABSOLUTE MAXIMUM 5 4 Trigger Signal 3 HIGH LEVEL 2 1 0 LOW LEVEL Figure 11: Trigger Thresholds 20 FAST-PS – User’s Manual 1.6.2 Front Panel Indicators The FAST-PS has four (4) front panel LED indicators as shown in the following Figure 12. Figure 12: front panel indicators The front panel indicators and their behaviour are hereafter listed (clockwise starting from top-left): C.C.: Constant Current mode (blue). If turned on, the FAST-PS is working in constant-current mode. When off, it is regulating the ouput voltage; STAT (green): signals the correct operation of the module diagnostics. The blinking signaling the correct operation has a 1-second period; OUT ON (blue): it signals if the output is enabled or not. The blue LED is on if the output is enabled and it is regualting output current or voltage; ALARM (red): if turned on signals that the power unit has experienced a fault condition. It is necessary to perform a “reset fault” command in order to turn off this LED and to turn to module output again (only if the fault condition/cause has been removed). 1.7 External Interlocks The system is provided with two external interlock inputs that can be configured as mode of operation as described hereafter. 21 FAST-PS – User’s Manual 1.7.1 Interlock Enable/Disable Mask The FAST-PS series external interlock can be enabled or disabled by writing to the corresponding Interlock Enable/Disable Mask field of the advanced configuration parameters (field #90), using the MWG command. The value to be written is in ASCII format, representing the corresponding bit mask, as shown in the following table: Interlock #2 Interlock #1 Bit Mask ASCII string Disabled (0) Disabled (0) 00 0x0 Disabled (0) Enabled (1) 01 0x1 Enabled (1) Disabled (0) 10 0x2 Enabled (1) Enabled (1) 11 0x3 Table 4: Enable/Disable Mask Parameter Example: if only interlock #2 needs to be enabled, the following command has to be se sent to the power supply (after having un-locked the password protection): “MWG:90:0x2\r”. 1.7.2 Interlock Activation Level Mask Each external interlock can be chosen to trip at high or low logic level. The high level means that the interlock trips when the interlock input signal is shorted, otherwise the low level that the interlock trips when the input is open. To configure the interlock state mask it is necessary to write on the advanced configuration parameters (field #91). The value to be written is an ASCII format representing the corresponding bit mask, as shown in the following table: Interlock #2 Interlock #1 Bit Mask ASCII string Low (0) Low (0) 00 0x0 Low (0) High (1) 01 0x1 High (1) Low (0) 10 0x2 High (1) High (1) 11 0x3 Table 5: Activation Level Mask Parameter 22 FAST-PS – User’s Manual Example: if interlock #1 needs to have a high activation level (trip when the interlock input signal is shorted), the following command has to be se sent to the power unit: “MWG:91:0x1\r”. This setting has no effect it the interlock is not enabled. 1.7.3 Interlock Intervention Time The module allows to set also the interlock intervention time (how long an interlock signal need to be at its activation level before tripping and thus generating a fault condition). The Intervention time parameters are stored in the field #92 for Interlock #1 and in field #94 for interlock #2. The value to be set is in ASCII format, representing the intervention time in milliseconds. The minimum settable value is 0 (immediate generating of fault condition) and the maximum value is 10.000 ms (corresponding to 10 seconds). Example: if interlock #1 needs to have an interlock intervention time of 750 ms, the following command has to be se sent to the power unit: “MWG:92:750\r”. This setting has no effect if the interlock is disabled. 1.7.4 Interlock Identification Name The FAST-PS also allows associating a name to the interlocks in order to read form the remote interface or to display on the local display the interlock condition name. The Intervention names are stored in the field #93 for Interlock #1 and in field #95 for interlock #2. The value to be set is in ASCII format, representing the interlock name. Example: if the interlock #1 is associated to the cabinet door open, the following command can to be se sent to the power unit: “MWG:93:Cabinet door\r”. This setting has not effect if the interlock is disabled. 1.8 Internal Protections The FAST-PS is equipped with several internal protections that allow configuring the unit for optimal operation. These protections have the dual use of protecting the unit and the connected load/device from unwanted damages or undesired operation conditions. A brief description of the FAST-PS internal protections is hereafter presented with some more basic considerations on their operation and use. 23 FAST-PS – User’s Manual 1.8.1 Earth Leakage Current This protection continuously monitors the current flowing to earth and it has a settable threshold [A] that can be set by experienced users. The tripping of this protection generates a fault condition that shuts the power supply output off. 1.8.2 Earth Fuse An earth fuse is present on the rear side of each FAST-PS and it is rated at 1A Class T. The blowing of this fuse generates a fault condition of the power unit and the fuse needs to be replaced in order to get rid of the fault condition before resetting the FAST-PS internal status register. The fuse housing is shown in Figure 13. Figure 13: earth fuse housing 1.8.3 Regulation Fault This fault is generated when the power supply is not able to correctly regulate the output current or output voltage (in CC and CV mode respectively). Different thresholds for the differential current, differential voltage and the intervention time can be set by experienced users. A typical example of a regulation fault is represented by a 10-Ω load on a FAST-PS 3020-600 for example where the maximum power supply output voltage is 20V. By setting a current of 5A to the load, the output voltage should reach a value of 50V which obviously is not feasible: once the power unit supplies 2A to the load it already reaches the maximum output voltage condition. The power unit recognizes this difference between the set-point – i.e. 5A – and the actual output current, thus generating a “regulation fault” condition. The tripping of this fault implies an automatic turning off of the FAST-PS unit. A status reset – i.e. reset faults – needs to be performed in order to turn the unit back on. 24 FAST-PS – User’s Manual 1.8.4 Input OVerCurrent - OVC The internal current drawn from the AC/DC power section of the unit is sensed by a hall transducer that, in conjunction with a comparator, generates a signal that turns off the device. The threshold value of intervention depends on the FAST-PS specific model and cannot be changed by the user. The tripping of this fault generates a latched fault condition that needs to be reset by the user before turning the power supply output back on again. 1.8.5 OVerPower - OVP The FAST-PS can work continuously at a 5% over its power rating as expressed in the specifications. The module is able to work at a power comprised between 5% and 10% over its rating – i.e. between 105% and 110% – for a 20-second period before turning off on an over-power fault. If the actual output power drawn from the power supply is more than 10% above its nominal ratings the power unit will shut down after 1-second. This behaviour summarized in the following Table 6 (an example of a FASTPS 2020-400 unit is also listed): Output Power Time of Operation < 105% of PN Continuous e.g. FAST-PS 2020-400: < 420W < 110% of PN 20 s e.g. FAST-PS 2020-400: < 440W ≥ 110% of PN e.g. FAST-PS 2020-400: ≥ 440W 1s Table 6: FAST-PS Output Power where PN is the rated nominal output power of the power supply unit, as indicated in the technical specifications. 25 FAST-PS – User’s Manual 1.8.6 Crow-Bar The energy stored in reactive loads – e.g. inductors – needs to be dissipated in order to protect the power supply from damages when, for example, the output stage gets suddenly disconnected. A hardware circuit with some voltage suppressors triggering TRIACs is present on each FAST-PS model with different triggering thresholds. This circuit allows protecting the unit from unwanted and dangerous over-voltage conditions. Being a hardware protection, the Crow-Bar is fixed for every model and the intervention thresholds are different based on the FAST-PS maximum voltage rating. 1.8.7 OVerTemperature - OVT Internal monitoring of temperature is performed in different places inside the FAST-PS power supply. If a pre-defined threshold is exceeded by any of these internal sensors, an OVT condition is generated, thus shutting off the power unit. The threshold value [°C] can be set by experienced users. A reset fault operation needs to be executed on the status register of the FAST-PS before turning the output off again. 1.8.8 DC-Link Undervoltage The FAST-PS is composed internally by a power AC-DC section cascaded with a DC-DC stage. The voltage generated by the AC-DC section is also called DCLink and it is proportional to the maximum rated voltage for the specific model. Usually the DC-Link voltage is about 20% higher than the rated output of the FASTPS. A continuous monitoring of the DC-Link voltage is performed in order to always guarantee the capability of obtaining the maximum voltage from the power supply. If the DC-Link drops below a certain threshold, the power supply unit could not be able to regulate correctly or some faulty conditions have arisen so that a fault conditions is generated. It is necessary to reset the status register and to get rid of the fault cause before turning the power supply back on again. 26 FAST-PS – User’s Manual 1.9 Waveform The FAST-PS is able to act as a waveform generator both in current and in voltage regulation modes. The waveform is stored internally into the power supply in a point-by-point manner and it gives a lot of flexibility since the maximum number of points of the waveform can be defined as well as the sampling period (of the waveform execution). The minimum time interval for the waveform execution period is rated at 0.1 ms = 100 µs, giving an equivalent output waveform update rate of 10 kHz. In order to correctly execute the output waveform it is necessary to “tune” the PID regulator parameters of the power supply to the specific load (and have an adequate load at the output). More information on the waveform feature can be found in the corresponding command section. 27 FAST-PS – User’s Manual 1.10 Status Register The following table shows the FAST-PS internal status register structure: Bit # Bit name Description #31 reserved #30 reserved #29 OVP Over Power condition reserved #28 #27 Ext. Interlock #2 External interlock 2 has tripped #26 Ext. Interlock #1 External interlock 1 has tripped #25 Excessive Ripple Module is having excessive ripple #24 Regulation Fault Modules has experienced a regulation fault #23 Earth Fuse Earth fuse is blown #22 Earth Leakage Earth current leakage fault #21 DC-Link Fault DC-Link under-voltage condition #20 OVT Over Temperature condition reserved #19 #18 Crowbar Crowbar protection intervention #17 Input OVC Input Over Current #16 reserved #15 reserved #14 reserved #13 Waveform Waveform is in execution #12 Ramping Module is ramping current or voltage #11 reserved #10 reserved #9 reserved #8 reserved #7 Update mode [bit 1] normal, waveform, Triggered FIFO, analog input #6 Update mode [bit 0] normal, waveform, Triggered FIFO, analog input #5 Regulation mode C.C. or C.V. output regulation mode reserved #4 #3 Control Mode [bit 1] Indicates the mode of operation of the unit (LOC, REM, FCI) #2 Control Mode [bit 0] Indicates the mode of operation of the unit (LOC, REM, FCI) #1 Fault condition This bit is set if the module has experienced a fault condition #0 ON/OFF This bit is set when the module is enabled and correctly regulating the output Table 7: Status Register structure 28 FAST-PS – User’s Manual 2. Local Control This chapter describes the local control functionalities that are provided by the FAST-PS power supply and some useful information on how to use it. The power supply can work either in LOCAL mode or in REMOTE mode. Please note that only readbacks are allowed from the remote communication interfaces when the unit is in LOCAL mode (i.e. settings are inhibited). 2.1 Navigation Switch Each FAST-PS power supply module is equipped with a Navigation Switch on the front panel of the unit as shown in the following Figure 14: Figure 14: Navigation switch There are multiple actions that can be performed via this front navigation switch: Left, Right, Up, Down arrow pushbuttons; Internal encoder rotation (CW and CCW); Central pushbutton (it will also be referred to as “Enter”). 29 FAST-PS – User’s Manual 2.2 Display The colour display on the FAST-PS power supply unit allows users to visualize information about the power supply status and to control the unit in order to use it locally. Screens and pages of the display can be navigated from the navigation switch though user friendly menus and sub-menus. 2.2.1 Power-up The FAST-PS, upon power-up or power-cycling, will display an empty screen until the unit embedded OS is initialized. Please note that this procedure will take approximately 25-seconds before the Home Screen is displayed. 30 FAST-PS – User’s Manual 2.2.2 Home Screen The FAST-PS home screen is the first loaded page upon power-up or powercycling of the module, it is shown in Figure 15, and contains information on: the FAST-PS model; the module IP address; output current readback value [A] with the light blue status bar; output voltage readback value [V] with the green status bar; the status of the output – i.e. ON or OFF; the status of the control – i.e. Local or Remote; the module Identification Name; the regulation mode of the unit – i.e. constant-current or constant-voltage. Figure 15: Home Screen The Home screen presents some indications on the right side as: ON – OFF: shows if the power supply output is enabled or not; REM – LOC – FCI: shows if the module is in Local, Remote or Fast Control Interface control mode; C.C. – C.V.: shows if the module is working in C.C. or in C.V. regulation mode. An example of the indications on the right side of the Home screen is hereafter shown in Figure 16: Figure 16: Home Screen indicators 31 FAST-PS – User’s Manual If the module has experienced one or more faults – e.g. interlock intervention, over-temperature, etc. – the home page screen would display a list the faults, turning also the module OFF. The power supply latches on every fault recognized by the internal logic so that every type of fault is recorded: this means that the first fault happening does not ban the other ones to be recorded so that, giving users more information, permits a better investigation of the fault cause. 32 FAST-PS – User’s Manual 2.2.3 Menu Page The Menu page is reachable by performing any action on the navigation switch when in the Home Screen. The Menu Page gives access to all the local features of the FAST-PS power supply unit. There are five different options that can be selected as shown in Figure 17: Figure 17: Menu Page The accessible sub-pages and/or actions from this page are hereafter listed (note that the selected sub-menu is lightened in a lighter shade): Control – sub-page; Config – sub-page; Advanced – sub-page; Reset faults - action; Return to main - action. The access to each sub-menu (or action) is necessary to highlight the selected rectangle by using the encoder or the arrows of the navigation switch and press the “Enter” button. The Reset faults rectangle, once pressed, resets the status register of the power supply and sends back to the visualization of the Home Screen. The Return to main rectangle, once pressed, sends back the visualization to the Home Screen. 33 FAST-PS – User’s Manual 2.2.3.1 Control Page The Control Page is reachable by selecting the corresponding rectangle from the Menu Page. The Control Page gives access to the main settings of the FAST-PS power supply unit. An example of a Control Page visualization is shown in Figure 18: Figure 18: Control Page From this screen is possible to turn the power supply unit ON and OFF and it is possible to set the output current or voltage (depending on the regulation type, C.C. or C.V.). Actual values of output current and output voltage (readbacks) can also be seen at the bottom line of this page. 34 FAST-PS – User’s Manual 2.2.3.2 Config Page The Config Page is reachable by selecting the corresponding rectangle from the Menu Page. This page allows the user to set the control mode of the power supply – e.g. LOCAL or REMOTE – to select the regulation mode (C.C. or C.V.) and to set the slew rate in [A/s] or [V/s] depending on the selected regulation mode. An example of a Config Page visualization is shown in Figure 19: Figure 19: Config Page The firmware installed version is shown at the bottom of this page (FW Version). 35 FAST-PS – User’s Manual 2.2.3.3 Advanced Page The Advanced Page is reachable by selecting the corresponding rectangle from the Menu Page. This page allows to locally set the power supply Ethernet IP address, the Network Mas and the Gateway. An example of an Advanced Page visualization is shown in Figure 20: Figure 20: Advanced Page It is very important to notice that once the "OK" button has been clicked, the user can remotely communicate and get control of the power supply again only by opening a new TCP socket to the IP that has just been set. 36 FAST-PS – User’s Manual Software Commands 3. Software Commands This chapter describes the base TCP/IP software commands used for the control and configuration of the FAST-PS power module. 3.1 Command Syntax The command syntax used by the FAST-PS protocol is described in the following sections. Commands must be sent in ASCII format and are composed by a “command field” and one, two or none “parameter field”, separated by a colon (“:” or “0x3A” in hexadecimal notation). The number of “parameter fields” depends on the specific command. Commands are NOT case sensitive and therefore the command string can be sent either using uppercase or lowercase characters (conversion to uppercase characters is performed internally). Each command must be terminated with the termination sequence. The FAST-PS supports two termination sequences: “carriage return” termination char “\r” (“0x0D” in hexadecimal notation or commonly CR) or “carriage return\line feed” sequence “\r\n” (“0x0D 0x0A” in hexadecimal notation or commonly CRLF). Command Example: MWI:20.5580\r or MWI:20.5580\r\n “MWI” is the command field; “:” is the parameter’s separation character; “20.5580” is the first parameter field; “\r” or “\r\n” are the termination sequences of the command. In the following command description the “\r” termination char is used, but it can be always replaced with the termination sequence “\r\n”. Commands are processed one at a time; therefore user must wait for a response from the unit before sending the next command. 37 FAST-PS – User’s Manual Software Commands All the responses from the FAST-PS module are in upper case and are terminated with the same “carriage return\line feed” sequence (“\r\n”), “0x0D 0x0A” in hexadecimal notation or commonly CRLF. MWI:10.5875\r\n #ACK\r\n or: MWI:10.5875\r #ACK\r\n 3.2 Command Replies The reply from the module depends on the given command. In general the command can be grouped in two categories: Write commands and Read commands. For write commands there are two specific replies that indicate that the command has been correctly elaborated or not. Those replies are hereafter presented: AcKnowledge (“#AK”) indicates that the command is valid and it was correctly elaborated by the device: #AK\r\n “#AK” is the AcKnowledged response to a valid command; “\r\n” is the termination sequence of the reply. Not AcKnowledge (“#NAK”) indicates that the command is either not valid or that it was not accepted by the device; the “NAK” reply is followed by an “error code” field, which can be used to determine the cause of the error (see the List of the Error Codes appendix for a detailed list of all possible error codes): #NAK:01\r\n “#NAK” is the Not AcKnowledged response to an invalid command; “:” is the parameter’s separation character; “01” is the error code, “\r\n” is the termination sequence of the reply. For read commands, the replies are generally formed by an echo string, followed by the corresponding read value. The echo string is preceded by the hash character (“#”) and the echo is separated from the “:” separation character. 38 FAST-PS – User’s Manual Software Commands Some examples are hereafter shown: MRI\r #MRI:12.8875\r\n or: MWI:?\r #MWI:10.9850\r\n or: MRG:90\r #MRG:90:0x2\r\n the read commands are highlighted in blue; the echo string is highlighted in green; the read value is in purple; the termination char is highlighted in red. For more detailed information about the single command please refer to the specific command section. 39 FAST-PS – User’s Manual Software Commands 3.3 Error Table The list of error codes returned with the #NAK reply and their description are hereafter shown: Error Code # Description 01 Unknown command 02 Unknown Parameter 03 Index out of range 04 Not Enough Arguments 05 Privilege Level Requirement not met 06 Saving Error on device 07 Invalid password 08 Power supply in fault 09 Power supply already ON 10 Setpoint is out of model limits 11 Setpoint is out of software limits 12 Setpoint is not a number 13 Module is OFF 14 Slew Rate out of limits 15 Device is set in local mode 16 Module is not in waveform mode 17 Module is in waveform mode 18 Device is set in remote mode 19 Module is already in the selected loop mode 20 Module is not in the selected loop mode 99 Unknown error Table 8: NAK Error code table 40 FAST-PS – User’s Manual Software Commands 3.4 Command Table The list of commands used by the FAST-PS and the corresponding syntax is hereafter presented as well as a description of each command purpose and any special requirements related to the specific command. The base commands are summarized in the following table: 41 FAST-PS – User’s Manual Software Commands Command Read/ Write Parameter #1 Parameter #2 Detailed description Reply value VER R / / Return the module model and installed firmware versions ASCII indicating the module model and firmware version MON W / / Turn on the module “AK” or “NAK” MOFF W / / Turn the module OFF “AK” LOOP W R “I” or “V” “?” / / Set the power module loop mode Query for the power supply loop mode “AK” or “NAK” Loop mode (“I” or “V”) MRI R / / Read output current value ASCII indicating the output read current MRV R / / Read output voltage value ASCII indicating the output read voltage MWI W R I Setpoint “?” / / Set the new current setpoint (ASCII) Query for the last applied current setpoint “AK” or “NAK” ASCII indicating the current setpoint MWV W R V Setpoint “?” / / Set the new current setpoint (ASCII) Query for the last applied setpoint “AK” or “NAK” ASCII indicating the voltage setpoint MWIR W R I Setpoint “?” / / Go to the given setpoint with a ramp (ASCII) Query for the last accepted final ramp setpoint “AK” or “NAK” ASCII indicating the current setpoint MWVR W R V Setpoint “?” / / Go to the given setpoint with a ramp (ASCII) Query for the last accepted final ramp setpoint “AK” or “NAK” ASCII indicating the voltage setpoint MSRI W R I Ramp Slew rate “?” / / Set the I ramp slew rate [A/s] (ASCII) Query for the I ramp slew-rate “AK” or “NAK” ASCII indicating the I ramp slew-rate MSRV W R I Ramp Slew rate “?” / / Set the I ramp slew rate [V/s] (ASCII) Query for the I ramp slew-rate “AK” or “NAK” ASCII indicating the I ramp slew-rate 42 FAST-PS – User’s Manual Software Commands Command Read/ Write Parameter #1 Parameter #2 Detailed description Reply value MRT R / / Read MOSFET Heatsink Temperature [°C] ASCII indicating the temperature value MRW R / / Read estimated active output power value [W] ASCII indicating the active output power value MGC R / / Read leakage current value [A] ASCII indicating the Leakage voltage value MRID R / / Read module identification Module identification (ASCII) MST R / / Read module internal status register Internal status register (Hex representation) MRESET W / / Reset the module status register “AK” or “NAK” PASSWORD W R Password word “?” / Set the password word (ASCII) Query for the actual user privileges “AK” or “NAK” User privileges (ASCII representation) MRG R Parameter field # Read the given parameter field Field content (ASCII) MWG W Parameter field # Cell content (ASCII) Write to the given parameter field “AK” or “NAK” MSAVE W / / Save the used parameter in the non-volatile memory “AK” or “NAK” Table 9: Commands overview table 43 Software Commands FAST-PS – User’s Manual 3.5 Basic Commands In the following section are described the basic commands that allows to control the FAST-PS unit and to monitor its status. 3.5.1 MON Command The MON (Module ON) command is intended to turn ON the FAST-PS output driver, thus enabling the output current terminals and allowing the power supply to regulate and feed current or voltage to the connected load. After the reception of an “MON” command, the power supply automatically sets output current to 0A or 0V (depending if the module is set in constant current or constant voltage mode) the when enabling the output. Replies from the FAST-PS to a MON command are in the form “#AK\r\n” – when the command is correctly executed - or “#NAK:xx\r\n”, when the command cannot be executed, with “xx” indicating the error code. The complete list of the error codes is shown in the Error Table. Sending an MON command when the module output is already enabled generates a non-acknowledgment response. Examples: MON command example: MON\r #AK\r\n MON command example when the module is already enabled (09 code): MON\r #NAK:09\r\n 44 FAST-PS – User’s Manual Software Commands 3.5.2 MOFF Command The MOFF (Module OFF) command is intended to turn OFF the FAST-PS output driver, thus disabling the output terminals. The MOFF command automatically sets output current to 0A or 0V with a ramp before disabling the output drivers. This is done in order to ovoid output overshoots (especially in constant current regulation mode). The slew-rate of the ramp is factory defined. Replies from the FAST-PS to a MON command are in the form “#AK\r\n” – when the command is correctly executed - or “#NAK:xx\r\n”, when the command cannot be executed, with “xx” indicating the error code. Examples: MOFF command example: MOFF\r #AK\r\n MOFF command example when the module is in local mode: MOFF\r #NAK:15\r\n 45 FAST-PS – User’s Manual Software Commands 3.5.3 VER Command The VER command returns the information regarding the FAST-PS model and the current installed firmware version. The response to the VER command is in the following format: #VER:ps_model:fw_version\r\n where “#VER” is the echo string, “ps_model” is the FAST-PS model and “fw_version” is the current firmware version. The echo, model and firmware information are separated by “:”character and the string is terminated with the standard “\r\n” character sequence. Example: VER command example: VER\r #VER:FAST-PS 2020-400:0.9.01\r\n 46 FAST-PS – User’s Manual Software Commands 3.5.4 MST Command The MST command returns the value of the FAST-PS power supply internal status. The response to the MST command is in the following format: #MST:status_reg\r\n where “#MST” is the echo string and “status_reg” is the hexadecimal representation of the internal status register. The internal status register has 32 bits and so its representation is composed by 8 hexadecimal values. For additional information regarding the status register, please refer to the Status Register structure. The MST command, being a reading command, returns a response in any module condition. Example: MST command example (the status register indicates that the module is in fault): MST\r #MST:00000020\r\n 47 Software Commands FAST-PS – User’s Manual 3.5.5 MRESET Command The MRESET command has to be used in order to perform a complete reset of the module status register. This is needed, for example, to enable the channel output again after a fault condition has been fixed. Replies from the FAST-PS to a MRESET command are in the form “#AK\r\n” – when the command is correctly executed - or “#NAK:xx\r\n”, when the command cannot be executed (“xx” is the error code). The complete list of the error codes is shown in the Error Table. Examples: MRESET command example: MRESET\r #AK\r\n MRESET command example when the module is in local mode: MRESET\r #NAK:15\r\n 48 FAST-PS – User’s Manual Software Commands 3.5.6 MRI Command The MRI command returns the readback value of the power supply actual output current. The readback current value is represented with 6-digit precision. Replies from the power supply to this command are in the following format: #MRI:current_value\r\n where “#MRI” is the echo string, “current_value” is the output current value readback in Ampere [A]. Example: MRI command example: MRI\r #MRI:22.123456\r\n 49 FAST-PS – User’s Manual Software Commands 3.5.7 MRV Command The MRV command returns the readback value of the power supply actual output voltage. The voltage readback value is represented with 6-digit precision. Replies from the power supply to this command are in the following format: #MRV:voltage_value\r\n where “#MRV” is the echo string, “voltage_value” is the output voltage value readback in Volts [V]. Example: MRV command example: MRV\r #MRV:10.123456\r\n 50 FAST-PS – User’s Manual Software Commands 3.5.8 LOOP Command The LOOP command can be used in order to select the mode of loop control of the FAST-PS unit. There are two possible mode of operation: Constant Current (c.c.), Constant Voltage (c.v.). To set the mode of operation the following commands has to be used: LOOP:mode\r\n where “mode” is a single char indicating the mode of operation: “I” for Constant Current (c.c.) mode and “V” for Constant Voltage (c.c.) mode. Replies from the FAST-PS to a LOOP set are in the form “#AK\r\n” – when the command is correctly executed - or “#NAK:xx\r\n”, when the command cannot be executed (“xx” is the error code). The two mode of operation can be changed only when the module is turned OFF. To read the current used loop mode of operation the query command: “LOOP:?” has to be used. The response to the “LOOP:?” query command is in the following format: #LOOP:mode \r\n where “#LOOP” is the echo string, “mode” is a single character indicating the loop mode (“I” for constant current mode and “V” for constant voltage mode). Examples: LOOP set example to set the constant current mode: LOOP:I\r #AK\r\n LOOP set example when the module is ON: LOOP:V\r #NAK:09\r\n LOOP query example when the module is in constant voltage (c.v.) mode: 51 Software Commands FAST-PS – User’s Manual LOOP:?\r #LOOP:V\r\n 52 FAST-PS – User’s Manual Software Commands 3.5.9 MWI Command The MWI command can be used to set the output current value when the module is in the constant current mode (see LOOP Command). This command is usually needed when running feedback-related application and for small changes in the output current. The use of this command is alternative to the MWIR Command (ramping current command), which is advised for regular use. This command has the following format: MWI:current_setpoint\r\n where “current_setpoint” is the desired current set-point expressed in Ampere [A]. Replies from the FAST-PS to a MWI set are in the form “#AK\r\n” – when the command is correctly executed - or “#NAK:xx\r\n”, when the command cannot be executed (“xx” is the error code). To read last applied current setpoint the query command: “MWI:?” has to be used. The response to this query command is in the following format: #MWI:current_setpoint\r\n where “#MWI” is the echo string, “current_setpoint” is the last applied current setpoint expressed in Ampere [A]. Examples: MWI set example, with current setpoint +1.52 A: MWI:1.52\r #AK\r\n MWI set example when the module is OFF: MWI:1.52\r #NAK:13\r\n MWI query example: MWI:?\r #MWI:1.52\r\n 53 FAST-PS – User’s Manual Software Commands 3.5.10 MWV Command The MWV command can be used to set the output voltage value when the constant voltage mode is used (see LOOP Command). The use of this command is alternative to the MWVR Command (ramping voltage command). This command has the following format: MWV:voltage_setpoint\r\n where “voltage_setpoint” is the desired voltage set-point expressed in Volts [V]. Replies from the FAST-PS to a MWV set are in the form “#AK\r\n” – when the command is correctly executed - or “#NAK:xx\r\n”, when the command cannot be executed (“xx” is the error code). To read last applied voltage setpoint the query command: “MWV:?” has to be used. The response to this query command is in the following format: #MWV:voltage_setpoint \r\n where “#MWI” is the echo string, “voltage_setpoint” is the last applied current setpoint expressed in Volts [V]. Examples: MWV set example, with current setpoint +10.525 V: MWV:10.525\r #AK\r\n MWV set example when the module is OFF: MWV:10.525\r #NAK:13\r\n MWI query example: MWV:?\r #MWI:10.525\r\n 54 FAST-PS – User’s Manual Software Commands 3.5.11 MWIR Command The MWIR command can be used to perform a ramp to the given current setpoint. This command can be used, when the constant current mode is selected (see LOOP Command). The use of this command is alternative to the MWI Command. The difference between the MWI command and the MWIR command is that the first one generates a direct change in output current characterized by the PID regulator parameters (the command is ideally suited for small output current changes and feedback purposes) while the second one makes the power supply go from the previous to the actual current value performing a ramp, defined by a slew-rate in [A/s]. The default value of the slew-rate is stored in the parameter table and it can be read and modified using the Configuration Commands. To dynamically change the current slew-rate value it is possible using the MSRI Command. This command has the following format: MWIR:final_ramp_setpoint\r\n where “final_ramp_setpoint” is the final current value expressed in Ampere [A] to which the power unit will ramp with the defined slew-rate. Replies from the FAST-PS to a MWIR set are in the form “#AK\r\n” – when the command is correctly executed - or “#NAK:xx\r\n”, when the command cannot be executed (“xx” is the error code). To read the selected final ramp setpoint, the query command: “MWIR:?” has to be used. The response to this query command is in the following format: #MWIR:final_ramp_setpoint\r\n where “#MWIR” is the echo string and “final_ramp_setpoint” is the final ramp setpoint expressed in Ampere [A]. Examples: MWIR set example, with final ramp setpoint +10.5 A: MWIR:10.5\r #AK\r\n MWIR set example when the module is OFF: MWIR:10.5\r #NAK:13\r\n 55 Software Commands FAST-PS – User’s Manual MWIR query example: MWIR:?\r #MWIR:10.5\r\n 56 FAST-PS – User’s Manual Software Commands 3.5.12 MSRI Command The MSRI command can be used to dynamically change the value of the current ramp slew-rate. The default slew-rate, used at start-up of the unit, is the value stored in the parameters table. This command has the following format: MSRI:slew_rate\r\n where “slew_rate” is slew-rate for the current ramp expressed in Ampere per second [A/s]. Replies from the FAST-PS to a MSRI set are in the form “#AK\r\n” – when the command is correctly executed - or “#NAK:xx\r\n”, when the command cannot be executed (“xx” is the error code). To read the current used slew-rate for the current ramp, the query command: “MSRI:?” has to be used. The response to this query command is in the following format: #MSRI:slew_rate\r\n where “#MSRI” is the echo string and “slew_rate” is the slew-rate value used for the current ramp expressed in Ampere per second [A/s]. Examples: MSRI example, to set the current slew-rate to 10 A/s: MSRI:10\r #AK\r\n MSRI set example when the FAST-PS is in local mode: MSRI:10\r #NAK:15\r\n MSRI query example: MSRI:?\r #MSRI:10\r\n 57 FAST-PS – User’s Manual Software Commands 3.5.13 MWVR Command The MWVR command can be used to perform a ramp to the given voltage setpoint. This command can be used, when the constant voltage mode is selected (see LOOP Command). The use of this command is alternative to the MWV Command. The difference between the MWI command and the MWIR command is that the first one generates a direct change in output voltage characterized by the PID regulator parameters while the second one makes the power supply go from the previous to the actual current value performing a ramp, defined by a slew-rate in [V/s]. The default value of the voltage slew-rate is stored in the parameter table (see the Configuration Commands). To dynamically change the slew-rate value it is possible to use the MSRV Command. This command has the following format: MWVR:final_ramp_setpoint\r\n where “final_ramp_setpoint” is the final voltage value expressed in Volts [V] to which the power unit will ramp with the defined slew-rate. Replies from the FAST-PS to a MWVR set are in the form “#AK\r\n” – when the command is correctly executed - or “#NAK:xx\r\n”, when the command cannot be executed (“xx” is the error code). To read the selected final ramp setpoint, the query command: “MWIR:?” has to be used. The response to this query command is in the following format: #MWVR:final_ramp_setpoint\r\n where “#MWVR” is the echo string and “final_ramp_setpoint” is the final ramp setpoint expressed in Volts [V]. Examples: MWVR set example, with final ramp setpoint +15.2 A: MWVR:15.2\r #AK\r\n MWVR set example when the module is OFF: MWVR:15.2\r #NAK:13\r\n 58 FAST-PS – User’s Manual Software Commands MWVR query example: MWIR:?\r #MWIR:15.2\r\n 59 FAST-PS – User’s Manual Software Commands 3.5.14 MSRV Command The MSRV command can be used to dynamically change the value of the voltage ramp slew-rate. The default slew-rate, used at start-up of the unit, is the value stored in the parameters table. This command has the following format: MSRV:slew_rate\r\n where “slew_rate” is slew-rate for the voltage ramp expressed in Volts per second [V/s]. Replies from the FAST-PS to a MSRV set are in the form “#AK\r\n” – when the command is correctly executed - or “#NAK:xx\r\n”, when the command cannot be executed (“xx” is the error code). To read the current used slew-rate for the voltage ramp, the query command: “MSRV:?” has to be used. The response to this query command is in the following format: #MSRV:slew_rate\r\n where “#MSRV” is the echo string and “slew_rate” is the slew-rate value used for the voltage ramp expressed in Volts per second [V/s]. Examples: MSRV example, to set the current slew-rate to 10 V/s: MSRV:10\r #AK\r\n MSRV set example when the FAST-PS is in local mode: MSRV:10\r #NAK:15\r\n MSRV query example: MSRV:?\r #MSRV:10\r\n 60 FAST-PS – User’s Manual Software Commands 3.5.15 MRT Command The MRT command returns the value of the temperature directly measured on the output stage MOSFET heatsink. The response to the MRT command is in the following format: #MRT:temperature\r\n where “#MRT” is the echo string and “temperature” is the temperature value expressed in Celsius [°C]. The MRT command, being a reading command, returns a response in any module condition. Example: MRT command example: MRT\r #MRT:37.4\r\n 61 FAST-PS – User’s Manual Software Commands 3.5.16 MRW Command The MRW command returns the actual value of the estimated active power applied to the connected load. The response to the MRW command is in the following format: #MRW:active_power\r\n where “#MRW” is the echo string and “active_power” is the output active power readback expressed in Watts [W], estimated as the product of the output voltage and output current readbacks. The MRW command, being a reading command, returns a response in any module condition. Example: MRW command example: MRW\r #MRW:100.4542\r\n 62 FAST-PS – User’s Manual Software Commands 3.5.17 MGC Command The MGC command returns the readback value of the actual leakage current of the FAST-PS unit. The response to the MGC command is in the following format: #MGC:leakage_current\r\n where “#MGC” is the echo string and “leakage_current” is the earth leakage current, expressed in Ampere [A]. When a leakage fault condition is tripped, the MGC command will return the value of the max leakage current that tripped the fault. To return to the normal behavior of the read command, the module status has to be reset (see MRESET Command). The MGC command, being a reading command, returns a response in any module condition. Example: MGC command example for a 60mA ground leakage current: MGC\r #MGC:0.06\r\n 63 FAST-PS – User’s Manual Software Commands 3.5.18 MRID Command The MRID command returns the FAST-PS identification name string. This description is useful in case that there are numerous units installed and it is possible to give a description for each unit (for example the name of the load on which the unit is connected). This information is also displayed on the local display. The response to the MRID command is in the following format: #MRID:fast_ps_identification\r\n where “#MRID” is the echo string and “fast_ps_identification” is the module identification string. The identification string is stored in the parameters table and so it is possible to change it using the Configuration Commands. Example: MRID example with the module identification “SkewMag1.3”: MRID\r #MRID:SKEWMAG1.3\r\n 64 FAST-PS – User’s Manual Software Commands 3.6 Configuration Commands In the following section are described the software commands that allow to read, set and store the working parameters of the FAST-PS unit. The MRG Command and MWG Command allow to read or modify the working parameters. The write-access to several parameters is password protected and certain parameters are read only and so it is not possible to modify them. To change the password privileges use the PASSWORD Command. In order to save the parameter on the on-bard non-volatile memory, the MSAVE Command has to be used. The complete list of the configuration parameters, its field index and the access privileges are hereafter shown: Parameter # Access Privileges Parameter Name #0 Read Only Firmware ID #1 Read Only PS Model #2 Read Only Serial Number #3 Read Only MAC Ethernet #4 Read Only MAC SFP #1 #5 Read Only MAC SFP #2 #6 - #8 / Reserved #9 Read Only Calibration date #10 Read Only Current Calibration Parameter a #11 Read Only Current Calibration Parameter b #12 Read Only Current Calibration Parameter c #13 Read Only Current Calibration Parameter d #14 Read Only Voltage Calibration Parameter a #15 Read Only Voltage Calibration Parameter b #16 Read Only Voltage Calibration Parameter c #17 Read Only Voltage Calibration Parameter d #18 Read Only DC Link Calibration Parameter a #19 Read Only DC Link Calibration Parameter b #20 Read Only AC Link Calibration Parameter a #21 Read Only AC Link Calibration Parameter b #22 Read Only Current Leakage Calibration Parameter a #23 Read Only Current Leakage Calibration Parameter b #24 - #29 / Reserved #30 User Module Identification #31 User Default Current Slew Rate [A/s] #32 User Default Voltage Slew Rate V [V/s] 65 FAST-PS – User’s Manual Software Commands Parameter # Access Privileges Parameter Name #33 - #39 / Reserved #40 User PID I: Kp_v #41 User PID I: Ki_v #42 User PID I: Kd_v #43 User PID I: Kp_i #44 User PID I: Ki_i #45 User PID I: Kd_i #46 User PID I: Upper Limit Acc_v #47 User PID I: Lower Limit Acc_v #48 - #59 / Reserved #60 User PID V: Kp_i #61 User PID V: Ki_i #62 User PID V: Kd_i #63 User PID V: Kp_v #64 User PID V: Ki_v #65 User PID V: Kd_v #66 User PID V: Upper Limit Acc_i #67 User PID V: Lower Limit Acc_i #68 - #79 / Reserved #80 Admin Max Current Setpoint [A] #81 Admin Max Voltage Setpoint [V] #82 Admin Max Mosfet Temperature #83 Admin Min DC-link Threshold #84 Admin Earth Leakage Limit #85 / Reserved #86 Admin Current Regulation Fault Limit [A] #87 Admin Voltage Regulation Fault Limit [A] #88 Admin Regulation Fault Intervention Time [s] #89 / Reserved #90 Admin Interlock Enable Mask #91 Admin Interlock Activation State #92 Admin Interlock #1 intervention time [ms] #93 Admin Interlock #1 name #94 Admin Interlock #2 intervention time [ms] #95 Admin Interlock #2 name #96 Admin Interlock #3 intervention time [ms] #97 Admin Interlock #3 name #98 - #99 / Reserved Table 10: Parameters table 66 FAST-PS – User’s Manual Software Commands 3.6.1 MRG Command The MRG command returns the value stored in the given parameter number. The correct form for the reading request is as follow: MRG:parameter_index\r\n where “parameter_index” is the index of the parameter to be read. The response to the MRG command is in the following format: #MRG:parameter_index:parameter_value\r\n where “#MRG” is the echo string, “parameter_index” is the parameter’s index and “parameter_value” is the parameter caption. The FAST-PS replies with “#NAK:xx\r\n”, when the command cannot be executed (“xx” is the error code) – for example if the given parameter is out of the permitted range. Examples: MRG example of the PS-Model (parameter #1): MRG:1\r #MRG:1:FAST-PS 2020-400\r\n MRG example of read a not valid parameter’s index (parameter # -1): MRG:-1\r #NAK:03\r\n 67 FAST-PS – User’s Manual Software Commands 3.6.2 MWG Command The MWG command lets users write a desired value in the given parameters index. MWG:parameter_index:parameter_value\r\n where “parameter_index” is the parameter’s index and “parameter_value” is the content to be written. Replies from the FAST-PS to a MWG write are in the form “#AK\r\n” – when the command is correctly executed - or “#NAK:xx\r\n”, when the command cannot be executed (“xx” is the error code). After a MWG command the values are immediately applied, but they are not stored in the internal memory. To store the modified parameters in the non-volatile internal memory it is necessary to use the MSAVE Command. Examples: MWG example of the Module ID (parameter #30) MWG:30:MAGNET A\r #AK \r\n MWG write example to the read-only filed #1 (PS Model): MWG:1:MAGNET A\r #NAK:05\r\n 68 FAST-PS – User’s Manual Software Commands 3.6.3 PASSWORD Command The PASSWORD command can be used to unlock or lock the access to the protected parameter fields. Several parameters are protected in order not to let inexperienced users to change some power supply parameters that might compromise the correct operation of the module. See the Parameters table for further details regarding the passwordprotected cells (parameters with User access privileges are not password protected; parameters with Admin access privileges are password protected; parameters with Read Only access privileges cannot be modified). The correct form format for this command is as follows: PASSWORD:password_word\r\n where “password_word” is the password to lock or unlock the protected parameter fields, that can be: “PS-ADMIN” to receive the Admin access privileges and unlock the protected parameter fields; “LOCK” to return to User access privileges and lock the protected parameters fields. Replies from the FAST-PS to a PASSWORD command are in the form “#AK\r\n” – when the command is accepted - or “#NAK:xx\r\n”, when the command is not accepted (“xx” is the error code). When a wrong password word is received, the unit replies with a “#NAK:07\r\n” (error code 07 – invalid password) and locks the protected parameter fields. To read the current privileges level the following query command can be used: “PASSWORD:?”. The response to this query command is in the following format: #PASSWORD:privileges_level\r\n where “#PASSWORD” is the echo string and “privileges_level” is the string indicating the privileges level. The privileges level “ADMIN” indicates that the user is able to modify the protected parameter fields, otherwise “USER” indicates that the uses is able to modify only the not protected parameter fields. The password to unlock password-protected cells is: PS-ADMIN 69 Software Commands FAST-PS – User’s Manual Examples: PASSWORD example of correct password word (unlock the protected cells): PASSWORD:PS-ADMIN\r #AK \r\n PASSWORD example of correct password word (lock the protected cells): PASSWORD:LOCK\r #AK \r\n PASSWORD example of wrong password word: PASSWORD:CAENELS\r #NAK:07 \r\n PASSWORD access level query: PASSWORD:?\r #PASSWORD:ADMIN\r\n 70 FAST-PS – User’s Manual Software Commands 3.6.4 MSAVE Command The MSAVE command can be used store the parameter fields in the nonvolatile internal memory. If the parameter fields are not saved, they will be lost at power-off of the power supply. Replies from the FAST-PS to a MSAVE are in the form “#AK\r\n” – when the command is correctly executed - or “#NAK:xx\r\n”, when the command cannot be executed (“xx” is the error code). Example: MSAVE example: MSAVE\r #AK \r\n 71 FAST-PS – User’s Manual Mechanical Dimensions 4. Mechanical Dimensions The mechanical dimensions of the FAST-PS unit are hereafter presented in Figure 21: Figure 21: FAST-PS Mechanical Drawings 72 FAST-PS – User’s Manual Technical Specifications 5. Technical Specifications The main technical specifications for the FAST-PS models are hereafter presented: Technical Specifications FAST-PS Output current range ±5A ± 10 A ± 20 A ± 30 A Output voltage range ± 20 V ± 40 V ± 80 V Maximum output power Up to 600W Regulation Type Current- or Voltage- Control Current setting resolution 18 bit Voltage setting resolution 18 bit Output curret readback 20 bit Output voltage readback 20 bit Output current ripple* 30 ppm / FS Output current stability 50 ppm / FS Output voltage stability 50 ppm / FS Switching Frequency Max Current/Voltage update rate (SFP/SFP+) Accuracy 100 kHz 10 kHz < 0.05% Ecternal Interlock/States 2 Inputs: user-configurable “dry” contacts 1 Output: magnetic relay-type (3 contacts) Itnernal Interlocks DC Link Under-Voltage Over-Temperature Input Over-Current Crowbar Earth Leakage Current Regulation Fault Hardware protections Input fuses Earth fuse 73 FAST-PS – User’s Manual Technical Specifications Technical Specifications FAST-PS Auxiliary ADC Read-Backs (16 bit resolution) DC Link Voltage Ground Leakage Current Heatsink Temperature Cooling On-module self-regulated fans Drivers EPICS Communication interfaces 1x Ethernet 10/100/1000 TCP-IP 2x SFP ports Extra-features Point-by-point current waveform User-definable interlock thresholds, active levels and timings Firmware remote update Dimensions 19” wide – 1U high rack – 365 mm deep Input Voltage 90/260 V (AC) (47-63 Hz) Weight < 8 kg Local Control / Monitor Graphic Display and Encoder 6 leds Table 11: Technical Specifications 74