1
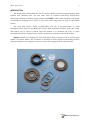
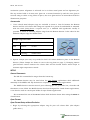
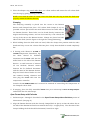
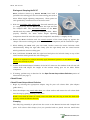
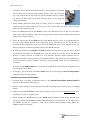
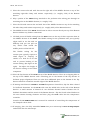
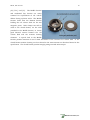
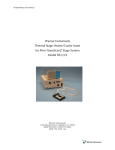
DH-35i, Rev. 05.07.03
Warner Instruments, Inc.
Micro-Incubation Chamber
For 35 mm Cell Culture Dishes
Model DH-35i
Warner Instruments, Inc.
1125 Dixwell Avenue, Hamden, CT 06514
(800) 599-4203 / (203) 776-0664
(203) 776-1278 - fax
Warner Instruments, Inc.
DH-35i, Rev. 05.07.03
Table of Contents
DESCRIPTION........................................................................................................................................... 3
INTRODUCTION....................................................................................................................................... 4
COMPONENTS.......................................................................................................................................... 5
Bottom Section ........................................................................................................................................ 5
Middle Section ........................................................................................................................................ 5
Top Section.............................................................................................................................................. 5
Accessories............................................................................................................................................... 6
SETUP.......................................................................................................................................................... 6
General Comments ................................................................................................................................. 6
Open Format........................................................................................................................................... 6
Open Format Setup without Perfusion ................................................................................................. 6
Open Format Setup with Perfusion ...................................................................................................... 7
Closed Format......................................................................................................................................... 8
Closed Format Setup without Perfusion............................................................................................... 8
Clamping .............................................................................................................................................. 8
Closed Format Setup with Perfusion .................................................................................................... 9
OPERATION ............................................................................................................................................ 11
Open Format Use.................................................................................................................................. 11
Closed Format Applications ................................................................................................................ 11
APPENDIX................................................................................................................................................ 13
Cleaning/Maintenance ......................................................................................................................... 13
Warranty and service........................................................................................................................... 13
Service ................................................................................................................................................ 13
Warranty............................................................................................................................................. 13
Warner Instruments, Inc.
3
DH-35i, Rev. 05.07.03
The DH-35i Micro-Incubation Chamber from Warner Instruments is designed to
provide complete environmental control over 35 mm culture dishes while maintaining
the ability to make both short- and long-term imaging studies. This versatile system
readily accommodates culture dishes from several manufacturers and will adapt to
any microscope stage supported by Warner Instruments.
Features of the DH-35i include:
Designed for glass-bottomed 35 mm cell culture dishes
Permits imaging, temperature, and gas atmosphere control
Adapts to Willco Wells, and Corning and Falcon dishes
Unique dish clamps permit either open or closed use
Works with RC-37 family of Cell Culture Dish Perfusion Chamber
Inserts
THIS EQUIPMENT IS NOT DESIGNED NOR INTENDED
FOR USE ON HUMAN SUBJECTS
Warner Instruments, Inc.
4
DH-35i, Rev. 05.07.03
INTRODUCTION
The introduction of affordable 35 mm cell culture dishes incorporating high-quality glass
bottoms has extended their use into areas such as confocal microscopy, fluorescence
microscopy and high resolution image analysis. The DH-35i Culture Dish Incubator is designed
to facilitate the imaging of live cells in a cell culture dish using either an open or closed dish
format.
The open dish format readily accommodates the use of microelectrodes or rapid
throughput tools (such as the RC-37 Cell Culture Dish Perfusion Chamber) while the closed
dish format can be used to perform long-term studies or to maintain pH, [CO2], or other
environmental factors. Temperature control is available in both open and closed formats
DH-35i incubators are designed to work with Willco Wells, Corning or Falcon 35 mm glass
bottom cell culture dishes. The incubator is machined in three separate interlocking sections
and metal adapters are supplied to insure a secure fit for supported cell culture dishes.
Warner Instruments, Inc.
5
DH-35i, Rev. 05.07.03
COMPONENTS
The completed DH-35i assembly is comprised of a bottom, middle and top section, along
with culture dish adapter rings and an optional RC-37 chamber insert. The completed assembly
can be mounted onto a microscope using an appropriate microscope stage adapter and thermal
control is provided using a CC-28 cable and temperature controller.
Bottom Section
The
Bottom
Section
positions
the
cell
culture dish using one of four adapter rings (see
table on next page). The bottom section also
includes two resistive heating elements, a 19
mm diameter aperture, two magnetic posts for
attachment of the Middle Section component,
two holes for the special dish clamps, and a
single hole for a attachment of a control
thermistor (e.g. via Warner’s CC-28 cable). The
periphery of the bottom section is framed with
stainless steel plates for mounting of magnetic
holders when the DH-35i is used on the open configuration.
Middle Section
The Middle Section attaches to the Bottom
Section via two magnetic points mounted on the
Bottom Section. The Middle Section has slots
around its circumference to allow access for
cabling and tubing elements.
Two recessed magnetic anchors couple
directly with the Bottom Section. Several slots
are provided for access of perfusate inlet and
outlet lines, gas inlet and outlet lines, and a
hole for placement of a bath thermistor (e.g. via
Warner’s CC-28 cable).
The small chrome tube shown in the
picture above can be used to supply a slight
vacuum to the chamber which will keep the top
cover clear of condensation while the DH-35i is in
use.
Top Section
The Top Section rests on top of the Middle
Section
and
forms
an
enclosed
micro-
Warner Instruments, Inc.
6
DH-35i, Rev. 05.07.03
incubation system. Alignment is achieved via is via three metal posts and an alignment pin.
The top section holds a 40 mm cover glass via a recessed annular lip and the cover glass is
secured using a rubber o-ring. When in place, the cover glass seals a 36 mm widow useful for
illumination purposes.
Accessories
1.
Four colored metal adapter rings are included to insure a close fit between the Bottom
Section and the cell culture dish. Rings are tapered for a precise fit and should be mounted
with the notch facing down. A special tool (i.e. a modified 18G hypodermic needle) is
provided to assist in removing adapter rings from the Bottom Section. Color codes for the
different adapter rings are shown below.
Adapter ring color codes
Blue
Willco Wells: Models D3512 and D3522
Red
Falcon:
37 mm
Gold
Falcon:
38 mm
Green
Corning:
25000 series
2. Special clamps (two sets) are provided to hold cell culture dishes in place in the Bottom
Section. (These clamps are shown in use in the top photo on page 5.) Clamping insures
good thermal contact between the culture dish and the heated surface which helps to
maintain tight temperature control.
SETUP
General Comments
The DH-35i is assembled in stages from the bottom up.
The Bottom Section may be used alone for open format applications while additional
assembly of the Middle and Top Sections are required for closed format applications.
The Middle Section contains several ports allowing gas line, perfusion line, electrode and
thermistor access. While the Middle Section has been designed for closed format applications,
it can also be used as a multi-port holder for open format applications.
We recommend the use of the RC-37 Culture Dish Perfusion Insert when using the DH-35i in
closed format.
Open Format
Open Format Setup without Perfusion
1. Begin by selecting the appropriate adapter ring for your cell culture dish. (See adapter
guide above.)
Warner Instruments, Inc.
7
DH-35i, Rev. 05.07.03
2. Place the adapter ring, notch side down, on a firm surface and insert the cell culture dish
into the ring by gently pushing it into place.
NOTE: Care must be taken to evenly insert the dish into the ring so that the dish seats
properly within the Bottom Section.
Clamping
The dish/ring assembly is placed into the recess in the Bottom
Section and clamped into place. Cell culture dish clamps (2 ea) are
provided and are placed into two small holes located on either side of
the Bottom Section. These holes can be found directly between the
magnet and heating resister, and can be located by a red colored dot
on top of the rim on the Bottom Section. Clamps are placed on both
sides of the dish. (See the figure to the right for clamp positioning.)
3. While holding down the dish with one hand, slide the clamps into position with the other
hand until they secure the culture dish into place. Verify that the dish is seated completely
flat.
4. If heating with Warner’s TC-324B or
TC-344B Temperature Controllers, slip
the
white
colored
T1
feedback
thermister on the CC-28 cable into the
milled hole in the side of the Bottom
Section. A small amount of mineral
oil
can
facilitate
thermal
contact
between the T1 feedback thermister
and the metal of the Bottom Section.
Slip the blued colored leads over the
two resistive heating elements and
then plug the CC-28 cable into the
temperature controller.
Consult the TC-324B/TC-344B user’s manual for methods of controlling the temperature of
the clamped culture dish.
5. If imaging, place the fully assembled DH-35i into your microscope’s Series 20 Stage Adapter
and mount onto the microscope.
Open Format Setup with Perfusion
1. Perform steps 1 through 3 described in the Open Format Setup without Perfusion portion of
this manual. (See page 6.)
2. Align the Bottom Section (with the already clamped dish in place) so that the white dot on
the side of the Bottom Section faces towards the left (i.e. roughly 9:00). The direction of the
clamps holding the dish should be horizontal, from left to right.
Warner Instruments, Inc.
8
DH-35i, Rev. 05.07.03
Placing and Clamping the RC-37
RC-37 perfusion inserts (e.g. RC-37F, RC-37W) have both a
perfusate inlet tubing port and a suction tubing port (with a
white Teflon height adjusting component). These ports are
each guarded by raised sections of the insert itself.
3. With the perfusion inlet tubing port directed towards you
(i.e. roughly 6:00), slip the RC-37 between the clips and into
the clamped dish. The non-raised sections of the RC-37
should easily slip under the clamps holding the dish. When
properly
installed,
the
white
Teflon
height
adjusting
component should be near the top of the clamped 35 mm dish (i.e. roughly 12:00).
4. Rotate the RC-37 clockwise until the raised sections of the insert bump up against the
clamps. The suction tubing port (with its white Teflon component) will be towards the right.
5. While holding the RC-37 with your left hand, further rotate the insert clockwise while
simultaneously lifting the right side clamp (use the right hand) onto the raised section
which guards the suction tubing port.
6. Next, hold down the RC-37 with the right hand and place the left side clamp on top of the
raised section which guards the inlet tubing port.
NOTE: It is important to always manually apply downward pressure on the RC-37 until both
clamps are securely in place.
7. Center the diamond-shaped chamber of the RC-37 insert on the window of the 35 mm cell
culture dish and adjust the height of the suction tubing port via its white Teflon
component.
8. If heating, perform step 4 described in the Open Format Setup without Perfusion portion of
this manual (see page 7).
Closed Format
Closed Format Setup without Perfusion
1. Begin by selecting the appropriate adapter ring for your cell culture dish. (See adapter
guide above.)
2. Place the adapter ring, notch side down, on a firm surface and insert the cell culture dish
into the ring by gently pushing it into place.
NOTE: Care must be taken to evenly insert the dish into the ring so that the dish seats
properly within the Bottom Section.
Clamping
The dish/ring assembly is placed into the recess in the Bottom Section and clamped into
place. Cell culture dish clamps (2 ea) are provided and are placed into two small holes
Warner Instruments, Inc.
DH-35i, Rev. 05.07.03
9
located on either side of the Bottom Section. These holes can be found
directly between the magnet and heating resister, and can be located
by a red colored dot on top of the rim on the Bottom Section. Clamps
are placed on both sides of the dish. (See the figure to the right for
clamp positioning.)
3. While holding down the dish with one hand, slide the clamps into
position with the other hand until they secure the culture dish into place. Verify that the
dish is seated completely flat.
4. Place the Middle Section of the DH-35i on top of the Bottom Section so that the two white
dots on the side are aligned. There are two long narrow slots for both clamps and two short
wide slots for both resisters.
5. Place the Top Section of the DH-35i on top of the Middle Section. There is an aligning hole on
the top of the Middle Section and a matching pin on the bottom of the Top Section to
facilitate proper alignment. There are also three additional pins on the bottom of the Top
Section which fit around the outside edges of the Middle Section.
6. If heating with Warner’s TC-324B or TC-344B Temperature Controllers, slip the white colored
T1 feedback thermistor on the CC-28 cable into the milled hole in the side of the Bottom
Section. A small amount of mineral oil can facilitate thermal contact between the T1
feedback thermistor and the metal of the Bottom Section. Slip the blued colored leads over
the two resistive heating elements and then plug the CC-28 cable into the temperature
controller.
Consult the TC-324B/TC-344B user’s manual for methods of controlling the temperature of
the clamped culture dish.
7. If imaging, place the fully assembled DH-35i into your microscope’s Series 20 Stage Adapter
and mount onto the microscope.
Closed Format Setup with Perfusion
1. Perform steps 1 through 3 described above in the Closed Format Setup without Perfusion
portion of this manual. (See page 8.)
2. Attach C-Flex tubing to the output port and PE-50 tubing to the input port on your RC-37
Insert.
3. Align the assembled DH-35i so that the white dot on the side of the Bottom Section faces
towards your left (i.e. roughly 9:00).
4. While holding the Middle Section of the DH-35i with its white dot also facing towards your
left, slip a portion of the RC-37 suction tubing through its matching slot on the right side of
the Middle Section (i.e. roughly at 2:00). Give yourself excess flexible tubing inside the
Middle Section at this time.
Warner Instruments, Inc.
10
DH-35i, Rev. 05.07.03
5. Place the narrow slot and wide slot on the right side of the Middle Section on top of the
matching right-side clamp and resister respectively (i.e. roughly 3:00) of the Bottom
Section.
6. Slip a portion of the PE-50 tubing attached to the perfusion inlet tubing port through its
matching slot on the Middle Section (i.e. roughly 7:00).
7. Place the left-side narrow slot and wide slot of the Middle Section on top of the matching
left-side clamp and resister respectively (i.e. roughly 9:00) of the Bottom Section.
8. The Middle Section of the DH-35i should now be able to mount directly on top of the Bottom
Section without any further restrictions.
9. Lift both pieces of flexible tubing from the RC-37 insert to the top of their respective slots in
the Middle Section of the DH-35i. The flexible tubing for the perfusion inlet port typically
aligns itself in its slot with no
difficulty and you can pull out
any
“slack”
from
inside
the
middle portion of the DH-35i.
The
flexible
tubing
for
the
suction port typically requires a
small
degree
of
“looping”
to
enable it to both fit in its slot
and to prevent kinking of the
suction tubing. (See figure to the
right).
Re-adjust the height of
the suction tubing via its Teflon
component.
10. Place the Top Section of the DH-35i on top of the Middle Section. There is an aligning hole on
the top of the Middle Section and a matching pin on the bottom of the Top Section to
facilitate proper alignment. There are also three additional pins on the bottom of the Top
Section which fit around the outside edges of the Middle Section.
11. If heating with Warner’s TC-324B or TC-344B Temperature Controllers, slip the white colored
T1 feedback thermistor on the CC-28 cable into the milled hole in the side of the Bottom
Section. A small amount of mineral oil can facilitate thermal contact between the T1
feedback thermistor and the metal of the Bottom Section. Slip the blued colored leads over
the two resistive heating elements and then plug the CC-28 cable into the temperature
controller.
Consult the TC-324B/TC-344B user’s manual for methods of controlling the temperature of
the clamped culture dish.
12. If imaging, place the fully assembled DH-35i into your microscope’s Series 20 Stage Adapter
and mount onto the microscope.
Warner Instruments, Inc.
11
DH-35i, Rev. 05.07.03
OPERATION
Open Format Applications
Only the Bottom Section is required for open format use, together with one of the four
colored adapter rings and one set of dish clamps. The open format enables easy access for
microelectrodes, as well as for perfusion and aspiration lines. Cell culture dishes can be used
with and without covers, and dish perfusion can be simplified by use of Warner’s RC-37
Perfusion Chamber Insert.
The open format permits imaging using either upright or inverted microscopes. Warner
Series 20 stage adapters are used to mount the DH-35i onto most commonly used microscope
stages. Contact our Tech Support Department for custom stage adapters.
Resistive heating of the DH-35i is achieved using Warner’s TC-324B or TC-344B Temperature
Controller and a CC-28 cable. The two blue CC-28 connectors attach directly to each resistive
heating element. Feedback control is provided thermistor (i.e. T1) is inserted in the Bottom
Section’s metal chassis via a special hole. (see photo) We recommend using a drop of mineral
oil to insure good thermal contact between the white T1 thermistor and the metal chassis. The
CC-28 cable’s bath thermistor (i.e. T2) can be placed directed in the bath to check solution
temperature. The temperature control unit regulates the heating current by sensing the
temperature of the incubator via the T1 control thermistor in the CC-28 cable. Heating of
perfusate can be achieved using our SH-27B or SF-28 In-Line solution heaters, which are also
controlled via our TC-324B and TC-344B Temperature Controllers.
Warner Instruments RC-37 perfusion chamber inserts (e.g. RC-37W, RC-37F) are also
available for Willco, Corning, and Falcon 35 mm cell culture dishes and can be used together
with the DH-35i. These incorporate our diamond fluidics design to maintain laminar perfusate
flow. Fluid level in the cell culture dish can be controlled via a height adjustable aspirator.
Agar bridge wells are built into the RC-37 perfusion chamber inserts, for signal grounding
purposes.
The combination of the RC-37 perfusion chamber inserts with our DH-35i micro-
incubation heater creates the ability to quickly alter the extracellular environment in 35 mm
cell culture dishes, by changing either
the perfusate or the bath temperature.
Closed Format Applications
In the closed format the Middle
Section and windowed Top Section are
used together with the Bottom Section
described
above
to
maintain
an
enclosed environment. Gas inlet and
outlet ports are available in the Middle
Section for atmospheric control of the
cell culture dish’s environment.
This
enables the user to control the cell’s
Warner Instruments, Inc.
12
DH-35i, Rev. 05.07.03
pH, [CO2], and [O2].
The Middle Section
and windowed Top Section are easily
removed for replacement of cell culture
dishes during replicate trials. The Middle
Section locks onto the Bottom Section
holding the cell culture dish via the two
magnetic posts. Dish clamps can still be
used in the closed format, via the slots
provided in the Middle Section, to insure
good thermal contact between the cell
culture dish and the resistive heating
elements.
A special hole in the Middle
Section permits insertion of out T2 bath thermistor in the enclosed cell culture dish. In the
closed format resistive heating can be achieved in the same manner as described above for the
open format. The closed format permits imaging using inverted microscopes.
Warner Instruments, Inc.
13
DH-35i, Rev. 05.07.03
APPENDIX
Cleaning and maintenance
The DH-35i is constructed of anodized aluminum. It can be easily cleaned with common
laboratory detergents or with ethyl alcohol.
Warranty and service
Service
We recommend that all questions regarding service be referred to our Technical
Support Department. Normal business hours are 8:30 AM to 5:00 PM (EST), Monday
through Friday.
Our offices are located at 1125 Dixwell Avenue, Hamden, CT 06514.
We can be reached by phone at (800) 599-4203 or (203) 776-0664. Our fax number is
(203) 776-1278. E-mail us at [email protected] or through the web at
http://www.warneronline.com/contact.html.
Warranty
The DH-35i is covered by our Warranty to be free from defects in materials and
workmanship for a period of one year from the date of shipment. If a failure occurs within
this period, we will either repair or replace the faulty component(s). This warranty does not
cover failure or damage caused by physical abuse.
In the event that repairs are necessary, shipping charges to the factory are the
customer's responsibility. Return charges will be paid by Warner Instruments.
Warner Instruments, Inc.