1
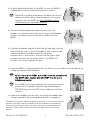
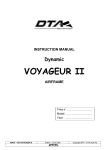
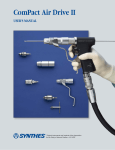
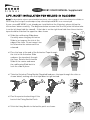
MOB1 USER MANUAL Supplement
LIFE JACKET INSTALLATION FOR WELDED-IN BLADDERS
Note: For description of parts mentioned below please refer to page 6 in the User Manual available on
line at http://oceansignal.com/wordpress/wp-content/uploads/MOB1-user-manual.pdf
If your rescueME MOB1 is not already pre-installed into the lifejacket, please follow the
instructions below carefully. The diagrams below assume that the life jacket inflation tube
is on the left hand side (as viewed). If the tube is on the right hand side then the activation
tape should be fitted on the opposite sides shown
•
•
•
•
•
Slide the red Arming Slide down.
Carefully move the grey Activation
Slide to just expose the slot at the
edge of the slide. Do not move it too
far otherwise the antenna will be
released.
Pass the loop at the end of the Activation Tape through
the slot in the Activation Slide
and pass the tape back through
the loop. Return the Activation
Slide to the centre and move
the red Arming Slide back to
lock the slide in place.
Take the lifejacket Fixing Buckle (Supplied) and pass the tape through the slots as
shown below, making sure that tape does not get twisted.
Peel the protective backing off the
back of the Fixing Buckle Patch.
Stick the fixing Buckle to the buckle patch as shown.
•
Clip the Mounting Bracket to the MOB1 so that the MOB1 is
sited between the oral tube and the patch as shown.
The MOB1 should be mounted as low down on the oral
tube as possible, without interfering with closing the
lifejacket over the MOB1, but with the MOB1 always
sited between the tube and the patch.
•
•
•
Attach the Mounting Buckle and patch directly to the
bladder, at a distance which will ensure that as the bladder
inflates, the tape will pull the Activation Slide from the
MOB1.
Fold up the bladder and pull the Activation Tape tight with the
free end of the tape, so that the bladder is free to inflate and
remains folded in accordance with the life jacket
manufacturer’s instructions. Ensure that the tape is tight
enough that when the life jacket inflates, the MOB1 will
activate. Do not over tighten the tape.
Once the MOB1 is fully attached to the life-jacket, you are ready to arm the device, by
sliding the red Arming Slide down.
Failure to arm the MOB1 will inhibit the auto activation of
the MOB1 when needed and will STOP the life jacket
inflating correctly.
If the MOB1 has turned on during the installation process,
make sure it is turned off by pressing and holding the
TEST/OFF Key until the LED flashes red twice and then
release.
•
Repack the bladder into the cover, ensuring the bladder does
not get trapped in the fastening mechanism or tangled up.
The above illustrations indicate a typical installation. Please ensure that the
position selected to attach the MOB1 to the oral tube does not hinder the
inflation of the life jacket, but at the same time allows enough pull on the
Activation Tape to fully remove the Activation Slide when the life jacket
inflates.
Version 01.10 17/03/2015
2
Part No. 912S-01772