1
FLEX User’s Manual
Technical Systems Consultants, Inc.
FLEX User's Manual
Copyright @ 1979 by
Technical Systems Consultants, Inc.
PO Box 2574
West Lafayette, Indiana 47906
All Rights Reserved
-i-
COPYRIGHT NOTICE
This entire manual and documentation is provided for
personal use and enjoyment by the purchaser.
The
entire contents have been copyrighted by Technical
Systems Consultants, Inc., and reproduction by any
means is prohibited. Use of this manual, or any part
thereof, for any purpose other than single end use is
strictly prohibited.
-ii--
PREFACE
The purpose of this User's Guide is to provide the user of the FLEX
Operating System with the information required to make effective use of
the available system commands and utilities. This manual applies to
FLEX 9.0 for full size and mini floppy disks. The user should keep this
manual close at hand while becoming familiar with the system. It is
organized to make it convenient as a quick reference guide, as well as a
thorough reference manual.
-iii-
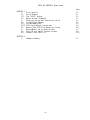
TABLE OF CONTENTS
Page
CHAPTER 1
I.
II.
III.
IV.
V.
VI.
CHAPTER 2
I.
Introduction
System Requirements
Getting the System Started
Disks Files and Their Names
Entering Commands
Command Descriptions
1.1
1.2
1.2
1.3
1.5
1.7
Utility Command Set
APPEND
ASN
BUILD
CAT
COPY
C4MAT
CLEAN
DATE
DELETE
ECHO
EXEC
FIX
I
JUMP
LINK
LIST
NEWDISK
N
O
P
P.COR
PO
PSP
PROT
Q
QCHECK
RENAME
RM
READPROM
S
SAVE
SBOX
SP
STARTUP
TTYSET
TOUCH
USEMF
VER
VERIFY
WRITPROM
XOUT
Y
2.1
A.1
A.2
B.1
C.1
C.2
C.5
C.6
D.1
D.2
E.1
E.2
F.1
I.1
J.1
L.1
L.2
N.1
N.2
O.1
P.1
P.2
P.3
P.4
P.5
Q.1
Q.2
R.1
R.2
R.3
S.1
S.2
S.3
S.4
S.5
T.1
T.2
U.1
V.1
V.2
W.1
X.1
Y.1
-iv-
TABLE OF CONTENTS (Continued)
Page
CHAPTER 3
I.
II.
III.
IV.
V.
VI.
VII.
VIII.
IX.
X.
XI.
XII.
Disk Capacity
Write Protect
The 'RESET' Button
Notes on the P Command
Accessing Drives Not Containing a Disk
System Error Numbers
System Memory Map
FLEX Input/Output Subroutines
Booting the FLEX Disk Operating System
Requirements for printer drivers
Parallel and Serial Printer drivers
Former P and PRINT.SYS
3.1
3.1
3.1
3.1
3.1
3.2
3.3
3.4
3.6
3.7
3.9
3.14
CHAPTER 4
I.
Command Summary
4.1
-v-
FLEX USER'S MANUAL
I.
INTRODUCTION
The FLEX™ Operating System is a very versatile and flexible operating
system. It provides the user with a powerful set of system commands to
control all disk operations directly from the user's terminal. The
systems programmer will be delighted with the wide variety of disk
access
and file management routines available for personal use.
Overall, FLEX is one of the most powerful operating systems available
today.
The FLEX Operating System is comprised of three parts, the File
Management System (FMS), the Disk Operating System (DOS), and the
Utility Command Set (UCS). Part of the power of the overall system lies
in the fact that the system can be greatly expanded by simply adding
additional utility commands. The user should expect to see many more
utilities available for FLEX in the future. Some of the other important
features include: fully dynamic file space allocation, the automatic
"removal"
of
defective
sectors from the disk, automatic space
compression and expansion on all text files, complete user environment
control using the TTYSET utility command, and uniform disk wear due to
the high performance dynamic space allocator.
The UCS currently contains many very useful commands. These programs
reside on the system disk and are only loaded into memory when needed.
This means that the set of commands can be easily extended at any time,
without the necessity of replacing the entire operating system.
The
utilities provided with FLEX perform such tasks as the saving, loading,
copying, renaming, deleting, appending, and listing of disk files.
There is an extensive CATalog command for examining the disk's file
directory. Several environment control commands are also provided.
Overall, FLEX provides all of the necessary tools for the user's
interaction with the disk.
-------------------* FLEX is a registered
Consultants, Inc.
trademark
-1.1-
of
Technical
Systems
FLEX User's Manual
II.
SYSTEM REQUIREMENTS
FLEX requires random access memory from location 0000 through location
2FFF hex (12K). Memory is also required from C000 (48K) through DFFF
hex (56K), where the actual operating system resides. The system also
assumes at least 2 disk drives are connected to the controller and that
they are configured as drives #0 and #1. You should consult the disk
drive instructions for this information. FLEX interfaces with the disk
controller through a section of driver routines and with the operator
console or terminal through a section of terminal I/O routines.
III.
GETTING THE SYSTEM STARTED
Each FLEX system diskette contains a binary loader for loading the
operating system into RAM. There needs to be some way of getting the
loader off of the disk so it can do its work.
This can be done by
either hand entering the bootstrap loader provided with the disk system,
or by using the boot provided in ROM if appropriate to FLEX.
As a specific example, suppose the system we are using has SWTPc's S-BUG
installed and we wish to run FLEX. The first step is to power on all
equipment and make sure the S-BUG prompt is present (>). Next insert
the system diskette into drive 0 (the boot must be performed with the
disk in drive 0) and close the door on the drive. Type "D" on the
terminal if using a full size floppy system or "U" if a minifloppy
system.
The disk motors should start, and after about 2 seconds, the
following should be displayed on the terminal:
FLEX X.X
DATE (MM,DD,YY)?
+++
The name FLEX identifies the operating system and the X.X will be the
version number of the operating system. At this time the current date
should be entered, such as 7,3,79. The FLEX prompt is the three plus
signs (+++), and will always be present when the system is ready to
accept an operator command. The '+++' should become a familiar sight
and signifies that FLEX is ready to work for you!
-1.2-
FLEX User's Manual
IV.
DISK FILES AND THEIR NAMES
All disk files are stored in the form of 'sectors' on the disk and in
this version, each sector contains 256 'bytes' of information. Each
byte can contain one character of text or one byte of binary machine
information.
A maximum of 340 user-accessible sectors will fit on a
single-sided mini disk or 1140 sectors on a single-sided full size
floppy.
Double-sided disks would hold exactly twice that number of
sectors. Double-density systems will hold more still.
The user,
however, need not keep count, for the system does this automatically. A
file will always be at least one sector long and can have as many as the
maximum number of sectors on the disk. The user should not be concerned
with the actual placement of the files on the disk since this is done by
the
operating system.
File deletion is also supported and all
previously used sectors become immediately available again after a file
has been deleted.
All files on the disk have a name.
typical:
Names
such
as
the
following
are
PAYROLL
INVNTORY
TEST1234
APRIL-78
WKLY-PAY
Anytime a file is created, referenced, or deleted, its name must be
used. Names can be most anything but must begin with a letter (not
numbers or symbols) and be followed by at most 7 additional characters,
called 'name characters'.
These 'name characters'
can
be
any
combination of the letters 'A' through 'Z' or 'a' through 'z', any digit
'0' through '9', or one of the two special characters, the hyphen (-) or
the underscore '_', (a left arrow on some terminals).
File names must also contain an 'extension'. The file extension further
defines the file and usually indicates the type of information contained
therein. Examples of extensions are: TXT for text type files, BIN for
machine readable binary encoded files, CMD for utility command files,
and BAS for BASIC source programs. Extensions may contain up to 3 'name
characters' with the first character being a letter. Most of the FLEX
commands assume a default extension on the file name and the user need
not be concerned with the actual extension on the file. The user may at
anytime assign new extensions, overiding the default value, and treat
the extension as just part of the file name. Some examples of file
names with their extensions follow:
APPEND.CMD
LEDGER.BAS
TEST.BIN
Note that the extension is always separated from the name by a period
'.'.
The period is the name 'field separator'. It tells FLEX to treat
the following characters as a new field in the name specification.
-1.3-
FLEX User's Manual
A file name can be further refined. The name and extension uniquely
define a file on a particular drive, but the same name may exist on
several drives simultaneously. To designate a particular drive a 'drive
number' is added to the file specification. It consists of a single
digit (0-3) and is separated from the name by the field separator '.'.
The drive number may appear either before the name or after it (after
the extension if it is given).
If the drive is not specified, the
system will default to either the 'system' drive or the 'working' drive.
These terms will be described a little later.
Some examples of file specifications with drive numbers follow:
0.BASIC
MONDAY.2
1.TEST.BIN
LIST.CMD.1
In summary, a file specification may contain up to three fields
separated by the field separator. These fields are; 'drive', 'name',
and 'extension'.
The rules for the file specification can be stated
quite concisely using the following notation:
[<drive>.]<name>[.<extension>]
or
<name>[.<extension>][.<drive>]
The '<>' enclose a field and do not actually
appear
in
specification,
and
the
'[]'
surround
optional
items of
specification. The following are all syntactically correct:
the
the
0.NAME.EXT
NAME.EXT.0
NAME.EXT
0.NAME
NAME.0
NAME
Note that the only required field is the actual 'name' itself and the
other values will usually default to predetermined values. Studying the
above examples will clarify the notation used. The same notation will
occur regularly throughout the manual.
-1.4-
FLEX User's Manual
V.
ENTERING COMMANDS
When FLEX is displaying '+++', the system is ready to accept a command
line.
A command line is usually a name followed by certain parameters
depending on the command being executed. There is no 'RUN' command in
FLEX.
The first file name on a command line is always loaded into
memory and execution is attempted. If no extension is given with the
file name, 'CMD' is the default. If an extension is specified, the one
entered is the one used. Some examples of commands and how they would
look on the terminal follow:
+++TTYSET
+++TTYSET.CMD
+++LOOKUP.BIN
The first two lines are identical to FLEX since the first would default
to an extension of CMD. The third line would load the binary file
'LOOKUP.BIN' into memory and, assuming the file contained a transfer
address, the program would be executed. A transfer address tells the
program loader where to start the program executing after it has been
loaded. If you try to load and execute a program in the above manner
and no transfer address is present, the message, 'NO LINK' will be
output to the terminal, where 'link' refers to the transfer address.
Some other error messages which can occur are 'WHAT?' if an illegal file
specification has been typed as the first part of a command line, and
'NOT THERE' if the file typed does not exist on the disk.
During the typing of a command line, the system simply accepts all
characters until a 'RETURN' key is typed. Any time before typing the
RETURN key, the user may use one of two special characters to correct
any mistyped characters.
One of these characters is the 'back space'
and allows deletion of the previously typed character. Typing two back
spaces will delete the previous two characters. The back space is
initially defined to be a 'control H' but may be redefined by the user
using the TTYSET utility command. The second special character is the
line 'delete' character. Typing this character will effectively delete
all of the characters which have been typed on the current line. A new
prompt will be output to the terminal, but instead of the usual '+++'
prompt, to show the action of the delete character, the prompt will be
'???'. Any time the delete character is used, the new prompt will be
'???', and signifies that the last line typed did not get entered into
the computer. The delete character is initially a 'control X' but may
also be redefined using TTYSET.
-1.5-
FLEX User's Manual
As mentioned earlier, the first name on a command line is always
interpreted as a command. Following the command is an optional list of
names and parameters, depending on the particular command being entered.
The fields of a command line must be separated by either a space or a
comma. The general format of a command line is:
<command>[,<list of names and parameters>]
A comma is shown, but a space may be used.
FLEX also allows several
commands to be entered on one command line by use of the 'end of line'
character. This character is initially a colon (':'), but may be user
defined with the TTYSET utility. By ending a command with the end of
line character, it is possible to follow it immediately with another
command.
FLEX will execute all commands on the line before returning
with the '+++' prompt. An error in any of the command entries will
cause the system to terminate operation of that command line and return
with the prompt. Some examples of valid command lines follow:
+++CAT 1
+++CAT 1:ASN S=1
+++LIST LIBRARY:CAT 1:CAT 0
As many commands may be typed in one command line as desired, but the
total number of characters typed must not exceed 128. Any excess
characters will be ignored by FLEX.
One last system feature to be described is the idea of 'system' and
'working' drives. As stated earlier, if a file specification does not
specifically designate a drive number, it will assume a default value.
This default value will either be the current 'system' drive assignment
or the current 'working' drive assignment. The system drive is the
default for all command names, or in other words, all file names which
are typed first on a command line. Any other file name on the command
line will default to the working drive.
This version of FLEX also
supports automatic drive searching. When in the auto search mode if no
drive numbers are specified, the operating system will first search
drive 0 for the file.
If the file is not found, drive 1 will be
searched and so on. When the system is first initialized the auto drive
searching mode will be selected. At this time, all drive defaults will
be to drive 0. It is sometimes convenient to assign drive 1 as the
working drive in which case all file references, except commands, will
automatically look on drive 1. It is then convenient to have a diskette
in drive 0 with all the system utility commands on it (the 'system
drive'), and a disk with the files being worked on in drive 1 (the
'working drive'). If the system drive is 0 and the working drive is 1,
and the command line was:
+++LIST TEXTFILE
FLEX would go to drive 0 for the command LIST and to drive 1 for the
file TEXTFILE. The actual assignment of drives is performed by the ASN
utility. See its description for details.
-1.6-
FLEX User's Manual
VI.
COMMAND DESCRIPTIONS
There are two types of commands in FLEX, memory resident (those which
actually are part of the operating system) and disk utility commands
(those commands which reside on the disk and are part of the UCS).
There are only two resident commands, GET and MON. They will be
described here while the UCS is described in the following sections.
GET
The GET command is used to load a binary file into memory.
It is a
special purpose command and is not often used. It has the following
syntax:
GET[,<file name list>]
where <file name list> is: <file spec>[,<file spec>] etc.
Again the '[]' surround optional items. 'File spec' denotes a file name
as described earlier. The action of the GET command is to load the file
or files specified in the list into memory for later use.
If no
extension is provided in the file spec, BIN is assumed, in other words,
BIN is the default extension. Examples:
GET,TEST
GET,1.TEST,TEST2.0
where the first example will load the file named 'TEST.BIN' from the
assigned working drive, and the second example will load TEST.BIN from
drive 1 and TEST2.BIN from drive 0.
MON
MON is used to exit FLEX and return to the hardware monitor system such
as S-BUG. The syntax for this command is simply MON followed by the
'RETURN' key.
NOTE: to re-enter FLEX after using the MON command, you should enter the
program at location CD03 hex.
-1.7-
UTILITY COMMAND SET
The following pages describe all of the utility commands currently
included in the UCS. You should note that the page numbers denote the
first letter of the command name, as well as the number of the page for
a particular command. For example, 'B.1.2' is the 2nd page of the
description for the 1st utility name starting with the letter 'B'.
COMMON ERROR MESSAGES
Several error messages are common to many of the FLEX utility commands.
These error messages and their meanings include the following:
NO SUCH FILE. This message indicates that a file referenced in a
particular command was not found on the disk specified.
Usually the
wrong drive was specified (or defaulted), or a misspelling of the name
was made.
ILLEGAL FILE NAME.
This can happen if the name or extension did
not start with a letter, or the name or extension field was too long
(limited to 8 and 3 respectively). This message may also mean that the
command being executed expected a file name to follow and one was not
provided.
FILE EXISTS. This message will be output if you try to create a
file with a name the same as one which currently exists on the same
disk. Two different files with the same name are not allowed to exist
on the same disk.
SYNTAX ERROR. This means that the command line just typed does not
follow the rules stated for the particular command used. Refer to the
individual command descriptions for syntax rules.
GENERAL SYSTEM FEATURES
Any time one of the utility commands is sending output to the terminal,
it may be temporarily halted by typing the 'escape' character (see
TTYSET for the definition of this character).
Once the output is
stopped, the user has two choices: typing the 'escape' character again
or typing 'RETURN'. If the 'escape' character is typed again, the
output will resume.
If the 'RETURN' is typed, control will return to
FLEX and the command will be terminated.
All other characters are
ignored while output is stopped.
-2.1-
APPEND
The APPEND command is used to append or concatenate two or more files,
creating a new file as the result. Any type of file may be appended but
it only makes sense to append files of the same type in most cases. If
appending binary files which have transfer addresses associated with
them, the transfer address of the last file of the list will be the
effective transfer address of the resultant file. All of the original
files will be left intact.
DESCRIPTION
The general syntax for the APPEND command is as follows:
APPEND,<file spec>[,<file list>],<file spec>
where <file list> can be an optional list of the specifications. The
last name specified should not exist on the disk since this will be the
name of the resultant file. If the last file name given does exist on
the disk, the question "MAY THE EXISTING FILE BE DELETED?" will be
displayed.
A Y response will delete the current file and cause the
APPEND operation to be completed.
A N response will terminate the
APPEND operation.
All other files specified must exist since they are
the ones to be appended together. If only 2 file names are given, the
first file will be copied to the second file. The extension default is
TXT unless a different extension is used on the FIRST FILE SPECIFIED, in
which case that extension becomes the default for the rest of the
command line. Some examples will show its use:
APPEND,CHAPTER1,CHAPTER2,CHAPTER3,BOOK
APPEND,FILE1,1.FILE2.BAK,GOODFILE
The first line would create a file on the working drive called
'BOOK.TXT' which would contain the files 'CHAPTER1.TXT', CHAPTER2.TXT',
and 'CHAPTER3.TXT' in that order.
The second example would append
'FILE2.BAK' from drive 1 to FILE1.TXT from the working drive and put the
result in a file called 'GOODFILE.TXT' on the working drive. The file
GOODFILE defaults to the extension of TXT since it is the default
extension.
Again, after the use of the APPEND command, all of the
original files will be intact, exactly as they were before the APPEND
operation.
-A.1.1-
ASN
The ASN command is used for assigning the 'system' drive and the
'working' drive or to select automatic drive searching.
The system
drive is used by FLEX as the default for command names or, in general,
the first name on a command line. The working drive is used by FLEX as
the default on all other file specifications within a command line.
Upon initialization, FLEX assigns drive #0 as both the system and
working drive.
An example will show how the system defaults to these
values:
APPEND,FILE1,FILE2,FILE3
If the system drive is assigned to be #0 and the working drive is
assigned to drive #1, the above example will perform the following
operation: get the APPEND command from drive #0 (the system drive), then
append FILE2 from drive #1 (the working drive) to FILE1 from drive #1
and put the result in FILE3 on drive #1. As can be seen, the system
drive was the default for APPEND where the working drive was the default
for all other file specs listed.
Automatic drive searching causes FLEX to automatically scan the ready
drives for the file specified. Hardware limitations prevent the mini
floppy versions from searching for "ready" drives. For this reason,
FLEX has been setup to ALWAYS assume drive 0 and 1 are ready. Thus if a
mini floppy version of FLEX attempts to search a drive which does not
have a disk loaded, it will hang up until a disk is inserted and the
door closed.
Alternatively, the system reset could be hit and a warm
start executed (a jump to address $CD03). The full size floppy version
CAN detect a ready condition and will not check drives which are out of
the ready state during automatic drive searching.
Automatic drive searching causes FLEX to first check drive #0 for the
file specified. If not there (or if not ready in the full size
version), FLEX skips to drive #1. If the file is not found on drive #1
in the mini floppy version, FLEX gives up and a file not found error
results. In the full size version FLEX continues to search on drives #2
and #3 before reporting an error.
DESCRIPTION
The general syntax for the ASN command is as follows:
ASN[,W=<drive>][,S=<drive>]
where <drive> is a single digit drive number or the letter A.
If just
ASN is typed followed by a 'RETURN', no values will be changed, but the
system will output a message which tells the current assignments of the
system and working drives, for example:
+++ASN
THE SYSTEM DRIVE IS #0
THE WORKING DRIVE IS #0
-A.2.1-
FLEX User's Manual
Some examples of using the ASN command are:
ASN,W=1
ASN,S=1,W=0
where the first line would set the working drive to 1 and leave the
system drive assigned to its previous value. The second example sets
the system drive to 1 and the working drive to 0. Careful use of drive
assignments can allow the operator to avoid the use of drive numbers on
file specifications most of the time!
If auto drive searching is desired, then the letter A for automatic,
should be used in place of the drive number.
Example:
ASN W=A
ASN S=A, W=1
ASN S=A, W=A
-A.2.2-
BUILD
The BUILD command is provided for those desiring to create small text
files quickly (such as STARTUP files, see STARTUP) or not wishing to use
the optionally available FLEX Text Editing System. The main purpose for
BUILD is to generate short text files for use by either the EXEC command
or the STARTUP facility provided in FLEX.
DESCRIPTION
The general syntax of the BUILD command is:
BUILD,<file spec>
where <file spec> is the name of the file you wish to be created.
The
default extension for the spec is TXT and the drive defaults to the
working drive. If the output file already exists the question "MAY THE
EXISTING FILE BE DELETED?" will be displayed. A Y response will delete
the existing file and build a new file while a N response will terminate
the BUILD command.
After you are in the 'BUILD' mode, the terminal will respond with an
equals sign ('=') as the prompt character. This is similar to the Text
Editing System's prompt for text input. To enter your text, simply type
on the terminal the desired characters, keeping in mind that once the
'RETURN' is typed, the line is in the file and can not be changed.
Any
time before the 'RETURN' is typed, the backspace character may be used
as well as the line delete character. If the delete character is used,
the prompt will be '???' instead of the equals sign to show that the
last line was deleted and not entered into the file. It should be noted
that only printable characters (not control characters) may be entered
into text files using the BUILD command.
To exit the BUILD mode, it is necessary to type a pound sign ('#')
immediately following the prompt, then type 'RETURN'. The file will be
finished and control returned back to FLEX where the three plus signs
should again be output to the terminal. This exiting is similar to that
of the Text Editing System.
-B.1.1-
CAT
The CATalog command is used to display the FLEX disk file names in the
directory on each disk. The user may display selected files on one or
multiple drives if desired.
DESCRIPTION
The general syntax of the CAT command is:
CAT[,<drive list>][,<match list>]
where <drive list> can be one or more drive numbers seperated by commas,
and <match list> is a set of name and extension characters to be matched
against names in the directory. For example, if only file names which
started with the characters 'VE' were to be cataloged, then VE would be
in the match list. If only files whose extensions were 'TXT' were to be
cataloged, then .TXT should appear in the match list.
A few specific
examples will help clarify the syntax:
+++CAT
+++CAT,1,A.T,DR
+++CAT,PR
+++CAT,0,1
+++CAT,0,1,.CMD,.SYS
The first example will catalog all file names on the working drive or on
all drives if auto drive searching is selected. The second example will
catalog only those files on drive 1 whose names begin with 'A' and whose
extensions begin with 'T', and also all files on drive 1 whose names
start with 'DR'. The next example will catalog all files on the working
drive (or on all drive if auto drive searching is selected) whose names
start with 'PR'.
The next line causes all files on both drive 0 and
drive 1 to be cataloged. Finally, the last example will catalog the
files on drive 0 and 1 whose extensions are CMD or SYS.
During the catalog operation, before each drive's files are displayed, a
header message stating the drive number is output to the terminal. The
name of the diskette as entered during the NEWDISK operation will also
be displayed. The actual directory entries are listed in the following
form:
NAME.EXTENSION
SIZE PROTECTION CODE
where size is the number of sectors that file occupies on the disk.
If
more than one set of matching characters was specified on the command
line, each set of names will be grouped according to the characters they
match.
For example, if all .TXT and .CMD files were cataloged, the TXT
types would be listed together, followed by the CMD types.
In summary, if the CAT command is not parameterized, then all files on
the assigned working drive will be displayed. If a working drive is not
assigned (auto drive searching mode) the CAT command will display files
-C.1.1-
FLEX User's Manual
on all on line drives. If it is parameterized by only a drive number,
then all files on that drive will be displayed. If the CAT command is
parameterized by only an extension, then only files with that extension
will be displayed.
If only the name is used, then only files which
start with that name will be displayed.
If the CAT command is
parameterized by only name and extension, then only files of that root
name and root extension (on the working drive) will be displayed. Learn
to use the CAT command and all of its features and your work with the
disk will become a little easier.
The current
follows:
D
W
(blank)
protection
code
options
that
can
be
displayed are as
File is delete protected (delete or rename prohibited)
File is write protected (delete, rename and write prohibited)
No special protection
-C.1.2-
COPY
The COPY command is used for making copies of files on a disk.
Individual files may be copied, groups of name-similar files may be
copied, or entire disks may be copied. The copy command is a very
versatile utility. The COPY command also re-groups the sectors of a
file in case they were spread all over the old disk. This regrouping
can make file access times much faster. It should be noted that before
copying files to a new disk, the disk must be formatted first. Refer to
NEWDISK for instructions on this procedure.
DESCRIPTION
The general syntax of the COPY command has three forms:
a. COPY,<file spec>,<file spec>
b. COPY,<file spec>,<drive>
c. COPY,<drive>,<drive>[,<match list>]
where <match list> is the same as that described in the CAT command and
all rules apply to matching names and extensions. When copying files,
if the destination disk already contains a file with the same name as
the one being copied, the file name and the message, "FILE EXISTS DELETE
ORIGINAL?" will be output to the terminal. Typing Y will cause the file
on the destination disk to be deleted and the file from the source disk
will be copied to the destination disk. Typing N will direct FLEX not
to copy the file in question.
The first type of COPY allows copying a single file into another.
The
output file may be on a different drive but if on the same drive the
file names must be different. It is always necessary to specify the
extension of the input file but the output file's extension will default
to that of the input's if none is specified. An example of this form of
COPY is:
+++COPY,0.TEST.TXT,1.TEST25
This command line would cause the file TEST.TXT on drive 0 to be copied
into a file called TEST25.TXT on drive 1. Note how the second file's
extension defaulted to TXT, the extension of the input file.
The second type of COPY allows copying a file from one drive to another
drive with the file keeping its original name. An example of this is:
+++COPY,0.LIST.CMD,1
Here the file named LIST.CMD on drive 0 would be copied to drive 1. It
is again necessary to specify the file's extension in the file
specification.
This form of the command is more convenient than the
previous form if the file is to retain its original name after the
copying process.
-C.2.1-
FLEX User's Manual
The final form of COPY is the most versatile and the most powerful.
It
is possible to copy all files from one drive to another, or to copy only
those files which match the match list characters given. Some examples
will clarify its use:
+++COPY,0,1
+++COPY,1,0,.CMD,.SYS
+++COPY,0,1,A,B,CA.T
The first example will copy all files from drive 0 to drive 1 keeping
the same names in the process. The second example will copy only those
files on drive 1 whose extensions are CMD and SYS to drive 0. No other
files will be copied. The last example will copy the files from drive 0
whose names start with 'A' or 'B' regardless of extension, and those
files whose names start with the letters 'CA' and whose extensions start
with 'T'.,to the output drive which is drive 1. The last form of copy
is the most versatile because it will allow putting just the command
(CMD) files on a new disk, or just the SYS files, etc., with a single
command entry. During the COPY process, the name of the file which is
currently being copied will be output to the terminal, as well as the
drive to which it is being copied.
-C.2.2-
C4MAT
The C4MAT command is used to format the CalComp Marksman hard disk. It
performs a surface verification and format function similar to the
NEWDISK utility.
DESCRIPTION
The general syntax of the C4MAT command is:
C4MAT
This command will initialize the entire surface of the hard disk. It is
important to format the disk initially to build directories and sector
maps. Once initialized, the disk should never need to be reinitialized
unless catastrophic damage occurs (like a wild program, writing all over
the disk).
The initialization process destroys all data previously on
the disk and it is vital that disks with good data not be formatted.
The C4MAT program required approximately two hours to run.
When the C4MAT program is run, it will ask you if you are sure you want
to initialize the disk. If you do, type "Y". C4MAT will then ask for a
volume name, which can be up to eight characters in length. The volume
name is stored in the disk information sector and is displayed by the
CAT command and others. Be absolutely sure the disk is not write
protected when you run the C4MAT program. An initial directory capable
of storing up to 250 files is build upon the disk. The directory will
expand if more than 250 files are placed on the disk.
Due to the large size and high density of the disk, it is not unusual
for several bad sectors to be found. The program will abort if it
cannot find at least 60,000 good free sectors on the disk.
All bad
sectors are automatically bypassed.
-C.3.1-
CLEAN
The CLEAN command is used in conjunction with a Remex FD-08 cleaning kit
to clean DMAF eight inch disk drive heads.
DESCRIPTION
The general syntax of the CLEAN command is:
CLEAN [,<drive number>]
where <drive number> is optional and defaults to drive zero. The CLEAN
command will then prompt you to load the cleaning diskette into the
specified drive. When the diskette is in place, the heads are loaded
and stepped back and forth over the cleaning surface for thirty seconds.
You should then remove the cleaning disk and inspect it for oxide
deposits. If deposits are noted, follow the manufacturers recomendations
for media replacement. Frequent oxide deposits could indicate defective
disk heads.
-C.6.1-
DATE
The DATE command is used to display or change an internal FLEX date
register.
This date register may be used by future programs and FLEX
utilities.
DESCRIPTION
The general syntax of the DATE command is:
DATE[,<month,day,year>]
where 'month' is the numerical month, 'day' is
'year' is the last two digits of the year.
+++DATE 5,2,79
Typing
date.
DATE
the
numerical
day
and
Sets the date register to May 2, 1979
followed by a carriage return will return the last entered
Example:
+++DATE
May 2, 1979
-D.1.1-
DELETE
The DELETE command is used to delete a file from the disk. Its name
will be removed from the directory and its sector space will be returned
to the free space on the disk.
DESCRIPTION
The general syntax of the DELETE command is:
DELETE,<file spec>[,<file list>]
where <file list> can be an optional list of file specifications. It is
necessary to include the extension on each file specified.
As the
DELETE command is executing it will prompt you with:
DELETE "FILE NAME"?
The entire file specification will be displayed, including the drive
number. If you decide the file should be deleted, type 'Y'; otherwise,
any other response will cause that file to remain on the disk. If a 'Y'
was typed, the message 'ARE YOU SURE?' will be displayed on the
terminal. If you are absolutely sure you want the file deleted from the
disk, type another 'Y' and it will be gone. Any other character will
leave the file intact. ONCE A FILE HAS BEEN DELETED, THERE IS NO WAY TO
GET IT BACK!
Be absolutely sure you have the right file before
answering the prompt questions with Y's. Once the file is deleted, the
space it had occupied on the disk is returned back to the list of free
space for future use by other files. Few examples follow:
+++DELETE,MATHPACK.BIN
+++DELETE,1.TEST.TXT,0.AUGUST.TXT
The first example will DELETE the file named MATHPACK.BIN from the
working drive.
If auto drive searching is selected, the file will be
deleted from the first drive it is found on.
The second line will
DELETE the file TEST.TXT from drive 1, and AUGUST.TXT from drive 0.
There are several restrictions on the DELETE command.
First, a file
that is delete or write protected may not be deleted without first
removing the protection. Also a file which is currently in the print
queue (see the PRINT command) can not be deleted using the DELETE
command.
-D.2.1-
ECHO
The ECHO command is a utility that permits messages and control
characters to be sent to the terminal device. It is particularly useful
when used inside of EXEC files.
DESCRIPTION
The general syntax of the ECHO command is:
ECHO,<string>
where string is any string of printable characters or control escape
sequences terminated by a carriage return or an end of line character.
Some examples of the echo command are:
ECHO,THIS IS A MESSAGE
ECHO,\G THE FILE HAS BEEN DELETED!
The first example types "THIS IS A MESSAGE" on the terminal. The second
example uses a control escape sequence to send a bell character (Control
"G") to the terminal, followed by the message "THE FILE HAS BEEN
DELETED!".
Control escape sequences provide a mechanism to send control characters
to the terminal device, for example, a bell character may be sent to
provide an audible alert signal. These sequences begin with a backslash
character followed by an upper case letter or symbol. The 'control'
value of the symbol is sent to the terminal. For example, the sequence
"\G" sends a control-G character. Two other escape sequences available
are "\0" which sends a null character (control-shift-P) and "\n" (Lower
case "N") which sends a carriage return, line feed to the terminal.
-E.1.1-
EXEC
The EXECute command is used to process a text file as a list of
commands, just as if they had been typed from the keyboard. This is a
very powerful feature of FLEX for it allows very complex procedures to
be built up as a command file.
When it is desirable to run this
procedure, it is only necessary to type EXEC followed by the name of the
command file. Essentially all EXEC does is to replace the FLEX keyboard
entry routine with a routine which reads a line from the command file
each time the keyboard routine would have been called. The FLEX
utilities have no idea that the line of input is coming from a file
instead of the terminal.
DESCRIPTION
The general syntax of the EX command is:
EXEC,<file spec>
where <file spec> is the name of the command file. The default
extension is TXT. An example will give some ideas on how EXEC can be
used.
One set of commands which might be performed quite often is the
set to make a new system diskette on drive 1 (see NEWDISK). Normally it
is necessary to use NEWDISK and then copy all .CMD and all .SYS files to
the new disk. Finally the LINK must be performed. Rather than having
to type this set of commands each time it was desired to produce a new
system diskette, we could create a command file called MAKEDISK.TXT
which contained the necessary commands. The BUILD utility should be
used to create this file.
The creation of this file might go as
follows:
+++BUILD,MAKEDISK
=NEWDISK,1
=COPY,0,1,.CMD,.OV,.LOW,.SYS
=LINK,1.FLEX
=#
+++
The first line of the example tells FLEX we wish to BUILD a file called
MAKEDISK (with the default extension of .TXT).
Next, the three
necessary command lines are typed in just as they would be typed into
FLEX.
The COPY command will copy all files with CMD, OV, LOW, and SYS
extensions from drive 0 to drive 1. Finally the LINK will be performed.
Now when we want to create a system disk we only need to type the
following:
+++EXEC,MAKEDISK
We are assuming here that MAKEDISK resides on the same disk which
contains the system commands.
EXEC can also be used to execute the
STARTUP file (see STARTUP).
-E.2.1-
FLEX User's Manual
There are many applications for the EXEC command. The one shown is
certainly useful but experience and imagination will lead you to other
useful applications.
IMPORTANT NOTE: The EXEC utility is loaded into the very upper end of
user memory.
This is done by first loading EXEC into the utility file
space, then calculating the proper starting address so that it will
reside right up against the end of the user memory space. Next EXEC is
moved to that location and a new end of memory is set to just below
EXEC.
When the EXEC file is finished, if the user has not further
changed the memory end location, EXEC will reset it to the original
value.
-E.2.2-
FIX
The FIX command is used to modify binary files that are stored on the
disk. Since the FIX command loads the file into an internal buffer, it
is possible to modify binary files that have several segments or that
load into system locations.
DESCRIPTION
The general syntax of the FIX command is:
FIX,<input file name> [,<output file name>]
where <input file name> is the name of the file you wish to modify, and
<output file name>, if specified, is the name of the file into which the
modified copy will be written. The default extension for FIX is .BIN
and the drive defaults to the working drive. If the output file is not
specified, the modified binary file will replace the input file.
When you run the FIX command, the computer will load the binary file
into it's internal buffer memory. If for some reason the file cannot be
loaded into memory, an error message is produced and the file is left
unmodified. After the file has been loaded, FIX will respond with a
prompt character, ":", and will then accept one of the following
single-letter commands:
B -- Add a new block of data to the file. This command requires a
pair of addresses specifying the lower and upper bounds of the
block to be added.
The block is initially cleared to zeros.
For example, to add a sixteen byte object code block at location
$0700, type :B 0700-070F. Added blocks may be modified with the
memory examine and change function.
E -- Exit.
All data that was modified is written back to the output
file on the disk. The resulting file has all of thp object code
blocks that were present in the original file, plus any new
blocks that have been added. There may be exactly one transfer
address in the file, and it will be the last block in the file.
If no output file name was specified, th e exit command will
delete the old binary file and write a new file in its place.
L -- Display File Limits. This command will display the transfer
address and the limit addresses of each contiguous block of
object code in the file.
M -- Memory Examine and Change. This command is used to examine or
modify a byte in the file. It cannot be used to extend the file
by adding additional bytes. See the detailed description below.
N -- Next line. This command displays the next sixteen bytes of the
binary file. It is normally used after the V or P commands (see
below).
-F.1.2-
FLEX user's manual
P -- Peek at the file.
This command allows you specify a single
address and have that address and a few surrounding bytes
displayed in a format similar to that of the V command (see
below).
T -- Specify the transfer address.
For example
transfer address to $0100, type :T 0100.
to
change
the
U -- Remove the transfer address from the file. See the description
of a binary file in the advanced programmer's guide.
V -- View a section of the file. This command expects a range of
addresses and displays the contents of the binary file between
these
addresses.
The binary code is displayed in both
hexadecimal and ASCII. Any addresses in the range not contained
within the binary file are displayed as a pair of hyphens.
X -- Exit (Give Up). No modified data is written back to the disk.
(The file is left intact.) This command is useful if you have
managed to screw up the file while making modifications.
FIX Memory Examine and Change
The memory examine and change function of fix permits the programmer to
look at and change bytes in a binary file by referencing the address at
which they will load. This function cannot be used to add additional
bytes to the binary tile. If you need to add data, use the "B" command
to create the new bytes, and then use the memory command to change them.
1.)
Enter the "M" command followed by the four digit address of the
byte you wish to examine or change. The computer will display
the address followed by the data found in the byte. If no such
byte exists in the binary file, a question mark will be shown.
2.)
At this point the user has the option of advancing, either
forward or backward, to the next memory location, changing the
data stored at the displayed address and advancing to the next
location, or of exiting the examine and change function.
a.)
To display
space.
the
next
sequential address and data, type a
b.)
To
display the
up-arrow, "^".
c.)
To change the data stored at the displayed location simply
enter the new data as two hexadecimal digits. If a non-hex
value such as "3Q" is entered the data will remain
unchanged and the memory change function will step to the
next sequential address.
previous
-F.1.2-
address
and
data,
type
the
d.)
If a delete character (control-X) or a backspace character
(control-H) is typed, the current address and data is
redisplayed.
e.)
To exit the Memory
carriage return.
Examine
-F.1.3-
and Chance function, type a
I
The I command allows a utility to obtain input characters from a disk
file rather than the terminal.
DESCRIPTION
The general syntax of the I command is:
I,<file spec>,<command>
where <file spec> is the name of the file containing the characters to
be used as input and <command> is the FLEX utility command that will be
executed and that will receive that input from <file spec>. The default
extension on <file spec> is .TXT.
For example, say that on a startup you always wanted the file DATA.DAT
deleted from the disk without having to answer the "ARE YOU SURE?"
questions. This could be done in the following manner:
+++BUILD,YES
=YY
=#
The first Y will answer the "DELETE 0.DATA.DAT?"
second Y will answer the "ARE YOU SURE?" question.
question
while
the
+++BUILD,STARTUP
=I,YES,DELETE,DATA.DAT
=#
Upon booting the disk, FLEX will execute the STARTUP file and perform
the following operation: delete the file DATA.DAT receiving all answers
to any questions from the input file YES.TXT rather than from the
terminal.
See the
STARTUP.
description
of
the
STARTUP
-I.1.1-
command for more information on
JUMP
The JUMP command is provided for convenience.
It is used
execution of a program already stored in computer RAM memory.
to
start
DESCRIPTION
The general syntax of the JUMP command is:
JUMP,<hex address>
where <hex address> is a 1 to 4 digit hex number representing the
address where program execution should begin. The primary reason for
using JUMP is if there is a long program in memory already and you do
not wish to load it off of the disk again. Some time can be saved but
you must be sure the program really exists before JUMPing to it!
As an example, suppose we had a BASIC interpreter in memory and it had a
'warm start' address of 103 hex. To start its execution from FLEX we
type the following:
+++JUMP,103
The BASIC interpreter would then be executed. Again, remember that you
must be absolutely sure the program you are JUMPing to is actually
present in memory.
-J.1.1-
LINK
The LINK command is used to tell the bootstrap loader where the FLEX
operating system file resides on the disk. This is necessary each time
a system disk is created using NEWDISK. The NEWDISK utility should be
consulted for complete details on the use of LINK.
DESCRIPTION
The general syntax of the LINK command is:
LINK,<file spec>
where <file spec> is usually FLEX.
examples of the use of LINK follow:
The default extension is SYS.
Some
+++LINK,FLEX
+++LINK,1.FLEX
The first line will LINK FLEX.SYS on the working drive, while the second
example will LINK FLEX.SYS on drive 1. For more advanced details of the
LINK utility, consult the "Advanced Programmers Guide".
-L.1.1-
LIST
The LIST command is used to LIST the contents of text or BASIC files on
the terminal. It is often desirable to examine a files without having
to use an editor or other such program.
The LIST utility allows
examining entire files, or selected lines of the file. Line numbers may
also be optionally printed with each line.
DESCRIPTION
The general syntax of the LIST command is:
LIST,<file spec>[,<line range>][,+(options)]
where the <file spec> designates the file to be LISTed (with a default
extension of TXT),and <line range> is the first and last line number of
the file which you wish to be displayed. All lines are output if no
range specification is given. The LIST command supports two additional
options.
If a +N option is given, line numbers will be displayed with
the listed file. If a +P option is given, the output will be formatted
in pages and LIST will prompt for "TITLE" at which time a title for the
output may be entered. The TITLE may be up to 40 characters long. This
feature is useful for obtaining output on a printer for documentation
purposes (see P command). Each page will consist of the title, date,
page number, 54 lines of output and a hex 0C formfeed character.
Entering a +NP will select both options. A few examples will clarify
the syntax used:
+++LIST,RECEIPTS
+++LIST,CHAPTER1,30-200,+NP
+++LIST,LETTER,100
The first example will list the file named 'RECEIPTS.TXT' without line
numbers. All lines will be output unless the 'escape character' is used
as described in the Utility Command Set introduction. The second
example will LIST the 30th line through the 200th line of the file named
'CHAPTER1.TXT' on the terminal.
The hyphen ('-') is required as the
range number separator. Line numbering and page formatting will be
output because of the '+NP' option. The last example shows a special
feature of the range specification. If only one number is stated, it
will be interpretted as the first line to be displayed. All lines
following that line will also be LISTed. The last example will LIST the
lines from line 100 to the end of the file. No line numbers will be
output since the 'N' was omitted.
-L.2.1-
NEWDISK
Newdisk is used to format a new diskette. Diskettes as purchased will
not work with FLEX until certain system information has been put on
them. The NEWDISK utility puts this information on the diskette, as
well as checking the diskette for defective sectors (bad spots on the
surface of the disk which may cause data errors).
DESCRIPTION
The general syntax of the NEWDISK command is:
NEWDISK,<drive>
where <drive> represents a single digit drive number and specifies the
drive to be formatted. After typing the command, the system will ask if
you are sure you want to NEWDISK, and if the disk to be initialized is a
scratch disk.
Type 'Y' as the response to these questions if you are
sure the NEWDISK command should continue. Certain versions of NEWDISK
will also ask you if you have a double-sided or double-density disk
installed. If so, type 'Y', otherwise type 'N'. NEWDISK then prompts
for a volume name and number. This gives you the ability to "name" the
diskette for future reference.
The NEWDISK process takes approximately five minutes to initialize a
disk, assuming there are no bad spots on it.
Defective sectors will
make NEWDISK run even slower, depending on the number of bad sectors
found. As bad sectors are detected, a message will be output to the
terminal such as:
BAD SECTOR AT xxyy
where 'xx' is the disk track number (in hex) and 'yy' is the sector
number, also in hex. NEWDISK automatically removes bad sectors from the
list of available sectors, so even if a disk has several bad spots on
it, it is still usable. When NEWDISK finishes, FLEX will report the
number of available sectors remaining on the disk. If no defective
sectors were detected, the total should be 340 or 1140 for single-sided
mini or full size disks respectively. A double-sided disk would yield
twice that number.
Sometimes during the NEWDISK process, a sector will be found defective
in an area on the disk which is required by the operating system. In
such a case, NEWDISK will report:
FATAL ERROR - FORMATTING ABORTED
and FLEX will regain control. You should not immediately assume the
disk to be useless if this occurs, but instead, remove the disk from the
drive, re-insert it, and try NEWDISK again. If after several attempts
the formatting is still aborted, you should assume the disk is unusable.
-N.1.1-
FLEX User's Manual
CREATING SYSTEM DISKETTES
A system disk is one from which the operating system can be loaded.
Normally the system disk will also contain the Utility Command Set
(UCS). The following procedure should be used when preparing system
disks.
1. Initialize the diskette using NEWDISK as described above.
2. COPY all .SYS files desired to the new disk.
3. COPY all .CMD files to the new disk.
It should be noted that
steps
2
and
3
can
be
done
with
one
command;
“COPY,0,1,.SYS,.CMD,.OV,.LOW”, assuming that the new disk in in
drive 1 and that the operating system and all commands and their
overlays are desired.
(the .OV copies overlay files and .LOW
copies the utility 'SAVE.LOW').
4. Last it is necessary to LINK the file FLEX.SYS to the system using
the LINK command.
A very convenient way to get the above process performed without having
to type all of the commands each time is to create a command file and
use the EXEC command. Consult the EXEC documentation for details.
It is not necessary to make every disk a system diskette.
It is
possible to create 'working' diskettes, disks which do not have the
operating system on them, for use with text files or BASIC files.
Remember that a diskette can not be used for booting the system unless
the operating system is contained on it and it has been linked.
To
create a working disk, simply run NEWDISK on a diskette. It will now
have all of the required information to enable FLEX to make use of it.
This disk, however, does not contain the disk operating system and is
not capable of booting the system.
-N.1.2-
N
The N command is used to automatically answer "N" to prompts produced by
various FLEX utilities. This facility is especially useful wnen writing
EXEC files.
DESCRIPTION
The general syntax of the N command is:
N,<command string>
where <command string> is a valid command line to be passed to FLEX. If
the N command is used with multiple commands per line using the end of
line character, it will only affect the command immediately following
it.
The N command is particularly useful when performing
COPY
operations that you do not wish to overwrite any existing files:
+++N,COPY,0,1,TEXT
FILE
FILE
FILE
FILE
TEXT1
TEXT2
DELETE
TEXT3
DELETE
TEXT4
TXT
TO
TXT
TO
ORIGINAL?
TXT
TO
ORIGINAL?
TXT
TO
DRIVE
DRIVE
N
DRIVE
N
DRIVE
-N.2.1-
#1
#1
COPIED.
FILE EXISTS
#1
FILE EXISTS
#1
COPIED.
O
The O (not zero) command can be used to route all displayed output from
a utility to an output file instead of the terminal. The function of O
is similar to P (the printer command) except that output is stored in a
file rather than being printed on the terminal or printer. Other TSC
software may support this utility.
Check the supplied
software
instructions for more details.
DESCRIPTION
The general syntax of the O command is:
O,<file spec>,<command>
where <command> can be any standard utility command line and <file spec>
is the name of the desired output file. The default extension on <file
spec> is .OUT. If O is used with multiple commands per line (using the
'end of line' character ':') it will only have affect on the command it
immediately precedes. Some examples will clarify its use.
+++O,CAT,CAT
writes a listing of the current disk directory into
a file called CAT.OUT
+++O,BAS,ASMB,BASIC.TXT
writes the assembled source listing of the text
source file 'BASIC.TXT' into a file called 'BAS.OUT'
when using the assembler
-O.1.1-
P
The P command is used to direct the output of commands in the Utility
Command Set to a parallel printer. It is normally used to produce hard
copy
output from text processors, assemblers, and other utility
programs.
DESCRIPTION
The general syntax of the P command is:
P[#n],<command string>
where #n is optional and is the port number of the parallel interface
connected to the printer and <command string> is a valid command line to
be passed to FLEX.
If the port number is not specified, it will default to port seven,
except on S/09 computers which will default to the MP-ID parallel port.
If the P command is used with multiple commands per line using the end
of line chracter, it will only affect the command immediately following
it in the command line. Some examples will clarify the use of the P
command:
+++P,CAT
+++P#3,LIST,TEXT
+++P#5-B,LIST,TXT
The first example will produce a printed listing of the catalog of the
working drive. The port number is omitted and defaults to port seven or
the MP-ID port, depending on the computer system.
The second example will produce a printed listing of the file TEXT.TXT
on the printer connected to port number three. When using dual parallel
ports, the port side may be specified by using an A or B suffix to the
port number. The suffix is separated from the port number by a hyphen
or slash character. If the suffix is omitted, the A side of the port is
selected. In the third example, the port specification of 5-B will use
the B side of port number five.
The P command initially loads into the utility command space at $C100.
If sufficient memory has been reserved for the printer driver (see the
RM command documentation) it will be relocated there, otherwise it will
be relocated into the highest available locations in user memory and the
end of user memory pointer will be updated.
When the command to be
printed has completed any user memory allocated to the printer driver
will be released.
The parallel data and handshake conforms to the CENTRONICS® interface
standard. This standard has been widely adopted for use with 8-bit
ASCII printers and is available on nearly all paralle printers.
-P.1.1-
P.COR
The P.COR file is a command file that can be used to construct
customized printer driver commands.
It contains the relocation and
memory management routines required to use position independent printer
drivers.
DESCRIPTION
P.COR is never used as a command by itself. Special internal checks are
made to insure that a printer driver has been properly appended to the
P.COR file.
In order to use P.COR, you must write a position
independent printer driver that begins at memory address $C300 and may
extend up to location $C6FF, thus allowing the driver to be up to 1K in
length.
This is normally sufficient space for any reasonable printer
driver. For more information on writing a position independent driver,
see section X in chapter 3.
Once the printer driver has been written and assembled, you must use the
append command to combine the P.COR file with the printer driver. To
clarify this procedure, consider the following example.
A serial
printer driver (A listing of this driver can be found in Chapter 3
section XI) named SERIAL has been assembled. In order to make a print
command out of this driver, the following command line must be entered:
APPEND,P.COR,SERIAL.BIN,SERIAL.CMD
The result is a print command that functions like the P command.
the new SERIAL command, enter
To use
SERIAL[#n],<command string>
where #n is the port number (you have set the default)
string> is any command string to be passed to Flex.
-P.2.1-
and
<command
PO
The PO command is the older version
included for comparability purposes.
of the P command and has been
DESCRIPTION
The general syntax of the PO command is:
PO,<command string>
where <command string> can be any standard utility command line. If PO
is used with multiple commands per line (using the 'end of line'
character), it will only have affect on the command it immediately
preceeds. Some examples will clarify its use:
+++PO,CAT
+++PO,LIST,MONDAY:CAT,1
The first example would print a CATalog of the directory of the working
drive on the printer. The second example will print a LISTing of the
text file MONDAY.TXT and then display on the terminal a CATalog of drive
1 (this assumes the 'end of line' character is a ':'). Note how the PO
did not cause the 'CAT,1' to go to the printer.
The PO command tries to load a file named PRINT.SYS from the same disk
which PO itself was retrieved. The PRINT.SYS file which is supplied
with the system diskette contains the necessary routines to operate a
parallel printer connected to port seven of a /09 computer system.
For
complete details on these routines, refer to section XI of this
publication .
-P.3.1-
PSP
The Print Spool Program provides FLEX with the ability to output stored
data to a printer at the same time that it is performing other tasks.
This method of printing is called Printer Spooling.
This feature is
especially useful when it is necessary to print a long listing without
tying up the computer.
DESCRIPTION
The general syntax of the Print Spool Program is as follows:
PSP,[<spool file>] [,<print command>] [,+<repeat count>]
where <spool file> is the name of the file to be printed (normally
produced by the "O" command), <print command> is the name of the print
command that will be used to drive the printer, and <repeat count> is
the number of additional copies of print you require. The default
extension of the spool file is .OUT and the default extension for the
print command is .CMD.
For example, say that your disk had a very large number of files on it
and a printer catalog listing was desired. A file containing the output
information should first be created by using the O command such as:
+++O,CAT.OUT,CAT.CMD
or
+++O,CAT,CAT
(see the description of the 0 command)
when printer output is desired the command
+++PSP,CAT.OUT,P.CMD
or
+++PSP,CAT,P
should be entered.
At this time the location of the file CAT.OUT is stored in a buffer
called a print queue (waiting list). If another PSP command is issued
before the first is finished, the second file will be in the next
available location in the print queue.
After the file name to be printed has been stored in the print queue,
the PSP program will load the specified printer driver command into the
printer reserved area (See the RM command). If the reserved area is not
big enough, a message is issued and the program terminates. Otherwise,
the spooling process is started and control returns to the FLEX command
interpreter.
Note that any of the relocatable printer commands may be
used, including the Q and SP commands.
Once printing is in progress, it is not possible to change printer
drivers until the spooling process has completed. For example, if you
have three files that you wish to print on a Qume printer, and two on a
serial printer, you must first spool the three Qume files and allow them
to complete printing. You can then spool the two files destined for the
serial printer.
-P.4.1-
FLEX user's manual
During printing, you can perform flex commands from the terminal, such
as deleting files, copying disks, etc. While you are using FLEX, the
Print Spool Program will be printing the desired file. PSP will
automatically wait for the printer to become ready (power up) even after
the file has been entered into the print queue. After printing the
first file, the second file in the queue will be printed (if there is
one), etc.
The print queue may be examined or modified at any time by
using the QCHECK utilty.
NOTE:
There are several things that the user should be aware of when
using the printer spooling:
1)
Any file that is in the print queue may not be deleted,
renamed, or changed in any way until it has been printed
or removed by the QCHECK print queue manager utility.
2)
Disks which contain the files in the print queue should
not be removed while the files are still in the queue.
3)
Non-Spooling print commands (like P) cannot be used while
files are waiting in the print queue.
4)
Any paper or cassette tape load or any other operation
which requires that the computer accept data at precise
time intervals should not be executed during a printer
spooling operation.
5)
In order for printer spooling to work in a non-S/09 computer
system, an MP-T or MP-T2 interface must be installed in I/O
port five and be strapped to provide IRQ interrupts.
6)
The PSP command is not supported by FLEX9S.
7)
The PSP command will function only with FLEX 9.0 Version
2.6 or above. If in doubt, check with "VER FLEX.SYS".
-P.4.2-
PROT
The PROT command is used to change a protection code associated with
each file. When a file is first saved, it has no protection associated
with it thereby allowing the user to write to, rename, or delete the
file.
Delete or write protection can be added to a file by using the
PROT command.
DESCRIPTION
The general syntax of the PROT command is:
PROT,<file spec>[,(option list)]
where the <file spec> designates the file to be protected
list) is any combination of the following options.
and
(option
D
A 'D' will delete protect a file. A delete protected file cannot be
affected by using the DELETE or RENAME Commands, or by the delete
functions of SAVE, APPEND, etc.
W
A 'W' will write protect a file. A write protected file cannot be
deleted, renamed or have any additional information written to it.
Therefore a write protected file is automatically delete protected
as well.
C
A 'C' will Catalog protect a file. Any files with a C protection
code will function as before but will not be displayed when a
CAT command is issued.
X
An 'X' will remove all protection options on a specific file.
Examples:
+++PROT CAT.CMD,XW
+++PROT CAT.CMD,X
+++PROT INFO.SYS,C
Remove any previous protection on the CAT.CMD
Utility and write protect it.
Remove all protection from the CAT.CMD utility.
Prohibit INFO.SYS from being displayed in a
catalog listing.
-P.5.1-
Q
The Q command is used to direct the output of commands in the Utility
Command Set to a Qume Sprint-3™ printer attached to an MP-QP I/O
interface. It is normally used to produce hard copy output from text
processors, assemblers, and other utility programs.
DESCRIPTION
The general syntax of the Q command is:
Q[#<n>][/<format>],<command string>
where #<n> is optional and is the port number of the MP-QP interface
connected to the printer, <format> is optional and is is one of the
letters A, B, C, D, E, or F, and <command string> is a valid command
line to be passed to FLEX. If the port number is not specified, it will
default to port seven. If the Q command is used with multiple commands
per line using the end of line chracter, it will only affect the command
immediately following it in the command line.
The format letter is separated from the port number or Q command by a
slash character, and specifies the printwheel pitch and print spacing to
be used. If the format character is omitted, it will default to format
"B". This format represents standard elite spacing and is used with the
WP LETTER GOTHIC 12 printwheel (number 80956) supplied with the
printers. The following formats are available:
A
B
C
D
E
F
-
10
12
15
10
12
15
Characters/Inch
Characters/Inch
Characters/Inch
Characters/Inch
Characters/Inch
Characters/Inch
Horizontal,
Horizontal,
Horizontal,
Horizontal,
Horizontal,
Horizontal,
6
6
6
8
8
8
Lines/Inch
Lines/Inch
Lines/Inch
Lines/Inch
Lines/Inch
Lines/Inch
Vertical
Vertical
Vertical
Vertical
Vertical
Vertical
Some examples will clarify the use of the Q command:
+++Q,CAT
This example will produce a printed listing of the catalog of the
working drive. The port number is omitted and defaults to port seven.
The format is also omitted, and defaults to "B", 12 characters per inch
horizontal, and 6 lines per inch vertical.
+++Q#3,LIST,TEXT
This example will produce a printed listing of the file TEXT.TXT.
The
port has been specified as port number three. No format is specified
and the default "B" will be assumed.
-Q.1.1-
FLEX User's Manual
+++Q/F,ROFF,LETTER
In this example, no port number is given so the default of seven will be
selected.
Format "F" has been selected so the printed output will be
spaced 15 characters per inch horizontal, and 8 lines per inch vertical.
This format provides 88 lines per 11 inch page, and matches the Qume
GOTHIC 15 printwheel (number 82090).
The Q command initially loads into the utility command space at $C100.
If sufficient memory has been reserved for the printer driver (see the
RM command documentation) it will be relocated there, otherwise it will
be relocated into the highest available locations in user memory and the
end of user memory pointer will be updated. When the command to be
printed has completed any user memory allocated to the printer driver
will be released.
-Q.1.2-
QCHECK
The QCHECK utility can be used to examine the contents of the print
queue and to modify it contents. QCHECK has no additional arguments
with it. Simply type QCHECK. QCHECK will stop any printing that is
taking place and then display the current contents of the print queue as
follows:
+++QCHECK
POS
1
2
3
COMMAND?
NAME
TEST.
CHPTR.
CHPTR2.
TYPE
.OUT
.OUT
.TXT
RPT
2
0
0
This output says that TEST.OUT is the next file to be printed (or that
it is in the process of being printed) and that 3 copies (1 plus a
repeat of 2) of this file will be printed. After these three copies
have been printed, CHPTR.OUT will be printed and then CHPTR2.TXT.
The
COMMAND?
prompt means QCHECK is waiting for one of the following
commands:
COMMAND
FUNCTION
(carriage return) Re-start printing, return to the FLEX command mode.
Q
A Q command will print the queue contents again.
R,#N,X
An R command repeats the file at position #N X times.
If X is omitted the repeat count will be cleared.
Example: R,#3,5
D,#N
A D command removes the file at queue position #N.
If N=1, the current print job will be terminated.
Example: D,#3
T
A T command will terminate the current print job.
This will cause the job currently printing to quit
and printing of the next job to start. If the
current files RPT count was not zero, it will
print again until the repeat count is 0. To
completely terminate the current job use use the
D,#1 command.
N,#N
A N command will make the file at position #N the
next one to be printed after the current print job
is finished. Typing Q after this operation will
show the new queue order.
Example: N,#3
S
An S command will cause printing to stop. After
the current job is finished, printing will halt
until a G command is issued.
-Q.2.1-
FLEX User's Manual
G
A G command will re-start printing after an S
command has been used to stop it.
K
A K command will kill the current print process.
All printing and queued jobs will be removed from
the queue. The files are not deleted from disk.
The QCHECK command is not supported under FLEX9S and Multi-User Basic.
-Q.2.2-
RENAME
The RENAME command is used to give an existing file a new name in the
directory. It is useful for changing the actual name as well as
changing the extension type.
DESCRIPTION
The general syntax of the RENAME command is:
RENAME,<file spec 1>,<file spec 2>
where <file spec 1> is the name of the file you wish to RENAME and <file
spec 2> is the new name you are assigning to it. The default extension
for file spec 1 is TXT and the default drive is the working drive. If
no extension is given on <file spec 2>, it defaults to that of <file
spec 1>.
No drive is requird on the second file name, and if one is
given it is ignored. Some examples follow:
+++RENAME,TEST1.BIN,TEST2
+++RENAME,1.LETTER,REPLY
+++RENAME,0.FIND.BIN,FIND.CMD
The first example will RENAME TEST1.BIN to TEST2.BIN. The next example
RENAMEs the file LETTER.TXT on drive 1 to REPLY.TXT. The last line
would cause the file FIND.BIN on drive 0 to be renamed FIND.CMD.
This
is useful for making binary files created by an assembler into command
files (changing the extension from BIN to CMD). If you try to give a
file a name which already exists in the directory, the message:
FILE EXISTS
will be displayed on the terminal.
Keep in mind that RENAME only
changes the file's name and in no way changes the actual file's
contents.
One last note of interest. Since utility commands are just like any
other file, it is possible to rename them also. If you would prefer
some of the command names to be shorter, or different all together,
simply use RENAME and assign them the names you desire.
-R.1.1-
RM
The RM command is used to Reserve Memory in which to load printer
drivers that are too large to fit in the actual printer driver area.
This command is primarily intended to permit the use of large printer
drivers (such as the QUME™ driver) with programs like BASIC that use all
available memory.
DESCRIPTION
The general syntax of the RM command is:
RM[,<size>] or RM?
where <size> is a decimal number indicating the amount of memory to be
reserved for the printer drivers. If not specified, the size parameter
defaults to 512 bytes.
If memory has previously been reserved for
printer drivers, the RM command will adjust the amount of memory
available as necessary. In order to get rid of the reserved memory, it
is only necessary to run the RM command with a size value of zero.
If
the second form of the RM command is used, the amount of reserved memory
will be reported.
Flex™ itself reserves approximately 56 bytes of memory for printer
driver code and defines the printer vector locations.
While this is
sufficient to run simple parallel or serial printers, it is not enough
memory to hold drivers for more complicated devices, for example, serial
printers requiring buffers and line protocol. The RM command allows the
user to reserve a memory area for the printer drivers that will be off
limits to programs like BASIC that use all available memory. Note that
it is NOT necessary to use the RM command to use the printer commands
like P and Q.
Some examples of using the RM command follow:
RM,700
RM?
RM,0
The first example will reserve 700 bytes of memory for use as a printer
area.
The second example will display that 700 bytes are reserved, and
the third example will free the memory reserved for the printer.
-R.2.1-
READPROM
The READPROM command is used to read the data from a 2716
compatible EPROM in a SWTPC MP-R EPROM programmer to a binary disk file.
Its primary use is for copying and modifying the contents of EPROMs.
DESCRIPTION
The general syntax of the READPROM command is:
READPROM[#n], <file spec>
Where #n is optional and is the port number in which the PROM programmer
is installed and <file spec> is the name to be assigned to the output
file. The default extension on the file is .BIN and the default drive is
the working drive. The default port for READPROM is #4. Some examples
will clarify the use of READPROM.
+++READPROM,JUNK
+++READPROM,JUNK.1
The first example will store the contents of the EPROM on the
programmer in port #4 to the file JUNK.BIN on the working drive. The
second example will read the EPROM on the programmer in port 7 and store
its contents in the file JUNK.BIN on drive 1. If an attempt is made to
save a program under a file name that already exists, the prompt "MAY
THE EXISTING FILE BE DELETED?" will be displayed. A Y response will
replace the file with the new data to be saved while a N response will
terminate the save operation.
The output file generated by READPROM will be 2048 (2K) bytes in
length with a load address of 0000.
No transfer address will be
assigned to the file.
The EPROM should not be
READPROM command tells you to.
installed
in the programmer until the
Default Port Addresses
If desired, the default port address can be changed
FIX utility on READPROM.CMD.
READPROM Address
C100
C102
by
using
Contents
S/09, 69A, 69K Default Port Address
/09 Default Port Address
-R.3.1-
the
S
The S command is used to direct the output of commands in the Utility
Command Set to a serial printer. It is normally used to produce hard
copy
output from text processors, assemblers, and other utility
programs.
DESCRIPTION
The general syntax of the S command is:
S[#n],<command string>
where #n is optional and is the port number
connected to the printer and <command string>
be passed to FLEX. If the port number is not
to port seven. If the S command is used with
using the end of line chracter, it will
immediately following it in the command
clarify the use of the S command:
of the serial interface
is a valid command line to
specified, it will default
multiple commands per line
only affect the command
line.
Some examples will
S,CAT
This example will produce a printed listing of the catalog of the
working drive. The port number is omitted and defaults to port seven.
S#3,LIST,TEXT
This example will produce a printed listing of the file TEXT.TXT.
port has been specified as port number three.
The
When using dual serial ports, the port side may be specified by using an
A or B suffix to the port number. The suffix is separated from the port
number by a hyphen or slash character. If the suffix is omitted, the A
side of the port is used. For example, a port specification of 5-B will
use the B side of port number five.
The S command initially loads into the utility command space at $C100.
If sufficient memory has been reserved for the printer driver (see the
RM command documentation) it will be relocated there, otherwise it will
be relocated into the highest available locations in user memory and the
end of user memory pointer will be updated.
When the command to be
printed has completed any user memory allocated to the printer driver
will be released.
The serial data output to the printer is 8-bit ASCII with two stop bits
and no parity. The S command does not use an ACK protocol, however it
will honor the data terminal ready line if it is connected to the
interface.
-S.1.1-
SAVE
The SAVE command is used for saving a section of memory on the disk.
Its primary use is for saving programs which have been loaded into
memory from tape or by hand.
DESCRIPTION
The general syntax of the SAVE command is:
SAVE,<file spec>,<begin adr>,<end adr>[,<transfer adr>]
where <file spec> is the name to be assigned to the file. The default
extension is BIN and the default drive is the working drive.
The
address fields define the beginning and ending addresses of the section
of memory to be written on the disk. The addresses should be expressed
as hex numbers.
The optional <transfer address> would be included if
the program is to be loaded and executed by FLEX.
This address tells
FLEX where execution should begin. Some examples will clarify the use
of SAVE:
+++SAVE,DATA,100,1FF
+++SAVE,1.GAME,0,1680,100
The first line would SAVE the memory locations 100 to 1FF hex on the
disk in a file called DATA.BIN. The file would be put on the working
drive and no transfer address would be assigned. The second example
would cause the contents of memory locations 0 through 1680 to be SAVEd
on the disk in file GAME.BIN on drive 1. Since a transfer address of
100 was specified as a parameter, typing 'GAME.BIN' in response to the
FLEX prompt after saving would cause the file to be loaded back into
memory and execution started at location 100.
If an attempt is made to save a program under a file name that already
exists, the prompt "MAY THE EXISTING FILE BE DELETED?" will be
displayed.
A Y response will replace the file with the new data to be
saved while a N response will terminate the save operation.
Sometimes it is desirable to save noncontiguous segments of memory. To
do this it would be necessary to first SAVE each segment as a separate
file and then use the APPEND command to combine them into one file. If
the final file is to have a transfer address, you should assign it to
one of the segments as it is being saved. After the APPEND operation,
the final file will retain that transfer address.
-S.2.1-
FLEX User's Manual
SAVE.LOW
There is another form of the SAVE command resident in the UCS. It is
called SAVE.LOW and loads in a lower section of memory than the standard
SAVE command.
Its use is for saving programs in the Utility Command
Space where SAVE.CMD is loa Those interested in creating their own
utility commands should consult the 'Advanced Programmer's Guide' for
further details.
-S.2.2-
SBOX
The SBOX command is used to configure Flex™ to run with various
configurations of memory and I/O. The selected configuration is then
reported to the programmer.
DESCRIPTION
The general syntax of the SBOX command is
SBOX [,<parameter>=<value>]
where <parameter> is one of the keywords described below, and <value> is
a string appropriate to the keyword. Values are either a decimal number
or one of the words "YES" or "NO".
If a yes or no response is
appropriate, you can specify tne single letters "Y" or "N". If no equal
sign follows the parameter, an implicit "=Y" is assumed.
The following paragraphs describe each of the keyword parameters and
what values they may assume. However, these values are normally set via
the Flex™ bootstrap configurator. Using the SBOX command to arbitrarily
change these parameters may result in unpredictable results. For
example, you can use the SBOX "CPU" parameter to set the "2MHz" bit in
the CPU type flag. This does NOT mean that the computer will then be
running at 2 MHz. Programs that contain internal timing loops may make
use of this flag byte and will then function improperly.
CPU= 1
or CPU=2
This parameter is used to set the CPU speed in MHz in the CPU type flag.
It is normally used on non-S/09 systems that have been modified to run
at
2 Mhz.
The flag is set by the bootstrap configurator in S/09
systems.
PORT=4
or PORT=16
This parameter is used to set the number of addresses per I/O port. The
default value is set by the conifigurator and is four for /09 systems
only. For S/09, 69/A and 69/K systems, the proper value is sixteen. For
compatability purposes, the keyword "IO=" is also accepted for this
parameter.
PLF=50
or PLF=60
This parameter is the Power
configurator on S/09 systems
computer systems.
Line
only
-S.3.1-
Frequency.
It is set by the
and defaults to 60 Hz. for other
FLEX User's Manual
EXT=YES
or EXT=NO
This value determines whether the system is using extended 20-bit
addresses. It is set by the bootstrap if an extended memory unit (such
as the Motorola SMS3509) is installed in the computer.
TIMER=YES or TIMER=NO
This parameter is set by the configurator on S/09 systems to reflect the
presence of the 68B40 programmable Timer Module on the MP-ID interface.
For convenience, the keyword "INT=" (For INTerval timer) is also
accepted.
UC=YES
or UC=NO
This parameter is defaulted to YES by the bootstrap, and causes Flex™ to
internally map all file names into upper case. If both upper and lower
case file names are desired, the parameter may be set to "NO".
NOMSG
The final parameter is not a keyword, and may be specified to supress
printing of the option flag settings. This parameter is useful when the
SBOX command is included in STARTUP files. When this parameter is not
specified, the format of the SBOX report is as follows:
SWTPC Configurator -- Version 2
-- Memory Size = 128K
-- I/O Port Size = 16
-- CPU Clock Rate = 2MHz
-- Power Line Frequency = 60 Hz
-- Extended Addressing = Yes
-- Interval Timer = Yes
-- Real Time Clock = Yes
-- Upper Case Only = Yes
-S.3.2-
SP
The SP command is used to direct the output of commands in the Utility
Command get to an IBM Electronic Typewriter Model 50 connected to an
MP-WP interface.
It is normally used to produce hard copy output from
text processors, formatters, and other utility programs.
DESCRIPTION
The general syntax of the SP command is:
SP[#n],<command string>
where #n is optional and is the port number of the MP-WP interface
connected to the tyepwriter and <command string> is a valid command line
to be passed to FLEX. If the port number is not specified, it will
default to port seven. If the SP command is used with multiple commands
per line using the end of line character, it will only affect the
command immediately following it in the command line. Some examples
will clarify the use of the SP command:
SP,CAT
This example will produce a printed listing of the catalog of the
working drive. The port number is omitted and defaults to port seven.
SP#3,LIST,TEXT
This example will produce a printed listing of the file TEXT.TXT.
port has been specified as port number three.
The
The SP command initially loads into the utility command space at $C100.
If sufficient memory has been reserved for the printer driver (see the
RM command documentation) it will be relocated there, otherwise it will
be relocated into the highest available locations in user memory and the
end of user memory pointer will be updated. When the command to be
printed has completed any user memory allocated to the printer driver
will be released.
-S.4.1-
STARTUP
STARTUP is not a utility command but is a feature of FLEX. It is often
desirable to have the operating system do some special action or actions
upon
initialization of the system (during the bootstrap loading
process). As an example, the user may always want to use BASIC
immediately following the boot process. STARTUP will allow for this
without the necessity of calling the BASIC interpreter each time.
DESCRIPTION
FLEX always checks the disk's directory immediately following the system
initialization for a file called STARTUP.TXT. If none is found, the
three plus sign prompt is output and the system is ready to accept
user's commands.
If a STARTUP file is present, it is read and
interpreted as a single command line and the appropriate actions are
performed. As an example, suppose we wanted FLEX to execute BASIC each
time the system was booted. First it is necessary to create the STARTUP
file:
+++BUILD,STARTUP
=BASIC
=#
+++
The above procedure using the BUILD command will create the desired
file. Note that the file consisted of one line (which is all FLEX reads
from the STARTUP file anyway). This line will tell FLEX to load and
execute BASIC.
Now each time this disk is used to boot the operating
system, BASIC will also be loaded and run. Note that this example
assumes two things. First, the disk must contain FLEX.SYS and must have
been LINKed in order for the boot to work properly. Second, it is
assumed that a file called BASIC.CMD actually exists on the disk.
Another example of the use of STARTUP is to set system environment
paramters such as TTYSET parameters or the assigning of a system and
working drive. If the STARTUP command consisted of the following line:
TTYSET,DP=16,WD=60:ASN,W=1:ASN:CAT,0
each time the system was booted the following actions would occur.
First, TTYSET would set the 'depth' to 16 and the 'width' to 60. Next,
assuming the 'end of line' character is the ':', the ASN command would
assign the working drive to drive 1.
Next ASN would display the
assigned system and working drives on the terminal. Finally, a CATalog
of the files on drive 0 would be displayed. For details of the actions
of the individual commands, refer to their descriptions elsewhere in
this manual.
As it stands, it looks as if the STARTUP feature is limited to the
execution of a single command line. This is true but there is a way
around the restriction, the EXEC command.
If a longer list of
operations is desired than will fit on one line, simply create a command
-S.5.1-
FLEX User's Manual
file containing all of the commands desired.
file placing the single line:
Then create the STARTUP
EXEC,<file name>
where <file name> would be replaced by the name assigned to the command
file crea A little imagination and experience will show many uses for
the STARTUP feature.
By directing STARTUP to a file that does not have a return to DOS
command it is possible to lockout access to DOS. You can correct the
problem by hitting the RESET button and beginning execution at address
$CD03. The STARTUP file may then be deleted and if desired, modified.
Directing execution to CD03, the DOS warm start address, bypasses the
DOS STARTUP function.
-S.5.2-
TTYSET
The TTYSET utility command is provided so the user may control the
characteristics of the terminal. With this command, the action of the
terminal on input and the display format on output may be controlled.
DESCRIPTION
The general syntax of the TTYSET command is:
TTYSET[,<parameter list>]
where <parameter list> is a list of 2 letter parameter names, each
followed by an equals sign ('='), and then by the value being assigned.
Each parameter should be separated by a comma or a space. If no
parameters are given, the values of all of the TTYSET parameters will be
displayed on the terminal.
The default number base for numerical values is the base
most
appropriate to the parameter. In the descriptions that follow, 'hh' is
used for parameters whose default base is hex; 'dd' is used for those
whose default base is decimal. Values which should be expressed in hex
are displayed in the TTYSET parameter listing preceded by a '$'.
Some
examples follow:
+++TTYSET
+++TTYSET,DP=16,WD=63
+++TTYSET,BS=8,ES=3
The first example simply lists the current values of all TTYSET
parameters on the terminal. The next line sets the depth 'DP' to 16
lines and the terminal width, 'WD' to 63 columns. The last example sets
the backspace character to the value of hex 8, and the escape character
to hex 3.
The following fully describes all of the TTYSET parameters available to
the user.
Their initial values are defined, as well as any special
characteristics they may possess.
BS=hh
BackSpace character
This sets the 'backspace' charcter to the character having the ASCII hex
value of hh.
This character is initially a 'control H' (hex 08), but
may be defined to any ASCII character.
The action of the backspace
character is to delete the last character typed from the terminal. If
two backspace characters are typed, the last two characters will be
deleted, etc. Setting BS=0 will disable the backspace feature.
-T.1.1-
FLEX User's Manual
BE=hh
Backspace Echo character
This defines the character to be sent to the terminal after a
'backspace' character is received. The character printed will have the
ASCII hex value of hh. This character is initially set to a null but
can be set to any ASCII character.
The BE command also has a very special use that will be of interest to
some terminal owners, such as SWTPC CT-64.
If a hex 08 is specified as the echo character, FLEX will output a space
(20) then another 08. This feature is very uesful for terminals which
decode a hex 08 as a cursor left but which do not erase characters as
the cursor is moved.
Example:
Say that you mis-typed the word cat as shown below:
+++CAY
typing in one CTRL-H (hex 08) would position the cursor on top of the Y
and delete the Y from the DOS input buffer. FLEX would then send out a
space ($20) to erase the Y and another 08 (cursor left) to re-position
the cursor.
DL=hh
DeLete character
This sets the 'delete current line' character to the hex value hh. This
character is initially a 'control X' (hex 18). The action of the delete
character is to 'erase' the current input line before it is accepted
into the computer for execution. Setting DL=0 will disable the line
delete feature.
EL=hh
End of Line character
This character is the one used by FLEX to separate multiple commands on
one input line.
It is initially set to a colon (':'), a hex value of
3A. Setting this character to 0 will disable the multiple command per
line capability of FLEX. The parameter 'EL=hh' will set the end of line
character to the character having the ASCII hex value of hh.
This
character must be set to a printable character (control characters not
allowed).
DP=dd
DePth count
This parameter specifies that a page consists of dd (decimal) physical
lines of output.
A page may be considered to be the number of lines
between the fold if using fan folded paper on a hard copy terminal, or a
page may be defined to be the number of lines which can be displayed at
any one time on a CRT type terminal.
Setting DP=0 will disable the
paging (this is the initial value).
See EJ and PS below for more
details of depth.
-T.1.2-
FLEX User's Manual
WD=dd
WiDth
The WD parameter specifies the (decimal) number of characters to be
displayed on a physical line at the terminal (the number of columns).
Lines of text longer than the value of width will be 'folded' at every
multiple of WD characters. For example, if WD is 50 and a line of 125
characters is to be displayed, the first 50 characters are displayed on
a physical line at the terminal, the next 50 characters are displayed on
the next physical line, and the last 25 characters are displayed on the
third physical line.
If WD is set to 0, the width feature will be
disabled, and any number of characters will be permitted on a physical
line.
NL=dd
NuLl count
This parameter sets the (decimal) number of non-printing (Null) 'pad'
characters to be sent to the terminal at the end of each line.
These
pad characters are used so the terminal carriage has enough time to
return to the left margin before the next printable characters are sent.
The initial value is 4. Users using CRT type terminals may want to set
NL=0 since no pad characters are usually required on this type of
terminal.
TB=hh
TaB character
The tab character is not used by FLEX but some of the utilities may
require one (such as the Text Editing System). This parameter will set
the tab character to the character having the ASCII hex value hh. This
character should be a printable character.
EJ=dd
EJect count
This parameter is used to specify the (decimal) number of 'eject lines'
to be sent to the terminal at the bottom of each page. If Pause is
'on', the 'eject sequence' is sent to the terminal after the pause is
terminated. If the value dd is zero (which it is by default), no 'eject
lines' are issued. An eject line is simply a blank line (line feed)
sent to the terminal. This feature is especially useful for terminals
with fan fold paper to skip over the fold (see Depth). It may also be
useful for certain CRT terminals to be able to erase the previous screen
contents at the end of each page.
PS=Y
or
PS=N
PauSe control
This parameter enables (PS=Y) or disables (PS=N) the end-of-page pause
feature.
If Pause is on and depth is set to some nonzero value, the
output display is automatically suspended at the end of each page.
The
output may be restarted by typing the 'escape' character (see ES
description). If pause is disabled, there will be no end-of-page
pausing. This feature is useful for those using high-speed CRT terminals
-T.1.3-
FLEX User's Manual
to suspend output long enough to read the page of text.
ES=hh
EScape character
The character whose ASCII hex value is hh is defined to be the 'escape
character'.
Its initial value is $1B, the ASCII ESC character. The
escape character is used to stop output from being displayed, and once
it is stopped, restart it again. It is also used to restart output
after Pause has stopped it. As an example, suppose you are LISTing a
long text file on the terminal and you wish to temporarily halt the
output. Typing the 'escape character' will do this (this feature is not
supported
on
computers
using
a
Control
Port
for
terminal
communications). At this time (output halted), typing another 'escape
character' will resume output, while typing a RETURN key will cause
control to return to FLEX and the three plus sign prompt will be output
to the terminal.
It should be noted that line output stopping always
happens at the end of a line.
-T.1.4-
TOUCH
The touch command is used to change the last-altered date in a file
directory entry to reflect the current date.
DESCRIPTION
The general syntax of the TOUCH command is:
TOUCH,<file spec>
where <file spec> is the name of the file to be touched.
If no
extension is specified, a default of .TXT is assumed. The directory
entry of the file is updated so that the last altered date is set to the
current date. The contents of the file itself are not altered.
-T.2.1-
USEMF
The USEMF command is used to enable access to an MF-68 MiniFloppy disk
unit attached to a 6809 computer system with two 8-inch DMAF drives.
DESCRIPTION
The general syntax of the USEMF command is:
USEMF
When the USEMF command is executed, a position independent MF-68 driver
is loaded into the utility command space at $C100. The USEM7 program
then obtains approximately 330 bytes of memory from the top end of the
user memory and relocates the MF-68 driver program into this area. The
FLEX® memory end pointer is updated, and the MF-68 driver program is
linked into the resident (DMAF) disk drivers. A message is then printed
informing the user that the MF-68 drives are now online.
The MF-68
drivers will remain resident until the system is re-booted.
Once the USEMF program is executed, any file references with drive
specifications of 2 or 3 are directed to MF-68 drives 0 and 1,
respectively. The following example shows how USEMF can be used to copy
files from a 5-inch diskette to an 8-inch diskette:
USEMF
MF-68 Now Online.
COPY,2,0,.TXT
FILE
FILE
FILE
STUFF
.TXT
MORESTUF.TXT
STILLMOR.TXT
TO DRIVE #0
TO DRIVE #0
TO DRIVE #0
COPIED.
COPIED.
COPIED.
etc.
The USEMF command has the following restrictions:
1. The command must not be used when the system has been BOOTED from
a 5-inch diskette.
2. The command must not be used more than once between boots.
A
convenient way to enforce this limitation is to place the command
into the startup file.
3. Neither the 5-inch nor
after the USEMF command.
4. This command
command.
must
not
the
be
8-inch NEWDISK command may be run
used
-U.1.1-
in
conjunction with the UCAL
UCAL
The UCAL command is used to enable access to a CalComp Marksman CDS-1
fixed disk unit attached to a 6809 computer system running FLEX9 (Not
FLEX9S which includes the CDS-1 drivers) having two 8-inch DMAF drives
or two 5-inch MF-68 drives.
DESCRIPTION
The general syntax of the UCAL command is:
UCAL
When the UCAL command is executed, a position independant CalComp
Marksman CDS-1 driver is loaded into the utility command space at $C100.
The UCAL program then obtains approximately 280 bytes of memory from
the top end of the user memory and relocates the CDS-1 driver program
into this area. The FLEX® memory end pointer, is updated, and the CDS-1
driver program is linked into the resident disk drivers. A message is
then printed informing the user that the CDS-1 drive is now online. The
CDS-1 drivers will remain resident until the system is re-booted.
Once the UCAL program is executed, any file references with drive
specification of 2 is directed to the CDS-1 disk unit. The following
example shows how UCAL can be used to copy files from an 8-inch DMAF or
5-inch MF-68 diskette to the CalComp CDS-1 disk unit:
+++UCAL
Marksman Now Online.
+++COPY,0,2,.TXT
FILE
FILE
FILE
STUFF
.TXT
MORESTUF.TXT
STILLMOR.TXT
TO DRIVE #2
TO DRIVE #2
TO DRIVE #2
COPIED.
COPIED.
COPIED.
etc.
The UCAL command has the following restrictions:
1. The command must not be used when the system has been BOOTED with
a FLEX9S system already supporting the CalComp drive.
2. The command must not be used more than once between boots.
A
convenient way to enforce this limitation is to place the command
into the startup file.
3. This command
command.
must
not
be
used
-U.2.1-
in conjunction with the USEMF
VER
The VER command is used to display the version number of
program.
a
utility
or
DESCRIPTION
The general syntax of the VER command is:
VER,<file spec>
where <file spec> is the name of the program you wish to check. The
default extension is .CMD and the drive defaults to the working drive.
As an example:
+++VER,0.CAT
would display
the terminal.
the
version number of the CAT command (from drive 0) on
-V.1.1-
VERIFY
The VERIFY command is used to set the File Management System's write
verify mode. If VERIFY is on, every sector which is written to the disk
is read back from the disk for verification (to make sure there are no
errors in any sectors). With VERIFY off, no verification is performed.
DESCRIPTION
The general syntax of the VERIFY command is:
VERIFY[,ON]
or
VERIFY[,OFF]
where ON or OFF sets the VERIFY mode accordingly. If VERIFY is typed
without any parameters, the current status of VERIFY will be displayed
on the terminal. Example:
+++VERIFY,ON
+++VERIFY
The first example sets the VERIFY mode to ON. The second line would
display the current status (ON or OFF) of the VERIFY mode.
VERIFY
causes slower write times, but it is recommended that it be left on for
your protection.
-V.2.1-
WRITPROM
The WRITPROM command is used to write the data contained in a disk
file to a 2716 compatible EPROM using a SWTPC MP-R EPROM programmer.
WRITPROM first checks the EPROM to be sure that it is erased, writes the
data, then verifies the contents.
DESCRIPTION
The general syntax of the WRITPROM command is:
WRITPROM[#n],<file spec>,<]oad address>,[+opt]
Where #n is optional and is the port number in which the PROM programmer
is installed, <file spec> is the name of the input file, <load address>
is the beginning address of the input file that will be written to the
EPROM, and [+opt] are the special options (described later) which can be
selected. The default extension on the file is .BIN and the default
drive is the working drive. The default port for WRITPROM is port #4
and the default file load address is 0000.
Some examples will clarify the syntax of WRITPROM:
+++WRITPROM,JUNK
+++WRITPROM #7,JUNK.CMD.1,C800,+R
The first example will write the 2K segment starting at address
0000 of the file JUNK.BIN on the working drive to the EPROM on the
programmer in port #4. The second example will write the contents of
the file JUNK.CMD on drive 1 starting at address C800 to the EPROM on
the programmer in port #7 using extended retry Capability.
Specifying the Load Address
The load address entered in the command line specifies the
beginning address of the 2K byte segment of the file which will be
written to the EPROM. As an example say that we want to store the 4K
program DIAG.CMD which resides from D000-DFFF into two EPROMs which will
be used in some type of ROM board or controller application. The first
EPROM should be written by the command WRITPROM,DIAG.CMD,D000. The
second EPROM should be written by WRITPROM,DIAG.CMD,D800. If no address
is specified, an address of 0000 is assumed. If an address is specified
that does not exist in the file, the message "SPECIFIED FILE CONTAINS
ALL BYTES = FF" will be displayed when attempting to write the EPROM
since no part of the file will be loaded into WRITPROM's write buffer.
W.1.1
Options
R - Retry
Specifying the +R option in the command line will instruct WRITPROM to
do multiple re-trys on programming. This feature should only be used
when
the normal programming sequence fails to program an EPROM
correctly.
C - Check +25 volts
The C option is used to turn on the +25 volts on the MP-R board.
BE
SURE THAT NO EPROM IS INSTALLED WHEN USING THIS OPTION. Entering any
character thru the keyboard will turn off the 25 volts and return
control the the operating system. To be sure that a file that always
exists on the disk is used for the input file, the following sequence
should always be used to invoke the C option:
+++WRITPROM,WRITPROM.CMD,+C
Remember that
normally not used.
this
option is for diagnostic purposes only and is
Error Messages
A number of messages can be displayed if an error is encountered
during the programming procedure.
Most of the messages are self
explanatory. If an EPROM which is not completely erased is used, during
the "is the EPROM erased" test any bytes that are not erased will be
displayed by the message "BYTE AT (ADDRESS) IS (DATA) - CONTINUE?".
Entering a Y will cause WRITPROM to check the next byte. Entering a B
will cause the rest of the "is the EPROM erased" check to be bypassed
and an N will cause the programming sequence to terminate. When
verifying the contents of the EPROM after writing, a similar output is
generated for those bytes which did not program correctly. Again the
verification can continue by typing Y, be bypassed by typing B or exited
by typing N.
If the message "SPECIFIED FILE CONTAINS ALL BYTES = FF" is ever
displayed then either the specified input file contains only $FF's as
data or an incorrect load address was entered.
The EPROM should not be installed in the programmer until WRITPROM
tells you to do so.
Default Port Addresses
If desired, the default port addresses can be changed by using
FIX utility on WRITPROM.CMD.
WRITPROM Address
1000
1002
Contents
S/09, 69A, 69K Default Port Address
/09 Default Port Address
W.1.2
the
XOUT
XOUT is a special form of the delete command
having the extension .OUT.
which
deletes
all
files
DESCRIPTION The general syntax of XOUT is:
XOUT[,<drive spec>]
where <drive spec> is the desired drive number.
If no drive is
specified all, .OUT files on the working drive will be deleted and if
auto drive searching is enabled, all .OUT files on drives 1 and 2 will
be deleted.
XOUT will not delete any files which are delete protected
or which are currently in the print queue.
Example:
+++XOUT
+++XOUT 1
-X.1.1-
Y
The Y command is used to automatically answer "Y" to prompts produced by
various FLEX utilities. This facility is especially useful when writing
EXEC files.
DESCRIPTION
The general syntax of the Y command is:
Y,<command string>
where <command string> is a valid command line to be passed to FLEX. If
the Y command is used with multiple commands per line using the end of
line character, it will only affect the command immediately following
it. Some examples will show the usefulness of the Y command:
+++Y,DELETE,JUNK.TXT
DELETE "0.JUNK.TXT" ? Y
ARE YOU SURE? Y
This example shows how to delete a file without having to reply to the
"ARE YOU SURE?" prompt. This is especially useful in EXEC files. In a
similar vein, you can perform COPY commands that automatically overwrite
existing files, as shown in the following example:
+++Y,COPY,0,1,PROG
FILE
FILE
FILE
PROG1
.TXT
TO
PROG2
.TXT
TO
DELETE ORIGINAL?
ARE YOU SURE? Y
PROG3
.TXT
TO
DELETE ORIGINAL?
ARE YOU SURE? Y
DRIVE #1
COPIED.
DRIVE #1 FILE EXISTS
Y
COPIED.
DRIVE #1 FILE EXISTS
Y
COPIED.
-Y.1.1-
GENERAL SYSTEM INFORMATION
I.
DISK CAPACITY
Each sector of a FLEX diskette contains 252 bytes of user data since 4
bytes of each 256 byte sector is used by the system. The various
capacities of disks are as follows:
5-inch
5-inch
8-inch
8-inch
8-inch
8-inch
II.
Single
Double
Single
Single
Double
Double
Sided
Sided
Sided,
Sided,
Sided,
Sided,
Single
Double
Single
Double
Density
Density
Density
Density
340
680
1140
1976
2280
3952
sectors,
sectors,
sectors,
sectors,
sectors,
sectors,
85,680
171,360
287,280
497,952
574,560
995,904
bytes
bytes
bytes
bytes
bytes
bytes
WRITE PROTECT
Floppy disks can normally be physically write protected to prevent FLEX
from performing a write operation. Any attempt to write to such a disk
will cause an error message to be issued. It is good practice to write
protect disks which have important files on them.
A 5-inch disk can be write protected by placing a piece of opaque tape
over the small rectangular cutout on the edge of the disk. 8-inch disks
are the opposite, i.e., tn order to write on a full size disk, you must
place tape over the notch on the rear edge of the diskette. To write
protect them, remove the tape. Some 8-inch disks do not have a write
protect notch and cannot be write protected.
III.
THE 'RESET' BUTTON
The RESET button on the front panel of your computer should NEVER BE
PRESSED DURING A DISK OPERATION.
There should never be a need to
'reset' the machine while in FLEX. If the machine is 'reset' and the
system is writing data on the disk, it is possible that the entire disk
will become damaged.
Again, never press 'reset' while the disk is
operating! Refer to the 'escape' character in TTYSET for ways of
stopping FLEX.
IV.
NOTES ON THE P COMMAND
The various printer commands initially load into the utility command
space at $C100. A check is then made for a reserved printer driver area
(See the RM command) and if available, the printer driver is relocated
there. If there is no reserved printer area, the printer drivers are
relocated into the high end of user memory and the end of user memory
pointer is updated. When the command to be printed completes, the
memory occupied by the printer driver is returned to the user memory
area.
-3.1-
FLEX User's Manual
V.
ACCESSING DRIVES NOT CONTAINING A DISKETTE
If an attempt is made to access a drive not containing a disk, an error
message is normally issued. However, if you are using 5-inch disks and
a DC-1 or DC-2 controller, the system will hang up attempting to read
until a disk is inserted and the door closed.
VI.
SYSTEM ERROR NUMBERS
Any time that FLEX detects an error during an operation, an appropriate
error message will be displayed on the terminal.
FLEX internally
translates a derived error number into a plain language statement using
a look-up table called ERROR.SYS. If you have forgotten to copy this
.SYS file onto a disk that you are using, FLEX will report a
corresponding number as shown below:
DISK ERROR
#xx
where 'xx' is a decimal error number. The table
these numbers and what error they represent.
ERROR #
1
2
3
4
5
6
7
8
9
10
11
12
13
14
15
16
17
18
19
20
21
22
23
24
25
26
27
28
below
is
MEANING
a
ILLEGAL FMA FUNCTION CODE ENCOUNTERED
THE REQUESTED FILE IS IN USE
THE FILE SPECIFIED ALREADY EXISTS
THE SPECIFIED FILE COULD NOT BE FOUND
SYSTEM DIRECTORY ERROR-REBOOT SYSTEM
THE SYSTEM DIRECTORY IS FULL
ALL AVAILABLE DISK SPACE HAS BEEN USED
READ PAST END OF FILE
DISK FILE READ ERROR
DISK FILE WRITE ERROR
THE FILE OR DISK IS WRITE PROTECTED
THE FILE IS PROTECTED-FILE NOT DELETED
ILLEGAL FILE CONTROL BLOCK SPECIFIED
ILLEGAL DISK ADDRESS ENCOUNTERED
AN ILLEGAL DRIVE NUMBER WAS SPECIFIED
DRIVE NOT READY
THE FILE IS PROTECTED-ACCESS DENIED
SYSTEM FILE STATUS ERROR
FMS DATA INDEX RANGE ERROR
FMS INACTIVE-REBOOT SYSTEM
ILLEGAL FILE SPECIFICATION
SYSTEM FILE CLOSE ERROR
SECTOR MAP OVERFLOW-DISK TOO SEGMENTED
NON-EXISTENT RECORD NUMBER SPECIFIED
RECORD NUMBER MATCH ERROR-FILE DAMAGED
COMMAND SYNTAX ERROR-RE-TYPE COMMAND
THAT COMMAND IS NOT ALLOWED WHILE PRINTING
WRONG HARDWARE CONFIGURATION
-3.2-
list
of
FLEX User's Manual
VII.
SYSTEM MEMORY MAP
The following is a brief list of the RAM space required by the FLEX
Operating System. All address are in hex.
0000 - BFFF
User RAM
*Note: Some of this space is used by
NEWDISK, COPY and the printer utilities.
C000 - C07F
System stack
C080 - COFF
Line Input Buffer
C100 - C6FF
Utility command space
C700 - DFFF
Disk Operating System
CD00
CD03
FLEX cold start entry address
FLEX warm start entry address
For a more detailed
Guide'.
memory
map,
consult
-3.3-
the
'Advanced
Programmer's
FLEX User's Manual
VIII.
FLEX OPERATING SYSTEM INPUT/OUTPUT SUBROUTINES
In order for the FLEX I/O functions to operate properly, all user
program character input/output subroutines should be vectored thru the
FLEX operating system rather than the computer's monitor. Below is a
list of FLEX's I/O subroutines and a brief description of each.
All
given addresses are in hexadecimal.
GETCHR at $CD15
This subroutine is functionally equivalent to S-BUG's character input
routine. This routine will look for one character from the control
terminal (I/0 port #1) and store it in the A accumulator. Once called,
the input routine will loop within itself until a character has been
input. Anytime input is desired, the call JSR GETCHR or JSR $CD15 should
be used.
GETCHR automatically sets the 8th bit to 0 and does not check for
parity. A call to this subroutine affects the processor's registers as
follows:
ACC. A
B,X,Y,U
loaded with the character input from the terminal
not affected
PUTCHR at $CD18
This subroutine is used to output one character from the computer to the
control port (I/O port #1). It is functionally equivalant to the output
character routine in S-BUG.
To use PUTCHR, the character to be output should be placed in the A
accumulator in its ASCII form. For example, to output the letter 'A' on
the control terminal, the following program should be used:
LDA
JSR
#$41
$CD18
The processor's registers are affected as follows:
ACC. A
B,X,Y,U
changed internally
not affected
PSTRNG at $CD1E
PSTRNG is a subroutine used to output a string of text on the control
terminal. When address $CD1E is called, a carriage return and line feed
will automatically be generated and data output will begin at the
location pointed to by the index register. Output will continue until a
hex 04 is seen. The same rules for using the ESCAPE and RETURN keys for
stopping output apply as described earlier.
The accumulator and register status after using PSTRNG are as follows:
ACC. A
Changed during the operation
-3.4-
FLEX User's Manual
ACC. B
X
Y,U
Unchanged
Contains the memory location of the last character read from the
string (usually the 04 unless stopped by the ESC key)
Unchanged
NOTE:
The ability of using backspace and line delete characters is a
function of your user program and not of the FLEX I/O routines described
above.
STAT at $CD4E
This routine is used to determine the "status" of the input device.
That is, to see if a character has been typed on the input terminal
keyboard. Its function is to check for characters such as the ESCAPE key
in FLEX which allows breaking of the output. This routine returns an
EQual condition if no character was hit and a Not-Equal condition if a
character was hit. No registers, except for the condition codes, may be
altered.
For additional information consult the 'Advanced Programmer's Manual'.
-3.5-
FLEX User's Manual
IX.
BOOTING THE FLEX DISK OPERATING SYSTEM
In order to read FLEX from the system disk upon powering up your system,
you must have a short program in RAM or ROM memory. This program is
called a 'bootstrap' loader.
If you are using a Southwest Technical Products disk system and the
S-BUG monitor, there are bootstraps stored in this ROM which you can
use.
They are executed by simply typing a 'D' for the full size floppy
or a 'U' for the mini floppy.
Those users of other hardware or monitor ROM
supplied with the hardware if compatible with FLEX.
the SWTPc mini system) is given here for reference.
should use the boot
A sample boot (for
If the system does not boot properly, re-position the system disk in the
drive and re-execute the bootstrap loader.
0100
0103
0105
0108
010B
010C
010E
0110
0112
0115
0117
011A
011C
011E
0120
0123
0125
0127
012A
012C
012F
0131
0133
0136
0138
013B
013D
013F
0142
0144
B6
86
B7
8E
3D
30
26
C6
F7
8D
F6
C5
26
86
B7
8D
C6
F7
8D
8E
C5
27
B6
A7
F6
C5
26
7E
8D
39
E018
00
E014
0000
START
OVR
1F
FB
0F
E018
2B
E018
01
F9
01
E01A
1D
8C
E018
16
C000
02
05
E01B
80
E018
01
F0
C000
00
LOOP1
LOOP2
LOOP3
RETURN
RTN
LDA
LDA
STA
LDX
MUL
LEAX
BNE
LDB
STB
BSR
LDB
BITB
BNE
LDA
STA
BSR
LDB
STB
BSR
LDX
BITB
BEQ
LDA
STA
LDB
BITB
BNE
JMP
BSR
RTS
COMREG
#0
DRVREG
#0000
TURN MOTOR ON
DELAY FOR SPEED UP
-3.6-
-1,X
OVR
#$0F
COMREG
RETURN
COMREG
#1
LOOP1
#1
SECREG
RETURN
#$8C
COMREG
RETURN
#$C000
#2
LOOP3
DATREG
0,X+
COMREG
#1
LOOP2
$C000
RTN
RESTORE
READ WITH LOAD
DRQ?
BUSY?
FLEX User's Manual
X.
REQUIREMENTS FOR RELOCATABLE PRINTER DRIVERS
There are four routines that must be furnished in all printer drivers -1) An OPEN routine which is called to perform all
initialization,
necessary
printer
2) A CLOSE routine which is called to perform all
cleanup and termination operations,
necessary
printer
3) A PUT routine which is called to output the next character to
printer, and
4) A CHECK routine which is called to determine
ready to accept another character.
if
the
printer
the
is
The assembled printer driver which contains these routines is then
combined with the “P.COR” binary file furnished with the operating
system. For the procedure used to combine these two files see the
documentation on P.COR, section P.2.
All four of the required routines may be located anywhere in the space
provided for the routines (C312-C6FF hex). The only requirement is that
one of the long branch (LBRA) instructions in the entry point vector
(located at C302-C30D hex) will branch to the appropriate routine. All
four routines must end with a return from subroutine (RTS) instruction.
All four routines must preserve the contents of the Y and U registers.
The OPEN and CLOSE routines have no input or output parameterization,
but must preserve the contents of the Y and U registers. The PUT
routine expects the character to be output in the A register on entry to
the routine, while the B, X, Y and U registers must be preserved. The
CHECK must return a minus indication if the printer is ready to accept
another character, otherwise it must return a plus indication. The
contents of all of the registers must be preserved by the CHECK routine.
Since the printer driver will be relocated from the $C300 location where
it is assembled, the driver must be written in position independent
code. Two good examples of position independent code are the parallel
printer driver and the serial printer driver listed in chapter 3,
section XI of this manual. The following are good rules of thumb that
may be used while writing position independent code.
1) If an instruction that will be relocated needs to reference a byte
of data that will be relocated as well, “program counter relative”
addressing must be used. All this means is that a “,PCR” must be
added to the instruction.
As an example refer to both the
position independent parallel printer driver listed in section XI
of chapter 3 and the non position independent parallel printer
driver listed in section XII of chapter 3. Look at the references
to variable “PFLAG”. “COM PFLAG” is not position independent,
-3.7-
FLEX User's Manual
2) If the location referenced by a JMP or JSR instruction will be
relocated, do not use JMP or JSR; use BRA, BSR, LBRA or LBSR
instead.
3) It is okay to use any of the “indexed” addressing modes in
position independend code. Instructions that make use of “indexed”
addressing may have operands that look like any of the following:
0,X or 5,X or 0,Y and so on.
4) It is okay to use the “immediate” addressing mode in position
independent code. An immediate value is one preceded by the
number sign character (#).
The following table describes the
printer driver must be assembled.
location
where
all
items
of
the
C300 - C301
Two byte count of the number of bytes in the driver. This
count includes all of the bytes between C302 and the end
of the driver.
C302
C305
C308
C30B
LBRA
LBRA
LBRA
LBRA
-
C304
C307
C30A
C30D
OPEN
CLOSE
PUT
CHECK
PRINTER INITIALIZE
PRINTER TERMINATE
PRINT CHARACTER
PRINTER READY CHECK
C30E - C30F
Port address of the printer interface. The default port
address should be assembled into these locations.
If a
port number is supplied on the command line, a new port
address will be stored here by the P.COR processing.
C310
Interface Side designator.
If a “side” is specified in
the command port specification, the sign bit of this byte
is set.
A side specification of “A” will result in $80,
“B” will be $81, etc.
C311
Reserved byte - assemble a zero into this location.
C312 - C6FF
Space for printer driver routines.
These routines must
fit within the space provided. The entire space does not
need to be used.
-3.8-
FLEX User's Manual
XI.
PARALLEL AND SERIAL PRINT DRIVERS
The following parallel and serial print drivers are provided to assist
the programmer in the creation of position independent relocatable print
drivers for use with the P.COR file.
The parallel driver assumes a
parallel port having an address of $E01C which is the default address
for port seven in a /09 computer system. It makes use of the CENTRONIX®
handshake, and (although position independent) is essentially equivalent
tp the non-relocatable driver listed in section XII. The serial driver
assumes an acia at address $E01C (also defaulting to port 7) and
transmits with 8 data bits, no parity, and two stop bits. The baud rate
is set at the interface.
By comparing the position independent and non-relocatable parallel print
drivers, it will be simple to write your own custom printer drivers.
Just remember to use program counter relative addressing for all
variables defined within the printer driver itself.
-3.9-
FLEX User's Manual
PARALLEL PRINTER DRIVER
*
*
*
*
*
*
*
*
C300
C302
C305
C308
C30B
16
16
16
16
C30E
C310
C311
C312
E10C
00
00
FF
000E
001B
001A
002F
0000
0000
0001
AE
86
86
86
86
86
A7
39
C323 86
8C F8
3A
01
FF
84
3E
01
0D
PAGE
1
THE FOLLOWING PRINTER DRIVER WAS WRITTEN
IN POSITION INDEPENDANT CODE AND IS
DESIGNED TO BE APPENDED TO THE P.COR
FILE TO MAKE A PRINTER COMMAND
SET UP ADDRESSES AND DRIVER LENGTH
ORG
C300 0050
C313
C316
C318
C31A
C31C
C320
C322
C316
10-23-79 TSC 6809 XASMB
$C300
MUST START AT C300
FDB
ENDS-POPEN LENGTH OF DRIVER
*
*
ENTRY VECTORS
*
POPEN
LBRA
OPEN
PRINTER INITIALIZE
PQUIT
LBRA
CLOSE
PRINTER TERMINATE
PCHAR
LBRA
PUT
PRINT CHARACTER
PCHEK
LBRA
CHECK
PRINTER READY CHECK
*
*
PARALLEL PRINTER FILE CONTROL BLOCK
*
PIA
FDB
#E01C
DEFAULT PORT ADDRESS
SIDE
FCB
0
INTERFACE SIDE VALUE
FCB
0
-- RESERVED BYTE -PFLAG
FCB
#FF
PRINTER READY FLAG
DR
FDB
0
DATA REGISTER OF PIA
DDR
FDB
0
DATA DIRECTION REG OF PIA
CR
FDB
1
CONTROL REGISTER OF PIA
*
*
PRINTER INITIALIZATION
*
OPEN
LDX
PIA,PCR
PICK UP PIA ADDRESS
LDA
#$3A
SELECT DATA DIRECTION REG
STA
CR,X
BY WRITING 0 IN DDR CONTROL
LDA
#$FF
SELECT ALL OUTPUT LINES
LDA
DDR,X
PUT IN DATA DIRECTION REG
LDA
#$3E
SET UP FOR TRANSITION CHECKS
STA
CR,X
AND ENABLE OUTPUT REGISTER
RTS
*
*
TERMINATE PRINTER PROCESSING
*
CLOSE
LDA
#$0D
PRINT CARRIAGE RETURN
-3.10-
FLEX User's Manual
PARALLEL PRINTER DRIVER
C325
C327
C329
C32B
C32E
C331
C333
C335
C337
C339
C33B
8D
2A
34
6F
AE
A7
86
A7
86
A7
35
16
3A
3A
8C E4
8C DD
84
36
01
3E
01
90
C33D
C33F
C342
C344
C347
C349
C34B
C34D
C350
34
6D
2B
AE
6D
2A
6D
63
35
10
8C D0
0C
8C C7
01
05
84
8C C2
90
C352
10-23-79 TSC 6809 XASMB
PAGE
2
*
*
PRINTER OUTPUT CHARACTER ROUTINE
*
PUT
BSR
PIA,PCR
TEST FOR PRINTER READY
BPL
PUT
LOOP UNTIL PRINTER READY
PUSHS X
SAVE INDEX REGISTER
CLR
PIA,PCR
SET PRINTER FLAG NOT READY
LDX
PIA,PCR
GET PRINTER ADDRESS
STA
DR,X
SET DATA IN OUTPUT REGISTER
LDA
#$36
SET DATA READY, HIGH TO LOW
STA
CR,X
STORE IN CONTROL REGISTER
LDA
#$3E
THEN SEARCH FOR TRANSITION
STA
CR,X
OF LOW LEVEL TO HIGH LEVEL
PULS
X,PC
*
*
CHECK FOR PRINTER READY
*
CHECK
PSHS
X
SAVE INDEX REGISTER
TST
PFLAG,PCR CHECK READY FLAG
BMI
CHECKEX
IF NEGATIVE, PRINTER READY
LDX
PIA,PCR
PICK UP INTERFACE ADDRESS
TST
CR,X
CHECK FOR TRANSITION
BPL
CHEXIT
IF PLUS, PRINTER READY
TST
DR,X
RESET TRANSITION STATUS
COM
PFLAG,PCR SET PRINTER READY FLAG
CHEXIT PULS
X,PC
ENDS
EQU
*
END
0 ERROR(S) DETECTED
-3.11-
END OF DRIVER
FLEX User's Manual
SERIAL PRINTER DRIVER
*
10-23-79 TSC 6809 XASMB
PAGE
SET UP ADDRESS AND DRIVER LENGTH
C300
ORG
$C300
C300 0044
FDB
ENDS-POPEN LENGTH OF DRIVER
*
C302
C305
C308
C30B
16
16
16
16
000D
0025
0024
002E
POPEN
PQUIT
PCHAR
PCHEK
A6
2A
48
48
AB
A7
ACIA
SIDE
8C F8
08
FDB
FCB
FCB
C31F
C322
C324
C326
C328
C32A
C32C
AE
86
A7
96
A7
A7
39
0D
C32F
C331
C333
C335
C338
C33A
8D
2A
34
AE
A7
35
0B
FC
10
8C D6
01
90
PUT
#E01C
0
0
DEFAULT PORT ADDRESS
INTERFACE SIDE VALUE
-- RESERVED BYTE --
SIDE,PCR
ARESET
IF POSITIVE NO SIDE SPECIFIED
MULTIPLY BY FOUR
ACIA+1,PCR
ACIA+1,PCR STORE INTO DEVICE ADDRESS
LDX
LDA
STA
LDA
STA
TST
RTS
ACIA,PCR GET ACIA ADDRESS
#%00000011
0,X
DO MASTER RESET ON ACIA
#%00010001
0,X
SET UP NO PARITY BIT,
1,X
8 DATA BITS, 2 STOP BITS
CLOSE DOWN PRINTER PROCESSING
CLOSE
*
PRINTER INITIALIZE
PRINTER TERMINATE
PRINT CHARACTER
PRINTER READY CHECK
RESET ACIA DEVICE
ARESET
*
C32D 86
LDA
BPL
ASLA
ASLA
ADDA
STA
8C F3
8C F0
8C EC
03
84
11
84
84
OPEN
CLOSE
PUT
CHECK
SEE IF A SIDE IS SPECIFIED
OPEN
*
LBRA
LBRA
LBRA
LBRA
SERIAL PRINTER FILE CONTROL BLOCK
*
C313
C315
C317
C318
C319
C31C
MUST START AT C300
ENTRY VECTORS
*
C30E E10C
C310 00
C311 00
1
LDA
#$0D
PRINT CARRIAGE RETURN
WRITE A CHARACTER TO PRINTER
BSR
BPL
PSHS
LDX
STA
PULS
CHECK
PUT
X
ACIA,PCR
1,X
X,PC
-3.12-
WAIT FOR PRINTER READY
GET ACIA ADDRESS
STORE INTO DATA REGISTER
FLEX User's Manual
SERIAL PRINTER DRIVER
*
10-23-79 TSC 6809 XASMB
C33C
C33E
C341
C342
C343
C344
34
E6
56
56
56
35
04
9C CD
CHECK TO SEE IF PRINTER IS READY
CHECK
90
C346
PAGE
ENDS
PSHS
LDX
RORB
RORB
RORB
PULS
B
[ACIA,PCR] GET ACIA STATUS
EQU
*
SHIFT READY BIT
INTO SIGN FLAG
B,PC
END
0 ERROR(S) DETECTED
-3.13-
END OF DRIVER
2
FLEX User's Manual
XII.
FORMER P AND PRINT.SYS
FLEX, as originally supplied, includes a printer driver that will work
with most parallel type printers, such as the SWTPC PR-40. Although
this printer driver has been superseded, a source listing has been
included for compatibility purposes. If desired, these drivers may be
used with the PO print command.
The requirements for this type of
driver are as follows:
1) The driver must be in a file called PRINT.SYS
2) Three separate routines must be supplied, a printer initialization
routine (PINIT at $CCC0), a check ready routine (PCHK at $CCD8),
and an output character routine (POUT at $CCE4).
3) When the POUT routine is called by FLEX, the character to be output
will be in the A accumulator. The output routine must not destroy
the B, X, Y, or U registers. PINIT may destroy the A, B, and X
registers. PCHK may NOT alter any registers.
4) The routines MUST start at the addresses specified, but may be
continued anywhere in memory if there is not room where specified.
If placed elsewhere in memory, be certain they do not conflict
with any utilities or programs which will use them.
5) All three routines must end with a
instruction.
return
from
subroutine
(RTS)
*
* PRINT.SYS PIA DRIVERS FOR GENERAL CASE PRINTER
*
E01C
CCC0
CCC0
CCC2
CCC5
CCC7
CCCA
CCCC
CCCF
86
B7
86
B7
86
B7
39
3A
E01D
FF
E01C
3E
E01D
PIA
EQU
$E01C
*
* PRINTER INITIALIZATION
*
ORG
$CCC0
PINIT
LDA
#$3A
STA
PIA+1
LDA
#$FF
STA
PIA
LDA
#$3E
STA
PIA+1
RTS
-3.14-
PIA ADDRESS FOR PORT #7
(MUST BE AT $CCC0)
MUST RESIDE AT $CCC0
SELECT DATA DIRECTION REG.
BY WRITING 0 IN DDR CONTROL
SELECT ALL OUTPUT LINES
PUT IN DATA DIRECTION REG.
SET UP FOR TRANSITION CHECKS
AND ENABLE OUTPUT REGISTER
FLEX User's Manual
E01C
CCE3
* PRINTER READY ROUTINE
PREADY TST
PIA
COM
PFLAG
RTS
CCE3
05
E01D
EE
CCE3 FF
*
* CHECK FOR PRINTER READY (MUST BE AT $CCD8)
*
ORG
$CCD8
PRINT TEST AT $CCD8
PCHK
TST
PFLAG
TEST FOR PRINTER READY
BMI
PCHKX
IF NEGATIVE, PRINTER READY
TST
PIA+1
CHECK FOR TRANSITION
BMI
PREADY
IF MINUS, PRINTER NOW READY
PCHKX
RTS
* PRINTER READY FLAG
PFLAG
FCB
$FF
PRINTER READY FLAG
CCE4
CCE4
CCE6
CCE8
CCEB
CCEE
CCF0
CCF2
CCF4
CCF7
*
* PRINTER OUTPUT CHARACTER ROUTINE (MUST BE AT $CCE4)
*
ORG
$CCE4
MUST RESIDE AT $CCE4
POUT
BSR
PCHK
TEST FOR PRINTER READY
BPL
POUT
LOOP UNTIL PRINTER READY
CLR
PFLAG
SET PRINTER FLAG NOT READY
STA
PIA
SET DATA IN OUTPUT REGISTER
LDA
#$36
SET DATA READY, HIGH TO LOW
BSR
POUTB
STUFF BYTE INTO THE PIA
LDA
#$3E
THEN SEARCH FOR TRANSITION
POUTB
STA
PIA+1
OF LOW LEVEL TO HIGH LEVEL
RTS
CCD0 7D
CCD3 73
CCD6 39
CCD8
CCD8
CCDB
CCDD
CCE0
CCE2
7D
2B
7D
2B
39
8D
2A
7F
B7
86
8D
86
B7
39
F2
FC
CCE3
E01C
36
02
3E
E01D
RESET PIA READY INDICATION
SET THE PRINTER READY FLAG
END
This mechanism for creating printer drivers is adequate for those
drivers that will fit entirely within the printer driver area located
from $CCC0 to $CCF7. For those drivers that require additional memory,
it
is recomended that the P.COR program be used with position
independant printer drivers.
-3.15-
FLEX User's Manual
COMMAND SUMMARY
APPEND,<file spec>[,<file list>],<file spec>
Default Extension: .TXT
Description Page: A.1
ASNE,W=<drive>][,S=<drive>]
Description Pane: A.2
BUILD,<file spec>
Default Extension: .TXT
Description Page: B.1
CAT[,<drive list>][,<match list>]
Description Page: C.1
C4MAT
Description Page: C.5
CLEAN,<drive number>
Description Page: C.6.1
COPY,<file spec>,<file spec>
COPY,<file spec>,<drive>
COPY,<drive>,<drive>[,<match list>]
Description Page: C.2
DATE[,<mm,dd,yy>]
Description Page: D.1
DELETE,<file spec>[,<file list>]
Description Page: D.2
ECHO,<string>
Description Page: E.1
EXEC,<file spec>
Default Extension: .TXT
Description Page: E.2
FIX,<file spec>[,<file spec>]
Default Extension: .BIN
Description Page: F.1
GET,<file spec>[,<file list>]
Default Extension: .BIN
Description Page: 1.7
I,<file spec>,<command>
Default Extension: .TXT
Description Page: I.1
-4.1-
FLEX User's Manual
JUMP,<hex address>
Description Page: J.1
LINK,<file spec>
Default Extension: .SYS
Description Page: L.1
LIST,<file spec>[,<]ine range>[,N]
Default Extension: .TXT
Description Page: L.2
MON
Description Page: 1.7
N,<command>
Description Page: N.2
NEWDISK,<drive>
Description
Page: N.1
O,<file spec>,<command>
Default Extension: .OUT
Description Page: 0.1
P,<command>
Description Page: P.1
P.COR
Description Page: P.2
PO,<command>
Description Page: P.3
PROT,<file spec>[,(options)]
Description Page: P.5
PSP[,<file spec>][,<print command>]
Default Extension: .OUT
.CMD
Description Page: P.4
Q,<command>
Description Page: Q.1
QCHECK
Description Page: Q.2
RENAME,<file spec 1>,<file spec 2>
Default Extension: .TXT
Description Page: R.1
RM[,<size>]
Description Page: R.2
-4.2-
FLEX User's Manual
READPROM,<file spec>
Default Extension: .BIN
Description Page: R.3
S,<command>
Description Page: S.1
SAVE,<file spec>,<begin adr>,<end adr>[,<transfer adr>]
Default Extension: .BIN
Description Page: S.2
SAVE.LOW
Description Page: S.2.2
SBOX[,<parameter list>]
Description Page: S.3
SP,<command>
Description Page: S.4
STARTUP
Description Page: S.5
TOUCH,<file spec>
Default Extension: .TXT
Description Page: T.2
TTYSET[,<parameter list>]
Description Page: T.1
UCAL
Description Page: U.2
USEMF
Descriptio page: U.1
VER
Default Extension: .CMD
Description Page: V.1
VERIFY[,<ON or OFF>]
Description Page: V.2
WRITPROM,<file spec>[,<address>]
Default Extension: .BIN
Description Page: W.1
XOUTL,<drive spec>]
Description Page: X.1
Y,<command>
Description Page: Y.1
-4.3-
FLEX User's Manual
NOTES:
-4.4-