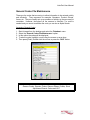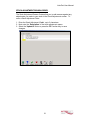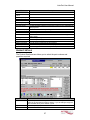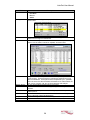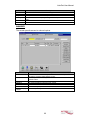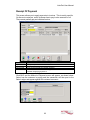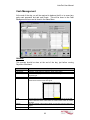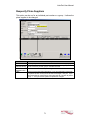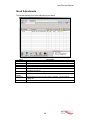
1
AutoPart User Manual
AutoPart
User
Manual
AutoPart User Manual
Table of Contents
INTRODUCTION .............................................................................................. 1
DATABASE....................................................................................................... 2
General Codes File Maintenance ................................................................. 3
AREA CODES ........................................................................................... 4
CREDIT REASON CODES ....................................................................... 5
CURRENCY CODES ................................................................................ 6
CUSTOMER PAYMENT TERMS.............................................................. 7
DEALLOCATION REASON CODES......................................................... 8
DELIVERY METHOD CODES .................................................................. 9
HOLD REASONS .................................................................................... 10
LINE OF BUSINESS CODES ................................................................. 11
LOST SALES REASON CODES ............................................................ 12
OPERATOR CODES............................................................................... 13
PAYMENT TERMS CODES.................................................................... 14
PRICE EXCEPTION CODES .................................................................. 15
PRODUCT GROUPS .............................................................................. 16
PSYCHOLOGICAL PRICING.................................................................. 17
RANGE CODES ...................................................................................... 18
RETURNS REASON CODES ................................................................. 19
SALES REPRESENTATIVE CODES...................................................... 20
STOCK ADJUSTMENT REASON CODES............................................. 21
VAT CODES ............................................................................................ 22
VOC CODES ........................................................................................... 23
Customer File Maintenance ........................................................................ 24
GENERAL................................................................................................ 24
SPECIAL TERMS.................................................................................... 26
ADDRESSES........................................................................................... 27
VEHICLE DETAILS ................................................................................. 28
NOTES .................................................................................................... 29
EXTRA DETAILS..................................................................................... 30
Supplier File Maintenance........................................................................... 31
ACCOUNT DETAILS............................................................................... 31
REP & EDI INFORMATION..................................................................... 33
MISCELLANEOUS .................................................................................. 34
ADDITIONAL INFORMATION................................................................. 35
Product & Price File Maintenance............................................................... 36
PART NUMBER ...................................................................................... 37
ALTERNATIVES...................................................................................... 38
SUPPLIERS AND COST PRICES .......................................................... 39
SELLING PRICES ................................................................................... 41
QUANTITY BREAKS............................................................................... 42
OTHER INFORMATION.......................................................................... 43
KIT PIECES ............................................................................................. 44
CROSS REFERENCES .......................................................................... 45
Block Changes ............................................................................................ 46
SELECTION ............................................................................................ 46
PROPOSED CHANGES ......................................................................... 48
BLOCK IMPORT ..................................................................................... 49
AutoPart User Manual
MISCELLANEOUS .................................................................................. 52
Supercessions............................................................................................. 53
Messages File Maintenance ....................................................................... 54
Password Setup .......................................................................................... 55
SALES............................................................................................................. 56
Point of Sale ................................................................................................ 56
CUSTOMER DETAIL .............................................................................. 56
PRODUCT DETAILS............................................................................... 57
END OF TRANSACTION ........................................................................ 59
INQUIRIES .............................................................................................. 60
Receipt Of Payment .................................................................................... 62
Cash Management...................................................................................... 63
CASH UP................................................................................................. 63
TILL TRANSACTIONS ............................................................................ 64
Surcharge Bank Inquiry............................................................................... 65
PURCHASES.................................................................................................. 66
Generate Purchase Orders ......................................................................... 66
SUGGESTED ORDERS.......................................................................... 66
PURCHASE ORDER PROCESSING ..................................................... 67
Goods Receiving ......................................................................................... 68
Returns To Supplier .................................................................................... 69
Respecify Prime Suppliers .......................................................................... 71
Surcharges In Inquiry .................................................................................. 72
Purchase Order Inquiry ............................................................................... 74
Goods Receiving Inquiry ............................................................................. 75
Returns Inquiry ............................................................................................ 76
STOCK............................................................................................................ 77
Stock Inquiry................................................................................................ 77
Stock Usage Inquiry .................................................................................... 78
Bin Card Inquiry........................................................................................... 79
Stock Adjustments ...................................................................................... 80
Stock Taking................................................................................................ 81
GENERATE STOCKSHEETS ................................................................. 81
STOCKSHEET LISTING/PRINT ............................................................. 83
STOCKSHEET DATA ENTRY ................................................................ 84
VARIANCE REPORTS............................................................................ 84
UPDATE STOCK..................................................................................... 85
Min & Max Recalculation............................................................................. 86
PARAMETERS ........................................................................................ 86
PART SELECTION.................................................................................. 87
VIEW/AMEND RESULTS........................................................................ 88
REPORTS ............................................................................................... 89
REPORTS....................................................................................................... 90
Load Reports............................................................................................... 90
REPORT GENERATOR.......................................................................... 91
LABEL PRINTING........................................................................................... 93
DAYENDS....................................................................................................... 94
DAYEND Routines ...................................................................................... 94
MONTHEND ROUTINES ............................................................................... 95
INDEX ............................................................................................................. 96
AutoPart User Manual
INTRODUCTION
The AutoPart System is designed for companies who operate in the
automotive aftermarket, trading primarily as manufacturers, distributors or
retailers.
Systems can vary in size and power, from configurations suitable for the
smaller, single outlet operation, right through to the large multi-user, multibranch company.
AutoPart has been designed to run on the latest Microsoft Windows operating
systems, including Windows XP and Windows 2000. It has been specifically
designed for ease of use; it will operate with either a mouse and/or keyboard.
Common operations are assigned to function keys and there is context
sensitive on-line help for all screens.
The AutoPart system is fully integrated with our electronic catalogue system.
This package provides the user with access to approximately 5 million product
references, based on catalogue data supplied directly to us by many of the
leading industry suppliers.
As an option AutoPart can also be linked with our garage/workshop system
AutoWork. This provides a fully integrated system for the company that
conducts workshop activities in addition to its parts business and requires
integration of stock, customer/supplier and accounting information.
This manual will take you through the basics of the AutoPart system including
sales, purchasing, inventory control, reports and database held information.
1
AutoPart User Manual
DATABASE
Before a customer can begin to use the system, there are several areas of set
up required before sales, purchasing and stock can commence. Within the
Database menu are multiple maintenance screens that must be completed.
2
AutoPart User Manual
General Codes File Maintenance
These are the codes that are set up to allow information to be entered quickly
and efficiently. They represent for example: Operators, Product Groups,
Areas, etc. They are usually set up as numbers or initials, so they are easy to
remember. However, throughout all the screens in AutoPart, if a code is
needed and you cannot remember the code you can do an Alpha Search.
Accessing General Codes:
1.
2.
3.
4.
5.
Start Autopart from the desktop and select the ‘Database’ menu.
Select the ‘General Codes File Maintenance’ option.
In this option the codes will be displayed.
To select a code, highlight a code using the mouse or arrow keys
Then press [Enter], double-click the mouse or press the ‘OK/2’ button.
Some of these codes are required within the system; they are Credit
Reason Codes, Operator Codes, Returns Reason Codes, Stock
Adjustment Reason Codes and VAT.
3
AutoPart User Manual
AREA CODES
These codes can be set-up as you prefer, either by postcodes, areas of the
country or your surrounding areas. They enable you to run reports for analytic
reasons. They also give you the opportunity to cross-reference the areas with
the deliveries. If you continuously have several deliveries per day to the same
area you can organize them more efficiently so that only one delivery is done
per day.
4
AutoPart User Manual
CREDIT REASON CODES
The Credit Reason Codes enable you to credit your customers for returned
goods, to enter the codes, take the following steps:
1. Enter the new ‘Code’, up to 3 characters.
2. Next enter the ‘Description’ of the credit reason.
3. Enter “Y” or “N” in the ‘Update Stock?’ column. This is to decide to
update or not to update your stock.
4. Enter “Y” or “N” in the ‘Overcharge?’ column to determine if the reason for
the credit is because the part was overcharged or not.
5. Enter a ‘Handling Charge %’ in the last column if there is a charge for
returning goods to the appropriate reason.
6. Select the ‘Update/2’ button to save changes.
5
AutoPart User Manual
CURRENCY CODES
The Currency Codes is used for overseas customers and exporting and
importing. This option allows you to enter the Exchange Rate. Once set up
you will then be able to enter your cost price as foreign currency, and the
code will translate this into US Currency.
1. Enter the new ‘Code’, up to 3 characters.
2. Next enter the ‘Description’ of the currency or country.
3. Enter in the ‘Exchange Rate’. To do this you must divide 1 by the
currency exchange rate, for example;
For French Francs, you would carry out the following calculation, 1 ÷ 9.7 =
0.103 and then enter 0.103 in the Exchange Rate column.
4. Select the ‘Update/2’ button or press the F2 Function Key to save
changes.
6
AutoPart User Manual
CUSTOMER PAYMENT TERMS
The Customer Payment Terms Code is the payment terms your customer has
with you. These codes are used in the Customer File Maintenance. To enter
a Customer Payment Terms code:
1. Enter the new Payment Terms ‘Code’, up to 3 characters.
2. Next enter the ‘Description’ of the Payment Terms.
3. Enter in the number of days in ‘Days From Invoice Date’ column if the
payment is to be paid so many days from the invoice date.
4. Enter in the number of days in ‘Days From Monthend’ column if the
payment is to be paid so many days from the end of the month.
5. Select the ‘Update/2’ button or press the F2 Function Key to save
changes.
7
AutoPart User Manual
DEALLOCATION REASON CODES
The Deallocation Reason Code enables you to add reason codes for when
you are deallocating Sales Backorders/Picking Lists. To enter the codes:
1. Enter the Deallocation ‘Code’, up to 3 characters.
2. Next enter the ‘Description’ of the deallocation reason.
3. Enter “Y” or “N” in the ‘Place on Backorder?’ column if the part needs to
go back onto Backorder.
4. Enter “Y” or “N” in the ‘Update Usages’ column to update stock usage.
5. Select the ‘Update/2’ button or press the F2 Function Key to save
changes.
8
AutoPart User Manual
DELIVERY METHOD CODES
The Deliver Method Codes allow you to add the delivery method when selling
parts to a customer. This is for analytic purposes allowing you to compare
delivery methods with area codes for example enabling you to see if your
deliveries can be more efficient.
9
AutoPart User Manual
HOLD REASONS
These codes allow you to hold an invoice in the Purchase Ledger. For
example, you could receive an invoice with the incorrect price or parts and
wish to hold the invoice for payment until corrected.
10
AutoPart User Manual
LINE OF BUSINESS CODES
The Line of Business Codes will indicate which line of business your customer
is in for analytic and reporting reasons.
11
AutoPart User Manual
LOST SALES REASON CODES
The Lost Sales Reason Codes is also for analytic purposes. When you lose a
sale, a code is added. This can be accessed via a report allowing you to see
the main reasons that your sales were lost.
12
AutoPart User Manual
OPERATOR CODES
The Operator Codes are needed to allow individuals access to the majority of
the screens within AutoPart. This is a required code and should be set up for
all users. To enter the codes:
1. Enter the new operator ‘Code’, up to 6 characters, using either letters or
numbers.
2. Next enter in the ‘Description’ column the relevant name of the operator.
3. Select the ‘Update/2’ button or press the F2 Function Key to save
changes.
13
AutoPart User Manual
PAYMENT TERMS CODES
These codes are exactly the same as customer payment terms codes, except
that they are terms you have with your supplier. To enter a Payment Terms
code:
1. Enter the new Payment Terms ‘Code’, up to 3 characters.
2. Next enter the ‘Description’ of the Payment Terms.
3. Enter in the number of days in ‘Days From Invoice Date’ column if the
payment is to be paid so many days from the invoice date.
4. Enter in the number of days in ‘Days From Monthend’ column if the
payment is to be paid so many days from the end of the month.
5. Select the ‘Update/2’ button or press the F2 Function Key to save
changes.
14
AutoPart User Manual
PRICE EXCEPTION CODES
The Price Exception Codes allow you to enter a reason if you override any
prices within Point of Sale and Sales Order Entry. To enter a Price Exception
Code:
1. Enter the new Price Exception ‘Code’, up to 2 characters.
2. Next enter the ‘Description’ of the exception.
3. Select the ‘Update/2’ button or press the F2 Function Key to save
changes.
15
AutoPart User Manual
PRODUCT GROUPS
The Product Group codes are for banding similar parts together. The groups
can be as big or small are you choose. The advantage of the codes can be
quite substantial depending on how you choose to set them up. If the groups
are quite specific then the opportunity is there to block changes to the
products (i.e., if all the products in the group have the same mark-up pricing
and they need to be increased/decreased this can be done together in the
block change option). It will also allow you to run detailed reports enabling
you to discover which are your best selling products. To enter the codes:
1. Enter the new product ‘Code’, up to 10 characters.
2. Next enter in the ‘Description’ of the product group.
3. Now enter the ‘Required Margins’; this is the minimum profit that you
wish to make on that particular product group. When any part from this
group is sold, you will be unable to sell it if the required margin is less then
the percentage you specify.
4. Enter the ‘Commission Discount %’, which is given to the sales or rep
people. To show this discount:
a. Set up a Rep Code next to a customer in Customer File Maintenance.
b. Every time a part that is in the allocated group is sold the Rep will be
allocated the commission.
c. To view how much commission each Rep is entitled look at report
TRW42C.
5. Enter a ‘Nominal Code’ if needed.
6. Enter “Y” in the ‘Allow Import’ column to allow Import of parts within the
group through Block Import routines, allowing the prices and details of all
the parts within the group to be changed during an update.
7. Enter any extra information about the part in the ‘Other Information’
column.
8. Select the ‘Update/2’ button or press the F2 Function Key to save
changes.
16
AutoPart User Manual
PSYCHOLOGICAL PRICING
This option allows you to create psychological pricing (i.e. rounding prices to
$9.99). You must set the codes and then run a routine in Block Changes for
this option to be carried out. To enter the codes:
This example is based on changing prices to $9.99, anything between $9.90
to $10.10.
1.
2.
3.
4.
In the ‘From Value’ column enter $9.90.
In the ‘To Value’ column enter $10.10.
In the ‘Round To’ column enter $9.99.
Select the ‘Update/2’ button or press the F2 Function Key to save
changes.
The routine in Block Changes would then need to be carried out (please see
the Block Changes section for more information).
17
AutoPart User Manual
RANGE CODES
The Range Codes are for breaking the product groups down into smaller
groups or for banding product groups together. Once again these can be set
how you wish or not at all. All they consist of is a range code, up to 10
characters and a description.
18
AutoPart User Manual
RETURNS REASON CODES
The Returns Reason Codes allow you to add reason codes when you are
returning goods to suppliers. Once again, these can be accessed via reports
for analytical purposes. To enter the codes:
1. Enter the new Return Reason ‘Code’, up to 3 characters long.
2. Next enter in the ‘Description’ column the returns reason description.
6. Enter “Y” or “N” in the ‘Update Stock?’ column if you want this return code
to affect inventory levels.
3. Enter “Y” or “N” in the ‘Old Unit Code?’ column. An old unit would be a
part that a consumer has returned and would then in turn be returned to
supplier.
4. Select the ‘Update/2’ button or press the F2 Function Key to save
changes.
19
AutoPart User Manual
SALES REPRESENTATIVE CODES
These codes enable you to enter your sales representative codes. These will
then allow you to associate a Sales Rep to a customer. This permits you to
run reports indicating their customer’s sales and also how much commission
they are entitled to (see Product Codes). To enter a Price Exception Code:
1. Enter the new Sales Rep ‘Code’, up to 3 characters.
2. Next enter the ‘Description’ of the Salesperson.
3. Select the ‘Update/2’ button or press the F2 Function Key to save
changes.
20
AutoPart User Manual
STOCK ADJUSTMENT REASON CODES
The Stock Adjustment Reason Codes allow you to add reasons against any
adjustments you make to your stock in the Stock Adjustments screen. To
enter a Stock Adjustment Code:
1. Enter the Stock Adjustment ‘Code’, up to 2 characters.
2. Next enter the ‘Description’ of the stock adjustment reason.
3. Select the ‘Update/2’ button or press the F2 Function Key to save
changes.
21
AutoPart User Manual
VAT CODES
This allows different VAT Codes from the standard VAT rate to be entered
(i.e., exports). They can be entered against a customer, supplier or part
number. To enter a VAT Code:
1.
2.
3.
4.
Enter the VAT ‘Code’, up to 2 characters.
Next enter the ‘Description’ of the VAT Code.
Next enter the ‘VAT Rate’.
Choose either “Y” or “N” if this code is an ‘EEC Member’. If you enter “Y”
for yes, then enter in the ‘EEC VAT Rate’.
5. Select the ‘Update/2’ button or press the F2 Function Key to save
changes.
22
AutoPart User Manual
VOC CODES
VOC stands for Volume of Combustibles. This indicates the presence of
combustibles with the part, for example, chemicals within paint need to meet
the Environmental Protection Act requirements. To set these codes:
1. Enter the new ‘VOC Code’, up to 3 characters long.
2. Next enter in the ‘Description’ column the particular chemical involved.
3. Select the ‘Update/2’ button or press the F2 Function Key to save
changes.
23
AutoPart User Manual
Customer File Maintenance
The Customer File Maintenance program allows you to enter all your
customers and their details. The screen is split into 6 sections: General,
Special, Special Terms, Addresses, Vehicle Details, Note and Extra Details.
GENERAL
The first section, General, allows you to enter the address, phone and credit
details and also the type of payment customer they are. Below is a list of field
definitions.
Field
Account No.
Terms As
Name
Title
Surname
Forename
Address
Post Code
Date Created
Date Amended
Contact Details
Area Code
LoB Code
Rep Code
Description
Enter the customer code using an alphanumeric code that yourself and
others can remember easily.
This is a time saving tool. If you have more than one customer with the
same payment and pricing terms then you can put their customer code in
here and it saves you entering all the same data twice. This is especially
useful for multi-branch customers.
This is the Customer’s Name
This is the Title of the customer and is an optional field.
This is the surname of the Customer and is an optional field.
This field is not necessary and can be skipped.
This is the Customer’s Primary Address.
This is the Customer’s Postal/Zip Code.
This is the date that this customer was added to the system.
This is the date that this customer was last updated/changed.
These fields are the customer’s phone numbers and contact information
for the Sales Desk and Accounting.
This is the Area Code created in the previous section.
This is the LoB Code created in the previous section.
This is the Salesperson Rep associated with this customer.
24
AutoPart User Manual
Field
Vat Code
Currency Code
Invoice Freq
Stmt Acct
Stmt Frequency
Ledger Type
Document Type
Selling Level
Nominal Code
Cost Supplier
Credit Limit
Min Inv
Max Inv
Payment Terms
Amend Stop
Description
Enter the appropriate VAT Code for this customer.
Enter the appropriate Currency Code for this customer if it is different then
US Dollars.
This field is how often the invoices or consolidated invoices are sent out.
For multi-branch users. If you send out invoices to all branches but would
only send a statement to Head Office, then the Head Office’s customer
code would be entered here.
How often the statements are sent out – weekly or monthly.
A mandatory section indicating how the customer pays, either by:
• Account – pays some or all of the account at a particular time.
• Paylater – pays the full amount at the end of the week for example.
• Cash – for customers that pay straight away.
• None – for IBTs (Inter-Branch Transfers, which are not applicable at
the present time. Possible future development). Means that no
payment is made.
This lists the type of document that will be printed out during a sale:
• Invoice – this will print out an invoice when a sale is made.
• Cashslip – to print a cashslip for cash customers.
These can be set as you choose, but the main ones are Trade, Retail and
Wholesale. There are also levels such as Current Cost, which is for
internal branch transfers so if the parts are transferred, they are
transferred at cost price.
This is the Nominal Account Code under which to analyse sales to that
particular customer.
If one customer allows the same sort of paint from a certain supplier, you
can enter the supplier code here so that the selling price is based on that
supplier’s cost price.
If the customer accumulates credit over the limit that has been set, they
will not be allowed any more until they pay off some of their debt.
This is the minimum amount the customer can spend.
This is the maximum amount the customer can spend.
Enter the customer’s payment terms.
This will disallow any sale to that customer, usually due to lack of
payment.
25
AutoPart User Manual
SPECIAL TERMS
This section allows you to add special terms for specific customers.
Field
Customer
Action
Ref
Description
Firstly you have a choice of how to give special terms.
P = A particular part.
G = A particular group.
R = A particular range.
S = Parts from a particular supplier.
A = All parts.
Item
Select the part, group, supplier or range.
Desc
Will automatically fill in.
Enter the new discount or price using one of the following columns:
New N.S.P.
New Net selling price.
RRP % Discount Discount off the retail recommended price.
Markon %
To replace the standard markon %.
NSP % Discount Discount off the Net selling price.
New Level
Enables you to give a customer a different selling level.
Break Quantity
How many the customer has to buy before they get the Special Terms.
26
AutoPart User Manual
ADDRESSES
This enables you to add further addresses if the delivery address is different
to that of the main address.
•
•
•
Click on either Add, Edit or Remove for addresses.
Delivery Details: This allows you to select a day, delivery method and
order of drop for each customer. When completed you must press
‘Update Routine’.
OK/2: Click when finished.
27
AutoPart User Manual
VEHICLE DETAILS
The Vehicle Details tab is mainly for garages. It enables you to put in your
customers vehicle details so that when a customer has a problem with their
car you know which make and model it is and therefore have a better idea
which parts to buy and to keep track of any historical problems.
Field
Make
Model
Reg No.
Chassis Number
Engine Size
Year
Miles
MOT Due
Service Due
Fleet Code
Notes
Description
This field is the Make of the Vehicle the customer owns.
This field is the Model of the Vehicle the customer owns.
This field is the Registration Number of the Vehicle the customer owns.
This field is the Chassis Number of the Vehicle the customer owns.
This field is the Engine Size of the Vehicle the customer owns.
This field is the Year of the Vehicle the customer owns.
This field is the number of miles on the Vehicle the customer owns.
This field is the MOT Due on the Vehicle the customer owns.
This field is the scheduled Date when next service is due on this vehicle.
This field is the Fleet Code associated with this Vehicle the customer
owns.
This field allows any specific notes associated with this Vehicle for the
customer.
28
AutoPart User Manual
NOTES
The Notes Tab in Customer File Maintenance is a facility to add messages
and notes to other screens, invoices and statements. The screen below
shows you where each message would be shown.
Field
Notes
Invoice Message
Order Message
Additional
Information
Statement
Message
Cust Grading
Description
This field holds General Notes seen in Point of Sale and the Sales
Ledger.
This field will print a message on the Customer’s Invoice.
This field is just reference field and does not display anywhere but in the
Customer File Maintenance, Notes screen.
This field will print a message on the Customer’s Statement.
29
AutoPart User Manual
EXTRA DETAILS
The Extra Details screen allows you to set up separate surcharge statements
and other various options.
Field
SIS Account
Surcharge Code
Do Not Update
Usages
Point of Sale
Auto Return
No Backorders
No Mail
Price Details
End of
Transaction
Description
Surcharge Invoice Separate, this box can contain a customer code, so
when selling a surchargeable part to a customer, the surcharge will
appear on a separate invoice as long as S-SIS is in the surcharge code.
This is a useful option if customers dispute the surcharge cost.
There are 4 codes that can be applied to this field:
A – Apply the surcharges.
I – Ignore any surcharges.
B – Bank any surcharges, for example you may not wish to charge the
customer the surcharge but want to keep a record of it.
S – SIS to invoice separately any surcharges.
This is for any Internal Branch Transfers.
This will default the selling quantity to 1 in the selling screen. This is
useful for cash customers when bar coding is used because it is quicker.
Mark this box to disallow sales backorders to this customer.
To not be included when Mail Merging.
There are currently 2 options:
Q – to not be able to sell any parts that have quantity breaks set up in
Product and Price File Maintenance.
S – To not be able to sell any parts unless included in Special Terms.
At the end of a transaction you can now stipulate whether you wish to fax,
print or e-mail invoices or acknowledgements. The available options are:
• None
• Print Acknowledgement
• Fax Acknowledgement
• Email Acknowledgement
• Fax Invoice
• Email Invoice
30
AutoPart User Manual
Supplier File Maintenance
Supplier File Maintenance allows you to enter all you suppliers and their
details. The screen is split into 4 sections: Account Details, Rep & EDI
Information, Miscellaneous and Additional Information.
ACCOUNT DETAILS
The first section allows you to enter the address, phone and credit details and
also place any bank details.
Field
Account No.
Name
Address
Post Code
Factor Acct.
Created
Amended
Contact Details
Acct Name
Bank Acct
Sort Code
BACS Payment
Remittance
Required
Account Details
Description
This field is the Supplier’s Account Number.
In this field enter the Supplier’s Name.
Enter the address of the supplier in this field.
Enter the Zip/Postal Code of the supplier in this field.
This field can hold another valid supplier account number that can be
printed on purchase orders or remittances.
This is the date the Supplier was created on the system.
This is the date the Supplier was updated/changed last on the system.
This section holds details of phone numbers, contact names and fax
number.
This field is required if payment is sent automatically through BACS.
This is the Bank Account used if the payment is sent automatically
through BACS.
Enter the Sort Code in this field if payment is sent automatically through
BACS.
If payment is sent automatically through BACS then the supplier’s bank
name, account and sort code will need to be entered. You must also
flagged this box and whether or not a remittance is required.
Select if a remittance is required if payment is sent automatically through
BACS.
31
AutoPart User Manual
Field
Minimum Order
Value
Minimum Boxes
Required
Credit Limit
Carriage Charge
Settlement
Discount %
Nominal Code
Payment Terms
Vat Code
Description
Holds the minimum value for an order and displays in the Suggested
Ordering screen as warning message.
As Minimum Order Value.
This holds the limit of credit that you have with the supplier.
Some suppliers may charge you a carriage fee, if so place it here.
Some suppliers offer a settlement discount if bill is paid in full.
This code is used as a default when posting invoices and credit to the
Purchase Ledger.
Enter the payment terms you have with the supplier.
Enter the rate of tax.
32
AutoPart User Manual
REP & EDI INFORMATION
This screen in the Supplier File Maintenance program allows you to enter the
Supplier’s Reps name and address and EDI information.
Field
Rep Details
Name
Address
Post Code
Phone
Area
Rep Code
Lob Code
EDI Information
Description
This field is the Rep’s Name.
This field is the Rep’s Address.
This field is the Rep’s Postal/Zip Code.
This field is the Rep’s Phone Number.
This field is the Rep’s Area Code.
This is the Rep’s Code.
This is the Rep’s LOB Code.
These fields affect Electronic Date Interchange. Companies such as
Bosch, Brown Brothers, Motoquip and Lucas use this so data can be
transferred from you to supplier. If you wish to have EDI set up then
please contact Tech Support.
EDI Style
Branch EDI
EDI Phone No.
EDI Dealer
EDI Path Name
33
AutoPart User Manual
MISCELLANEOUS
This screen in the Supplier File Maintenance program gives the chance to
enter several extra options regarding the supplier.
Field
Price Print Details
Invoice
Frequency
Order Code
Description
This field is under development.
The Invoice Frequency field can be optionally only set to “S”. This forces
the suggested ordering routines to use the STOCK table for that supplier
rather then MVPR. When typing a supplier into suggested ordering there
are two ways of identifying the parts to order:
1. Take the typed supplier and get each MVPR record then look at the
stock record.
2. Look at all the stock records in turn, seeing if any relate to the
required supplier.
If the majority of your parts are sourced from one supplier (like Motaquip,
Dana or Unipart) then the 2nd option is faster (there ought to be far fewer
stocks records then MVPR records since there would be one MVPR
record per part number whereas there would only be a STOCK record
where there was some stock, or a max).
There is a parameter, which you can set to say, always do option 2, but
this “S” allows you to specify that for Dana (i.e.), use option 2, leaving the
rest to process very quickly using option 1.
When the ‘Retreive/F10” button is clicked in Suggested Order routine
and the Suggested Order Search screen is displayed, it is possible to
enter an order code to display only those suppliers with that code. The
order code may be set up in any of the following ways:
MON – Selects all suggested orders where the supplier code MON in
the Code field. (Monday Orders)
JBMON – Selects all suggested orders where the supplier code has
JBMON in the Order Code field. (Monday orders for JB)
3 – Selects all suggested orders where the supplier code has 3 in the
order code field. (Day 3 orders)
Please note that in order for this work correctly, your system must be set
up for orders to be generated overnight as part of the dayend routines.
34
AutoPart User Manual
Field
Supplier Account
No.
Currency Code
Lead Time
Description
This is the number that the supplier knows YOU as on their system.
This field holds the foreign currency code.
This field holds the number of days from the day the goods are ordered
until delivery.
ADDITIONAL INFORMATION
This screen allows you to enter additional details, notes, order method details
and the option to enter e-mail and web addresses as shown here.
Field
Additional
Details
Notes
Order
Method/Details
e-mail Address
Website
Swap Tels/10
Description
This field contains additional notes/details on the supplier but is note
displayed on any screen but the Additional Information Tab.
The notes entered in this field displays in the Account Inquiry screen and
the Purchase Ledger.
The notes entered in this field display on the Purchase Order Processing
screen.
This is the Supplier’s E-Mail Address.
This is the Supplier’s Website Address.
35
AutoPart User Manual
Product & Price File Maintenance
Product & Price File Maintenance allows you to enter parts and their details.
The screen is split into 8 sections: Part Number, Alternatives, Suppliers &
Cost Prices, Selling Prices, Quantity Breaks, Other Information, Kit Pieces
and Cross References.
If you are manually keying in your product database, some thought must be
given to the way in which it is constructed. Important considerations are:
•
•
•
•
Purchasing & Reporting – many reports are produced by group, supplier
and range. Think about how best to arrange your database and produce
meaningful reports and to order products.
Pricing – many discounts are based around group, supplier and range.
Make sure you know which parts will be affected.
Price Updates – what is the most efficient way to structure the database
in order to perform block changes easily.
Stock Take – think about the way in which you want to count stock and
the way it is arranged on your shelves.
36
AutoPart User Manual
PART NUMBER
The Part Number Tab allows you to enter the part number and which group
and range it is assigned to. There is also a facility to enter the minimum and
maximum of stock levels.
Field
Part Number
Known As
Product Group
Description
Range Code
Date Setup
Condition
Indicator
Stock Under
Minimum Stock
Maximum Stock
Unit of Issue
Location
Description
Enter the actual part number. If you wish to search for an existing part
number, click on Search/5.
This field is used for barcode numbers.
This field is used for ordering, reports, pricing, Block Changes and Stock
Taking procedures. Each part number must be assigned to a product
group.
The field can contain free text up to 40 characters long.
This field can be used in the exact same way as the product group field
although having a range code is optional.
This field automatically completes when a part has been entered, except
any parts that have been block imported.
This field can be set to the following:
D - The part has been flagged for deletion.
N - The part is ‘Not Yet Available’.
O - The part is now obsolete.
S - The part has been superseded.
W - The part will remain as ‘While Stocks Last’.
Entering a part number in this field means that no stock movements or
usage updates take place for the original part, they will all be written
against the Stock Under part.
This is the level at which stock should be considered for re-ordering
purposes.
This is the level at which stock should be ordered up to.
This is a text field used to identify the product unit. Some examples may
be a box of 10 or a pack of 4. If nothing is entered the field defaults to
‘each’.
This is the physical bin or shelf location of the product.
37
AutoPart User Manual
ALTERNATIVES
The Alternatives Tab allows you to set up an alternative just in case the
original product cannot be sold either due to being not quite the correct part or
if there is no free stock.
Field
Part Number
Description
Supplier
Supplier Part
Number
Cost Price
Oneway Link
Remove
Alternates
Description
Enter in here the list of part numbers that are alternatives to the original
part number.
This is the description of the alternate part number.
This is the Supplier you can order this alternate part number from.
This is the supplier’s part number for the alternate part number. This field
allows the alternate to be shown on your system but reference the
supplier’s part number so there is no confusion when ordering.
This is the Cost of the Alternate Part Number.
If this box is checked it will cause the alternative to operate only one way.
For example, BAT101 is an alternative to BAT10 but a BAT10 is not an
alternative to BAT101.
Clicking on this box will ask you if you wish to delete all alternatives.
38
AutoPart User Manual
SUPPLIERS AND COST PRICES
This screen allows you to enter a number of suppliers that supplies the part
plus costs.
Field
Supplier
R.R.P.
PDISC %
N.P.P.
N.P.D. %
Supplier Part
Surch In
Box Qty
Unit
Description
Enter the supplier(s) code from which the part is purchased. Entry of a
supplier code means that the RRP and NPP must be entered before the part
can be accepted.
Suppliers retail recommended price.
Purchase Discount Percentage. This is the percentage by which the RRP
will be discounted to arrive at a cost.
Net Purchase Price, the actual price of the product.
This is a further discount that is applied to the result of the RRP less
PDISC% or the NPP.
This is the part number by which the supplier recognises your part.
Surcharge In, This is the surcharge value charged to you, by the supplier.
Where products are bought in boxes or packs, but are stocked individually, a
box quantity should be entered into this field.
This field holds the purchase unit of measure. This is for instances where the
supplier holds stock of a particular part as a box or a case, rather than
individually. To avoid misunderstandings, the order quantity is divided by the
unit quantity when calculating order quantities.
Example: A quart of oil has an RRP of $1.00. It is supplied to you in boxes of
10 at $2.50 per box and you order 100 quarts at a time. To set this up you
need to do the following:
1. Enter the supplier code, enter a RRP of $10.00 and a NPP of $2.50.
2. In the unit column, enter 10 (the box quantity from the supplier).
3. Give the part a maximum stock of 100.
4. Set the selling prices to equate to one quart of oil, i.e. $7.50
When you run the suggested order it will tell you to order 100 at $25 each.
However, when the order prints, it will print 10 at $2.50 each, which the
supplier will understand as 10 boxes. Finally, when you receive the goods
into stock, the system will book in 100 bottles at $25 each.
The secret with this is to remember to hold you cost prices at the box level
39
AutoPart User Manual
Field
Min Order
STG Cost
Orhter
Information
•
Description
and your selling prices at unit level. *Note: even if you use discount % or
markon %, the selling prices will still be correct.
Entry of a quantity here will cause the suggested ordering routines to round
up the order quantity to this figure if it is initially lower.
The final sterling cost of the part after all discounts.
Any other details you would like to add.
Core Cost: This is the surcharge value charged to you by the supplier.
Unit:
40
AutoPart User Manual
SELLING PRICES
This screen allows you to set the selling prices for the part at different selling
levels.
Field
Level
Description
These are the various selling levels that can be assigned to customers. The
first level is Retail, which will be set to be VAT inclusive. The other 4 levels
will be set not to include VAT.
*Note: When choosing which selling price to use it is worth noting that if a supplier changes all
their RRP’s and/or Cost Prices and your selling prices are based on NPP’s, it is likely you will
have to amend them. However, if you selling prices are based on Disc % or Markon %, the
chances are that these will not need to amended.
Retail 0.00
If a figure is entered in this column, the selling price for the customers
Disc %
assigned to this level is based on the RRP less the discount.
N.S.P
This column contains the nett selling price.
Mkon %
If a figure is entered in this column, the selling price for customers on this
level is based on the actual cost price plus the Markon %.
Price
This is the price that will be charged for each level based on the entered
Disc %, NSP or Markon %. Note: it is only possible to enter one of these for
each level.
Margin
This shows the actual margin that would be achieved if the part was sold at
the RRP.
Price (inc
This is the price that will be charged for each level, plus VAT.
VAT)
Selling
If more than one supplier is present in the Cost Prices tab, the system
Supplier
needs to know upon which RRP or cost to base it’s prices. The supplier to
be used should be entered in this field.
Surcharge
This is the surcharge to be charged to the customer.
Shelf Edge
If your system is set up for these labels, it is possible to produce such labels
Labels
by clicking this button.
VAT Code
Enter here the VAT charged for the part.
Disallow
Entering a “Y” for yes will not allow you to discount the part in Point of Sale.
Discount
41
AutoPart User Manual
QUANTITY BREAKS
This screen allows you to enter a quantity of parts to achieve a set discount.
Field
Brk Qty
Price
Disc %
Mkon%
Level
Remove Quantity
Breaks
Description
Enter in here the quantity that a customer has to purchase in order to
receive a better price.
The price can be in the format of any of the given three.
The price can also be set by selling level, i.e. Retail, Price 1 etc.
In order to remove a break, highlight the one to be removed and then
click on the button.
42
AutoPart User Manual
OTHER INFORMATION
This screen allows you to enter miscellaneous information about the product.
Field
Product
Information
OUBIN
Reference
Brake Shoe
Number
Sort Code
Intrastat Code
Nominal Code
VOC (grams)
VOC (Cat)
Write Off %
Class
Weight
COHS
Off Price Lists?
Not Supplied by
Warehouse
BS5750
Description
This field can contain any amount of free text with regard to the part
number. The information is displayed in the Product Details screen in
Point of Sale.
Old unit bin card number for old part that is brought back.
A brake shoe can consist of 3 parts but only 1 piece of the part is brought
back, the number of that piece is what is entered into this field.
An additional field on which to sort reports.
This field will hold the intrastate code that any purchases and sales of
relevant goods can be reported on. It is also necessary to enter the weight
of products for intrastate reports.
If sales are to be posted to the nominal ledger then a code needs to be
entered.
Volatile Organic Compound Weight.
Volatile Organic Compound Category.
This is the percentage by which the part is written down. This percentage
is taken off the cost price for stock valuation purposes.
This field can be used to rank the part number in terms of its sales value
and volume against other parts, either within the same group or compared
to the whole product file. The code will normally take the format of one
alpha and one numeric character (i.e., A1).
This is the actual weight of the part. It can be in any format you require;
pounds, ounces, grams, etc. The total weight can be printed on invoices,
purchase orders and can be included in reports.
Control of Hazardous Substances field shows if parts are hazardous or not.
Marking this box will not include the part number in reports 528 and 528s.
Marking this box prevents the part from being ordered from a head office or
warehouse by a branch. For example, the part is not included on a
branch’s suggested order for head office. Instead the part will have to be
ordered from outside sources.
This indicates that the part is from a BS5750 approved supplier.
43
AutoPart User Manual
KIT PIECES
If a part number is also going to be part of a KIT then you can enter the other
parts in this screen that will also be part of the same KIT.
Field
Part Number
Quantity
Remove Pieces
KITS
Description
In this column enter all the component parts of the KIT.
Enter how many of this part are needed for this KIT.
This button will ask you if you wish to “Delete all Kit Parts?”.
This button will display any other Kits this component is associated with.
44
AutoPart User Manual
CROSS REFERENCES
This screen holds cross-reference details for both customers and suppliers.
Customer Cross Reference: For instances where a customer may hold
his/her part number under a different reference to yours, it is possible to enter
the customer code followed by the customer’s part number. When the
customer’s part is keyed into Point of Sale the original part is displayed.
Supplier Cross Reference: For instances where a supplier may hold their
part number under a different reference to yours, it is possible to enter the
supplier code followed by the supplier’s part number. When entering the
supplier’s cross-reference in the purchase order screen, the original part is
displayed.
45
AutoPart User Manual
Block Changes
The Block Changes program allows you to change large amounts of data at
the same time, so for example if you want to increase prices, this option
enables you to change a large number at once rather than one at a time.
SELECTION
Field
Prime Supplier
Product Group
Range
From Part
To Part
Effective From
Effective Until
New Value
(Replace
From/To
Description
Enter the supplier code that is set as prime against the parts in question.
If the changes apply to one particular group then enter this here.
If within a range, enter this here.
To narrow down even further enter the parts from and to here. *Note: The
system holds parts in alphabetical order from left justified. For example
part 12345 would be sorted before 345, you can check the details in
Proposed Changes before you run the update.
This is the date that your changes will take place. This enables you to set
up Proposed Changes that are not due to happen for a week or so. All you
do is enter the correct date here. *Note: A setting need to be added in the
Dayend for this to work, please see your trainer.
This is for promotions that last for a limited time only. *Note: A setting need
to be added in the Dayend for this to work, please see your trainer.
This option will replace an old value with a new value. Remember, this is a
replacement not an accumulation. Therefore, if you wish to change a
percentage from 20% to 50% you would enter 50% or if you wish to
change number from 5 to 10 you would enter 10.
This section acts like another search criteria allowing you to search for a
particular value within your chosen field and change the ones with that
value only.
• Firstly, select the field that you wish to change.
• Select the From Value box and enter the value that you wish to
change and search for.
46
AutoPart User Manual
Field
Increase%/
Decrease%
Psychological
Pricing
Copy
Amend
Selected
Description
• Select the To Value box and enter the new value, the one you wish to
change to.
This option allows you to increase or decrease a percentage by a certain
amount.
This option, together with the Psychological Codes (set up in General
Codes File Maintenance) will allow you to change the VAT Inclusive –
Retail field. This will allow you to change any retail price within a range
that you have set to a psychological price.
This will copy one field value or information to another selected field.
First, select the field that you want to copy the values from in the Copy
From grid.
Then select the field that you wish to copy the values to in the Copy To
grid.
This option allows you to select fields that cannot be changed to the same
value within Block Changes, for example, mins and maxes and locations.
It allows you to choose your options enabling you to make a list, which you
can amend manually.
• Select the fields you wish to change. When they are selected,
“Selected” will show on the Select column.
• Press OK/2 and all the parts in your search criteria will be shown in list
form.
• You then have the option to amend these manually by moving through
the list.
Note: If a field has been selected that is driven by the cost price (i.e.
any option that uses your cost price to calculate it’s value, for
example Markon %), a Cost Supplier has to be entered. This indicates
which supplier’s cost prices you wish to use to add values into.
Once you have chosen your changes press the ‘OK/2’ button to propose the
change. To cancel your changes press the ‘Cancel/3’ button.
47
AutoPart User Manual
PROPOSED CHANGES
Once you have done your changes, Autopart does not automatically change
the parts that you have chosen. A Proposed Change is created. This option
allows you to check and amend if required before the change is complete. To
do this:
1. Select the ‘Proposed Changes’ by clicking on it once. “Selected” will
appear in the ‘Status’ column.
2. Click the ‘Amend/6’ button to view the changes and make any changes
if not correct.
3. Select the ‘OK/2’ button or press the F2 Function Key to save changes.
4. The ‘Cancel/3’ button will cancel any amendments and the ‘Delete/4’
button will delete the Proposed Changes.
48
AutoPart User Manual
BLOCK IMPORT
The Block Import routine is used to import data from a text or .csv file. There
are a number of options available within the Block Import procedure, which
will be covered in detail in this manual.
When you receive a floppy disk containing a file, place it in the A drive. We
would advise that you then copy the file onto the hard drive, as this will make
the import quicker. It will also allow you to keep the import files in one place
for easy access. You may need to look at the original data if there are any
problems completing the import. You may wish to set up a directory called
C:\IMPORT to copy the files onto.
Field
File Name
Supplier Code
Effective From
Effective Until
Add New Parts
Flag New Parts
with “N – Not
Yet Available”
Allow Spaces in
Part Numbers
New Part
Product Group
Description
With the cursor in this field, click search and find the file on the hard drive.
Once this is found click open and it will place the path and file name into
this field.
Type in the supplier code of who has supplied the file.
This works in the same way as it does within the Selection screen of Block
Changes. (Note: A setting needs to be added in the Dayend for this to
work, please see your trainer).
Select this option to add any parts, which are on the disk but not on your
product file. You should always select this option if you are loading new
supplier files on the system.
Select this option if you require the new parts to have a condition indicator
of “N – Not Yet Available”. This will mean that the parts are loaded onto
the system, but you will not be able to sell then until the flag is removed.
Normally when importing, the system will not allow spaces in part numbers.
Checking this box will allow spaces.
Enter a default group in this field. This will result in any parts without a
product group being given the specified default group instead. You may
then allocate groups accordingly at a later stage. (Note: You must make
sure the default group is set up in General Codes File Maintenance).
49
AutoPart User Manual
Field
New Part
Range Code
Part Number
Prefix/Suffix
Update Existing
Parts Product
Details
Add New
Supplier Cost
Prices
Use Supplier
Part Numbers
Import as
Proposed
Changes
OK/2
Description
This field allows you to enter a range code. This field is NOT mandatory.
(Note: The range code has to be set up in General Codes File
Maintenance first).
If the part requires a prefix or suffix, use these fields. This will result in the
prefix or suffix being added at the point of import.
Checking this box will allow the update of any details to parts that are held
on the product file, i.e. group, description, range etc.
This will add new cost price information only if the part to be imported
contains the same supplier on file. If the supplier on file is different, the
information will not be imported.
This will allow update of the part numbers where the supplier’s part number
matches the number from the disk. As long as the supplier codes are the
same.
This will allow you to view the changes/additions to the data before
updating the system. Using this option will double the time taken to
complete the import, but it is extremely useful as a failsafe mechanism.
This will take you though to the following screen shown below.
The Import Field Definition grid will display all the fields contained in the file.
Use the drop down box to select the field definition on each of the lines. On
the example above you would select Part Number for the first line and
Description for the second line.
Field
Validate
Second Record
Total Parts to
Import
New Parts
Added
Existing Parts
Modified
Error in Part
Description
Checking this box will automatically display the second record on the file.
This should be used if record one has the header information against it.
This displays the number of parts that will be added to the database.
This is the number of new parts that have been added.
This indicates the number of parts that have been updated.
This will report the number of errors in the part number only. This may be
50
AutoPart User Manual
Field
Number
No Change in
Data
Import
Disallowed
Problems
OK/2
Description
due to invalid characters or due to spaces identified when the Allow
Spaces in Part Numbers has not been checked.
If an existing part contains exactly the same information that is to be
imported, there is no need to import any details. This reports the number
of occurrences.
This reports the number of disallowed parts. For example, if you have
product and price data to import but you leave the Add New Supplier
Cost Prices unchecked, then import the actual NPP from the file you will
receive errors in Import Disallowed. These parts will therefore, not be
added to the database.
Reports the number of errors other than in the part number. These may be
due to invalid characters in the price and cost fields etc.
This will update the file. If you have not sent it to Proposed Changes, the
system will update straight away.
51
AutoPart User Manual
MISCELLANEOUS
This option allows you to do more Block Changes.
Once again, you need to enter your search criteria as you did in the Block
Changes – Selection screen.
Field
Block Part
Number
Transfer
Add/Delete
Change
Supplier
Supercessions
& Deletions
Description
This allows you to delete or add prefixes/suffixes to your part numbers. It
also enables you to delete characters from block part numbers.
This allows you to do what it says. If you wish to delete a supplier there
must be not transactions against them. To add or change a supplier to a
new one, you must first create the supplier in Supplier File Maintenance.
Supercessions – If any of your selected parts are flagged with a W and
have a superceded part entered against them, this option will supercede all
of the parts that have no free stock.
Deletions – This will delete any parts that have been flagged with a D.
52
AutoPart User Manual
Supercessions
This screen allows you to supercede parts individually and also create a
supplier cross-reference number.
Field
Operator
From Part Number
To Part Number
Create Supplier Cross
References for Supplier
BinCard/5
Usages/6
OK/2
Description
Enter your operator code.
Enter the part you wish to supersede.
Enter the part you wish to supersede to.
If applicable, tick the box and enter the cross-reference number in
the field provided.
This option allows you to view Bin Card information. You need to
click on the part entered in either of the boxes that you wish to view
(make sure it is highlighted in blue), and then click on Bincard/5.
This option allows you to view Usages information. You need to
click on the part entered in either of the boxes that you wish to view
(make sure it is highlighted in blue), and then click on Usages/6.
This will save the changes and will transfer the stock of the
superseded part to the new part number.
53
AutoPart User Manual
Messages File Maintenance
This option will allow you to add a message on every document that is printed
to your customers.
Printing on specific documents: All you do is type the required message, give
it a name and press OK/2. You will need to give it a name such as INVOICE,
CASHSLIP, which will be the same as your spec names. You will find these
names in the Printers – Assign Defaults option and they are held in the left
hand column.
The above message will only print on invoices and not other documents.
Default message on all documents: If you would like a message to appear on
all documents to your customer then you would name it DOCUMENT.
54
AutoPart User Manual
Password Setup
This option allows you to override certain procedures that are not permitted as
standard.
For example, by entering a password against 101CP2, the system will allow
you to sell a part below the cost price. The Password Check box will appear
asking you to enter the password to force the sale through.
55
AutoPart User Manual
SALES
Now that all General Codes have been entered and all parts, customers and
suppliers have also been entered you can now proceed to make a sales
transaction. The Point of Sale screen is split into 4 sections; Customer Detail,
Product Details, End of Transaction and Inquiries.
Point of Sale Field Definitions
CUSTOMER DETAIL
Field
Operator
Customer
Order Number
Delivery Method /
Route Number
Delivery Address
Description
Enter the operator code, user, who is dealing with the customer.
Enter the customer code or key in the first character(s) of the code.
Alternatively you can click the ‘Search/5’ button to open the alpha
search screen.
This can be mandatory or optional depending on parameter settings.
Although if any message is entered in the Order Message field within
Customer File Maintenance, then this message will display if a sales
order is created without an order number but, if no message is entered,
there is no requirement for an order number.
Select a delivery method or route number.
If the customer has a delivery address and you wish to select this,
please click either ‘Del Address/2’ or ‘Del Address/3’. Customer’s can
have more than one delivery address; just use the F2 and F3 keys to
select the correct one. You can add additional address or change an
existing address on this screen if you need to.
Customer Notes
This field will display any customer notes that are set-up on the
customer.
Additional Customer Information: The following fields list additional information related to
sales. At any time these fields can be changed and updated. This system will display a
message box asking if you want to permanently change this information on the customer file.
56
AutoPart User Manual
Field
Credit Limit
Maximum Invoice
Value
Contact (Sales)
Telephone (Sales)
Fax
Contact (Accts)
Screen Options:
Account Inquiry
Backorder Inquiry
Cust Database
Man Stock Alloc
Memos
Picking Notes
Quotations
Sales History
Recpt of Payment
Suspended Trans
Special Terms
Description
To view the Sales Ledger Account Inquiry screen for any outstanding or
paid payments.
Allows the user to view any existing backorders for that customer.
This gives you access to Customer File Maintenance.
To manually allocate stock from a backorder.
To record comments about the customer, which carries through to the
Sales Ledger.
To view any picking notes that were created.
To view any currency quotations for this customer.
To view past sales for this customer.
To enter account payments for this customer.
To view the Suspended Transaction Inquiry screen for this customer.
To view any special terms that may be set up for this customer.
PRODUCT DETAILS
The Product Details screen allows you to select the part numbers and
quantities required.
Field
Part Number
Qty
Amendments
Description
Key in the part number or key in the first characters and press the TAB
button for the part search screen to appear. If you are selling a bought out
part remember to key in the asterisk (*) first.
Enter the quantity required.
You can amend the following in this screen:
57
AutoPart User Manual
Field
Pricing Details
Alternatives
Bin Card
BOP Details
Branch Stocks
Full
Kit Pieces
Lost Sale
Margins
Orders
Stock Inquiry
Description
Description.
Unit Price.
Disc %.
Suffix.
To choose another selling for the part, double-click on the required level as
shown below:
To view alternatives to the part plus gain access to Supplier File
Maintenance through the Costs button.
To view a chronological order of the stock movements of a part for any
reason, such as issued, received or adjusted, as shown below:
Bought Out Part – These products are described by description rather than
by part number. These are bought or sold through AutoPart but not yet
part of the database. These part numbers are prefixed by an * (asterisk)
and in the event of a sale will demand information to be entered about the
type, source of supply, cost, etc. for future reference and analysis.
To view stock levels at another branch for that part.
To view the cost details from each supplier, together with any alternative
numbers.
If the part number represents a kit, this will give you the other parts that
make up the kit.
To record a lost sale. All reasons for lost sale should have already been
set up in General Codes File Maintenance.
To view the margins and discounts resulting from different price discounts.
To place an order for the selected part.
To view stock levels for the selected item as shown below:
58
AutoPart User Manual
Field
Usages
Xref Customer
Xrefs Supplier
Description
To view the monthly usage over the last 12 months.
Will give you the part number description, as the customer knows it.
Will give you the part number description, as the supplier knows it.
END OF TRANSACTION
This screen allows you to end the transaction and create the appropriate
document type, either an invoice, cash slip, suspended note or a quotation.
Field
Sell
Invoice/3
CashSlip/4
Description
To complete the transaction by the default method set in the Customer File
Maintenance, for example if the customer has been set to account then the
Sell button will automatically produce an invoice.
To raise an Invoice.
To produce a cash slip. Note that if the credit limit is exceeded by the
59
AutoPart User Manual
Field
Quote/5
Suspend/6
Message/7
Back Ord/8
Cash/9
Description
transaction the Password Check box will appear.
To produce a quotation for customers.
To suspend a transaction which will produce an advice note.
To add or amend the Company Message which will print on invoices and cash
slips.
To convert the transaction to a backorder.
To record a cash sale.
INQUIRIES
This screen permits access to various inquires.
Field
Customer
Part Number
Document
Display/2
New Sale/3
Recover/4
Account Inquiry to
Usages
Description
Enter the customer code or key in the first characters and press TAB to
access the Customer Alpha Search screen.
Enter the part number or key in the first characters to access the Part
Search screen.
Enter the document reference if known.
To show transactions matching given criteria.
To access the Customer Detail screen.
To access any suspended transactions.
As stated previously in Customer Detail and Product Details screen.
60
AutoPart User Manual
Point of Sale: Creating Quotes/Invoices/Cash Tickets
61
AutoPart User Manual
Receipt Of Payment
This screen allows you to apply payments to invoices. This is mainly used for
On-Account customers, as the customer has to pay invoice amounts in full.
They cannot partially pay an individual invoice.
Field
Operator
Customer
Amount Paid
Clear
Description
Enter your operator code in this field.
Enter the Customer’s Code in this field.
Enter the amount that the customer is paying.
Tab across to the Clear column and type in ‘C’ for all Invoices that the
customer is applying payment to.
Click OK/2 and the Method of Payment screen will appear, as shown below.
Select how the customer is paying and the transaction will then post to the
Sales Ledger and appear against the customer’s account.
62
AutoPart User Manual
Cash Management
At the end of the day you will be required to balance the till or to record any
petty cash payments and add cash floats. This will be done in the Cash
Management screen and is found in the Sales Menu.
CASH UP
This process should be done at the end of the day, just before running
Dayend or Monthend.
Field
Operator
Till Number
Till Contents
Amount In Till
Cash
Float
Print/5
Cashslip/6
Description
Enter your operator code in this field.
Enter the Till ID and then select the ‘Open Till/4’ button.
This box will display the contents of the till according to the method of
payment type.
Excluding cash enter the total value for other methods of payment.
Count the till and enter each type of denomination in the relevant field as
shown here to balance the cash figure.
Denominations between 0.01 and 1.00 will automatically be left as float
unless otherwise stated. Next select the ‘Cash Float/7’ button to confirm
the float.
After all contents of the till are entered you can then print off a summary
report.
This button when selected produces a cash slip.
63
AutoPart User Manual
TILL TRANSACTIONS
This screen allows you to add or remove any petty cash details.
Field
Total Amount
Petty Cash
Details
Details Unknown
Description
Key in the total amount. To add money to the till key in a negative
amount.
Enter the supplier, description and goods amount. The system will then
automatically default and ask if the value includes VAT. Pressing yes will
fill in the VAT and Total fields. Press OK/2 to complete.
If petty cash details are unknown, key in the value in the Total Amount
field and press OK/2. The amount will then show in red.
64
AutoPart User Manual
Surcharge Bank Inquiry
This option allows you to inquire about any surcharges that have been
charged to the customer or just banked for reference.
Field
Operator
Customer
Part Number
Display/2
Description
Enter your operator code in this field.
Enter the Customer code in this field.
You can enter in the part number of leave this field blank.
Click this once you have made the relevant selections. You can remove
these units by pressing Select/4 and Remove/6.
65
AutoPart User Manual
PURCHASES
Now that sales are starting to accumulate, it is time to start ordering goods to
replenish stock. There are 2 ways of doing this, Suggested Ordering or
Manual Ordering.
Generate Purchase Orders
This screen allows you to generate a purchase order by what the system
suggests depending on supplier and stock levels.
SUGGESTED ORDERS
Field
Supplier
Group, Range &
Class
Branch
Suggest/4
Amendments
Select All/5
Add to Overnight
Order/2
Description
In this field enter the supplier code or press ‘Search/12’ button to locate
the supplier required.
Information can be entered in these fields to narrow down parts required.
Enter the branch for which the parts are to be ordered for.
This button will list all products from the chosen supplier where the free
stock level is below minimum level or the part is on backorder.
You can change the Qty column if the required value is not appropriate.
Only the lines selected (they will change to green) will be picked up for
ordering. If you do not wish to select all lines then double-clicking with
mouse will select and unselect any line.
If suggested orders are part of the Dayend routine click on this button to
add order.
This button will take you into the Purchase Order Processing screen.
66
AutoPart User Manual
PURCHASE ORDER PROCESSING
This procedure either creates a purchase order based on suggested orders
from the previous screen or allows you to key in part numbers that you
require. This screen also allows you to create a Manual purchase order.
Field
Supplier
Operator
Amendments
OK/2
Fax/5
Transmit/6
Cut Off/9
Description
If you are processing a suggested order, the supplier name will be carried
forward, otherwise you will need to select a supplier.
Enter your operator code in this field.
At this point you can now add additional items to the existing order or, if
doing a manual order, you can now enter the parts and quantities required.
You can also add a part number that may not be on the parts database. If
this is necessary, Autopart will automatically add an asterisk (*) prefix to the
number.
This button will create the purchase order and open the print screen to give
you the option to print the order.
This button is used to fax the order through Faxman.
This button can be selected to send the order via the modem.
To cancel the purchase order before it is sent, select this button.
67
AutoPart User Manual
Goods Receiving
This option allows you to receive your goods into stock. It will then delete the
purchase order and create a goods received document, which can be printed
if required.
Field
Order Number
Operator
Receive by
Exception
Enter
Quantities
Manually
Remove/4
Prod & Price7
Labels/5
OK/2
Description
Enter the order number or press the ‘Search/6’ to open the Purchase Order
Search screen.
Enter the Operator Code in this field.
If this option is chosen, the received quantities in the goods received column
will default to the amount ordered, allowing you to overkey the changes (if
some goods have not been delivered for example).
If this option is chosen, the received quantities in the goods received grid
will be blank enabling you to add them all manually as you check your order.
To remove any line, select that line and then press the ‘Remove/4’ button. It
will show the line in red text.
Use this button to gain access to the Product & Price File Maintenance
screen.
Use this button to print labels for delivered parts.
Once you have completed the goods receiving, click this button and the
goods will be booked into stock. If you have not received certain parts on
the order, select the appropriate line and click Remove/4. The line will not
be removed, but will be highlighted and the number received will be zero.
Once you have clicked OK/2 you will be given the option to delete the
remainder of the order for the goods you have not received or keep it on file.
68
AutoPart User Manual
Returns To Supplier
This option allows you to record the return of faulty goods to your suppliers,
whether it has been delivered damaged or a customer has returned the part
claiming it to be faulty. You are able to print copies of returns notes for you,
your customer and supplier if desired.
Field
Returns Note
Operator Code
Invoice Number
Collection Note
Customer
Returns Note
Date Created
Time Created
Supplier Code
Remarks To
Remarks From
Credit Note
Date
Customer Code
Remarks To
Remarks From
Customer Ref
Description
If you are entering the return for the first time, leave this blank. When the
returns note is created, a document number will be assigned to it.
Enter your operator code.
This is a reference box only and can be left blank. You can enter the
customer’s invoice number from the invoice you provided when you sold
the part or the supplier’s invoice number to you.
This is a reference box only and can be left blank. This could be the
collection note your customer or you provided when your driver collected
the faulty part or the collection number that your supplier supplied.
This is a reference box only and can be left blank. The returns note
number that your customer has sent to you.
These fields will auto fill when you have created the returns note.
Enter the supplier code and the name will auto fill.
This can contain the reasons for sending the part back to the supplier.
This is a reference box containing the remarks from the supplier, i.e. if they
have credited you the amount or sent a new part.
When or if you are credited, this box is for the credit note number from your
supplier.
The date that your supplier completed the return, either by crediting or
rejecting the return.
Enter the customer code and the name will auto fill.
This is the remarks you make to your customer, for example, a date you
said that you would contact them by.
Information about the faulty part or a phone number, which you can contact
the customer.
If you credit the customer for the part, this could be the credit note number.
69
AutoPart User Manual
Field
Date
Part
Reason Code
GRN No
Advice No
Comments
Status
OK/2
Description
The date that the customer was credited, or not.
Enter the part number; the quantity field will default to one, which can be
changed.
Enter the returns reason code; you can click Search/5 if you cannot
remember the codes.
This is the goods received note number that was created when the part
was initially booked into stock.
This is a reference field and can be used as you please.
Any comments you wish to enter.
When the return is completed enter C.
This will complete the returns note.
70
AutoPart User Manual
Respecify Prime Suppliers
This option can be run for an individual part number or a group. It allows the
prime supplier to be changed.
Field
Part Number
Process
Selected Group
Make Selected
Supplier Prime
OK/2
Description
On entry of a part number, the relevant details will automatically display.
If you leave the part number blank to respecify for a whole group, tick this
box and enter the product group in the field to the left.
Tick this box and enter the required supplier code in the field on the left.
Once you have okay’d this information, if you have selected one part then
the system will ask “would you like to save the changes”, click yes. If you
have respecified for a whole group the system will ask “process all parts in
group ***” click yes and the system will update the changes.
71
AutoPart User Manual
Surcharges In Inquiry
This option allows you to produce a report by supplier and/or part number,
showing the quantity and value of surcharges in, remove items from the
surcharge screen up to a certain date and display details of returned units as
well as outstanding items.
Field
Supplier
Part Number
Part Group
Range
Display/4
Remove/6
Description
Enter the supplier code in this field.
In this field enter the part number or leave blank.
Enter the group in this field or leave blank.
Enter the range code or leave field blank.
This button will display the details of your chosen selections.
There are 2 ways to remove the surcharges from inventory:
In Block
Without entering any quantities, click the Remove/6 button, you are then
asked to enter a date:
After entering the date and clicking OK, you will be asked if you are sure; click
yes and the outstanding quantities will be removed for the selected items.
This will result in the lines being deleted from the grid.
Individually
In this instance, simply enter the quantity in the ‘No. Return’ column next to
the appropriate part(s). Enter the values to return.
Click Return/2 and the Returns to Supplier screen is displayed, with a number
72
AutoPart User Manual
Field
Add/8
Description
of detailed automatically completed. Complete this in the normal way and
accept it.
It is possible to add lines to the grid using Add/8. This facility may be useful
for new users, so they can create the correct data.
Enter the required details, click on Return/2 and then Add/8. The next time
you enter the screen, you will see the new added line.
73
AutoPart User Manual
Purchase Order Inquiry
This option allows you to view any outstanding orders, also giving you the
option to amend orders.
The orders display in the above grid but you can search on the following to
narrow the list down. Obviously, the more information you enter, the shorter
the list.
Field
Order Number
Order Date
Due Date
Operator
Supplier
Part
Doc/6
Description
If you know the order number, enter it here.
This will list orders produced on the entered date.
If you entered a due date when creating the order, it will list all orders with
that due date.
All orders produced by the entered operator code.
All orders for the entered supplier.
All orders that have the entered part number.
To view a document, highlight it and click on Doc/6. If you wish to amend
an order click on Amend/9. The system will then take you to the following
screen:
You can then amend the quantity field and the cost field. Once you have
made your changes, click OK/2.
74
AutoPart User Manual
Goods Receiving Inquiry
This enables you to enquire on your goods received notes.
The search criteria works in the same way as the Purchase Order Enquiry.
Enter details to narrow down the list.
Again, like the Purchase Order Enquiry, if you would like to view a particular
goods received note, highlight it and click Doc/6.
75
AutoPart User Manual
Returns Inquiry
This allows you to enquire on any returns notes created.
Like Goods Received Note and Purchase Order Enquiry, enter details in the
search criteria to narrow the search down, otherwise the system will display
all returns notes.
Again, like the other enquiries, you can view a particular document by clicking
Doc/6 or you can amend a returns note by clicking Amend/9, which will take
you through to the Returns to Supplier screen. After making any amendment
on the Returns to Supplier screen, click OK/2.
76
AutoPart User Manual
STOCK
The aim of the Stock taking procedures is to enable stock to be counted
quickly and accurately. This procedure is straightforward but nevertheless it
takes time and practice to become proficient. When running these routines
for the first time, it is recommended that a small product group or supplier
code be attempted as a test stock-take. This will help enormously when it
comes to the real stock-take, and any difficulties or requirements that may
arise can be sorted out.
Stock Inquiry
This option allows you to check your stock for a particular part. It also allows
you to view other details about the part, including its prime supplier, usages,
mins and maxes etc.
Field
Part Number
Bin Card/3
Cost Detail/4
Alts/5
Usages/6
Sales Graph/7
Description
Enter the part number and press tab. All details of the part will auto fill.
This will take you to the bin card screen.
This will display the Full Cost Details screen.
This will display the alternatives for this part if there are any.
This will display the Stock Usage Log screen.
This will display the Stock Inquiry Sales Graph and also gives you the option
to print, as shown below:
77
AutoPart User Manual
Stock Usage Inquiry
This procedure displays parts usage over a 12 month period. Either key in
the part number or select Search/3 to open the part alpha search. Prev/9 and
Next/10 will allow you to view adjacent part numbers.
Field
Enter Part Number
Lost Sales Q’ties/4
Description
Enter the required part and press tab to display the usage details.
This will display a date box asking you the enter the year to show
results from, as shown below:
78
AutoPart User Manual
Bin Card Inquiry
Bin card records are records of stock movements and are referred to as bin
cards, irrespective of whether actual cards are maintained separately from the
computer system. This procedure finds bin card records selected by part
number. It displays all movements recorded against a part number within a
chosen history period.
Each stock movement has a movement type, which indicates the reason for
the change in stock levels. You can reduce the number of movements
displayed by choosing to display only one type and by selecting the check
box, you can display cost details.
To view other part numbers, select the Back/11 and Fore/12 buttons. To view
details of any transaction, double click or highlight and press Trans/3, which
will show details of all stock movements associated with that event.
•
•
•
•
•
•
•
•
•
Type ADJ: Adjustment
Type CRN: Credit Note
Type ISS: Issue
Type REC: Receipt
Type REF: Refund
Type RTN: Return
Type SCR: Suspended Adjustment
Type STK: Stock Take
Type SUS: Suspended Transaction
79
AutoPart User Manual
Stock Adjustments
This screen allows you to manually adjust your stock.
Field
Operator
Reference
Supplier
Part Number
Adj
New Stock
Adjustment
Reason
Remove/3
OK/2
Description
Enter your operator code.
Enter a reference name or number if required.
Enter the supplier code if required.
Enter the part number and press tab.
This will add the amount entered to the free stock total and calculate the
new stock accordingly.
This will amend the stock figure to the amount entered.
You must select a reason code for the adjustment.
This will remove a line if you have made a mistake. The line must be
highlighted.
This will save the adjustments.
80
AutoPart User Manual
Stock Taking
The stock taking procedures must be carried out in a structured format.
Before start some thought must be given to the way in which you intend to
count the stock (i.e., by supplier, group, location, range, classification, cyclical
or combinations of the above).
The screen is split into 4 sections, Generate Stocksheets, Stocksheet
Listing/Print, Stocksheet Data Entry and Update Stock.
GENERATE STOCKSHEETS
This screen will allow you to generate the stocksheets by a selection criteria,
but first you MUST clear all the previous stock taking information by selecting
the ‘Clear Previous Stocktake/3’ button.
Field
Description
Enter Selection Criteria: Decide on the method in which to count the stock. It is
possible to only include the following:
Condition
Indicator
Select only parts
with a location
Select only parts
with a Min/Max
Sort By
Highlight in these fields the order in which parts are to be sorted on the
shocksheets. This is particularly important when choosing multiple
selection criteria. If no fields are specified here, sheets will generate in
part number order.
Page Break
Placing a tick in this check box will cause a new sheet to be printed each
time the sort criteria changes.
81
AutoPart User Manual
Field
Description
Sort Parts Left
Will sort the part numbers in order from the leftmost character.
Justified
Parameters: A number of check boxes exist to select which parts are to be included/excluded.
Thought should be given to the various check boxes ensuring that the correct ones are used
to make your stock take easier and more suited to your particular requirements.
Sort parts LEFT
This will sort selected parts in order from the leftmost character.
Justified
Exclude parts with This option will exclude all parts that the system is showing as having
zero stock
zero stock.
Include
superceded parts
Exclude Parts with This will exclude parts with a zero minimum and maximum level and
Zero Min/Max and with free stock showing as less than 1.
stock < 1
Exclude parts with This option will exclude parts with a zero minimum and maximum levels
and with free stock equal to zero according to the system records.
zero Min/Max and
zero stock
Exclude parts with This will exclude all parts where there is no usage and with free stock
no usages and
equal to zero according to the system records.
zero stock
Multi-locations
This option will allow the Stock-take routine to take account of the multilocation facility that is available.
Lines per Page
This setting equates to the number of lines on each stock sheet. The
default value is 50.
Generate Sheets/2 When all the above information has been entered and is correct, the
user can select this button so the stock sheets can be generated.
Clear Previous
This will clear all the previous stock taking information. This option is
Stocktake/3
essential when a stock take is to be performed because if parts are
already on stocksheets, they will not be included on new sheets.
Note: One of the most frequently asked questions to technical support is “Why
is part number XXX not on a stock sheet?” and the answer is usually because
it is already on another one, but which one?
Users can find this out by going to the ‘Stock Sheet Data Entry’ (third tab)
and tabbing directly down to the part number column without entering any
sheet number. Type the part number – if it already appears on a sheet, then
a message saying which sheet number and which line number on the sheet
will be displayed.
82
AutoPart User Manual
STOCKSHEET LISTING/PRINT
This screen will allow you to display the stock sheets that have been created
and to print them.
Field
Operator
Part Number
Set Stock for
Counting/2
Print/3
Select All/4
Clear/5
Description
Enter a selected operator in this field or select ‘All Operators’.
Keying in a part number and pressing TAB will give you the sheet number
this part number has been allocated to.
If transactions have occurred between the time the stocksheets were
created and the time of entering the actual date, this option will update the
quantities.
To print the selected stocksheets. If you do not need to print all stocksheets
highlight the one(s) required and then press the ‘Print’ button.
To select all stocksheets.
This will either clear selected sheets or all if required.
83
AutoPart User Manual
STOCKSHEET DATA ENTRY
This screen will allow you to enter the physical count quantity from the
stocksheet that is entered. All sheets that have been generated must be
recorded in this option, even if no stock is found. *Note: It is not necessary to
key in zeros.
Field
Display Free
Stock
Display Free
Stock in Count
Column
Display
Location
Count Qty
Bin Card/4
Record/2
Description
This will show the free stock level at the time the stock is set for counting.
This can be used for a comparison to the actual count quantity.
Choosing this option will mean that only the values counted on the sheets
that differ from the values on the screen need to be entered.
To display the location of each part.
Key in the counted quantities against each part number.
To view the stock movement of the part number highlighted.
To update the stocksheet when finished.
VARIANCE REPORTS
When all sheets have been entered, a stock take variance report should be
produced to check the computer stock to the physical count. This is done by
going into the ‘Reports’ menu, choosing ‘Load Reports’ and then run report
‘711’ or ‘711n’.
When variances have been checked, any amendments can be re-inputted
using the ‘Stock sheet Data Entry’ option.
84
AutoPart User Manual
UPDATE STOCK
This option will adjust the live stock file by the difference between the
computer and counted quantities. A record of each adjustment will appear on
the bin card.
Field
Operator
Start Sheet Number
End Sheet Number
Udpate/2
Description
Enter in the Operator Code in this field.
Enter the starting Sheet Number you want to update.
Enter the ending Sheet Number you want to update.
Select this button to update the stock levels.
85
AutoPart User Manual
Min & Max Recalculation
This option will automatically recalculate your Minimum and Maximum order
points using the sales history and parameters that you set within this screen.
This process can then be run monthly for example, with the same parameter
settings. This screen is split into 4 sections: Parameters, Part Selection,
View/Amend Results and Reports.
PARAMETERS
Field
Percentage of Average
Monthly Sales to Use
as Maximum
Percentage of
Maximum to Use as
Minimum
Number of Months
Usage to Use for
Calculation
Usages, Over Period,
Above Which to Keep
One in Stock
Usages, Over Period,
Below Which to Not
Recalculate
Description
If you add 100% in here, the computer will read all your sales over
your selected period, to calculate the maximum.
Example: If you use 12 months history to calculate your max, you
sell 240 of a particular part a year and you add 100% in this box,
the max will be calculated to 20 (the average monthly usage of the
part). If you put 50% in this box, the max would be 10.
This will be the percentage of the calculated maximum.
Example: If the max is 20 and you add 50%, in this box the
minimum will be 10.
This indicates the amount of months that you wish the computer to
look at to recalculate the mins and maxes (6 months or 12 months
for example).
This is for slow moving parts.
Example: You are using 12 months usages to re-calculate and
during that period you have sold 3 of a particular part. The
computer would then calculate your monthly sales at 0.25 and
therefore calculate your min and max to 0. If you add 3 in this box,
any stock that you sell 3 or above will keep a minimum of one in
stock (calculating your min and max to one).
Once again, this setting is for your slow moving parts.
Example: By adding 6 in here will mean that the recalculation will
not change the mins and maxes of a part if 6 or less are sold
during the selected number of months.
86
AutoPart User Manual
PART SELECTION
This screen enables you to recalculate only certain parts using a set of
selection criteria.
Field
Supplier Code
Group
Range
Part Prefix
Recalc/5
Description
Enter the Supplier Code if a required selection criteria.
Enter the Group if a required for selection.
Enter the Range if required for selection.
Enter any Part Prefix if required for selection.
Click this button to create the proposed changes.
87
AutoPart User Manual
VIEW/AMEND RESULTS
The grid shows all the proposed changes that the computer has re-calculated,
using the parameters set. You can amend the Minimums and Maximums by
highlighting the lines and manually typing a different figure. You can also
remove lines from the grid using Remove/4.
Also you do not have to view all proposed changes, only the exceptional ones
by ticking the box towards the bottom of the screen. You can then choose
your own percentages.
Field
Show only exceptional
changes in grid
Percentage increase to
regard as exceptional
Percentage decrease to
regard as exceptional
OK/2
Description
This button will update the stock file with the proposed changes.
88
AutoPart User Manual
REPORTS
This screen enables you to print off two reports based on the previous
screens.
89
AutoPart User Manual
REPORTS
The load reports option can be used to produce a variety of reports for
business use. The reports are based on the information Autopart creates and
the information you have inputted into the system. With this in mind, please
remember that the reports will only be accurate as the data that you maintain.
Load Reports
The Report Generator screen will give you access to over 600 reports from
sales to customer file listing. Each report can either be printed or exported to
a .txt or a .csv file for use in a Microsoft application.
Field
Report Reference
Search/4
Description
Enter the report reference and click Display/2.
If the reference is not known, click this button and you will see the Report
Generate screen.
90
AutoPart User Manual
REPORT GENERATOR
At the top of the screen you have an option to select which category you
would like your report to be from. For example, type in monthly sales and
click TAB. The following will appear:
Choose your report by highlighting it and clicking OK/2. This will take you
back to the first screen. The report name will be in the Report Reference
field, click Display/2 and depending on the report, you will have some options,
as shown below:
91
AutoPart User Manual
Choose your selection criteria and click OK/2 to load the report. The report
will then display and you have the option to print or save it to a csv file.
92
AutoPart User Manual
LABEL PRINTING
This option allows you to label your part numbers. The labels are set to print
part number, retail price and description.
You have the option to make the following selections:
•
•
•
•
•
•
•
•
•
•
•
•
Prime Supplier: Enter the supplier code.
Product Group: Enter the group.
Range: Enter the range code.
From Part & To Part: Enter the part from which you would like to include,
to the part, which you would like to include. *Note: Remember that parts
are justified from the left so 1000 would be sorted before 300.
Only Show Stock > Zero: This will only include part numbers that have
stock greater than zero.
Number of Labels – None: This will display parts leaving the Number of
Labels column blank, allowing you to enter the figures manually.
Number of Labels – One Label Per Part: This will print one label per part
number, i.e. if you wanted to apply the label to shelf space and not actually
on the part itself.
Number of Labels – Labels For All Parts: This will look at the stock
figure for each part and print the same number of labels.
Document Type: This gives you 3 options, GRN, Purchase and Invoice.
Document No: Enter the document number of the GRN, Purchase Order
or Invoice. This will then print labels for the parts on the document.
Select/2: This will display the details according to your selection criteria.
Print/4: This will then print the labels.
93
AutoPart User Manual
DAYENDS
DAYEND Routines
A dayend routine collects all the data since the previous dayend and produces
reports. The dayend reports are stored on the computer’s hard disk for as
long as required and can be reprinted whenever necessary. However, when
they have been cleared down it will no longer be possible to reprint them.
•
•
Select Option to Run the Dayend: If this item is selected, by clicking
Dayend/2 will run the dayend.
Select Option to Reprint the Dayend: This will reprint the dayend reports
and you will need to select the date, so the system knows which dayend to
reprint. By checking this box the date field will appear, as shown below.
Click Reprint/2 to reprint the reports.
94
AutoPart User Manual
MONTHEND ROUTINES
A monthend routine runs the dayend for the current day and also any extra
monthly reports. The reports are also stored on the computer’s hard disk for
as long as required. Again, these can be reprinted but if they have been
cleared down you will no longer be able to reprint them.
•
•
Select Option to Run the Monthend: If this is checked, click Monthend/2
to run the monthend.
Select Option to Reprint the Monthend: This will reprint the monthend
reports and you will need to select the date, so the system knows which
monthend to reprint. By checking this box the date field will appear, as
shown below. Click Reprint/2 to reprint the reports.
95
AutoPart User Manual
INDEX
96