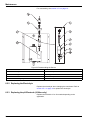
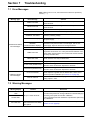
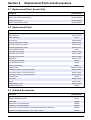
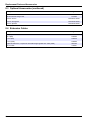
1
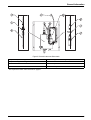
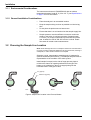
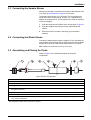
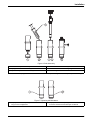
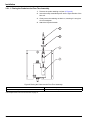
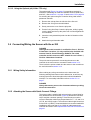
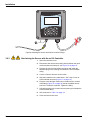
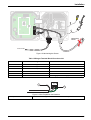
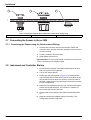
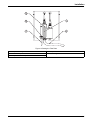
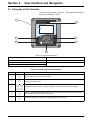
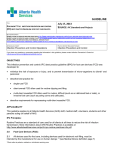
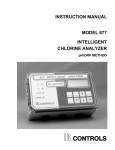
Catalog Number DOC023.54.00051
9184sc Chlorine
9185sc Ozone and
9187sc Chlorine Dioxide Analyzer
USER MANUAL
February 2006, Edition 4
©Hach Company, 2005–2006. All rights reserved. Printed in Germany.
te/dk
Visit us at www.hach.com
Table of Contents
Section 1 Specifications .........................................................................................................5
Section 2 General Information ...............................................................................................7
2.1 Safety Information ....................................................................................................................... 7
2.1.1 Use of Hazard Information ................................................................................................. 7
2.1.2 Precautionary Labels ......................................................................................................... 7
2.2 General Sensor Information ........................................................................................................ 8
2.3 Theory of Operation .................................................................................................................... 8
Section 3 Installation ............................................................................................................ 11
3.1 Mounting the Analyzer .............................................................................................................. 11
3.1.1 Environmental Considerations ......................................................................................... 12
3.1.2 General Installation Considerations ................................................................................. 12
3.2 Choosing the Sample Line Location ......................................................................................... 12
3.3 Connecting the Sample Stream ................................................................................................ 13
3.4 Connecting the Waste Stream .................................................................................................. 13
3.5 Assembling and Placing the Probe ........................................................................................... 13
3.5.1 Probe Assembly ............................................................................................................... 14
3.6 Connecting/Wiring the Sensor with the sc100 .......................................................................... 17
3.6.1 Wiring Safety Information ................................................................................................. 17
3.6.2 Attaching the Sensor with Quick-Connect Fittings ........................................................... 17
3.6.3 Hard-wiring the Sensor with the sc100 Controller ............................................................ 18
3.7 Connecting the Sensor to the sc1000 ....................................................................................... 20
3.7.1 Connecting the Sensor using the Quick-connect Fittings ................................................ 20
3.8 Instrument and Controller Startup ............................................................................................. 20
Section 4 User Interface and Navigation ............................................................................. 23
4.1 Using the sc100 Controller ........................................................................................................ 23
4.1.1 Controller Display Features ............................................................................................. 24
4.1.2 Important Key Presses ..................................................................................................... 24
4.2 Using the sc1000 Controller ...................................................................................................... 25
4.2.1 Display Features .............................................................................................................. 25
Section 5 Operation .............................................................................................................. 29
5.1 Sensor Setup ............................................................................................................................ 29
5.1.1 Changing the Sensor Name and Parameter Selection .................................................... 29
5.2 Sensor Data Logging ................................................................................................................ 29
5.3 Sensor Diagnostics Menu ......................................................................................................... 29
5.4 Sensor Setup Menu .................................................................................................................. 30
5.5 Calibration ................................................................................................................................. 31
5.5.1 Temperature Sensor Calibration ...................................................................................... 31
5.5.2 pH Calibration (9184sc only) ............................................................................................ 32
5.5.3 Concentration Calibration ................................................................................................ 33
5.5.4 Calibration Configuration ................................................................................................. 34
5.5.5 Zero Calibration ............................................................................................................... 34
5.5.6 Set Calibration Defaults .................................................................................................. 35
Section 6 Maintenance .......................................................................................................... 37
6.1 Maintenance Schedule ............................................................................................................. 37
6.2 Scheduled Maintenance ........................................................................................................... 37
6.2.1 Replacing the Membrane ................................................................................................. 37
6.2.2 Replacing the Electrolyte ................................................................................................. 38
6.2.3 Replacing the pH Electrode (9184sc only) ....................................................................... 38
3
Table of Contents
Section 7 Troubleshooting ...................................................................................................39
7.1 Error Messages .........................................................................................................................39
7.2 Warning Messages ....................................................................................................................39
Section 8 Replacement Parts and Accessories .................................................................41
8.1
8.2
8.3
8.4
Replacement Parts, Sensor Only ..............................................................................................41
Replacement Parts ....................................................................................................................41
Optional Accessories .................................................................................................................41
Extension Cables ......................................................................................................................42
Section 9 How to Order .........................................................................................................43
Section 10 Repair Service ....................................................................................................44
Section 11 Limited Warranty ................................................................................................45
Section 12 Compliance Information ....................................................................................47
Appendix A 9184sc Theory of Operation ............................................................................49
A.1 Theory of Operation ..................................................................................................................49
A.1.1 Principle of Operation .......................................................................................................49
Appendix B 9185sc Theory of Operation ............................................................................51
B.1 Theory of Operation ..................................................................................................................51
B.1.1 Principle of Operation .......................................................................................................51
Appendix C 9187sc Theory of Operation ............................................................................53
C.1 Theory of Operation ..................................................................................................................53
C.1.1 Principle of Operation ......................................................................................................53
Appendix D Modbus Register Information .........................................................................55
4
Section 1
Specifications
Specifications are subject to change without notice
General
Mounting
Flat, vertical surface such as a wall, panel, stand, etc.
Analyzer Dimensions
10.63 x 9.84 in. (270 x 250 mm)
Analyzer Weight
6.5 kg (14.3 lb)
Materials
Electrode: gold cathode/silver anode; probe body: PVC; measuring cell: acrylic
Sample Requirements
Sample Flow Rate to Analyzer
Flow rate should allow for 14 L/hr minimum
Minimum Inlet Pressure to
Instrument
0.1–2 bar (1.4–28 psi)
Minimum Flow Rate
14 L/hr auto-regulated by flow thru cell
Pressure Range
0.1–2 bar (1.4–28 psi) influent; flow cell pressure will be the atmospheric pressure
Sample Temperature Range
+2–45 °C (35.6–113 °F)
Temperature Compensation
Automatic over the sample Temperature Range
Sample pH
4 to 8 (acidification unit available for >8 pH)
Sample Inlet Tubing: at
instrument
¼ in. OD
Drain Fitting
½ in. ID (supplied)
Application Sample
Clean water
Electrical
Power Consumption
12V, 1.5 Watts provided by sc100/sc1000
Performance
9184sc
9185sc
9187sc
Measurement Range
0–20 ppm (0–20 mg/L) HOCl
0–2 ppm (0–2 mg/L) O3
0–2 ppm (0–2 mg/L) ClO2
Detection Limit
5 ppb (0.005 mg/L) HOCl
5 ppb (0.005 mg/L) O3
10 ppb (0.01 mg/L) ClO2
Accuracy
TFC—2% at pH < 7.5, 5% at
pH 7.5 to 7.7, 10% at pH 7.7
to 8.0
HOCl—2% at pH < 8
3% or ±10 ppb O3, whichever
is greater
5% or ±10 ppb ClO2,
whichever is greater
Standard Deviation
0.7%
1.0%
1.5%
Interference
No interference from
chloramines.
Ozone and chlorine dioxide
interfere with measurement.
No interference from
chlorine, chloramines,
hydrogen peroxide, bromine,
or chlorine dioxide.
None
Response Time
90% <T=90 seconds
Measurement Interval
Continuous
Measurement Technology
Amperometric/Membrane (electrode, membrane, electrolyte)
Calibration
Electrical zero or chemical zero with dechlorinated or deozoned water; calibration of the
slope by comparison with a laboratory instrument; pH calibration (9184sc only) with Single or
Two Point using standards or comparison with lab method with the process sample.
Calibration Interval
2 months for typical application
Maintenance
Maintenance Interval,
Measurement Cell
6 months for the membrane and electrolyte for typical operation (3 to 12 month range)
Maintenance Interval, pH
1 to 1.5 years for typical operation
5
Specifications
Environmental (sc Analyzer)
Enclosure
IP66/NEMA 4X
Storage Temperature Range
–20 to 60 °C (–4 to 140 °F)
Operating Temperature Range 0 to 45 °C (32 to 113 °F)
Relative Humidity
10 to 90% non-condensing
Operating Humidity
0 to 90% non-condensing
Compliance
The sc analyzer and sensor combination are:
CE marked and declared by Hach Company to the applicable EU Safety and EMC Directives.
Listed to UL61010A-1 by OSHA accredited 3rd party NRTL's.
Certified CSA C22.2 No. 1010.1 by SCC accredited Test Laboratories.
6
Section 2
General Information
2.1 Safety Information
Please read this entire manual before unpacking, setting up, or
operating this equipment. Pay attention to all danger and caution
statements. Failure to do so could result in serious injury to the
operator or damage to the equipment.
To ensure that the protection provided by this equipment is not
impaired, do not use or install this equipment in any manner other
than that specified in this manual.
2.1.1 Use of Hazard Information
DANGER
Indicates a potentially or imminently hazardous situation
which, if not avoided, could result in death or serious injury.
CAUTION
Indicates a potentially hazardous situation that may result in
minor or moderate injury.
Important Note: Information that requires special emphasis.
Note: Information that supplements points in the main text.
2.1.2 Precautionary Labels
Read all labels and tags attached to the instrument. Personal injury
or damage to the instrument could occur if not observed
This symbol, if noted on the instrument, references the instruction manual for operation and/or safety information.
Electrical equipment marked with this symbol may not be disposed of in European public disposal systems after 12
August of 2005. In conformity with European local and national regulations (EU Directive 2002/96/EC), European
electrical equipment users must now return old or end-of life equipment to the Producer for disposal at no charge to
the user.
Note: For all electrical products (marked or unmarked) which are supplied or produced by Hach-Lange, please
contact the local Hach-Lange sales office for instructions for proper disposal.
This symbol, when noted on a product enclosure or barrier, indicates that a risk of electrical shock and/or
electrocution exists.
This symbol, when noted on the product, identifies the location of a fuse or current limiting device.
This symbol, when noted on the product, indicates that the marked item can be hot and should not be touched
without care.
This symbol, when noted on the product, indicates the presence of devices sensitive to Electro-Static Discharge and
indicates that care must be taken to prevent damage to them.
This symbol, when noted on the product, identifies a risk of chemical harm and indicates that only individuals
qualified and trained to work with chemicals should handle chemicals or perform maintenance on chemical delivery
systems associated with the equipment.
This symbol, if noted on the product, indicates the need for protective eye wear.
This symbol, when noted on the product, identifies the location of the connection for Protective Earth (ground).
7
General Information
2.2 General Sensor Information
DANGER
Although the sc100 controller is certified for Class 1, Division
2 Hazardous Locations, it is only certified when installed with
sensors listed in Control Drawings 5860078. The sc100
controller and this sensor are NOT suitable for use in Class 1,
Division 2 Hazardous Locations.
The system consists of a controller with an integrated display, and a
sensor (Figure 2). The choice can be made to use this instrument
with the specifications and processes of the 9184sc, 9185sc, or
9187sc sensor. This is determined by selecting the parameter
during the initial sensor setup and the type of sensor being used.
See section 4.1 on page 23.
2.3 Theory of Operation
Refer to the following Appendices.
•
Appendix A 9184sc Theory of Operation on page 59
•
Appendix B 9185sc Theory of Operation on page 61
•
Appendix C 9187sc Theory of Operation on page 53
Figure 1 Sensor Cell Operation
1
Membrane
7
Electrolyte
2
Membrane Holder
8
Probe Body
3
Anode
9
Cathode
Plug1
4
Electrolyte Filling
5
Electrolyte Filling Hole
6
Assembled Electrode
1 See
8
Replacement Parts and Accessories on page 51.
10 Membrane/Interface Sample
11 Sample
General Information
Figure 2 General Instrument Schematic1
1
pH Probe (9184sc only)
5
Gateway (behind Mounting Plate)
2
pH Cell Cap (9184sc only)
6
Connector
3
Connector
7
Cell Cap
4
Cable to Controller
8
Probe Body
1 See
Replacement Parts and Accessories on page 51
9
Visit us at www.hach.com
Section 3
Installation
DANGER
Only qualified personnel should conduct the tasks described
in this section of the manual.
3.1 Mounting the Analyzer
The analyzer is designed to be mounted on a flat, vertical surface
such as a wall, panel, stand, etc. The instrument must be level.
Locate the sensor as close to the sampling point as possible. The
shorter the distance traveled by the sample, the faster the
instrument can respond and indicate changes in sample
concentration. The 6-inch clearance at the bottom of the instrument
is not necessary if using the accessories. Refer to section 3.3 on
page 13 for sample stream connection instructions.
Figure 3 Dimensions
Note: The optional pH probe is used for the 9184sc TFC only.
11
Installation
3.1.1 Environmental Considerations
The instrument enclosure is IP66/NEMA 4X with an ambient
temperature between 0 and 45 °C (32 to 113 °F), see Specifications
on page 5 for more information.
3.1.2 General Installation Considerations
•
Place the analyzer in an accessible location.
•
Keep the sample tubing as short as possible to minimize lag
time.
•
Do not place the probe next to a heat source.
•
Ensure that there is no air intrusion into the sample supply line.
•
Sample pressure must be sufficient to ensure a continuous
supply to the probe. A minimum pressure of approximately
0.1–2 bar (1.4–28 psi) is sufficient to provide the correct flow
rate. A stable flow rate of 200–250 mL/min is critical. Erratic
flow rates will create erratic measurements.
3.2 Choosing the Sample Line Location
Note: Erratic readings will occur if a sample is drawn from a location that is
too close to points of chemical additions to the process stream, if mixing is
inadequate, or if the chemical reaction is incomplete.
Selecting a good, representative sampling point is important for
optimum instrument performance (). The sample analyzed must be
representative of the condition of the entire system.
Install sample line taps into the side of larger process pipes to
minimize the chance of ingesting sediment from the pipe line
bottom or air bubbles from the top. A tap projecting into the
horizontal center of the pipe is ideal.
Air (Typical)
Sediment (Typical)
Poor
Poor
Good
Figure 4 Sample Line Location in the Process Stream
12
Best
Installation
3.3 Connecting the Sample Stream
Sample inlet and drain connections are made on the Analyzer Flow
Cell. Refer to Specifications on page 5 for flow rates.
The sample inlet requires ¼ in. OD tubing. The connections are
made with a quick connect fitting. Use the ¼ in. supplied tubing
adapter in the electrode kit. Cut all tubing so the ends are squarely
cut and not angled.
1. Push the tubing into the influent of the flow analyzer (Figure 5).
2. Push the supplied drain tubing onto the nipple beside the
influent.
3. Ensure there are no bends in the tubing to prevent back
pressure.
3.4 Connecting the Waste Stream
Connect the waste stream using the supplied ½-inch ID tubing. Be
sure the drain is free flowing (free of obstructions) so that the waste
stream does not cause unnecessary back-pressure or overflow.
Note: Waste from this instrument must go to the drain.
3.5 Assembling and Placing the Probe
Refer to Figure 5 for a detailed description of the probe
components.
Figure 5 Probe Components1
1
Electrode Retaining Ring
2
Measurement Electrode
3
Probe Body
4
Filling Screw
5
A small hole exists in the plug to allow the instrument to maintain a consistent pressure regardless of changes in
atmopsheric pressure.
6
Flange
7
Probe Body Washer
8
Pre-Mounted Membrane (set of four); Ensure the properly marked membrane is chosen (e.g. CL will appear on the side
for a Chlorine membrane).
1 See
Replacement Parts and Accessories on page 51.
13
Installation
3.5.1 Probe Assembly
CAUTION
To familiarize yourself with handling precautions, dangers and
emergency procedures, always review the Material Safety Data
Sheets prior to handling containers, reservoirs, and delivery
systems that contain chemical reagents and standards.
Protective eye wear is always recommended when contact
with chemicals is possible.
1. Screw the membrane cap onto the probe body (Figure 6 and
Figure 7). Be careful not to touch or damage the membrane
surface.
2. Remove the filling screw from the probe body.
3. Visually inspect the electrolyte to ensure that there are no
particles or other
impurities present.
4. Using the supplied syringe, fill the probe body with ~7 mL of
electrolyte.
5. Slowly insert the electrode into the probe body. Do not use
force when inserting into the probe body.
6. Tap the side of the probe to make sure that no air bubbles are
trapped in the probe body when inserting the electrode.
7. Screw on the retaining ring. Some electrolyte may spill out the
top of the body.
8. Insert the filling screw.
9. Wash hands and rinse sensor to remove excess electrolyte.
10. Place the probe into the Flow Thru Assembly.
14
Installation
Figure 6 Probe Assembly
1
Membrane Cap to Probe Body
4
Seat Electrode into Probe Body.
2
Syringe Filled with 5 mL Electrolyte
5
Secure Electrode with Retaining Ring.
3
Inject Electrolyte into Electrode Body.
6
Insert Filling Screw1.
1A
small hole is in the plug so the instrument can maintain consistent pressure regardless of atmospheric pressure changes.
Figure 7 Tightening the Membrane
1
Displays the correct way to tighten the membrane. It is
snug but not overtightened.
2
Displays the incorrect way to tighten the membrane. It is
too loose and the internal electrolyte could leak.
15
Installation
3.5.1.1 Placing the Probe Into the Flow Thru Assembly
1. Remove the probe retaining nut (item 2, Figure 8).
2. Insert the newly assembled probe into the right chamber of the
flow cell.
3. Gently screw the retaining nut back on, ensuring it is snug but
do not overtighten.
4. Attach the keyed electrode.
Figure 8 Placing the Probe Into the Flow Thru Assembly1
1
Electrode Cable Connector
3
Probe Assembly
2
Probe Retaining Nut
4
Flow Thru Assembly
1 See
16
Replacement Parts and Accessories on page 51.
Installation
3.5.1.2 Using the Optional pH (9184sc TFC only)
The optional pH (Figure 2 on page 9) is used when analysis is
needed for measuring all of the free available chlorine (both HOCI
and OCI–). See section 4.1 on page 23 and section 5.2 on page 38
for selecting this option using the controller during initial sensor
parameter selection.
1. Remove the red cap from the left side of the flow cell.
2. Remove the O-ring from the white blank.
3. Gently remove the cover from the pH probe.
4. Put the O-ring from Step 2 onto the pH probe, sliding it gently
over the glass end and up the probe until it is flush against the
red connection.
5. Insert the newly assembled probe into the left chamber of the
flow cell.
6. Attach the keyed electrode cable.
3.6 Connecting/Wiring the Sensor with the sc100
DANGER
Although the sc100 controller is certified for Class 1, Division
2 Hazardous Locations, it is only certified when installed with
sensors listed in Control Drawings 5860078. The sc100
controller and this sensor are NOT suitable for use in Class 1,
Division 2 Hazardous Locations.
The quick-connect process for connecting the sensor to the
controller is the most common connection used section 3.6.2.
There is also the option to hard-wire the sensor to the controller at
the user’s discretion section 3.6.3.
3.6.1 Wiring Safety Information
When making any wiring connections to the instrument, the
following warnings and notes must be adhered to, as well as, any
warnings and notes found throughout the individual installation
sections. For more safety information refer to section 2.1 on
page 7.
DANGER
Always disconnect power to the instrument when any making
electrical connections.
3.6.2 Attaching the Sensor with Quick-Connect Fittings
The sensor cable is supplied with a keyed quick-connect fitting for
easy attachment to the controller (Figure 9). Retain the connector
cap to seal the connector opening in case the sensor must be
removed. Extension cables may be purchased in 7.7, 15, and 31 m
(25, 50, and 100 ft) lengths. The maximum cable length should not
exceed 310 m (1000 ft). A load termination box must be installed for
installations with more than 31 m (100 ft) of cable between the
controller and sensor. See Replacement Parts and Accessories on
page 41.
17
Installation
Figure 9 Attaching the Sensor with Quick-Connect Fittings
3.6.3
Hard-wiring the Sensor with the sc100 Controller
1. Open the controller cover.
2. Disconnect and remove the existing wires between the quick
connect and terminal strip J5, see Figure 10 on page 19.
3. Remove the quick connect fitting and wires and install the
threaded plug on the opening to maintain the environmental
rating.
4. Cut the connector from the sensor cable.
5. Strip the insulation on the cable back 1-inch. Strip ¼-inch of
each individual wire end (Figure 11 on page 19)
6. Pass the cable through conduit and a conduit hub or a strain
relief fitting (Figure 12 on page 20) and an available access
hole in the controller enclosure. Tighten the fitting.
7. Reinstall the plug on the sensor access opening to maintain the
environmental rating.
8. Wire as shown in Table 1 on page 19.
9. Close and secure the cover.
18
Installation
J1
J3
S1
ANALOG OUTPUTS
J4
J5
U9
PCB
CONNECTOR
NETWORK
INTERFACE
CARD
NC COM NO
RELAY 1
NC COM NO
RELAY 2
1
2
3
4
5
6
+ DATA
1
2
3
4
5
+ OUT 2
– DATA
SERVICE REQUEST
+V
GND
F2
U5
F1
PROBES
J2
– OUT 2
SHIELD/CHASSIS GND
+ OUT 1
– OUT 1
NC COM NO
RELAY 3
DANGER - EXPLOSION HAZARD
DO NOT DISCONNECT WHILE CIRCUIT IS LIVE
UNLESS AREA IS KNOWN TO BE NON-HAZARDOUS.
DANGER - RISQUE D'EXPLOSION
J6
NE PAS DEBRANCHER TANT QUE LE EST SOUS
TENSION, A MONIS QU'IL NE S'AGISSE D'UN
EMPLACEMENT NON-DANGEROUX
FIELD WIRING
INSULATION MUST
BE RATED TO
80° C MINIMUM
Disconnect
Power
From Probe
Figure 10 Hard-wiring the Sensor
Table 1 Wiring at Terminal Block J5 on the sc100
Terminal Number
Terminal Designation
Wire Color
1
Data (+)
Blue
2
Data (–)
White
3
Service Request
No Connection
4
+12 VDC
Brown
5
Circuit Common
Black
6
Shield
Shield (grey wire in existing quick-disconnect fitting)
1
2
Figure 11 Wire Preparation and Insertion
1
Strip ¼-inch of insulation.
2
Seat insulation against connector with no bare wire exposed.
19
Installation
3
2
Figure 12 Using the Optional Strain Relief and Conduit Hole Sealing Plug
1
Power cord strain relief
2
Conduit strain relief
3
Conduit hole sealing plug
3.7 Connecting the Sensor to the sc1000
3.7.1 Connecting the Sensor using the Quick-connect Fittings
1. Unscrew the connector cap from the controller. Retain the
connector cap to seal the connector opening in case the sensor
must be removed.
2. Push the connector into the socket.
3. Hand-tighten the union nut.
Important Note: Do not use the middle connection for the sensors
as this is reserved for the display module.
3.8 Instrument and Controller Startup
1. Ensure the flow regulator is threaded (clockwise) all the way
and is snug but not overtightened.
2. Turn on the sample stream.
3. Slowly open the flow regulator (Figure 13) counterclockwise
until consistent flow is achieved at a rate in which the flow cell
can be flushed out for about two minutes. Check for leaks at
this time. If leaks occur, fix by ensuring all connections are snug
but not overtightened.
4. Adjust the flow regulator on the flow cell until the water begins
to drain out the left drain port. This results in a constant 14
L/hour (200–250 mL/min) flow rate.
5. Supply power to the controller and it will automatically power
on.
6. Allow the instrument to stabilize before proceeding. This
usually takes between 2–48 hours.
20
Installation
Figure 13 Setting the Flow Rate
1
Sample inlet tubing
4
Sample
2
Flow meter adjustment knob
5
Drain tubing
3
Sample level overflow (indicates the correct water level)
21
Visit us at www.hach.com
Section 4
User Interface and Navigation
4.1 Using the sc100 Controller
The front of the controller is shown in . The keypad consists of the
eight keys described in Table 2.
1
sc100
5
2
6
3
7
4
Figure 14 Front of the Controller
1
Instrument display
5
IrDA window
2
BACK key
6
HOME key
3
MENU key
7
ENTER key
4
RIGHT, LEFT, UP, and DOWN keys
Table 2 Controller Key Functions/Features
Number
Key
Function
2
Moves back one level in the menu structure.
3
Moves to the main menu from other menus. This key is not active in menus where a selection or
other input must be made.
4
Navigates through the menus, changes settings, and increments and decrements digits.
5
Moves to the Main Measurement screen from any other screen. This key is not active in menus
where a selection or other input must be made.
6
Accepts an input value, updates, or accepts displayed menu options.
23
User Interface and Navigation
4.1.1 Controller Display Features
When a sensor is connected and the controller is in measurement
mode, the controller automatically identifies the connected sensors
and displays associated measurements.
The display will flash on startup, when a sensor error has occurred,
and when a sensor is being calibrated.
An active system warning will cause the warning icon (a triangle
with an exclamation point inside) to be displayed on the right side of
the display. See Figure 15.
SENSOR NAME:
1
4
7.00
2
5
pH
6
TEMP: 23.0°C
3
Figure 15 Display
1
Status bar. Indicates the sensor name and status of relays. The relay
letter is displayed when the relay is energized.
4
Parameter
2
Main measurement
5
Warning icon area
3
Secondary measurement (if applicable)
6
Measurement units
4.1.2 Important Key Presses
•
Press HOME then the RIGHT or LEFT key to display two
readings when two sensors are connected. Continue to press
the RIGHT or LEFT key to toggle through the available display
options as shown below.
•
Press the UP and DOWN keys to toggle the status bar at the
bottom of the measurement display to display the secondary
measurement (temperature) and output information.
SENSOR NAME:
SENSOR NAME:
pH
7.00
pH
TEMP: 23.0°C
24
pH
OUTPUT1: 12.00 mA
•
MAIN MENU
SENSOR DIAG
SENSOR SETUP
SYSTEM SETUP
TEST/MAINT
7.00
SENSOR NAME:
pH
7.00
pH
pH
OUTPUT2: 12.00 mV
When in Menu mode, an arrow may appear on the right side of
the display to indicate that more menus are available. Press the
UP or DOWN key (corresponding to the arrow direction) to
display additional menus.
SYSTEM SETUP
OUTPUT SETUP
RELAY SETUP
NETWORK SETUP
DISPLAY SETUP
SYSTEM SETUP
DISPLAY SETUP
SECURITY SETUP
LOG SETUP
CALCULATION
SYSTEM SETUP
SECURITY SETUP
LOG SETUP
CALCULATION
ERROR HOLD MODE
User Interface and Navigation
4.2 Using the sc1000 Controller
The sc1000 is a touch screen application. Use your finger to touch
keys and menu commands. In normal operation the touch screen
displays the measured values for the sensors selected.
4.2.1 Display Features
4.2.1.1 Using the Pop-up Toolbar
The pop-up toolbar provides access to the controller and sensor
settings. The toolbar is normally hidden from view. To view the
toolbar, touch the bottom-left of the screen.
1
2
4
Figure 16 Pop-up Toolbar Functions
MAIN MENU–displays the Main Menu Structure
UP Arrow–scrolls up to the previous displayed value.
1
Displays one value.
2
Displays two values at the same time.
4
Displays four values at the same time.
LIST–displays the list of connected devices and sensors.
DOWN Arrow–scrolls down to the next displayed value.
4.2.1.2 Using the Menu Windows
If the Menu button (from the pop-up toolbar) is selected, the Main
Menu screen is opened. The Main Menu screen allows the user to
view the sensor status, configure the sensor setup, system setup,
and perform diagnostics.
The menu structure may vary depending on the configuration of the
system.
25
User Interface and Navigation
3
2
4
5
MENU
SENSOR STATUS
1
6
SENSOR SETUP
SYSTEM SETUP
TEST/MAINT
7
Figure 17 Main Menu
1
Display Area
2
BACK
3
FORWARD
4
ENTER–confirms the entry or selection.
5
HOME–changes to the display of measured values. The pop-up toolbar cannot open from the menu window. To view the
Main Menu from this display, touch the Home button and then the bottom of the screen.
6
UP–scrolls up
7
DOWN–scrolls down
4.2.1.3 Navigating the Menu Windows
To view a menu item, touch the menu item or use the UP and DOWN
keys to highlight the item. The menu item remains highlighted for
approximately 4 seconds after it is selected. To view the highlighted
command, select the area to the left of the menu item or select the
ENTER button.
A “+” next to a menu command indicates there is a submenu.
Touch the “+” to view the submenu. An “i” next to a menu command
indicates it is information only.
If a menu item is editable, highlight the item and touch the far-left
part of the menu item until it is highlighted and press ENTER or
double-tap the highlighted item. A keypad will be displayed to
change an entry (Figure 19 on page 27) or a list box will be
displayed (Figure 20 on page 28).
Messages are displayed in the message window (Figure 21 on
page 28).
If an entry is incorrect, repeat the entry with the correct values. If
the entry is outside the working range, a correction to the entry is
made automatically.
26
User Interface and Navigation
Figure 18 Changing a Menu Item
1
Display Area
5
HOME–changes to the display of measured values.
2
BACK
6
UP–scrolls up
3
FORWARD
7
DOWN–scrolls down
4
ENTER–confirms the entry or selection.
1
2
3
1
2
3
:
4
4
5
6
/
5
7
8
9
0
6
Figure 19 Keypad
1
Enters numbers or the character as shown on the button.
2
Moves the cursor one position to the left or to the right.
3
Increase/Decrease a number or letter at the cursor position. Keep the button pressed to change the numbers/characters
continuously.
4
Deletes the character to the left of the cursor.
5
CANCEL–cancels the entry.
6
ENTER–confirms the entry or selection.
27
User Interface and Navigation
1
mg/l
g/l
ppm
mE
E
m-1
FNU
NTU
2
3
Figure 20 List Box
1
Scrolls up or down
2
CANCEL–cancels and entry.
3
ENTER–confirms a selection.
Figure 21Message window
1
3
2
4
COMMUNICATION ERROR
5
Ph [11f20030007]
6
Figure 22 Message Window
1
Scrolls up or down.
2
Displays the messages or warnings.
3
Displays details on the selected entry.
4
This button changes back to the previous display.
5
ENTER–confirms an entry.
6
CANCEL–cancels an entry.
28
Section 5
Operation
5.1 Sensor Setup
Select the parameter during the initial sensor setup for the
parameter that corresponds to the instrument that has been
purchased. Parameter choices, depending on the instrument, are:
•
Chlorine HOCL, does not include pH measurement
•
Chlorine + Acid which is HOCL plus the acid verification
accessory, does not include pH measurement
•
Total Free Chlorine (TFC), includes pH measurement
•
Ozone, does not include pH measurement
•
Chlorine Dioxide, does not include pH measurement
5.1.1 Changing the Sensor Name and Parameter Selection
When a sensor is initially installed, the sensor name will be
displayed.
To change the sensor name:
1. From the Main Menu, select SENSOR SETUP and confirm.
2. Highlight the appropriate sensor if more than one sensor is
attached and confirm.
3. Select CONFIGURE and confirm.
4. Select EDIT NAME and edit the name. Confirm or cancel to
return to SENSOR SETUP.
5. Select PARAMETER and confirm.
6. Choose the parameter that the purchased instrument
corresponds to and confirm.
5.2 Sensor Data Logging
1. From the Main Menu, select SENSOR SETUP and confirm.
2. Highlight the appropriate sensor if more than one sensor is
attached and confirm.
3. Select CONFIGURE and confirm.
4. Select LOG SETUP and confirm.
5. Select from the logging interval options and confirm
.
5.3 Sensor Diagnostics Menu
SELECT SENSOR
ERROR LIST
See section 7.1 on page 39.
WARNING LIST
See section 7.2 on page 39.
29
Operation
5.4 Sensor Setup Menu
SELECT SENSOR (if more than one sensor is attached)
CALIBRATE
ZERO CAL
See section 5.5.5 on page 34.
PROCESS CONC
Use to adjust concentration which requires accurate pH; and TFC in ppb. See section 5.5.3 on
page 33.
PROCESS TEMP
Use to adjust the TEMPERATURE for a °C value. See section 5.5.1.1 on page 31.
PROCESS PH
(9184sc only)
Use to adjust for a 1 or 2 Point Process pH Sample. See section 5.5.2.1 on page 32 and
section 5.5.2.2 on page 32.
CAL CONFIG
Select OUTPUT MODE, CAL ZERO, or CAL DELAY.
OUTPUT
MODE
Select ACTIVE, HOLD, TRANSFER, or CHOICE
ACTIVE—Outputs the value currently measured by the sensor
HOLD—Holds the last value stored before going into calibration mode
TRANSFER—Sensor transfers a value set by the user (refer to the sc controller manual)
CHOICE—User is prompted to enter a transfer value when entering calibration mode
CAL ZERO
Select ELECTRICAL or CHEMICAL. For CHEMICAL use a sample that does not contain any oxidants.
Ensure that the sample source has a sufficient flow rate and that the sample is adequately mixed.
ELECTRICAL—For most users, the manufacturer recommends using the Electrical Zero Calibration.
This is a completely automated method of setting the zero calibration point. No user input is required,
although it can be manually triggered.
CHEMICAL—In low range applications (< 50 ppb) and applications with strong oxidants such as
Ozone, the Chemical Zero Method is recommended. The Chemical Zero Method requires a sample
that is completely free of any oxidants. An oxidant free reference sample may be produced by leaving
water in an open container for 24 hours. For best results use actual process water. Bubble the water, if
possible, to speed up the oxidant evaporation.
CAL DELAY
Adjust the number of days between calibration and alarm signal. The default is 90 days.
See section 5.5.4 on page 34
SET CAL DEFLT
Resets the sensor configuration to default settings. See section 5.5.6 on page 35.
CONFIGURE
EDIT NAME
Enter up to a 10-digit name in any combination of symbols and alpha or numeric characters.
SELECT
PARAMETER
Select CHLORINE HOCL, CHLORINE + ACID, T.F.C., OZONE, or CHLORINE DIOX.
CONC UNITS
Select ppb–ppm or µg/L–mg/L to allow the sensor to automatically select the most appropriate
measurement range.
Select ppb, ppm, ug/L, or mg/L to override the autoranging feature and force the reading to a particular
unit of measure.
T-SENSOR
The sensor has a factory-set internal temperature. Select AUTOMATIC or MANUAL setting. The
preferred setting is AUTOMATIC.
TEMP UNITS
Select °C or °F.
SELECT PH
MEAS
AUTOMATIC or MANUAL setting and pH compensation. Use the AUTOMATIC setting when using
supplied pH.
DISP PH FORMAT
Choose either XX.XX pH or XX.X pH.
(9184sc only)
30
LOG SETUP
Allows user to select data logging interval for the sensor and temperature.
FILTER
Adjust for + s. This averages the signal over the specified time interval.
MAINS FREQ
Choose 50 or 60 Hz.
DEFAULT SETUP
Resets the sensor configuration to default settings.
Operation
5.4 Sensor Setup Menu (continued)
DIAG/TEST
PROBE INFO
Displays the driver and software versions and the serial number.
CAL DATA
Displays OFFSET: °C, SLOPE: in A/mg and OFFSET: uA, SLOPE: %
SIGNALS
Displays INT, TEMP RAW, MV RAW and PH RAW.
COUNTERS
Displays sensor total time and humidity suppressor.
SERVICE
Displays the Enter Passcode screen.
5.5 Calibration
5.5.1 Temperature Sensor Calibration
The probe contains a temperature sensor which is factory pre-set. If
there are setting questions, the data can be validated using a high
precision thermometer using Table 3 and performing the steps in
section 5.5.1.1 on page 31.
Temperature Conversion
Conversion from Celsius to Fahrenheit: °F = 1.8 x °C + 32
Conversion from Celsius to Kelvin: K = °C + 273.15
Table 3 Temperature Conversions
°C
°F
K
°C
°F
K
°C
°F
K
0
32
273.15
16
60.8
289.15
32
89.6
305.15
1
33.8
274.15
17
62.6
290.15
33
91.4
306.15
2
35.6
275.15
18
64.4
291.15
34
93.2
307.15
3
37.4
276.15
19
66.2
292.15
35
95
308.15
4
39.2
277.15
20
68
293.15
36
96.8
309.15
5
41
278.15
21
69.8
294.15
37
98.6
310.15
6
42.8
279.15
22
71.6
295.15
38
100.4
311.15
7
44.6
280.15
23
73.4
296.15
39
102.2
312.15
8
46.4
281.15
24
75.2
297.15
40
104
313.15
9
48.2
282.15
25
77
298.15
41
105.8
314.15
10
50
283.15
26
78.8
299.15
42
107.6
315.15
11
51.8
284.15
27
80.6
300.15
43
109.4
316.15
12
53.6
285.15
28
82.4
301.15
44
111.2
317.15
13
55.4
286.15
29
84.2
302.15
45
113
318.15
14
57.2
287.15
30
86
303.15
15
59
288.15
31
87.8
304.15
5.5.1.1 Adjusting the Temperature
1. From the Main Menu, select SENSOR SETUP and confirm.
2. Highlight the appropriate sensor if more than one sensor is
attached and confirm.
3. Select CALIBRATE and confirm.
4. Select PROCESS TEMP and confirm.
31
Operation
5. Confirm when stable. TEMP: XX.X will be displayed. Confirm to
continue.
6. Adjust the Reading XX.X °C and confirm.
7. A screen will display CAL COMPLETE, OFFSET: X.X °C,
confirm to continue.
8. Move the probe to the process and confirm.
5.5.2 pH Calibration (9184sc only)
The manufacturer recommends calibrating the pH probe with a pH
4 and pH 7 buffer solution, regardless of sample pH.
5.5.2.1 Process pH 1 Point Sample
1. From the Main Menu, select SENSOR SETUP and confirm.
2. Highlight the appropriate sensor if more than one is attached
and confirm.
3. Select CALIBRATE and confirm.
4. Select PROCESS PH and confirm.
5. Select 1 POINT SAMPLE. Select the available Output Mode
(Active, Hold, or Transfer) and confirm.
6. Move the clean probe to the sample and confirm to continue.
7. VALUE: X.XX pH, TEMP: XX.X °C is displayed. Confirm to
continue.
8. Adjust the SAMPLE VALUE: X.XX pH and confirm.
9. COMPLETE, OFFSET: X.XX pH, SLOPE: XX.X% is displayed.
Confirm to continue.
10. Return the probe to the process and confirm.
5.5.2.2 Process pH 2 Point Sample
1. From the Main Menu, select SENSOR SETUP and confirm.
2. Highlight the appropriate sensor if more than one is attached
and confirm.
3. Select CALIBRATE and confirm.
4. Select PROCESS PH and confirm.
5. Select 2 POINT SAMPLE. Select the available Output Mode
(Active, Hold, or Transfer) and confirm.
6. Move the clean probe to Sample 1 and confirm.
7. VALUE: X.XX pH, TEMP: XX.X °C is displayed. Confirm to
continue.
8. Adjust the SAMPLE VALUE: X.XX pH to the known pH and
confirm.
9. Move the clean probe to Sample 2 and confirm.
10. The VALUE: XX.XX pH, TEMP: XXX °C is displayed. Confirm
to continue.
11. Adjust the second SAMPLE VALUE: X.XX pH to the known pH
and confirm.
32
Operation
12. The VALUE: XX.XX pH, TEMP: XXX °C IS displayed. Confirm
to continue.
13. COMPLETE, SLOPE: XXX.X%, OFFSET: X.XX pH is
displayed. Confirm to continue.
14. Return the probe to the process and confirm.
5.5.3 Concentration Calibration
9184sc
To test for Total Free Chlorine, use the Total Free Chlorine
Calibration Method, with the manufacturer DPD test kits (Cat. No.
2105545) for the DR/4000 and DR/2500 spectrophotometers and
the DR/800 colorimeter.
Use the Pocket Colorimeter II™ for measuring free chlorine
concentrations with the DPD method that is available from the
manufacturer (Cat. No. 5870023) for all other 9184sc uses.
9185sc
To test for Ozone, use the Indigo Method, Ozone HR AccuVac test
(Cat. No. 25180-25) for the DR/4000, DR/2500, DR/890, and the
Pocket Colorimeter II.
9187sc
Table 4 lists methods available for Chlorine Dioxide testing (listed in
order of preference). Check the Procedures Manual to verify
program availability for specific spectrophotometers and
colorimeters.
Table 4 Chlorine Dioxide Tests
Reagent
Method
Range
Catalog Number
Chlorine Dioxide Reagent A
Amaranth Method
20–500 µg/L
LYW240
Chlorine Dioxide Tool Set for LYW240
NA
NA
LZC140
Chlorine DIoxide Reagent
Chlorophenol Red
0.01–1.00 mg/L
22423-00
Chlorine Dioxide DPD/Glycine Reagent
DPD/Glycine
0.04–5.00 mg/L
27709-00
5.5.3.1 Process Calibration
For the 9184sc, calibrate the pH and record the number for
reference. To ensure accuracy, the pH calibration buffers must be at
the same temperature as the chlorine sensor.
1. From the Main Menu, select SENSOR SETUP and confirm.
2. Highlight the appropriate sensor if more than one sensor is
attached and confirm.
3. Select CALIBRATE and confirm.
4. Select PROCESS CONC and confirm.
5. Move the clean probe to the sample and confirm.
6. Confirm when Stable, VALUE: X.X nA, TEMP: XX.X °C will be
displayed.
7. (9184sc only) Adjust the pH VALUE: +X.XXpH (this is an actual
value) and confirm.
33
Operation
8. Adjust the TFC or CONCENTRATION VALUE (depending on
instrument): XXX.X ppb (this is an actual value) and confirm.
9. Refer to section 5.5.3 on page 33. If adjusting the TFC value,
use the Total Free Chlorine Method.
10. COMPLETE, SLOPE: nA/MG, OFFSET: uA is displayed.
Confirm to continue.
11. Return the probe to the process and confirm.
5.5.4 Calibration Configuration
1. From the Main Menu, select SENSOR SETUP and confirm.
2. Highlight the appropriate sensor if more than one sensor is
attached and confirm.
3. Select CALIBRATE and confirm.
4. Select CAL CONFIG and confirm.
5. Select the Output mode (ACTIVE, HOLD, TRANSFER, or
CHOICE) and confirm.
6. Select CAL CONFIG and confirm.
7. Select CAL ZERO and confirm.
8. Choose either ELECTRICAL or CHEMICAL and confirm.
9. Select CAL CONFIG and confirm.
10. Select CAL Delay and confirm.
11. Adjust the Day XX and confirm.
5.5.5 Zero Calibration
The Zero Calibration can be performed in two different ways:
chemically (recommended for low range applications) or electrically
(recommended by the manufacturer for standard applications). To
perform a Zero Calibration, refer to section 5.5.4 on page 34.
The electrical zero calibration uses an automatic means of setting
the zero calibration point. Electrical zero can be done at any time
regardless of where the sensor is located (sample, air, etc.). The
9184sc will auto-zero when the power is cycled, or upon demand.
In low range applications (< 50 ppb), the manufacturer
recommends using the Chemical Zero Calibration (section 5.5.5.1
on page 35). The Chemical Zero Calibration requires a sample that
is free of oxidants. An oxidant-free reference sample may be
produced by leaving water in an open container for 24 hours. For
best results use actual process water. Bubble the water to speed up
the oxidant evaporation.
The Upper Level Calibration point is obtained by reference to a
laboratory method (process calibration).
34
Operation
5.5.5.1 Chemical Zero Calibration
1. From the Main Menu, select SENSOR SETUP and confirm.
2. Highlight the appropriate sensor if more than one is attached
and confirm.
3. Select CALIBRATE and confirm.
4. Select ZERO and confirm. Select the available Output Mode
(Active, Hold, or Transfer) and confirm to confirm.
5. Move the clean probe to the sample and confirm.
6. The VALUE: XX.X µg/L, TEMP: XX.X °C is displayed. Confirm
to continue.
7. Complete OFFSET: 0.0 uA is displayed. Confirm to continue.
8. Return the probe to the process and confirm.
5.5.6 Set Calibration Defaults
1. From the Main Menu, select SENSOR SETUP and confirm.
2. Highlight the appropriate sensor if more than one sensor is
attached and confirm.
3. Select CALIBRATE and confirm.
4. Select DEFAULT SETUP and confirm.
5. ARE YOU SURE? is displayed. Confirm to continue.
6. Complete is displayed. Confirm to return to the CALIBRATE.
35
Visit us at www.hach.com
Section 6
Maintenance
DANGER
Only qualified personnel should conduct the tasks described
in this section of the manual.
6.1 Maintenance Schedule
The following schedule shows the minimum maintenance
requirements for typical operation.
Maintenance Task
2 Months
3 Months
6 Months
Membrane
X
Electrolyte
X
pH (9184sc only)
X
Cleaning1
X
Tubing
Calibration
Annually
X
X
1 Maintenance
frequency is application dependent. Additional or less maintenance will be appropriate in some applications. The
sensor must be cleaned before liquid standard verification or calibration.
6.2 Scheduled Maintenance
CAUTION
To familiarize yourself with handling precautions, dangers and
emergency procedures, always review the Material Safety Data
Sheets prior to handling containers, reservoirs, and delivery
systems that contain chemical reagents and standards.
Protective eye wear is always recommended when contact
with chemicals is possible.
6.2.1
Replacing the Membrane
When removing the probe from the sample, th emanufacturer
recommends keeping the probe vertical with the membrane facing
down. Avoid touching the active part of the membrane.
Replace the membrane every 6 months under typical operating
conditions, or more frequently as experience dictates.
1. Shut off the sample supply. Remove the probe cable.
2. Unscrew the probe retaining ring. Remove the sensor.
Note: Removing the sensor may activate alarms. Ensure that
removing the sensor will not affect plant operation by switching to
maintenance mode.
3. Unscrew the electrode retaining ring and filling screw. Never
pull sharply on the electrode when the filling screw is in place.
4. Remove the electrode. Pour out the electrolyte.
5. Unscrew the membrane.
Note: Do not re-install a used membrane. After changing the membrane,
allow the probe to stabilize for at least three hours; recalibrate the sensor.
37
Maintenance
For re-assembly, see section 3.5.1 on page 14.
Figure 23 Disassembling the Sensor
1
Probe Chamber
6
Measurement Electrode
2
Probe Assembly
7
Probe Body
3
Probe Retaining Nut
8
Filling Screw
4
Electrode Cable Connector
9
Probe Body Washer
5
Electrode Retaining Ring
10 Pre-mounted Membrane
6.2.2 Replacing the Electrolyte
Replace the electrolyte when changing the membrane. Refer to
section 3.5.1 on page 14 to replace the electrolyte.
6.2.3 Replacing the pH Electrode (9184sc only)
Replace the electrode 12 to 18 months depending on the
application.
38
Section 7
Troubleshooting
7.1 Error Messages
Note: When an error occurs, the measurement values are replaced by
dashes, (- - -).
Message Type
Error Message
CONC TOO HIGH
Check the current value, along with the calibration parameters.
Check electrode.
CONC TOO LOW
Check the current value, along with the calibration parameters.
Check electrode.
TEMPERATURE ERROR
Measurement-related
Error Messages
Check for short-circuit or open circuit.
CURRENT TOO LOW
Negative current. Check the electrode (electrolyte and membrane).
CURRENT TOO HIGH
Ensure that there are no short-circuits on the measurement chain.
Check the polarizing voltage.
***** on the main display
No communication. Verify the connection and the cable. Test the
12V power supply.
(At Connection time:) SENSOR
MISSING
FFFFFFFFFFFFF displays
No communication. Verify the sensor is properly connected to the
transmitter. Verify that the cable is not damaged. Test the 12V
power supply. Open the sensor and change the board.
COMMUNICATION ERROR
Open the sensor and verify that there is no humidity.
TEMP TOO LOW
Temperature measurement is below –2°C. Verify that the actual
temperature is not below –2°C. Verify the internal resistance of the
NTC/K, which must be around 10 K. Connect the sensor simulator
and verify the RAW value.
TEMP TOO HIGH
Verify the actual temperature is not higher than 45 °C. Connect the
sensor simulator and verify the RAW value.
RAW MEASURMENT
Calibration-related
Error Messages
Solution
Change the preamplifier.
PH TOO LOW (9184sc only)
PH electrode is clogged, broken or too old. Calibrate the pH
electrode. Clean the electrode. Replace the electrode.
PH TOO HIGH (9184sc only)
PH electrode is clogged, broken or too old. Calibrate the pH
electrode. Clean the electrode. Replace the electrode.
ΔT OUT OF LIMITS
OUT OF 4/20 mA
The temperature difference between calibration and the theoretical
sensor response is greater than the allowed limit. Limits: ±20 °C.
Check temperature calibration (see section 4.5 on page 25),
The measured value is out of the programmed scale range for
analog outputs 1 and 2.
7.2 Warning Messages
Warning Display
Problem
CAL FAIL SLOPE
LOW
Slope is outside the limits.
Check zero calibration, especially if chemical zero calibration
procedure was performed. Change calibration to default settings (if
necessary) and repeat concentration calibration.
Ensure proper flow rate and cleanliness of probe before performing
any calibrations.
Time to chemical calibration
has exceeded the CAL Delay
time period.
Perform chemical calibration and/or adjust default delay time
(section 4.5.5 on page 29).
SLOPE HIGH
CAL TOO OLD
Resolution
39
Visit us at www.hach.com
Section 8
Replacement Parts and Accessories
8.1 Replacement Parts, Sensor Only
Description
Catalog Number
9184sc HOCl Chlorine Sensor
LXV430.99.00001
9184sc TFC Chlorine Sensor With pH
LXV432.99.00001
9185sc Ozone Sensor
LXV433.99.00001
9187sc Chlorine Dioxide Sensor
LXV434.99.00001
8.2 Replacement Parts
Description
Catalog Number
Cable, electrode
09184=A=4300
Cable, pH probe
09184=A=4400
Cable, transmitter
LZY105
Electrode, pH
368416,00000
Electrode, replacement, 9184sc
09184=A=1001
Electrode, replacement, 9185sc
09185=A=1000
Electrode, replacement, 9187sc
09184=A=1001
Electrode Spare Parts Kit
LZY061
Electrolyte for the 9184sc
09184=A=3600
Electrolyte for the 9185sc
09185=A=3600
Electrolyte for the 9187sc
09187=A=3600
Filling Screw
09184=C=1030
Flow Cell, pre-assembled
LZY053
Flow Cell Maintenance Kit
LZY297
Gateway Circuit Board
LZX823
Manual, English
DOC023.54.00051
Membranes, 9184sc, set of 4 pre-mounted
09184=A=3500
Membranes, 9185sc, set of 4 pre-mounted
09185=A=3500
Membranes, 9187sc, set of 4 pre-mounted
09187=A=3500
Mounting Panel
LZY059
Probe Body
09184=C=4100
Syringe
560150,21957
Tubing Adapter, ¼-inch
09184=A=4020
Tubing Kit, Acidification
LZY300
8.3 Optional Accessories
Description
Catalog Number
9180sc Acidification Unit
LZY051
9180sc Intermittent Flow Unit
LZY052
Versa Stand
5743200
125V Power Cord w/ Strain Relief
5448800
230V Power Cord w/ Strain Relief
5448900
Chlorine Free, Pocket Colorimeter II, with SwifTest DPD Reagent Dispenser
5870023
Chlorine, Free, DPD Test 'N-Tube, 10 mL sample, 50/test
2105545
41
Replacement Parts and Accessories
8.3 Optional Accessories (continued)
Description
Catalog Number
Ozone HR AccuVac
2518025
Chlorine Dioxide Reagent Set
2770900
Manual—French
DOC023.91.00051
Manual—Portuguese
DOC023.90.00051
Manual—Spanish
DOC023.92.00051
8.4 Extension Cables
Description
Catalog Number
1 m (3.3ft)
6122400
7.6 m (25ft)
5796000
15.2 m (50ft)
5796100
30.5 m (100ft)
5796200
Digital termination box, required for total cable lengths greater than 100m (328ft)
5867000
Service cable
LXV887
42
Section 9
How to Order
U.S.A. Customers
By Telephone:
6:30 a.m. to 5:00 p.m. MST
Monday through Friday
(800) 227-HACH (800-227-4224)
By Fax:
(970) 669-2932
By Mail:
Hach Company
P.O. Box 389
Loveland, Colorado 80539-0389 U.S.A.
Ordering information by e-mail: [email protected]
Information Required
•
Hach account number (if available)
•
Billing address
•
Your name and phone number
•
Shipping address
•
Purchase order number
•
Catalog number
•
Brief description or model number
•
Quantity
International Customers
Hach maintains a worldwide network of dealers and distributors. To
locate the representative nearest you, send an e-mail to:
[email protected] or contact:
Hach Company World Headquarters; Loveland, Colorado, U.S.A.
Telephone: (00) (1) (970) 669-3050; Fax: (00) (1) (970) 669-2932
Technical and Customer Service (U.S.A. only)
Hach Technical and Customer Service Department personnel are
eager to answer questions about our products and their use.
Specialists in analytical methods, they are happy to put their talents
to work for you.
Call 1-800-227-4224 or e-mail [email protected].
43
Section 10
Repair Service
Authorization must be obtained from Hach Company before sending any items for
repair. Please contact the Hach Service Center serving your location.
In the United States:
Hach Company
Ames Service
100 Dayton Avenue
Ames, Iowa 50010
(800) 227-4224 (U.S.A. only)
FAX: (515) 232-3835
In Canada:
Hach Sales & Service Canada Ltd.
1313 Border Street, Unit 34
Winnipeg, Manitoba
R3H 0X4
(800) 665-7635 (Canada only)
Telephone: (204) 632-5598
FAX: (204) 694-5134
E-mail: [email protected]
In Latin America, the Caribbean, the Far East,
Indian Subcontinent, Africa, Europe, or the Middle East:
Hach Company World Headquarters,
P.O. Box 389
Loveland, Colorado, 80539-0389 U.S.A.
Telephone: (00) (1) (970) 669-3050
FAX: (00) (1) (970) 669-2932
E-mail: [email protected]
44
Section 11
Limited Warranty
Hach Company warrants its products to the original purchaser against any defects that are due to faulty
material or workmanship for a period of one year from date of shipment unless otherwise noted in the
product manual.
In the event that a defect is discovered during the warranty period, Hach Company agrees that, at its
option, it will repair or replace the defective product or refund the purchase price excluding original
shipping and handling charges. Any product repaired or replaced under this warranty will be warranted
only for the remainder of the original product warranty period.
This warranty does not apply to consumable products such as chemical reagents; or consumable
components of a product, such as, but not limited to, lamps and tubing.
Contact Hach Company or your distributor to initiate warranty support. Products may not be returned
without authorization from Hach Company.
Limitations
This warranty does not cover:
•
Damage caused by acts of God, natural disaster, labor unrest, acts of war (declared or undeclared),
terrorism, civil strife or acts of any governmental jurisdiction
•
Damage caused by misuse, neglect, accident or improper application or installation
•
Damage caused by any repair or attempted repair not authorized by Hach Company
•
Any product not used in accordance with the instructions furnished by Hach Company
•
Freight charges to return merchandise to Hach Company
•
Freight charges on expedited or express shipment of warranted parts or product
•
Travel fees associated with on-site warranty repair
This warranty contains the sole express warranty made by Hach Company in connection with its
products. All implied warranties, including without limitation, the warranties of merchantability and fitness
for a particular purpose, are expressly disclaimed.
Some states within the United States do not allow the disclaimer of implied warranties and if this is true in
your state the above limitation may not apply to you. This warranty gives you specific rights, and you
may also have other rights that vary from state to state.
This warranty constitutes the final, complete, and exclusive statement of warranty terms and no person
is authorized to make any other warranties or representations on behalf of Hach Company.
Limitation of Remedies
The remedies of repair, replacement or refund of purchase price as stated above are the exclusive
remedies for the breach of this warranty. On the basis of strict liability or under any other legal theory, in
no event shall Hach Company be liable for any incidental or consequential damages of any kind for
breach of warranty or negligence.
45
Visit us at www.hach.com
Section 12
Compliance Information
Hach Company certifies this instrument was tested thoroughly,
inspected and found to meet its published specifications when it
was shipped from the factory.
The 9184sc, 9185sc, 9187sc sensor and sc series controllers
have been tested and is certified as indicated to the following
instrumentation standards:
Product Safety
UL 61010A-1 (ETL Listed)
CSA C22.2 No. 1010.1 (ETLc Certification)
Certified by Hach to EN 61010-1 (IEC1010-1) per 73/23/EEC,
supporting test records by Intertek Testing Services.
Immunity
The 9184sc, 9185sc, 9187sc sensor and sc series controllers were
tested for Industrial level EMC per
EN 61326 (EMC Requirements for Electrical Equipment for
Measurement, Control and Laboratory Use) per 89/336/EEC
EMC: Supporting test records by Hach Company, certified
compliance by Hach Company.
Standards include:
IEC 1000-4-2:1995 (EN 61000-4-2:1995) Electro-Static
Discharge
Immunity (Criteria B)
IEC 1000-4-3:1995 (EN 61000-4-3:1996) Radiated RF
Electro-Magnetic Field Immunity (Criteria A)
IEC 1000-4-4:1995 (EN 61000-4-4:1995) Electrical Fast
Transients/Burst (Criteria B)
IEC 1000-4-5:1995 (EN 61000-4-5:1995) Surge (Criteria B)
IEC 1000-4-6:1996 (EN 61000-4-6:1996) Conducted
Disturbances Induced by RF Fields (Criteria A)
IEC 1000-4-11:1994 (EN 61000-4-11:1994) Voltage Dip/Short
Interruptions (Criteria B)
Additional immunity Standard/s include:
ENV 50204:1996 Radiated Electro-Magnetic Field from Digital
Telephones (Criteria A)
Emissions
The 9184sc, 9185sc, 9187sc sensor and sc series controllers were
tested for Radio Frequency Emissions as follows
Per 89/336/EEC EMC: EN 61326:1998 (Electrical Equipment for
measurement, control and laboratory use—EMC requirements)
Class “A” emission limits. Supporting test records with Hach
Company.
Standards include:
EN 61000-3-2 Harmonic Disturbances Caused by Electrical
Equipment
EN 61000-3-3 Voltage Fluctuation (Flicker) Disturbances
Caused by
Electrical Equipment
Additional Emissions Standard/s include:
EN 55011 (CISPR 11), Class “A” emission limits
47
Compliance Information
CANADIAN INTERFERENCE-CAUSING EQUIPMENT REGULATION, IECS-003, Class A
Supporting test records with Hach Company.
This Class A digital apparatus meets all requirements of the
Canadian Interference- Causing Equipment Regulations.
Cet appareil numérique de la classe A respecte toutes les
exigences du Règlement sur le matériel brouilleur du Canada.
FCC PART 15, Class "A" Limits
Supporting test records with Hach Company.
This device complies with Part 15 of the FCC Rules. Operation is
subject to the following two conditions:
(1) this device may not cause harmful interference, and (2) this
device must accept any interference received, including
interference that may cause undesired operation.
Changes or modifications to this unit not expressly approved by the
party responsible for compliance could void the user's authority to
operate the equipment.
This equipment has been tested and found to comply with the limits
for a Class A digital device, pursuant to Part 15 of the FCC Rules.
These limits are designed to provide reasonable protection against
harmful interference when the equipment is operated in a
commercial environment. This equipment generates, uses, and can
radiate radio frequency energy and, if not installed and used in
accordance with the instruction manual, may cause harmful
interference to radio communications. Operation of this equipment
in a residential area is likely to cause harmful interference, in which
case the user will be required to correct the interference at his own
expense. The following techniques of reducing the interference
problems are applied easily.
1. Disconnect the Controller from it’s power source to verify that it
is or is not the source of the interference.
2. If the Controller is connected into the same outlet as the device
with which it is interfering, try another outlet.
3. Move the Controller away from the device receiving the
interference.
4. Reposition the receiving antenna for the device receiving the
interference.
5. Try combinations of the above.
48
Appendix A 9184sc Theory of Operation
A.1 Theory of Operation
The 9184sc Chlorine Analyzer is an on-line, single-channel
industrial analyzer that measures free chlorine in drinking water
treatment plants, distribution networks, and other applications that
require monitoring free chlorine at the ppb and ppm levels.
This instrument uses an amperometric method to measure HOCl
concentration. A membrane allows the selective diffusion of HOCl
molecules to the amperometric sensor (section 2.3 on page 8). The
measurement is compensated for pH and temperature.
A.1.1 Principle of Operation
Specific terms exist to mention the different species of chlorine:
•
Active Chlorine HOCl (hypochlorous acid)
It is the most powerful disinfectant, up to 100 times more
efficient than hypochlorite
•
Total Free Chlorine (TFC): HOCl + ClO–:
It is composed of dissolved chlorine (at low pH values),
hypochlorous acid gas and hypochlorite ion. These species
coexist, their relative proportion is depending on pH and
temperature (see curve below for a dissociation at 25°C).
•
Total Combinated Chlorine (TCC):
It results from the addition of total free chlorine and chloramines
(mono-, di- and trichloramine). The 9184 sc does not measure
this parameter.
Fraction of Cl2, HOCl and ClO– react as a function of pH
(Figure 24).
Figure 24 Dissociation Curve
49
The dissociation reactions are as follow:
+
–
Cl 2 + H 2 O → H + Cl + HOCl
+
HOCl → H + ClO
–
pK1 = 4.6 at 25 °C
pK2 = 7.5 at 25 °C
It is also important to notice that the dissociation constants are
temperature-dependent (the equipment takes into account this
element).
The amperometric sensor consists of:
•
a gold working electrode (cathode) where the main reaction
occurs
•
a silver counter-reference electrode (anode)
•
KCl electrolyte
•
a microporous membrane selective to HOCl
The HOCl molecules in the sample diffuse through the membrane
to a thin region between the membrane and the cathode that
contains the electrolyte.
A constant potential is applied to the working electrode where HOCl
is reduced according to the reaction:
+
HOCl + H + 2e – → Cl – + H 2 O
At the silver electrode (anode) the silver is oxidized to Ag+:
2Cl – + 2Ag + → 2AgCl + 2e –
The reduction in HOCl at the cathode generates a current that is
directly proportional to its partial pressure in the sample.
The electrochemical reaction and diffusion through the membrane
are dependent upon temperature. Consequently, the measurement
cell contains a temperature sensor that allows for automatic
temperature compensation.
The 9184sc Chlorine Sensors measure HOCl, the concentration of
which is pH dependant. Therefore it is necessary to control the
sample pH in certain circumstances for optimal performance. For
the HOCl Sensor, accuracy is maintained at 2% until pH exceeds 8,
at which point the accuracy diminishes quickly. For the TFC Sensor,
accuracy is maintained at 2% until pH exceeds 7.5, at which point
accuracy diminishes quickly. For this reason, it is recommended to
add the 9180sc Acidification Unit to the HOCl Sensor for sample pH
at values that exceed 8 and to the TFC Sensor for sample pH at
values that exceed 7.5 (see Specifications on page 5). With the
acidification unit, sample pH is kept constant between 5.5 and 6.5
by continuously adding acid solution. At such pH levels, all ClO–
ions turn into HOCl, thus enabling the sensor to measure TFC.
50
Appendix B 9185sc Theory of Operation
B.1 Theory of Operation
The 9185sc Ozone Analyzer is an on-line, single-channel industrial
analyzer that measures ozone in drinking water treatment plants,
distribution networks, and other applications that require monitoring
ozone at the ppb and ppm levels.
This instrument uses an amperometric method to measure O3
concentration. A membrane allows the selective diffusion of O3
molecules to the amperometric sensor (section 2.3 on page 8). The
measurement is compensated for pH and temperature.
B.1.1 Principle of Operation
Ozone is a gas that is highly soluble in water (13 times more than
oxygen). It is unstable when dissolved in water.
Effects on solubility:
•
Some parameters e.g. temperature and pH can influence the
stability of the measurement. The solubility of ozone in water
decreases rapidly with temperature.
Effects of pH: Ozone reacting with OH– hydroxide ions: the greater
the number of these ions (high pH), the greater the degree of
breakdown. Conversely, at a low pH, breakdown will be slower.
Figure 25 TIme of Breakdown of Dissolved Ozone
51
Finally, it is worth noting that, as the OH– ion is a by-product of
ozone breakdown in water, the reaction between OH– and O3 can
be sustained until complete disappearance of the ozone. This is
more pronounced if air is mixed with the water sample.
The exposure to free air of ozone water results in significant
degassing: as the ozone content of ambient air is very low
compared to that of the sample, exchange therefore occurs, with
rapid loss of ozone in the sample.
This problem is even more pronounced if air/water mixing occurs.
All of these phenomena, therefore, require that certain precautions
be taken concerning the sampling line (section 3.2 on page 12 and
section 3.3 on page 13).
52
Appendix C 9187sc Theory of Operation
C.1 Theory of Operation
The 9187sc Chlorine Dioxide Analyzer is an on-line, single-channel
industrial analyzer that measures chlorine dioxide in drinking water
treatment plants, distribution networks, and other applications that
require monitoring chlorine dioxide at the ppb and ppm levels.
This instrument uses an amperometric method to measure chlorine
dioxide concentration. A membrane allows the selective diffusion of
ClO2 molecules to the amperometric sensor (section 2.3 on
page 8). The measurement is compensated for temperature.
C.1.1 Principle of Operation
Measurement is carried out using an amperometric method after
diffusion of the chlorine dioxide molecules through a membrane.
The molecules of chlorine dioxide contained in the sample diffuse
through the membrane and are then found in an electrolyte zone of
very slight thickness between the membrane and the cathode. A
constant work potential is applied to the work electrode (cathode)
where CIO2 is reduced according to the reaction:
–
+
–
ClO 2 + 5e + 4H → Cl + 2H 2 O
At the silver electrode (anode) the silver is oxidized to:
+
–
Ag : Cl + Ag → AgCl + e
–
The reduction in chlorine dioxide at the cathode generates a current
which is directly proportional to the partial pressure of it in the
sample. The electrochemical reaction and diffusion through the
membrane are dependent upon temperature, consequently the
measurement cell is fitted with a temperature sensor which enables
the automatic compensation of measurement variations according
to temperature.
53
Visit us at www.hach.com
Appendix D Modbus Register Information
Table 5 Sensor Modbus Registers
Tag Name
Register # Data Type Length R/W
Description
Main Measurement Parameter in mg/L
40001
Float
2
R
Concentration Measurement Tag in mg/L
pH Measurement Param.
40003
Float
2
R
pH Measurement Tag
Temperature measurement
40005
Float
2
R
Temperature measurement
Current Measurement Parameter in µA
40007
Float
2
R
Current measurement in µA
Main Measurement Parameter in ppm
40009
Float
2
R
Concentration Measurement Tag in ppm
Main Measurement Parameter in ppb
40011
Float
2
R
Concentration Measurement Tag in ppb
Main Measurement Parameter in µg/L
40013
Float
2
R
Concentration Measurement Tag in µg/L
Current Measurement Parameter in nA
40015
Float
2
R
Current measurement in nA
Raw pH measurement
40017
Float
2
R
Raw pH measurement
mV Raw measurement
40019
Float
2
R
Raw ORP measurement
Raw Temperature measurement
40021
Float
2
R
Raw Temperature measurement
AutoRange Concentration in ppX
40023
Integer
1
R
Auto Ranging Tag in ppX
AutoRange Concentration in Xg/L
40024
Integer
1
R
Auto Ranging Tag in xg/L
AutoRange Current
40025
Integer
1
R
Auto Ranging redirection of nA-µA units
Concentration Tag-based
40026
Integer
1
R
Redirection tag for concentration
ppm-mg/L units
Temperature Tag-based
40027
Integer
1
R/W
Sensor Name[0]
40028
Integer
1
R/W Sensor Name[0]
Sensor Name[1]
40029
Integer
1
R/W Sensor Name[1]
Sensor Name[2]
40030
Integer
1
R/W Sensor Name[2]
Sensor Name[3]
40031
Integer
1
R/W Sensor Name[3]
Sensor Name[4]
40032
Integer
1
R/W Sensor Name[4]
Sensor Name[5]
40033
Integer
1
R/W Sensor Name[5]
Function code
40034
Integer
1
Function code
Next Step
40035
Integer
1
Next Step
Password
40036
Pass
1
R/W Password
Serial Number[0]
40037
Integer
1
R/W Serial Number[0]
Serial Number[1]
40038
Integer
1
R/W Serial Number[1]
Serial Number[2]
40039
Integer
1
R/W Serial Number[2]
Redirection tag for temperature unit
(°C-°F)
Application toogle
40040
Integer
1
R/W 9184...9187 applications
Active Concentration unit
40041
Integer
1
R/W Active concentration unit (ppm or mg/L)
Concentration unit toogle
40042
Bit
1
R/W Concentration unit toogle (ppm-mg/L)
Temperature unit toogle
40043
Bit
1
R/W Temperature unit toogle (°C-°F)
Concentration offset unit
40044
Integer
1
Compensation pH toogle
40045
Integer
1
R/W Compensation pH toogle (manual-auto)
pH display format toogle
40046
Bit
1
R/W pH display format XX.X or XX.XX
---
40047
Integer
1
R/W Internal use
---
40048
Integer
1
R/W Internal use
Averaging
40049
Integer
1
R/W Averaging
Automatic/Manual temperature toogle
40050
Bit
1
R/W Automatic/Manual temperature toogle
Manual Temperature unit
40051
Integer
1
R/W Manual Temperature unit
Manual Temperature
40052
Float
2
R/W Manual Temperature
Manual pH
40054
Float
2
R/W Manual pH
R
Concentration offset unit (na-µA)
55
Table 5 Sensor Modbus Registers (continued)
Tag Name
Register # Data Type Length R/W
Description
50/60 Hz toogle
40056
Bit
1
Output Mode
40057
Integer
1
R
Internal use
---
40058
Integer
1
R
Internal use
---
40059
Integer
1
R
Internal use
---
40060
Integer
1
R
Internal use
---
40061
Integer
1
R
Internal use
---
40062
Integer
1
R
Internal use
---
40063
Integer
1
R
Internal use
---
40064
Integer
1
R
Internal use
---
40065
Float
2
R
Internal use
---
40067
Float
2
R
Internal use
---
40069
Float
2
R
Internal use
Temperature Offset
40071
Float
2
Temperature Offset unit
40073
Integer
1
R
Internal use
pH Buffer 1 Measurement
40074
Float
2
R
Internal use
pH Buffer 2 Measurement
40076
Float
2
R
Internal use
Cal Conc Measurement
40078
Float
2
R
Internal use
Cal TFC Measurement
40080
Float
2
R
Internal use
Output Mode
40082
Integer
1
R
Internal use
Software version
40083
Float
2
R
Software version
Serial Number String[0]
40085
Integer
1
R/W Internal use
Serial Number String[2]
40086
Integer
1
R/W Internal use
Serial Number String[4]
40087
Integer
1
R/W Internal use
Serial Number String[6]
40088
Integer
1
R/W Internal use
Serial Number String[8]
40089
Integer
1
R/W Internal use
Serial Number String[10
40090
Integer
1
R/W Internal use
pH Offset
40091
Float
2
R
pH Calibration Offset
pH Slope
40093
Float
2
R
pH Calibration slope
Concentration Offset
40095
Float
2
R
Concentration Offset
Concentration Slope
40097
Float
2
R
Concentration Slope
Calibration Return Status
40099
Integer
1
R
Calibration Return Status
Time between two calibrations
40100
Integer
1
R/W Time between two calibrations
Concentration zero toogle
40101
Integer
1
R/W
Concentration zero toogle
(electrical-chemical)
Time from start up
40102
Integer
1
R
Time the system is running
Time to exchange Humidity bag
40103
Integer
1
R
Time the humidity bag has been used
DriverVersion_float
40104
Float
2
R
Driver version
---
40106
Float
2
R
Internal use
Measurement Logging Interval
40108
Integer
1
R/W Sensor Data logging interval
Temperature Logging Interval
40109
Integer
1
R/W Temperature logging interval
56
R/W 50/60 Hz toogle
R/W Temperature Offset
Index
B
Installation Considerations ................................ 12
Buttons
List box .............................................................. 27
N
Normal operation ..................................................... 25
D
Display ..................................................................... 24
O
Optional pH .............................................................. 17
E
Emissions ................................................................. 47
Entries
Incorrect ............................................................. 26
Error Messages ........................................................ 39
I
Instrument Specifications ........................................... 5
K
Key
Functions ........................................................... 23
L
List box ..................................................................... 27
M
Menu command
Marking ........................................................ 25, 26
Menu windows ......................................................... 25
Mounting
P
Probe Components .................................................. 13
R
Replacement Parts and Accessories ....................... 41
S
Safety ......................................................................... 7
Sample Line ............................................................. 12
sc100 Warning Messages ........................................ 39
Sensor Cable
sc100 Wiring ...................................................... 17
sc1000 Wiring .................................................... 20
T
Theory 9184sc ......................................................... 49
Theory 9185sc ......................................................... 51
Theory 9187sc ......................................................... 53
W
Warranty .................................................................. 45
57
Visit us at www.hach.com