1
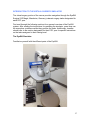
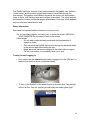
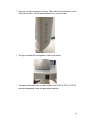
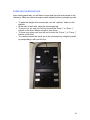
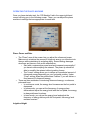
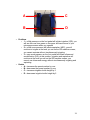
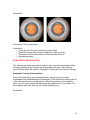
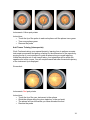
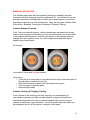
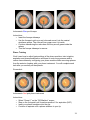
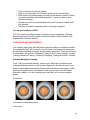
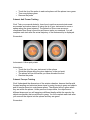
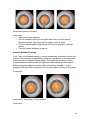
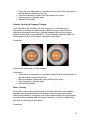
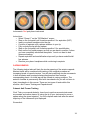
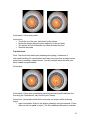
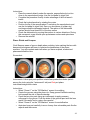
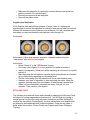
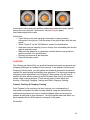
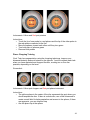
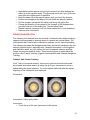
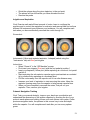
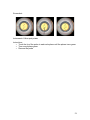
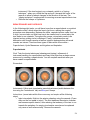
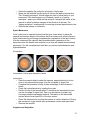
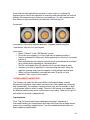
The Virtual Cataract Surgery Course Manual for Ophthalmology Residents ! ! ! Emily Li, MD ‘15 Peter Fay, MD Paul B Greenberg, MD Division of Ophthalmology Alpert Medical School Brown University This course is dedicated to Carly J Seidman, MD without whom the ophthalmic virtual surgery program at Brown would still be virtual Disclosure None of the authors have any conflicts of interest with respect to the materials discussed or instruments used in the course.! Financial support: This material is the result of work supported with resources and the use of facilities at the VA Medical Center, Providence, RI. Disclaimer: The views expressed in this article are those of the authors and do not necessarily reflect the position or policy of the United States (US) Department of Veterans Affairs or the US Government. ! 2! TABLE OF CONTENTS Page DIDACTICS COURSE OVERVIEW 4 LENS ANATOMY 5 LENS PATHOPHYSIOLOGY 6 AGING NUCLEAR CATARACTS CORTICAL CATARACTS POSTERIOR SUBCAPSULAR CATARACTS PREOPERATIVE CARE 8 PROCEDURE 9 POSTOPERATIVE CARE 13 COMPLICATIONS OF CATARACT SURGERY 14 VIRTUAL SURGERY INTRODUCTION TO THE VIRTUAL SURGERY SIMULATOR 17 OPERATING THE MICROSCOPE 20 OPERATING THE PHACO MACHINE 21 TRAINING COURSES 24 GETTING STARTED 25 PGY-2 COURSES: CAT-A INTRODUCTION, CAT-B BEGINNER 28 PGY-3 COURSES: CAT-C INTERMEDIATE 45 PGY-4 COURSES: CAT-D ADVANCED 53 REFERENCES 58 ! 3! COURSE OVERVIEW Welcome to the Resident Virtual Cataract Surgery Course at the Division of Ophthalmology, Alpert Medical School. The present manual provides PGY 2, 3 and 4 residents with an overview of cataract surgery and an opportunity to practice microsurgical skills in preparation for the operation room. There are two components to this course: didactics and virtual surgery. The didactics portion comprises a brief overview of surgical lens anatomy, surgical lens diseases and complications of cataract surgery. The didactic section also contains a primer on the pre-operative and post-operative care of patients undergoing cataract surgery and an overview of cataract surgery complications. Residents should reference the American Academy of Ophthalmology (AAO) Basic and Clinical Science Course® (BCSC), “Lens and Cataract” (2012-2013) and the AAO Preferred Practice Pattern® Guidelines, “Cataract in the Adult Eye” (www.aao.org/ppp) for more detailed information along the way. The virtual surgery portion of the course consists of virtual cataract surgery training with the EyeSi® Simulator (VRMagic, Mannheim, Germany). This section incorporates training modules designed to improve hand-eye coordination, such as navigation and anti-tremor tasks and modules that teach different skill sets for the key steps in cataract surgery. Each ophthalmology resident PGY year (2, 3 and 4) has a separate set of learning components. The ordering of tasks within each PGY course reflects their increasing difficulty. Residents should spend 4 to 5 hours with the EyeSi® during each year of their training, performing the section designated for their PGY year. They may, of course, repeat each task as many times as desired. ! 4! LENS ANATOMY • Crystalline lens: transparent, biconvex component of the eye that lies between the iris and the vitreous body o Attached to the ciliary body and suspended in position by the zonules of Zinn—strong, delicate connection fibers o Avascular; depends on aqueous humor for metabolic needs o No innervations o Index of refraction 1.4 centrally and 1.36 peripherally Decreases with age because of increasing insoluble protein particles o Curvature increases with age, augmenting refractive power o Grows in size throughout life Birth: 6.4 mm equatorially, 3.5 mm anteroposteriorly, 90 mg Adult: 9 mm equatorially, 5 mm anteroposteriorly, 255 mg o Composed of: capsule, lens epithelium, cortex and nucleus • Lens capsule: elastic, transparent basement membrane o Type IV collagen o Point of attachment for zonular fibers • Lens epithelium: single layer of epithelial cells lying immediately behind anterior lens capsule o Cells generate ATP for the lens • Nucleus and cortex: New fibers are created at the periphery of the lens, forming the outermost layers of the cortex, crowd and compact the existing ones toward the center, or nucleus o Cortical thickness increases with age • Please refer to Figure 1-2 (AAO BCSC “Lens and Cataract,” 2012-2013, page 6) ! 5! LENS PATHOPHYSIOLOGY • Aging: lens increases in weight and thickness and decreases in accommodative power with age o Nuclear sclerosis: new cortical fiber layers compress and harden the lens nucleus o High-molecular-weight protein aggregates form from chemical modification and proteolytic cleavage of crystallins, or lens proteins Aggregates grow in size and cause abrupt fluctuations in local refractive index of lens, leading to light scattering and decreased transparency Chemical modification causes lens discoloration, leading to a yellowish, brownish tint o 3 main types of age-related cataracts: nuclear, cortical and posterior subcapsular o Large proportion of risk of age-related cataracts is inherited from single gene loci Inheritance accounts for more than 50% of the risk of cortical cataracts 35%-50% of risk of nuclear cataracts comes from inheritance • Nuclear cataracts: excess amount of light scattering and yellowing, causing central opacity o Typically progress slowly o Usually bilateral but they may be asymmetric o Tend to impair distance vision more so than near vision o Lenticular myopia: progressive hardening of lens nucleus often causes increased refractive index of lens, thereby creating a myopic shift in refraction o Difficult to distinguish nuclear cataract nucleus from normal, aged nucleus on histology o Please refer to Figure 4-2 (AAO BCSC “Lens and Cataract,” 20122013, page 41) • Cortical cataracts: local disruption of mature fiber cell structure; compromise of membrane integrity leads to essential metabolite loss from affected cells, causing extensive protein oxidation and precipitation o Rate of progression varies o Usually bilateral but they are often asymmetric o Glare is a common symptom when the central portion is affected o Monoculear diplopia may result o First signs are vacuoles and water clefts in the anterior or posterior cortex, visible with a slit-lamp biomicroscope o Characterized by local swelling and disruption of lens fiber cells on histology o Please refer to Figure 4-4 (AAO BCSC “Lens and Cataract,” 20122013, page 43) • Posterior subcapsular cataracts (PSCs): located in posterior cortical ! 6! layer; usually axial o Seen more in younger patients than nuclear and cortical cataracts o First sign is a subtle iridescent sheen in the posterior cortical layers, visible with a slit-lamp biomicroscope o Glare and poor vision under bright lighting often result PSCs obscure more of the papillary aperture when miosis (pupil constriction) is induced by bright lights, accommodation or miotics o Monoculear diplopia may result o Causes in addition to age include trauma; systemic, topical or intraocular corticosteroid use; inflammation; exposure to ionizing radiation and alcoholism o Posterior migration of lens epithelial cells from the lens equator to the axis on the inner surface of the posterior capsule seen on histology o Please refer to Figure 4-8 (AAO BCSC “Lens and Cataract,” 20122013, page 47) ! 7! PREOPERATIVE CARE Preoperative Medical Evaluation and Patient Counseling Perform the following prior to surgery: • Conduct a comprehensive ophthalmic evaluation, including an assessment of how the patient’s cataract affects the impact of the patient’s quality of living • Obtain informed consent from the patient or the patient’s surrogate decision maker after discussing the risks, benefits and expected outcomes of surgery, including the anticipated refractive outcome and the surgical experience • Formulate a surgical plan, including selection of an appropriate intraocular lens (IOL) • Formulate postoperative care plans and inform the patient or the patient’s surrogate decision maker of these arrangements (i.e., setting of care, individuals who will provide care, etc.) Anesthesia • Options include general and local anesthesia (i.e., retrobulbar, peribulbar, sub-Tenons injection, or topical). For the selection of anesthesia management, consider the patient’s needs and preferences and the expertise of the anesthesia professional and surgeon • Discuss the planned method with the patient so he or she will know what to expect in terms of pain, discomfort, consciousness level, visual experiences and complications • The general preferred method is local anesthesia, with or without sedation/analgesia. • Indications for general anesthesia include medical, psychosocial or surgical complications. Infection Prophylaxis • Identify and minimize infection risk factors. Ensure antisepsis of the periocular surface, usually with povidine iodine prior to surgery, and make certain that all incisions are closed in a watertight fashion at the end of the procedure • Antibiotic use on the day of surgery, rather than waiting until the next day, is important. • Any additional prophylactic antibiotic techniques are at your discretion. You may administer topical antibiotics as prophylaxis, though no study provides convincing evidence of their efficacy in reducing risk of endophthalmitis in routine cataract surgery ! 8! PROCEDURE Background Cataract surgery has progressed over centuries and evolved into a modern technique called phacoemulsification (phaco). This method uses an ultrasonically-driven tip to fragment the cataract nucleus before emulsifying the pieces and removing them via an automated irrigation aspiration system. Phaco incisions and techniques are minimally invasive; allowing for fewer wound-related complications, faster healing and more rapid visual rehabilitation than procedures that create larger incisions. Additionally, phaco maintains a relatively closed system throughout surgery to control anterior chamber depth and safeguard against positive vitreous pressure and choroidal hemorrhage. Instruments Phaco machines have foot pedals that allow surgeons to control the fluidics through the handpiece. Handpieces have tips that vary according to their lumen size and angle, depending on the surgeon’s preference. Handpieces also have irrigation and aspiration lines for the different steps of cataract surgery. Constant flushing of the irrigation sleeve around the ultrasound tip with some fluid release through incisions is critical to phacoemulsification. It maintains anterior chamber depth and cools the phaco probe, preventing heat buildup and resultant damage to surrounding tissue. Phaco power delivery comes in several forms. Continuous phacoemulsification occurs when the surgeon applies a constant delivery of power, the degree of which ranges from 0% to 100% depending on how far the surgeon depresses the pedal. This form of power delivery allows the surgeon to sculpt deep grooves in the lens nucleus, useful in “divide and conquer” and “stop and chop” techniques. Drawbacks and risks include cavitation, shock waves, shear forces and heat buildup. Alternate forms of phaco power delivery are pulse and burst techniques. Pulsed phaco sets a certain number of deliveries per second; burst phaco delivers a single spurt of preset power. They are more energy efficient and pulsed phaco reduces repulsion of material, improving followability, while burst phaco lets the needle bury into the lens, making chopping possible. A phaco machine can have one of three types of aspiration pumps—peristaltic, diaphragm and Venturi. The peristaltic pump uses rollers that move along flexible tubing to force fluid through the tubes, creating a vacuum at the aspiration port of the phaco tip. Vacuum rise time is stepwise and control is linear as the roller speed increases. An example of the peristaltic pump is Alcon Infinity. The diaphragm pump has a flexible diaphragm that overlies a fluid chamber with oneway valves at the inlet and outlet. When the diaphram moves out, it creates a relative vacuum in the chamber to draw in fluid. When the diaphragm moves in, it ! 9! increases the chamber pressure and closes the intake valve while opening the exit valve. Vacuum rise time is exponential. The diaphragmatic system is not used anymore. The Venturi pump generates a vacuum using the Venturi principle—a flow of gas or fluid across a port creates a vacuum proportional to the rate of flow of the gas. Vacuum rise time is linear. An example of a Venturi system was the Bausch & Lomb Millennium. All three-pump types are effective, but most current phaco machines are based on the peristaltic design. Refer to later sections of the manual for more information about cataract surgery instruments. Basic Procedure Outline • Pupillary dilation: use mydriatic/cycloplegic drops • Exposure of the globe: use a lid speculum to hold eyelids apart. Superior approach phaco procedures may use a bridle suture to stabilize and expose the globe • Paracentesis: use a sharp blade to create a small paracentesis adjacent to the planned handpiece incision site. Instill an ophthalmic viscosurgical device (OVD) to protect intraocular structures and allow for more control during incision • Incision: o Scleral tunnel incision: superiorly-placed scleral tunnel incision with an internal corneal lip commonly used by novice phaco surgeons o Clear corneal incision: small incision just large enough to accommodate the phaco needle and a foldable intraocular lens (IOL) used by most phaco surgeons Based on surgeon’s preference, incision can be made superiorly, temporally or at the cornea’s steepest axis • Continuous curvilinear capsulorrhexis (CCC): use a cystotome needle or capsulorrhexis forceps with special tips for grasping and tearing to create a central curvilinear tear in the anterior capsule o Loose zonules may impede CCC. Capsular hooks may stabilize the bag to allow tear completion o Surgeons may convert to a can-opener anterior capsulotomy if he or she cannot complete a CCC • Hydrodissection: place a flattened hydrodissection cannula attached to a syringe under the anterior capsule flap to gently inject irrigation fluid. This separates the peripheral cortex from the underlying posterior lens capsule o Hydrodissection loosens the lens nucleus and cortex to allow nuclear rotation during phaco o Additionally, it hydrates the peripheral cortex, making aspiration after nucleus removal easier • Nuclear rotation: successful hydrodissection breaks posterior cortex and posterior capsule attachments, enabling rotation of the nucleus within the ! 10! • • • • ! capsular bag Irrigation: use the phaco needle to irrigate without ultrasound Aspiration: use the phaco needle to aspirate without ultrasound Emulsification: use ultrasound from the handpiece to break up the cataract o Possible locations: anterior chamber, iris plane and posterior chamber o Anterior chamber: prolapse the nucleus into the anterior chamber before emulsification. Earliest method Advantages: great visualization; minimized risk of damage to posterior capsule Disadvantages: increased risk of corneal endothelial trauma and resultant corneal edema o Iris plane: prolapse the superior pole of the nucleus anteriorly and emulsify halfway between the corneal endothelium and the posterior capsule to reduce risk of damage to either structure Advantages: reduces stress on posterior capsule and zonular fibers during nuclear manipulation; maintains visualization in cases with small pupils; desirable for novice phaco surgeons in more difficult cases Disadvantages: difficulty in prolapsing nucleus; potential damage to corneal endothelium if superior pole of nucleus is emulsified too close to cornea o Posterior chamber: method includes capsulorrhexis, hydrodissection and nucleus rotation. Most common method Advantages: reduces risk of corneal endothelial trauma; Disadvantages: emulsification close to the posterior capsule increases chance of rupture of the posterior capsule; difficult in cases with small pupils; requires more sophisticated nuclear splitting methods Nucleus disassembly: o One-handed technique: one surgical incision following adequate capsulorrhexis. Then, use the phaco needle to remove the epinuclear envelope with low power and medium vacuum settings. Use irrigation/aspiration to remove residual cortex o Two-handed technique: uses two instruments within the eye to remove the lens. There are many different ways of removing the lens, such as Divide and Conquer, horizontal chopping and vertical chopping Divide and Conquer technique: sculpt a central linear groove deep enough for subsequent cracking. Crack the nucleus into 2 pieces or divide the intact nucleus into quadrants. Then, use a second instrument to present a quadrant to the phaco needle for emulsification. Repeat for the other 3 quadrants • Most widely-used technique for all but very soft cataracts 11! ! Chopping techniques: bury the phaco tip in the center of the nucleus using high vacuum. Then, insert a phaco chop instrument under the anterior capsule flap, deeply engage the endonucleus in the periphery and draw it toward the phaco tip to crack the nucleus into 2 pieces. Repeat on each piece to create small wedges for emulsification • “Stop and chop”: modified procedure that involves the creation of a central groove first followed by division of the nucleus into 2 pieces through sculpting and cracking before chopping of each heminuclei • Need high vacuums to maintain a firm grasp and control and reduce ultrasound energy • Not appropriate for soft nuclei 12! POSTOPERATIVE CARE Postoperative Follow-Up Care • Inform the patient about appropriate signs and symptoms of possible complications, eye protection, activities, medication, required visits and details for access to emergency care • Inform the patients of their responsibility to follow provided advice and instructions. Patients should always have access to an ophthalmologist for appropriate care if serious problems arise; inform the patient that he or she should notify an ophthalmologist immediately if problems arise • Base the frequency of postoperative exams on optimizing the outcome of surgery and minimizing/managing complications. Patients are routinely followed up within 24 hours of surgery. Subsequent visits are based on post-operative signs and symptoms • Patients should make a final visit to obtain an accurate post-operative refraction when the prescription has stabilized. This usually occurs within 1-2 months after surgery! ! Postoperative Medication • Evidence varies for postoperative regimens of topically applied antibiotics, corticosteroids and NSAIDs. Use discretion when deciding the use of any topical agent, whether it be singly or in combination o Complications of postoperative medications include elevated intraocular pressure (IOP) with corticosteroids and allergic reactions to antibiotics o Significant corneal reactions, including epithelial defects and stromal ulceration and melting, rarely occur with topical ocular NSAIDs but have been reported ! ! ! 13! COMPLICATIONS OF CATARACT SURGERY • Corneal edema: (0.3~1.95% complication rate) stromal and/or epithelial edema resulting immediately in the post-operative period o Frequently caused by a combination of mechanical trauma, prolonged surgery, inflammation and elevated intraocular pressure (IOP) o Trauma-induced edema from usually resolves completely within 4 to 6 weeks of surgery o Epithelial edema presenting with a compact stroma immediately after surgery suggests the cause to be an elevated IOP with intact endothelium o If corneal periphery is clear, corneal edema will resolve with time. Corneal edema lasting for more than 3 months usually does not clear, and may reguire surgical intervention to correct o In early stages, control of corneal edema includes use of topical hyperosmotic agents, topical corticosteroids and bandage (therapeutic) contact lenses o Brown-McLean Syndrome: a condition of peripheral corneal edema with clear central cornea that can develop after intracapsular, extracapsular and phaco surgery Edema usually starts inferiorly and progresses circumferentially, all the while sparing the central cornea Often, have central corneal guttae and brown pigments speckling edematous areas Etiology unknown o Please refer to Figure 8-1 (AAO BCSC “Lens and Cataract,” 20122013, page 147) • Capsular opacification and contraction: o Posterior capsule opacification: (0.7~47.6%) continued viability and proliferation of lens epithelial cells remaining after removal of nucleus and cortex. These cells can undergo metaplasia and conversion to fibroblasts, which create a matrix of fibrous and basement membrane collagen that can contract to cause wrinkles in the posterior capsule. This distorts vision and produces glare Most common complication of cataract surgery by means of extracapsular cataract extraction (ECCE) or phacoemulsification Risk is minimized by hydrodissection and meticulous cortical cleanup o Anterior capsule fibrosis and phimosis: capsular fibrosis refers to clouding of the anterior capsule and symptoms include glare especially at night, and the sensation of a peripheral haze. Capsular phimosis indicates shrinking and distortion of the anterior capsule opening as a result of fibrosis, revealing capsular tissue through undilated pupil and causing fibrosis symptoms ! 14! Phimosis usually causes more pronounced symptoms than fibrosis Treatment, used on symptomatic patients, consists of a Nd:YAG laser anterior capsulotomy to enlarge the anterior capsule opening • Hemorrhage: (retrobulbar suprachoroidal) potential locations are listed below. Research shows that patients on anticoagulant or antiplatelet therapy during cataract surgery do NOT have increased risk of hemorrhagic complications o Retrobulbar hemorrhage (1~3%) o Suprachoroidal effusion or hemorrhage (0~0.14%) Please refer to Figure 17-12 (AAO BCSC “Retina and Vitreous,” 2012-2013, page 360) o Expulsive suproachoroidal hemorrhage o Delayed suprachoroidal hemorrhage o Hyphema • Endophthalmitis: (0~1.9%) vitreous inflammation with possible accompaniment of eyelid or periorbital edema, ciliary injection, chemosis, anterior chamber reaction, hypopyon, decreased visual acuity, corneal edema and retinal hemorrhages o Acute or chronic/indolent o Symptoms include mild to severe ocular pain, loss of vision, floaters and photophobia o Key prevention measure: scrupulous attention to watertight incision closure Preoperative application of topical therapy for 3 days can reduce bacterial counts but studies have not shown a corollary decrease in infection incidence A preliminary study suggested that injection of 1 mg cefuroxime into the anterior chamber at the end of cataract surgery can reduce endophthalmitis incidence by fivefold Instillation of 5% Providine iodine on the eye 20 minutes before surgery also reduces risk of endophthalmitis o Treatment: assess visual acuity to make management decisions When vision has been reduced to light perception, pars plana vitrectomy with vitreous biopsy and administration of intravitreal antibiotics is indicated When vision is hand motion or better, a vitreous tap with injection of intravitreal antibiotics is indicated Administer topical (and subconjunctival) antibiotics and topical steroids; oral antibiotics with good vitreous penetration may also be considered. Intravitreal corticosteroids to decrease inflammation and scarring may also be considered o Please refer to Figure 17-8-8 (AAO BCSC “Retina and Vitreous,” 2012-2013, page 355) ! 15! • Cystoid macular edema (CME): (0~7.6%) increased perifoveal capillary permeability causing decreased vision after cataract surgery o Recognize by characteristic petaloid appearance of cystic spaces in the macula on ophthalmoscopy or fluorescein angiography or by characteristic retinal thickening on optical coherence tomography o May manifest in loss of contrast sensitivity even with preserved Snellen acuity o Incidence peaks 6 to 10 weeks after surgery o Spontaneous resolution occurs in 95% of uncomplicated cases usually within 6 months o Risk factors for CME: absence of intact posterior capsule, poorlycontrolled postoperative inflammation, pre-existing epiretinal membrane, diabetes mellitus and a previous occurrence of CME o Can reduce risk of CME with preoperative and postoperative prophylactic use of topical or systemic indomethacin or topical ketorolac o Treatment: corticosteroid and nonsteroidal anti-inflammatory drops are first-line options for patients with persistent CME Periocular corticosteroids may be used in recalcitrant cases Intravitreal triamcinolone or anti-VEGF drugs may be effective in CME that has not resolved with other more conservative measures Pars plana vitrectomy with removal of obvious vitreous adhesions to anterior segment structures may be helpful in cases with vision loss that is unresponsive to topical therapy and injections • Retinal detachment: (0.14~0.9%) often occurs within 6 months of cataract surgery or following posterior capsulotomy o Risk factors: axial myopia (>25 mm), age under 50 years, lattice degeneration of retina, previous retinal tear or detachment in surgical eye, history of retinal detachment in fellow eye and family history of retinal detachment o Risk of retinal detachment increases fourfold following Nd:YAG laser posterior capsulotomy o Please refer to Figure 17-15 (AAO BCSC “Retina and Vitreous,” 2012-2013, page 363) ! 16! INTRODUCTION TO THE VIRTUAL SURGERY SIMULATOR The virtual surgery portion of the course provides navigation through the EyeSi® Surgical (VR Magic; Mannheim, Germany) cataract surgery tasks designated for each PGY year. First read through the following sections for a general overview of the EyeSi® system. After reading the instructions for operating the simulator, users may use the manual as a reference while they perform the tasks. Additionally, learners should refer to the section designated for their PGY year for specific instructions on the tasks assigned to their training level. The EyeSi® Simulator Familiarize yourself with the different parts of the EyeSi®. ! 17! The EyeSi® simulator consists of two basic elements: the graphic user interface (touch screen) and the virtual surgical environment (visual field through the microscope). The graphic user interface serves as the control unit and enables users to log in, start training tasks and configure instruments. The virtual surgical environment contains a computer-graphic presentation of the eye, which appears only once the user has started a task. Safety Information See below for important safety information to keep in mind: • Do not use sharp objects, such as a pen, to touch the screen. USE ONLY YOUR FINGERS! Do not press to hard on the screen. • Head model: o Do not reach inside the head model and avoid penetration of objects or fluids. o Only introduce the EyeSi® instruments through the pre-made holes in the silicone pads surrounding the eye. o Never leave the instruments hanging in the holes without support. Pull the instruments out completely when not in use. Turning On and Logging In ! • First, make sure the cataract head model is plugged in to the USB port on the blue box (there is also a vitreoretinal head). • To turn on the EyeSi®, hit the power button on the blue box. The red light will turn on first, then the yellow light and finally the steady green light. 18! ! • Now turn on the touch screen monitor. There are five round buttons on the side of the monitor. Hit the lowest button to turn on the screen. • The log-in screen will now appear on the touch screen. • Username and passwords for each resident level (PGY-2, PGY-3, PGY-4) are listed separately under the appropriate sections. 19! OPERATING THE MICROSCOPE Upon starting each task, you will have to zoom and focus the microscope on the virtual eye. Make sure the microscope is well adjusted before you begin any task. • • • • • ! To adjust the height of the microscope, use the “up/down” button on the platform. At the start of each task, select the microscope tab. To zoom in or out, use your left foot to touch the “Zoom ↑” or “Zoom ↓” buttons on the floor. Always zoom first, then focus. To focus up or down, use your left foot to touch the “Focus ↑” or “Focus ↓” buttons on the floor. You can also center the virtual eye in the microscope by using the joystick by manipulating it with your left foot. 20! OPERATING THE PHACO MACHINE Once you have started a task, the “OR Machine” tab in the upper right-hand corner will bring you to the following screen. There, you can adjust the phaco machine to settings that are appropriate for each task. Phaco Power and Rate • • The “Phaco” area of the screen lets you adjust the ultrasound power. Make sure to minimize the amount of ultrasonic energy you introduce into the eye while maintaining its sculpting ability. Excess energy damages structures and tissues, such as the endothelium. o Start with a conservative power level and increase incrementally if you have trouble sculpting the cataract. The phaco tip should be able to emulsify the cataract without pushing it away. o The “Linear” setting allows you to deliver an incremental amount of ultrasound energy depending on your foot pedal position. Under “Fixed” setting, when the pedal enters Position 3, you will deliver a fixed amount of ultrasound energy. There are three methods of introducing ultrasound energy—continuous, pulse and burst. o In continuous mode, the energy level increases as the foot pedal is depressed. o In pulse mode, you can set the frequency of energy pulses delivered and adjust the energy level with the foot pedal; the energy is always delivered in pulses. o In burst mode, you can set the energy level and adjust the frequency of energy delivery with the foot pedal; the energy level remains constant. Irrigation Height ! 21! • The “Irrigation” area of the screen allows you to determine the bottle height, and subsequently the amount of fluid, you introduce through the handpiece. The higher the height setting, the more fluid will enter the eye. Aspiration Vacuum and Flow • • The “Aspiration” area of the screen lets you adjust the vacuum pressure and the aspiration through the handpiece. o The higher the vacuum setting, the greater your ability to hold onto pieces of the cataract. You are able to reach your set level of vacuum pressure when you fully occlude the handpiece tip with the cataract. o The higher the aspiration setting, the greater the rate with which you remove fluid from the eye. This will affect how quickly pieces of the nucleus flow to the tip. The aspiration rate should not exceed your ability to replace the fluid volume, so adjust your “Irrigation Height” setting accordingly. When you set the vacuum and flow to “Linear,” you are able to adjust them through your foot pedal as you can with your phaco power. Presets • • • • Preset 1: Sculpting o Power = 55 [µm], Pulse Mode o Irrigation Height = 80 [cm], Continuous o Aspiration Vacuum = 60 [mmHg], Fixed o Aspiration Flow = 22 [ml/min], Fixed Preset 2: Quadrant Removal o Power = 55 [µm], Pulse Mode o Irrigation Height = 100 [cm], Continuous o Aspiration Vacuum = 300 [mmHg], Fixed o Aspiration Flow = 30 [ml/min], Fixed Preset 3, Ignore Preset 4: Irrigation/Aspiration (I/A) o Irrigation Height = 100 [cm], Continuous o Aspiration Vacuum = 600 [mmHg], Linear o Aspiration Flow = 34 [ml/min], Fixed Foot Pedal ! 22! • • ! A C B D Positions o 1 = a little pressure on the foot pedal will initiate irrigation (IRR); you will see this oval turn green on the upper left-hand corner of your microscope screen when you operate o 2 = a little more pressure will initiate aspiration (ASP); you will continue to irrigate at the level you set on the OR machine screen; you cannot aspirate without simultaneously irrigating o 3 = even more pressure on the foot pedal will initiate ultrasound emulsification (US); at this position, irrigation and aspiration will continue at the level you set on the OR machine screen; you cannot use ultrasound energy without simultaneously irrigating and aspirating Knobs o A = increases the preset number by one o B = decreases the preset number by one o C = increases irrigation bottle height by 5 o D = decreases irrigation bottle height by 5 23! TRAINING COURSES • • You are ready to start the simulations! For each resident PGY level, please turn to the appropriate portion of the course (see table of contents). For each task listed, you will have the following information: o Goal: the objective/desired endpoint of the task. o Screenshots: still pictures of the task at hand. o Instruments: instruments you will need to perform each task. There are three different colored ports on the EyeSi®: yellow, blue and red. Each port becomes a specific instrument depending on the task and module. When viewed through the microscope, the ports will function as instruments, such as forceps, pointers, etc. o Instructions: descriptions of how to perform the task. o Tips: pointers that may help you in performing the task. ! 24! GETTING STARTED Logging In • Turn on EyeSi® and at the log-in screen, enter: User: the first letter of your first name and your last name (may be a shorter version) Password: “eyesi” you will receive a prompt to change this once you have successfully logged in • • • ! If you get a “Login Failed!” message, try again more slowly with the tip of your finger. You will be brought to the main screen. Select “Courses” Select the “CAT-A Introduction” tab and the top course, “CAT-A Anterior Chamber Navigation (Cataract Course).” 25! ! • You will see the “Course Overview” page with the list of tasks you will perform during training. To open any task, touch the task to highlight it and then hit the “Select Task” button at the lower right hand corner of the screen. • You will then see the task description page, where you can select different tabs to view “Instructions” and “Presentations.” (Some tasks have slide presentations and animations that you can view.) Once you have read through the tabs, select “Start Simulation” to begin the task! 26! ! 27! PGY-2 COURSES: CAT-A INTRODUCTION, CAT-B BEGINNER CAT-A courses use abstract scenarios to train basic surgical skills, such as instrument navigation in the anterior chamber, proper OR machine settings and microscope adjustment. ANTERIOR CHAMBER NAVIGATION The following six tasks will train basic hand-eye coordination in the anterior chamber. You will learn to perform efficient and controlled movements using a pointing instrument. There are two types of tasks within this module—Navigation Training and Anti-Tremor Training: Cataract Navigation Training Goal: Train your manual dexterity, improve your eye-hand coordination and understand the dimensions of the anterior chamber by touching the tip of your instrument to each red sphere in the anterior chamber. You will complete each task after you turn all the spheres green. Screenshot: Instruments: Yellow port pointer Instructions: • Insert the probe into a silicon hole, keeping it oriented sideways so that the bent portion doesn’t stick up or down • Touch the tip of the probe to each red sphere until the sphere turns green • Turn every sphere green • Remove the probe Cataract Anti-Tremor Training Goal: Train your manual dexterity, learn how to perform accurate instrument movements and reduce tremor by moving the tip of your instrument to guide a sphere along a trajectory. You will complete each task after the actual trajectory of the instrument tip is displayed. ! 28! Screenshot: Instruments: Yellow port pointer Instructions: • Touch the tip of the your instrument to the sphere • Guide the sphere along the given trajectory to the end point • The sphere will turn blue when you have arrived at the end • Remove the probe INTRACAPSULAR NAVIGATION The following six tasks uses abstract tasks to train controlled movements within an empty capsule where the lens has already been removed. There are two types of tasks within this module—Navigation Training and Anti-Tremor Training: Navigation Training (Intracapsular) Goal: Continue training your manual dexterity, improving your eye-hand coordination and understanding the dimensions of the capsule by touching the tip of the yellow instrument to each sphere. Unlike the previous set of navigation tasks, you will have to reach spheres within the capsular sac in this course. You will complete each task after you turn all the spheres green. Screenshot: ! 29! Instruments: Yellow port pointer Instructions: • Touch the tip of the probe to each red sphere until the sphere turns green • Turn every sphere green • Remove the probe Anti-Tremor Training (Intracapsular) Goal: Continue training your manual dexterity, learning how to perform accurate instrument movements and getting a feeling for the dimensions of the capsule by moving the tip of your instrument to guide a sphere along a curved trajectory. Unlike the previous set of anti-tremor tasks, your trajectories will be within the capsular sac in this course. You will complete each task after the actual trajectory of the instrument tip is displayed. Screenshot: Instruments: Red port pointer Instructions: • Touch the tip of the your instrument to the sphere • Guide the sphere along the given trajectory to the end point • The sphere will turn blue when you have arrived at the end • Remove the probe ! 30! BIMANUAL NAVIGATION The following eight tasks will train bimanual dexterity as needed in surgical techniques such as chopping, cracking or bimanual I/A. You will have to use two pointing instruments simultaneously to either aim at given objects or to perform opposing movements in a controlled manner. There are two types of tasks within this module—Bimanual Training and Cracking & Chopping Training: Cataract Bimanual Training Goal: Train your manual dexterity, reduce unnecessary instrument motion and improve your eye-hand coordination by touch two instruments, one in each hand, to two spheres simultaneously. Hold the instruments on the spheres until they change from red to green in color. You will complete each task when all the spheres have turned green. Screenshot: Instruments: Yellow and Red port pointers Instructions: • Touch the tip of one probe to a red sphere and the tip of the other probe to the red sphere connected to the first • Hold the instruments in place until both spheres turn green • Turn every pair of spheres green • Remove both probes Cataract Cracking & Chopping Training Goal: Prepare for the cracking of a lens, improve your understanding of instrument movements and train a steady hand by using two instruments to simultaneously pierce both ends of a barbell-shaped object and moving the spheres at each end in given directions. You will complete each task when you have repeated this for all the objects, turning all of the green. ! 31! Screenshot: Instruments: Yellow and Red port pointers Instructions: • Touch the tip of one probe to a red sphere and the tip of the other probe to the red sphere connected to the first • Move the spheres toward each other until they turn green • Turn both pairs of spheres green • Remove both probes INSTRUMENTS The following six tasks will introduce use of forceps and the phaco tip. You will practice handling of the forceps by grasping and maneuvering abstract objects. Basic phaco skills such as irrigation, aspiration and emulsification are also trained on abstract objects. The phaco training tasks require an appropriate setup of the OR machine. There are two types of tasks within this module— Forceps Training and Phaco Training: Cataract Forceps Training Goal: Understand the dimensions of the anterior chamber, become familiar with forceps handling and minimize tissue stress by using forceps to grasp objects and to move them inside a wireframe sphere so that they turn green. You will complete each task after you move all the objects into the sphere. Screenshot: ! 32! Instruments: Blue port forceps Instructions: • Insert the forceps sideways • Use the forceps to pick up a red cube and move it into the central wireframe sphere. The cube will turn green once it is inside • Continue transferring the red cubes until they are all green inside the sphere • Turn the forceps sideways to remove Phaco Training Goal: Learn how to adjust basic settings of the phaco machine; train irrigation, aspiration and phacoemulsification and learn to control eye pressure and to reduce tissue stress by configuring your phaco machine while removing spheres from the anterior chamber with your phaco instrument. You will complete each task after you emulsify all the spheres. Screenshot: Instruments: Red port phaco instrument Instructions: • Select “Preset 1” on the “OR Machine” screen • Step on the foot pedal until it reaches position 2 for aspiration (ASP) • Insert your phaco handpiece into the eye • Continue to aspirate until a sphere attaches to your tip ! 33! • • • • • Fully occlude the tip with the sphere Step on the foot pedal until it reaches position 3 for emulsification Ease on the foot pedal pressure so that you are back in position 2 when you have completely emulsified the sphere. You do not want to leak ultrasound energy Repeat aspiration and emulsification steps until you have emulsified all four spheres Remove your phaco handpiece while continuing to aspirate You are now ready for CAT-B CAT B courses train different steps of cataract surgery separately; following abstract instrument handling tasks, practice first steps in capsulorhexis, lens segmentation and lens removal. NAVIGATION AND INSTRUMENTS The following eight tasks will train basic instrument skills in an abstract scenario as presented in the CAT-A courses. You will hone your instrument movements as well as the handling of forceps and the phaco instrument. There are six types of tasks within this module—Navigation Training, Anti-Tremor Training, Forceps Training, Bimanual Training, Cracking & Chopping Training and Phaco Training: Cataract Navigation Training Goal: Train your manual dexterity, improve your hand-eye coordination and understand the dimensions of the anterior chamber by touching the tip of your probe to each sphere and holding it there until each sphere turns green. Unlike previous navigation tasks, the spheres in this course vary in size and depth within the capsule. You will complete each task after you turn every sphere green. Screenshot: Instruments: Yellow port pointer Instructions: ! 34! • • • Touch the tip of the probe to each red sphere until the sphere turns green Turn every sphere green Remove the probe Cataract Anti-Tremor Training Goal: Train your manual dexterity, learn how to perform accurate instrument movements and reduce tremor by using the tip of your instrument to move a sphere along the given trajectory. The patterns of this course are more complicated than those in previous anti-tremor tasks you mastered. You will complete each task after the actual trajectory of the instrument tip is displayed. Screenshot: Instruments: Yellow port pointer Instructions: • Touch the tip of the your instrument to the sphere • Guide the sphere along the given trajectory to the end point • The sphere will turn blue when you have arrived at the end • Remove the probe Cataract Forceps Training Goal: Understand the dimensions of the anterior chamber, become familiar with forceps handling and minimize tissue stress by using forceps to grasp red objects and to transfer them into a wireframe sphere. The objects will turn green when they are within the sphere. Unlike previous forceps tasks, the objects are a different shape and you will experience different depths within the capsule; the objects are smaller and more difficult to grasp. You will complete each task after you move all the objects into the sphere and they are green. Screenshot: ! 35! Instruments: Blue port forceps Instructions: • Insert the forceps sideways • Use the forceps to pick up a red object and move it into the central wireframe sphere. The object will turn green once it is inside • Continue transferring the red objects until they are all green inside the sphere • Turn the forceps sideways to remove Cataract Bimanual Training Goal: Train your bimanual dexterity, reduce unnecessary instrument motion and improve your hand-eye coordination by using two instruments to simultaneously touch two ends of a barbell-shaped object. The object will turn green. Unlike previous bimanual training tasks, the spheres of each barbell are held apart at different distances and are scattered within the anterior chamber. You will complete each task after you perform this on every object and they all turn green. Screenshot: Instruments: Yellow and Red port pointers Instructions: ! 36! • • • • Touch the tip of one probe to a red sphere and the tip of the other probe to the red sphere connected to the first Hold the instruments in place until both spheres turn green Turn every pair of spheres green Remove both probes Cataract Cracking & Chopping Training Goal: Prepare for the cracking of a lens, improve your understanding of instrument movements and train a steady hand by using two instruments to simultaneously pierce both ends of a barbell-shaped object and moving the spheres at each end in given directions. You will complete each task when you have repeated this for all the objects, turning all of the green. Screenshot: Instruments: Yellow and Red port pointers Instructions: • Touch the tip of one probe to a red sphere and the tip of the other probe to the red sphere connected to the first • Move the spheres toward each other until they turn green • Turn both pairs of spheres green • Remove both probes Phaco Training Goal: Learn how to adjust basic settings of the phaco machine; train irrigation, aspiration and phacoemulsification and learn to control eye pressure and to reduce tissue stress by configuring your phaco machine while removing spheres from the anterior chamber with your phaco instrument. You will complete each task after you emulsify all the spheres. Screenshot: ! 37! Instruments: Red port phaco instrument Instructions: • Select “Preset 1” on the “OR Machine” screen • Step on the foot pedal until it reaches position 2 for aspiration (ASP) • Insert your phaco handpiece into the eye • Continue to aspirate until a sphere attaches to your tip • Fully occlude the tip with the sphere • Step on the foot pedal until it reaches position 3 for emulsification • Ease on the foot pedal pressure so that you are back in position 2 when you have completely emulsified the sphere. You do not want to leak ultrasound energy • Repeat aspiration and emulsification steps until you have emulsified all four spheres • Remove your phaco handpiece while continuing to aspirate CAPSULORHEXIS The following twelve tasks will train the circular opening of the anterior capsule. Abstract tasks will be combined with training of the surgical procedure at increasing levels of capsule tension. You will start practicing circular movements in both clockwise and counterclockwise directions and then create a corresponding rhexis. An initial tear will be offered at varying positions. The anterior chamber is permanently filled with viscoelastics so you will not have to inject viscoelastics in this course. There are two types of tasks within this module—Anti-Tremor Training and Capsulorhexis: Cataract Anti-Tremor Training Goal: Train your manual dexterity, learn how to perform accurate instrument movements and reduce tremor by using the tip of your instrument to move a sphere along the given trajectory. You will complete each task after the actual trajectory of the instrument tip is displayed. Screenshot: ! 38! Instruments: Yellow port pointer Instructions: • Touch the tip of the your instrument to the sphere • Guide the sphere along the given trajectory to the end point • The sphere will turn blue when you have arrived at the end • Remove the probe Capsulorhexis Goal: Train the rhexis techniques (shearing and ripping), refinement of instrument handling for capsulorhexis and learn how to perform a rhexis rescue maneuver by creating a capsulorhexis. You will complete each task after you have created a capsulorhexis. Screenshot: Instruments: Yellow port viscoelastics cannula/cystotome (switch between the two using the “Instruments” tab) and Blue port forceps Instructions: (some tasks within this course may not require all the following steps) • Inject viscoelastic fluid into the anterior chamber using the cannula. (Press down on the foot pedal to inject.) The fluid stabilizes the anterior chamber ! 39! • • • and lessens capsule tension, thus reducing the tendency of the tear to run towards the periphery. An empty viscoleastics cannula can be replaced only once so work economically. Remove the cannula Create the capsule flap suing the cytotome or the forceps Grasp the flap with the forceps and pull it along the desired circular line. This “shearing technique” should trigger the tear to follow the tip of your instrument. If the tear begins to run outwards, switch to a “ripping technique,” where you unfold the flap and pull it towards the center of the capsule to allow for abrupt changes in the direction of the tear. The “ripping technique” is appropriate for rescuing an errant capsulorhexis tear Remove the forceps or cystotome INTRACAPSULAR TISSUE The following seven tasks will introduce the essential skills of hydrodissection and delineation, as well as removal of the lens and residual cortex. The hydrodissection and Delineation tasks will provide a basic understanding of instrument movements and lens interaction. In the Divide and Conquer tasks, lens parts have to be removed using the phaco instrument. The Irrigation and Aspiration tasks train the removal of residual cortex after lens removal. Different OR machine settings can be explored. There are three types of tasks within this module—Hydro Maneuvers, Phaco Divide and Conquer and Irrigation and Aspiration: Hydro Maneuvers Goal: Learn how to separate tissues from the lens, learn where to place the cannula and become aware of the effects that fluid volume and velocity have on hydro maneuvers by performing hydrodissection (separation of the lens nucleus from the cortex and the capsule) and hydrodelineation (separation of the epinucleus from the harder inner nucleus) on an eye with capsulorhexis already performed. You will complete each task after you perform hydrodissection and hydrodelineation. Screenshot: Instruments: Yellow port dissection canula ! 40! Instructions: • Place the cannula directly under the capsule, perpendicular but not too close to the capsulorhexis edge. Use the foot pedal to inject fluid • Complete the procedure fluently to take advantage of the fluid wave’s inertia • Check the hydrodissection by rotating the cortex • Position the tip of the cannula about 1 mm below the capsulorhexis and use the foot pedal to inject fluid. Soon you should see a ‘golden ring’ evolving around the delineated nucleus. The radius of the delineated nucleus should be at least 60% of the lens radius • Check the delineation by moving the nucleus in various directions. During this movement, a gap should open up between nucleus and epinucleus • Remove the cannula Phaco Divide and Conquer Goal: Become aware of groove depth when sculpting, train cracking the lens with bemanual techniques and learn to optimize the parameters of the phaco machine. You will complete each task when you have sculpted, cracked and phacoemulsified the lens. Screenshot: Instruments: Yellow port push-pull/lens rotator/lens pusher/lens dialer (switch among the tools using the “Instruments” tab) and Red port phaco instrument/straight lens rotator Instructions: • Select “Preset 1” on the “OR Machine” screen for sculpting • Create the grooves using the phaco tip. Deep grooves facilitate cracking but increase the risk of capsule damage • Crack the lens into parts using two instuments to apply pressure orthogonal to the groove. Push the sides of the groove apart until the lens cracks. Be careful not to rupture the capsule! • Select “Preset 2” on the “OR Machine” screen for emulsification • Aspirate a lens part carefully to move it away from vulnerable parts like the capsule and the cornea ! 41! • • • Make sure the phaco tip is completely occluded before moving the foot pedal to position 3 for emulsification Emulsify and remove all the lens parts Remove the phaco probe Irrigation and Aspiration Goal: Exercise safe and efficient removal of cortex, learn to configure the machine and to control the aspiration for occlusion and removal and find out how different I/A instrument types influence your technique. You will complete each task when you have successfully removed the cortex through I/A. Screenshot: Instruments: Yellow port aspirator/aspirator, J-shaped (switch using the “Instruments” tab) and Red port irrigator Instructions: • Select “Preset 4” in the “OR Machine” screen • First insert your irrigator (Red port) with the foot pedal at position 1 • Insert your aspirator (Yellow port) while aspirating at a low level, foot pedal position 2 • Start aspirating the sub-anterior capsular region and maintain an occluded tip by continuously aspirating at a moderate level • Pull the cortex away from the capsule until it is a safe distance away • Increase your level of aspiration to start removing the cortex. Keep the aspirator opening away from the capsule to help prevent capsular tear • When you have completely removed the cortex, first pull out your aspirator. Then, remove your irrigator STOP AND CHOP The following four tasks will teach skills needed for applying the Stop and Chop technique for nuclear segmentation and removal. You will begin by carving a central groove into the lens using the phaco instrument and then splitting the nucleus into two halves. Subsequently, the lens halves have to be aspired with the phaco tip and subdivided with a vertical chopper. There are two types of tasks within this module—Phaco Divide and Conquer and Phaco Chopping Training: ! 42! Phaco Divide and Conquer Goal: Become aware of groove depth when sculpting, train cracking the lens with bemanual techniques and learn to optimize the parameters of the phaco machine. You will complete each task when you have sculpted, cracked and phacoemulsified the lens. Screenshot: Instruments: Yellow port push-pull/lens rotator/lens pusher/lens dialer (switch among the tools using the “Instruments” tab) and Red port phaco instrument/straight lens rotator Instructions: • Crack the lens into parts using two instuments to apply pressure orthogonal to the groove. Push the sides of the groove apart until the lens cracks • Select “Preset 2” on the “OR Machine” screen for emulsification • Aspirate a lens part carefully to move it away from vulnerable parts like the capsule and the cornea • Make sure the phaco tip is completely occluded before moving the foot pedal to position 3 for emulsification • Emulsify and remove all the lens parts • Remove the phaco probe Phaco Chopping Training Goal: Train lens segmentation using the chopping technique, improve your bimanual dexterity and avoid stress on the capsule. You will complete each task when you have aspirated and chopped the disc, creating two or four disc quarters, depending on the level. Screenshot: ! 43! Instruments: Yellow port chopper and Red port phaco instrument Instructions: • The yellow sphere in the center of the disc represents the spot where you should aspirate the disc. If there is a whole disc, use a little ultrasound to create a small hold for better aspiration and access to the sphere; if there are segments, you can skip this step • Aim the phaco tip at the sphere • Aspirate the yellow sphere using a high vacuum level while keeping the phaco tip in the capsule center. The green ball turns red if your tip moves away from the original point of aspiration • Keep the phaco tip in the capsule center while you insert the chopper • Position the chopper at the edge of the dic under the anterior capsule • Pull the chopper toward the disc center and along the dotted line • Change the direction of movement of the chopper by 90 degrees when you reach the end of the dotted line. The disc should split • Repeat steps as necessary until you have created two or four quadrants • Remove your instruments ! 44! PGY-3 COURSE: CAT-C INTERMEDIATE CAT-C courses take your surgical skills to a higher level: practice advanced surgery techniques before performing multi-step cataract procedures in a simulated surgical environment. CAPSULORHEXIS The following nine tasks will enhance your basic capsulorhexis skills. Following a preparatory abstract forceps training, you will practice tearing an initial flap into the capsule. The rhexis then will have to be performed on capsules with increasing tension, which makes the capsule more sensitive. The same tissue configuration has to be treated once with a guiding circle and once without one. There are two types of tasks within this module—Forceps Training and Capsulorhexis: Cataract Forceps Training Goal: Understand the dimensions of the anterior chamber, become familiar with forceps handling and minimize tissue stress by using forceps to grasp red objects and to transfer them into a wireframe sphere. The objects will turn green when they are within the sphere. You will complete each task after you move all the objects into the sphere and they are green. Screenshot: Instruments: Blue port forceps Instructions: • Insert the forceps sideways • Use the forceps to pick up a red cube and move it into the central wireframe sphere. The cube will turn green once it is inside • Continue transferring the red cubes until they are all green inside the sphere • Turn the forceps sideways to remove Capsulorhexis ! 45! Goal: Train the rhexis techniques (shearing and ripping), refinement of instrument handling for capsulorhexis and learn how to perform a rhexis rescue maneuver by creating a capsulorhexis. You will complete each task after you have created a capsulorhexis. Screenshot: Instruments: Yellow port viscoelastics cannula/cystotome (switch between the two using the “Instruments” tab) and Blue port forceps Instructions: (some tasks within this course may not require all the following steps) • Inject viscoelastic fluid into the anterior chamber using the cannula. (Press down on the foot pedal to inject.) The fluid stabilizes the anterior chamber and lessens capsule tension, thus reducing the tendency of the tear to run towards the periphery. An empty viscoleastics cannula can be replaced only once so work economically. Remove the cannula • Create the capsule flap suing the cytotome or the forceps • Grasp the flap with the forceps and pull it along the desired circular line. This “shearing technique” should trigger the tear to follow the tip of your instrument. If the tear begins to run outwards, switch to a “ripping technique,” where you unfold the flap and pull it towards the center of the capsule to allow for abrupt changes in the direction of the tear. The “ripping technique” is appropriate for rescuing an errant capsulorhexis tear • Remove the forceps or cystotome DIVIDE AND CONQUER The following four tasks will help you develop an advanced understanding of nuclear segmentation using the divide and conquer technique. First, you will enable nuclear rotation by performing hydrodissection and hydrodelineation. After cracking a pre-sculpted lens, you will then have to perform the complete divide and conquer procedure; including sculpting, cracking and lens removal on a soft and medium hard lens. There are two types of tasks within this module— Hydro Maneuvers and Phaco Divide and Conquer: Hydro Maneuvers ! 46! Goal: Learn how to separate tissues from the lens, learn where to place the cannula and become aware of the effects that fluid volume and velocity have on hydro maneuvers by performing hydrodissection (separation of the lens nucleus from the cortex and the capsule) and hydrodelineation (separation of the epinucleus from the harder inner nucleus) on an eye with capsulorhexis already performed. You will complete each task after you perform hydrodissection and hydrodelineation. Screenshot: Instruments: Yellow port dissection canula Instructions: • Place the cannula directly under the capsule, perpendicular but not too close to the capsulorhexis edge. Use the foot pedal to inject fluid • Complete the procedure fluently to take advantage of the fluid wave’s inertia • Check the hydrodissection by rotating the cortex • Position the tip of the cannula about 1 mm below the capsulorhexis and use the foot pedal to inject fluid. Soon you should see a ‘golden ring’ evolving around the delineated nucleus. The radius of the delineated nucleus should be at least 60% of the lens radius • Check the delineation by moving the nucleus in various directions. During this movement, a gap should open up between nucleus and epinucleus • Remove the cannula Phaco Divide and Conquer Goal: Become aware of groove depth when sculpting, train cracking the lens with bemanual techniques and learn to optimize the parameters of the phaco machine. You will complete each task when you have sculpted, cracked and phacoemulsified the lens. Screenshot: ! 47! Instruments: Yellow port push-pull/lens rotator/lens pusher/lens dialer (switch among the tools using the “Instruments” tab) and Red port phaco instrument/straight lens rotator Instructions: • Crack the lens into parts using two instuments to apply pressure orthogonal to the groove. Push the sides of the groove apart until the lens cracks • Select “Preset 2” on the “OR Machine” screen for emulsification • Aspirate a lens part carefully to move it away from vulnerable parts like the capsule and the cornea • Make sure the phaco tip is completely occluded before moving the foot pedal to position 3 for emulsification • Emulsify and remove all the lens parts • Remove the phaco probe CHOPPING The following six tasks will let you practice bimanual instrument movements and chopping techniques as needed for lens removal. In the abstract Cracking and Chopping Training tasks, you will practice the bimanual instrument movements required for lens cracking and handling lens segments. The horizontal chopping technique will be introduced in the Chopping Training tasks; you will have to stabilize the lens with the phaco tip and at the same time chop it into smaller pieces using a vertical chopper. There are two types of tasks within this module—Cracking & Chopping Training and Phaco Chopping Training: Cataract Cracking & Chopping Training Goal: Prepare for the cracking of a lens, improve your understanding of instrument movements and train a steady hand by using two instruments to simultaneously pierce both ends of a barbell-shaped object and moving the spheres at each end in given directions. You will complete each task when you have repeated this for all the objects, turning all of the green. Screenshot: ! 48! Instruments: Yellow and Red port pointers Instructions: • Touch the tip of one probe to a red sphere and the tip of the other probe to the red sphere connected to the first • Move the spheres toward each other until they turn green • Turn both pairs of spheres green • Remove both probes Phaco Chopping Training Goal: Train lens segmentation using the chopping technique, improve your bimanual dexterity and avoid stress on the capsule. You will complete each task when you have aspirated and chopped the disc, creating two or four disc quarters, depending on the level. Screenshot: Instruments: Yellow port chopper and Red port phaco instrument Instructions: • The yellow sphere in the center of the disc represents the spot where you should aspirate the disc. If there is a whole disc, use a little ultrasound to create a small hold for better aspiration and access to the sphere; if there are segments, you can skip this step • Aim the phaco tip at the sphere ! 49! • • • • • • • Aspirate the yellow sphere using a high vacuum level while keeping the phaco tip in the capsule center. The green ball turns red if your tip moves away from the original point of aspiration Keep the phaco tip in the capsule center while you insert the chopper Position the chopper at the edge of the dic under the anterior capsule Pull the chopper toward the disc center and along the dotted line Change the direction of movement of the chopper by 90 degrees when you reach the end of the dotted line. The disc should split Repeat steps as necessary until you have created two or four quadrants Remove your instruments IRRIGATION/ASPIRATION The following four tasks will train the removal of residual cortex while avoiding a capsular rupture caused by exerting stress to capsule and zonular fibers. The intracapsular Anti-Tremor task is intended to prepare you for capsule polishing. The following intracapsular Navigation task trains instrument handling in the subanterior capsular region, especially with J-shaped instruments. In the Irrigation and Aspiration tasks, you can explore the use of adequate vacuum and flow values for removing residual cortex. There are three types of tasks within this module—Anti-Tremor Training, Irrigation and Aspiration and Cataract Navigation Training: Cataract Anti-Tremor Training Goal: Train your manual dexterity, learn how to perform accurate instrument movements and reduce tremor by using the tip of your instrument to move a sphere along the given trajectory. You will complete each task after the actual trajectory of the instrument tip is displayed. Screenshot: Instruments: Yellow port pointer Instructions: • Touch the tip of the your instrument to the sphere ! 50! • • • Guide the sphere along the given trajectory to the end point The sphere will turn blue when you have arrived at the end Remove the probe Irrigation and Aspiration Goal: Exercise safe and efficient removal of cortex, learn to configure the machine and to control the aspiration for occlusion and removal and find out how different I/A instrument types influence your technique. You will complete each task when you have successfully removed the cortex through I/A. Screenshot: Instruments: Yellow port aspirator/aspirator, J-shaped (switch using the “Instruments” tab) and Red port irrigator Instructions: • Select “Preset 4” in the “OR Machine” screen • First insert your irrigator (Red port) with the foot pedal at position 1 • Insert your aspirator (Yellow port) while aspirating at a low level, foot pedal position 2 • Start aspirating the sub-anterior capsular region and maintain an occluded tip by continuously aspirating at a moderate level • Pull the cortex away from the capsule until it is a safe distance away • Increase your level of aspiration to start removing the cortex. Keep the aspirator opening away from the capsule to help prevent capsular tear • When you have completely removed the cortex, first pull out your aspirator. Then, remove your irrigator Cataract Navigation Training Goal: Train your manual dexterity, improve your hand-eye coordination and understand the dimensions of the anterior chamber by touching the tip of your probe to each sphere and holding it there until each sphere turns green. Unlike previous navigation tasks, the spheres in this course vary in size and depth within the capsule. You will complete each task after you turn every sphere green. ! 51! Screenshot: Instruments: Yellow port pointer Instructions: • Touch the tip of the probe to each red sphere until the sphere turns green • Turn every sphere green • Remove the probe ! 52! PGY-4 COURSE: CAT-D ADVANCED CAT-D courses offer training of the capsulorhexis under more demanding and varying conditions such as increasing capsule tensions or weak zonules; be prepared for complications. CAPSULORHEXIS ERRANT TEAR The following six tasks will hone the technique of creating a clockwise or counterclockwise rhexis under increasingly difficult conditions; the capsule tension is medium to high, and the tear tends to run outwards. In all tasks, viscoelastic has to be injected before opening the anterior capsule. An initial tear has been created and a guiding circle is displayed. There is one type of task within this module—Capsulorhexis: Capsulorhexis Goal: Train the rhexis techniques (shearing and ripping), refinement of instrument handling for capsulorhexis and learn how to perform a rhexis rescue maneuver by creating a capsulorhexis. You will complete each task after you have created a capsulorhexis. Screenshot: Instruments: Yellow port viscoelastics cannula/cystotome (switch between the two using the “Instruments” tab) and Blue port forceps Instructions: (some tasks within this course may not require all the following steps) • Inject viscoelastic fluid into the anterior chamber using the cannula. (Press down on the foot pedal to inject.) The fluid stabilizes the anterior chamber and lessens capsule tension, thus reducing the tendency of the tear to run towards the periphery. An empty viscoleastics cannula can be replaced only once so work economically. Remove the cannula • Create the capsule flap suing the cytotome or the forceps • Grasp the flap with the forceps and pull it along the desired circular line. This “shearing technique” should trigger the tear to follow the tip of your ! 53! • instrument. If the tear begins to run outwards, switch to a “ripping technique,” where you unfold the flap and pull it towards the center of the capsule to allow for abrupt changes in the direction of the tear. The “ripping technique” is appropriate for rescuing an errant capsulorhexis tear Remove the forceps or cystotome WEAK ZONULES AND CAPSULES In the following eight tasks, you will have to perform a capsulorhexis on a patient with weak zonules, which cause the lens to get loose, making the surgical procedure more demanding. Between the tasks, capsular tension varies from low to high. In some tasks, an initial tear has to be created; and in some tasks, the tear tends to run outwards. Throughout the course, viscoelastic needs to be injected and no guiding circle is displayed. Finally, hydrodissection and delineation with a weak capsule as well as irrigation and aspiration with weak zonules are trained. There are three types of tasks within this module— Capsulorhexis, Hydro Maneuvers and Irrigation and Aspiration: Capsulorhexis Goal: Train the rhexis techniques (shearing and ripping), refinement of instrument handling for capsulorhexis and learn how to perform a rhexis rescue maneuver by creating a capsulorhexis. You will complete each task after you have created a capsulorhexis. Screenshot: Instruments: Yellow port viscoelastics cannula/cystotome (switch between the two using the “Instruments” tab) and Blue port forceps Instructions: (some tasks within this course may not require all the following steps) • Inject viscoelastic fluid into the anterior chamber using the cannula. (Press down on the foot pedal to inject.) The fluid stabilizes the anterior chamber and lessens capsule tension, thus reducing the tendency of the tear to run towards the periphery. An empty viscoleastics cannula can be replaced only once so work economically. Remove the cannula ! 54! • • • Create the capsule flap suing the cytotome or the forceps Grasp the flap with the forceps and pull it along the desired circular line. This “shearing technique” should trigger the tear to follow the tip of your instrument. If the tear begins to run outwards, switch to a “ripping technique,” where you unfold the flap and pull it towards the center of the capsule to allow for abrupt changes in the direction of the tear. The “ripping technique” is appropriate for rescuing an errant capsulorhexis tear Remove the forceps or cystotome Hydro Maneuvers Goal: Learn how to separate tissues from the lens, learn where to place the cannula and become aware of the effects that fluid volume and velocity have on hydro maneuvers by performing hydrodissection (separation of the lens nucleus from the cortex and the capsule) and hydrodelineation (separation of the epinucleus from the harder inner nucleus) on an eye with capsulorhexis already performed. You will complete each task after you perform hydrodissection and hydrodelineation. Screenshot: Instruments: Yellow port dissection canula Instructions: • Place the cannula directly under the capsule, perpendicular but not too close to the capsulorhexis edge. Use the foot pedal to inject fluid • Complete the procedure fluently to take advantage of the fluid wave’s inertia • Check the hydrodissection by rotating the cortex • Position the tip of the cannula about 1 mm below the capsulorhexis and use the foot pedal to inject fluid. Soon you should see a ‘golden ring’ evolving around the delineated nucleus. The radius of the delineated nucleus should be at least 60% of the lens radius • Check the delineation by moving the nucleus in various directions. During this movement, a gap should open up between nucleus and epinucleus • Remove the cannula Irrigation and Aspiration ! 55! Goal: Exercise safe and efficient removal of cortex, learn to configure the machine and to control the aspiration for occlusion and removal and find out how different I/A instrument types influence your technique. You will complete each task when you have successfully removed the cortex through I/A. Screenshot: Instruments: Yellow port aspirator/aspirator, J-shaped (switch using the “Instruments” tab) and Red port irrigator Instructions: • Select “Preset 4” in the “OR Machine” screen • First insert your irrigator (Red port) with the foot pedal at position 1 • Insert your aspirator (Yellow port) while aspirating at a low level, foot pedal position 2 • Start aspirating the sub-anterior capsular region and maintain an occluded tip by continuously aspirating at a moderate level • Pull the cortex away from the capsule until it is a safe distance away • Increase your level of aspiration to start removing the cortex. Keep the aspirator opening away from the capsule to help prevent capsular tear • When you have completely removed the cortex, first pull out your aspirator. Then, remove your irrigator CAPSULORHEXIS VARIATIONS The following two tasks are the most difficult of all capsulorhexis courses because the conditions under which the rhexis has to be created vary randomly and unpredictably. For example, capsular tension may be low, medium or high; or the zonules might be intact or weak. The aim of this course is to prepare you for different patient cases and to further improve your skills. There is one type of task within this module—Capsulorhexis: Capsulorhexis Goal: Train the rhexis techniques (shearing and ripping), refinement of instrument handling for capsulorhexis and learn how to perform a rhexis rescue maneuver by creating a capsulorhexis. You will complete each task after you have created a capsulorhexis. ! 56! Screenshot: Instruments: Yellow port viscoelastics cannula/cystotome (switch between the two using the “Instruments” tab) and Blue port forceps Instructions: (some tasks within this course may not require all the following steps) • Inject viscoelastic fluid into the anterior chamber using the cannula. (Press down on the foot pedal to inject.) The fluid stabilizes the anterior chamber and lessens capsule tension, thus reducing the tendency of the tear to run towards the periphery. An empty viscoleastics cannula can be replaced only once so work economically. Remove the cannula • Create the capsule flap suing the cytotome or the forceps • Grasp the flap with the forceps and pull it along the desired circular line. This “shearing technique” should trigger the tear to follow the tip of your instrument. If the tear begins to run outwards, switch to a “ripping technique,” where you unfold the flap and pull it towards the center of the capsule to allow for abrupt changes in the direction of the tear. The “ripping technique” is appropriate for rescuing an errant capsulorhexis tear • Remove the forceps or cystotome ! 57! REFERENCES American Academy of Ophthalmology. Basic and Clinical Science Course®, Section 11 “Lens and Cataract.” 2012-2013. American Academy of Ophthalmology. Basic and Clinical Science Course®, Section 11 “Retina and Vitreous.” 2012-2013. American Academy of Ophthalmology Cataract and Anterior Segment Panel. Preferred Practice Pattern® Guidelines. Cataract in the Adult Eye. San Francisco, CA: American Academy of Ophthalmology; 2011. Available at: www.aao.org/ppp. ! ! 58!