1
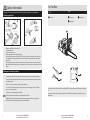
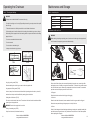
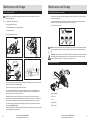
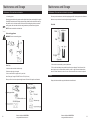
Qualcast
45.4cc Petrol Chainsaw
Original Manual
PCS46Z
Technical Support & Parts
01904 727500
www.gardenservicecentre.co.uk
Important - Please read these instructions fully before starting assembly.
These instructions contain important information that will help you get the best from your
chainsaw, ensuring it is assembled correctly and safely.
If you need help or have damaged or missing parts, call the Customer Helpline on 01904 727500
prior to returning product to store.
July 2014 Rev A
Contents Safety Information
Important - Please read these instructions fully before operation or maintainance
Safety Information..............................................................................................................................................3
In the Box...........................................................................................................................................................9
Preparing to Operate the Chainsaw...............................................................................................................10
Operating the Chainsaw.................................................................................................................................14
Warning Symbols
The following warning symbols appear through this manual and indicate the appropriate safety
measures you should take when operating and maintaining the chainsaw.
Before any use, refer to the corresponding paragraph in the present manual.
Maintenance and Storage...............................................................................................................................19
Troubleshooting...............................................................................................................................................24
Technical Data.................................................................................................................................................25
Disposal...........................................................................................................................................................26
This symbol, before a safety comment, indicates a precaution, a warning or a danger.
Ignoring this warning can lead to an accident for yourself or for others. To limit the risk of
injury, fire, or electrocution always apply the recommendations indicated.
Getting Help.....................................................................................................................................................26
Guarantee........................................................................................................................................................27
Conforms to European standards.
The exhaust gas is poisonous and asphyxiating. If inhaled it may even be lethal. Do not
operate the engine in closed or poorly ventilated places.
Petrol and petrol vapours are extremely inflammable.
Do not touch to prevent burns.
Wear hearing protection and eye protection when using the device.
Wear robust footwear when using the device.
Wear protective gloves when using the device.
2
Customer Helpline 01904 727500
www.gardenservicecentre.co.uk
Customer Helpline 01904 727500
www.gardenservicecentre.co.uk
3
Safety Information
Safety Information
Important - Please read these instructions fully before operation or maintainance
Important - Please read these instructions fully before operation or maintainance
Warning Symbols
General Safety
Guaranteed Sound power level data (115dB) in accordance with Directive 2000/14/EC
WARNING!
- Keep this operating and maintenance manual in a safe place for reference at a later date.
- Read the instructions carefully. Be familiar with the controls and the proper use of the equipment.
Beware of kickback (recoil).
- Never allow children or people unfamiliar with these instructions to use the chainsaw. Local
regulations can restrict the age of the operator.
- Never saw while people, especially children or pets are nearby. Keep in mind that the user is
responsible for accidents or hazards occurring to other people or their property.
Avoid contact with the tip of the guide bar (chain return point). This will result in kickback of
the chainsaw.
Do not hold the saw with one hand.
- This appliance is not intended for use by persons (including children) with reduced physical,
sensory or mental capabilities or lack of experience and knowledge, unless they have been
given supervision or instruction concerning use of the appliance by a person responsible for their
safety.
- Do not touch chain.
Preparation
Hold the saw firmly with both hands. Place your right hand on the rear handle and your left
hand on the front handle.
Do not start or use the equipment close to people (especially children) or animals. During
operation, it is recommended that a minimum distance of 10 metres from other people be
maintained.
General Safety
- DO NOT operate a chainsaw with one hand! Serious injury to the operator, helpers, bystanders or
any combination of these persons may result from one-handed operation. A chainsaw is intended
for two-handed use only.
- Do NOT use the saw if you are tired, ill or under the influence of alcohol and/or drugs.
- Use safety footwear, snug-fitting clothing, protective gloves as well as eye, hearing and head
protection devices.
- Use caution when handling fuel. Move the chainsaw at least 10 feet (3m) away from the fueling
point before starting the engine.
The chain is designed exclusively for sawing wood. You may only fell trees if you have received
the appropriate training. The manufacturer cannot be held liable for damage caused by improper
or incorrect usage.
Please note that our equipment has not been designed for use in commercial, trade or industrial
applications. Our warranty will be voided if the machine is used in commercial, trade or industrial
businesses or for the equivalent purposes.
4
WARNING!
Customer Helpline 01904 727500
www.gardenservicecentre.co.uk
- DO NOT allow other persons to be near when starting or cutting with the chainsaw. Keep
bystanders and animals out of the work area.
- DO NOT start cutting until you have a clear work area, secure footing, and a planned retreat path
from falling trees or branches.
Customer Helpline 01904 727500
www.gardenservicecentre.co.uk
5
Safety Information
Safety Information
Important - Please read these instructions fully before operation or maintainance
Important - Please read these instructions fully before operation or maintainance
Operation
Operation (continued)
- Please note that our equipment has not been designed for use in commercial, trade or industrial
applications. Our warranty will be voided if the machine is used in commercial, trade or industrial
businesses or for the equivalent purposes.
WARNING!
- Keep all parts of your body away from the saw’s chain when the engine is running.
- Before you start the engine, make sure that the chain is not in contact with anything.
- Carry the chainsaw with the engine stopped, the chain bar and saw chain facing rearwards, and with
the exhaust away from your body.
- NEVER use a chainsaw which is damaged, incorrectly set, incomplete or loosely assembled. Make
sure that the chain rotation stops when the chain brake is applied.
- Shut off the engine before setting the chainsaw down.
- Use extreme caution when cutting a small size bush and saplings because slender material may
catch in the saw chain and be whipped towards you or pull you off balance.
- When cutting a limb that is under tension, be alert for spring back so that you will not be struck when
the tension in the wood fibers is released.
- Keep the handles dry, clean, and free of oil or fuel mixture.
- Operate the chainsaw only in well-ventilated areas.
- DO NOT operate a chainsaw from in a tree unless you have been specifically trained to do so.
Kickback
Kickback may occur when the nose or tip of the chain bar touches an object, or when the wood
closes in and pinches the saw chain in the cut. If the bar tip contacts, it may cause a extremely
fast reverse reaction, kicking the chain bar up and back towards the operator. Pinching the saw
chain along the top of the chain bar may push the chain bar rapidly back towards the operator.
Either of these reactions may cause you to lose control of the saw, which could result in serious
personal injury. Do not rely exclusively upon the safety devices built into your saw. As a chainsaw
user, you should take several steps to keep your cutting jobs free from accident or injury.
NOTE! With a basic understanding of kickback, you can reduce or eliminate the element of
surprise. Sudden surprise contributes to accidents.
- Keep a good firm grip on the saw with both hands, the right hand on the rear handle, and the
left hand on the front handle, when the engine is running. Use a firm grip with thumbs and fingers
encircling the chainsaw handles. A firm grip will help you reduce kickback and maintain control of
the saw. Never let go of the Chainsaw.
- All chainsaw servicing, other than the items listed in the user manual safety and maintenance
instructions should be performed by competent chainsaw service personnel.
- Make sure that the area in which you are cutting is free from obstructions. Do not let the nose
of the chain bar contact a log, branch, or any other obstruction which could be hit while you are
operating the saw.
- When transporting your chainsaw, use the appropriate chain bar cover.
- Cut at high engine speeds.
- DO NOT operate your chainsaw near or around flammable liquids or gases whether in or out of
doors. An explosion and/or fire may result.
- Do not overreach or cut above shoulder height.
- Do not fill the fuel tank, oil reservoir or lubricate whilst the engine of the chainsaw is running.
- Only use replacement bars and chains specified by the manufacturer or the exact equivalent.
- USE THE CORRECT TOOL: Cut wood ONLY. Do not use the chainsaw for purposes for which
it was not intended. For example, do not use the chainsaw for cutting plastic, masonry or building
materials.
- PINCHING the saw chain along the BOTTOM of the cutting (chain) bar may PULL the saw
forward away from the operator.
- The engine will create toxic exhaust fumes as soon as the engine is started. Never work in enclosed
areas or in areas with poor ventilation.
NOTE! The chainsaw is designed for non-commercial, occasional use for general work such as
stump grubbing, cutting firewood, etc. It is not designed for lengthy use. If it is used for a lengthy
period, the vibrations it causes in the hands of the user may result in circulation problems (white finger
syndrome).
- Follow the manufacturer’s sharpening and maintenance instructions for the saw chain.
- PINCHING the saw chain along the TOP of the cutting (chain) bar may PUSH the chain bar
rapidly back towards the operator.
- Any of these reactions may cause you to lose control of the saw, which could result in serious
personal injury.
- The chain is designed exclusively for sawing wood. You may only fell trees if you have received
the appropriate training. The manufacturer cannot be held liable for damage caused by improper or
incorrect usage.
6
Customer Helpline 01904 727500
www.gardenservicecentre.co.uk
Customer Helpline 01904 727500
www.gardenservicecentre.co.uk
7
In
the Box
Safety Information
Important - Please read these instructions fully before operation or maintainance
Kickback (continued)
A
A
B
Tools
Parts
Chainsaw
C
1
Screw driver
2
Plug wrench
3
Mixing bottle
A
A
A
E
D
Beware of the following: Rotary recoil.
A = Recoil direction
B = Recoil reaction zone
Impact/Jamming recoil and pulling reactions
When cutting from under an object (See Pic D) using the top of the chain the object may pinch
the chain and cause either a forward force on the chainsaw or a rearward force on the object
(See Pic C).
When cutting from the top surface of an object (Pic E) using the bottom of the chain the object
may pinch the chain and cause either a rearward force on the chainsaw or a forward force on the
object.
40: 1
Maintenance and Storage Safety
1
- Keep all nuts, bolts and screws tight to be sure the equipment is in safe working condition;
- Never store the equipment with petrol in the tank inside a building where fumes can reach an
open flame or spark;
5
3
2.5 5
2.5
2
- Allow the engine to cool before storing in any enclosure;
- To reduce the fire hazard, keep the engine, silencer and petrol storage area free of hedge,
leaves, or excessive grease;
- Replace worn or damaged parts for safety;
- If the fuel tank has to be drained, this should be done outdoors.
You will also need 2-Stroke engine oil according JASO FC classic, unleaded fuel and special chainsaw
oil.
Any parts missing? Call the customer helpline on 01904 727500, most parts can be send out on next
day delivery.
NOTE! Dispose of soiled maintenance material and operating materials at the appropriate
collection point. Recycle packaging material, metal and plastics.
8
Customer Helpline 01904 727500
www.gardenservicecentre.co.uk
Customer Helpline 01904 727500
www.gardenservicecentre.co.uk
9
Preparing
to Operate the Chainsaw
Preparing
to Operate the Chainsaw
Safety features
Step 1 - Chain brake mechanical test
b
WARNING!
a
The purpose of the chain brake is to reduce the possibility of injury due to kickback; however, it
cannot provide the intended measure of protection if the saw is operated carelessly.
Always test the chain brake before using your saw and periodically while on the job.
d
a
b
e
c
a. LOW KICKBACK SAW CHAIN: helps significantly reduce kickback, or the intensity of kickback,
due to specially designed depth gauges and guard links.
b i. CHAIN BRAKE: is a safety feature designed to reduce the possibility of injury due to kickback
by stopping a moving saw chain in milliseconds. It is activated by the CHAIN BRAKE lever.
b ii. CHAIN BRAKE LEVER / HAND GUARD: protects the operator’s left hand in the event it slips
off the front handle while saw is running in the event of kick back.
c. STOP SWITCH: immediately stops the engine when tripped. Stop switch must be pushed to
the “START” position to start or restart engine.
d. SAFETY TRIGGER LOCK: prevents accidental acceleration of the engine. Throttle trigger
cannot be squeezed unless the safety latch is depressed.
e. CHAIN CATCHER: reduces the danger of injury in the event saw chain breaks or derails
during operation. The chain catcher is designed to intercept a whipping chain.
NOTE! Study your saw and be familiar with its parts.
10
Customer Helpline 01904 727500
www.gardenservicecentre.co.uk
Your chainsaw is equipped with a chain brake that reduces possibility of injury due to kickback.
The brake is activated if pressure is applied against the brake lever when, as in the event of
kickback, the operator’s hand strikes the lever. When the brake is actuated, chain movement
stops abruptly.
Before starting, to test the chain brake. (Push it forward until an audible click is heard).
a. The Chain brake is DISENGAGED (chain can move by hand) when the BRAKE LEVER IS
PULLED BACK AND LOCKED.
b. The chain brake is ENGAGED (the chain is locked) when the brake lever is pushed forward. It
should not be possible to move the chain by hand.
WARNING! The brake lever should snap into both positions. If this is not the case do not use
your saw. Contact the helpline immediately on 01904 727500
Customer Helpline 01904 727500
www.gardenservicecentre.co.uk
11
Preparing
to Operate the Chainsaw
Preparing
to Operate the Chainsaw
Step 2 - Adjust the chain tension
Step 3 - Filling with Engine Fuel and lubrication
This product is powered by a 2-Stroke engine and requires pre-mixing of petrol and 2-stroke oil.
Use a high quality 2-Stroke engine oil according JASO FC classic. Do not use automotive oil or
2-stroke outboard oil. DO NOT mix quantities larger than usable in a 30 day period.
loose
loose
5
1
2
B
A
tight
D
40:1
tight
Use
matching
numbers
C
5
chain tension screw
chain cover lever
FUEL MIXTURE: 1 Litre (1000 ml) petrol: 25cc (25 ml) 2 Stroke engine oil (40:1 ratio)
Using a funnel and keeping the bottle level, pour the fuel in the left hand side (‘A’) up to the required
level eg 2.5 or 5 then fill the right hand side (‘B’) up to the same corresponding mark with oil. Shake
vigorously to mix the two products prior to pouring into the tank (C).
1a Pull the chain cover lever out, and slightly loosen the chain cover.
NOTE! Use 5 for 500ml fuel mixture and 2.5 for 250ml fuel mixture.
1b Take off the blade protector. While holding up the tip of the bar, adjust the chain tension by
turning the tensioner screw until the chain engages in the bar channel.
FILLING THE LUBRICATION
1c While lifting tip of guide bar, tighten bar knob securely (clockwise). Hand tighten only!
NOTE! when tensioned correctly it should be possible to pull one full chain link free of the bar
channel with ease.
- A new chain will expand its length during the first period of use. Check and re-adjust the tension
frequently as a loose chain can easily derail or cause rapid wear of itself and the chain bar.
Whenever you refill the fuel tank with petrol you must also top up the level of chain oil in the chain
oil reservoir (D).
Use special chainsaw oil to lubricate the saw chain.
NOTE! Most stores will sell acceptable oil under the name “Chainsaw chain oil”.
FILLING FULE TANK
Clean surface around the fuel cap to prevent contamination. Loosen fuel cap slowly. Rest the cap
on a clean surface. Carefully pour fuel into the tank. Avoid spillage. Prior to replacing the fuel cap,
clean and inspect the seal located inside the fuel cap
. Immediately replace fuel cap and hand
tighten. Wipe up any fuel spillage.
NOTE! It is normal for smoke to be emitted from a new engine after first use.
CAUTION! If the saw chain is TOO LOOSE or TOO TIGHT the V-drive wheel, chain bar, chain
and crank shaft bearing will suffer premature wear. Above fig. shows the correct tension A (when
cold) and tension B (when warm). FIG C shows a chain that is too loose.
Important! The fuel mix is added into fuel tank(C), chain lubrication oil is filled into oil reservoir(D).
Seal one cap prior to removing the second cap. If you put the fluid into the wrong tank call the
customer helpline immediately at 01904 727500.
2 Tighten the chain cover.
12
Customer Helpline 01904 727500
www.gardenservicecentre.co.uk
Customer Helpline 01904 727500
www.gardenservicecentre.co.uk
13
Operating
the Chainsaw
Operating
the Chainsaw
Step 1 - Start the engine
Step 2 - Checking the oil supply
1a
1b
With the chainsaw fully assembled and adjusted it is important to check the chain oil supply is
dispensing adequate lubrication.
switch
Chain oil
1d
1c
A
increase
right way of
starting
decrease
Chain oil flow
adjusting
After starting the engine, run the chain at medium speed and see if chain oil is being dispensed
as shown.
B
WARNING!
With the chainsaw switched off the chain oil flow can be changed by inserting a screwdriver in
the hole on the bottom of the side of the clutch. Increase or decrease the oil flow according to
your work conditions. Restart the chainsaw and check the rate of flow meets your requirements.
Do not start the engine whilst holding the chainsaw in one hand. The saw chain may touch your
body. This is very dangerous.
NOTE! The oil reservoir should become nearly empty by the time fuel is used up. Be sure to refill
the oil reservoir every time when refueling the saw.
1a Engage the chain-brake (push it forward until an audible click is heard).
1b Set the switch to the “START” position.
1c Press and release the primer bulb (B) 10 times and ensure that the primer bulb is
approximately 3/4 filled with fuel before attempting to start.
Pull the choke control (A) out to engage.
1d While holding the saw unit securely on the ground, pull the start handle four times. at this
point, the engine will usually not start.
Step 3 - Check chain brake
This machine is equipped with a chain-brake that will immediately disable the chain upon the
occurrence of kickback during cutting. The brake is automatically operated by inertia forces,
which act on the weight fitted inside the front guard. This brake can also be operated manually
with the front guard pushed forward to the guide bar. To disengage the chain-brake, pull it back
until it touches the front handle.
a
b
1e Push the choke control in to disengage (failure to do this may cause the engine to flood).
1f Pull the start handle with smooth, continuous pulls no more than five times. If the engine does
not start, remove the spark plug, dry it with paper towel and replace. Repeat the start procedure.
1g Allow the saw to run and warm up in this position for 30 seconds.
1h. Disengage the chain-brake, by pulling it back.
a= brake disengage
- When restarting immediately after stopping the engine or when the engine is warm, it will not be
necessary to use the choke function.
b= brake engage
Make sure the cutting blade is pointing away from your body at all times, the chain may rotate
upon ignition.
Important! Be sure to test brake operation every time you use the machine and periodically
during the period of use.
NOTE! If you fail to start your machine or require further assistance, please contact our after
sales support team at 01904 727500 .
14
Customer Helpline 01904 727500
www.gardenservicecentre.co.uk
Customer Helpline 01904 727500
www.gardenservicecentre.co.uk
15
Operating
the Chainsaw
Operating
the Chainsaw
How to confirm if the chain brake is functioning correctly
Step 5 - Sawing
1. Turn off the engine and leave until cold.
WARNING!
2. With the chainsaw on a flat surface and the chain tensioned correctly, engage the chain-brake
by pushing it forward until an audible click is heard. Then, wearing protective gloves, attempt to
move the chain by hand in the direction of normal rotation if this is not possible the chain brake
has been engaged. If the brake is engaged when the chain is rotating at high speed for extended
periods of time this can cause damage to the clutch or for it to fail completely. When the brake is
activated whilst cutting, immediately release it having first released the throttle lever and set the
chainsaw to “STOP”.”
Before proceeding to your job, read the “Safety instructions” section. It is recommended to
first practice sawing easy logs. Ensure your logs are securely placed, using a saw or logging
horse.This also helps you get accustomed to your unit. Always follow the safety regulations.
This chainsaw is design to cut wood ONLY. Cutting any other materials with this machines is
DANGEROUS and will damage the machine. Vibrations and kickback will vary with materials
other than wood and the requirements of the safety regulations would not be met. Do not use
the chainsaw as a lever for lifting, moving or splitting objects. Do not lock it over fixed stands.
It is strictly forbidden to attach any accessories to this product other than those supplied by the
manufacturer.
Step 4 - Stop the engine
It is not necessary to force the saw into the cut. Apply only light pressure while running the
engine at full throttle.
Step 6 - Felling a Tree
WARNING!
switch
-You should have received training from a suitable person before attempting to fell a tree.”
- When you fell a tree, be sure to warn anyone in close proximity of the danger.B
1. Release the throttle lever to allow the engine to idle for a few seconds.
felling direction
45°
2. Set the switch to the “STOP” position.
NOTE! When you have finished using the saw, always relieve the tank pressure by loosening,
then retightening, the chain oil and fuel mix caps. Allow the engine to cool before storing.
2nd cut
1
1st cut
2
A
B
45°
Important: Do not put the chainsaw on the ground when it is still running. For additional safety,
Switch the chainsaw off when not in use or between cuts. In the event that the ignition switch will
not stop the saw, pull the choke control out and engage the chain brake to stop the engine. If the
ignition switch does not stop the saw when set to the “STOP” position. Have the ignition switch
repaired before using the chainsaw again to prevent unsafe conditions or serious injury.
1. When deciding the felling direction considering the wind, lean of the tree, location of heavy
branches, ease of job after felling and other factors.
2. While cleaning the area around the tree, arrange a good foothold and retreat path.
3. Make a notch cut one-third of the way into the tree on the felling side.
4. Make a felling cut from the opposite side of the notch and at a level slightly higher than the
bottom of the notch.
5. Escape path: First clear the tree base and work area of interfering limbs and brush and clean
its lower portion with an axe. Then, establish two paths of escape (B) and remove all obstacles.
These paths should be generally opposite to the planned direction of the fall of the tree (A) and
about at a 45° angle. Place all tools and equipment a safe distance away from the tree, but not
on the escape paths.
16
Customer Helpline 01904 727500
www.gardenservicecentre.co.uk
Customer Helpline 01904 727500
www.gardenservicecentre.co.uk
17
Operating
the Chainsaw
Maintenance
and Storage
Step 7 - Bucking and limbing
List of vulnerable parts
WARNING!
- Always ensure a stable foothold. Do not stand on the log.
- Be alert to the rolling over of a cut log. Especially when working on a slope, stand on the uphill
side of the log.
- Follow the instructions in “Safety Instructions” to avoid kickback from the saw.
- Before starting work, check the direction of the bending force inside the log to be cut. Always
finish cutting from the opposite side of the bending direction to prevent the chain bar from being
trapped in the cut.
Description
Spark Plug
Guide bar
Saw chain
Clutch drum
Models or specifications
LD L8RTF/902700
180SDEA041
91P063X
910221
Maintenance after each use
WARNING!
Before cleaning, inspecting or repairing your unit, make sure that the engine has stopped and is
cool. Disconnect the spark plug to prevent accidental starting.
- Do not use an unstable foothold or ladder.
- Do not overreach.
- Do not cut above shoulder height.
- Always use both hands to grip the saw.
Air filter
FIG A
FIG B
FIG C
A log lying on the ground (FIG A)
FIG D
Saw down halfway, then roll the log over and cut from the opposite side.
A log supported off the ground (FIG B)
Dust on the air filter surface can be removed by detaching the engine cover, removing the filter
and tapping a corner of the filter cover against a hard surface. To clean dirt in the meshes remove
the cover and brush in petrol. When using compressed air, blow from the inside. To reassemble
push the cover back into place, press the rim until it clicks.
In area A, saw up from the bottom one-third and finish by sawing down from the top. In area B,
saw down from the top one-third and finish by sawing up from the bottom.
2. Oiling port
Cutting limb of a fallen tree (FIG C)
3. Chain bar
First check to which side the limb is bent. Then make an initial cut from the bend side and finish
by sawing from the opposite side.
When the chain bar is dismounted, remove sawdust from the bar groove and the oiling port.
WARNING! Be alert to the spring back of a cut limb.
4. Others
Pruning of a standing tree (FIG D)
Check for fuel leakage and loose fastenings and damage to major parts, especially handle joints
and chain bar mounting and silencer. If any defects are found, make sure to have them repaired
before operating the unit again.
Customer Helpline 01904 727500
19
www.gardenservicecentre.co.uk
Cut up from the bottom, finish down from the top.
18
1. Air filter
Customer Helpline 01904 727500
www.gardenservicecentre.co.uk
Detach the chain bar and check the oiling port for clogging.
Grease the nose sprocket through the grease port on the tip of the bar.
Maintenance
and Storage
Maintenance
and Storage
How to Replace the Saw
How to Replace the Saw (continued)
NOTE! It is very important for smooth and safe operation to cut with a sharp chain. The chain
needs replacing when:
When tensioned correctly it should be possible to pull one full chain link free of the bar channel
with ease see image (1d).
1. Sawdust becomes powder-like.
8. Tighten the nuts securely finger tight. Then check the chain for smooth rotation and proper
tension while moving it by hand. If necessary, loosen the chain cover.
2. Cutting requires extra force.
9. Tighten the tensioner nuts.
3. The chainsaw does not cut straight and clean.
4. Vibration increases.
5. Fuel consumption increases.
1a
1b
NOTE! A new chain will expand its length during the first period of use. Check and re-adjust the
tension frequently as a loose chain can easily derail or cause rapid wear of itself and the chain
bar.
1d
1c
CAUTION! If the saw chain is TOO LOOSE or TOO TAUT, the Vdrive wheel, chain bar, chain and
crank shaft bearing will suffer premature wear. FIG 8 shows the correct tension A (when cold)
and tension B (when warm). FIG C shows a chain that is too loose.
Periodical service points
Direction of chain
A
Tension
pin
5
4
3
1a Pull the chain-brake back and ensure that it has been released (the chain cover can only be
removed with the chain-brake disengaged).
1b Then remove the securing nuts and the chain cover
1c Fit the chain around the bar ensuring that the direction of the chain is as depicted in the
picture on the bar. Fit the chain on the sprocket. Adjust the position of chain tensioner so the
tensioner pin locates in the hole (A) on the bar.
1
1. Start assembly
5. Adjust the tension to ensure that there is not too much slack in the chain. Make sure the
tensioner pin is located in the assembly hole on the bar. Pay attention to the correct direction of
the saw chain. Compare with the picture near the chain sprocket and the picture on the bar.
2. Fan cover
6. Fit the chain cover to the power unit.While lifting tip of guide bar, tighten bar knob securely
(clockwise). Hand tighten only!
4. Cylinder fins
7. While holding up the tip of the bar, adjust the chain tension by turning the tensioner screw until
the chain engages in the bar channel.
20
2
Customer Helpline 01904 727500
www.gardenservicecentre.co.uk
3. Fan
5. Engine cover
Customer Helpline 01904 727500
www.gardenservicecentre.co.uk
21
Maintenance
and Storage
Maintenance
and Storage
Maintenance of the saw chain and chain bar
Maintenance of the saw chain and chain bar (continued)
1. Air cooling system
After every cutter has been set, check the depth gauge and file it to the proper level as illustrated.
Dust clogging around the cooling system and the cylinder fins will cause overheating of the engine.
Periodically check and clean the cooling system and the cylinder fins with a brush after removing
the cylinder cover, the air cleaner and the recoil case. When installing the cylinder cover and the
cooling system, make sure that switch wires and grommets are positioned correctly in place.
Make sure every cutter has the same length and angle as illustrated.
Chain Bar
NOTE! Be sure to unblock the air intake hole.
Cutter setting guidance
WARNING! Be sure to wear safety gloves.
1. Reverse the bar occasionally to prevent partial wear.
Before filing:
1. Make sure the saw chain is held securely.
2. Make sure the engine is stopped.
3. Use a round file with the proper size for your chain
Note: Chain type: Oregon 91PJ063X File size: 5/32 in (4.0 mm)
Place your file on the cutter and push straight forward. Position the file position as illustrated.
22
Customer Helpline 01904 727500
www.gardenservicecentre.co.uk
2. The bar rail should always have parallel internal faces (see diagram). Check for wear of the
bar rail. Apply a ruler to the bar and the outside of a cutter. If a gap is observed between them,
the rail is normal. Otherwise, the bar rail is worn. Such a bar needs to be corrected or replaced.
Storage
Storage the chainsaw before empty the lubrication tank and fuel tank.
Customer Helpline 01904 727500
www.gardenservicecentre.co.uk
23
Troubleshooting
Technical
Data
General Troubleshooting
Technical Data Table
CAUTION!
- Always switch off the engine and pull the ignition cable before starting any inspection or
adjustment work.
- If, after making an adjustment or repair to the engine, you let it run for a few minutes,
remember that the exhaust and other parts will get hot. Thus, do not touch parts that emanate
heat, as these may burn you.
The following table provides solutions to common problems encountered with the chainsaw.
Fault
Possible Cause
Solution
1. Incorrect starting procedures
1. Follow instructions in the User Guide
or refer to the starting procedure check
list on page 14
2. Incorrect carburetor mixture
adjustment setting
Unit won’t start or
starts but will not run
3. Fouled spark plug
2. Have carburetor adjusted by an
Authorised Service Centre
4. Fuel filter blocked
3. Clean/gap or replace plug
5. Chain brake is on
4. Replace fuel filter
5. Put Chain brake in off position
1. Incorrect lever position on choke 1. Move to RUN position
Unit starts, but engine 2. Dirty air filter
has low power
3. Incorrect carburetor mixture
adjustment setting
Engine hesitates
1. Incorrect carburetor mixture
adjustment setting
No power under load 1. Incorrectly gapped spark plug
2. Remove, clean and reinstall filter
3. Have carburetor adjusted by an
Authorised Service Centre
1. Have carburetor adjusted by an
Authorised Service Centre
45.4 cm3
1.6 kW
45 cm
42 cm
(0.050˝), 1.27 mm
3300 min-1
11500 min-1
16.7m/s
270 ml
190 ml
Yes
6 Teeth x 9.255 mm
Yes
Yes
Yes
Yes
5 kg
5.8 kg
450g / kWh
101 dB(A) K=3 dB(A)
115 dB(A)
max. 3.04 m/s2 K=1.5 m/s2
max. 5.10 m/s2 K=1.5 m/s2
Oregon 91PJ063X
Oregon 180SDEA041
L8RTF
1. Clean/gap or replace plug
Runs erratically
1. Incorrect carburetor mixture
adjustment setting
1. Have carburetor adjusted by an
Authorised Service Centre
Smokes excessively
1. Incorrect fuel mixture
1. Use properly mixed fuel (40:1 mix)
Poor performance
when operated
1. Blunt chain
1. Sharpen or replace the chain
2. Loose chain
2. Tension the chain
1. Empty petrol tank
1. Fill up the petrol tank
2. Fuel filter in the wrong position
in the tank
2. Completely fill the petrol tank or reposition the fuel filter in the petrol tank
Engine dies
Engine displacement
Maximum engine capacity
Bar length
Cutter rail length
Chain gauge
Idling speed
Maximum speed with cutting equipment
Chain speed
Fuel tank capacity
Oil tank capacity
Anti-vibration function
Chain wheel teeth
Chain brake
Clutch
Automatic chain lubrication
Low-kickback chain
Net weight without chain and chain bar
Net weight (dry)
Fuel consumption (specific)
LpA sound pressure level
LWA sound power level
Vibration ahv (front handle)
Vibration ahv (rear handle)
Chain type
Bar type
Spark plug
1. Top up the oil tank for the chain
Insufficient chain
1. Empty oil tank for the chain
lubrication (the cutter
rail and chain get hot) 2. Oil lubrication opening blocked
2. Clean the oil lubrication hole in the
cutter bar (FIG5/Item A)
Clean the groove in the cutter bar
24
Customer Helpline 01904 727500
www.gardenservicecentre.co.uk
Customer Helpline 01904 727500
www.gardenservicecentre.co.uk
25
Disposal
Guarantee
Disposal Instructions
The chainsaw and its accessories are made of various recyclable materials. Dispose of the
chainsaw in accordance with your local recycling regulations.
Dear Customer,
In the unlikely event that your device develops a fault, please contact our Customer service
department on the telephone number shown below.
1. These guarantee terms cover additional guarantee rights and do not affect your statutory
warranty rights.
Getting
Help
Customer Helpline 01904 727500
Our dedicated UK based customer helpline is open 7 days a week to assist you with assembly,
parts queries and technical support. We are open during office hours but you can always send an
email via [email protected]. Our experts are here to get you back enjoying
your garden in no time.
For useful assembly, starting and maintenance videos and ordering spares please visit
www.gardenservicecentre.co.uk.
Calling our service does not affect your statutory rights
UK/Ireland 01904 727500
Monday to Friday 9am – 5pm. Saturday & Sunday 11am – 4pm
www.gardenservicecentre.co.uk
email : [email protected]
Claims must be accompanied by Proof of Purchase. This must be in the form of a Sales receipt
or Bank statement and must show that the product has been purchased within 2 years prior to
the claim, from the retailer that it was originally sold to.
2. Our guarantee covers problems caused by material or manufacturing defects, and will result
in the repair of these defects or replacement of the device with a like for like or similar article.
Please note that our devices have not been designed for use in commercial, trade or industrial
applications. Consequently, the guarantee is invalidated if the equipment is used in commercial,
trade or industrial applications or for other equivalent activities.
3. The following are also excluded from our guarantee:
A) Faults due to accidents, customer misuse, or unauthorized repairs
B) Consumable Parts such as Blades/ /Spark plugs or Filters
C) Failure due to lack of routine maintenance
D) Failure as a result of not using the equipment in accordance with the manual and safety
instructions
E) The adjustment of cables, drive belts, or recoil starters
4. The guarantee is valid for a period of 2 years starting from the purchase date of the device.
Guarantee claims should be submitted before the end of the guarantee period within two weeks
of the defect being noticed. No guarantee claims will be accepted after the end of the guarantee
period. The original guarantee period remains applicable to the device even if repairs are carried
out or parts are replaced. In such cases, the work performed or parts fitted will not result in
an extension of the guarantee period, and no new guarantee will become active for the work
performed or parts fitted. This also applies when an on-site Service is used.
5. Please keep your sales receipt in a safe place. If the defect is covered by our guarantee your
device will either be repaired under the terms of guarantee or we will send you a replacement
device. This device may be re-conditioned or Like for like replacement.
26
Customer Helpline 01904 727500
www.gardenservicecentre.co.uk
Customer Helpline 01904 727500
www.gardenservicecentre.co.uk
27