1
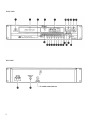
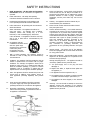
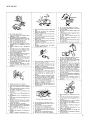
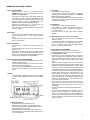
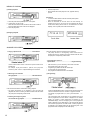
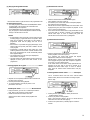
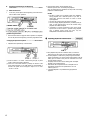
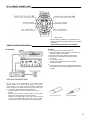
STEREO CD PLAYER
DN-600F
OPERATING INSTRUCTIONS
IMPORTANT TO SAFETY
LABELS (for U.S.A. model only)
WARNING:
TO PREVENT FIRE OR SHOCK HAZARD, DO NOT EXPOSE THIS
APPLIANCE TO RAIN OR MOISTURE.
CAUTION:
1. Handle the power supply cord carefully
Do not damage or deform the power supply cord. If it is damaged or deformed, it may cause
electric shock or malfunction when used. When removing from wall outlet, be sure to remove
by holding the plug attachment and not by pu0lling the cord. 2. Do not open the top
cover In order to prevent electric shock, do not open the top cover. If problems occur,
contact your DENON dealer. 3. Do not place anything inside Do not place metal objects
or spill liquid inside the CD player. Electric shock or malfunction may result.
Please, record and retain the Model name and serial number of your set
shown on the rating label.
Model No. DN-60OF
Serial No.
CAUTION: USE OF CONTROLS OR ADJUSTMENTS OR PERFORMANCE OF
PROCEDURES OTHER THAN THOSE SPECIFIED HEREIN MAY RESULT IN
HAZARDOUS RADIATION EXPOSURE.
THE COMPACT DISC PLAYER SHOULD NOT BE ADJUSTED OR REPAIRED BY
ANYONE EXCEPT PROPERLY QUALIFIED SERVICE PERSONNEL.
NOTE:
This unit may cause interference to radio and television reception if you do not
operate it in strict accordance with this OPERATING INSTRUCTIONS.
This unit complies with Class B computing device rules in accordance with the
specifications in Sub-part J or Part 15 of the FCC Rules, which are designed to
provide reasonable protection against such interference in a residential installation.
If the unit does cause interference to any radio or television reception, try to
reduce it by one or more of the following means:
a) Turn the other unit to improve reception b) Move this
unit
c) Move this unit away from others d) Plug this unit respectively into a
different AC outlet
" This is note in accordance with Section 15.838 of the FCC Rules.
FOR U.S.A. & CANADA MODEL ONLY
CAUTION
TO PREVENT ELECTRIC SHOCK DO NOT USE THIS (POLARIZED)
PLUG WITH AN EXTENSION CORD, RECEPTACLE OR OTHER
OUTLET UNLESS THE BLADES CAN BE FULLY INSERTED TO
PREVENT BLADE EXPOSURE.
POUR LES MODELES AMERICAINS ET CANADIENS
UNIQUEMENT
ATTENTION
POUR PREVENIR LES CHOCS ELECTRIQUES NE PAS UTILI
SER CETTE FICHE POLARISEE AVEC UN PROLONGATEUR
UNE PRISE DE COURANT OU UNE AUTRE SORTIE DE
COURANT, SAUF SI LES LAMES PEUVENT ETRE INSEREES A
FOND SANS EN LAISSER AUCUNE PARTIE A DECOUVERT.
NOTE:
This CD player uses the semiconductor laser. To allow you to enjoy music at a stable
operation, it is recommended to use this in a room of 5°C (41 °F) - 35°C (95°F).
CLASS 1 LASER PRODUCT
LUOKAN 1 LASERLAITE
KLASS 1 LASERAPPARAT
FRONT PANEL
REAR PANEL
3
SAFETY INSTRUCTIONS
1.
Read Instructions - All the safety and operating
instructions should be read before the appliance is
operated.
2.
Retain Instructions - The safety and operating
instructions should be retained for future reference.
3.
12.
Power-Cord Protection - Power-supply cords should be
routed so that they are not likely to be walked on or
pinched by items placed upon or against them, paying
particular attention to cords at plugs, convenience
receptacles, and the point where they exit from the
appliance.
Heed Warnings-All warnings on the appliance and
in the operating instructions should be adhered to.
14.
Cleaning - The appliance should be cleaned only as
recommended by the manufacturer.
4.
Follow Instructions - All operating and use instructions
should be followed
15.
Power Lines-An outdoor antenna should be located
away from power lines.
5.
Water and Moisture - The appliance should not be
used near water - for example, near a bathtub,
washbowl, kitchen sink, laundry tub, in a wet
basement, or near a swimming pool, and the like.
16.
Outdoor Antenna Grounding - If an outside antenna is
connected to the receiver, be sure the antenna system
is grounded so as to provide some protection against
voltage surges and built-up static charges. Article 810
of the National Electrical Code, ANSI/NFPA 70, provides
information with regard to proper grounding of the
mast and supporting structure, grounding of the
lead-in wire to an antenna discharge unit, size of
grounding conductors, location of antenna-discharge
unit, connection to grounding electrodes, and
requirements for the grounding electrode. See Figure
A.
17.
Nonuse Periods - The power cord of the appliance
should be unplugged from the outlet when left unused
for a long period of time.
18.
Object and Liquid Entry - Care should be taken so that
objects do not fall and liquids are not spilled into the
enclosure through openings.
Carts and Stands - The appliance should be used only
with a cart or stand that is recommended by the
manufacturer.
6A. An appliance and cart
combination should be moved
with care. Quick stops,
excessive force, and uneven
surfaces may cause
the appliance and cart
combination to overturn.
7.
Wall or Ceiling Mounting -The appliance should be
mounted to a wall or ceiling only as recommended by
the manufacturer.
8.
Ventilation -The appliance should be situated so that its
location or position does not interfere with its proper
ventilation. For example, the appliance should not be
situated on a bed, sofa, rug, or similar surface that may
block the ventilation openings; or, placed in a built-in
installation, such as a bookcase or cabinet that may
impede the flow of air through the ventilation openings.
9.
4
Damage Requiring Service - The appliance should be
serviced by qualified service personnel when:
A. The power-supply cord or the plug has been
damaged; or
B. Objects have fallen, or liquid has been spilled into
the appliance; or
Heat -The appliance should be situated away from heat
sources such as radiators, heat registers, stoves, or
other appliances (including amplifiers) that produce
heat.
10.
Power Sources-The appliance should be connected
to a power supply only of the type described in the
operating instructions or as marked on the appliance.
11.
Grounding or Polarization - Precautions should be
taken so that the grounding or polarization means of
an appliance is not defeated.
C. The appliance has been exposed to rain; or
D. The appliance does not appear to operate normally
or exhibits a marked change in performance; or
20.
E. The appliance has been dropped, or the enclosure
damaged.
Servicing - The user should not attempt to service the
appliance beyond that described in the operating
instructions. All other servicing should be referred to
qualified service personnel.
NOTE ON USE:
5
Thank you for purchasing this DENON Compact Disc Player. Please
read the operating instructions thoroughly in order to acquaint
yourself with the CD player and achieve maximum satisfaction from
it.
TABLE OF CONTENTS FEATURES ..................................................................................6
NAMES AND FUNCTIONS OF PARTS .........................................7, 8
CONNECTION .............................................................................9
OPENING AND CLOSING THE DISC HOLDER AND
LOADING A DISC .........................................................................9
NORMAL CD PLAYBACK ............................................................. 10
ADVANCED CD PLAYBACK ...................................................10 ~12
RC-41 REMOTE CONTROL UNIT ................................................. 13
TIMER-CONTROLLED PLAYBACK ................................................ 13
INSTALLATION PRECAUTIONS ................................................... 13
THE COMPACT DISC .................................................................. 14
TROUBLESHOOTING ................................................................. 14
SPECIFICATIONS ....................................................................... 14
Please check to make sure the following items are included with
the main unit in the carton:
(1) Operating Instructions ............................................................1
(2) Connection Cord ....................................................................1
FEATURES
The DN-60OF Compact Disc Player incorporates DENON's Super
Linear Converter which prevents deterioration of sound quality in
PCM playback systems. This assures accurate reproduction of the
digital signals recorded on compact discs no matter whether they are
pure studio recordings or "live" performance recordings. All parts
making up this CD player have selected with the greatest care in
order to produce high quality realistic playback of the full musical
content on compact discs.
Double Super Linear Converter
The use of DENON's unique system and D/A converters with
excellent resolution to prevent zero cross distortion, the main
cause of reduced sound quality in the PCM playback system,
make for sound field reproduction with rich musical expression.
(2) High Performance Digital Filter
The DN-60OF uses independent D/A converters for the left and
right channels and an 8x oversampling high precision digital
filter to bring out the best of the analog filter and offer clear,
crisp sound.
(3) Simple Playback of 8cm CD Singles
8cm CD singles can be played without using an adaptor.
(4) Digital Output (Coaxial)
The data on the compact disc is output in digital form, so
playback is possible with an external digital processor or D/A
unit.
IMPORTANT
(CANADIAN MODEL ONLY)
This digital apparatus does not exceed the Class B limits for
radio noise emissions from digital apparatus setout in the
Radio Interference Regulations of the Canadian Department of
Communication.
Line Voltage Selection (for multiple voltage model only)
The desired voltage may be set with the VOLTAGE SELECTOR knob on the rear panel, using a
screwdriver. Do not twist the VOLTAGE SELECTOR knob with excessive force as this may cause
damage. If the VOLTAGE SELECTOR knob does not turn smoothly, please contact a qualified
serviceman.
6
NAMES AND FUNCTIONS OF PARTS
1. Power Switch (POWER)
When the power is turned on, "(00)" appears on the
TRACK NO. display, and if no disc is loaded, "(00 oooo )"
appears on the digital display.
If the power is turned on with a disc already loaded, the
total number of tracks on the disc is displayed on the
TRACK N0. display, the total time is displayed on the TIME
display, the numbers on the music calendar light up to the
number of tracks on the disc, and playback begins.
Whenever the power switch is in the OFF state, the
apparatus is still connected on AC line voltage.
Please be sure to unplug the cord when you leave home
for, say, a vacation.
2. Disc Holder
Place the disc on the disc holder with the label facing up.
Use the open/close button to open and close the disc
holder.
The disc holder may also be closed by pressing the play
button or pause button.
3. Open/Close Button
The disc holder is opened and closed by pressing this
button.
Press this button once to open the disc holder, and once
again to close it.
When the disc holder is closed with a disc loaded, the disc
will rotate for a couple of seconds while the disc contents
are read. The number of tracks and total playback time on
the disc are then displayed on the digital display.
4. Remote Control Sensor (REMOTE SENSOR)
This sensor receives the infrared light transmitted from the
wireless remote control unit.
Point the separately sold RC-41 or RC-U620 remote control
unit at this sensor when operating it.
When a signal is transmitted from the remote control unit,
the remote control indicator in the display will light up
briefly.
5. Display
The digital display is divided into sections, such as displays
for track number, playback time and calendar, as shown
below.
7. Stop Button
Press this button to stop playback.
The disc will stop rotating, and the number of tracks and
total playing time of the disc are displayed on the TRACK
NO. and TIME displays, respectively.
• In case programmed playback is engaged when this button
is pressed, the number of tracks and total playing time of
the program are displayed.
8. Pause Button
Press this button to stop playback temporarily.
• If this button is pressed during playback, playback is
stopped temporarily, the PLAY indicator goes out and the
PAUSE indicator lights.
Press this button or the play button again to continue
playback.
9. Number Buttons (1, 2, 3, 4, 5, 6, 7, 8, 9 and 10)
Use these buttons for the direct search and program
memory functions.
For direct search, press for example button 03 if you want
to hear track number 3. For track number 12, press +10
then 2. To program tracks, press the PROG/ DIRECT
button 10 to set to the program mode.
10. Program Button (PROG/DIRECT)
Press this button when you want to enter tracks for
programmed playback. (Refer to page 10, 11 for details.)
11. Auto Edit Button (A. EDIT)
• The tracks on a CD are automatically split into two halves,
Side A and Side B, like an analog disc, with the division at
the place between tracks which is closest to 1/2 the total
playing time, and with the tracks remaining in the same
order.
When this button is pressed in the stop mode, the total
playing time for the first half and the track numbers on the
calendar are displayed for approximately 2 seconds. Next,
the same is done for the second half, after which the unit
is automatically set to the pause mode at the beginning of
the first track. When the PLAY or PAUSE button is pressed,
playback begins, and the unit is automatically set to the
pause mode at the beginning of the first track of the
second half which was previously displayed. When the
PLAY or PAUSE button is pressed again, playback begins,
and the unit is automatically set to the stop mode at the
end of the last track on the disc.
• This function will only work for discs with a total of 20
tracks or less. Also, when this function is used the mode is
automatically set to the program mode, so direct search is
not possible.
• The auto edit function is cleared when the STOP button
is pressed.
• The data for the total playing time recorded on the disc
and the actual total playing time of the tracks differ, so
there may be a difference between the time displayed in
the stop mode (the total playing time) and the total of the
times of the first and second halves in the auto edit mode
(about 2 seconds).
6. Play Button (PLAY)
• Press this button to start playback of a disc.
• When this button is pressed, PLAY is displayed, and the
track number being played is displayed together with the
elapsed playback time of the track.
• Tracks are shown on the calendar display. Once a track
has been played, the corresponding track number goes out
on the calendar display.
7
12. Auto Space Button (A. SPACE)
Pressing this button will cause the A. SPACE indicator to light
and a blank space of approximately 4 seconds is inserted
between tracks during CD playback. Pressing the button
once more, the A. SPACE indicator goes out and the Auto
Space feature is cancelled.
When one of the track search buttons is pressed, the Auto
Space function will not operate.
The Auto Space function will work during normal playback
as well as programmed playback.
Although 4-second blanks are inserted between tracks, this
additional time is not reflected by the indication on the
time remaining display or time display when the Auto Edit
function is engaged.
19.
Automatic Search Reverse Button
• Press this button to return the pickup to the beginning of
the present track. Press again to return to other tracks.
• By pressing the button a number of times, the pickup
will move back the corresponding number of tracks.
20.
Automatic Search Forward Button
• Press this button to move the pickup forward to the
beginning of the next track. Press again to move ahead to
other tracks.
• By pressing the button a number of times, the pickup
will advance the corresponding number of tracks.
21.
Pitch - Button (PITCH -)
• Press this button to slow down the playing speed.
(Refer to Page 12.)
13. Time Mode Button (TIME)
This button is used to select the desired indication on the
TIME display. The indication on this display will change
each time the button is pressed.
Normally, the elapsed playback time of the current track is
displayed.
Pressing the button once, SINGLE is displayed and the
remaining time of the current track is displayed.
Pressing once more, TOTAL is displayed, and total playing
time of remaining tracks is displayed. However, when
programmed play is in progress, the total remaining time
of the program is displayed.
Press the button once again to return to the normal
display of the elapsed playback time of the current track.
22.
• Press this button to make the playing speed faster.
(Refer to Page 12.)
23.
15. A-B Repeat Button (A-B)
Press this button for repeat playback between a designated starting point (A) and an ending point (B).
(Refer to page 12 for details)
16. Manual Search Reverse Button
Press this button during playback for fast reverse search.
As long as the button is kept pressed, music signals are
played back faster than normal.
Pressing this button when the pause mode is engaged, you
can quickly reverse the pickup to a desired position, three
times faster compared to manual reverse search during
playback. During this time, no sound is heard.
17. Manual Search Forward Button
Press this button during playback for fast forward search.
As long as the button is kept pressed, music signals are
played back faster than normal.
Pressing this button when the pause mode is engaged, you
can quickly forward the pickup to a desired position, three
times faster compared to manual forward search during
playback. During this time, no sound is heard.
18. +10 Button (+10)
Press this button first when selecting track numbers over
10.
Use it together with the number buttons 9. For example,
to select track number 15, press +10 then 5.
For track number 33, press +10 three times, then press 3.
8
Headphones Jack (PHONES)
• For private listening, you can connect your headphones to
this jack. Do not raise the volume level too much when
listening through headphones. (Headphones are sold
separately.)
24.
Output Terminal (LINE OUT)
• Connect these jacks to the input jacks on your amplifier.
(Refer to page 9 for details on the connections.)
14. Display Button (DISPLAY)
Press this button to turn off (or turn on) the display. One
press of this button during play will turn off the entire
display; in conditions other than the play mode, only the
track number will be displayed.
Pressing the button once more will provide a return to the
regular display.
Pitch + Button (PITCH +)
25.
Digital Output Jack (COAXIAL)
• This jack outputs digital data.
• We recommended using a 75 Q/ohm pin cord (avail
able in stores) for connections.
Continuous Button Operation
If the automatic search reverse button 19, the automatic
search forward button 20 or the +10 button 18 are held in,
the function of that button will be repeated.
CONNECTION
(1) Connecting the Output Terminal (LINE OUT)
Use the included pin cords to connect the left (L) and right (R)
output terminal (LINE OUT) of the DN-60OF to the CD, AUX, or
TAPE PLAY left (L) and right (R) input jacks of the amplifier.
(2) Connecting the Digital Output Jack (COAXIAL)
Use a 75 0 /ohm pin cord to connect the digital output jack
(COAXIAL) of the DN-60OF to the digital input jack (COAXIAL)
on a digital processor or D/A unit, available in stores.
Connection Precautions
Before proceeding with connections or disconnections of cables
and power cords, be sure to turn all system components off.
Ensure that all cables are connected properly to the L (left) and R
(right) jacks.
Insert plugs fully into the terminals.
• Connect the output jacks to the amplifier CD, AUX or TAPE
PLAY input jacks.
OPENING AND CLOSING THE DISC HOLDER AND LOADING A DISC
Opening and closing the disc holder
(This operation only works while the power is on.)
1. Press the power switch (POWER) to turn on the power.
2. Press the open/close button (OPEN/CLOSE).
How to load a disc
Make sure the disc holder is completely open.
Hold the disc by the edges and place it on the disc tray. (Do not
touch the signal surface, i.e., the glossy side.)
• When using 12 cm diameter discs, make sure the outer edge
matches the tray guide circumference (Fig. 1), and when using CD
singles (8 cm diameter) match the outer edge with the inner tray
guide circumference. (Fig. 2)
Press the open/close button (OPEN/CLOSE) to close the disc
holder.
• When the disc holder is closed, the disc is read and after a few
seconds the number of tracks and total playing time are displayed
on the TRACK NO. and TIME displays, respectively.
• When the disc holder is open and a disc is loaded, you may also
press the play or pause button to close the disc holder. (If the play
button is pressed, playback will start immediately upon the disc
contents having keen read.)
Caution:
If your finger should get caught in the disc holder when it closes,
press the open/close button (OPEN/CLOSE).
• Do not place any foreign objects on the disc tray, and do not
place more than one disc on the tray at a time. Otherwise
malfunction may occur.
• Do not push in the disc tray manually when the power is off as
this may cause malfunction and damage the CD player.
NORMAL CD PLAYBACK
(1) Starting Playback
1 Press the power switch (POWER) to turn on the power.
2 Load the disc you want to play.
• When the disc holder is closed, the disc is read and the number of
tracks and total playing time of the disc are displayed.
3 Press the play button.
1 Press the stop button.
• When all tracks have been played on a disc, playback will stop
by itself.
Precautions:
• If no disc has been loaded or the disc has been placed upside
down, all indicators will light.
• When the information on the disc cannot be read correctly, for
example due to dust or dirt on the disc, the indicators will read as
shown below. Nothing will be shown on the TRACK N0. and TIME
displays, and it may take quite a while to read the disc.
(2) Stopping Playback
ADVANCED CD PLAYBACK
1. Playing a Specific Track .................................. Direct Search
Press the Automatic search reverse button during playback.
• The pickup will return to the beginning of the current track and
playback will continue. Pressing the button several times will return
the pickup the corresponding number tracks.
4.Playing Specific Tracks in a
Specific Order ................................................... Programmed Play
Use the number buttons and the +10 button to input the number of the
desired track.
For example, to play track number 4, press 4, and to play track
number 12, press +10 and 2 . Playback will begin from that track.
2. Advancing to the next track
during playback ................................................Automatic Search
Press the Automatic search forward button during playback.
• The pickup will advance to the beginning of the next track and
playback will continue. Pressing the button several times will forward
the pickup the corresponding number tracks.
3. Returning to the beginning of the
current track during playback ......................... Automatic Search
10
•
•
•
•
With this function, you can choose any of the tracks on the disc
and program them to play in any order.
Programming is possible with the disc holder open.
Up to 20 tracks can be programmed.
The programmed tracks are shown on the calendar.
(1) Programming
Press the PROG/DIRECT button so that the PROG indicator lights, then
use the number buttons and the +10 button to program the tracks.
For example, to program tracks 3, 12, and 7, press PROG/DIRECT , 3, +10,
[2, and 7.
The corresponding track number lights on the calendar each time a
track is programmed, the track number is displayed on the TRACK
display, the number of tracks programmed is displayed on the
CALENDAR display, and the total playing time of the programmed
tracks is displayed on the TIME display. A few seconds after the last
track has been programmed, the total number of tracks programmed
is displayed on the TRACK display and the total playing time of the
programmed tracks is displayed on the TIME display.
(2) Playing the Programmed Tracks
• Press the PLAY button to play the tracks in the programmed order.
(3) Clearing the Program
• The entire program is cleared when the PROG/DIRECT button
is pressed again. The program is also cleared when the
(OPEN/CLOSE) button is pressed.
• If the PROG/DIRECT button is pressed during programmed
play, the program is cleared and playback continues normally
through to the last track on the disc.
NOTES
• If programming is done in the play or pause mode, the track
currently playing is programmed at the first position. Other
tracks can be added to the program, but the number of
programmed tracks and the playing time will not be
displayed.
• Direct search is not possible during programmed play. If the
number buttons are pressed, that track is added to the end
of the program.
• Programming is possible with the disc holder open. Track
numbers greater than the number of tracks recorded on the
disc can be programmed, but will be automatically cleared
before playback begins.
• The remaining time per track will only be displayed for
track numbers 1 through 20.
• The total program time and remaining program time are not
displayed if tracks greater than track number 20 are
programmed.
5. Pausing playback at any point ................................. Pause
(1) Manual Search Forward
1. Press the manual search forward button during play
back. Playback of the track is sped up.
• As a reference, the current track number and elapsed playback
time within the track are displayed.
• Manual search forward is approximately three times faster when
engaged during the pause state compared to playback. In this
case, no sound is heard however.
• If the manual search forward button is kept pressed after the end
of the final track on the disc is reached, (JJ) is displayed and
manual search stops. To return to another point, press the
manual search reverse button until (JJ) disappears.
(2) Manual Search in Reverse
1. Press the manual search reverse button during playback.
Reverse playback of the track is sped up.
As a reference, the current track number and elapsed
playback time within the track are displayed.
Manual search in reverse is approximately three times faster
when engaged during the pause state compared to playback.
In his case, no sound is heard however.
If the manual search reverse button is kept pressed after the
beginning of the first track on the disc is reached, CC is
displayed and manual search stops. To return to another
point, press the manual search forward button until (CC)
disappears.
7. Inserting blanks between tracks ............... Auto Space
This is convenient feature that will insert 4-second blanks
between tracks, which can be used when recording compact
• Playback can be temporarily halted and then continued from
the same point in the track.
1. Press the pause button during playback.
2. To continue playback, press the play button or the
pause button once more.
discs on tape.
Audible quick search ............................. Manual Search
• Using this function, you can cue to a desired point within a
track, either in the forward or reverse direction.
• Release the manual search button when the
desired point has been reached. Normal playback then
continues.
1. Pressing the auto space button (A. SPACE) will cause the
A. SPACE indicator to light.
2. Press the play button to start playback.
When a track has been played to its end, a 4-second silence is
made before the next track starts playing.
3. Press the auto space button (A. SPACE) again to cancel the
function.
11
8.
Searching and Pausing at the Beginning
of the Track ........................................................... Pause
(1)
With Direct Search
•
In this case, the set pauses at the beginning of the track found
with the direct search operation.
(3) Press the PLAY button during playback with a
different speed to return to normal speed playback.
Also, the speed setting is cancelled if the stop mode is set during
playback at a different speed.
NOTES
• No data is output from the digital output jack (COAXIAL)
during playback with a different speed. If you want to
output data, press the PLAY button to return to normal
speed playback.
• The pitch also changes when the speed is changed.
• The time display (elapsed playback time, remaining time per
track, or total remaining time) will not be accurate during
playback with a different speed.
• A maximum of 1 second is required to return to the normal
speed when the PLAY button is pressed during playback
with a different speed. During this time, only the
OPEN/CLOSE and STOP buttons will function.
(2) With Program Search
• Press the button after the program search operation is completed.
The set will pause at the beginning of the first programmed track.
Changing the Speed of Playback ...................... Pitch Control
• Playback can be speeded up or slowed down.
(1) Press the PITCH + or PITCH - button during the play or pause
mode to change the speed of playback.
(2) When one of the PITCH buttons is pressed, the amount of the
speed change appears on the TIME display for approximately 2
seconds. The speed can be changed in steps of 0.1 % from
-12.0% to +12.0%.
12
1. Start playback and press the A-B button when you reach the
starting point of the interval. The A-B indicator starts blinking.
2. Continue playback or advance the pickup using the Automatic
search forward button or manual search forward button until the
ending point is reached. Then press the A-B button once more.
The A-B indicator will light.
• The pickup will now return to the starting point and repeat
playback of the selected interval.
• This interval will be repeated until the A-B repeat mode is
cancelled by pressing the A-B repeat button. The A-B
indicator goes out.
• A-B repeat playback is not possible during programmed
playback.
RC-41 REMOTE CONTROL UNIT
This is the separately sold wristwatch type remote control unit.
TIMER-CONTROLLED PLAYBACK
Both CD: DN-600F, and deck d1, d2: DRW-585P can be
operated by switching the display between CD, d1, d2 with
select switch.
*Hand held RC-U620 remote is also available.
Operation
1. Turn on the power of all system components.
2. Set the input selector on the amplifier to correspond to the
inputs the CD player is connected to.
3. Make sure a disc has been loaded in the disc holder.
4. Check the time on the timer and then set the desired
turn-on time.
5. Turn the audio timer ON.
Power is turned off automatically in all components
connected to the timer.
6. When the preset turn-on time is reached, power is turned on
in the system components, and CD playback starts from the
first track.
INSTALLATION PRECAUTIONS
The CD player uses a microcomputer for controlling internal
electronic circuits. In the event that the player is used while a
near-by tuner or TV is turned on, although unlikely, interference
could occur either in the sound from the tuner or the picture of the
TV. To avoid this, please take the following precautions.
0
Keep the CD player as far away from the tuner or TV set as
possible.
Keep the power cable and connecting cable of the CD player
separate from the antenna wires of the tuner and TV.
Interference is particular likely to occur when an indoor antenna
or a 300 0 /ohm feeder cable is used. Thus, use of an outdoor
antenna and 75 f2/ohm coaxial cable is strongly recommended.
300 I? /ohm feeder cable
75 i2/ohm coaxial cable
13
THE COMPACT DISC
1. Precautions on handling compact discs
Do not allow fingerprints, oil or dust on the surface of the
compact disc. If the signal surface is dirty, wipe it off with a soft,
dry cloth. Wipe in circular motions from the center and out.
Do not use water, benzene, thinner, record sprays, electrostatic
proof chemicals, or silicone-treated cloth to clean discs.
Always use care when handling discs to prevent damaging the
surface, in particular when removing a disc from the case and
returning it.
Do not bend compact discs.
Do not apply heat to compact discs.
Do not enlarge the hole in the center of the disc.
Do not write on the disc and do not attach any labels.
Condensation will form on the disc surface if it is brought into a
warm room from a cold area, such as outdoors during winter.
Wait until the condensation disappears. Never dry discs with hair
dryers, etc.
2. Precautions on storage
After playing a disc, always return it to its case.
Keep discs in the cases when they are not to be played. This
will protect them from dust and dirt and prolong their service
life.
Do not store discs in the following places:
1) Places exposed to direct sunlight for a considerable
time.
2) Places subject to accumulation of dust or high humidity.
3) Places exposed to high temperatures, such as close to
heater outlets.
TROUBLESHOOTING
If the CD player does not seem to be functioning properly, check
the following:
Disc holder does not open or close.
• Is the power on?
When a disc is loaded, 00 00 00 is displayed.
• Is the disc loaded properly? .......................................See page 9
When the play button ( 1 PLAY ) is pressed, playback does
not start.
• Is the disc dirty or scratched? ..............................See page 14
There is no sound, or it is distorted.
• Is the output cord properly connected to
the amplifier? .........................................................See page 9
• Have the amplifier controls been set correctly?
A specific section of the disc will not play.
• Is the disc dirty or scratched? .............................. See page 14
Programmed playback does not work.
• Have programming been properly done?
................................................................ See pages
SPECIFICATION
AUDIO
No. of Channels:
Frequency Response:
Dynamic Range:
Signal-to-noise Ratio:
Harmonic Distortion:
Separation:
Wow & Flutter:
Output Voltage:
DISCS
GENERAL CHARACTERISTICS
Power Supply:
Power Consumption:
Dimensions:
Weight:
2 channels
2 ^- 20,000 Hz
98 d8
107 dB
0.003% (1 kHz)
103 dB (1 kHz)
Below measurable limit:
(±0.001% W.peak)
2V
Compact Disc format
FUNCTIONS AND DISPLAY
Functions:
Automatic search, programmed
playback, repeat playback,
manual search, auto space,
time mode, auto edit
Display:
Track number, time, music calendar,
emphasis feature and engaged modes
Others:
Headphones jack
Voltage is shown on rating label
10 W
482 (19") W x 8813-15/32") H x 280 (11-1 /32") D mm
4.2 kg
* Design and specifications are subject to change without notice in the course of product improvement.
14