Transcript
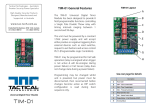
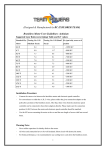
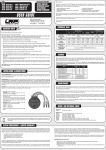
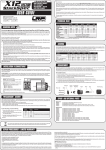
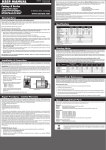
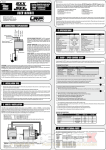
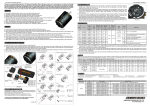
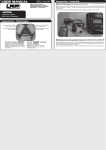
3. SPECIFICATION
MA00182
ORDER NO
BRUSHLESS
NEW DESIGN
EXTRA POWER
SENSOR TECHNOLOGY
50830 10.5T
50820 9.5T
50810 8.5T
50860 21.5T
50850 17.5T
50840 13.5T
USER GUIDE
LRP electronic GmbH,
Wilhelm-Enssle-Str. 132-134, 73630 Remshalden, Deutschland
[email protected] www.LRP.cc
VECTOR X11
„Stock Spec“
21.5T
17.5T
13.5T
10.5T
9.5T
Order No.
50860
50850
50840
50830
50820
50810
Top Aluminium Ring Color
Voltage input
[Volt]
Green
Yellow
Orange
Blue
Purple
Darkgrey
RPM1
Specific RPM
per volt
12‘960
16‘560
23‘040
27‘360
30‘240
33‘840
[kV]
1800
2300
3200
3800
4200
4700
[Watt]
124
153
201
255
278
303
Efficiency 1
[%]
93
93
93
92
92
92
Weight
[g]
168
168
168
168
168
168
Power1
4.8 - 7.4
Rotor
Sintered 12.3mm „Stock-Spec“ (#50613)
Minimum speedo
requirement
LRP A.I.Brushless
(#80100)
Winding
thank you for your trust in this LRP product. By purchasing a LRP VECTOR X11 „Stock Spec“ motor, you have chosen a
high-performance brushless motor. LRPs R&D team took all the experience and testing results from the last 3 years of
practical tests with the LRP brushless motors on the highest levels of competition and put it into the new X11 motors.
IFMAR ISTC Worlds A-finalist + European champion!
Please read the following instructions carefully before you start using your LRP VECTOR X11 „Stock Spec“ motor. This
user guide contains important notes for the installation, the safety, the use and the maintenance of this product. Thus
protecting yourself and avoid damages of the product.
1Measured
LRP A.I.Brushless Pro
(#80150)
LRP Sphere
(#80500)
Star
Compliant to IFMAR/EFRA/ROAR/BRCA/DMC rules
Sensor assignment
Dear Customer,
8.5T
at 7.2V. Specifications subject to change without notice.
4. GEARING
Please pay special attention to our gear ratio recommendations, before using the motor for the first time.
Proceed according to the user guide in order to understand your LRP VECTOR X11 „Stock Spec“ motor better. Please take
your time as you will have much more joy with your product if you know it exactly.
Never overgear your LRP VECTOR X11 „Stock Spec“ motor. A wrong gear-ratio causes much more heating and may result
in a temperature shutdown of your speed-control under extreme conditions.
This user manual shall be kept in a safe place. If another customer is using this product, this manual has to be handed
out together with it.
Take your kits instruction manual to find the correct pinion. Please note, that following gear ratios are only a recommendation and a good starting point. The actual gearing may vary due to different tracks, models, track conditions
and/or batteries:
No. of
cells
21.5T
17.5T
13.5T
10.5T
9.5T
8.5T
TC (small track)
6
5.0:1
5.0:1
5.8:1
6.6:1
7.0:1
7.5:1
TC (big track)
6
3.5:1
3.5:1
4.0:1
5.0:1
5.3:1
5.7:1
1:12 (Rollout)
4
68mm
68mm
56mm
46mm
42mm
39mm
Off-Road 2+4wd
6
5.5:1
5.5:1
6.5:1
7.5:1
8.0:1
8.5:1
Off-Road Truck
6
6.5:1
6.5:1
7.5:1
8.5:1
9.0:1
9.5:1
USAGE
1.
!
WARNING NOTES
No toy. Not suitable for children under 14 years.
Keep the product out of the reach of children.
Pay close attention to the following points, as they can destroy the product and void your warranty. Non-observance of these points can lead to property damage, personal and severe injuries!
• Never leave the product unsupervised while it is switched on, in use or connected with a power source. If a defect
occurs, it could set fire to the product or the surroundings.
• Avoid incorrect connections or connections with reversed polarity of the product.
• All wires and connections have to be well insulated. Short-circuits can possibly destroy the product.
• Never allow this product or other electronic components to come in contact with water, oil or fuels or other electroconductive liquids, as these could contain minerals, which are harmful for electronic circuits. If this happens, stop the
use of your product immediately and let it dry carefully.
• Never open the product and never solder on the PCB or other components.
• Avoid overtightening the motor screws. Damaged threads are not covered under warranty!
• Avoid overloading the motor due to wrong or too long gear ratios.
• Never apply full throttle if the motor is not installed. Due to the extremely high RPMs without load, the motor
can get damaged.
• Always wire up all the parts of the equipment carefully. If any of the connections come loose as a result of vibration,
you could loose control over your model.
• Avoid soldering longer then 5 seconds per soldering joint when replacing the power wires to prevent possible damage
to the product due to overheating of the components. Use a high power soldering station for soldering.
5. DISASSEMBLY
Due to the maintenance free design of the LRP VECTOR X11 „Stock Spec“, it is not necessary to open the motor under
normal conditions. Nevertheless, if you intend to check the ball bearings and oil them from time to time, you can disassemble the motor.
Disassembling the motor:
1. Loosen the 3 screws at the front of the motor and take off the front cover. You can now access the ball bearing for
cleaning or replacement.
2. Carefully take the magnet out of the can.
3. Loosen the 3 screws on the endcover and remove screws and cover. You can now access the ball bearing to clean it
or, if necessary, to oil it.
4. To re-assemble the motor, begin with step 3 backwards. Doublecheck, that all screws are securely retightened. Do
2. INSTALLATION / CONNECTIONS
HALL-SENSOR WIRE:
This bi-directional multipole wire connects the speed-control and the motor. Do not alter or modify this cable! The HallSensor wire is imminent for the use of the LRP VECTOR X11 „Stock Spec“. Make sure, that the plugs have a proper and
tight fit and are always clean.
POWER WIRES:
The LRP VECTOR X11 „Stock Spec“ comes pre-wired using common motor connectors. It‘s simply „plug & play“ when you
intend using a LRP SPHERE (#80500) or LRP A.I.Brushless/Pro (#80100/#80150) speed-control. You can also use normal power wires and solder them directly to the motor if you prefer to use a „hardwired“ wire setup. The unique splitted
solder-tabs allow easy and convenient replacement of the power wires. Nevertheless some soldering skills are required.
Talk to your local hobbyshop if you are concerned about replacing the wires yourself.
• Install the motor in the model.
CAUTION! The maximum length of the motor screws shall not exceed 8mm.
• Connect the power wires of the speed-control to the motor. You can do this by using the
pre-assembled motor plugs or by soldering
on the power wires directly to the motor.
• CAUTION! Make sure, that the polarity is
right by checking the color code and the
letters:
- MOT.A = blue wire
- MOT.B = yellow wire
- MOT.C = orange wire
blue
yellow
orange
CAUTION: Avoid soldering longer then 5sec per soldering joint when replacing the power wires to prevent possible
damage to the speed-control due to overheating of the components!
���� ��
����
��
6. SPARE- + OPTIONAL PARTS
Spare Parts:
#50604
#50613
#81910
#50619
X11 R166 ABEC5 Ball Bearings (2pcs)
X11 Spare Rotor Sintered 12.3mm „Stock Spec“
Hall-Sensor Anschlusskabel 20cm
X11 Small Parts Set (includes all screws, the plastic endcover and the ball bearing shim)
Optional Parts:
#50608
X11 R166 Ceramic Ball Bearings (2pcs), for lowest friction
#50611
X11 Tuning Rotor Sintered „FactoryTeam“ 12.5mm
#50612
X11 Tuning Rotor Sintered „FactoryTeam“ 13.0mm
#50616
X11 Alu Tuning Frontplate „MegaCool“ (with extra cooling openings)
#50617
X11 Alu Tuning Frontplate „MegaCool“, 1.5mm shorter (to alter car balance)
#50618
X11 Alu Tuning Endcover (with black cooling fins)
#81920
Hall-Sensor Wire 10cm (shorter wire for 1/12, TC, etc)
#82505
Power-Wire Set Brushless 2.6mm² (red, black, blue, orange, yellow)
#82506
Power-Wire Set Brushless 3.3mm² (red, black, blue, orange, yellow)
#82510
Brushless+Brushed Cooling Set (specially made heatsink and high-performance fan)
��
��
Hall-Sensor wire
• Connect the motor and the speed-control, using the Hall-Sensor wire.
• Finally check all the connections before using the motor.
The crossed-out wheeled bin means that within the European Union the product must be taken to seperate
collection at the product end-of-life. Do not dispose of these products as unsorted municipal waste.
REPAIR PROCEDURES / LIMITED WARRANTY
All products from LRP electronic (hereinafter called “LRP”) are manufactured according to the highest quality standards.
LRP guarantees this product to be free from defects in materials or workmanship for 90 days (non-european countris only)
from the original date of purchase verified by sales receipt. This limited warranty doesn’t cover defects, which are a result
of normal wear, misuse or improper maintenance. This applies among other things on:
•
•
•
•
•
Overload (for example: unsoldered Star-ring)
Excessive amounts of dirt inside the motor
Rotor damage due to debris inside motor
Mechanical damage due to external causes
Rust
To eliminate all other possibilities or improper handling, first check all other components and the trouble shooting guide,
if available, before you send in this product for repair or warranty. Products sent in for repair, that operate perfect have
to be charged with a service fee.
By sending in this product, you assign LRP to repair the product, if it is no warranty or Limited Lifetime Warranty case.
The original sales receipt including date of purchase needs to be included. Otherwise, no warranty can be granted. For
quick repair- and return service, add your address and detailed description of the malfunction.
Because we don’t have control over the installation or use of this product, we can‘t accept any liability for any damages
resulting from using this product. Therefore using this product is at owner‘s risk. Our limited warranty liability shall be
limited to repairing the unit to our original specifications. In no case shall our liability exceed the original cost of the unit. By
installing or operating this product, the user accepts all resulting liability.
The specifications like weight, size and others should be seen as guide values. Due to ongoing technical improvements, which
are done in the interest of the product, LRP does not take any responsibility for the accuracy of these specs.
LRP-Distributor-Service:
• Package your product carefully and include sales receipt and detailed description of malfunction.
• Send parcel to your national LRP distributor.
• Distributor repairs or exchanges the product.
• Shipment back to you usually by COD (cash on delivery), but this is subject to your national LRP distributor‘s general
policy.