1
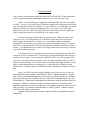
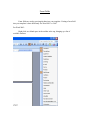
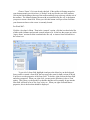
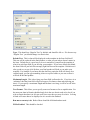
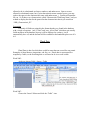
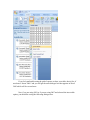
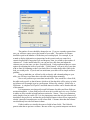
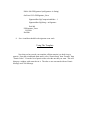
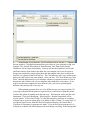
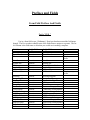
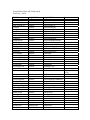
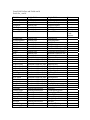
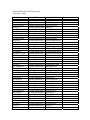
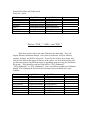
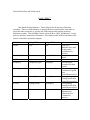
LGC
LGC Permits
MS Word Automation User Manual
Introduction
This manual is to use as a reference for creating a template using Microsoft Word
and linking it with LGC Permits, allowing faster and easier creation and modification of
custom forms.
What can it do?
In its current state, you will be able to use Microsoft Word to create a custom
permit and certificate of occupancy. You will be able to insert any data into these
documents that was used in the access report versions of the same documents, as well as
some that was not used in the Access report versions. Additionally you will be able to
insert data that could have multiple entries, fees or inspections for example.
The advantage to this is that, if a customer wants their permit or certificate of
occupancy modified, either they can themselves, or they can email us their document, the
modifications are made, and the document is sent back. This will be much faster and
easier than having to create a new release of the entire software package whenever a
report needs to be modified or created, and MS Word is a much easier to use and intuitive
interface for documents than the Access Report designer.
What can it not do?
Currently, It cannot print a range of anything, for example, you could not print 10
different permits at the same time, though you could print 10 copies of the same permit if
you so desired. It also does not care where it page breaks, if your template is too long, it
will simply move over to a second page when printing. It will not, however, break in the
middle of a table (more on tables later). It also currently cannot be used for a temporary
Certificate of Occupancy.
If there is anything that you do not understand or that doesn’t work as it should or
that you would like to see improved, please contact Mike Joyce ([email protected])
or Beth Aylor ([email protected])
If you are Mike or Beth, contact Ryan.
This manual is not intended as a how-to on using Microsoft Word and only really
covers that parts that are necessary to get word automation for Permits working. Fine
tuning may require some trial and error or practice with using MS Word.
I am by no means a master of MS Word, but I will do what I can to help if you
run into something.
So lets get started making a word template for LGC Permits.
Getting Started
You can make your template using either Word 2003 or Word 2007, so the instructions
will be somewhat different depending on which version of word you are using.
Before you start making your template you should decide what sort of document
it will be. You can, if you wish, specify a different template for each permit code for that
code’s permit and certificate of occupancy. If you wanted to, you could make one permit
and one certificate of occupancy and apply them to every code, or you could make
different ones for each. Once you know what sort of document you wish to make and
what you generally want for it to look like you are ready to start.
First you should open Word and save your document. What you name it and
where you save it is not important as far as Permits is concerned, later you will tell
permits where the document is at. However, it is advisable to name it something
meaningful to you because you may have more than one template, and also it is a good
idea to save it somewhere that it will not be inadvertently deleted or edited for obvious
reasons. You should make note of where it is being saved because later on you will have
to give this location to permits.
Now that you have your template open you can type in anything you want and it
will show up in the eventual result. You can type in your permit header, insert a logo, or
anything else you want. You can also put in labels for where your data is going to be if
you wish. Any changes made to the font, color, size and positioning of the text will be
reflected in the end result. If you wish to have several lines right-aligned about a certain
point or center aligned about a certain point, you can do that sort of thing by setting
absolute tabs. A Google search for ‘MS Word set tabs’ should get you plenty of info on
that.
Once you feel like you have things looking the way you want, you’re ready to
start adding data to the template. Data takes two forms—singular and plural. Singular
data is a piece of information that there can be only one of for one permit, for example a
permit can only have one PermitID, only one result for SewerImpactNumber, only one
OwnerAddress1. Plural data is information for which there could be multiple entries for
one permit. Whether or not there actually exists more than one is irrelevant, what is
important is that there could be more than one. For example one permit could have more
than one sub fee, so FeeName, PermitFeesID, etc. would be plural. Another example
would be fields related to inspections.
Singular data is put into the template using form fields, and plural data is put in
using tables.
Form Fields
Form fields are used to put singular data into your template. Putting a form field
into your template is done differently for Word 2003 vs. 2007.
For Word 2003:
Right click on a blank space in the toolbar at the top, bringing up a list of
available toolbars.
Choose ‘Forms’ if it is not already checked. If the toolbar is floating around on
your document and you wish to have it ‘docked’ at the top like the rest of the toolbars,
click on the blue heading at the top of the toolbar and drag it up to the top with the rest of
the toolbars. The leftmost button, the one with an icon that looks like: ab| is the button
you press to insert a form field. When you click this button it will put a form field into
your document wherever the cursor is currently located.
For Word 2007:
Click the ‘developer’ ribbon. Then in the ‘controls’ section, click the icon that looks like
a folder with a hammer and wrench crossed in front of it. In the box that comes up, in the
‘legacy forms’ section click the icon that looks like: ab| to insert a form field wherever
the cursor is at.
To get rid of a form field, highlight it and press the delete key on the keyboard.
Once you have created a form field, the next step is the same for both versions of Word.
You have to set the properties of the form field. To do this, right click on the form field
and select properties. When you right click, you may notice that there is also a ‘Font’
option. This is how you design the way that the data that will eventually be put into the
form field will look as far as size, font, color, etc. When you right click and choose
properties, this is the box that should be displayed.
Type: This should say ‘Regular Text’ by default, and should be left so. If it does not say
‘Regular Text’ you should change it so that it does.
Default Text: This is what will be displayed on the template in the form field itself.
This text will be replaced in the final product, so what you put in here doesn’t matter in
the least. Default text is a good way to leave a reminder to yourself on the template of
what is in each form field as you develop your template. If you leave default text blank,
the form field will just look like an empty light blue box on the template. Default text is
also a good way to get a feel for how your final product will look as you make your
template. For example if you know that the data for a particular field will always be a
certain length, you can type something in here as a place holder so you can see how it
will look in the final product.
Maximum Length: This is how long your form field is allowed to be. If you leave it as
‘unlimited’ then the form field will grow longer to fit whatever data ends up being put
into it. If you specify a maximum length and the data is too long, it will be cut off at the
maximum length.
Text Format: This allows you to specify some text formats as far as capitalization. For
the most part, data in Permits should already be in the case that it needs to be, but if you
wish to ensure that data is in all caps or all lower case then you may do so here. Leaving
it blank will cause data to be displayed as it is saved in the database.
Run macro on entry/exit: Both of these should be left blank and not used.
Fill In Enabled: This should be checked.
Calculate on Exit: This should not be checked.
Bookmark: Bookmark is the most important property. What you put into the bookmark
is how Permits knows what data to put into that particular form field. What you type into
bookmark is divided into two parts, the prefix and the field, separated by an
undercurse(_). So an entry in the bookmark field should always look like: Prefix_Field.
The bookmark field is not case sensitive, and how you capitalize (or don’t) will not affect
Permits’ ability to retrieve your data.
Because of the way permits works and other technical (boring) considerations, the
data for a permit or certificate of occupancy has to be divided up into sections called
recordsets. Permits needs to know which recordset the data that you want is in. The
Prefix tells permits which recordset to look in. The prefix is always three letters long.
If you are familiar with the structure of Permits then this information may be helpful, if
not, it is not necessary that you learn this.
Prefix
PER
AED
CON
SUP
MSC
CHR
Tables used in query
Permits
PermitCharacteristics
RemittanceAddressCodes
PermitCodes
TaxpayersLocations
TaxpayersLocations
TaxpayersLocations
Various
Characteristics
PermitsCharacteristics
Type in the prefix for that data that you want, followed by an undercurse (_)
followed by the field name. The field name is the specific piece of information that you
want from a recordset. For example, if you wanted to display the permit number, you
would type “Per_PermitNumber” as the bookmark. When you actually printed a permit
using this template, instead of a form field, the document would have the permit number
in that space. A complete list of prefixes and field names can be found at the end of this
manual.
Errors
Errors are something that will happen from time to time. For the most part,
Permits will try to tell you which form field it didn’t understand, and in the final product
will try to put “*Error*” into that space since it does not have any data to go there. This
is to try and make the process of making a template as painless as possible and if you
have mistyped something, Permits will try to let you know where it occurred rather than
leaving you to check every form field.
Duplicate Fields
In a Word Document, no two bookmarks are allowed to have the same name.
Word will not tell you if you have given a bookmark a name that was already being used,
it will simply erase the old one, and you will get an error on your final product. If you
wish to use a field name more than once, you may make the bookmark names different
by adding zeros to the end of the field name. Permits knows to ignore these zeros and
will give you the same data for “per_PermitNumber” and “per_PermitNumber0” and
“Per_PermitNumber0000”. So if you need to use a field more than one time on your
template, be sure to add different numbers of zeros to the ends so that it works properly.
Aliasing
A bookmark is limited to a length of 20 characters, so after a prefix and an
undercurse, a field name is limited to 16 characters. If you have worked with the
structure of Permits before, then you are aware that many of the actual field names are
longer than 16 characters. This is solved with aliasing; an alias is a name temporarily
given to a piece of data, and the recordset recognizes the data by its alias, not its actual
name. The fields that have names that are longer than 16 characters have been aliased
with shorter names, and some of the longer fields that were less than 16 characters were
aliased as well to allow for ending zeros if needed. So if you are accustomed to the
structure of permits and are getting errors on a particular bookmark, check the list at the
end of this manual to see if the field that you are referencing got aliased, and could be
recognized by a different name.
User Defined Characteristics
There are characteristics of a permit that the user may create on their own through
the software by going to “Permit Setup” > “Permits” > “Permit Characteristics”. Doing
this the users can create their own characteristics and then from within a permit, add data
to that permit for that characteristic. You can put the data for these characteristics onto
your template by using the prefix “CHR_ [the first 16 characters of the characteristic
name]”. This is not a very intuitive way of doing things, unfortunately while
characteristics of this type give the user a lot of versatility as far as their permits, the
developers have no way of knowing what the users will name their characteristics.
If the first 16 characters of more than one characteristic are identical, when you
print your permit it will just display the data from the first characteristic. For this reason,
in some rare instances it may be necessary to rename some characteristics in order to
make the first 16 characters unique.
If you wish to display the same characteristic on the permit more than once, you
may do one as “CHR_[first 16 characters]” and the next as “CHR_[first 15 characters]”
and so forth. However, the more times you use the same characteristic, the more unique
it must be. In the example above, the first 15 characters must now be unique, so
repeatedly using the same characteristic increases the likelihood that some names may
need to be changed. The CHR_ prefix is the only one where you can shorten the field
name like this, and adding zeros to the end of the field name when using the CHR prefix
will cause an error.
Another reason that a characteristic name may need to be changed is because it
contains characters that are not allowed to be in a bookmark. The only characters that are
allowed to be in a bookmark are letters, numbers, and undercurses. Spaces are not
allowed in a bookmark name, but if your characteristic name contains spaces, you may
replace the spaces in the characteristic name with undercurses(_). Permits will translate
for you. So if there was a characteristic called “Characteristic With Long Name” and you
wanted to display the data for the permit for that characteristic then in you would use
“CHR_Characteristic_W”.
Formatting
Currently all fields are printed in the format that they are found in the database
with a couple exceptions. “msc_PTotal” and “msc_AFeesTotal”(which are not actually
fields anywhere in the database anyway) will be displayed as currency, it will
automatically have a $ and the decimal will be extended to the hundreths place even if it
is 0.
Plural Data
Plural Data is data for which there could be more than one record for one permit.
Examples of plural data are inspections, sub fees, etc. Plural data is represented in a
template by a table, so the first thing that we will need to do is to create a table.
Word 2003:
At the top choose Table > Insert > Table
Word 2007:
Choose the “Insert” ribbon and click the “Table” icon.
If you feel comfortable using the grid of squares to draw your table, that is fine, if
not choose “Insert Table” and you will get the same dialogue box that appears in Word
2003 which will be covered next.
Now if you are using 2003 or if you are using 2007 and selected the insert table
option, you should be seeing the following dialogue box.
The number of rows should be changed to one. If you use a number greater than
one, you will have empty rows at the bottom of your table. The number of columns
should be equal to the number of fields that you want displayed. For example, if you
wanted to display information on inspections for this permit, and you wanted it to
contain: InspectionID, InspectionType and Inspector, then you would set the number of
columns to 3. Under autofit behavior, you can just leave this alone and adjust the
columns one at a time once you have your table made. Under autoformat there are some
options for adjusting the looks of your table. “Table Normal” will put in all of your data
with no lines or formatting so that it just looks like a list rather than a table if that is the
look you would prefer. If you do not use autoformat your table will be simple and have
gridlines.
Keep in mind that you will not be able to directly add column headings to your
table, you will have to put them above the table and align them manually.
Now to tell permits to put some data into the table. First, much like a form field,
the table needs a prefix so that it knows which set of data the table will be using, so in the
top leftmost cell (rectangle) type in a prefix name, followed by a dash(-), followed by a
field name. A complete list of prefix’s and field names for tables can be found at the end
of this manual.
It is important to note that prefixes and field names for tables and form fields are
not interchangeable. A form field prefix will not work in a table and vice versa. Prefixes
in tables are also variable in length and not restricted to 3 letters. There is no limitation
on the length of text in a table cell. It is also important to note that only the leftmost cell
should have the prefix in it, and that the prefix and field name in that cell are separated by
a dash(-) instead of an undercurse as with a form field. Columns other than the leftmost
one should only have the field name in them.
Fields in tables are virtually the same as fields in form fields. The field tells
permits what data to put into a column. Because of the way permits interprets text that is
in a table, at the end of every field name, you must type an asterisk (*) though. This lets
permits know where the end of what your field name is. So for example if you wanted to
make a table that had some information about sub fees then it may look like this:
Fees-FeeID*
FeeName*
OutputAmount*
This tells Permits that you want to make a table with fees data. The first column
will have the Fee ID of each fee, the second will have the Fee Name, and the third will
have the Output Amount.
If you had this in your permit template and that permit had three fees associated
with it, Permits would automatically remove what you have typed and refill the cells with
the data from the first fee, then add two more rows and fill them in with the data from the
other two fees.
Like with form fields, Permits will do its best to let you know the problem if there
is one with your template. Also like form fields, some of the actual fields are aliased for
the tables. Unlike form fields however, there is no limitation on duplicate fields. If for
some reason you wanted to, you could have 5 tables all of which had 10 columns and all
50 of those columns had FeeName as the data.
Formatting
With tables, you are allowed to put in literal text that will appear in front of the
data on every row for a particular column. You specify this text by putting it in
parenthesis right in front of the field name. This text can include any characters and
spaces if you would like. Here is an example of using literal text:
Template:
Fees-(Meow: )FeeID*
(Bark: )FeeName*
If the permit or certificate of occupancy being printed had 3 fees it would look
like this:
Meow: 1
Meow: 2
Meow: 3
Bark: Thumbtack Fee
Bark: Coffeecup Fee
Bark: Computer Fee
Notice that the text that was in parenthesis prints out in front of the data for every
row in that column. You may put whatever you want in parenthesis, or you may not put
anything. Also notice that the parenthesis is in front of the field name, and in the case of
the first column, follows the prefix and dash.
Data that is put into the cells will be formatted just as it appears in the database
with one exception. If you use a $ as the literal text, for example “Fees($)OutputAmount*” then if the data is numeric, it will be formatted as currency. It will
have a $ and the decimal will be carried out to the hundreths place.
Once you have made your table, if you are not happy with it, you may edit it in
any number of ways without having to delete it and start over. To add an extra column,
hover the mouse at the top of the table along the topmost line until it becomes a
downward pointing arrow. Now right click and select insert columns.
To adjust the gridlines in your table, highlight all of the cells and right click. Now
choose ‘borders and shading’. In the dialogue that comes up, you can change the
thickness and style of the gridlines, or you can add and remove certain gridlines. To the
right you will see a 2x2 table with black gridlines. If you click on the gridlines, or the
empty spaces where gridlines would be if you have already removed them, you will add
and remove those gridlines from your table. You can remove all of them to have your
table appear as a list, or you can remove the inside ones and just have a box around your
table, or whatever you want to do. When you remove gridlines from your table, you will
still see them in your template, but they will be gray. This is to help you keep track of
your table, the gray lines will not actually print out.
By right clicking when a cell, column, row, or entire table is highlighted you can
change the alignment of the text within the cells.
If you hover over a line in the table between two columns and the cursor turns
into two bars and arrows pointing away from each other you can change the size of your
columns and rows. Making a row taller will add extra blank space in between the records
in your table, making it shorter will make them appear closer together.
To change the font, color, point size, etc. of the data in the columns, just highlight
the text and make the changes that you want. They will carry over when the data is put
into the table.
Scanned Signatures
Inserting scanned signatures from the topaz electronic signature hardware will
probably require some OJT from Lisa or Ryan, but the basic steps are as follows:
1. Add a reference to the Topaz signature scan library to the document
2. Insert a signature active X control onto the document
3. Position and size the signature control as you want it to appear on the final
product
4. Open the properties window for the signature control
5. Change the name property from ‘sig1’ or whatever it is to ‘SignatureBox’
6. Change the ‘SigCompressionMode’ property to 1
7. Go into the visual basic for the document itself (not a project or anything, and not
macros, just plain VB) and add the following function:
Public Sub FillSignature1(strSignature As String)
On Error GoTo FillSignature_Error
SignatureBox.SigCompressionMode = 1
SignatureBox.SigString = strSignature
Exit Sub
FillSignature_Error:
Exit Sub
End Sub
8. Save it and that should let the signature scan work.
Using The Template
Now that you have made your template, all that remains is to hook it up to
permits. From the switchboard main menu, select “Permit Setup” then “Permits” then
“Permit Codes”. From the list of permit codes select the one that you want. This will
bring up a window with some tabs in it. The tabs we are concerned with are Permit
Message and COO Message.
At the bottom if you check the “Use Word Permit Form” box the “…” button will
become enabled. Clicking this button allows you to browse your computer to find your
template. The “Include Description on Printed Permit” and “Print Permit Details”
checkboxes will no longer do anything. You may still use the Signature Line, Header,
and Footer and use form fields to put them into your template, but it may be easier to
design your template by simply typing them into the template since they would be the
same for every permit of that code anyway. The COO Message tab is very similar to the
permit one, and works in the same manner. Once you have “Use Word Permit (or COO)
Form” checked and pointed it to your template, whenever you print a permit or COO of
that permit code, Permits will use your template rather than the Access reports. If you
wish to use that same template for more than one code, you have to go through the
different codes and specify it on every one.
When printing a permit, there are a few different ways you can get it printed. If
you accept a payment for the permit or a permit invoice and choose to print the permit,
you have the option of printing more than one copy. This function works just fine with
automation. If you go to Reporting > More Reports > Reprint Permit there will be
several options. If you choose Temp C.O. then the temporary certificate of occupancy
will print out as an access report, there is no ability to make a Temp C.O. using word. If
you choose Print Preview, then MS Word will open and display your Permit and or
Certificate of Occupancy in print preview mode. If you do not choose print preview, it
will print it or them to the default printer with word doing everything ‘in the background’
and you will never see word. “Reprint Permit” using print preview mode is an excellent
way to test your template out after you have finished it to see how the finished product
will look and test for spelling errors in your template.
I hope that this manual has helped you to understand and use Word automation
with LG Permits. Thank you.
Prefixes and Fields
Form Field Prefixes And Fields
Prefix “PER_”
Use in a form field as per_[fieldname]. Don’t put brackets around the field name
though. The Per recordset contains most of the fields that are unique to a permit. The far
left column is the field name or alias that you would use in making a template.
Field Name
Origin Table
Origin Field
PermitID
PermitNumber
PStatus
Permits
Permits
Permits
PermitID
PermitNumber
Status
IssueDate
PermitCode
PEU
AppliedDate
ApprovedBy
Residential
Permits
Permits
Permits
Permits
Permits
Permits
IssueDate
PermitCode
PeriodEffectiveUsed
AppliedDate
ApprovedBy
Residental
Drawing
OccupancyID
ImpTypeID
JobCost
PermitFee
ConTaxID
ConLocNum
ConLicCode
AEDTaxpayerID
AEDLocNum
AEDLicenseCode
SuperTaxID
SuperLocNum
SuperLicCode
Notes
Permits
Permits
Permits
Permits
Permits
Permits
Permits
Permits
Permits
Permits
Permits
Permits
Permits
Permits
Permits
Drawing/Diagram
OccupancyID
ImprovementTypeID
JobCost
PermitFee
ContractorTaxpayerID
ContractorLocationNumber
ContractorLicenseCode
AEDTaxpayerID
AEDLocationNumber
AEDLicenseCode
SupervisorTaxpayerID
SupervisorLocationNumber
SupervisorLicenseCode
Notes
Notes
Displays as one
letter
Displays as yes
or no
Form Field Prefixes and Fields cont’d
Prefix Per_ cont’d
Field Name
Origin Table
Origin Field
Notes
JobAddress1
JobAddress2
JobLocationCity
JobState
JobZip
JobPhone
JobSurvey
JobLocationLot
JobBlock
JobMapNum
JobGroup
JobCtrlMap
JobParcel
JobGEOCode
JobNotes
PVerifiedBy
OwnerName
OwnerAddress1
OwnerAddress2
OwnerCity
OwnerState
OwnerZipCode
OwnerPhone
Paid
Permits
Permits
Permits
Permits
Permits
Permits
Permits
Permits
Permits
Permits
Permits
Permits
Permits
Permits
Permits
Permits
Permits
Permits
Permits
Permits
Permits
Permits
Permits
Permits
JobLocationAddress1
JobLocationAddress2
JobLocationCity
JobLocationState
JobLocationZipCode
JobLocationPhoneNumber
JobLocationSurvey
JobLocationLot
JobLocationBlock
JobLocationMapNumber
JobLocationGroup
JobLocationControlMap
JobLocationParcel
JobLocationGEOCode
JobLocationNotes
VerifiedBy
OwnerName
OwnerAddress1
OwnerAddress2
OwnerCity
OwnerState
OwnerZipCode
OwnerPhoneNumber
Paid
Void
FootPrint
JobSpecInterest
ProposedUse
WorkDescription
Hold
MasterPermitID
ProjectID
SubDivision
StreetNumber
StreetID
NumberOfUnits
COIssued
ExpirationDate
PermitCode
PCodeDesc
Permits
Permits
Permits
Permits
Permits
Permits
Permits
Permits
Permits
Permits
Permits
Permits
Permits
Permits
PermitCodes
PermitCodes
Void
Footprint
JobLocationSpecialInterest
ProposedUse
WorkDescription
Hold
Yes/No
MasterPermitID
ProjectID
SubDivision
StreetNumber
StreetID
NumberOfUnits
COIssued
ExpirationDate
PermitCode
Description
Displays as Yes
or No
Yes/No
Form Field Prefixes and Fields cont’d
Prefix Per_ cont’d
Field Name
Origin Table
Origin Field
ShortDesc
MediumDesc
LongDesc
PCodeStatus
PermitType
PermitHeader
PermitCodes
PermitCodes
PermitCodes
PermitCodes
PermitCodes
PermitCodes
ShortDescription
MediumDescription
LongDescription
Status
PermitType
PermitHeader
PermitFooter
PermitSignature
COOHeader
COOFooter
COO1
COO2
COO3
RAC
CalcLabel
ExpirationDays
RACDesc
AddressLine1
AddressLine2
AddressLine3
AddressLine4
AddressLine5
RACZip
ContactName
RACPhone
PhoneExtension
FaxNumber
EmailAddress
PayTo
DrawnBy
ConstTypeID
HeatTypeID
CentralAir
SewageDisposal
SIN
Elevator
NumParking
WaterSupply
PermitCodes
PermitCodes
PermitCodes
PermitCodes
PermitCodes
PermitCodes
PermitCodes
PermitCodes
PermitCodes
PermitCodes
RemittanceAddressCodes
RemittanceAddressCodes
RemittanceAddressCodes
RemittanceAddressCodes
RemittanceAddressCodes
RemittanceAddressCodes
RemittanceAddressCodes
RemittanceAddressCodes
RemittanceAddressCodes
RemittanceAddressCodes
RemittanceAddressCodes
RemittanceAddressCodes
RemittanceAddressCodes
PermitCharacteristics
PermitCharacteristics
PermitCharacteristics
PermitCharacteristics
PermitCharacteristics
PermitCharacteristics
PermitCharacteristics
PermitCharacteristics
PermitCharacteristics
Notes
One Letter
From Permit
Code
Options
PermitFooter
“
PermitSignature
“
COOHeader
“
COOFooter
“
CertificateOfOccupancy1 “
CertificateOfOccupancy2 “
CertificateOfOccupancy3 “
RemittanceAddressCode
CalculationLabel
ExpirationDays
Description
AddressLine1
AddressLine2
AddressLine3
AddressLine4
AddressLine5
Zip/PostalCode
ContactName
PhoneNumber
PhoneExtension
FaxNumber
EmailAddress
MakeChecksPayableTo
DrawnBy
ConstructionTypeID
HeatingTypeID
CentralAir
SewageDisposal
SewageImpactNumber
Elevator
NumberOfParking
WaterSupply
Form Field Prefixes and Fields cont’d
Prefix Per_ cont’d
Field Name
Origin Table
Origin Field
Stories
TotalLiving
TotalNonLiving
PlotArea
FrontWidth
RearWidth
Side1Length
Side2Length
ZoningClassID
Bedrooms
Bathrooms
TotalRooms
TypeExplosives
NumOfCharges
DetMethod
ExplosivePerChg
DistToRes
ChargePerDet
WaterService
WaterSvcSize
PlumLoc
BuildingSewer
SewerSvcSize
ImprType
SepticTank
ConOrDiscon
Excavation
MvAddress1
MvAddress2
MovingCity
MovingState
MvZip
MovingSurvey
MovingLot
MovingBlock
CVerifiedBy
MvDateTime
ExType
PavType
SizeCut
GasDemand
PermitCharacteristics
PermitCharacteristics
PermitCharacteristics
PermitCharacteristics
PermitCharacteristics
PermitCharacteristics
PermitCharacteristics
PermitCharacteristics
PermitCharacteristics
PermitCharacteristics
PermitCharacteristics
PermitCharacteristics
PermitCharacteristics
PermitCharacteristics
PermitCharacteristics
PermitCharacteristics
PermitCharacteristics
PermitCharacteristics
PermitCharacteristics
PermitCharacteristics
PermitCharacteristics
PermitCharacteristics
PermitCharacteristics
PermitCharacteristics
PermitCharacteristics
PermitCharacteristics
PermitCharacteristics
PermitCharacteristics
PermitCharacteristics
PermitCharacteristics
PermitCharacteristics
PermitCharacteristics
PermitCharacteristics
PermitCharacteristics
PermitCharacteristics
PermitCharacteristics
PermitCharacteristics
PermitCharacteristics
PermitCharacteristics
PermitCharacteristics
PermitCharacteristics
NumberOfStories
TotalLiving
TotalNonLiving
PlotArea
FrontWidth
RearWidth
Side1Length
Side2Length
ZoningClassID
NumberOfBedrooms
NumberofBathrooms
TotalRooms
TypeOfExplosives
NumberOfCharges
MethodOfDetonation
ExplosivesPerCharge
DistanceToResidence
ChargePerDetonation
WaterService
WaterServiceSize
PlumbingLocation
BuildingSewer
SewerServiceSize
ImprovementType
SepticTank
ConnectOrDisconnect
Excavation
MovingAddress1
MovingAddress2
MovingCity
MovingState
MovingZipCode
MovingSurvey
MovingLot
MovingBlock
VerifiedBy
MovingDateTime
ExcavationType
PavementType
SizeCut
GasDemand
Notes
Form Field Prefixes and Fields cont’d
Prefix Per_ cont’d
Field Name
Origin Table
Origin Field
SignLength
SignWidth
SignSqFt
Misc1
Misc2
MinPadEle
PermitCharacteristics
PermitCharacteristics
PermitCharacteristics
PermitCharacteristics
PermitCharacteristics
PermitCharacteristics
SignLength
SignWidth
SignSquareFeet
Misc1Information
Misc2Information
MinPadElevation
Notes
Prefixes “CON_”, “AED_”, and “SUP_ ”
These three prefixes all use the same fields from the same table. They will
display different information though. Con is short of contractor, AED for architect,
engineer, designer, and SUP for supervisor. To specify one of these for a permit, they
must be selected from the taxpayers that are in the system. So all of those prefixes will
get data on a taxpayer, but different taxpayers depending upon how they are classified in
the permit. They should be used in a form field as “CON_[fieldname]”,
“AED_[fieldname]”, or “SUP_[fieldname]”. Don’t use brackets around your fieldnames
though. The column on the far left are the field names that you should use in your
template.
Field Name
Origin Table
Origin Field
DBA
MailAttn
MailAddress1
MailAddress2
MailCity
MailState
MailZip
MCN
TaxpayersLocations
TaxpayersLocations
TaxpayersLocations
TaxpayersLocations
TaxpayersLocations
TaxpayersLocations
TaxpayersLocations
TaxpayersLocations
DoingBusinessAs
MailingAttention
MailingAddress1
MailingAddress2
MailingCity
MailingState
MailingCity
MasterCertificateNumber
Notes
Form Field Prefixes and Fields cont’d
Prefix “MSC_”
Msc stands for Miscellaneous. These fields do not fit into any of the other
recordsets. These are fields that have to query different records from the same table as
one of the other recordsets, or get only one field from one table and do not need a
dedicated recordset. They should be used in a form field as “MSC_[Fieldname]”, except
don’t use brackets around your field names. The column on the far left is the name of the
field as it should be used in the template.
Field Name
Origin Table
Origin Field
Notes
PTotal
N/A
N/A
MastPermitNum
Permits
PermitNumber
=Sub fees +
additional fees, total
for the permit.
Preformatted as
currency.
For the master
permit
ProjNum
Occupancy
Projects
OccupancyTypes
ProjectNumber
Occupancy
ConstType
ConstructionTypes
ConstructionType
ZoningClass
ZoningClasses
ZoningClass
ZCDesc
ZoningClasses
Description
AFeesTotal
N/A
N/A
Corresponds to
OccupancyID from
Permits
Corresponds to
ConstructionTypeID
from
PermitCharacteristics
Corresponds to
ZoningClassID from
PermitCharacteristics
Corresponds to
ZoningClassID from
PermitCharacteristics
Total of all
additional fees
without sub fees.
Formatted as
currency.
Form Field Prefixes and Fields cont’d
Prefix “CHR_”
Please see “User Defined Characteristics” under “Form Fields” for the instructions on
using the CHR_ prefix, it does not have predefined field names.
Table Prefixes And Fields
Prefix “Fees-“
This table will list information on the sub fees associated with the permit.
Field Name
Origin Table
Origin Field
FeeID
FeeName
UnitOfMeasure
PermitFeesID
PermitID
InputAmount
UnitAmount
OutputAmount
Fees
Fees
Fees
PermitFees
PermitFees
PermitFees
PermitFees
PermitFees
FeeID
FeeName
UnitOfMeasure
PermitFeesID
PermitID
InputAmount
UnitAmount
OutputAmount
Notes
Prefix “AddFees-“
This table will list information on the additional fees associated with the permit
Field Name
Origin Table
Origin Field
Name
UnitOfMeasure
PermitAdditionalFeesID
PermitID
AdditionalFeeID
AdditionalFees
AdditionalFees
PermitAdditionalFees
PermitAdditionalFees
PermitAdditionalFees
Name
UnitOfMeasure
PermitAdditionalFeesID
PermitID
AdditionalFeeID
Notes
Table Prefixes and Fields cont’d
Prefix AddFees- cont’d
Field Name
Origin Table
Origin Field
Notes
InputAmount
UnitAmount
FeeAmount
Paid
PermitAdditionalFees
PermitAdditionalFees
PermitAdditionalFees
PermitAdditionalFees
InputAmount
UnitAmount
FeeAmount
Paid
Yes/No
Prefix “Inspections-“
This table will list information on inspections.
Field Name
Origin Table
Origin Field
InspectionID
PermitID
InspectionType
RequestedBy
Inspector
SchedDate
SchedTime
ActualDate
ActualTime
Approved
Fee
Notes
InspectionName
Description
PermitInspections
PermitInspections
PermitInspections
PermitInspections
PermitInspections
PermitInspections
PermitInspections
PermitInspections
PermitInspections
PermitInspections
PermitInspections
PermitInspections
InspectionTypes
InspectionTypes
InspectionID
PermitID
InspectionType
RequestedBy
Inspector
ScheduledInspectionDate
ScheduledInspectionTime
ActualInspectionDate
ActualInspectionTime
Approved
Fee
Notes
InspectionName
Description
Notes