1
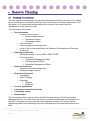
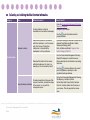
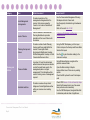
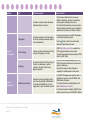
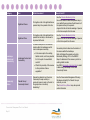
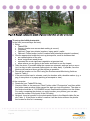
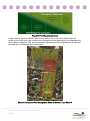
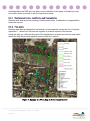
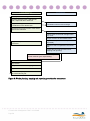
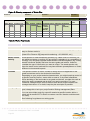
Environmental Works Conservation Management Plan User Manual Date Prepared: November 2012 Table of contents 1 2 3 4 5 6 Introduction ................................................................................................................... 4 Reserve Planning ......................................................................................................... 7 2.1 Desktop Assessment .............................................................................................. 7 2.2 Collecting and collating the Site Overview information ........................................... 8 Site assessment ......................................................................................................... 13 3.1 Pre-visit Preparation ............................................................................................. 13 3.2 Reconnaissance ................................................................................................... 13 3.3 Vegetation Quality Assessment ............................................................................ 13 3.4 Weed/Threats Mapping ........................................................................................ 14 3.5 Fuel Hazard Assessments .................................................................................... 14 3.6 Significant Species ............................................................................................... 14 3.7 Infrastructure......................................................................................................... 15 3.8 Other Issues ......................................................................................................... 15 3.9 Photopoint monitoring ........................................................................................... 15 Management Zones .................................................................................................... 19 4.1 Management Zones .............................................................................................. 19 4.2 Fuel Management Zones ...................................................................................... 21 4.3 Habitat Zones ....................................................................................................... 24 Developing the CMP ................................................................................................... 25 5.1 Site Overview........................................................................................................ 25 5.2 Values and Assets ................................................................................................ 25 5.2.1 Vegetation ...................................................................................................... 25 5.2.2 Fauna ............................................................................................................. 25 5.2.3 Habitat Values ................................................................................................ 25 5.3 Threatening processes ......................................................................................... 25 5.3.1 Habitat destruction, modification and fragmentation ...................................... 26 5.3.2 Pest plants ..................................................................................................... 26 5.3.3 Pest animals................................................................................................... 27 5.3.4 Tree decline ................................................................................................... 27 5.3.5 Erosion and sediment control ......................................................................... 27 5.3.6 Direct human impacts .................................................................................... 27 5.3.7 Drainage/stormwater ...................................................................................... 27 5.4 Altered fire regime ................................................................................................ 27 5.4.1 Altered browsing/grazing regime .................................................................... 27 5.4.2 Altered water quality and flows....................................................................... 28 5.5 Management Zones .............................................................................................. 28 5.5.1 Management Zones ....................................................................................... 28 5.5.2 Fuel Management Zones ............................................................................... 28 Works planning and reporting ..................................................................................... 29 6.1 Working with contractors ...................................................................................... 29 6.2 Develop a works plan ........................................................................................... 31 6.2.1 Setting Goals.................................................................................................. 33 6.2.2 Setting Actions ............................................................................................... 35 6.3 Report actions (end of the financial year) ............................................................. 36 6.4 Review the plan (end of financial year) ................................................................. 37 6.5 File management of Works Plans ......................................................................... 37 Conservation Management Plan User Manual Page 2 Appendix A – VQA Field Sheet .......................................................................................... 39 Conservation Management Plan User Manual Page 3 1 Introduction Nillumbik Shire Council is responsible for the management of 99 environmentally significant reserves covering an area of 495 hectares on both Council freehold land and as the Committee of Management for Crown Land. The primary purpose of these reserves is for the conservation of natural values; however they are also important from a social, cultural and historical perspective. These reserves are home to an array of native plants and animals, and often provide the last remaining refuges for threatened and endangered species in a fragmented landscape. Council’s Environmental Works (EW) Team actively manages these reserves by undertaking a range of works such as weed and rabbit control, species conservation, fencing, trail maintenance and fuel reduction works to protect and enhance their biodiversity and community values. EW develops yearly works programs for a number of the bushland reserves. Historically, yearly works programs have been developed in response to a number of factors including: Community expectations and pressures Presence of rare or threatened species or communities Presence of threatening processes Conservation value of the reserve Presence of an active Friends Group On-going historic management of the reserves To provide a holistic and strategic approach to managing Council’s bushland and wetland reserves all reserves will have an individual Conservation Management Plan (CMP) developed which outlines the values, threats and management objectives for that reserve. To implement the CMPs, EW will also develop a five-year works objective. The works objective will detail the actions required to achieve the management objectives specified in the CMP. It also provides a tool for communicating with contractors and reporting on progress and achievements. Works objectives may specify actions up to five-years, however they will be translated into annual works programs for contractors. The purpose of this manual is to provide staff within EW guidelines for how to develop a CMP, how to develop works objectives and an annual works plan and how to monitor and review works within reserves. The process for developing CMPs and works plans follows the process outlined in the Environmental Works Reserves Prioritisation and Planning Guidelines (Figure 1). Conservation Management Plan User Manual Page 4 Figure 1: Environmental works cycle Conservation Management Plan User Manual Page 5 Planning is essential for on-ground environmental works. Good plans enable land managers to manage works over several years and/or over large areas. The best plans constantly evolve based on the outcome of control works and changes in environmental condition through a cycle of plan, do and review (see Figure 2). Plan Do Works • Identify and prioritise biodiversity, agricultural and amenity values and assets to protect from threats • Map priority weeds and pest animals • Monitor biodiversity • Set up photopoints • Develop a plan including goals and actions • Brief contractors • Do works • Keep a record of works Evaluate and Review Figure 2: Plan, Do and Review Conservation Management Plan User Manual Page 6 • Update weed and pest animal mapping • Retake photos at photopoints • Monitor biodiversity • Evaluate progress towards goals • Review plan 2 Reserve Planning Desktop Assessment 2.1 The first step when developing a Conservation Management Plan for a reserve is to collect as much background information relating to the reserve and surrounding as possible. This will assist you in formulating and developing the context of the reserve and the management of the reserve to date. This information will include: Site Information o Location of the reserve Street location/address Catchment location Landscape location o Area (hectares) o Land management arrangements o Level of Service as specified by the Reserves Prioritisation and Planning Guidelines Planning and policies o Planning overlays or zones (ESO, WMO, PCRZ) o Previous studies Vegetation Management Plans Fire Management Plans Streamflow Management Plans Historical land uses o Indigenous cultural heritage sites o European usage if known Physical environment o Topography o Soils / Geology o Hydrology Streams Wetlands Level of significance Landscape context/connectivity Community values Stakeholders This information will be used to inform the Site Overview section of the Conservation Management Plan. The Site Overview section provides s background and introduction to the site. It discusses the environmental and landscape context of the site as well as presenting broad overview/background of the management of the bushland at the site to date. Conservation Management Plan User Manual Page 7 2.2 Collecting and collating the Site Overview information Category Item What Information? Property address or physical boundaries such as roads or waterways Reserve Location Describe the location of the reserve within the catchment. i.e. is the reserve part of the Yarra or Plenty River catchments, is it located at the headwaters or at the confluence Site Information Described the location of the reserve within the landscape. Is it close to a township or is it surrounded by farms? Area (hectares) and shape Conservation Management Plan User Manual Page 8 Provide a description of the area of the reserve in hectares, and also the shape of the reserve i.e. long and thin, rectangular, square Where to find it? Open the Conservation Management Planning MapInfo Workspace Navigate to your reserve Use the to get information about the property address Information relating to catchment location can be obtained from Melbourne Water’s Healthy Waterways Strategy (draft) Refer to Melbourne Water’s Regional River Health Strategy 2008-2013 Use the Conservation Management Planning MapInfo Workspace to locate the reserve. Review aerial photos to determine surrounding land uses. Use the to measure distances to nearest patch of vegetation, townships or other significant landscape features. Using the Conservation Management Planning Workspace, go to Map>>Options. Set the Map Units>>Area Units to hectares Click Ok, and then double click the arrow on your reserve. This will generate the reserve area. Category Planning and Policies Item What Information? Where to find it? Land Management Arrangements Provide a description of the management arrangements for the reserve. Is the reserve owned by Council or is it under a Committee of Management? Use the Conservation Management Planning Workspace to check Crown Land. Use the property information to get landowners details. Refer to Council’s List of CoM Level of Service Use the Reserves Prioritisation and Planning Guidelines to provide a description of the Level of Service for the reserve ..\Reserves Prioritisation and Planning Guidelines.docx Planning Overlays and Zones Provide an outline of what Planning Overlays and Zones might affect the reserve. These might include Environmental Significance Overlays, Wildfire Management Overlays or Public Conservation Resource Zone. Using the CMP Workspace, go to the Layer Control and open the Overlays and Zones folder Select all the layers Previous Studies A number of Council’s bushland and wetland reserves have previous studies such as flora and fauna reports, fire management plans or net gain assessments. This information will be useful in forming a view of management required. Using Windows Explorer, navigate to the particular reserves folder. Open the folder relating to Reports Explore folder to see if there are any existing reports. Check the EW cupboard to see if hard copies exist Historical Land Use Provide an overview of any sites of Indigenous Cultural Significance either within your reserve or surrounding areas. Check DPCD Areas of Cultural Sensitivity Maps. Select the Ringwood map to see if any areas have particular cultural sensitivity Use the CMP Workspace, Aboriginal Sites Grid to determine particular sites of significance. Conservation Management Plan User Manual Page 9 Use the to get information relating to the zones and overlays Category Physical Environment Level of Significance Item Where to find it? Provide an overview of post-European Settlement land use if known. Post-European historical land use may be difficult to determine, but may be available in existing reports relating to the reserve. From the Field Assessment you may be able to infer past landuse practices such as vegetation clearance or the presence of fences or mines. Use the contours layer in the CMP Workspace to determine steepness, aspect. Topography Provide a description of the topography of the site, including steepness, aspect, form and elevations. Soils / Geology If known, provide a brief overview of the soil type and geology of the site DSDPI Earth Resources Online website has PDF geological maps at various scales Some of these maps have been saved as PDFs within the CMP folder Hydrology Provide a description of the hydrology of the site. Are waterways or gullies present on the site? Are there any wetlands present? Use the contours and waterways layers in the CMP Workspace to determine the presence of gullies or waterways. Aerial photos may also show changes in vegetation to indicate wetter or drier areas. Discuss the level of significance of the site. Is the site listed as a DSE Biosite? Is it listed under NEROC as a site of significance or part of a habitat corridor? In the CMP Workspace use open the Level of Significance layers to view both NEROC and DSE Biosite Information. For further information relating Biosites click here DSE Biosites in Nillumbik For further information relating to NEROC sites obtain an electronic copy of the NEROC Report Significance of the site Conservation Management Plan User Manual Page 10 What Information? Use the tool to select the contours and determine height above sea-level. Category Item What Information? Where to find it? Significant Fauna Put together a list of all significant fauna species likely to be present at the site. Use the Victorian Biodiversity Atlas. Use a 2km radius to determine species likely to occur within the area, reduce the list based on if the species is likely to be present. Augment the list with local knowledge of species or from fauna reports from the area. Significant Flora Put together a list of all significant flora species that are likely or are known to be present at the site. Use the Victorian Biodiversity Atlas. Augment the list with local knowledge of species or from flora reports from the area. Provide a description of the reserve’s location within the landscape and its role in landscape connectivity. Landscape Context and Connectivity Community Values Landscape Context and Connectivity Friends Group / Community Interest Conservation Management Plan User Manual Page 11 Is the reserve part of an existing habitat corridor, or is there potential for it to be part of a new habitat corridor? What is the proximity of the reserve to other patches of native vegetation? Discuss the details of any Friends or Community Groups currently or previously known to work on the site. Is the group active or is activity diminishing? Use aerial photos to determine the location of the reserve within the landscape. Refer to Strategic Documents such as the Biodiversity Strategy 2012 or the NEROC Report to determine if the reserve is part of an existing habitat corridor. Use DSE’s Biodiversity Interactive Map to assist in determining Landscape Context and Connectivity Scores. Use the Conservation Management Planning Workspace to identify if a Friends Group is active at your site. The Friends Group Manual may also provide useful information Category Item What Information? Where to find it? Contact Leisure Services to determine recreational use of reserves Recreational Use Discuss and describe the recreational use of the reserve. Is it currently used for passive or active forms of recreation? Are there recreational trails through the reserve? Other Agencies Discuss the involvement of other stakeholders in the management of the site. If there is a waterway is Melbourne Water undertaking works? Using the Conservation Management Planning Stakeholders Neighbours Conservation Management Plan User Manual Page 12 Discuss the details of adjoining property owners. Are there any existing relationships or arrangements with the neighbours? Workspace, you can use the tool to select properties around the reserve and view the surrounding property owners details. The reserve folder may also contain relevant information about pre-existing arrangements with surrounding landowners. 3 Site assessment The next step in the development of the Conservation Management Plan and Works Plan is to undertake a site assessment of the reserve. Pre-visit Preparation 3.1 To undertake the site assessment of the reserve you will need to take the following items: Clipboard and Pencil PDA/Tablet Camera Diameter Tape Field Sheets o Treeless Vegetation Quality Assessment Sheet o VQA Life form recording sheet Maps o EVC and Bioregion Maps – determine the EVCs likely to be present at the site prior to visiting o Aerial Photograph o Directions EVC Benchmarks OH&S Equipment Overall Fuel Hazard Assessment Guide Pegs / Equipment to set up photopoints VQA Manual Reconnaissance 3.2 Walk and drive around the site to formulate an idea of the: 3.3 Spatial distribution of the vegetation Remnant patches Identification and distribution of EVCs Quality differences within EVCs Presence/absence of high threat weeds Presences/absence of feral animals Adjoining land management practices Other potential issues/threats or features of note. Vegetation Quality Assessment Note: This section will be updated once the new Habitat Hectare methodology has been finalised. Conservation Management Plan User Manual Page 13 Undertake a Vegetation Quality Assessment of the site using the Habitat Hectares Approach. Use the Vegetation Quality Assessment Manual, the Vegetation Quality Assessment Sheet and the EVC benchmarks to undertake the assessments. Step 1: Identify Habitat Zones within the Reserve Step 2: Identify Ecological Vegetation Classes for each Habitat Zone Step 3: Undertake a Vegetation Quality Assessment for each identified Habitat Zone Once you have completed the Vegetation Quality Assessment for the reserve, you will need to input the data into Appendix D of the Conservation Management Plan, as well as updating the Habitat Zones table in MapInfo (see 4.3 Habitat Zones). Weed/Threats Mapping 3.4 Using Council’s PDA map and record information on weeds or other threatening processes observed. These may include: Weeds Pest Animals Erosion Rubbish Encroachments Drainage/stormwater The Environmental Works Mapping Data Fields document outlines the fields within the PDA that need to be collected. ..\..\..\Administration\Policies_ Procedures\GIS\Environmental Works mapping data fields.docx Fuel Hazard Assessments 3.5 By undertaking an Overall Fuel Hazard Assessment you can: Make a rapid, visual assessment of fuel arrangement; and Gain an understanding of how this will affect the changes of controlling a bushfire. Using the PDA and the Overall Fuel Hazard Assessment Guide, undertake a number of representative fuel hazard assessments across the reserve. 3.6 Significant Species Use the PDA to map and record the presence of any significant flora and fauna species that you might encounter during the site assessment. This data will be used to augment the list you have previously generated using the Atlas of Victorian Wildlife and the Flora Information System. Conservation Management Plan User Manual Page 14 Infrastructure 3.7 Use the PDA to map and record any infrastructure that might occur in the reserve. This may include infrastructure such as: Signs Fences Gates Seats Erosion control structure Other Issues 3.8 Use the PDA to map and record other issues that you might observe within the reserve. Other issues may include but are not limited to: 3.9 Cubby Houses Mines Graffiti Vandalism Illegal trails Historically significant sites Photopoint monitoring Photopoints are permanent or semi-permanent sites from where you can take a series of photographs which can be used to provide a visual record of changes over time. EW uses photopoints to demonstrate how issues such as vegetation condition and weed cover change. The following section provides a description of how to set up photopoints and manage the associated data. The pictures for comparison are taken at the same location, with the same direction angle, focus points and preferably camera settings. Photographic records provide a permanent visual record of change without reliance on memory or taking physical measurements, and are used to support other monitoring efforts where data is being collected. The number of photopoints you set up will depend on the variation in the vegetation and your ability to repeat photos. In general, take photos in spring and repeat once a year. There are also many internet resources that provide advice on where to place photopoints, how to use them and how to take the photos (in particular, DSE’s Land for Wildlife Note 43: Photopoint monitoring and BushTender Information Sheet 17: Photopoint monitoring). EW have 2 PDAs and a tablet set up to record the location and details of photopoints using Crest. Data collected on the units feeds directly into Nillumbik’s Environmental Monitoring database. Conservation Management Plan User Manual Page 15 Action Figure 3: Example a photopoint (growth of grassy weeds before and after a wet year) To set up the initial photopoint: In the field (overcast days are best): 1. Bring: Tablet/PDA Camera (make sure camera date setting is correct) Compass Optional: Pegs/ star pickets/ markers / spray paint / mallet Optional: Printed maps (useful if marked with potential photopoint locations) 2. Choose appropriate locations to set up photopoints, such as locations that: are representative of the site show a significant weed threat represent the most significant vegetation at greatest risk areas where you are going to do works and want to see the impact 3. Take the photo. If possible keep the camera on automatic settings and no zoom (so it is easy to take a second similar photo at a later date). If possible, face the photo south east and show as little skyline as possible. 4. Record the location on the PDA using the Environmental Monitoring fields as listed in Table 1. 5. If the point will be hard to relocate, mark the location with a durable marker (e.g. a peg, a star picket or by spray-painting a fencepost or tree). At the computer: 6. Download your Tablet/PDA data. 7. Create a folder in the reserves “Photo” folder called “Photopoints” and then within this folder create another folder named the date you took the photos. The date on the folder should be in YYYYMMDD format. Download the photos into this folder. For easily comparing the photos you could number your photos (you can also include the number of the point in the GIS data). 8. Optional: Insert a hyperlink to the photopoints folder in the MapInfo table file (as per Table 1). If the photo is within a reserve it will be obvious where the photos are located so this isn’t necessary. Conservation Management Plan User Manual Page 16 To take subsequent photos at the photopoint: In the field: 1. If possible, take the photo in the same conditions as the previous photo. 2. Bring: Tablet/PDA with previous photopoints loaded Camera (make sure camera date setting is correct) Compass Previous photos Optional: Printed maps with previous photopoints shown 3. Relocate your photopoint using previous photos and the PDA. 4. Line up the photo to match the previous photo and take the photo. At the computer: 5. Download photos and place in the Reserve Folder under Photos. 6. Create a folder in the reserves “Photo/Photopoints” folder named with the date you took the photos. The date on the folder should be in YYYYMMDD format. Download the photos into this folder. For easily comparing the photos you could number your photos “Photopoints_date”. Table 1: Data fields for recording photopoints Field Field Type Field Options Field Description Form AssetID Character (100) Automatic Unique identifier for each parcel of land. 1 AssetID InspectionID Integer Inspector Drop-down Character (100) InspectDate Date/Time Automatic Unique identification code (ID) that provides a reference to a particular record. 2 Automatic based on login list of names Automatic Name of people/person doing the monitoring 3 Automatic Date record taken. InspectionI D Inpsector 4 InspectDat e Organisatio n Drop-down Character (100) Automatically “Nillumbik Shire Council” Name of the organisation doing the 5 monitoring. Organisati on Type Drop down Photopoint Type of monitoring. If “Other”, Conservation Management Plan User Manual Page 17 6 Field Field Type Field Options Field Description Form Character (100) Vegetation Monitoring Plot enter monitoring type in Comments. Type Direction the photographer faces for photopoints. 7 Trail Monitoring Point Orchid Cage Nest Box Artificial Hollow Habitat Tile Fauna survey Flora survey Fauna camera Transect Other Direction_P hotopoint Drop-down North Character (30) North East Photopoint Direction East South East South South West West North West Comments Data_Locati on Character (254) Character (254) Conservation Management Plan User Manual Page 18 Results, location of monitoring point, description of monitoring, duration of monitoring, description of photo, camera settings, camera used, weather conditions, etc. 8 File location of monitoring data. Not on form Comments 4 Management Zones When putting together the final CMP it is important to define a range of Zones which will assist in the on-going management of the reserve. 4.1 Management Zones Using a hard copy map, define management zones for the reserve. Management zones will be used to group areas of the reserve that have similar management/maintenance requirements. These zones may be very site specific i.e. Wetland Zone, Glycine Zone, Revegetation Zone or may use the categories outlined in the table below. Once you have determined the zones on the hard copy map, transfer the information to the appropriate Management Zones table in MapInfo. Use the Conservation Management Planning MapInfo Workspace and edit the Management Zones table. Table 2: Management Zones descriptions Core Habitat (& Biodiversity Hotspots) Areas of Core Habitat provide refuge for native plants and animals to live, reproduce and flourish. Protecting, improving and connecting core habitat areas is the highest priority for nature conservation, to maintain ecological function at a landscape scale. Within these Core Habitat areas may be hotspots of biodiversity (Biodiversity Hotspots). Biodiversity Hotspots provide important habitat for the most sensitive species and/or contain a particularly high diversity native plants and animals. The presence of sensitive species and/or habitat means that even low numbers of weeds may significantly impact these areas. Core habitat has most of the following attributes: - Structurally intact - contains under-storey, mid-storey and canopy species with a broad age class distribution (depending on the vegetation type) - Support a high diversity of native plants and animals - Old growth, hollow bearing trees (although much high quality bushland in Nillumbik has no or few old growth trees due to extensive logging in the past) - Contribute to healthy creeks and rivers (when present) - Large and connected to other bushland by wide (>50m) corridors of vegetation - Support threatened and significant plants and animals Note: Very little bushland in Victoria meets all these criteria; so consider an area to be core habitat if it contains most of these attributes. Because these areas are largely intact, they are resilient to most weed invasion and regenerate easily after control works. Weed control has immediate and long-term benefits. Conservation Management Plan User Manual Page 19 Rehabilitation Areas Rehabilitation areas are areas of lower quality bushland compared to core habitat. These areas may: Be missing important structural elements (e.g. under-storey, mid-storey or canopy species) Have a moderate or low diversity of native species Be isolated within an agricultural or urban landscape Have been subject to significant disturbance in the past Although degraded these areas may: provide a buffer to weed and pest animal invasion between cleared areas and core habitat provide corridors for movement of animals between areas of core habitat provide habitat for the more common native plants and animals Rehabilitation areas are: prone to weed invasion and may provide a source of weeds to core habitat don’t regenerate easily after control works and are therefore subject to reinvasion by weeds Weed control has limited benefits in the short-term except to protect surrounding core habitat and prevent further degradation. In the long-term, concerted effort in these areas provide the greatest opportunity to expand the areas of core habitat and improve ecological function at a landscape scale. Cleared/degraded areas Cleared or degraded areas are areas that support mostly exotic and few native plants Cleared or degraded areas: - are often heavily invaded by weeds and may provide a source of weeds to other areas - don’t regenerate easily after control works and are therefore subject to reinvasion by weeds. Weed control has limited benefits except to manage source infestations that may spread into higher quality areas. Weed control will probably require a significant change in associated land management (e.g. restrict disturbance and manage nutrient inputs (e.g. exclude stock & rabbits) Cleared or degraded areas provide a potential for revegetation of native species to buffer or link core habitat areas. Conservation Management Plan User Manual Page 20 Figure 4: Example of establishing management zones – Bulwidj Reserve 4.2 Fuel Management Zones Fire Prevention Works within Council’s bushland and wetland reserves adopt a risk-based prioritisation approach to preventing fires starting within Council’s reserves and spreading to adjoining properties. This approach is outlined in the Environmental Works Fuel Modification Methodology. However, at the reserve scale Fuel Management Zones (FMZs) can be used as a tool to determine a range of activities that can eliminate or reduce the incidence, severity or impact of fire events that may impact surrounding residents and the community. The DSE Code of Practice for Bushfire Management on Public Land (2012), outlines four revised FMZs. The four Fire Management Zones are: Asset Protection Zone Bushfire Moderation Zone Landscape Management Zone Planned Burning Exclusion Zone Conservation Management Plan User Manual Page 21 FMZ placement is determined through analysis conducted in the development of strategic bushfire management plans, with input from stakeholders. Considerations include: risk to human life and property and community infrastructure, practical and achievable burning outcomes, appropriate fire regimes for vegetation types, maximum overall fuel hazard ratings, topographical alignments, and bushfire behaviour. Table 3: Fuel Management Zones (adapted from DSE Code of Practice for Bushfire Management on Public Land 2012) Fuel Management Zone Zone Description Asset Protection Zone Using intensive fuel treatment, the Asset Protection Zone (APZ) aims to provide the highest level of localised protection to human life and property and key community assets. The goal of fuel treatment in the APZ is to reduce radiant heat and ember attack in the event of a fire. Fuel treatment will be carried out in the APZ through a combination of methods such as mowing, slashing, vegetation removal or burning. This zone aims to reduce the speed and intensity of bushfires. This zone complements the APZ in that the use of fuel reduction techniques in the BMZ is designed to protect nearby assets, particularly from ember spotting during a bushfire. Bushfire Moderation Zone Where practicable, the BMZ will aim to achieve ecological outcomes by seeking to manage for ecologically desirable fire regimes, provided bushfire protection objectives can still be met. This may include using a range of fuel management methods. Within this zone, planned burning will be used for three broad aims: Landscape Management Zone bushfire protection outcomes by reducing the overall fuel and bushfire hazard in the landscape ecological resilience through appropriate fire regimes management of the land for particular values including forest regeneration and protection of water catchments at a landscape level. Other fuel reduction methods will be used within this zone as appropriate. Planned Burning Exclusion Zone This zone excludes the use of planned burning or fuel reduction techniques in areas intolerant to fire. Conservation Management Plan User Manual Page 22 Figure 5: Fuel Management Zones Using a hard copy map, define FMZs for the reserve. Once you have determined the zones on the hard copy map, transfer the information to the appropriate Fuel Management Zones table in MapInfo. Use the Conservation Management Planning MapInfo Workspace and edit the Fuel Management Zones table. Figure 6: Example of Fuel Management Zones at Brown's Lane Reserve Conservation Management Plan User Manual Page 23 4.3 Habitat Zones Using the Habitat Zones determined during the Vegetation Quality Assessment (Habitat Hectares), transfer the zones and data to the Habitat Zones table in MapInfo. Conservation Management Plan User Manual Page 24 5 Developing the CMP Now that you have collected and collated all of that useful information, it’s time to put together the Conservation Management Plan. Using the Conservation Management Plan Template start to put the information you have collected into the document. 5.1 Site Overview The Site Overview section provides background and introduction to the site. It discusses the environmental and landscape context of the site as well as presenting broad overview/background of the management of the bushland at the site to date. Include a map of the reserve which shows the location of the reserve in relation to Nillumbik Shire Council’s boundaries and includes aerial photography, property boundaries, reserve boundaries, contours and the location of waterways or wetlands. 5.2 Values and Assets The Values and Assets section of the CMP allows you to describe and discuss the values and assets existing within the reserve or surrounding the reserve. 5.2.1 Vegetation In this section you should provide a description of the extent quality and significance of the indigenous vegetation at the site, as well as discussing and describing the Ecological Vegetation Classes and providing a summary of the Vegetation Quality Assessment. You will need to complete Appendices A and D of the CMP Template. The EVC Benchmarks may provide you with useful information in completing this section. 5.2.2 Fauna In this section you should provide a description of the fauna occurring within or surrounding the reserve. You should discuss any significant species recorded within or near the reserve, levels of significance i.e. National, State, Regional, Local of particular species and any management requirements of the species. You will need to complete Appendix B of the CMP Template. 5.2.3 Habitat Values In this section you will need to provide a description of any particular habitat values of the site. Here you may discuss the presence or absence of Large Old Trees (LOTs), hollow bearing trees, logs or other habitat features. 5.3 Threatening processes Describe and discuss the key threatening processes to the site and recommend management actions for each in relation to native vegetation management for the site. The Conservation Management Plan User Manual Page 25 headings within the CMP are only given as an indication of the types of threats you may encounter, delete or modify to suit your particular needs. 5.3.1 Habitat destruction, modification and fragmentation Describe and discuss issues relating to habitat destruction, modification or fragmentation within the reserve. 5.3.2 Pest plants Describe and discuss distribution and density of weed species across the site. Complete Appendix C - Weed List. Discuss the negative or positive impacts of the weeds. Using the data you collected during the Site Assessment, prepare and insert a map which shows the high threat weed species present within the reserve. Figure 7: Example of a Weed Map at Brown's Lane Reserve Conservation Management Plan User Manual Page 26 5.3.3 Pest animals Describe pest animals known to occur on site including rabbits, foxes, feral pigs, feral cats etc. Describe potential densities and impact of animals on the site. Using the data you collected during the Site Assessment, prepare and insert a map which shows the location of pest animal burrows, dens or harbour within the reserve. 5.3.4 Tree decline Describe and discuss any issues relating to tree decline across the site. 5.3.5 Erosion and sediment control Describe and discuss any issues relating to erosion and sediment control across the site. 5.3.6 Direct human impacts Describe and discuss any issues relating to direct human impacts on the site. This may include rubbish, recreation, timber cutting, removal of firewood and debris. If required, you may provide a map showing the locations of any issues that you mapped during the site assessment. 5.3.7 Drainage/stormwater If applicable, describe and discuss any negative drainage or stormwater impacts the reserve might be experiencing. Some sites may have Waterwatch monitoring data for them. This information can be found at: http://www.vic.waterwatch.org.au/monitoring-and-data/1065/. To interpret the data there is a manual here: http://www.vic.waterwatch.org.au/monitoringand-data/1011/ 5.4 Altered fire regime If applicable, describe and discuss the impacts of altered fire regime’s on the reserve. Is the lack of fire affecting the vegetation communities and suitable habitat at the site? What sort of fire regime would have been expected here? What species/species composition is it affecting? You may wish to use the CFA’s Fire Ecology Guidelines. 5.4.1 Altered browsing/grazing regime If applicable, describe and discuss the impacts of altered browsing and grazing regimes on the reserve. What sort of grazing regime would have been expected here, e.g. small browsing mammals which now aren’t present? What species/species composition is it affecting? Conservation Management Plan User Manual Page 27 5.4.2 Altered water quality and flows If applicable, describe and discuss the impacts of altered water quality and flows on the reserve. Is this area on the floodplain? What is the expected flood regime? How is drainage affecting the site? Management Zones 5.5 In this section of the CMP you will be required to discuss and present the different Management Zones within the reserve. 5.5.1 Management Zones Referring back to the Management Zones you mapped in Section 4 of this manual provide detailed descriptions on each of the Management Zones you have mapped. Include the following information: Name of the Zone Values/assets present in that zone Threats to the zone Management actions required for the zone Prepare and insert a thematic map of the reserve which shows all of the Management Zones. 5.5.2 Fuel Management Zones Referring back to the Fuel Management Zones that you mapped in Section 4 of this manual, you will need to describe and discuss each FMZ. You may wish to cover topics such as: Overall Fuel Hazard Assessment results Key fuel management issues i.e. bark, Kunzea etc. Assets potentially at risk i.e. nearby houses, LOTs, logs Areas to be exempt from burning Potential areas for ecological/prescribed burning. Prepare and insert a thematic map of the reserve which shows the Fuel Management Zones, as well as the Overall Fuel Hazard Assessment results. Conservation Management Plan User Manual Page 28 Works planning and reporting 6 A Works Plan is an Excel spreadsheet that turns a Conservation Management Plan and its goals into on-ground actions. The best works plans constantly evolve based on the outcome of works and change to the threatening process through a cycle of plan, do and review (Figure 2). The Works Plan provides space to include the 5-year goals from the Conservation Management Plan, annual works for the current financial year and reporting of works done and final costs. Develop a Works Plan for each reserve where works you are contracting works. Depending on the level of planning that has occurred for the reserve it may include a 5year goals as well as annual actions and budgets. When a Works Plan precedes the Conservation Management Plan you can hide the goals section until you have developed them. The following section provides a method for creating a Works Plan, recording works and reviewing the Works Plan. 6.1 Working with contractors The system is designed to set up a conversation between land mangers (you) and environmental contractors. It helps you set goals for management, plan actions, allocate budgets and report to funding bodies. It allows contractors to understand their responsibilities, provide input into planning, share their knowledge of reserves, report on works and provide accurate invoicing. Collectively it allows land managers and contractors to record a history of a reserve and to share intentions and actions. See Figure 8 and Table 4. When working with contractors provide them with the following resources (available in G:\Environmental_Works\Administration\Policies_ Procedures\Environmental_Works_Toolkit): Contractor Reporting Procedure Works Plan with works plan, weed record and rabbit record worksheets (Excel spreadsheet) Weed and Rabbit Field recording sheets (if required) A template for recording details of weed control works and weed mapping in Apple Numbers format for collecting data in the field using an iPhone or an iPad (if required). Quick references for collecting weed and rabbit control and mapping data Reserve maps (if required) Existing weed/rabbit/threat mapping data (if available/required) Conservation Management Plan User Manual Page 29 Land Manager Contractor Develop a Works Plan (goals and actions) Provide contractor with a draft Works Plan, maps and other resources Support and approve contractor contributions to the Works Plan Contribute to the Works Plan in consultation with the land manager Provide an approved version of the Works Plan to the contractor Undertake works Report issues to the land manager when they occur Keep a record of environmental works Support and provide advice to the contractor Map invasive species locations (if requested) Report on works completed in the Works Plan Provide the land manger with invoice, mapping and reporting Assess the effectiveness of invasive species control methods (joint responsibility) Confirm works have occurred as recorded Pay invoice Compile and distribute mapping data Report on achievements Review/develop objectives and actions for the next financial year Figure 8: Works planning, mapping and reporting procedure for contractors Conservation Management Plan User Manual Page 30 Table 4: Contractor data management requirements Works Planning 1. Prior to starting on-ground works, work with the land manager to develop a Works Plan for the year. 2. Return the Works Plan to the land manager for approval. Note: You are authorised to start works once the land manager provides you with the approved Works Plan and a purchase order. Implementation 3. Record and map weed and/or rabbit control and, when specified in the Works Plan, map locations of uncontrolled infestations. 4. Report against the Works Plan. Invoicing and Reporting 5. With each invoice, send the land manager the most up-to-date Works Plan with a record of completed weed control works. Final Reporting and Data Submission 6. With the final invoice for the current financial year’s budget, send the land manager the completed Works Plan, any records of weed and rabbit control works/locations and all associated mapping data. 6.2 Develop a works plan Action The Works Plan template and an example is located at G:\Environmental_Works\Administration\Policies_ Procedures\Environmental_Works_Toolkit 1. Set up a works plan for your reserve using the Excel template. Enter the name of the reserve in the title of the worksheet. You may choose to have separate works plans for different contractors or management zones within a site. See Section 6.5 for guidance on naming and managing Work Plan files. 2. List all the weeds and other threats you plan to manage and activities you plan to undertake. For each, complete sections 1 and 2 of the Work Plan template. See Figure 9 and Table 5 for details. Note: You can develop a works plan in stages by first planning actions for one year, and set a five year goal and actions for subsequent years as you improve your knowledge of the site. 3. Provide the Works Plan to the contractor and ask them to fill in section 3. Only provide the contractor with the actions for which they are responsible. Note: You can use the work plan in this way to get a quote from a contractor. 4. Review the contractors suggested changes and costs and make changes to the plan as appropriate. This may involve a discussion with the contractor. 5. Hide the Budget and Suggested changes columns (select the columns, right click the selected area and select Hide). 6. Raise a purchase order. 7. Enter the works in Rapid Asset. 8. Add the word approved and the work order number in the Works Plan file name and send the approved Works Plan back to the contractor so they can commence work. Conservation Management Plan User Manual Page 31 Figure 9: Planning component of Works Plan Section 1 Section 2 Section 3 Section 4 Year 1 Works plan Works Weed/ Location Five ID Threat/ year Activity goal Annual works Contractor planning (cost and time works) plan Action Control Budget Suggested Timing Estimated Estimated Method/s ($ changes hours cost exGST) to actions ($ exGST) or control methods Year 2 Actual Works …. …. …. Table 5: Works Plan Details Field Details Section 1: Overall Works Plan Works ID Number your works so contractors can reference them when mapping. A simple way to number works is: [Asset ID or Reserve ID]-[sequential numbering – 001,002,003, etc.] Weed/ Threat/ Activity Weed species or other threatening process (e.g. rabbit control or erosion) you are going to manage, or activity you are going to undertake (e.g. revegetation or fencing). You can group together weeds that are controlled together (e.g. woody weeds or bulbous weeds) and have the same goals and actions. However, consider the type of information you want to collect. Two weed species may have the same control methods but may have different spread patterns or cause different environmental impacts. Location The specific location of works. Include for clarity and if not applicable or the goals and actions are for the whole site leave blank. Depending on your project and site characteristics, you might break up control of a specific weed by reserve, zones within a reserve, or by weed infestations. When deciding on the best scale to set goals and actions, consider the scale at which the area is managed and at which you require reporting. For most instances a budget will be set at a reserve scale and a single contractor will manage that reserve. If in doubt, keep the plan as simple as possible. Five year goal Goal for each weed, threat or activity. Although the column heading is five year goal, change this to suit your project and/or existing management plans. You can set multiple goals for a specific weed at a specific location within a single cell by pressing CTL+Enter to create a new line. Number multiple goals for clarity. See following for guidance on setting goals. Section 2: Annual Works Plan - Complete for each year. Conservation Management Plan User Manual Page 32 Field Details Action The action/s you plan to undertake for that weed, threat or activity in that year. For weed control, include treatment of weeds, mapping, weed surveillance, landholder engagement and management of threatening process causing weeds to establish and spread. You can set multiple actions for a specific weed at a specific location within a single cell by pressing CTL+Enter to create a new line. Number goals for clarity. See followingfor guidance on setting actions. Control Method/s The planned control method/s for the weed (e.g. cut and paint, drill and fill, hand pull, etc.). You may need different control methods for different age classes and/or for areas with more sensitive vegetation. Budget Hide the budget column If you haven’t divided the budget by different weeds/threats or if you are asking for a quote. List the total budget next to the worksheet tile. To hide the column right click the column heading and select Hide. Section 3: Contractor Planning – to allow contractors to make suggestions to the Works Plan and to cost and time actions. Suggested changes to actions or control methods Space for contractor to suggest changes to the actions or the control methods. Timing Space for contractor to plan the timing of the action/s (e.g. which season or months). To hide the column right click the column heading and select Hide. Estimated Time Space for contractor to estimate the number of man hours the action/s will take. (hrs) Estimated Cost ($ exGST) Space for contractor to estimate the cost of the action/s. When planning works consider any specific issues or risks arising from works and how they will be managed. For example, contractor safety, public safety (such as pine trees falling after being drilled and filled, birds or people eating sprayed blackberries), untested control methods, cultural heritage, damage to native vegetation, removal of habitat, weed reinvasion following removal, waterway pollution by herbicide runoff, Phytophthora cinnamomi infection, erosion and fire hazards. If a control method has not been proven or there are specific risks (e.g. off-target damage), discuss with the contractor how the effectiveness of the control method will be assessed. 6.2.1 Setting Goals Outcome based goals Conservation Management Plan User Manual Page 33 When setting goals consider the level of service for your reserve (Reserves Prioritisation and Planning Guidelines) and the biosecurity approach. Set goals that are S.M.A.R.T (Specific, Measurable, Achievable, Relevant and Time-bound). Goals should reflect the outcomes you want to achieve. You may vary your goals from the level of service depending on the: natural values to be protected vegetation type slope level of threat current availability of resources ($, time) weed or pest animals ecology ease of control accessibility your ability to control external weed sources, pest animals and threatening processes Make sure you have a good understanding of the ecology of a weed or pest animal before setting control goals. Wording goals The language used when setting goals is very important because they provide a benchmark to monitor the success of your project. Goals need to make it very clear what you intend to achieve and where. For weed control, use words such as Maintain, Eliminate, Reduce, Remove or Engage. Maintain: For example: “maintain an area free of a weed species”. A maintain goal may apply to an area in which a weed has been removed (or is not yet present but likely to invade) and would involve actions such as surveillance for and treatment of all new infestations. Eliminate: A nice way of saying kill. For example: “eliminate all isolated infestations”, “eliminate a particular infestation” or “eliminate all plants within a particular area”. Even if a weed is eliminated it is likely there will be a soil seed bank, a small number of remaining undetected plants and/or ongoing dispersal from outside the site. Thus, ongoing maintenance works will probably be required. Reduce: A reduction in the cover of a weed, extent of a weed infestation or level of soil seed bank. Remove: Use a remove goal to relate to the protection of a particular biodiversity asset. For example: “remove all plants from around a significant species” or for a climbing weed – “remove all aerial parts from native plants”. Engage: For example: “Engage adjacent land holders to treat their infestations of a particular weed”. Eradicate: Don’t use the word ‘eradicate’ unless dealing with a small infestation of a high threat new and emerging weed (such as a state controlled weed), as it is defined as complete and permanent removal of a weed. For most weeds even once all plants are eliminated, seeds or propagules will remain in the soil or will be able to enter the site from nearby populations. Containment How you contain a weed infestation will depend on the ecology of the weed and its current extent. If the level of service is to contain and/or prevent spread, the specific goals may include: Conservation Management Plan User Manual Page 34 Eliminate all plants within a defined distance of a biodiversity asset Eliminate isolated infestations Eliminate recruiting individuals Reduce the extent of a core infestation Prevent a core infestation from seeding (e.g. by quick spraying, slashing or deadheading) 6.2.2 Setting Actions Input based actions Unlike a goal which is outcome based, actions should be input based, relating to what you want done on or for the site. Outcomes are difficult to measure over a single year due to environmental variability and variable responses of weeds to control. Input-based actions make it clear what you want done, make it easier for contractors to cost works and can be measured in the short term. Wording actions Writing clear, unambiguous actions is important to provide a clear line of communication with contractors and allow you to assess if the action is completed. Use words like treat, systematically search, map and engage: Treat: Use the word ‘treat’ to represent any control activities – the specific method can be included in the control method column. Specify the lifeform and location – for example: “Treat all mature sweet pittosporum in the rehabilitation area”. Systematically search: For example: “systematically search an area of a reserve and treat all infestations found”. This builds surveillance into your action and gives you some certainty that areas are weed free. Map: Sometimes mapping is required to plan and prioritise future actions (see Section 3.4 and the Contractor Reporting Procedure). Engage: You may wish to specify how you want to engage a landholder, although as a different department or organisation than the land manger (you) often delivers programs available to assist landholders, you may wish to leave the action vague and provide details in the comments section at the end of the year. Dividing up actions over the length of a project Consider the sequence of actions required to achieve your goals. Consider budget and resource availability. For revegetation consider: Ordering plants Preparing the site Planting Watering Follow up weed control Removing guards For weeds consider: the ecology of the weed. For example: Boneseed’s seed can remain viable in the soil for up to 10 years. It reaches maturity at 18-24 months, flowers in autumn, fruits in winter-spring and seeds are mostly dispersed locally. Therefore, a systematic Conservation Management Plan User Manual Page 35 search and treatment of all plants every 2 years in autumn, when the plant is flowering, should reduce the seed bank to negligible levels within 10 years. how the weeds will respond to other actions such as rabbit control, weed control or ecological and fuel reduction burns. what plants may grow in the spaces created by treated weeds. Think about how you can stagger works or change control methods to prevent re-infestations of the treated weed or infestations by new weeds. how weeds may spread if you don’t do a particular action. Plan the actions first that protect a biodiversity asset or prevent a situation worsening. that sometimes a big push in the early years, particularly if there are lots of mature seeding plants, can allow you to get ahead of a weed. that in more degraded areas staggered removal of weeds is often desirable to allow natural regeneration of native species. Staggered removal may also be appropriate in more intact areas to make sure you don’t impact too heavily on fauna populations that might be using weeds for habitat. that it may take treatment of the same area over several years to exhaust a seed bank – consider the length of time seed remains viable in the soil. Even once you reach your goal you will probably still need to systematically search for and treat new infestations and emerging seedlings. Build flexibility into your actions considering unexpected weather conditions, weed growth or wildfire. 6.3 Report actions (end of the financial year) Action Keeping a good record of actual works completed allows you to develop a site history and cost and plan future works. This information is also very useful when reporting to funding agencies. 1. At the end of each year ask the contractor to complete section 4 of the Works Plan (as per Figure 10 and Table 6) and return it to you. 2. If you have works from several contractors and/or works completed in-house compile the separate Works Plans/reporting into one document. Figure 10: Reporting component of the Works Plan Section 4 Year 1 Actual Works Progress Comments Suggested followup works Conservation Management Plan User Manual Page 36 Actual hours Actual Cost ($ exGST) Invoice number/s Table 6: Details of the reporting component of the Works Plan Field Details Section 4: Actual works – to allow contractors to report on works completed. Also allows the land manager (you) to report on actions completed in-house. Progress Contractor progress towards completing the action selected from a dropdown menu including: Not started; In progress; Partially completed action; Completed action; Exceeded action. In progress should only be included in interim reporting. Comments Contractor comments. Particularly if the action wasn’t fully completed or was exceeded. Suggested follow-up works Contractor suggestions for works in the following years. Use the responses in this section when planning future works. Actual Hours Contractor to enter the number of man hours the action took. Actual Cost ($ exGST) Contractor to enter the actual cost of completing the works – as reflected in the their invoicing. Invoice number/s Contractor to enter invoice number of works Use this section to reconcile accounts. 6.4 Review the plan (end of financial year) Action An important step in planning weed management is checking back with your works plan to see how far you’ve progressed and how you can adapt and improve the plan for future weed management. The continuous cycle of; plan, do, review (see Figure 2: Plan, Do and Review) will not only enable you to carry out considered and strategic weed management, but allow you to adapt to changing environmental conditions and budgets, respond to emerging issues and improve your management over time. 6.5 1. Review the plan each year based on the actions achieved and changes in weed and pest animal presence, priorities, threats, cover and abundance. Use the suggested follow up and comments responses provided by the contractor. Always reflect back to your five year goals to determine what steps you need to take to achieve them. File management of Works Plans The following section provides guidance to naming and working with Work Plan files to prevent confusion or data loss. Master works plan: Create a single master Works Plan for each reserve (or project if appropriate). Include the name of the reserve or project). At the end of the financial year copy all changes and additions into this file. Also, make changes to future years actions in this file when reviewing the plan. Naming convention: WP_Master_[Reserve name(or project name)] Contractor works plans: From the master Works Plan, create a version to give to each contractor working on the site (you may only have one). Remove all actions that are not Conservation Management Plan User Manual Page 37 the responsibility of that contractor. Delete or hide all columns in subsequent years except the action and control method columns (decide if you want to disclose future budgets). Include the year and a short description in the title of the works plan to make the version clear. Naming convention: WP_ [Reserve name(or project name)]_[Year (eg.12-13)]_[Work order number]_[ Short description/contractor name to distinguish between different plans]_Proposed And once the Works Plan is approved, change the word proposed to approved. Quote requests: You can use the works plan format to request a quote from a contractor. Create a version of the Works Plan (from the master works plan if available) which only contains the actions you want quoted. Include the words quote request in the title of the works plan. Naming convention: WP_Quote Request_[Reserve name(or project name)]_[Year (eg.1213)]_Short description/contractor name to distinguish between different plans] Conservation Management Plan User Manual Page 38 Appendix A – VQA Field Sheet Conservation Management Plan User Manual Page 39