1
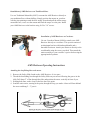
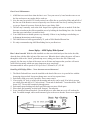
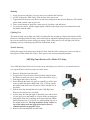
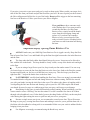
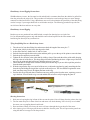
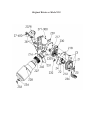
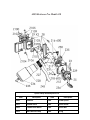
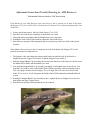
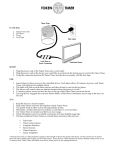
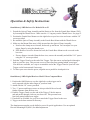
Operation & Safety Instructions
Installation of AMS Retriever Pro Models 610 or 611
1. Detach the Quiver/Clamp Assembly and the Retriever Pro from the Female Base Mount (Z102)
by loosening the Thumb Screw. Make sure the “o” ring stays on the Thumb Screw. See page 12.
2. Position the Female Base Mount over the sight holes on your bow riser and secure with the 3/8”
screws provided.
3. Re-attach the Quiver/Clamp Assembly to the Female Base Mount with the Thumb Screw.
4. Make sure the Mount Plate stem is fully inserted into the Quiver/Clamp Assembly.
a. Note how the clamp moves forward, backward, up and down. You can adjust it to your
trigger finger by using the thumb screw.
b. If the Retriever is too far forward or back, the Female Base Mount can be reversed on the
bow riser.
c. If more distance is needed from the bow riser, remove the assembly and add the 3/16” spacer
using the 7/8” screws provided.
5. Push the Trigger Guard over the end of the Trigger. Take the narrow end and push it through a
hole on your bow riser. This prevents excess or loose line from getting behind your trigger.
If no holes are available, use a zip-tie to attach the end of the Trigger Guard to your bow riser.
Trigger can be bent outward if necessary.
6. To insert your arrow into the quiver, align the arrow parallel to it and push it in.
Installation of AMS Original Retriever Model 310 on Compound Bows
1. Position the AMS Retriever over the sight holes so the trigger can be
easily operated with the index finger of your bow hand.
2. Attach with the 3/8” screws provided.
3. Two ¼” spacers and longer screws are also provided if the reel needs
further clearance from the bow riser.
4. Push the Trigger Guard over the end of the Trigger. Take the narrow
end and push it through a hole on your bow riser. This prevents loose
line from getting behind your trigger.
5. If no holes are available, use a zip-tie to attach the Trigger Guard to the riser.
6. Trigger can be bent outward if necessary.
The aluminum mount plate can be drilled or cut to fit special applications. Use our optional
Dovetail Mounting Kit (M101) for added adjustment.
Installation of AMS Retrievers on Traditional Bows
Use our Traditional Mount Kit (M107) to mount the AMS Retriever directly to
your traditional bow without drilling. Simply position the mount on your bow
with the pins pointing toward the bow-string. Stretch and pull the rubber straps
around the bow, cross over the mount and hook the straps over the pins. Install
your AMS Retriever to the bracket using 10-24 x 3/8” screws.
Installation of AMS Retrievers to Crossbows
Use our Crossbow Mount (M108) to attach your AMS
Retriever directly to a crossbow. This system consists of
an aluminum bracket with hardwood handle and a
threaded float insert. Attach your Retriever directly to the
wood handle using the screws provided. Then attach the
entire assembly to your crossbow’s quiver holes using the
appropriate hole pattern.
AMS Retriever Operating Instructions
Attaching the bowfishing line to the arrow
1. Remove the Safety Slide found on the AMS Retriever. It is a spare.
2. Thread the bowfishing line through the Safety Slide on your arrow following the groove in the
slide. Pull about 5” of line through the slide and position the arrow vertically in front of you.
3. Holding both lines, make a loop in the line above the point.
4. Send the entire arrow, starting at the point, through the loop you made. A knot will form behind
the arrow and hang 2 – 3” past it.
Line Care & Maintenance
1. AMS Retrievers work best when the line is wet. Toss your arrow by hand into the water to wet
the line and remove any tangles before each use.
2. New line may be twisted. If it’s badly twisted, cut off the line at your Safety Slide and pull all of
the line out of the Retriever across an open dry area. Retrieve the line slowly working out twists
as you go. Repeat if necessary. Retie the line to your Safety Slide.
3. The line may eventually wear at the slide. Inspect line regularly and retie as needed. If the line
becomes twisted near the slide suspend the arrow by holding the bowfishing line a few feet back
from the arrow and allow it to untwist freely.
4. Your AMS Retriever should operate very smoothly. If there is any binding or misfeeding see
Adjustment Instructions on the last page.
5. The AMS Retriever holds approximately 25 yards of 200# Braided Dacron line.
6. We only recommend using AMS Bowfishing line in your Retriever.
Arrow Safety – AMS Safety Slide System!
Here’s how it works! With the slide installed over the arrow shaft and your line tied to the slide,
draw the bow with the slide in front of the arrow rest. When the shot is taken, the arrow will move
through the slide to the “shock” pad and stop screw, taking your line to the fish. When used
properly, the line stays in front of the arrow rest at all times and ensures that your line will not tie
itself to the bowstring, which can cause dangerous arrow snap-back!
Recommended for arrow speeds of 145 fps or less. US Patent 6,417,453 B2.
Installing AMS Safety Slides – Never shoot an arrow without one!
1. The Shock Pad and Screw must be installed so the head of the screw is up and in line with the
bowstring when nocked. It must not bump arrow rest or bow upon release.
2. Push Safety Slide over nock if possible. If not, remove nock.
3. If an existing 1/8” hole is in line with bowstring and nock it can be used. If no hole is present,
use a drill press and drill a 1/8” hole at least 1” from end of shaft and 1” from other holes. Drill
down 4/16”. Do not drill completely through arrow.
4. Push small square bushing into shock pad following curvature of both parts.
5. Place shock pad assembly on shaft with “bumper” toward point.
6. Screw should self-thread into hole. Do not thread screw more than once as it will weaken the
hole. For added strength, add a small amount of glue to the screw threads. Do not over-tighten.
Shooting
1. Nock your arrow and place it in your arrow rest with the shock pad up.
2. ALWAYS keep the AMS Safety Slide in front of the arrow rest.
3. Tighten the line between your Retriever and arrow and push it into the Line Retainer (Z59) found
on the front, outside edge of your reel.
4. There are no buttons to push like a spin cast reel, just draw, aim and shoot.
5. To retrieve the arrow, pull the trigger lightly with the index finger of your bow hand and crank
the handle with the other.
Fighting Fish
The most exciting way to fight your fish is by taking the line in hand over hand. Note that the AMS
Retriever is designed with zero drag. It does not have an adjustable fighting drag like a spin cast reel,
but you can control line release using your trigger. With a little practice you can fight your fish by
pumping your bow and taking up slack line on the down stroke.
Trouble Shooting
Pulling the trigger back and trying to brake the fish, while the fish is running can cause your line to
burn grooves in the rubber drive roller. These grooves can cause operational problems.
AMS Big Game Retriever Pro Model 611 Setup
Your AMS Big Game Retriever Pro comes set up and ready to use. However, you must learn how
to re-rig the Retriever before you go out on the water.
1. Remove all the line from the bottle.
2. Loop the line 2 feet from the end and feed the loop back into
the Retriever until you can see some line in the bottle. (Fig. 1).
3. Pull trigger and retrieve one turn.
4. Reach through the bottle slit, pull out a small loop of line and
secure it under the black rubber band. (Fig. 2). Keep it under
the rubber band at all times. Do not let it mix with the line in
the bottle.
5. Pull the short line through the slot on the AMS Big Game
Retriever Pro and tie it to your float.
6. Always keep the float line tight. It should lie over and in front
of your gear cover and handle so it clears all the moving parts.
7. Snug up the float line by pulling on the loop under the rubber
band. Keep the loop 1” or less in size while pulling line out of
the mouth of the reel. The loop should be clearly visible, on
top of the bottle neck and tight to the bottle where it
remains until the target pulls it free.
8. Retrieve the remaining line into the bottle.
Fig. 1
Fig. 2
If you miss, just retrieve your arrow and you’re ready to shoot again. When you hit your target, let it
take all the line from your bottle and pull the float from your bow. Be sure to point your bow toward
the fish or alligator until all the line is out of the bottle. Do not pull the trigger as the last remaining
line leaves the Retriever. Follow your float to your fish or alligator.
It’s a good idea to have someone ready
with a backup shot. If you want to take a
second shot and have two Big Game
Retriever Pros, simply loosen the thumb
screw from the telescoping clamp and
replace it. If you don’t have another
Retriever, have a second spool of line
ready to install. Practice reloading before
your hunt to avoid frustration later during
the hunt.
Important Safety Tips Big Game Retriever Use
ALWAYS make sure your AMS Big Game Retriever Pro is rigged correctly. Keep the float
line in front of the Gear Cover and Handle. Keep the float line tight between the slot in the Retriever
and the float.
The loop under the black rubber band should always be secure. It must never be allowed to
mix with the line in the bottle. The loop should be clearly visible, on top of the bottle neck and tight
to the float.
If you are using a large float at your feet, keep it and your line under control. Use one wrap
of electrical tape to secure the line from the Retriever to the lower bow limb so the float line cannot
become tangled with you, the bow or AMS Retriever in any way. This also keeps your float line
tight from the 1” loop on the bottle down to the bow limb.
Be EXTREMELY careful when handling the float lines. Gloves are strongly recommended.
A wounded shark or alligator can bolt and change directions without warning. Pull the line toward
you with your hands, leaving the slack line in the water. This reduces the chance of tangling with it.
Avoid pulling the line into the boat and forming a pile at your feet. NEVER wrap the line around
your hands for more leverage as a sudden surge from your prey could cause severe damage.
Bowfishing for big game is much different than archery hunting. When bowfishing, you first
want to attach a secure “tracking” line into the animal. You don’t want the first shot to be a shoot
through with a broadhead, even if it has barbs, because the sharp blades will likely cut the entry hole
wider during the fight causing the arrow to pull free and you to lose your game.
Because a single arrow can rip out, we recommend a second secure shot. This will increase
the drag on your prey, wearing him down faster and making it easier for you to pull him boat side. A
final shot with a broadhead or a bang stick is recommended. Make sure your catch is subdued before
bringing it into your boat.
For alligators we strongly recommend using the BreakAway arrows.
BreakAway Arrow Rigging Instructions
With BreakAway Arrows, the line must be tied and utilized in a manner that allows the shaft to be pulled free
from the point once the target is hit. This procedure will minimize arrow breakage; however arrow damage
cannot be avoided at all times. Using a BreakAway arrow will also minimize the possibility of the shaft being
used as leverage if your target should roll or swim under an object. The following procedure keeps the line
out in front of the bow and riser on every shot.
BreakAway Arrow Rigging
BreakAway arrows purchased from AMS include a sample line showing how to rig the line.
It is for demonstration purposes only and should be removed and replaced in the same manner with
bowfishing line directly from your Retriever.
Tying bowfishing line to a BreakAway Arrow
Take the end of your bowfishing line and measure back the length of the arrow plus 7”.
At this point, loosely tie the line to the ring on the shaft.
At the end of the line, double back 4” and tie a knot.
Push the loop through the hole on the point and then pull it up over the top of the point to secure the knot.
Push the point completely onto the shaft.
Tighten the line from the point to the shaft by sliding a loop of line under the rubber collar while keeping
the ring at the tail of the arrow. This keeps the point on the shaft during the shot. A light wrap of electrical
tape over the point and shaft will loosely hold the point on if you miss.
7. Check that there is enough slack line between the point and the ring so you are able to pull the point free
from the shaft upon impact.
8. With the ring near the stop screw at tail of the arrow, re-adjust the ring knot by gently stretching the line
from the tip and sliding the ring all the way back to the stop screw. The line should lie against the arrow
shaft, not droop away from it. Re-tighten the knot on the ring.
9. Practice this set-up! Missed shots in shallow water may pull the point from the arrow, requiring you to rerig in the boat. You will need to rig a second and third arrow before safely bringing the gator in.
1.
2.
3.
4.
5.
6.
Shooting Instructions
1. Nock arrow, keeping the ring in front of the rest near the point. (Line will hang from the point to the ring).
2. The line must always be in front of the bow and arrow rest when shooting. Never let it lay on or behind
the arrow rest as a tangling hazard could result.
3. Draw and shoot. When you release, the arrow will move through the ring at the tail of the arrow.
4. After impact, give a firm tug to pull the arrow shaft free from the point. This will prevent the gator from
using the shaft as leverage to work the point free.
Re-Assembling Your Original Retriever,
Model 310. See Parts Schematic
Tools needed: Flat screw driver, 5/16” box wrench & marine grease
1. Set the back Mount Plate (Z16) down on your work area and add the Pinion Bearing (Z17) into
the center hole.
2. Grease small end of the Rubber Drive Roller (Z35) slightly and place in Pinion Bearing.
3. Insert Line Guide (Z30) into Mount Plate with legs of Line Guide over the Rubber Drive Roller.
4. Insert Alignment Spacers (Z32) into Mount Plate with long stems up.
5. Add Side Plate (Z18) aligning holes on bottom edge over the spacers.
6. Assemble Drive Gear (Z12), Gear Cover (Z20) and Handle Shank Assembly (Z36) if not intact.
Secure parts with Truss Screw (Z5).
7. Apply a peanut sized amount of grease to the Rubber
Drive Roller. (Note: Excessive grease is not required).
8. Position Gear Cover Assembly over Side Plate and
secure to mounting plate with 1” Screws (Z3) and
Lock Nuts (Z8) at the base. Add the 3/16” (Z1)
Screw into the top of the Gear Cover.
9. Thread a 1” Screw through the Line Guide and into
the Mount Plate.
10. Add the Line Retainer (Z59) with the slot facing
forward onto the back plate. Add a 1” screw and
secure with a lock nut. Do not tighten completely
as it will be adjusted later.
11. Push the Stripper/Bottle Cap Assembly (Z31/Z27)
between the plates with the spring facing up.
12. Thread the Stripper Screw (Z2) ¾” into the hole
below the Stripper. Do not tighten yet.
13. Add the Trigger (Z37) over the plates with the roller
facing forward. Align the holes of the plates, Trigger
and Stripper.
14. Place a Trigger Bushing (Z7 or Z7-300) on the 1 ¼”
(Z4) Screw and push through the Trigger hole. Add
the other Trigger Bushing to the back side and add
a Lock Nut. Do not tighten yet.
15. IMPORTANT! Adjust the Stripper and Line
Guide using the Adjustment Instructions
found on the last page of this booklet.
Original Retriever Model 310
Re-Assembling Your AMS Retriever Pro,
Model 610. See Parts Schematic
Tools needed: Flat screw driver, 5/16” box wrench & marine grease
1. Push Lock Nuts (Z8) into the back side of the Mount Plate (Z16-600).
2. Place Pinion Bearing (Z17) into Mount Plate aligning small notch in bearing.
3. Grease both ends of the Rubber Drive Roller (Z35) and place small end into the Pinion
Bearing. Excessive grease is not required. A peanut sized amount on the gears is adequate.
4. Place Line Guide (Z30) into the Mount Plate with the legs over the Rubber Drive Roller.
5. Assemble the Gear Cover if necessary. Place Gear Cover (Z20) over Brass Gear (Z12).
Add Handle (Z36) and Truss Screw (Z5).
6. Locate the small snap above the center hole on the Side Plate. Place your Gear Cover
Assembly over it and push downward until the holes snap onto the stems of the Side Plate.
7. Add Side Plate Assembly to Mount Plate Assembly and click alignment spacers into
place. Secure with 1” Screws (Z3) at base.
8. Add the Line Guide Screw (Z3). If your Line
Retainer (Z59) is a separate piece, add it to the
back side of this screw with the slot facing
forward. Secure with a Lock Nut but do not
tighten completely as it will be adjusted later.
9. Add the Trigger Assembly (Z37) by slightly
squeezing the Mount and Side Plates together
and pushing it onto the built-in trigger bushings.
10. Assemble your Stripper (Z31) and Bottle Cap
(Z27) by squeezing the cap slightly if necessary.
11. Push Stripper/Bottle Cap Assembly between
the plates and under the Trigger with the spring
facing up. Align the holes.
12. Add the Stripper Screw Z3 to the lower hole
but do not tighten as it will be adjusted later.
13. Add the Trigger Screw (Z4) but don’t tighten.
14. IMPORTANT! Adjust the Stripper and Line
Guide on the Retriever following the
instructtions closely on the last page.
AMS Retriever Pro Model 610
Quiver Clamp Assembly Parts List
Item
Description
Item
Description
Z100
Slab Nut
Z104
Arrow Quiver
Z101
Thumb Screw
Z105
Quiver Screw
Z102
Female Base Mount
Z106
Quiver Nut
Z103
Male Mount Clamp
Z109
O-ring
Adjustment Instructions/Trouble Shooting for AMS Retrievers
Tools needed: flat screw driver, 5/16” box wrench
If the handle on your AMS Retriever won’t turn freely or line is coming out in front of the bottle,
the Stripper (Z31), Line Guide (Z30) or both need to be adjusted. We recommend adjusting the Line
Guide first:
1.
2.
3.
4.
5.
Loosen, but do not remove, the Line Guide Screw (Z3 or Z121).
Push the Line Guide down completely so the handle won’t turn.
Then push it back up slightly until the handle turns freely. Stop there.
Holding the Line Guide in this location, tighten the Line Guide Screw.
More than one attempt of this adjustment may be required to get the Line Guide in the perfect
location.
If the handle still won’t turn or line is coming out in front of the bottle, the Stripper (Z31) is the
problem and needs to be adjusted also.
1. The Stripper is the cone shaped part between the bottle cap and the body of the Retriever.
Slightly loosen the Trigger Screw above it and the Stripper Screw below it.
2. Slide the Stripper/Bottle Cap Assembly downward toward the base of the Retriever until it meets
the Rubber Drive Roller and the handle won’t turn.
3. Now push the Stripper/Bottle Cap Assembly up slightly so the handle starts to turn freely. You
want the Line Guide as close to the Rubber Drive Roller as possible without interfering with it.
This is the proper location for the Stripper. If it is too high, line will come out in front of the
bottle. If it is too low, it will rub against the Rubber Drive Roller and make the handle difficult
to turn.
4. Holding the Stripper/Bottle Cap Assembly in place, tighten the lower Stripper Screw first and
then tighten the upper Trigger Screw.
5. More than one attempt at this adjustment may be required.