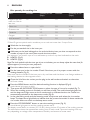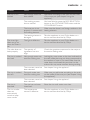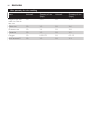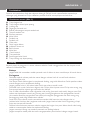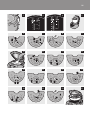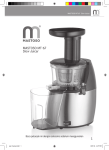
1
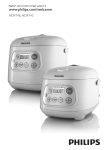
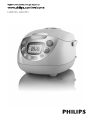
HD4755, HD4751
2
3
1
6
English
Introduction
Congratulations on your purchase and welcome to Philips! To fully benefit from the support that
Philips offers, register your product at www.philips.com/welcome.
General description (Fig. 1)
A
B
C
D
E
F
G
H
I
J
K
L
M
N
O
P
Q
R
S
Outer lid
Detachable inner lid
Steam vent
Rice cooker handle
Mounting bracket of scoop holder
Scoop holder
Heating element
Mains cord
Soup ladle
Rice scoop
Measuring cup
Inner pot
Water level indication
Steam tray
Main body
Control panel
Release lever
Mains cord connection
Detachable steam vent cap
Important
Read this user manual carefully before you use the appliance and save it for future reference.
Danger
-- Never immerse the housing of the rice cooker in water, nor rinse it under the tap.
Warning
-- Check if the voltage indicated on the appliance corresponds to the local mains voltage before
you connect the appliance.
-- Only connect the appliance to an earthed wall socket. Always make sure that the plug is
inserted firmly into the wall socket.
-- Do not use the appliance if the plug, the mains cord or the appliance itself is damaged.
-- If the mains cord is damaged, you must have it replaced by Philips, a service centre authorised by
Philips or similarly qualified persons in order to avoid a hazard.
-- This appliance is not intended for use by persons (including children) with reduced physical,
sensory or mental capabilities, or lack of experience and knowledge, unless they have been given
supervision or instruction concerning use of the appliance by a person responsible for their
safety.
-- Children should be supervised to ensure that they do not play with the appliance.
-- Keep the mains cord out of the reach of children. Do not let the mains cord hang over the edge
of the table or worktop on which the appliance stands.
-- Make sure that the heating element, the magnetic switch and the outside of the inner pot are
clean and dry before you put the plug in the wall socket.
-- Do not cover the steam vent and the lid while the rice cooker is operating.
-- Do not plug in the appliance or operate the control panel with wet hands.
English
7
Caution
-- Never use any accessories or parts from other manufacturers or that Philips does
not specifically recommend. If you use such accessories or parts, your guarantee becomes
invalid.
-- Only use the rice scoop provided. Avoid using sharp utensils.
-- Do not expose the rice cooker to high temperatures, nor place it on a working or still hot stove
or cooker.
-- Always insert the inner pot before you put the plug in the wall socket.
-- Always press the KEEP-WARM/OFF button once before you unplug the rice cooker.
-- Always unplug the rice cooker and let it cool down before you clean it.
-- Do not place the inner pot directly over an open fire to cook rice.
-- This appliance is intended to be used in household and similar applications such as:
-- staff kitchen areas in shops, offices and other working environments;
-- farm houses;
-- by clients in hotels, motels and other residential type environments;
-- bed and breakfast type environments.
-- This appliance is intended for household use only. If the appliance is used improperly or for
professional or semi-professional purposes or if it is not used according to the instructions in
this user manual, the guarantee becomes invalid and Philips refuses liability for any damage
caused.
-- Place the rice cooker on a stable, horizontal and level surface.
-- The accessible surfaces may become hot when the appliance is operating.
-- Beware of the hot steam that comes out of the steam vent during cooking or out of the rice
cooker when you open the lid.
-- Always unplug the appliance after use.
-- Do not lift and move the rice cooker by its handle while it is operating.
Electromagnetic fields (EMF)
This Philips appliance complies with all standards regarding electromagnetic fields (EMF). If handled
properly and according to the instructions in this user manual, the appliance is safe to use based on
scientific evidence available today.
Before first use
Remove the sheet between the inner pot and the heating element.
1 Clean the parts of the rice cooker thoroughly before using the appliance for the first time
(see chapter ‘Cleaning’). Make sure all parts are completely dry before you start using the
appliance.
2 Attach the scoop holder to the body of the rice cooker (Fig. 2).
Using the appliance
Cooking rice
1 Measure the rice using the measuring cup provided.
Each cup of uncooked rice normally gives 2 bowls of cooked rice. Do not exceed the quantities
indicated on the inside of the inner pot. 1 cup of rice is approx. 180ml.
-- HD4751: 1-5.5 cups of rice
-- HD4755: 2-10 cups of rice
English
8
Rice quantity for cooking rice
Menu
Volume/L
Quantity of rice
(cups)
Volume/L
Quanrity of rice
(cups)
Fragrant rice, see
mew rice, Northeast rice
1.0
1-1.5
1.8
2-10
Other rice
1.0
1-1.5
1.8
2-10
Glutinous rice
1.0
1-4
1.8
2-8
Casserole
1.0
1-3
1.8
2-5
Congee
1.0
0.25-0.75
1.8
0.5-1.5
Small amount**
1.0
1-3
1.8
2-3
**Note: To get an optimal result, we advise you to cook not more than 3 cups of rice.
2 Wash the rice thoroughly.
3 Put the pre-washed rice in the inner pot.
4 Add water to the level indicated on the scale inside the inner pot that corresponds to the
number of cups of rice used. Then smooth the rice surface.
For instance, if you cook 4 cups of rice, add water up to the 4-cup level indicated on the scale.
,, HD4751 (Fig. 3)
,, HD4755 (Fig. 4)
Note:The level marked inside the inner pot is just an indication; you can always adjust the water level for
different types of rice and your own preference.
5 Press the release lever to open the lid
6 Put the inner pot in the rice cooker. Check if the inner pot is in proper contact with the
heating element (Fig. 5).
Make sure that the outside of the inner pot is dry and clean and that there is no foreign residue on
the heating element or the magnetic switch.
7 Close the lid of the rice cooker, put the plug in the wall socket and switch on the mains.
You will hear a beep.
8 Press the MENU button until the desired cooking function is displayed (Fig. 6).
The cook/reheat light starts to blink.
,, Then press the RICE SELECTION button to select the type of rice to be cooked (Fig. 7).
,, When the cooking process is finished, you will hear a beep. The cook/reheat light goes out
and the keep-warm light starts to burn continuously to indicate that the rice cooker has
automatically switched to the keep-warm mode (Fig. 8).
,, In the cake baking mode and the steaming mode, the process ends when the rice cooker
beeps. The keep-warm light blinks to indicate that the process has ended. In these modes the
rice cooker does not switch to the keep-warm mode.
9 Press the COOK/REHEAT button to start the cooking process (Fig. 9).
The cook/reheat light goes on and the cooking process starts.
The display counts down in minutes (10, 9, 8 etc.) during the last 10 minutes of the cooking process.
The table below shows the approximate cooking time in each mode. The actual cooking time may
vary depending on voltage, room temperature, humidity and amount of water used.
English
Function
Approximate cooking time
(minutes)
Countdown time until ready
(minutes)
Regular
40-50
10
Quick
30-40
10
Small amount
40-50
10
Steam*
10-60
n.a. (not applicable)
Cake
40-50
n.a.
Casserole*
45-60
n.a.
Soup*
30-240
n.a.
Congee*
30-240
n.a.
Reheat
23
n.a.
* Note: To view the countdown time, press the COOKING TIME button.
10Open the lid and stir the rice to loosen it (Fig. 10).
For the best results, do this just after the rice cooker has switched to keep-warm mode. Then close
the lid firmly. Stirring the rice allows excess steam to escape. This will give fluffier rice.
11Press the KEEP-WARM/OFF button once to cancel a cooking process, preset setting or
when it is in keep-warm mode (Fig. 11).
The cook/reheat light starts to blink.
The rice cooker has a backup memory that retains the last selected mode, function and settings in
case of a power failure. The cooking process or the timer function will resume within 2 hours after
the power supply is restored.
Always press the KEEP-WARM/OFF button once before unplugging the rice cooker, as otherwise
the last selected mode, function and settings will resume when the rice cooker is plugged in again.
12Unplug the rice cooker to switch it off.
Cooking congee
1 Follow steps 1 to 7 in section ‘Cooking rice’.
Do not exceed the volume indicated in the table for congee cooking, as this may cause the rice
cooker to overflow.
2 Press the MENU button to select the congee cooking mode (Fig. 12).
3 Press the COOKING TIME button to set the desired cooking time (Fig. 13).
,, The default cooking time of 1 hour is displayed.
,, To view the preset cooking time, press the COOKING TIME button.
,, Press the HR and/or MIN buttons to set the desired time.You can set any time between 30
minutes and 4 hours (Fig. 14).
,, If you fail to set a cooking time, the default cooking time of 1 hour will apply.
4 Press the COOK/REHEAT button to start the congee cooking process.
,, The cook/reheat light goes on and the cooking process starts.
,, When the cooking process starts, the display switches from preset time to current time.
When the cooking process is finished, you will hear a beep. The cook/reheat light goes out and the
keep-warm light starts to burn continuously to indicate that the rice cooker has automatically
switched to the keep-warm mode.
9
10
English
5 Press the KEEP-WARM/OFF button once to cancel a cooking process, preset setting or
when it is in keep-warm mode.
6 Unplug the rice cooker to switch it off.
Cooking soup
1 Put the ingredients for the soup and the water in the inner pot.
Do not exceed the maximum water level indicated inside the inner pot on the scale for congee
cooking.
2 Follow steps 6 to 7 in section ‘Cooking rice’.
3 Press the MENU button to select the soup cooking mode (Fig. 15).
4 Press the COOKING TIME button to set the desired cooking time.
Press the HR and/or MIN buttons to set the desired time. You can set any time between 30 minutes
and 4 hours.
,, To view the preset cooking time, press the COOKING TIME button.
5 Press the COOK/REHEAT button to start the soup cooking process.
,, The cook/reheat light goes on and the cooking process starts.
,, When the cooking process starts, the display switches from preset time to current time.
When the cooking process is finished, you will hear a beep. The cook/reheat light goes out and the
keep-warm light starts to burn continuously to indicate that the rice cooker has automatically
switched to the keep-warm mode.
6 Press the KEEP-WARM/OFF button once to cancel a cooking process, preset setting or
when it is in keep-warm mode.
7 Unplug the rice cooker to switch it off.
Baking cake
1 Press the MENU button to select the cake baking mode (Fig. 16).
2 Press the COOK/REHEAT button to start the cake baking process (Fig. 17).
,, The cook/reheat light goes on and the cake baking process starts.
,, When the cake baking process is finished, the rice cooker beeps and the keep-warm light
blinks to indicate that the process has ended.
3 Press the KEEP-WARM/OFF button once and remove the plug from the wall socket to
switch the rice cooker off.
Cake recipe
Ingredients: ready-made cake mix 250g; butter 65g; water or milk 100ml; 1 large egg.
Note: Mix the cake mix, water or milk, butter and egg in a large bowl.Whisk with an electric mixer at low
speed for 1 minute, and then at medium speed for another 3 minutes.
Note: Coat the inner pot with some butter and then pour the cake mixture into it.
Note: Press the MENU button to select the cake baking mode.
Note:When the rice cooker beeps to indicate the end of the baking process, press the KEEP-WARM/OFF
button once and lift the inner pot out of the cooker.
Note: Allow the cake to cool, then turn the inner pot upside down to let the cake slip out of the inner pot
onto a plate.
Cooking casserole
You can use the casserole mode to make traditional claypot rice recipes. A slight crispy crust will
form at the bottom of the rice.
English 11
1 Put the washed rice into the inner pot and add the appropriate amount of water.
Stick to the rice quantities mentioned in the table in section ‘Cooking rice’.
Add the corresponding amount of water mentioned in the table in section ‘Cooking rice’.
2 Follow steps 6 to 7 in section ‘Cooking rice’.
3 Press the MENU button to select the casserole cooking mode (Fig. 18).
4 Press the COOK/REHEAT button to start the casserole cooking process (Fig. 19).
The cook/reheat light goes on and the cooking process starts.
5 When the rice is ready, the rice cooker beeps for 2 minutes and the cook/reheat light starts
to blink (Fig. 20).
6 Add the ingredients for the casserole by placing them on top of the rice. Close the lid and
press the COOK/REHEAT button again to resume the cooking process.
,, If you do not press the COOK/REHEAT button, the rice cooker will automatically resume
the casserole cooking process.
,, When the cooking process is finished, you will hear a beep. The cook/reheat light goes out
and the keep-warm light starts to burn continuously to indicate that the rice cooker has
automatically switched to the keep-warm mode.
7 Press the KEEP-WARM/OFF button once to cancel a cooking process, preset setting or
when it is in keep-warm mode.
8 Unplug the rice cooker to switch it off.
Recipe: Chicken & Chinese sausage claypot rice
Ingredients: 3 cups rice; 300g chicken pieces; 200g Chinese sausage, sliced; 1-inch ginger, sliced; 1 tbsp
of oil; salt and sugar.
Note: Marinade the chicken with some salt and sugar.
Note: Put the washed rice in the inner pot and fill it with water up to the 3-cup level indicator. Press the
MENU button to select the casserole cooking mode and press the COOK/REHEAT button to cook.
Note:When the rice cooker beeps to indicate that the rice is ready, put the ingredients in the inner pot
and spread them evenly over the rice.
Note:When the casserole cooking process is finished, sprinkle some chopped spring onions on top and
serve the casserole hot.
Steaming
1 Measure 3 cups of water with the measuring cup and pour it into the inner pot.
The amount of water varies according to the quantity of food being steamed.
It will take approx. 8 minutes for 3 cups of water to come to the boil.
2 Put the food to be steamed on a plate or in the steam tray.
To ensure even steaming, the food should be spread out evenly and should not be piled up.
3 Put the steam tray on top of the inner pot (Fig. 21).
4 If you are using a separate plate, put it in the steam tray.
5 Close the lid firmly.
6 Press the MENU button to select the steaming mode (Fig. 22).
7 Press the COOKING TIME button to set the desired steaming time (Fig. 23).
The default steaming time of 15 minutes is displayed.
8 Press the HR and/or MIN buttons to set the desired time (Fig. 24).
You can set any time between 10 minutes and 1 hour.
12
English
If you fail to set the cooking time, the default steaming time of 15 minutes will apply.
9 Press the COOK/REHEAT button to start the steaming process. See points 10 and 12 of
‘Cooking rice’.
,, The cook/reheat light goes on and the steaming process starts.
,, When the steaming process is finished, the rice cooker beeps to indicate that the process
has ended.
10Open the lid and carefully remove the steamed food from the plate or steam tray. Use a
kitchen glove or a cloth, as the plate and steam tray will be very hot.
Beware of the hot steam.
11Press the KEEP-WARM/OFF button once to cancel a cooking process, preset setting or
when it is in keep-warm mode.
12Unplug the rice cooker to switch it off.
Reheating
You can use the reheating mode to warm up rice that has cooled down. Fill the inner pot to not
more than half its capacity to ensure that the rice is heated up properly.
1 Loosen the cooled rice and evenly distribute it in the inner pot.
2 Pour some water onto the rice to prevent it from becoming too dry. The amount of water to
be added depends on the amount of rice being reheated.
If the rice starts scorching, add more water.
3 Press the COOK/REHEAT button twice to start the reheating process.
,, The cook/reheat light goes on and the reheating process starts.
,, When the reheating process is finished, you will hear a beep. The cook/reheat light goes out
and the keep-warm light starts to burn continuously to indicate that the rice cooker has
automatically switched to keep-warm mode.
,, Mix the rice thoroughly before serving.
,, The default reheat time is 23 minutes.
,, Cooled rice should not be reheated more than once.
4 Press the KEEP-WARM/OFF button once to cancel a cooking process, preset setting or
when it is in keep-warm mode.
5 Unplug the rice cooker to switch it off.
Keeping warm
This mode allows you to keep your rice warm for a longer period of time.
Press the KEEP-WARM/OFF button twice to activate the keep-warm mode.
Note:The keep-warm light starts to burn continuously.
We advise you to keep rice warm for not more than 12 hours so as to preserve its taste.
During the keep-warm process, the display shows the time in hours from 0 to 11 (0HR, 1HR
...11HR). After 12 hours, the display will switch to the current time.
After 12 hours, the keep-warm mode will end and the cook/reheat light will blink.
Press the KEEP-WARM/OFF button once and remove the plug from the wall socket to switch the
rice cooker off.
English 13
Timer
You can use the timer for the rice cooking functions and the steaming, soup cooking and congee
cooking modes.
Press the TIMER button to set the time when you want the food to be ready to eat.
You can set a time from 0 minute up to 23 hours.
Setting the rice ready time for the rice cooking functions:
1 Press the MENU button to select the desired rice cooking function.  (Fig. 25)
2 To set the rice ready time, press the TIMER button once and then use the HR and/or MIN
buttons to set the time.
,, You can for example use the TIMER button to set the rice ready time at 18:30 hours (Fig. 26).
3 Press the COOK/REHEAT button to start the timer and cooking process.  (Fig. 27)
The cook/reheat light blinks and timer light burns continuously. The display shows the current time.
To view the preset time, press the TIMER button once.
When the cooking process starts, the cook/reheat light starts to burn continuously and the timer
light goes out.
If the preset time is shorter than the required total cooking time of the selected cooking function,
the rice cooker will start the cooking process immediately.
Setting the ready time of congee, soup or steamed dishes:
1 Press the MENU button to select the congee cooking, soup cooking or steaming
mode.  (Fig. 28)
2 Press the COOKING TIME button to set the desired cooking time. For cooking times see
section ‘Cooking congee’, ‘Cooking soup’ or ‘Steaming’ (Fig. 29).
3 Follow steps 2 to 3 under the heading ‘Setting the rice ready time’ above.
Clock
To set the current time:
1 Plug in the rice cooker.
2 Press the HR and MIN buttons to set the time.
The time on the display starts to blink.
You can put the time forward quickly by holding down the HR or MIN button.
The time cannot be adjusted during the cooking or keep-warm process.
3 To confirm the time, do not press any key for 5 seconds after setting the time. The time has
been confirmed when the time indicated on the display stops blinking.
Cleaning
Unplug the rice cooker before starting to clean it.
Wait until the rice cooker has cooled down sufficiently before cleaning it.
To protect the non-stick coating of the inner pot, do not:
-- use the inner pot for washing dishes;
-- put vinegar into the pot.
1 Take the steam tray and the inner pot out of the body of the appliance.
2 Detach the inner lid from the outer lid by pressing the lid release tabs and pulling the inner
lid outward and downwards.  (Fig. 30)
14
English
To reattach the inner lid, slot the top end of the inner lid into the outer lid and push the release tabs
firmly home (‘click’).
3 Detach the steam vent cap from the outer lid by pulling it upwards (Fig. 31).
,, To remove the bottom cover of the steam vent cap, slide the locking tab to ‘open’ and detach
the cover from its hinge (Fig. 32).
,, To reattach the bottom cover of the steam vent cap, slot the cover at the hinge, slide the
locking tab to ‘close’ and push the bottom cover against the cap (‘click’) (Fig. 33).
,, To put the steam vent cap back into the vent hole of the outer lid, insert it into the hole and
push it down firmly (Fig. 34).
4 Clean the inner lid, inner pot, steam tray, rice scoop and steam vent cap with a sponge or a
cloth in hot water with some washing-up liquid.
Do not use abrasive cleaning agents, scourers or metal utensils to clean the inner pot as these
will damage the non-stick coating.
5 Use only a damp cloth to wipe the outside and inside of the body of the rice cooker.
Never immerse the body of the rice cooker in water, nor rinse it under the tap. Wipe the heating
element with a dry cloth.
Environment
,, Do not throw the appliance away with the normal household waste at the end of its life, but
hand it in at an official collection point for recycling. By doing this you will help to preserve
the environment (Fig. 35).
Guarantee & service
If you need service or information or if you have a problem, please visit the Philips website at
www.philips.com or contact the Philips Consumer Care Centre in your country (you find its phone
number in the worldwide guarantee leaflet). If there is no Consumer Care Centre in your country,
go to your local Philips dealer.
Troubleshooting
If your rice cooker does not function properly or if the cooking quality is insufficient, consult the
table below. If you are unable to solve the problem, please contact the Philips Consumer Care
Centre in your country.
Problem
Cause
Solution
The cook/reheat
light does not go
on.
There is a connection
problem.
Check if the rice cooker is connected to the
mains and if the plug is inserted firmly into the
wall socket.
The light is defective.
Take the appliance to your Philips dealer or a
service centre authorised by Philips.
The light is defective.
Take the appliance to your Philips dealer or a
service centre authorised by Philips.
The keep-warm
light does not go
on when the
cooking process is
finished.
English 15
Problem
Cause
Solution
The rice is not
cooked.
Not enough water has
been added.
Add water according to the scale on the inside
of the inner pot (see chapter ‘Using the
appliance’).
The cooking process
has not started.
You have failed to press the RICE SELECTION
button or the COOKING TIME button and the
COOK/REHEAT button.
The inner pot is not
properly in contact with
the heating element.
Make sure that there is no foreign residue on the
heating element.
The heating element is
damaged.
Take the appliance to your Philips dealer or a
service centre authorised by Philips.
The timer light
does not go on
when the timer is
set.
The light is defective.
Take the appliance to your Philips dealer or a
service centre authorised by Philips.
The cake does not
bake properly.
The quantity of
ingredients was too
large.
Check the quantities mentioned in the recipe in
the section ‘Baking cake’.
The rice is cooked
too hard.
Not enough water was
used for cooking rice.
Add slightly more water to the level indicated on
the cale inside the inner pot that corresponds to
the number of cups of rice used. Make sure the
water does not exceed the next level on the
scale as this may cause overflow during cooking.
The incorrect menu has
been selected.
See chapter ‘Using the appliance’.
Too much water was
used for cooking rice.
Make sure you add water according to the scale
on the inside of the inner pot (see chapter ‘Using
the appliance’).
The incorrect menu has
been selected.
See chapter ‘Using the appliance’.
The rice is
scorched.
The rice has not been
rinsed well.
Rinse the rice until water runs clear.
The rice cooker
does not
automatically
switch to keepwarm mode.
The temperature
control is defective.
Take the appliance to your Philips dealer or a
service centre authorised by Philips.
The rice is cooked
too soft.
16
English
Rice quantity for rice cooking
Menu
Volume/L
Quantity of rice
(cups)
Volume/L
Quantity of rice
(cups)
Fragrant rice, see
mew rice, Northeast rice
1.0
1-5.5
1.8
2-10
Other rice
1.0
1-3
1.8
2-6
Glutinous rice
1.0
1-4
1.8
2-8
Casserole
1.0
1-3
1.8
2-5
Congee
1.0
0.25-0.75
1.8
0.5-1.5
Small amount**
1.0
1-3
1.8
2-3
Indonesia 17
Pendahuluan
Selamat atas pembelian Anda dan selamat datang di Philips! Untuk memanfaatkan sepenuhnya
dukungan yang ditawarkan Philips, daftarkan produk Anda di www.philips.com/welcome.
Gambaran umum (Gbr. 1)
A
B
C
D
E
F
G
H
I
J
K
L
M
N
O
P
Q
R
S
Tutup bagian luar
Tutup bagian dalam lepas-pasang
Lubang uap
Pegangan penanak nasi
Braket pemasangan tempat sendok nasi
Tempat sendok nasi
Elemen pemanas
Kabel listrik
Sendok sup
Sendok nasi
Gelas ukur
Panci bagian dalam
Indikator ukuran air
Baki kukusan
Kabel alat
Panel kontrol
Tuas pembuka
Sambungan kabel listrik
Tutup lubang uap lepas-pasang
Penting
Bacalah petunjuk pengguna ini secara saksama sebelum Anda menggunakan alat dan simpan untuk
referensi di kemudian hari.
Bahaya
-- Jangan sekali-kali merendam wadah penanak nasi di dalam air, atau membilasnya di bawah keran.
Peringatan
-- Periksalah apakah voltase pada alat sesuai dengan voltase listrik di rumah Anda, sebelum
menghubungkan alat.
-- Alat hanya boleh dihubungkan ke stopkontak dinding yang telah dibumikan. Selalu pastikan steker
masuk dengan pas ke stopkontak dinding.
-- Jangan gunakan alat ini jika steker, kabel listrik atau alatnya sendiri rusak.
-- Jika kabel listrik rusak, maka harus diganti oleh Philips, pusat layanan resmi Philips atau orang yang
mempunyai keahlian sejenis agar terhindar dari bahaya.
-- Alat ini tidak dimaksudkan untuk digunakan oleh orang (termasuk anak-anak) dengan cacat fisik,
indera atau kecakapan mental yang kurang, atau kurang pengalaman dan pengetahuan, kecuali
jika mereka diberikan pengawasan atau petunjuk mengenai penggunaan alat oleh orang yang
bertanggung jawab bagi keselamatan mereka.
-- Anak kecil harus diawasi untuk memastikan mereka tidak bermain-main dengan alat ini.
-- Jauhkan kabel listriknya dari jangkauan anak-anak. Jangan biarkan kabel listrik tergantung di tepi
meja atau tempat alat berada.
-- Pastikan bahwa elemen pemanas, sakelar magnet dan bagian luar panci dalam, bersih dan kering
sebelum menancapkan steker ke stopkontak dinding.
-- Jangan menutupi lubang uap sewaktu penanak nasi sedang bekerja.
-- Jangan tancapkan steker pada alat atau mengoperasikan panel kontrol dengan tangan basah.
86
2
3
4
5
6
7
8
9
10
11
12
13
14
15
16
17
18
19
20
21
0,75
5,5
4
2
1
0,50
0,25
87
22
23
24
25
26
27
28
29
30
31
32
33
34
35
4222.200.0144.2