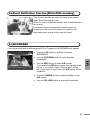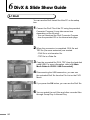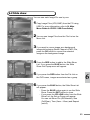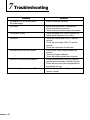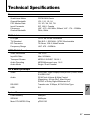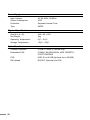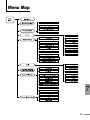
1
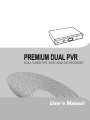
PREMIUM DUAL PVR DUAL TUNER PVR / DVR / ANALOG RECORDER User's Manual Greetings Thank you for purchasing our product, and welcome to Kaonmedia, a leading manufacturer. We manufacture a product that will satisfy you, and hope that our product will enhance your life. We provide a product of the best quality and functionality. This manual is to help you use the product. Before operating the product, please read the entire manual thoroughly, and retain it for future reference. Thank you. Copyright, Authentication, Disclaimer, Product A/S, User/Master password Copyright This manual is protected under the copyright laws of the Republic of Korea. Reproduction or use of any or all the contents in this manual without the express written permission of Kaonmedia Co.,Ltd. is forbidden. The use of the contents in whole or in part without such permission will result in prosecution. Authentication CE, FCC, EMI Disclaimer lT he manufacturers, importers and agents do not accept liability of any kind for damages caused by accidental injury or inappropriate use and operation of the product. l The information in this manual is based on current product specifications. The manufacturer, Kaonmedia Co., Ltd. is constantly updating it with new functions, and will continue to adopt new technology. All specifications are subject to change without prior notice. Product A/S This product may receive after-sales service. Users can refer to the A/S information on the company’s website (http://www.kaonmedia.net). If the Internet is not available, contact a service center or agent in your area. User/Master Password l The default user password of this product is set to 0000. l The Master Password for this product is set to RGYB (Red button + Green button + Yellow button + Blue button). Cautions Read this manual carefully before using the product. The cautions described below contain important information about safety, and are categorized into: Danger, Warning and Notice. The company will not take any responsibility for accidents or damage resulting from careless handling by the user. Danger If the user mishandles the product, there is a risk of loss of life or critical injury. Connect the power cord only to A/C outlets as specified by the user manual or product specification. If the power code is connected to a non-specified A/C outlet, it could result in fire or electric shock. n The product must not be exposed to water or liquid of any sort, or be exposed to drips or splashes. It could result in fire or electric shock. n Do not place heavy objects, including the product itself, on top of the power cord. If it is damaged, it could result in fire or electric shock. n Do not place metal objects on top of the apparatus. If metal objects fall into the apparatus, it could result in fire or electric shock. n Do not repair, disassemble or modify this apparatus yourself. It might cause fire or electric shock. If internal checking or maintenance is needed, please contact your service center or agency. n Do not block or cover any ventilation opening. A fire might result from overheating. n Turn off and unplug the power as quickly as possible during electric storms. Failure to do so could result in fire or electric shock. n Remove the antenna’s power plug from the outlet as quickly as possible during electric storms. Failure to do so could result in fire or electric shock. n Do not drop the apparatus (for example by putting it in a place where it may fall) or subject it to impact. The product might be damaged. If it is damaged, please turn off the power and remove the plug from the power outlet, or fire or electric shock may result. n Never touch the power cord with wet hands. It could result in an electric shock. n Warning If the product is mishandled, the user might receive a serious or minor injury. Damage or loss to the user’s property might also result. n n n n n The product must not be exposed to water or liquid. If the apparatus is exposed to drips or splashes, it might cause a problem that cannot be repaired. Do not repair, disassemble or modify this apparatus yourself. It might be seriously damaged, possibly beyond repair. Turn off the power and unplug the power cord as quickly as possible during electric storms. They might damage the apparatus. Remove the antenna’s power plug from the outlet as quickly as possible during electric storms, or the apparatus might be damaged. Data recorded in the HDD might be lost due to a shock, lightening or electricity failure. The user must back up his or her own data, and the company does not take any responsibility for failure to do so. If the product is mishandled, it might cause minor damage. Danger If the apparatus becomes marked, clean it gently with a soft cloth or towel. Never use chemical solvents such as benzene, thinner, acetone or other solvents. The surface of the apparatus might become discolored and the paint might peel. n Do not place or keep the apparatus in the following situations. Doing so might cause problems. l where it is too hot or cold. l where there is high humidity. l where there are excessive temperatures, for example in front of air-conditioners or heating vents. l where there is dust or soot. l in confined areas where the heat cannot be released. l where it is exposed to direct sunlight. n Turn the apparatus off or unplug the power cord if it is to remain unused for a long period of time. n Do not place heavy objects on top of this apparatus. It might cause malfunction or damage. n If the apparatus is so seriously damaged that it cannot be repaired, or has stopped working altogether, dispose of it properly in accordance with the local laws or regulations in your area. n Contents Greetings...............................................................................................2 Copyright, Authentication, Disclaimer, Product A/S, User/Master password....................................................3 Cautions................................................................................................4 Contents................................................................................................6 1. Overview...........................................................................................8 1.1 Introduction...................................................................................................8 1.2 Product Features..........................................................................................9 2. Functions and Installation.............................................................11 2.1 Remote Control Unit...................................................................................11 2.2 Front Panel................................................................................................. 13 2.3 Rear Panel................................................................................................. 16 2.4 Connecting and Installation....................................................................... 17 3. Basic Operation..............................................................................22 3.1 Quick Start................................................................................................. 22 3.2 Basic Function Usage............................................................................... 24 4. Main Menu Guide............................................................................31 4.1 Installation.................................................................................................. 32 4.2 Edit Channel List........................................................................................ 35 4.3 Program Guide.......................................................................................... 38 4.4 PVR............................................................................................................ 40 4.5 System Setting........................................................................................... 45 4.6 Utility........................................................................................................... 56 4.7 Common Interface..................................................................................... 58 5. Record File Guide...........................................................................60 5.1 Recording................................................................................................... 60 5.2 File List....................................................................................................... 61 5.3 Fast-Forward & Rewind............................................................................. 61 5.4 Quick-Search............................................................................................. 61 5.5 Slow-Motion............................................................................................... 62 5.6 QUICK REPLAY/FORWARD.................................................................... 62 5.7 Time Shift [While watching Broadcasting]................................................ 62 5.8 Event Notification Function [While DVR recording].................................. 63 5.9 BOOKMARK.............................................................................................. 63 6. DivX & Slide Show Guide...............................................................64 6.1 DivX............................................................................................................ 64 6.2 Slide show.................................................................................................. 65 Troubleshooting..................................................................................66 Technical Specifications....................................................................67 Menu Map............................................................................................69 Warranty..............................................................................................70 1 2 3 4 5 6 7 ? 1 Overview 1.1 Introduction This product is a Combo receiver manufactured by Kaonmedia Co.,Ltd. It provides various functions and a user-oriented interface to allow it to be used with safety and convenience. The receiver provides not only the basic functions of a Combo receiver, but also various functions such as PVR, DVR , RMCS and Analog PVR. With PVR, an important receiver function, you can record or play a Combo-broadcast program from a high-capacity HDD. In addition, you can record programs from up to six channels simultaneously, with two tuners. With the DVR, another major function of the receiver, you can record other material by connecting to outside monitoring equipment such as a camera sensor. In addition, the RMCS (Remote Monitoring Control system) provides a function for controlling the receiver remotely via Ethernet. The varied and useful functions of this receiver will transport you into the wonderful world of digital broddcast. 1 1.2 Product Features • DVB Common Interface with 2 CAM slots • 2 Tuners for zapping while recording • PIP (Picture in Picture) • Symbol rate, Max 180Mbit/sec • Up to 8000 TV or Radio Channels programmable • MPEG-II Digital Fully DVB Compliant • EPG access for on- screen channel information • 2 IEC Input, IF 2 RF signal loop through • Built-in Teletext function • Subtitle function • Multi-language support • True color or 16bit color on-screen display • Parental control facility by channel, menu and file locks • Memorizes the last-viewed channel if power goes down • Last 10 channel recall facility • Real time display on Channel Info & on front panel display in standby mode • Full Editing function Channels (Add, Delete & Rename) • Receiver-to-receiver full channel data copying facility • 32 different favorite groups with ability to categorize & re-categorize each group • Digital audio output (S/PDIF) on RCA & Optical Jack • Multiple audio selection (L/R, Stereo & Mono) • Picture in Menu Auto Favorite function • Supports Multiple Audio Support • AC 90 - 250V, 50/60Hz, SMPS • LED Display (Light-Emitting Diode) • 2 SCART, TV (CVBS/RGB) with VCR loop through facility • Software Upgrade via OTA (Over-the-Air) and serial connection (RS-232). • 7 RCA sockets (Output: Audio L/R, Video) (Input: Audio L/R, Video) • PLL RF Modulator (CH21-CH69, PAL B/G, I, DK, PAL M,NTSC M, SECAM L) • 8 event VCR or HDD Timer facility Dual PVR • 3D Graphic User Interface by 16bit Color • Multi Channel (up to 6 Channels) Record and 1 Channel Playback simultaneously • Dual Decoding for Two Live Streams, or One Live Stream & One Recorded Stream • PIP : Picture-in-Picture (Adjustable sizes & selectable locations) • MP3 (MPEG-1 Layer-3) & Video Stream Transfer & Play on Web Environment via USB2.0 • Photo Image Slide Show • Time Shift Function • Analog Signal Input & Record (CAMERA, Game Console, Camcorder, TV) 10 2 Functions and Installation 2.1 Remote Control Unit No. Button Functions 1 STAND BY To switch between operation and stand by mode 2 MUTE To enable or disable audio 3 NUMERIC BUTTONS To select the channel and enter the channel edit and PIN code 4 TV/STB To switch between TV and Combo receiver mode 5 TEXT To use Tele-text to check functions 6 SUB-T(RED) To enable or disable subtitle 7 GREEN To sort channel list 8 YELLOW To watch the current screen with zoom function. 9 INFO(Blue) To display the information box on the screen. 10 STOP Used for stopping play 11 REW Used for rewinding 12 FF Used for fast-forwarding 13 PLAY/PAUSE Used for playing or pausing files. 14 SLOW Used for viewing the screen in slow motion. 15 QUICK REPLAY To go to the previous screen 16 QUICK FORWARD To go to the next screen 17 RECORD Saves the current channel to the HDD 18 CHANNEL UP/DOWN To change channel up and down. 19 VOLUME UP/DOWN To increase or decrease the volume. 20 EXIT To return the normal viewing mode from a menu. 21 MENUTo display the Main Menu on the screen or return to the previous menu. 22 UP/DOWN To move up or down on the menu. 23 LEFT/RIGHT To move left or right on the menu. 24 OK To confirm your choice. 25 TV/RADIO To switch between TV and Radio. 26 INPUT To switch to the DVR screen or Analog PVR screen. 27 A.L/R To select the sound mode.(Mono, Left, Right, Stereo) 28 A.LANG To select the audio language. 29 RECALL To view the recall list. 30 EPG To display the TV/Radio program guide. 31 SLEEP To select a present time interval for automatic shut off. 32 DISPLAY To open the Display screen of the System Setting menu. 33 SAT To arrange programs in satellite order. 34 PAUSE To pause the current screen 11 2 35 PIP To turn the PIP screen on/off. 36 PIP CHTo change the PIP screen channel. If you press the button, the PIP Channel List will be shown. 37 MODE/FILE To change or modify the size or location of the PIP. To open the File List screen 38 SWAP/TUNERTo swap the main screen for the PIP screen. To change the tuner. • When inserting batteries, make sure that the polarity (+/—) is correct. • The design of the Remote Control Unit may be changed without any notice in advance. 12 2.2 Front Panel 2 No. 1 Button Functions STAND BYSwitch the receiver power “ON” or “OFF”. 2 MENU 3 CH UP/DOWNTo move the channel Up/Down or select a sub-menu item. To see main menu. 4 OKTo select a program, a highlighted line or parameter value. 5 VOL UP/DOWNTo turn the volume Up/Down or select a sub-menu item. 6 7-segment The message of the 7-segment LED LED Display(Light-Emitting Diode) on the receiver and keys will be displayed. 7 CAM Slots (CI Model Only) 2 Slots for Common Interface CAM (VIACCESS, IRDETO, NAGRAVISION, CRYPTOWORKS, CONAX) with Smart Card. 8 2 Slots for Smart Card Smart Card Slots (CAS Model Only) 13 VFD Information (Option) No. Descriptions 1 When the camera is connected 2 When channel No. is displayed 3 Power off 4 NTSC mode 5 PAL mode 6 PLAY 7 PAUSE 8 Rewind 9 Fast forward 10 When the MP3 file is playing 11 When the file is repeating in PVR 12 When the TV is selected in TV/STB 13 When the Channel list is in All mode 14 When the Audio Mode is STEREO or LEFT 15 When the Audio Mode is STEREO or RIGHT 16 When Time is displayed, Month/ Date (Standby mode) When PROGRAM is displayed, Channel No. (Channel No. is displayed as 0001, not p 001) Displaying the name for each channel 17 Displaying current time in “A/P: hour: minute” Displaying play time in “hour;minute;second” while File (including MP3 file) is playing 14 LED Display Information Lamp Color GREEN YELLOW Contents REDLamp is “ON” when the power is off Lamp is “OFF” when the power is on GREEN 2 Lamp is “ON” when it shows Signal Locked Lamp is “OFF” when it shows Signal Unlocked Signal Check is subjected to only on the Main Video Tuner Lamp is “ON” when the HDD is running (e.g. Record, Play, TimeShift) Lamp is “OFF” when the HDD stops Lamp is “ON” when remote control is in use Lamp is “OFF” when remote control is not in use Front Panel Display Message KEY & DISPLAY The message of the 7-segment LED (Light-Emitting Diode) on the receiver and keys are explained as below. Standby ModeCurrent Program Number System Booting TV Mode Power Off Combo Receiver Mode MICOM Version Upgrade Boot Loader Version Upgrade Procedure Download Upgrade Completion Download Procedure 15 2.3 Rear Panel 3.IEC 14.VIDEO(Option) 16.S-VIDEO 12.SCART FOR VCR 10.VIDEO 9. S/PDIF 8.USB 6.ANT IN 1.POWER SUPPLY 2.POWER SWITCH 4. LOOP THROUGH 5. RS-232 7. TV OUT 11. AUDIO 13. SCART FOR TV No. 2.AUDIO(Option) Button Functions 1 POWER SUPPLY AC 90-250V, 50/60Hz, 45W(maximum) 2 POWER SWITCH To provide power to the main unit 3 IEC To connect to a terrestrial antenna and cable jacks. 4 LOOP THROUGHTo connect an RF signal from the receiver either to the RF input jack on your television or to the receiver. 5 RS-232 6 ANT INTo connect a general aerial antenna and cable jacks to an RF input jackon the rear of the receiver. To connect to a personal computer for software upgrade. 7 TV OUT To connect a TV via a coaxial cable. 8 USB USB port 9 S/PDIF Output for connection to a digital amplifier. 10 VIDEO Video connection port to the TV or other equipment. 11 AUDIO Audio connection port to the TV or other equipment. 12 SCART FOR VCR To connect this port to the VCR via a SCART cable. 13 SCART FOR TV To connect this port to the TV via a SCART cable. 14 AUDIO (Option) Audio that connects to the Analog PVR 15 VIDEO (Option) Video that connects to the Analog PVR 16 S-VIDEOVideo connection port to a TV or other equipment via SUPER VIDEO. 16 2.4 Connecting and Installation How to connect the receiver to various other systems There are several ways of connecting the receiver to your TV, VCR and/or Hi-Fi SYSTEM. Consult your local supplier for assistance in setting-up your system that is best suited to your requirements. (Option) 1.Connect the receiver to a TV set Connect the receiver to a TV set with SCART, if your TV set is equipped for it. Alternatively you can use A/V, TV out (UHF) or S/Video jacks. 2.Connect the receiver to a VCR Connect the SCART jack from the VCR to the back of the receiver. Alternatively you can use A/V, TV out (UHF) or S/Video jacks. 3.Connect the receiver to a Hi-Fi System Connect a RCA stereo cable from the AUDIO L/R jacks, S/PDIF on the receiver to the LINE, AUX, SPARE or EXTRA input jacks on your Hi-Fi System. 4.Connect the receiver to a Digital Audio System If you have a DAC with S/PDIF coaxial cable input, you can connect the receiver with it to enjoy higher quality sound. Connect S/PDIF coaxial cable to a digital amplifier. 17 2 5.Loop Through If you have another analogue or digital receiver and you wish to use the same LNB then you can connect it via the loop through. Connect one end of the coaxial cable to the Loop Through on the receiver and connect the other end to the LNB IN on your second receiver. 6.Analog PVR Connecting (Option) Used to record received signals Connect the Video cable of the Analog PVR to the Analog PVR Video. Connect the Audio cable of the Analog PVR to the Analog PVR Video. 7.DVR Connecting (Option) The camera has to be connected to the sensor to watch via the DVR. Connect the Video cable of the camera to the DVR Video jack. Connect the Audio cable of the camera to the DVR Audio jack. Connect the sensor to the sensor jack. 18 TV with Terrestrial Antenna 2 a Connect one end of RCA/Cinch cable to the RCA/Cinch jack on the back of the receiver and the other end to a RCA/Cinch jack on your TV. If your TV doesn’t have a RCA/Cinch jack, connect one end of RF cable to the TV OUT on the back of the receiver and the other end to a RF input jack on your TV. b Connect one end of RF cable to the ANT IN on the back of the receiver and the other end to a terrestrial antenna connection or the jack for the public antenna on the wall. c Finally connect the coaxial cable from the IEC to the antenna IN jack on back of the receiver. 19 TV with Motorized System (DiSEqC 1.2) a Connect one end of RCA/Cinch cable to the RCA/Cinch jack on the back of the receiver and the other end to a RCA/Cinch jack on your TV. If your TV doesn’t have a RCA/Cinch jack, connect one end of RF cable to the TV OUT on the back of the receiver and the other end to a RF input jack on your TV. b Connect one end of your coaxial cable to the LNB IN connector on the receiver and the other end to the REC or Receiver connector on the DiSEqC 1.2 motor. c Connect the coaxial cable from the LNB to the LNB connector on the DiSEqC 1.2 motor. 20 Connecting to the PC a Turn the receiver and your PC on. b Connect the receiver to your PC with the enclosed USB cable. 2 Please be careful when you upload or download files while the receiver is connected to a PC with the USB cable. The data recorded in the HDD may be lost if the PC’s power is turned off, or if the USB cable is unplugged while uploading or downloading files. c Connect it using USB connections in the PVR. d To confirm, click the start button and then click Program> Accessories >Windows Explorer. e You can check that the new drive is installed in your computer. The factory drive name is PVR HDD. 21 3 Basic Operation 3.1 Quick Start 1 Start System Before you watch the television or radio program, you must perform the installation procedure first. Therefore you will see only “Easy Installation Menu” at first when you plug into your system. The Easy Installation gives you the convenience of selecting various languages, adjusting the time and channel search. A Automatic Installation by “Easy Installation” The Installation Wizard is a user-friendly method assuring the easy set-up of the receiver by the new user. B System Connection Connect the receiver to all peripheral devices such as the TV, Audio and Video etc. C Power On Turn on the power of the receiver and other devices. D Power Off When you press the STAND BY button again. The receiver will display “OFF”. 2Language The first option is “Language Select” to select the desired language of the Menu, Audio, or Subtitle. Place the cursor on the sub menu by pressing the keys and press the OK button to change the language. The Language of the Menu, Audio, or Subtitle will be changed to the selected language. 3Local Time/GMT 22 Select the time setting type. Press the LEFT/RIGHT button to select either Local Time or GMT and then press the DOWN button to move to the time setting item. When Local Time is selected. You can set your local time according to your location. To set the local time, press the NUMERIC button. When Local Time is selected. You can set your local time according to your location. To set the local time, press the NUMERIC button. When GMT is selected. Press the LEFT/RIGHT button to select the current time zone from standard time and then press the OK button. When you press the LEFT/RIGHT button, the time zone will move by 30 minutes. 4Channel Search You can search the channels. If you press the OK button, the Installation screen will appear. 5Installation Set the channel when the Installation screen appears. Please refer to [4. Main Menu Guide - 4.1 Installation] for more details on Channel Search. 6Confirm the channel searched The first channel searched is displayed after saving the channel. Press the UP/DOWN button or the NUMERIC button to move to the searched channel. The screen is displayed with the Channel Banner. • If you press the OK button on the screen, the Simple Channel List will be displayed. Press the NUMERIC button to change the channel on the screen. Or press the UP/DOWN button to select the channel and press the OK button. Press the EXIT button to exit the Simple Channel List. • Channel Banner The Channel Banner provides information on the channel, and is placed at the bottom of the screen. It shows the channel number, channel name, channel information, and signal. Press the YELLOW, GREEN, BLUE button for further reference. 23 3 3.2 Basic Function Usage 1Program Information After the television channels have been programmed, you will see the information box each time you change the channels. a Every time you change channels you will receive program information for a few seconds. (In the “Banner Time” menu you can select how long this information will be shown.) b You may change channel lists with the UP or DOWN button. You can get “Channel Banner” at the bottom of the screen. c When you press the COLOR button, you can use the banner as a simple channel operation. 2Now-Information Banner a During “Channel Banner” is appearing, when you press the GREEN button, you can get “NowInformation Banner”. b Using “Now-Information Banner”, you can get a simple EPG of “Now-Information”. 3Next-Information Banner a During “Channel Banner” is appearing, when you press the YELLOW button, you can get “Next-Information Banner”. b Using “Next-Information Banner”, you can get a simple EPG of “Next-Information”. 24 1 Program Information After the television channels have been programmed, you will see the information box each time you change the channels. a Every time you change channels you will receive program information for a few seconds. (In the “Banner Time” menu you can select how long this information will be shown.) b You may change channel lists with the UP or DOWN button. You can get “Channel Banner” at the bottom of the screen. c When you press the COLOR button, you can use the banner as a simple channel operation. 2Now-Information Banner a During “Channel Banner” is appearing, when you press the GREEN button, you can get “Now-Information Banner”. b Using “Now-Information Banner”, you can get a simple EPG of “Now-Information”. 3Next-Information Banner a During “Channel Banner” is appearing, when you press the YELLOW button, you can get “Next-Information Banner”. b Using “Next-Information Banner”, you can get a simple EPG of “Next-Information”. 25 3 8Simple Channel List a When you press the OK button during receiving service stream, you can get “Channel List” view. b Using the UP/DOWN button in “Channel List” view, you can choose another channel. c After moving highlight on a channel, then press the OK button. d Press the RED button to move to the Favorite channel list. Only the selected favorite channels among the 32 favorite channels will appear. e To get the channel sort list, press the GREEN button. Pop up window will be displayed on the screen. f Select the sort list you want with the UP/DOWN buttons and then press the OK button to get it. There are seven ways of sorting; Normal, Tuner, CAS, Network, Genre, and Favorite. g Press the BLUE button. You can see the Signal of current channel on the Simple Channel List. You can change the following settings on the Simple Channel List screen; Favorite and Genre List setting, Lock Function Setting and Channel Name Change. a If you press the Blue button on the Simple Channel List, the Edit Pop-up window will appear. b Press the UP/DOWN button to select the desired item and press the LEFT/RIGHT button to change the setting. If the Rename item or the Favorite item is selected, press the OK Button to setup. c Press the EXIT button. When the save message is shown, press the OK button to save. 9Soundtrack a When you want to change the Audio Language of current channel, press the A.LANG button on the remote control. The on-screen menu is displayed on the left side of the screen. b Use the UP/DOWN buttons to choose the audio you want. c To cancel or exit, press the A.LANG button again. 26 You can change a default audio language in the system setting menu mode. 10 To change the audio output a Press the A.L/R button on the remote control unit to change the output. b Then on-screen menu is displayed on the top right side of the screen. c Press the A.L/R button repeatedly to change the sound mode. (Mono, Left, Right, Stereo) 3 11 PIP The PIP (Picture-in-Picture) function allows you to watch two screens at the same time. With the PIP function, you can move the PIP screen or freely adjust the screen size. a If you press the PIP button while the channel is showing on the screen, the PIP will be shown at the top left of the screen. b If you press the PIP CH button, the PIP Simple Channel List will appear on the screen. c Press the UP/DOWN button on the PIP Simple Channel List screen to select a channel, and press the OK button. • Press the PIP button to make the PIP screen disappear. • Press the FILE/MODE button and press the UP/DOWN or the LEFT/RIGHT button to change the location of the PIP screen. • Press the FILE/MODE button once again and press the the UP/DOWN button or the LEFT/RIGHT button to change the size of the PIP screen. • If you press the FILE/MODE button once again, you can see the screen as a multi-media window type. The main screen will be displayed on the left, and the PIP screen on the right side of the screen, as a multi-media window type. • Press the SWAP/TUNER button to swap the main screen for the PIP screen, while the PIP screen is showing. 27 12 Recall List Recall List is to show the previous channels (up to 10 channels). a If you press the RECALL on the screen, the Recall List Pop-up window will appear. b Press the UP/DOWN button to select the channel and then press the OK button. The changed channel will be shown with the channel banner. • Press the EXIT button to exit from the Recall List Pop-up window. 13 DISPLAY Setting This mode changes settings such as the RF Channel, RF Mode and TV Type. If you press the DISPLAY button, the DISPLAY screen of the System Setting menu will appear. Change the settings on the screen. Refer to [4. Main Menu Guide - 4.5 System Setting 4. Display] for more details on setting changes. 14 Sleep Timer 28 The unit will be turned off automatically after a specified time. If you press the SLEEP button while you are watching TV, the Sleep Time pop-up window will appear. Each time you press the SLEEP button, the time will be changed in these intervals: 10, 20, 30, 40, 50, 60, 70, 80 and 90 minutes. After you have changed and saved the time, the Sleep Time pop-up window will disappear. 15 TV/Radio Change With this function, you can change the Radio listening mode while you are watching TV. If you press the TV↔RADIO button while you are watching TV, the radio listening screen will appear. If you press the TV↔RADIO button again, the TV screen will reappear. 16 Multi Video Multi Video allows you to watch several channels in one screen simultaneously. It can be used to watch one channel from among several channels. a If you press the 0 button while you are watching TV, the Multi Video pop-up window will appear. b Press the UP/DOWN button to select the number of channels on the Multi Video pop-up window, and then press the OK button. The possible numbers of channels are 4, 9, 10, 13 and 16. c When several channels appear on-screen, press the UP/DOWN button or the LEFT/RIGHT button to select the channel. d Press the OK button to change the subject channel. • If you press the MENU button or the EXIT button, it will change to the full screen. 29 3 17 File Playback With this function, you can play recorded files. a If you press the MODE/FILE button while watching TV, the File List screen will appear. The currently saved directory in the HDD will be displayed on the File List screen. b Press the UP/DOWN button to select the desired directory and then press the OK button. c Press the UP/DOWN button to select the desired file and then press the OK button. The selected song will playback. • For Group Play If you press the OK button while the file is playing, the Play List screen will appear. Press the following buttons to perform various actions in the Play List window. RED: If you press this button, you can move the selected file up and down. Press the UP/DOWN button to move to the desired location and then press the OK button. GREEN: If you press this button, the selected file can be changed to repeat mode. R is displayed next to the selected file. BLUE: If you press this button, the selected file will be deleted. The file that is currently playing will not be deleted. 18 Wallpaper A PC image file (BMP, JPG) can be used as the wallpaper for the main unit. 30 4 Main Menu Guide Press the MENU button on the remote control unit. You will see the “Main Menu” on the screen. a You can move into the desired submenu using the LEFT/RIGHT buttons. b You should enter the PIN code in order to move into the corresponding submenu in case of the Installation, the Edit Channel List or the System Setting. c Press the OK button to confirm your selection. d Press the MENU button to return to previous menu. Or press the EXIT button to quit the Menu system completely. Main Menu shows the following information. Installation Terrestrial Search Edit Channel List Edit Favorites 1~32, Lock, Skip, Delete, Move, Genre. Program Guide Shows Now, Next, Weekly Program guide. PVR File List, Record, Timer, TimeShift, USB Connection, Format HDD. System Setting Language, Time, Display, Lock Control, Factory Reset, System Information, RMCS Usage, Analog PVR/DVR Option, OTA Upgrade (option). Utility Games, Demonstration, Calendar, Zoom, Calculator, Set to Set. Common Interface Shows scrambled channels by using common interface modules.(CI or CAS model only) 31 4 4.1 Installation Basic Setting Press the UP/DOWN buttons to select the desired item on the basic setting screen. 1Terrestrial Search If you want to search the channel, press the OK button to move to the Terrestrial Search channel search setting screen. 2Copy from Tuner 1 to Tuner 2 Use when you copy channels in Tuner 1 to Tuner 2. Press the OK button to copy channels in Tuner 1 to Tuner 2. 3Copy from Tuner 2 to Tuner 1 Use when you copy channels in Tuner 2 to Tuner 1. Press the OK button to copy channels in Tuner 2 to Tuner 1. 4Copy All 32 Use this when you copy channels in Tuner 1to Tuner 2 and channels in Tuner 2 to Tuner 1. Press the OK button to copy channels in Tuner 1 to Tuner 2 and channels in Tuner 2 to Tuner 1. Terrestrial Search Auto Search In this menu, You can set terrestrial channel automatically. - Automatic Search for all MUX 1. Press the SUB-T(RED) button to start searching. 2. At the pop up window, select all channel or FTA channel search. 3. When searching is started, the name of channels searched will be displayed on the screen. 4. When searching is finished the “Search finished” message will be displayed on the center or the screen. 5. Press the OK button to save the channel list and watch the channel searched. 33 4 Manual Search Manual search is more convenient to search a specific MUX. This menu searches also channels broadcasted over a specific MUX using its detected information. 1. Press the UP/DOWN buttons to select the MUX No. you want to find, and then press OK button to add or remove fron the search list. 2. To start search, press the GREEN button. 3. At the pop up window, select all channel or FTA channel search. 4. When searching is started, the name of channels searched will be displayed on the screen. 5. When searching is finished, the ”Search finished” message will be displayed on the center of the screen. 6. Press the OK button to save the channel list and watch the channel searched. w Press the BLUE button to change the MUX priority. (Auto/High/Low). 34 4.2 Edit Channel List From these menus, you can create favorite lists, lock, skip, delete, or move channel. a Select “Edit Channel List” in the main menu with the LEFT/RIGHT buttons and press the OK button. b At the request window, Input PIN code. If you have not entered your own PIN code, then the PIN code 0000 applies, which was set at the factory. c Press the UP/DOWN button in MODE to select the desired mode and then press the OK button. d Among the all channel list, the selected channel can be moved to the right folder of Favorite 1~32, Lock, Delete, Skip, Move, Genre. Press the OK button to add from edit list at right folder. e To remove the channel list from edit list at right folder, press the OK button. The edited list will be removed. f To rename the channel, press the YELLOW button. g Press the BLUE button to change the favorite name. h To confirm the channel list, press the MENU button or the EXIT button. The request window will be displayed on the screen, Press the OK button to save or the EXIT button to exit this menu. • Press the GREEN button to arrange the channels. When the Sort pop-up window appears, select the desired arrangement and then press the OK button. • Press the RED button if you want to include all the channels in the channel list. 35 4 • To rename the Favorite channel, press the INFO (BLUE) button. 1Favorite 1 ~ 32 a You can edit favorite TV and Radio list. This enables you to create the 32 favorite TV and Radio lists. b Select the channel you want to edit on the favorite list and press the OK button. 2Lock a From here you can lock channels in any of the list in order to prevent e.g. your children from watching. b Select the channel you want to lock and press the OK button. c Repeat the procedure for each channel you want to lock. When you lock a channel in any list, the channel will be locked automatically in all other lists. 3Delete a You can delete the TV or Radio channel from the current list. b Select the channel you want to delete and press the OK button. 4Skip a You can skip the TV or Radio channel from the current list. b Select the channel you want to skip and press the OK button. c To recover the skipped channel, press the OK button from edit list. 36 5Move a You can change the position of the channel you want on the TV/Radio/All channel lists. b Select the channel you want to move to desired channel and press the OK button. c And press the INFO (BLUE) button to change the position of the channel you want. d Using the UP/DOWN buttons, select the channel you want to move and press the OK button. e The position of the channel will be moved. 6Genre a You can edit the TV and Radio list of the various genres. (Movie, News and Factual, Entertainment, Sport, Children, Factual, Education, Lifestyle, Drama, Music, Arts, Current Affairs, Special, Comedy, Documentary.) b Select the channel you want to edit genre list and press the OK button. 7 Auto Favorite a. You can edit auto favorite. b. Press the YELLOW button in Simple Channel List 37 4 4.3 Program Guide The program guide provides information such as the program listings and ending times for all available programs. Select “Program Guide” in the main menu with the LEFT/RIGHT buttons and press the OK button. In the viewing program, when you press the EPG button, you can get this view. • The Program Guide information might not be supported by the service providers. 1Now/Next Program Guide Shows the information of Present/Following program on different channels. To watch the programs you go through the display window: a Select a program with the UP/DOWN buttons. You can get the list at right-side view. b Use the SUB-T(RED) button to change the channel list. c After selecting the program you want, press the OK button. You can see the detailed information. d If you want to change program guide, press the INFO(BLUE) button. 2Weekly Program Guide Shows the information of program that will be played for a week. a When you press the INFO(BLUE) button, you can alternatively select Now, Next or Weekly EPG. b To see more information about the program you want on the weekly EPG, move the highlighted channel by pressing the LEFT/RIGHT, UP/DOWN buttons and then press the OK button. 38 3EPG Information a To view the Program Guide, press the EPG button on the remote control unit. The EPG information will be displayed on the bottom of the screen. b Each press of the UP/DOWN buttons will change the displayed EPG information by one hour. c Each press of the LEFT/RIGHT buttons will change the displayed EPG information by one day. d If there is available EPG information, it will be displayed on the EPG information bar. e Press the EPG button again, and the Program Guide menu will be displayed. 4 4EPG Scheduled Recording With the EPG information, you can easily set scheduled recording. a If you press the YELLOW button after checking the EPG information, the Add pop-up window will appear. All the basic scheduled recording information will be shown in the Add pop-up window. b Press the RED button to save the settings after confirming the scheduled recording information. 39 4.4 PVR Press the LEFT/RIGHT buttons on the Main Menu to select the PVR and then press the OK button. Press the UP/DOWN buttons on the PVR menu to select the desired item. 1File List • Saving too many files in one directory might cause problems — slowing the system down, for example. It is recommended that you manage the directory by classifying some files into subdirectories. File List manages the files and directories in the HDD. Press the UP/DOWN buttons on the PVR menu to select the File List and press the OK button. The recorded files and directories currently saved in the HDD will appear. Various basic directories such as AVDATA, MP3 and SOFTWARE will appear in the directory. The names of the basic directories cannot be changed. The basic directories are as follows; • AVDATA: Directory that saves recorded files • MP3: Directory that saves MP3 files • SOFTWARE : Directory that saves software-related files • GAME: This is the directory that the ROM file downloaded from the Internet site can be saved on. Select the saved ROM file and press the OK button to play the game. • IMAGE : Directory that saves image files • DVR : Directory that saves files recorded with the DVR. • ANALOG : Directory that saves the file recorded with Analog PVR. • For more information about the execution of DivX file, JPG and BMP file saved on the File List, refer to [6. DivX and Slide Show Guide]. play mode Press the SWAP button to mode change. 40 Play Press the UP/DOWN buttons on the directory menu to select the desired file or directory and then press the OK button. If the file is selected, the file will play. If the directory is selected, the selected directory file list will be displayed. Group Play a Move to the directory where the file for Group Play is located. b Press the UP/DOWN buttons on the Directory screen to select the file to be added to the Group Play List and then press the RED button. c The number will be displayed for the selected file. Select the file to be added to the Group Play List in the same manner as described above. If you press the RED button again, the added file will be canceled. d When you finish the file selection for Group Play press the BLUE button. The Group Play List pop-up window will appear. e If you press the BLUE button on the Group Play List pop-up window, it starts playing. • If you press the GREEN button on the Group Play List pop-up window after selecting the file, the selected file will be deleted. • If you press the RED button on the Group Play List pop-up window, all files will be deleted. Edit a If you press the YELLOW button on the File List screen, the File Edit pop-up window will appear. b Press the UP/DOWN button to select the items to be edited and then press the OK button. The items you can edit are as follows; • New Directory: To create a new directory in the current directory. • Rename: To change file or directory names. Characters such as 0~9, a~z and A~Z can be used. • Delete: To delete a file or directory. • Lock: To set for entering a password when you access files and directories. They are then displayed as “hidden files” in Microsoft Windows, after the USB cable is connected. 41 4 Sort a If you press the GREEN button on the File List screen, the File Sort pop-up window will appear. b Press the UP/DOWN button to select the arrangement method and then press the OK button. The different methods are as follows: • • • • File Name: To arrange files in file name order. Date: To arrange files in date order. File Type: To arrange files in file type order. Lock: To arrange files according to whether locked or not. c Press the OK button to arrange files in the way you selected. delete mode Press the SWAP button to mode change. select Press the OK button on the File List screen. The Checking Mark will appear On the file list. select All Press the RED button on the File List screen. The Checking Mark will appear On all file of the file list. delete Press The YELLOW button on the File List Screen. You can delete All checked File. lock Press The YELLOW button on the File List Screen. You can lock All checked File. 2Record • RECORD display Analog PVR or DVR recording will be displayed at No.1 and DVR (EVENT) recording at No.2. PVR recording will be displayed from No.3~No.8. 42 With this function, you can check file information while recording with the PVR. In addition, you can set the record-end time, and the power to go off after recording. a Press the UP/DOWN button on the PVR menu to select Record and then press the OK button. b When you press the OK button on the Record screen, the Edit screen will appear. c Press the UP/DOWN button on the Edit screen to select the items for setting. These are record-end time, and power ON/OFF after recording. d When you finish setting, press the RED button to save. The details of the setting will be displayed on the Record screen. 3Timer With this function, you can set reserved recording functions including adding, changing and deleting reserved recordings. You can add a reserved recording. a Press the UP/DOWN buttons on the PVR menu to select the Timer and then press the OK button. b If you press the BLUE button on the Timer screen, the Add screen will appear. c Press the UP/DOWN buttons on the Add screen to select the items for setting. These are as follows; • Type: To set the type of reserved recording. There are three kinds of reserved recording: PVR, DVR and Analog PVR. • Mode: To set the interval for the reserved recording. You can choose to record once, every day or every week. • Date: To set the date for the reserved recording. • Time: To set the time the reserved recording starts. • End Time: To set the time the reserved recording Ends.If End time is passed, the reserved recording will stop. • Option: appears when you set the Type to DVR, and you can choose either Normal or Event. If you choose Normal, you can record for a designated time. In the case of Event, an exterior sensor will run for a designated time. While the exterior sensor is running, if an Event occurs it records in accordance with the setting in the Analog PVR/DVR Option of the System Setting menu. Please refer to [4. Main Menu Guide - 4.5 System Setting - 8. Analog PVR/ DVR Option] for more details. • Channel: appears when you set the Type to PVR. Press the OK button to set the channel you want to record. • Power off: If you select “Yes”, the receiver turns to the Stand by mode automatically after the recording. If you select “No”, the receiver doesn’t turn to the Stand by mode. d Press the RED button to save. The details of the setting will be displayed on the Timer screen. 43 4 • To change the reserved recording, select reserved recording on the Timer screen and then press the OK button. When the Edit screen appears, change the reserved recording in the same way as you did with adding. • To delete a reserved recording, select it on the Timer screen and then press the RED button. • Please be aware that when you change the System’s Local Time or edit a reserved channel, the Timer might also change • If you skip a reserved channel, or Delete it, the reserved settings are canceled. 4Time Shift This function is for setting the Time Shift. If you set to ON, you can use the Time Shift function. a Press the UP/DOWN buttons on the PVR menu to select Timeshift. b Press the RIGHT button to move to the right pop-up menu. c Press the UP/DOWN buttons to select the desired items and then press the OK button. 5USB Connection a Press the UP/DOWN buttons on the Utility screen to select USB Connection and then press the OK button. b The ‘USB connected’ message pop-up window will appear. Press the EXIT button to disconnect USB. 6Format HDD With this function, you can format the HDD. Please be aware that all data will be deleted if the HDD is formatted. • You can check the basic directory created in the File List. 44 a To format the HDD, press the UP/DOWN button on the PVR menu to select Format HDD and then press the OK button. b When the format confirmation pop-up window appears, press the OK button. 7 HDD Information You can see the HDD Information. (Size, Serial Number, Firmware Version, Model Name) 4 4.5 System Setting You will be asked to enter your PIN code before you can enter this menu. The PIN code preset to 0000 from the factory. If you want to customize the system to suit you better, you can specify some settings from the submenus in the “System Setting” menu. a Select “System Setting” in the main menu with the LEFT/RIGHT buttons and press the OK button. b If you move the focus on the main menu, the contents of the selected menu will be shown. 1Language a Press the UP/DOWN buttons on the Setup list to select Language and press the OK button. b Press the UP/DOWN buttons to select Menu Language, Audio Language or Subtitle Language and then press the RIGHT button to move to the right pop-up menu. 45 Menu Language Here you may select in which language the menus will be shown. Use the UP/DOWN buttons to move to the language you want and then press the OK button. You can choose the language from a selection of English, Spanish, Finnish, Norwegian, Swedish, German, French, Turkish, Italian, Slovenian, Ukrainian, Russian, Czech, Latvian, Arabic, Farsi, Danish, Bulgarian, Romanian, Serbian, Dutch, Hungarian, Albanian, Greek, Indonesian, Portuguese, Lithuanian and Polish (Option). Audio Language In this menu, you can change default language for audio when changing services. Use the UP/DOWN buttons to move to language you want and then press the OK button. You can choose the language from a selection of English, Spanish, Finnish, Norwegian, Swedish, German, French, Turkish, Italian, Slovenian, Ukrainian, Russian, Czech, Latvian, Arabic, Farsi, Danish, Bulgarian, Romanian, Serbian, Dutch, Hungarian, Albanian, Greek, Indonesian, Portuguese, Lithuanian and Polish (Option). Subtitle Language In this menu, you can change default language for subtitle when changing services. Use the UP/DOWN buttons to move to language you want and then press the OK button. You can choose the language from a selection of English, Spanish, Finnish, Norwegian, Swedish, German, French, Turkish, Italian, Slovenian, Ukrainian, Russian, Czech, Latvian, Arabic, Farsi, Danish, Bulgarian, Romanian, Serbian, Dutch, Hungarian, Albanian, Greek, Indonesian, Portuguese, Lithuanian and Polish (Option). 2Time a Press the UP/DOWN button on the Setup list to select Time and then press the OK button. b Press the UP/DOWN button to select either Banner Time or Local Time/GMT and then press the RIGHT button to move to the right pop-up menu. 46 Banner Time When you switch channels, an information banner will be shown for a few seconds. You can select for how long the banner will be shown. a Select the banner time you want and then press the OK button. b Each selectable time items has meaning of the interval time during a channel banner stays on changed channel screens. The time ranges 1, 3, 6, 9 12 and 15 seconds. Local Time/GMT Select the time setting type. Press the LEFT/RIGHT buttons to select either Local Time or GMT and then press the DOWN button to move to the time setting item. Local Time You can set your local time according to your location. a To set year, month and date, press the UP/DOWN buttons. The Calendar pop up window will be displayed. Select year using the SUB-T(RED) and GREEN buttons. Select month using the YELLOW and INFO(BLUE) buttons. Select date using the UP/DOWN or the LEFT/RIGHT buttons. b Adjust hour and minute with the UP/DOWN buttons and move the field with the LEFT/RIGHT buttons. c When the OK button is pressed, the selected time applies. GMT Press the UP/DOWN buttons to select the current time zone from standard time and then press the OK button. When you press the UP/DOWN buttons, the time zone will move by 30 minutes. Day Light Saving If you want to turn the Day Lignt Saving on, press the UP/DOWN button to select ON and then press the OK button. 47 4 3Lock Control a Press the UP/DOWN button on the Set list to select Lock Control and then press the OK button. b Press the UP/DOWN buttons to select either Menu Lock, Parental Lock, Receiver Lock or Change PIN Code and then press the RIGHT button to move to the right pop-up menu. 48 Parental Lock When you change “Parental Lock” to “On” or “Off”, service channel can get or not from that set values. If you select “On”, you may need PIN code every time you select the lock channel program as you set in the channel control. If you select “Off”, you can see all channels without PIN code. Receiver Lock If you select “On”, you will have to enter the PIN code every time you start the receiver from standby. Change PIN Code From here you can change the PIN code from the standard 0000. DO NOT FORGET IT! Without it, you are not able to access to any of the functions where the code is required. You can change password for Parental Lock and Receiver Lock simultaneously. • If you forget the PIN code, press the RGYB(Color) button in sequence. (i.e. Red -> Green -> Yellow -> Blue button) The PIN code will be changed to 0000. Menu Lock If the Menu Lock is already set, the PIN code is needed to set the Edit Channel List and System Setting. If you want to set the Menu Lock, press the UP/ DOWN buttons to select Locked and then press the OK button. a Input the current PIN code using the NUMERIC buttons on the remote control. b In the highlighted new PIN code, input a new PIN code. c To verify the new PIN code, re-enter a new PIN code in the highlighted confirm PIN code. If the PIN code is correct, the message “Success” will be displayed on the display window. Auto Power (option) 1. If the Auto Power is set to On and power is off, the Set turns on automatically and turns into the channel mode which you were watching before power breakdown. 2. If the Auto Power is set to Off and power is off, the Set turns into the standby mode. 4Display a Press the UP/DOWN buttons on the Setup list to select Display and press the OK button. b Press the UP/DOWN button to select either Screen Type, Menu Transparency, SCART Output, SPDIF Output, RF Channel, RF Mode or TV Type and then press the RIGHT button to move to the right pop-up menu. TV If you have a TV set with 4:3 picture format, select 4:3 TV. and If you have a TV set With 16:9 picture format, select 16:9 TV. Screen Type If you have a TV set with the 4:3 picture format and the transmission is in 16:9, you can select Full, letterbox and Cinema. If you have a TV set with the 16:9 picture format and the transmission is in 4:3, you can select Full, Pilar Box and Cinema. Select the aspect ratio of TV which is connected to the receiver and then press the OK button. Menu Transparency From 20% to 100% will give the variable transparency on Video and OSD screen. To set menu transparency, press the UP/DOWN buttons. The transparency will be applied on the screen. 49 4 A/V Output If your TV input supports SCART-RGB control, select SCART-RGB. Otherwise select SCART-CVBS. If your TV input supports S-VHS, select S-VHS. Scart Screen Type. Select Your Scart Screen Type. You can select from 4:3 and 16:9 and then press the OK button. S/PDIF Output You can hear digital audio of the Dolby 5.1 channel using S/PDIF Output. a If selecting OFF, the digital audio will not be output. b When selecting PCM, the unzipped digital audio is output through S/PDIF. c When selecting Dolby Digital, if the current channel is a Dolby audio channel, the zipped Dolby stream is output through S/PDIF. 50 TV Type Select your TY Type. You can choose from Multi, NTSC, SECAM or PAL. Press the UP/DOWN button to select from Multi, NTSC, SECAM or PAL and then press the OK button. RF Channel Select this alternative if you have to change the RF channel. Select an UHF Channel you want with the UP/DOWN buttons. The RF Channel ranges from 21 to 69. RF Mode You can select the RF Mode. If you get picture but no sound, the RF Mode selecting might be wrong. Select an RF Mode and then press the OK button. 4 • RF Mode PAL BG, PAL I, PAL DK, SECAM L, NTSC M 5System Information Displays the system information: MODEL name, Last Update, S/W, H/W, Loader version, C.A Press the UP/DOWN button on the Setup list to select System Information and then press the OK button. 6Factory Reset Press the UP/DOWN button on the Setup list to select Factory Reset. Use this option only if you have to start the complete installation procedure from scratch. If you continue from here, all your previous settings and all channels will be cleared! The default data will be loaded. If you press the OK button, it asks for your confirmation. If you want to reset, press the OK button, or press the EXIT button to exit this menu. 51 7RMCS Usage With this function, you can connect the receiver remotely to the Ethernet. Decide whether or not to use the RMCS function. When you set it to “ON”, you can use the RMCS function. a Press the UP/DOWN buttons on the Setup list to select RMCS Usage and then press the OK button. b Press the RIGHT button to move to the right pop-up menu. c If you want the remote setting, press the UP/ DOWN button to select ON and then press the OK button. 8Analog PVR/DVR Option With this function, you can set the Analog PVR, and DVR recording. The analog PVR enables you to record audio and video signals to the HDD when receiving external analog audio and video signals. There are two kinds of analog signal; Video and Audio. The DVR enables you to save audio and video signals recorded with an exterior camera to the HDD. a Press the UP/DOWN buttons on the Setup list to select the Analog PVR/DVR Option and then press the OK button. • When recording using both two tuners, you cannot record with the DVR or the Analog PVR. 52 b When the Analog PVR/DVR Option pop-up window appears, press the LEFT/RIGHT buttons to select either Analog PVR, DVR Option or Off and then press the OK button. c When the selected list appears, press the UP/ DOWN buttons to select and then set again. l Analog PVR Video Quality With this function, you can set the size of the analog data. There are three size options; Standard, High and Very High. Very High is the largeest and offers the best quality. Press the UP/DOWN buttons to select the desired item and then press the OK button. Analog PVR •If the HDD size is 10 GB, the time available for saving recordings is as follows; Standard: 20 hours recorded at 140Kbps. High: 9 hours recorded at 300Kbps. Very High: 6 hours recorded at 450Kbps. Analog PVR Video Type With this function, you can set the analog data Type. There are two options; PAL and NTSC. Press the UP/DOWN buttons to select the desired item and then press the OK button. l DVR DVR Video Quality With this function, you can set the size of the Video data. There are three size options; Standard, High and Very High. Very High is the largest and offers the best quality Press the UP/DOWN buttons to select the desired item and then press the OK button. • If the HDD size is 10 GB, the time available for saving recordings is as follows; Standard: 20 hours recorded at 140Kbps. High: 9 hours recorded at 300Kbps. Very High: 6 hours recorded at 450Kbps. 53 4 54 DVR Video Type With this function, you can set the Video Data Type. There are two options; PAL and NTSC Press the UP/DOWN buttons to select the desired item and then press the OK button. DVR Normal Recording With this function, you can set the type recording during DVR recording. There are three kinds of recording type; OFF, Continuous Rec and Schedule Rec. If OFF is selected, the DVR cannot be used for recording. Press the UP/DOWN buttons to select the desired item and then press the OK button. • OFF: DVR record function unavailable. • Continuous Record: If you press the OK button, the DVR Data Size pop-up window will appear. Designate the capacity of the HDD used while DVR recording on the DVR Data Size pop-up window. If you set Continuous Record, you can record all the time. If recording exceeds the designated HDD capacity, it will be rolled back and start recording again. DVR Event Recording With this function you can record ‘With Event’ while DVR recording. If you set it to ON, it records automatically for the selected time when an event is detected by the exterior sensor. If you set to OFF, the event will not be recorded. Press the UP/DOWN buttons to select the desired item and then press the OK button. •If you select “ON”, Recording Duration, Sensor Type will appear on the pop-up menu. a Press the UP/DOWN button to select the desired items. •Recording Duration: sets the recording time after the event occurs. •Sensor Type: selects the type of exterior sensor. b Press the LEFT/RIGHT button to set and then press the OK button. 55 4 4.6 Utility 1Game Press the OK button to move to the GAME folder of the File List. Select the GAME file on the HDD to play the game. 2Demonstration Select “Demonstration” in the Utility menu with the UP/DOWN buttons and press the OK button, you can see the Automatic Operation Function. Press the EXIT button to quit the Automatic Operation Function completely. 3Calendar Select “Calendar” in the Utility menu with the UP/ DOWN buttons and press the OK button, you can see the Calendar. 4Calculator 56 Select “Calculator” in the Utility menu with the UP/DOWN buttons and press the OK button, you can then see the Calculator. 5Zoom Select “Zoom” in the Utility menu with the UP/DOWN buttons and press the OK button, the white frame will appear. • Select the size and position of video you want to expand with the RED/GREEN, LEFT/ RIGHT buttons and press the OK button. You can see the expanded video. • Press the YELLOW button in the video only, you can then see the white frame. • Press EXIT button in the video only, you can see the white frame. • Press EXIT button to quite the expanded video completely. • RED : Expand the size • GREEN : Reduce the size 6Set to Set Select “Set to Set” in the Utility menu with the UP/ DOWN buttons and press the OK button, Upgrade Modules will appear. • Connect the serial port Set To Set. • You can receive the Application and Channels through the Set To Set function. 57 4 4.7 Common Interface The menus are provided by the CA module and its smart card. Your receiver is equipped with two slots of Common Interface(CI), accepting both Type 1 and Type 2 PCMCIA modules(see diagram below.). Plug in the appropriate CI module together with a valid smart card. You will then have access to the respective scrambled and Pay-Per-View services. Insert the smart card into the CI module, and the CI module into the slot behind the flap on the front panel. The CI and smart card modules determine the programs that can be de-scrambled. The receiver supports two CI slots so you can plug in two different modules, automatically provide access to both services. Each smart card contains your subscription details. You can view your entitlement via the COMMON INTERFACE menu by using the MENU button as below. a Press the MENU button and select Common Interface then Slot1 and Slot2 will be showed up on the screen and the menu will be appeared. If you use Slot1 for Irdeto, you will see “Irdeto” on the screen. Also if you use Slot2 for Viaccess, you will see “Viaccess” on the screen. Select the item and then you will see information for card. Press EXIT button if you wish to exit from this menu. b If you inserted the smart card with CAM into the receiver, and switch on the receiver. Then you will see “CAM Initializing icon” on the top screen. c If you do not insert the smart card, you will see the message “Insert the valid smart card”. If you insert the smart card into the CI module then you can watch your selected channel. 58 CAM (Conditional Access Module) and Smart Card [Caution] Please do not plug in the main power supply cord until you have finished all of the connections! If you want to enjoy watching scrambled broadcasting channels, you need to purchase the CAMs and smart cards from a service provider’s sales department. However, broadcasting channels from multiple service providers call for multiple CAMs and Smart cards. Receivers which have only the CAMs and smartcards provided by the one service provider can show several broadcasting channels of the provider. Please refer to manuals provided by service providers for details because the CAM and smartcards are featured with unique menus, apart from menus given by the receiver. Watching "Free-To-Air" channel is available regardless of the CAM and smart cards. As service providers download new information to smart cards if necessary, those who have CAMs and smart cards should always put the smart cards in proper slots. 59 4 5 Record File Guide 5.1 Recording 1General Recording Press the RECORD button to record the current broadcast program. When the recording starts the Record Icon is displayed. Press the STOP button to stop recording. 2Multi-Channel Recording If you change channels while recording and press the RECORD button, recording starts. You can record up to six channels simultaneously in the manner described above. To stop recording a If you press the STOP button the currently recording channels are displayed on the pop-up window. b Press the UP/DOWN buttons on the pop-up window to select the channel to be stopped and then press the UP/DOWN buttons again to select further channels. c When you finish selecting channels to be stopped, press the STOP button. Recording of the selected channels stops. • You can record up to 6 channels simultaneously. When the Bit Rate is too high for the recording to be interrupted, recording may stop automatically. • If you want to check the file information while recording press the BLUE button and check the banner. • You can change the record settings while recording, with the PVR RECORD menu . 3Analog PVR/DVR Recording 60 Please refer to [4. Main Menu Guide - 4.5 System Setting - 8. Analog PVR/DVR Option] for more details on Analog PVR and DVR recording setting. 5.2 File List With this function you can manage files and directories recorded in the HDD. Please refer to [4. Main Menu Guide - 4.4 PVR - 1. File List] for more details on File List 5.3 Fast-Forward & Rewind The Fast-Forward and Rewind functions enable the user to view the front, back or any desired part of the file. a To view forward parts press the FF button and to view previous parts press the REW button on the remote control. b The screen will move when the relevant symbols appear on the top right-hand side of the screen. c To Rewind or Fast-Forward at a faster speed, press the relevant button again. The speed can be controlled by selecting from 3 different speeds; 2 X, 4 X and 8 X. d Press the PLAY button at the desired place to PLAY at the recorded speed. 5.4 Quick-Search You can move to the desired location using the banner. a If you press the BLUE button on the currently playing screen the channel banner will appear. b If you press and hold the LEFT/RIGHT buttons while the channel banner is visible, the location icon moves along the progress bar. c If you release the LEFT/RIGHT buttons at the desired point, playing starts at that point. 61 5 5.5 Slow-Motion The Slow-Motion function can be used to PLAY at a slower speed. a Pressing the SLOW MOTION button will play the screen at a slower speed. b If the button is pressed again, the screen will play at an even slower speed. There are 2 different Slow-Motion speeds; 1/2 and 1/4. c Press the STOP button to PLAY at the recorded speed. 5.6 QUICK REPLAY/FORWARD If you press and hold the QUICK REPLAY/FORWARD button, you can rewind or fast forward the screen with 4X-speed. If you release the button, the screen will play back. 5.7 Time Shift [While watching Broadcasting] If the Time Shift is set while watching broadcasting, press the REW button once to rewind the currently playing screen and the Play/Pause button to pause. If you press the Play/Pause button, the screen will play back from the point where it is stopped. • While you are watching the Time Shift data, the same function as the general recording will be adopted. 62 5.8 Event Notification Function [While DVR recording] This function notifies the user of an event occurrence when Event Recording is set. Enter the user’s telephone number and e-mail address in the screen. If an event (such as a potential intrusion) occurs it is notified to the user via the phone. In addition the captured screen is sent to the user by e-mail. 5.9 BOOKMARK If you press the 0 button while playing AV file, Progress for BOOKMARK will appear. a Press the OK button to specify or remove BOOKMARK. b Use the UP/DOWN button to move between bookmarks. c Use the RED button to select A-B repeat. If you press the RED button once, the start point will be set. If you press it again, the end point will be set. If you press it once more, set A-B repeat will be initialized. d Press the GREEN button to decide whether to use A-B repeat. e Use the YELLOW button to erase all bookmarks. 63 5 6 DivX & Slide Show Guide 6.1 DivX You can see the DivX format file of the PC on the settop box. 1Convert the DivX File of the PC using the provided Converter Program (It may take some time depending on the file size). - You can download the DivX Converter Program from the provided CD or the Internet web page. 2When the conversion is completed, DVX file and TRF file (file name extension) are created. - DVX file is a information file. - TRF file is a Data file. 3Copy the converted file (DVX, TRF) from the hard disk using USB. For more information, refer to [4. Main Menu Guide-4.4 PVR-5. USB Connection]. 4Disconnecting the USB connection, you can see the uploaded DivX file from the File List on the PVR Menu. 5If you press the OK button, you can see the DivX file. 6You can watch the mp3 files and other recorded files 64 through Group Play or Normal Play. 6.2 Slide show You can see each Image File one by one. 1Copy Image Files (JPG, BMP) from the PC using USB. For more information, refer to [4. Main Menu Guide-4.4 PVR-5. USB Connection]. 2You can see Image Files from the File List on the Menu List. 3If you want to use an image as a background image while playing Radio Channel of MP3 File, press the OK button to convert the selected image as the background image. 4Press the RED button to add to the Slide Show List. If you press the BLUE button, the Slide Show List Popup menu will appear. 6 5If you press the RED button from the File List on the PVR menu, images are selected as a group. 6 If you press the BLUE button, the Slide Show List will appear. - Press the BLUE button again to run the Slide Show. Press the EXIT button to close. - If you press the YELLOW button from the Slide Show List, the Set up Popup will appear. You can set Show File (All/Selected), Size (Full/Rear), Time (2sec.~10sec) and Repeat (on/off). 65 7 Troubleshooting Problem Solution No display LED on the front panel. No power supply No PictureEnsure that the receiver is switched on. Check connection and correct. Check channel and video output and correct. Poor picture qualityCheck the signal level, if this is low then try adjusting the alignment of your dish. No SoundCheck the volume level of the TV and the receiver. Check the mute status of the TV and the receiver. Check the connection of audio cord. Remote Control does not operatePoint remote control directly towards the receiver. Check and replace batteries. Check that nothing blocks the front panel. Service is not running or scrambled.Check the whether the Common Interface module and smart card is correctly inserted. Check that the smart card is appropriate for the selected service. You have forgotten your secret PIN code.Refer to Change PIN code(Page 51) of this owner’s manual. 66 Power cord plug in correctly. Technical Specifications Tuner Guard Interval Modes COFDM 2K/8K-Carrier Channel Bandwidth FEC Modes Rate Input Connector Frequency Channel Bandwidth 1/32, 1/16, 1/8, 1/4 1/2, 2/3, 3/4, 5/6, 7/8 IEC 169-2, Female UHF : 470 ~ 860 MHz, S-Band, VHF : 174 ~ 230MHz 7MHz, 8MHz RF Modulator PLL type CH 21-69 for the modulation TV Standard PAL B/G, I, SECAM L, NTSC M selectable RF Connector 75 Ohms, 169-2, Male/Female Frequency Range UHF: 470 ~ 860MHz MPEG TS A/V Decoder Video Resolution 720 x 576 Input Bit Rate Max. 90 Mbit/s Transport Stream MPEG-2 ISO/IEC 13818-1 Audio Decoding MPEG/Musicam Layer 1 & 2 Audio Mode Single / Dual Channel A/V & Data Input/Output VideoRCA/Cinch, Video Output(CVBS)/SCART(CVBS, RGB) S-VIDEO OUT AudioRCA/Cinch Volume & Mute Control (Resolution: 20 bits DAC, Max 2Vrms) S/PDIF of Dolby Digital Bitstream Out RS-232CTransfer rate 115Kbps, 9 PIN D-Sub Type USB 7 2.0 System Resources Flash Memory4MBytes SDRAM 64Mbytes Main CPU MPEG Chip µPD61130 67 Power Supply Input Voltage AC 90-250V, 50/60Hz Power Consumption45W Protection Separate Internal Fuse Type SMPS Physical Specification Size(W x H x D)340 x 60 x 250 Net Weight3kg Operating Temperature 0¡C ~ 50¡C Storage Temperature -20¡C ~ 60¡C Option Function Common Interface 2 DVB -CI Slots (CI model only) Embedded CASCONAX, NAGRAVISION, NDS, IREDETO, CRYPTOWORKS 68 PVR HDD 40 or 80 GB (Optional Up to 300GB) SW Upload RS232C (Optional Via OTA) Menu Map 7 69 Warranty Your product, “the Product”, is warranted by Kaonmedia Co., Ltd. “ the Company“, to be free from defects in materials and workmanship within the following terms and conditions, which are based on the ‘Regulations on Consumer Damage Compensation’ notification of the Ministry of Finance and Economy. Contents of Warranty 1. The Product is warranted by the Company, having been through a thorough quality management and strict inspection regime. The warranty period is one (1) year from the date of purchase. 2. During the one-year warranty period, the Company or its service agent will repair the Product free if there are any defects in materials and/or workmanship occurring under normal conditions. Chargeable service will be subject to the following terms and conditions even though within warranty period. • The warranty does not apply to any defects or loss caused by the incorrect operation of the Product or any of its parts. • The warranty does not cover any service that may be required following accident, alteration, misuse, fire, flood or natural disaster. • The warranty does not apply to any defects or loss caused by not keeping to the recommended instructions and cautions (i.e. user misuse or fault). • The warranty does not cover any defects arising from use of incorrectly rated power sources. • The warranty does not cover any defects or loss caused by any service not carried out by a technician of the Company on the Company’s premises or by a service agent of the Company on the service center premises. 3. After the one-year warranty period, the Product can be given a service subject to charges, with a repair request or repair contract. • If the apparatus does not operate normally or malfunctions, please refer to a service center to get A/S service as quickly as possible. 4. The warranty applies only to the original buyer, who must retain this Warranty Statement. Please keep this Warranty Statement since it cannot be reissued. 5. This Warranty Statement is valid only in Korea. 70 Product Name Model Name Manufacturing No. Name Buyer Address Seller Manufacturer (Guarantee) Date of Purchase Tel Name Name Address Tel Name Kaonmedia Co., Ltd. Address Warranty Period Retain period for its accessories or parts Web site http://www.kaonmedia. net Tel One (1) year from the date of the purchase Five (5) years from the closing date of the sale 71 EMMA2_ENGLISH 102756