1
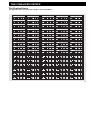
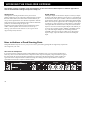
USER’S MANUAL
Finalizer Express
STUDIO MASTERING PROCESSOR
IMPORTANT SAFETY INSTRUCTIONS
The lightning flash with an arrowhead symbol within an equilateral triangle, is intended to alert the
user to the presence of uninsulated "dangerous
voltage" within the product's enclosure that may be of sufficient magnitude to constitute a risk of electric shock to persons.
The exclamation point within an equilateral triangle
is intended to alert the user to the presence of
important operating and maintenance (servicing)
instructions in the literature accompanying the product.
1
2
3
4
5
6
7
Warning!
• To reduce the risk of fire or electrical shock, do not
expose this equipment to dripping or splashing and
ensure that no objects filled with liquids, such as vases,
are placed on the equipment.
• This apparatus must be earthed.
• Use a three wire grounding type line cord like the one
supplied with the product.
• Be advised that different operating voltages require the
use of different types of line cord and attachment plugs.
• Check the voltage in your area and use the
correct type. See table below:
8
9
10
11
12
13
14
Read these instructions.
Keep these instructions.
Heed all warnings.
Follow all instructions.
Do not use this apparatus near water.
Clean only with dry cloth.
Do not block any ventilation openings. Install in
accordance with the manufacturer's instructions.
Do not install near any heat sources such as radiators,
heat registers, stoves, or other apparatus (including
amplifiers) that produce heat.
Do not defeat the safety purpose of the polarized or
grounding-type plug. A polarized plug has two blades
with one wider than the other. A grounding type plug
has two blades and a third grounding prong. The wide
blade or the third prong are provided for your safety. If
the provided plug does not fit into your outlet, consult
an electrician for replacement of the obsolete outlet.
Protect the power cord from being walked on or
pinched particularly at plugs, convenience receptacles,
and the point where they exit from the apparatus.
Only use attachments/accessories specified by the
manufacturer.
Use only with the cart, stand, tripod, bracket, or
table specified by the manufacturer, or sold with
the apparatus. When a cart is used, use caution
when moving the cart/apparatus combination to
avoid injury from tip-over.
Unplug this apparatus during lightning storms or when
unused for long periods of time.
Refer all servicing to qualified service personnel.
Servicing is required when the apparatus has been
damaged in any way, such as power-supply cord or
plug is damaged, liquid has been spilled or objects
have fallen into the apparatus, the apparatus has been
exposed to rain or moisture, does not operate normally,
or has been dropped.
Voltage
Line plug according to standard
110-125V
UL817 and CSA C22.2 no 42.
220-230V CEE 7 page VII, SR section
107-2-D1/IEC 83 page C4.
240V
•
•
•
•
•
BS 1363 of 1984.
Specification for 13A fused
plugs and switched and
unswitched socket outlets.
This equipment should be installed near the socket
outlet and disconnection of the device should be easily
accessible.
To completely disconnect from AC mains, disconnect
the power supply cord from the AC receptable.
The mains plug of the power supply shall remain
readily operable.
Do not install in a confined space.
Do not open the unit - risk of electric shock inside.
Caution:
You are cautioned that any change or modifications not
expressly approved in this manual could void your authority
to operate this equipment.
Service
• There are no user-serviceable parts inside.
• All service must be performed by qualified personnel.
a
IMPORTANT SAFETY INSTRUCTIONS
EMC / EMI.
This equipment has been tested and found to comply with
the limits for a Class B Digital device, pursuant to part 15 of
the FCC rules.
These limits are designed to provide reasonable protection
against harmful interference in residential installations. This
equipment generates, uses and can radiate radio
frequency energy and, if not installed and used in
accordance with the instructions, may cause harmful
interference to radio communications. However, there is no
guarantee that interference will not occur in a particular
installation. If this equipment does cause harmful
interference to radio or television reception, which can be
determined by turning the equipment off and on. The user
is encouraged to try to correct the interference by one or
more of the following measures:
•
•
•
•
Reorient or relocate the receiving antenna.
Increase the separation between the equipment and
receiver.
Connect the equipment into an outlet on a circuit
different from that to which the receiver is connected.
Consult the dealer or an experienced radio/TV
technician for help.
For the customers in Canada:
This Class B digital apparatus complies with Canadian
ICES-003.
Cet appareil numérique de la classe B est conforme à la
norme NMB-003 du Canada.
b
TABLE OF CONTENTS
INTRODUCTION
Table of Contents
Welcome
Introduction
Front Panel
Rear Panel
Signal Flow Diagram
Compressor/Limiter
Setups
APPENDIX
p. 3
p. 4
p. 5
p. 6
p. 8
p. 9
p. 10
p. 11
BASIC OPERATION
Knobs & Keys
Working the Express
Step by Step
The Finalizer Matrix
WORKING THE FINALIZER EXPRESS
Analog Inputs
Digital Outputs
HOW TO ACHIEVE
A GOOD STARTING POINT
How to hit the Compressor
How to hit the Limiter
How to Compare Bypassed
and Finalized Signals
Classical or Acoustic
Source Material
Average Rock/Pop Music
Commercial Speak
Self Test
Troubleshooting
MIDI Implementation Chart
Technical Specifications
Note
Glossary
Soldering Instructions
My Settings
Optional Master Fader
p. 22
p. 23
p. 24
p. 25
p. 26
p. 27
p. 28
p. 30
p. 31
p. 12
p. 14
p. 15
p. 16
p. 16
p. 16
p. 17
p. 17
p. 17
p. 18
p. 18
SPECIAL SETUPS
Using an External Clock
p. 19
Finalizer Exp. as Master Clock p. 19
Finalizer Express as Insert
p. 19
EXTERNAL CONTROL
Using the TC Master Fader
Controlling Fader via MIDI
Record/Playback of a Fade
p. 20
p. 20
p. 21
TC Electronic, Sindalsvej 34, DK-8240 Risskov - [email protected]
English version
Rev 3 - SW - V 1.01
Prod. No: 606064013
3
WELCOME
Congratulations
Congratulations on the purchase of your new Finalizer
Express. We hope that you have as much pleasure
using it as we had making it.
The Finalizer Express is an easy-to-use three band home
mastering device. It will optimize the level and punch of your
music by increasing the average perceived level. The user
interface of the Finalizer Express is presented in an analog style,
making it extremely intuitive and fast to use.
The Finalizer Express interfaces with the outside world through
24 bit A/D and D/A converters, AES/EBU, S/PDIF and Optical
I/O’s. The Finalizer Express features a digital fader, remote
controllable through the optional TC Master Fader or via MIDI.
About this Manual
Many people in the music business (and elsewhere) have an
aversion to reading manuals. We understand that. So if you feel
like starting without reading the whole manual, simply get going.
On the other hand, you might want to know a little more about
the Finalizer Express before you start turning knobs or pressing
keys. This manual will take you through all of the Finalizer
Express functions step by step. If you want to read about a
specific function, please refer to the Table of Contents.
4
INTRODUCTION
What is the Finalizer Express?
This is a short introduction to the Finalizer Express concept, including a brief description of Multiband Dynamics
processing.
Multiband Dynamics Processing
TC Electronic has been working with Multiband Dynamics for several years and has become one of the world’s leading companies in this
field. The simple explanation of Multiband Dynamics is that the incoming signal is split into several frequency bands, in this case into three
bands. This is done using three stereo-linked crossover bands combining linear phase digital filters. When the signals are separated, it is
possible to process them independently. In this case three stereo Compressors and three stereo Limiters are used, one for each band. After
the dynamics processing, the three bands are joined again. All this is done digitally with no loss in sound quality or resolution.
Why Multiband Dynamics ?
Multiband Dynamics makes it possible to process the bands independently. This means that the bands can be processed differently without
affecting each other. When working with a full mix using conventional dynamics processing, you face certain problems. Generally you will
have a problem, when the energy of the source material is mainly in the low end. The bass guitar or kick drum will then control the overall
compression and thereby introduce what is best known as “pumping and breathing”. With conventional dynamics processing it is also
impossible to compress, or limit, the low end without affecting the mids containing Vocals and guitars, or to leave the highs less
compressed than the rest of the signal.
All these problems can be avoided by using Multiband Dynamics. With the Finalizer Express you will avoid “Pumping and Breathing”,
you can compress and limit the low end without affecting the mids and highs, and you can leave the highs less compressed than the rest of
the signals. In addition to these benefits, Multiband Dynamics sound a lot more subtle and transparent, making it possible to achieve
a higher perceived level of a mix without getting that ‘squeezed and squashed’ compressor sound.
The Finalizer Express
The Finalizer Express is a studio mastering device meant for optimizing the overall perceived level of your mixes. This is done by utilizing
TC’s proprietary Multiband Dynamics algorithm that the Finalizer Express inherited from the TC Finalizer Plus/96.
The Multiband Dynamics algorithm automatically makes up for the gain loss caused by the Compressor, and thereby ensures maximum
level. The Finalize LED Matrix enables you to choose between 25 different settings of the Compressor organized by Ratio and
Compression style ranging from smooth and subtle to aggressive and hard compression. In addition, the three Emphasis keys can be used
for adding extra compression to the selected band.
The three Spectral Balance controls allow you to change the level relationship between low, mid and high, making it possible to add some
extra tight compressed low end.
The digital fader enables you to perform your fades within the digital domain, using the fade knob on the front panel of the Finalizer
Express or by using the optional TC Master Fader, and even record and playback fades through MIDI. Last but not least, the Finalizer
Express features 16 and 20 bit dither for delivering your material to a 16, 20 or even 24 bit digital media.
5
FRONT PANEL
POWER
Electronic POWER key
»Easy touch«
Turn on the device with a
single light touch. To turn off
the device you must press
and hold down the POWER
key approx. 3 seconds.
This delay time is to avoid
switching off the device by
accident.
CARD SLOT
The Finalizer Express is
ready for future software
update possibilities through
the PCMCIA slot.
SELECT INPUT
Toggles between the analog
Inputs and any of the three
digital Inputs.
ANALOG IN
Controls the analog Input gain.
MIDI
Indicates incoming MIDI
information, the LED will blink
accordingly.
INPUT/OUTPUT METERS
The high resolution LED meters
show the Input and Output level
of the Finalizer Express. The
Clip LEDs indicate digital
clipping on the Input or Output.
NORMALIZE GAIN
Sets the gain of the Normalizer
section. This parameter
determines how hard the
Compressor is driven.
NORMALIZER CLIP
Indicates digital clipping in the
Normalizer section.
SOFTCLIP
Sets the Softclipper of the
Normalizer section On/Off.
OPTO, AES/EBU, S/PDIF
Indicates the selected digital
Input.
44.1, 48kHZ
Indicates the incoming Sample
Rate. These LEDs will blink
when either unacceptable clock
or no clock is present at all.
6
GAIN REDUCTION METERS
Shows the gain reduction of the
Compressor and Limiter.
FRONT PANEL
THE FINALIZE MATRIX
Selects the amount of
Compressor Rate and the
Compression style.
SPECTRAL BALANCE
The Low, Mid and High knobs
adjust the level in each of the
three bands.
LOOK AHEAD DELAY
Sets the 3ms Look Ahead
Delay of the Dynamics section
On/Off.
EMPHASIS
The three Emphasis keys add
compression and gain in their
respective bands.
SOFTCLIP
Enables/disables the
Softclipper in the
Dynamics section.
THE FADER
Controls the Master Output level of
the Finalizer Express.
EXTERNAL CONTROL
Determines whether the Fader
should be controlled by the Fader
knob, the optional TC Master
Fader or MIDI.
BYPASS ALL
Bypasses all functions except
Dithering.
ANALOG OUT
Controls the analog Output gain.
SYNC FROM
Sets the digital clock that the
Finalizer Express should utilize.
DIGITAL OUT
Sets the digital Status bits used on
all digital Outputs.
DITHER
Toggles Dither between 16 bit,
20 bit and Off (24 bit). Dither is
available on digital Outputs only.
7
REAR PANEL
Main
Power
Switch
Power
Input
Balanced
XLR
analog
Inputs
Balanced
XLR
analog
Outputs
Serial no.
Digital In/Out
AES/EBU
S/PDIF
OPTICAL
(Tos-link)
MIDI
In, Thru, Out
External
Fader
Input
Notes
Pin 2 is “Hot” on all XLR’s (IEC and AES standards)
The Finalizer Express power supply is capable of operating at any line voltage from 100-240 Volts, 50-60Hz.
For further instructions on cables please see our Soldering instructions on page 28-29.
8
SIGNAL FLOW
INPUT PPM
OUTPUT PPM
Left
Left
Right
ANALOG IN
GAIN
Input
Selector
Normalizer
Right
Spectral Balance
Fader
ANALOG OUT
GAIN
Bypass
Left
ANALOG
INPUTS
[balanced]
A/D
Right
Normalizer
Gain
Digital Input
[S/PDIF]
SOFT
CLIP
COMP
LIM
SOFT
CLIP
ANALOG
OUTPUTS
[balanced]
D/A
Digital
Digital Input Select
AES
S/PDIF
Tos
Digital Input
[AES]
Digital Input
[Tos]
Analog
Opto
Bypass
Digital Output
[AES]
Dither
Digital Output
[S/PDIF]
Opto
Digital Output
[Tos]
Note
Signal is always present on all Outputs.
9
COMPRESSOR - LIMITER
The Dynamics Algorithm
This chapter explains the basic principles of the Finalizer Express Dynamics Algorithm, including Auto Make-up Gain,
Look-Ahead Delay and Softclipping.
The Compressor
Fig. 1
A Compressor is meant to reduce the dynamic content of the Input signal, and
thereby keep a more constant level. When the Input signal exceeds a certain
Threshold, the Compressor starts to reduce the signal according to the Ratio. The
Ratio indicates how much the signal is reduced. For example, a Ratio set at 2:1
means that for every 2dB the signal exceeds the Threshold, only 1dB comes out
(see fig. 1). Attack and Release parameters set the rise and fallback time of the
Compressor. The Threshold, Ratio, Attack and Release parameters are some of
the parameters set by the 25 Compressor settings in the Finalize LED Matrix.
Crossover Frequencies
The Compressor of the Finalizer Express works differently from conventional
compressors in a number of ways. First of all, the Compressor works over three
bands, as you may know by now. The Crossover points are fixed to 315Hz and
3.15kHz using 6dB slope linear phase digital filters.
Auto Make-up Gain
A second difference is the Auto Make-up Gain of the Compressor. This function
compensates for the loss of gain through the Compressor. A conventional
compressor drops in level when compressing according to the specified Ratio and
Threshold (see fig. 1). The Finalizer Express Compressor automatically
compensates for this gain loss, and thereby always ensures maximum Output
(see fig. 2).
Look Ahead Delay
By delaying the audio signal 3ms, the Compressor has ample time to accurately
calculate and create the necessary level correction. This reduces the number of
“overshoots” in the Compressor and thereby makes the compression more precise
and less audible. Please note that this feature will delay the full signal through
the Finalizer Express by 3ms.
The Limiter
Fig. 2
10
The Limiter works over three bands just like the Compressor. The Limiter is a
brickwall type in order to prevent unintentional compressor overshoots from
causing fullscale overloads. The Ratio of the Limiter is fixed to Inf:1, with an
Attack time of 1.4ms and a Release time of 1.4s - 1.4s - 1.0s.
Finalize Softclip
The Softclipper smoothly eliminates any overshoot that might occur after the
three bands are joined together. Please note that if you drive the Softclipper too
hard, you might introduce noticeable distortion on signals with a low harmonic
content and/or on very pure signals. The distortion introduced is somewhat
similar to tape saturation that can occur when overdriving an analog tape
recorder. The amount of Finalize softclipping is displayed by the four orange
LEDs above the Output meter. The Finalizer Express softclipper starts working at
-3dBFS and gradually increases with the level.
SETUPS
Example 1
Setup with an analog mixing console and a digital
recording device.
1. Connect the analog Outputs of your mixer to the analog
Input of the Finalizer Express.
2. Select the analog Inputs by pressing the “Select Input”
key on the front panel.
3. Connect one of the digital Outputs of the Finalizer
Express to your digital recording device.
4. Connect the analog Outputs of the Finalizer Express to
your monitoring system.
Example 2
Setup with a digital mixing console and a digital
recording device
1. Connect the digital Output of your mixer to one of the
digital Inputs of the Finalizer Express.
2. Select the current digital Input using the “Select Input”
key on the front panel.
3. Connect one of the digital Outputs of the Finalizer
Express to your digital recording device.
4. Connect the analog Outputs of the Finalizer Express to
your monitoring system.
Example 3
Mastering from DAT to DAT
1. Connect the digital Output of DAT #1 to one of the
digital Inputs of the Finalizer Express.
2. Select the current digital Input using the “Select Input”
key on the front panel.
3. Connect one of the digital Outputs of the Finalizer
Express to the digital Input of DAT #2.
11
BASIC OPERATION Knobs & Keys
This chapter will explain all of the controls of the Finalizer Express.
POWER key
Turn on the Finalizer Express with a single light touch. To turn
off the device you must press and hold down the power key
approx. 3 seconds. The LED in the POWER key blinks when the
unit is turned off. A master POWER switch is placed on the rear
panel of the Finalizer Express to accommodate CE regulations.
INPUT selector
This key toggles between the four Inputs of the Finalizer
Express: Analog, Optical, S/PDIF and AES/EBU. When one of
the digital Inputs is selected, the Finalizer Express automatically
selects the current Input as master clock, the selected Input and
the incoming sample rate is indicated by one of the two
44.1/48kHz LEDs. In case the clock is invalid, or not present,
the 44.1 and 48 kHz LEDs will be blinking. An alternative clock
source may be chosen in the Out section (See ”Sync from
44.1/48/Digi”).
ANALOG IN knob
Sets the analog Input level. In order to get maximum
performance out of the A/D converter, you should turn the
signal up to approximately -6dB (shown on the INPUT meter).
This control is only functional when analog Input is selected.
Range: -6dB to +26dB.
When the knob is set to 0dB you need to input 16dBu in order to
reach 0dBFS.
Warning: If the INPUT CLIP LEDs are lit, the signal is hard
clipped or distorted.
NORMALIZER GAIN knob
The NORMALIZER GAIN knob sets the digital gain of the
incoming signal, and at the same time drives the Compressor. In
case of too much gain, the NORMALIZER CLIP LED will light.
This is indicating that the signal is hard clipped and may be
distorted. The Normalizer section contains a Softclipper that will
allow you to add more gain before clipping.
(see Normalizer Softclip below).
Range: +/- 18dB.
NORMALIZER SOFTCLIP key
This key toggles the Normalizer Softclip on/off. The Softclipper
smoothly eliminates any overshoot that might occur in the
Normalizer. Please note that if you ‘gain’ the signal too hard, you
might introduce noticeable distortion on source material with a
low harmonic content and/or on very pure signals. The distortion
12
introduced is somewhat similar to tape saturation that can occur
when overdriving an analog tape recorder.
The Normalizer softclipper starts working at -6dBFS and
gradually increases with the level.
FINALIZE SOFTCLIP ON/OFF key
This key toggles the Finalize Softclip on/off. The Softclipper
smoothly eliminates any overshoot that might occur after heavy
compression or limiting. Please note that by using too hard
compression, you might introduce noticeable distortion on signals
with a low harmonic content and/or on very pure signals. The
distortion introduced is somewhat similar to the tape saturation
distortion that occurs when overdriving an analog tape recorder.
The amount of Finalize softclipping is displayed by the four
orange LEDs above the Output meter. The Finalizer Express
Softclipper starts working at -3dBFS and gradually increases with
the level.
The LED FINALIZE MATRIX
The Finalize Matrix sets the style and Rate of the Compressor.
Try to experiment with the different settings to find the one that
suits your source material best. Use the ARROW keys for selecting the
desired setting. (see the “Finalize Matrix” Appendix for details).
LOOK AHEAD DELAY ON/OFF key
By delaying the audio signal 3ms, the Compressor gets the
necessary ample time to create perfect level correction. This
reduces the number of “overshoots” in the Compressor and
thereby makes the compression more accurate and less audible.
It is recommended to leave this function on in most cases.
Note: This feature will delay the full signal through the Finalizer
Express by 3ms.
MIDI Channel
Press the Finalize Softclip and the ARROW up key
simultaneously to access the MIDI channel transmitted and
recognized by the Finalizer Express. Use the ARROW up/down
to change the MIDI channel of the Finalizer Express.
The EMPHASIS keys
Each of the three EMPHASIS keys, enhances their respective
frequency range by additional compression and Make-up gain.
For example if you press the Low Emphasis key, the low band
will be additionally compressed and level compensated, keeping
it at the same level.
BASIC OPERATION Knobs & Keys
The SPECTRAL BALANCE knobs
Use these knobs to set the level of the three bands of the Compressor.
This enables you to add more level to a specific band, very much
like a three band eq or tone controls. The SPECTRAL BALANCE
controls are placed between the Compressor and Limiter (see
page 9), making it possible to use the Spectral balance knobs for
hitting the Limiter harder, by boosting each of the bands accordingly.
FADER knob
Controls the digital (and analog) Master Output level of the
Finalizer Express. The Fader allows you to perform your fades
within digital domain. The Fader can be externally controlled by
the optional TC Master Fader or MIDI.
EXTERNAL CONTROL - MIDI/FADER
This key toggles between the two external remote possibilities
and off. When the green FADER LED is lit, the digital Fader is
controlled by the 1/4” jack on the back panel. When the red
MIDI LED is lit, the digital Fader is controlled by MIDI CTRL 7
on the selected MIDI channel (see MIDI Channel). When either
the Fader knob or the External Fader is selected, the current
setting takes effect immediately. When MIDI is selected, the
Finalizer Express awaits the next MIDI command before
changing the fader setting.
BYPASS ALL key
This key bypasses all processing of the Finalizer Express except
Dither. When Dither is set to off, the Finalizer Express performs
true 24 bit bypass.
DIGITAL OUT key
This key toggles the digital Status bits on all three digital
Outputs. AES/EBU is recognized as the professional standard
while S/PDIF is recognized as the consumer format. Please note
that some digital devices will not accept the incoming digital
signal unless the Status bits are correct.
When none of the two LEDs are lit, the Finalizer Express simply
copies the Status bits of the selected Digital Input. This setting
comes in handy when for example you want to pass on track IDs
through the Finalizer Express.
If no digital input is chosen and none of the formats are selected,
the Finalizer Express outputs its own AES/EBU Status bits as
default.
DITHER key
Toggles between dither at 16 bit, 20 bit and off (24 bit).
The dither type is HP-TDF or High Passed Triangular probability
Density Function. When one of the dither LEDs are lit, dither
noise is applied to the digital Outputs. However, the signal is not
truncated as the Finalizer Express always outputs 24 bit data.
Dither must always be applied when the wordlenght of a signal is
reduced, e.g. when going from the Finalizer Express’ 24 bit
resolution to a CD players 16 bit resolution you must apply 16
bit dither in order to avoid truncation distortion at low levels.
When you want to compare the current processed signal
with the bypassed sound, use the Fader to achieve even
levels.
ANALOG OUT knob
Sets the analog Output level. This control only affects the analog
Output. Range: -26dB to +6dB.
SYNC FROM - 44.1/48/DIGITAL INPUT key
Use this key to select the desired Master clock. Pressing the key
toggles between the internal 44.1kHz, internal 48kHz, the clock
present at the Optical Input, the S/PDIF Input or the AES/EBU
Input. This makes it possible to force the Finalizer Express to
utilize an incoming digital clock with the analog Input, or to
force the Finalizer Express to use its internal clock with a digital
Input (see the section: “Special Setups” for further examples).
Warning: Choosing a different Sample Rate than the incoming
does not give you Sample Rate conversion, and will cause digital
clicks in your source material.
13
WORKING THE FINALIZER EXPRESS
Depending on your background you may, or may not
be completely on top of all technical terms presented
on the previous pages. DON’T WORRY!
The Finalizer Express is easy to use and you will soon
be confident operating this unit.
The Finalizer Express is an extremely powerful tool that allows
you to tighten up most material. Working intelligently on several
frequency areas the Finalizer Express will enhance the energy
and the level of your mix, making the sound punchier and louder
yet adding the feel of air when needed.
Be aware that processing your material with the Finalizer
Express can be rather addictive, in the sense that you might want
to add more and more and sometimes too much from the
Finalizer Express’ powerful tools. However, though you do not
notice at first, heavy multiband compression and soft-clipping
does generate “listening fatique” more easily than material where
more of the natural dynamic range is preserved.
So use your ears and and enjoy the features of the Finalizer
Express as so many already do, by applying the right amount of
processing in any given situation.
Though the Finalizer Express has a very user friendly interface
(almost Plug and Play) you will definitely get better results once
you understand how each section works.
Working the Express step by step
1. Connect the Finalizer Express in your setup. Be sure to
use the correct cables correctly soldered. Please see
soldering instructions on page 28.
2. Select the desired Input, for instance the analog Input.
3. Start your source material, and adjust the ANALOG IN
knob until the INPUT meter shows approximately
-6 to -3dB, with no clipping.
4. Turn on the Normalizer Softclipper, the Look Ahead
Delay and the Finalize Softclipper.
5. Adjust the Normalizer gain until you see the
GAIN REDUCTION meters moving.
14
6. Use the ARROW keys to find the compressor setting
that you find suitable. Experiment with this.
The most subtle setting is in the lower left corner, and
the most aggressive setting is in the upper right corner.
At page 15 you’ll find the Finalizer Express Matrix,
showing settings of Ratio, Threshold, Attack and Release
for each “program” (field), in the Matrix.
7. Go back to the Normalizer gain, and use it to set the
amount of compression that you want.
It is recommendable to stay below 3dB of gain reduction.
8. Try experimenting with the spectral balance controls to
add some extra lows, mids or highs.
9. If additional compression in a specific area is needed try
the EMPHASIS keys. Compression will be applied in a
wider frequency band while adding “make-up” gain to
compensate for the loss of level caused by this
compression.
If your material is going to be re-mastered at a later date,
it is recommended to bring a copy of the original material
in order to be able to “go back” to the original sound.
Please see pages 20-21 for information on how to use
the Finalizer Express with external control.
Note: This short tutorial does not replace the experience you can
achieve by working with the Finalizer Express.
THE FINALIZER MATRIX
The Finalize Matrix
This appendix shows you the actual settings of the Finalize Matrix
15
WORKING THE FINALIZER EXPRESS
This chapter contains a number of tips and examples on how to use the Finalizer Express in different applications
such as recommended settings and special setups, etc.
Analog Inputs
Gaining levels in the digital domain can be perceived as a
graphic magnifying process. The better optimized signal you feed
the 24 bit A/D converter, the better/clearer result/resolution you
will get in the digital domain. It is therefore important to feed the
24 bit A/D converters of the Finalizer Express with the maximum
possible level without letting the signal clip.
The INPUT meter of the Finalizer Express should show approx.
-6dB to -3dB for optimal A/D conversion, but never clip.
Warning: If the INPUT CLIP LEDs are lit, the signal is hard
clipped and probably distorted.
Digital Outputs
The digital Outputs of the Finalizer Express will always outputs
all 24 bits. This means that the receiving device is responsible for
the truncation of the signal. If dither is selected on the front panel
of the Finalizer Express, this will be added to the digital Outputs.
Dither must always be applied when the wordlenght of the signal
is reduced e.g. when going from a 24 bit format to 16 bit format.
The digital Status bit selected on the front panel of the Finalizer
Express is sent out on all three digital Outputs. This enables you
to convert any incoming signal to S/PDIF or AES/EBU and use
any of the three digital Outputs for transmitting S/PDIF or
AES/EBU. When none of the two LEDs are lit, the Finalizer
Express simply copies the Status bits of the selected Digital
Input.
How to Achieve a Good Starting Point
Though the Finalizer Express is a very “easy to use” unit, a good starting point/guide line supplied by experienced
users might ease your work.
How to hit the Compressor
If you want to hit the Compressor harder without adding more Normalize gain, you may use the Emphasis keys.
These keys will lower the Threshold of the Compressor in their respective frequency ranges and add extra gain to
the current band. By activating the three Emphasis keys and lowering the Spectral balance controls slightly, the
signal will hit the Compressor harder without increasing the Limiting, since the Spectral Balance controls are
positioned in between the Compressor and the Limiter.
16
WORKING THE FINALIZER EXPRESS
How to hit the Limiter
If you want to hit the Limiter harder without adding more compression, you may use the Spectral Balance controls.
Since the Spectral Balance controls are positioned between the Compressor and the Limiter, boosting them equally
will hit the Limiter harder without affecting the Compressor.
How to Compare Bypass and Finalized signal
Comparing the actual sound between the original source material and the Finalized signal can be somewhat difficult
because of the added gain. Use the Fader for this purpose. Adjust the Fader until you feel that the two signals are
evenly levelled. Then press the “Bypass All” key to compare. The Fader setting will indicate how much gain has
been added to the signal.
Classical or Acoustic Source Material
When using the Finalizer Express for classical music, it is preferable to choose a subtle setting. Here is a
suggestion: Disable both Softclippers. This will eliminate the risk of adding second harmonic distortion to your
signal. This type of distortion is easily recognizable and not desirable on acoustic types of music. Choose the Matrix
setting in the lower left corner in order to get the most subtle setting of the Compressor, using a low Ratio, a fairly
slow Attack time and a quite rapid Release time. Enable all three EMPHASIS keys in order to lower the Threshold
of the Compressor. Now set the Normalizer GAIN knob until you see the GAIN REDUCTION meters move. It is
recommended to stay below -3dB of gain reduction.
17
WORKING THE FINALIZER EXPRESS
Average Pop/Rock Music
Pop/Rock music is a wide range of styles. It is really a matter of taste and style how you want to treat your source material. Here is a
suggestion to a setting for this type of music: Enable both Softclippers. Choose the middle spot of the Matrix. Now use the Normalizer
GAIN knob to set the Compressor. It is recommendable to stay below -3dB of gain reduction. Want to add a bit more low end ? Try
experimenting with the LOW knob or maybe lower the MID and HIGH knobs a bit while keeping the LOW knob at center position.
Commercial Speak
You might want to try the Finalizer Express for compressing a commercial speaker. This will most likely require a bit more compression
than a full mix would do. Here is a suggestion to get you started: Enable both Softclippers. Choose a Matrix setting in the Upper right
corner using higher Ratios and a bit aggressive response times. Try experimenting with the settings in the lower right corner as well, using
high Ratios but slightly sloppier response times. Choose what suits your source material the best. Now use the Normalizer gain knob to set
the Compressor. It is recommendable to stay below -6dB of gain reduction displayed on the gain reduction meters.
Want to enhance a specific frequency domain ? Try experimenting with the Spectral Balance controls to add more low end, or enhance the
mids to get more intelligibility.
18
SPECIAL SETUPS
Using an External Clock with Analog In
The Finalizer Express may be forced to use an incoming digital clock as master clock and still use the audio of the analog Inputs. This may
be handy if you have a house clock or if you prefer to use a second digital device as master clock of your setup. This is a step by step guide
on how to set this up.
1.
2.
3.
4.
5.
Connect the source material to the analog Inputs of the Finalizer Express.
Connect the digital Output of your master clock device to one of the digital Inputs of the Finalizer Express.
Connect one of the digital Outputs of the Finalizer Express to the digital destination.
Select analog In on the Finalizer Express by pressing the “Select Input” key.
Press the “Sync From” to select one of the digital Inputs as master clock.
The Finalizer Express is set up to accept the audio from the analog Input, but slave to the incoming digital clock.
Using an external clock with the analog Input
Using the Finalizer Express as master clock
It is possible to use the Finalizer Express as the master clock in a
digital setup. This may come in handy when inserting the
Finalizer Express for example into a hard disk recording system.
Here is a step by step guide on how to set this up:
1. Connect the digital Output of your device to one of the
digital Inputs of the Finalizer Express.
2. Select the current digital Input on the Finalizer Express
by pressing the “Select Input” key.
3. Connect one of the Finalizer Express digital Outputs to
the digital Input of your device.
4. Press the “Sync from” key to select the desired internal
clock.
5. Select the digital Input on your device.
The Finalizer Express is now the master clock of the setup.
Using the Finalizer Express as an Insert device
Using the Finalizer Express as an Insert device
The Finalizer Express may be used as a stereo Compressor
inserted in a subgroup on your mixer, for example it could be
used for compressing a group of background vocals or a full
drum kit.
This is a step by step guide on how to set this up.
1. Connect the two group sends from your mixing console
to the analog Inputs of the Finalizer Express.
2. Connect the analog Outputs of the Finalizer Express to
the group returns of your mixing console.
3. Disable the Look Ahead Delay by pressing the “Look
Ahead Delay” key.
The Finalizer Express is now inserted into a group on your
mixing console.
Warning: Analog to digital to analog conversion results in a
minor delay. This delay may cause phase cancellation when the
processed signal is mixed with the original signal.
19
EXTERNAL CONTROL
External Control
This chapter describes the External control possibilities including descriptions of setups with sequencers for
recording fade ins and fade outs.
Remote Controlling the Finalizer Express digital fader
The digital fader of the Finalizer Express can be remote controlled by the optional TC Master Fader or by MIDI. This enables you to
perform your fades within the digital domain, and to record, playback, edit or move fades when using a sequencer.
Using the TC Master Fader
Using the TC Master Fader
The optional TC Master Fader is a high quality fader perfectly
matched to the Finalizer Express. The Master Fader is activated
by pressing the EXT CONTROL key on the front panel.
Connecting and Calibrating the Master Fader
- Connect the Master Fader to the External Controller jack of the
Finalizer Express.
- Press and hold the BYPASS key while powering up.
- Use the ADJUST “UP” cursor to select self test no. 10, which
is the calibration menu.
- Press the SOFTCLIP “ON” key - an arrow up symbol will then
be displayed.
- Move the Fader to max position - the cable end of the Fader.
To compensate for mechanical tolerances move the Fader back
slightly.
- Press SOFTCLIP “ON” key to confirm - an arrow down
symbol will now be displayed.
- Move the Fader to min position. To compensate for mechanical
tolerances move the Fader up slightly.
- Press the SOFTCLIP “ON” key to confirm.
- The Master Fader is now calibrated.
- Power Off/On
20
Recording/Playback of a fade
Controlling the digital fader via MIDI
The digital fader of the Finalizer Express responds to MIDI
controller #7 on the selected MIDI channel. This is a step by step
guide on how to set this up.
1. Connect a standard MIDI cable from the MIDI Out
connector of your MIDI device to the MIDI In
connector of the Finalizer Express.
2. Press the Finalize Softclip and the ARROW up key
simultaneously to access the MIDI channel of the
Finalizer Express.
3. Use the ARROW up/down keys to select the desired
MIDI channel.
4. Press the “EXT. CONTROL” key to select “MIDI”.
The digital fader of the Finalizer Express is now controlled by
MIDI.
EXTERNAL CONTROL
Recording/Playback of a Fade
The Finalizer Express digital fader is transmitted by MIDI. This
makes it possible to record and playback fades of the Finalizer
Express. This is a step by step guide on how to record and
playback a fade with the Finalizer Express.
1. Connect The MIDI Out of the Finalizer Express to the
MIDI In of your MIDI recording device and vice versa.
2. Make sure that your MIDI device and the Finalizer
Express are set to the same MIDI channel
(See “Controlling the digital fader via MIDI”).
3. Make sure that the “Ext Control” of the Finalizer
Express is set to Off (meaning that the Fader knob is
used to control the digital fader).
4. Start the recording.
5. Perform the fade using the FADER knob.
6. Stop the recording.
Now you can edit or move the fade in your MIDI device before
playing it back.
7. Press the “Ext. Control” key to select “MIDI”.
8. Playback the fade from your MIDI device.
The fade can now be stored with the rest of your MIDI
commands.
A fade is always transmitted as controller #7 on the current MIDI
channel regardless of whether it is performed by the Fader knob
or the optional TC Master Fader.
21
APPENDIX Self Test
PRESS AND HOLD THE “BYPASS ALL” KEY, WHILE
POWERING UP, TO ACCESS THE SELF TEST
Use the ARROW left and right < > keys to select a test, press the
FINALIZE SOFTCLIP key to activate or deactivate a test.
The test number is shown in the Finalize LED Matrix. The
selftests are described below.
Test 5 - Opto In/Out test
Connect an optical cable between OPTO Output and Input. Press
the FINALIZE SOFTCLIP key to start test.
The Input meters will show 0dB. The symbol “+” will indicate
that the test is okay. The symbol ”-” will indicate that the Input
or Output is not okay.
Test 0 - LED test
Turns all LEDs on. Press the “FINALIZE SOFTCLIP” key to
start test.
Test 6 - MIDI In/Out test
Connect a standard MIDI cable between MIDI In and Out. Press
the FINALIZE SOFTCLIP key to start test.
If MIDI is working the symbol “+” is shown, otherwise the
symbol “-” is shown. Press LOOK AHEAD DELAY key to stop
test.
Test 1- Potentiometer test
This test is used for calibration of the potentiometers.
All potentiometers must be set in middle position. Start test by
pressing the FINALIZE SOFTCLIP key.
If any of the potentiometers are outside the specified range, the
symbol “-” will be shown and the LED above the faulty
potentiometer will flash.
The symbol “+” confirms that all controls are within the
specified range.
The new control values can be stored by pressing the “SELECT
INPUT” key. The symbol “+” confirms that the new settings
were stored successfully.
Test 2 - Analog In/Out test
Connect a balanced cable between an analog Output and an
analog Input. Press the FINALIZE SOFTCLIP key to start test.
The INPUT meters will show -12dB. The symbol “+” will
indicate that the test is okay. The symbol ”-” will indicate that the
Input or Output is not okay. If so, try the test with the other
analog Input/Output to narrow down the problem.
Test 3 - AES/EBU In/Out test
Connect a balanced cable between AES/EBU Input and Output.
Press the FINALIZE SOFTCLIP key to start test.
The INPUT meters will show 0dB. The symbol “+” will indicate
that the test is okay. The symbol ”-” will indicate that the Input
or Output is not okay.
Test 4 - S/PDIF In/Out test
Connect a RCA cable between S/PDIF Output and Input. Press
the FINALIZE SOFTCLIP key to start test.
The INPUT meters will show 0dB. The symbol “+” will indicate
that the test is okay. The symbol “-” will indicate that the Input
or Output is not okay.
22
Test 7 - External Fader In test
Connect a cable to the External Fader In. Press the FINALIZE
SOFTCLIP key to start test. When the TIP is connected to
ground the symbol “+” is shown, otherwise the symbol “-” is
shown.
Test 8 - Battery test
Press the FINALIZE SOFTCLIP key to start test. The battery
voltage is tested and if within limits the symbol “+” is shown,
otherwise the symbol “-” is shown.
Test 9 - System test
Press the FINALIZE SOFTCLIP key to start test. The ASIC,
DSP, DSP RAM and EEPROM are tested and if within limits the
symbol “+” is shown, otherwise the symbol “-” is shown.
Test 10 - Fader Calibration
Connect the Fader to External Fader In. Press the FINALIZE
SOFTCLIP key to start calibration test. Move the Fader to max.
position. Press the FINALIZE SOFTCLIP key again. Move the
Fader to min. position. Press the FINALIZE SOFTCLIP key and
the symbol “+” is shown shortly to confirm calibration.
Power Off – On to start the Operating System software.
Service Note
In case of the unlikely event that the unit needs to be sent in for
service, please pack in the original box and an outer box before
sending it.
APPENDIX Troubleshooting
You press the POWER switch, but there is no reaction.
• The power switch on the rear panel is switched off.
You cannot turn the power off.
• Press and hold the POWER switch for 3 seconds, then release to power off.
No sound through the Finalizer Express.
• You are using analog Input, but the INPUT selector is set to digital. Press the “SELECT INPUT” key until the “analog” LED is lit.
The incoming Sample Rate is 44.1kHz, but the Finalizer Express sends out 48kHz.
• You are using digital Input but the Finalizer Express is set to use its own internal clock. Press the “Sync from” key to select the
digital clock.
Your DAT recorder will not accept the digital signal from the Finalizer Express
• Try to change the digital Status bits Output from the Finalizer Express by pressing the “digital Out” key.
The digital fader of the Finalizer Express is not working
• Make sure that both External Control LEDs are turned off in the Fade In/Out section.
The digital fader is not responding to MIDI
• Make sure that you selected the correct MIDI channel by pressing the FINALIZE SOFTCLIP key and the “ARROW-UP” key
simultaneously.
23
APPENDIX MIDI Implementation Chart
EFFECTS PROCESSOR Finalizer Express - August, 1998 Version 1.0
Function
Basic Channel
Mode
Default
Changed
Default
Messages
Altered
Note Number
Velocity
After Touch
True Voice
Note ON
Note OFF
Key’s
Ch’s
Pitch Bend
Control Change
Prog Change
True#
System Exclusive
Common
System real time
Aux Messages
Notes
O:YES
X:NO
24
:Song Pos
:Song Sel
:Tune
:Clock
:Commands
:Local ON/OFF
:All Notes OFF
:Active Sense
:Reset
Transmitted
1(-16)
1-16
Recognized
1(-16)
1-16
X
X
X
X
X
X
X
X
X
7
X
X
X
X
X
X
X
7
X
X
X Bulkdump
X
X
X
X
X
X
X
X
X
X
X
X Bulkdump
X
X
X
X
X
X
X
X
X
Remarks
APPENDIX Technical Specifications
Digital Inputs and Outputs
Connectors:
Formats:
Output Dither:
Sample Rates:
Processing Delay:
Frequency Response DIO:
Compressor THD+N:
XLR (AES/EBU), RCA Phono (S/PDIF), Optical (Tos-link)
AES/EBU (24 bit), S/PDIF (24 bit), EIAJ CP-340, IEC 958, EIAJ Optical (Tos-link)
HPF TPDF dither 16, 20 and 24 bit
44.1 kHz, 48 kHz
0.2 ms @ 48 kHz
DC to 23,9 kHz ± 0,01 dB @ 48 kHz
-122 dB (0,00008%) @ 10 dB Compression, 20 Hz-20 kHz
Analog Inputs
Connectors:
Impedance:
Max. Input Level:
Min. Input Level (for 0 dBFS):
Sensitivity:
A to D Conversion:
A to D Delay:
Dynamic Range:
THD:
Frequency Response:
Crosstalk:
XLR balanced (pin 2 hot)
20 kohm
+22 dBu (balanced)
-10 dBu
@ 12 dB headroom: -22 dBu to +10 dBu
24 bit (1 bit, 128 times oversampling)
0.8 ms @ 48 kHz
>103 dB (unweighted), >106 dB(A)
-95 dB (0,0018 %) @ 1 kHz, -6 dBFS (FS @ +16 dBu)
10 Hz to 20 kHz: +0/-0.2 dB
<-80 dB, 10 Hz to 20 kHz typical -100 dB @ 1 kHz
Analog Outputs
Connectors:
Impedance:
Max. Output Level:
Full Scale Output Range:
D to A Conversion:
D to A Delay:
Dynamic Range:
THD:
Frequency Response:
Crosstalk:
XLR balanced (pin 2 hot)
100 ohm (active transformer)
+22 dBu (balanced)
-10 dBu to +22 dBu
24 bit (1 bit, 128 times oversampling)
0.57 ms @ 48 kHz
>100 dB (unweighted), >104 dB(A)
-86 dB (0.005 %) @ 1 kHz, -6 dBFS (FS @ +16 dBu)
10 Hz to 20 kHz: +0/-0.5 dB
<-60 dB, 10 Hz to 20 kHz typical -90 dB @ 1 kHz
EMC
Complies with:
Safety
Certified to:
Environment
Operating Temperature:
Storage Temperature:
Humidity:
PCMCIA Interface
Connector:
Standards:
Card Format:
Control Interface
MIDI:
GPI, Pedal, Fader:
General
Finish:
Dimensions:
Weight:
Mains Voltage:
Power Consumption:
Backup Battery Life:
Warranty Parts and labor:
EN 55103-1 and EN 55103-2, FCC part 15 class B, CISPR 22 class B
IEC 65, EN 60065, UL 1419, CSA E65
32° F to 122° F (0° C to 50° C)
-22° F to 167° F (-30° C to 70° C)
Max. 90 % non-condensing
PC Card, 68 pin type 1 cards
PCMCIA 2.0, JEIDA 4.0
Supports up to 2 MB SRAM
In/Out/Thru: 5 Pin DIN
1/4" phone jack, 0 ohm to 50 kohm
Anodized aluminum front, Plated and painted steel chassis
19" x 1.75" x 8.2" (483 x 44 x 208 mm)
5.2 lb. (2.35 kg)
100 to 240 VAC, 50 to 60 Hz (auto-select)
<20 W
>10 years
1 year
Technical Specifications are subject
to change without notice !
25
APPENDIX Note
This equipment has been tested and found to comply with the
limits for a Class B digital device, pursuant to part 15 of the FCC
rules.
These limits are designed to provide reasonable protection against
harmful interference in a residential installation.
This equipment generates, uses and can radiate radio frequency
energy and, if not installed and used in accordance with the
instructions, may cause harmful interference to radio
communications. However, there is no guarantee that interference
will not occur in a particular installation.
If this equipment does cause harmful interference to radio or
television reception, which can be determined by turning the
equipment off and on, the user is encouraged to try to correct the
interference by one or more of the following measures:
• Reorient or relocate the receiving antenna.
• Increase the separation between the equipment and receiver.
• Connect the equipment into an outlet on a circuit different
from that to which the receiver is connected.
• Consult the dealer or an experienced radio/TV technician for
help.
The user may find the following booklet, prepared by the Federal
Communications Commission, helpful:
"How to identify and Resolve Radio/TV interference Problems."
Certificate Of Conformity
TC Electronic A/S, Sindalsvej 34, 8240 Risskov, Denmark,
hereby declares on own responsibility that following product:
Finalizer Express Digital Signal Processor
- covered by this certificate and marked with CE-label conforms
with following standards:
EN 60065
(IEC 60065)
Safety requirements for mains
operated Electronic and related
apparatus for household and similar
general use.
EN 55103-1
Product family standard for audio,
video, audio-visual and entertainment
lighting control apparatus for
professional use.
Part 1: Emission.
EN 55103-2
Product family standard for audio,
video, audio-visual and entertainment
lighting control apparatus for
professional use.
Part 2: Immunity.
This booklet is available from the US. Government Printing
Office, Washington, DC 20402, Stock No. 004-000-0034-4.
Caution:
You are cautioned that any change or modifications not expressly
approved in this manual could void your authority to operate this
equipment.
For the customers in Canada:
This Class B digital apparatus meets all requirements of the
Canadian Interference-Causing Equipment Regulations.
Cet appareil numérique de la classe B respecte toutes les exigences
du Réglement sur le matériel brouilleur du Canada.
Caution:
Danger of explosion if battery is incorrectly replaced. Replace only
with same or equivalent type recommended by the manufacturer.
Discard used batteries according to the manufacturer's instructions.
26
With reference to regulations in following directives:
73/23/EEC, 89/336/EEC
Issued in Risskov, August 17th 1998
Anders Fauerskov
Managing Director
APPENDIX Glossary
Brickwall type limiter
A type of limiter that allows absolutely no signal above Threshold.
Dithering
When going from one type of bit resolution to a lower, e.g. from
24 bit to 16 bit, you actually loose 8 bits of information.
The process of cutting of bits is called truncation and it introduces
digital distortion of low level signals, due to the lack of complete
signal information. To compensate for this, dithering must be
applied. Dithering is a small amount of filtered noise, shaped and
optimized for the human ear, and when added to the truncated
signal the effect is a less distorted low level signal.
Dithering is only relevant on digital Outputs and it is always the
receiving device that determines the number of bits you must
dither to.
A DAT or CDR recorder should always be Dithered to 16 bit.
TC Products do not perform truncation on digital Outputs.
Truncation is left to be done by the receiving device.
Bits & Bytes
1 bit is the smallest unit for information in the digital world. Its
value can be can be 0 or 1 or you could say on/off. 1 byte=8 bit.
House Clock
A separate piece of equipment used only to generate a common
standard clock keeping all the attached digital equipment in sync.
Compressor Overshoot
When slow attack times are used overshoots might occur. This
causes an unwanted click/distortion. To prevent compressor
overshoots you can use a brickwall type limiter.
Master Clock
If you don’t use a separate House Clock you can use most digital
units for the same purpose. In this case the unit you sync to is
called the Master Clock.
Cross-over point
Splitpoint indicating where the different bands begins/stops
working
Make up gain
To optimize the output gain and energy in your material auto
Make-Up gain is used to gain the compressed band automatically.
dBFS
dB full scale. 0dBFS is the absolute max in the digital world.
Any signal above 0dBFS will cause serious unwanted distortion.
Sample Rate
The quality of sound depends on how precise you can measure
the analog signal. This is done by taking “pictures” of the wave
at a given rate: The Sample Rate.
The maximum frequency that can be successfully reproduced is
the Sample Rate divided by two since you need two points to
define a sinus curve. E.g. the max frequency that can be
successfully reproduced with a Sample Rate of 48kHz is 24kHz.
AES/EBU
Professional digital in/out standard, using balanced XLR cables.
The AES/EBU format outputs 24 bit.
S/PDIF
Consumer digital in/out standard, using coaxial phono-type
cables. This format can generally output 20 bit.
TC products outputs all 24 bits on S/PDIF.
Tos-link
Also called optical S/PDIF. 24 bits can be transferred with this
format.
dBu
Measuring unit in the analog world.
0dBu=0,775V in 600ohm
De-essing
An algorithm that removes unwanted “esses” or sibilance from
vocal material.
27
APPENDIX Soldering instructions
MIDI Cable
DIN CONNECTOR
5POLE - MALE
45 degrees
DIN CONNECTOR
5POLE - MALE
45 degrees
max. 10m
SHIELDED CABLE (3 or 5 wires + screen)
Pedal Cable
PEDAL SWITCH or similar
JACK PLUG
Mono - male
Ø 6.35mm, 1/4”
max. 100m
2 wires
Shield/ground
Switch must be
momentary type
Tip
Fader Cable
JACK PLUG
Mono - male
Ø 6.35mm, 1/4”
max. 100m
2 wires
28
MASTER FADER or similar
APPENDIX Soldering instructions
XLR - XLR
Jack (unbalanced) - XLR
Pin 1 - Pin 1 (Ground)
Pin 2 - Pin 2 (Hot)
Pin 3 - Pin 3 (Cold)
Sleeve - Pin 1 (Ground)
Tip - Pin 2 (Hot)
Sleeve - Pin 3 (Ground)
Jack (balanced) - XLR
TIP
GND
Sleeve - Pin 1 (Ground)
Tip - Pin 2 (Hot)
Ring - Pin 3 (Cold)
TIP
RING
GND
29
MY SETTINGS
My settings
Use this to write down your own settings
Name:
Purpose:
Date:
Name:
Purpose:
Date:
Name:
Purpose:
Date:
Name:
Purpose:
Date:
30
MASTER FADER
Why make a Master Fader?
If a fade is performed before the Finalizer Express, the Compressor will try to increase the level as the fader decreases. To
avoid this problem, fades must always be done after the Finalizer Express. The Master Fader makes it possible to perform a
manual fade on the very output of the Finalizer Express and you thereby keep your fade in digital domain and ensuring perfect
tracking of left and right.
Connecting and Calibrating the Master Fader
-
Connect the Master Fader to the External Controller jack of the Finalizer Express.
Press and hold the BYPASS key while powering up.
Use the ADJUST “UP” cursor to select self test no. 10, which is the calibration menu.
Press the FINALIZE SOFTCLIP “ON” key - an arrow up symbol will then be displayed.
Move the Fader to max position - the cable end of the fader. To compensate for mechanical tolerances move the fader back
slightly.
Press FINALIZE SOFTCLIP “ON” key to confirm - an arrow down symbol will now be displayed.
Move the Fader to min position. To compensate for mechanical tolerances move the fader up slightly.
Press the FINALIZE SOFTCLIP “ON” key to confirm.
The Master Fader is now calibrated.
Power Off/On.
Activating the Master Fader
To activate the Master Fader as External Controller press the FADER key in the Fade In/Out section.
The Master Fader controls the digital fader of the Finalizer Express.
Cables and lengths
The Master Fader uses standard mono jack cables. The cable can be extended using the jack to jack adapter, and can run at
cable lengths up to 25 meters. Remember to recalibrate after extending the cable.
31