1
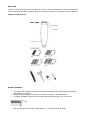
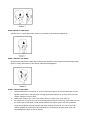
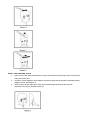
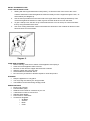
AC Hair Clipper SY-HC16 Instructions Manual WELCOME Thank you for purchasing the new hair clipper SY-HC16. In order to benefit fully from this product please read the following instructions carefully. Store the instructions manual in a safe place for future reference. PARTS OF THE SY-HC16 BLADE ALIGNMENT Your clipper was carefully examined to ensure that the blades were oiled and properly aligned before leaving our factory. Blades must be realigned if they were removed for cleaning or after replacement. To realign the blades, simply match the upper and lower blades teeth up, point for point. End of top blade teeth should be approximately 1.2 mm back from lower blade. If blade alignment is incorrect, add a few drops of oil to the blades, switch on the clipper for a few moments, switch off and unplug. Loosen screws slightly and adjust. Tighten screws after blade is aligned. To maintain your clipper in peak condition, the blades should be oiled after every haircut. Do not use hair oil, grease, oil mixed with kerosene or any solvent. OIL BLADE LEVER The lever is conveniently located on the side of the unit so it can easily be adjusted while the clipper is in your hand. The lever adds versatility to your clipper by allowing you to gradually change the closeness of your cut without an attachment comb. When the lever is in the uppermost position, the blades will give you the closest cut and leave the hair very short. Pushing the lever downward gradually increases the cutting length. In its lowest position, the lever will leave the hair approximately the same length as a #1 comb. The lever will also extend the use of your blades since a different cutting edge is used in each setting. In addition, if extremely heavy hair cutting has jammed the blades, the level will help to remove the jammed hair without disassembling the blades. While the clipper is running, rapidly move the lever from “close cut” to “longer cut” a couple of times. Doing this each time after you have finished using your clipper will help to keep the blades clear of hair. If your clipper stops cutting and this does not help, your cutting blades are worn out. Replace them with new blades. IMPORTANT SAFEGUARDS Please read this instruction manual carefully before use and keep in a safe place for future reference. Before the first use of the appliance check that the voltage indicated on the rating label corresponds to the mains voltage in your home. For home use only. Do not use for industrial purposes. Do not use the appliance for any other purposes than described in this instruction manual. Do not use outdoors. Always unplug the appliance from the power supply before cleaning and when not in use. To prevent risk of electric shock and fire, do not immerse the appliance in water or any other liquids. However if this does occur DO NOT TOUCH the appliance, unplug it immediately and contact your near service center. Do not take this product to a bathroom or use near water. This appliance is not intended for use by persons (including children) with reduced physical, sensory or mental capabilities, or lack of experience and knowledge, unless they have been given supervision or instruction concerning use of the appliances by a person responsible for their safety. Children should be supervised to ensure that they do not play with the appliance. Do not leave the appliance switched on when not in use. Do not use other attachments than those supplied. Do not operate after malfunction or cord damage. Do not attempt to repair, adjust or replace any parts of the appliance. Check and repair the malfunctioning by contacting Sytech Service Center. Keep the cord away from sharp edges and hot surfaces. Do not place or store the appliance where it can fall or be pulled into a tub or sink. Do not pull, twist, or wrap the power cord around the appliance. Never insert any objects into the openings of the appliance. Before use, make sure that blades are adjusted properly. Do not place the appliance while it is operating on any surface, it may cause injury or damage. Do not use the appliance with a damaged comb, or with teeth missing from the blades as injury may occur. NOTE: KEEP THE BLADES OILED Do not use the hair clipper when the skin is infected. Do not use the hair clipper on animals. The manufacturer reserves the right to introduce minor changes into the product design without prior notice, unless such changes influence significantly the product safety, performance, and functions. INSTRUCTIONS FOR HAIR CUTTING Attachment Combs Attachment Comb #1 leaves 3mm hair length. Attachment Comb #2 leaves 6mm hair length. Attachment Comb #3 leaves 9mm hair length. Attachment Comb #4 leaves 12mm hair length Attaching the Combs To attach the comb, hold it with its teeth upward and slide it along the sides of the hair clipper until the comb firmly adjusts onto the sides and you hear the “click” sound. To remove the comb, simply pull the comb upward and away from the clipper. BEFORE STARTING THE HAIR CUT Check the clipper, making sure that there is no oil between the cutting blade teeth. Turn the unit on to distribute the oil and to make sure it is running smoothly before using. Wipe off any excess oil. This should be done before each use. Select the desired attachment comb (see above) and fix it onto the clipper as indicated. Seat the person so the head is approximately at the eye level. This allows ease of visibility while cutting and a better control of the clipper. Place a towel around the neck and shoulders of the person getting the haircut. Before cutting always comb the hair so it is tangle free. REMINDERS Cut the hair in an even and slow manner. Use short strokes only and work gradually over the entire head. Always take off a little hair at a time; you can always trim off additional hair later. As you work, comb the hair frequently back into the style to which you are cutting. When cutting with this hair clipper it is better to leave the hair dry, not wet. With dry hair, it is much easier to control the amount of the hair being cut. Cutting hair requires practice so it is always better to leave the hair longer for the first few haircuts until you become used to the hair clipper levels and how much hair does each level cut. STEP 1-BACK OF THE NECK 1. Attach the 3mm or 6mm comb. 2. Hold the clipper with the cutting edge pointed up and begin the haircut by starting at the center of the base of the neck (see diagram 1). 3. Hold the clipper comfortably in your hand and hold lightly against the head with the comb teeth pointing upward. Gradually and slowly lift the clipper, working upwards and outwards. 4. As you cut, gradually lift the hair clipper head towards you. Continue to cut the back area from the bottom of the neck upwards to the top of the ears. STEP 2-BACK OF THE HEAD Use the 9mm or 12mm attachment comb to cut the back of the head (see diagram 2) STEP 3- SIDE OF THE HEAD Change to one of the shorter combs (3mm or 6mm) to trim sideburns. Then change to one of the longer combs (9mm or 12mm), and continue to cut to the top of the head (see diagram 3). STEP 4- TOP OF THE HEAD 1. Using the attachment comb 9mm or 12mm cut the hair at the top of the head from back to front against the direction in which the hair normally grows (see diagram 4). In some cases, this may require cutting from front to back. 2. Attachment combs 3 mm or 6mm are used to achieve a close crew cut or short cut. 3. For longer hair on top use the hair comb provided and lift the hair on the top of the head. Cut over the comb, with the hair lifted or hold the hair between the fingers to lift it and cut it to desired length (see diagrams 5 and 6). Always work from the back of the head. You can cut the hair shorter gradually by reducing the space between the comb/fingers and the head. Comb out trimmed hair and check for uneven stands. STEP 5- THE FINISHING TOUCH 1. Finally, use the cutter without an attachment comb for close trimming around the base of the neck, the sides of the neck and the ears. 2. To produce a clean straight line at the sideburns use the hair clipper with the top parts of the blades pointing straight to the hair. (See diagram 7). 3. Press the clipper at right angles to the head, tips of the blades lightly touching the skin and work downwards. This way you will obtain a clean cut. SHORT TAPERED STYLES′FLAT TOPS & SHORT CUTS 1. Starting with the longest attachment comb(12mm), cut from the back of the neck to the crown .Hold the attachment comb flat against the head and slowly move the clipper through the hair , as shown below (see diagram 8). 2. 3. 4. Use the same procedure from the lower side to the upper side of the head (as illustrated). Then cut the hair against the direction in which it grows and then level the cut from the sides. To give a ′flat top’ look; the hair on top of the head must be cut over the top of a flat comb rather than by using the attachment comb. Use closer cutting attachment combs to decrease the hair down to the neckline as desired. Comb hair and check for uneven areas. CARE AND CLEANING Before cleaning, make sure to switch off the appliance and unplug it. Clean and oil the appliance after each use. Remove cut hair from the clipper with the brush enclosed. Wipe the clipper with a dry soft cloth. Oil the blades as mentioned above. Do not use any chemicals or abrasive liquids to clean this product. STORAGE Keep the appliance in a dry place. You may hang the cutter by the loop provided. The blades must be oiled during storage period. SPECIFICATIONS Electric Hair Trimmer Powerful Motor (9W) Gradual Level Control for closeness of your cut 4 Attachment combs to choose from Stainless Steel blades Power Source: 220V/50Hz Accessories Supplied: o Oil Bottle o Scissors o Brush o Comb DECLARATION OF CONFORMITY Manufacturer Name: Satyatrade S. L. Address: Pol. Ind. La Raya. C/ Guadalquivir, 2. Camarma de Esteruelas, 28816 Madrid Tel: 902 430 967 Fax: 91 8864285 NIF: B83254763 Manufacturing country: China Sytech® SY-HC16 complies with the following directives: EMC Standard: Directive 2004/108/EC EN 55014-1:2006+A1:2009 EN 55014-2:1997+A1:2001+A2:2008 EN 6100-3-2:2006+A1:2009+A2:2009 EN 61000-3-3:2008 LVD Standard: Directive 2006/95/EC EN 60335-2-8:2003+A1:2005+A2:2008 EN 60335-1:2002+A11:2004+A1:2004+A12:2006 +A2:2006+A13:2008+A14:2010 EN 62233:2008 ROHS standard:2002/95/EC Restriction of Hazardous Substance Signed: Ajeet Nebhwani Utamchandani Sole Administrator