1
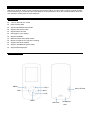
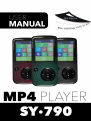
Welcome
Welcome to Sytech! Thank you for purchasing the new MP4 Player SY-790. Please read this manual carefully
before operating your product and pay close attention to the precautions which are mentioned below. Store this
user manual in a safe place for future reference.
Key features
1.8 inch 128*160 TFT screen
Flash memory:8GB
Support MP3/WMA/ format audio
Support AMV format video
Support Micro SD card
ID3 support, Lyrics display
Support FM Radio
Multi EQ modes and repeat modes
Built-in microphone for long time recording
Support txt E-book reading
Support JPG,BMP,GIF photo viewer
Support Multi-languages
Parts of the SY-790
MENU
VOL+
Micro SD card
Next
PRE
VOL-
MAIN
USB Jack
Headphone
Jack
Operating Instructions
● Power On / Off
In POWER OFF Status,Press and hold the
button to turn on the player;
In POWER ON status, Press and hold the
button to turn off the player.
Note: When the MP4 standby time reaches the set turn off time, the unit will automatically turn off.
This function will not work when the MP4 is in charging mode.
● Basic Operation
In the main menu interface, press
to select the desired option. Press the “M” button to enter into the option.
To access the main menu, press and hold the “M” button.
1.(MAIN) button function: Play/Pause/Power On-Off when holding the button over 2 seconds.
2.(MENU) button “M”: Selection, Enter into menu. Press and hold this button to exit to the main menu.
Note: While charging, press the “M” button to start and jump to the main menu.
3.(PRE): Select the previous menu or option, press and hold to rewind
4.(NEXT): Select the next menu or option, press and hold to fast forward
5.(VOL+/VOL-): Press ’+’ or ’-’ to adjust volume level
Button action definition
Action
Basic operation
Short press
Time within 1.2 seconds
Long Press
Time more than 1.2 seconds
Hold
Press button and maintain
Note: If no special instructions are mentioned on this manual, it normally refers to short press.
Low battery
When the MP4 is out of power, the display will indicate ‘Low Battery’ and the device will turn off
automatically. At this moment it is necessary to charge the MP4 player.
Memory Card Slot
Insert with precaution a Micro-SD card into the MP4 player slot. Before inserting, make sure the card is in
the correct position and then gently push it inside until a click sound is heard. Make sure the memory card
only contains MP3 or WMA files. Access to the navigation function and select External memory to play the
content stored into the memory card.
To remove the Micro-SD card, gently push the card towards the inside and it will pop out.
1. Main menu
Press the “M” button to access to the main menu. 8 different functions can be selected by pressing the
“PRE” or “NEXT” buttons.
2. Music
A. sub-menu under playing status
Repeat
Normal, Repeat one; Folder; Repeat Folder; Repeat All;
Random; Intro.
Equalizer
Natural, Rock, Pop, Classic, Soft, Jazz, DBB
Replay
mode
Replay: A-B repeat, when the ”A” in the icon
blinks, press
[NEXT] to confirm the starting point, press [NEXT] again to set
the ”B” point. The player will replay the section selected between
A to B according to the times set in the replay mode.
(Return to A-B replay mode by pressing on the [PRE] button
when in this status).
Replay times: Set how many times the A-B point replays itself.
Maximum: 10times(1-10)
Replay gap: set the replay time gap
Exit
Exit from sub-menu
B. Sub-menu under stop status:
Local folder
Indicate the folder of the current playing file
Delete file
Delete the current playing song
Delete all
delete all music files
Exit
Exit from the sub-menu
3. Videos
Before using the Video function, it is important to connect your MP4 player to your PC to record from the
memory of the MP4 player, the video converter software, Media Player Utility 4.45.
Run the Media Player Utility by clicking on the "Setup.exe" option. Choose the folder where you want to
install the application. Once installed, open the program by clicking on the "AMV & AVI Video converter"
option. A window appears in blue.
1. In the folder "Ar. origin ", find the video you want to convert.
2. In the folder "Ar. Output ", choose the path where you want to store your video
3. At the bottom of the window, the file name and state of the file will appear
4. Click on the icon with 2 arrows to start converting the video.
5. After conversion, go to the folder where the video was stored, copy and paste the same video to MP4
root directory.
6. Now you can enjoy video on your MP4.
4. Movie
A. Press the [MENU] button to go to the playing interface, and then press the [Main] button to play movie
files.
B. Sub-menu (accessible when the player is in STOP mode).
Local folder
Indicate the folder of the current playing file
Delete file
Delete the current playing movie
Delete All
Delete all movie files
Repeat
Normal, Repeat one, Folder, Repeat Folder, Repeat All, Random,
intro.
Exit
Exit from the sub-menu
5. Record
Select the Record from the main menu and press the MENU button to enter the recording mode.
Press the [MENU] in the recording interface to enter into recording sub-menu.
Local folder
Indicate the folder of the current recording file
REC type
32K BPS,64K BPS,128K BPS
Exit
Exit from the sub-menu
After setting, press the [MAIN] button to start recording again.
In the meantime please note:
1. During recording, only [MAIN] and [MENU] buttons are active.
2. Press and hold the [MENU] button to save the current recording file.
3. Ensure that there is sufficient battery capacity whilst recording.
6.Playback
Press the MENU button to select Play in the main menu, press the [PRE] or [NEXT] buttons to select
recording files, then press the [MAIN] button to play or pause the current recording file.
Sub-menu when the player is in playback mode:
Repeat
Normal, Repeat one, Folder, Repeat folder, Repeat all.
Random, intro.
Replay mode
Replay, Replay times, Replay gap
Exit
Exit from the sub-menu
Sub-menu when the player is in STOP mode:
Local folder
Indicate the folder of the current recording
file
Delete file
Delete the recording file you have selected
Delete all
Delete all recording files
Exit
Exit from the sub-menu
7.Radio
Select Radio from the main menu and press the MENU button to confirm.
1. Recording a broadcast station
When listening to the broadcast station program, it is possible to record a station.
Press the “MENU” button to enter into the “FM” sub-menu to choose the “record” function, the player will
automatically enter into the recording interface. Press the “MAIN” button to start recording. Press the
“MAIN” button to stop the recording process and then hold the “MENU” or “MAIN” button to save the
recording.
2. Manual Tuning:
Press the “PRE” button for the stations to go backward by 100KHZ;
Press the “NEXT” button for the stations to go forward by 100KHZ.
3. Saving a station
Press the “MENU” button to enter into the “Radio” sub-menu to save a broadcast station and then press
the “MENU” button once again to save it.
4. Listening to the saved stations
If there are many saved broadcast stations, you could press the “MAIN” button to listen to them one by
one.
5. Automatic Tuning
Press the “MENU” button to enter into the sub-menu, press the “NEXT” button to choose “Auto search“.
The player will begin to search automatically in intervals of 100KHZ and will stop and save found
stations.
8. Text
Enter the Text mode by pressing the [MENU] button, and then you can read and edit the article in the
device. The device only can recognize articles which are in “txt.” format.
9. Picture
Under the main menu, press [PRE] or [NEXT] button to select Picture mode, then press the [MENU]
button to confirm.
Local
folder
Choose the folder where picture is saved
Playback
set
Manual play or auto play(there’s a time gap for auto play from
1-10 seconds which you may choose)
Delete file
Delete current picture
Delete all
Delete all pictures
Exit
Exit from sub-menu
10. Settings
Under main menu, press [PRE] or [NEXT] button to select Set up mode, Press the [MENU] button again
to enter into the sub-menu:
Clock
Set the time and date
LCD set
Dark mode: set the time to turn off the screen when there is
no activity on the player. Choose from 0---50 seconds. 0
means the screen will never turn off when there is no activity.
Exit: exit from the sub-menu
Language
Multiple languages
Power off
Off time: set the time for the unit to turn off on its own. The
time unit is in seconds. 0 means that the function is turned
off. Sleep time: set the time for the unit to go off time after
the last key has been pressed, regardless of whether the
player is active or stopped. The time unit is in minutes.
On-Line Mode
When connecting to a PC, please select from which disk the
information should be read.
Memory info.
Check the memory size and the remaining space.
Firmware version
Display the player’s firmware version
Firmware upgrade
Firmware can be updated via connection
Exit
Exit from the sub-menu
Declaration of Conformity
Manufacturer Name: Satyatrade S. L.
Address: Pol.Ind.La Raya. C/ Guadalquivir, 2.
Camarma de Esteruelas, 28816 Madrid
Tel: 902 430 967
Fax: 91 8864285
NIF: B83254763
Manufacturing country: China
Description: MP4 Player
Sytech® SY-790 complies with the following directives:
EMC Standard: Directive 2004/108/EC
Rohs Standard: 2011/65/EU
Signed: Ajeet Nebhwani Utamchandani
Sole Administrator