1
[FRIDAY, APRIL 4, 2014]
Formal Report
Home/Office Automation
Jimmy Bright, Alexander Kampel,
Chris Woolford
HOME SOLUTIONS
Table of Contents
Executive Summary ....................................................................................................................................... 3
Team ................................................................................................................................................................ 3
Achievements ................................................................................................................................................. 3
Project Outline ............................................................................................................................................... 4
Project Scope .................................................................................................................................................. 4
Budget ............................................................................................................................................................. 4
Conclusion ...................................................................................................................................................... 5
Appendices...................................................................................................................................................... 6
Appendix A - User Manual............................................................................................................................ 6
Appendix B - Source Code ............................................................................................................................ 9
Appendix C - Bibliography…………………………………………………………………………..21
2 | PAGE
Executive Summary
The purpose of this document is to provide information on the Home/Office Automation project as
completed by the team Home Solutions. This document will outline the team members and some
of their achievements. It will also have an outline of the project itself, as well as the project scope.
This document will also outline the project budget. There will be a conclusion section at the end of
the document.
Following this document will be a few appendices. It will include the user manual for the final
product and also source code and other documents from the project.
Team
Home Solutions consists of three SAIT Polytechnic students studying IT Computer Systems.
Jimmy Bright was the main coder for the project, he was the person most responsible for the
scripts that make the project possible.
Alex Kampel was the person behind many designing aspects of the project. He also created many
HTML pages for the project.
Chris Woolford was responsible for many of the hardware aspects of this project and was also the
main person creating the project documentation.
Achievements
Before this project began, none of the team members had ever worked with Raspberry Pi’s before.
There was a small learning curve to understanding the pins on the RPi. Along with learning how to
work with the RPi was learning how to code in Python. Learning Python was not very difficult but it
is a little different than the Java and Perl learned at SAIT.
The team also had to achieve a better understanding of electrical circuits and electrical
components in order to solder the RPi to the receiver and the remote.
3 | PAGE
Project Outline
Our project utilizes a small computing device called the Raspberry Pi, in order to control power
outlets remotely. This allows us to turn on a light, coffee maker, computer, and many other
electrical devices from a web page on our computers or smartphones. Our system also has the
ability for events to be scheduled. If you want your office lights to turn on at 9 AM and off at 5 PM
simply the rules on the web page. We also added a motion sensor to the project. This feature
allows the power outlets to turn on when motion is detected, and if no motion is detected for a
certain amount of time then they will turn off.
Project Scope
-Solder
- outlet remote to RP
- sensor receiver to RP
-Programming
- Web Pages - buttons to turn on/off outlets
- RP scripts
-Server
- DNS role
- VNCViewer
- Web Server
- CLAMAV Antivirus
We also added scope to put a timer on the website so you can turn on any outlet at any time of the
day you want in the future.
Budget
In the project charter we estimated that the total cost of this project would be $8090.
We ended up paying $185 for the hardware that was needed and we only budgeted for $110.
In the project charter we estimated that it would take 390 hours to complete this project and that
would cost a total of $7980 with a $20/hour wage. We actually completed the project in 250 hours
which is a total of $5000 for wages.
Our initial budget was $8090 and we were able to finish the project using only $5185, for a total
savings of $2905q.
4|P A G E
Conclusion
The project was completed without many problems. The team learned many valuable skills along
the way, such as Python and a stronger understanding of electrical circuits, principles and
components. The team worked efficiently and were able to finish the project well within the budget.
The project itself works as it was outlined in the charter, but with some added functionality to the
project’s website.
Overall the project was a great experience for the team, the lessons learned will greatly prepare us
for work in the IT industry.
5 | PAGE
Appendices
Appendix A - User Manual
Webpage Option
Login:
The user must be on the proper network, and then navigate to 10.0.1.17/cgi-bin/login.php. This
page currently works with Safari and Chrome.
Username: HS
Password: capstone
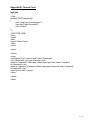
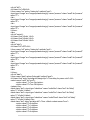
The username and password can be changed in the file check.php on line 8, as seen in the
following picture.
6|P A G E
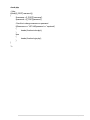
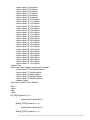
Once logged in, the user will be taken to the following page:
There are many options for controlling the outlets on this page. At the top are the master On/Off
buttons.
Clicking the top power buttons will turn on (top left) or off (top right) all of the outlets.
The On/Off buttons in the middle are used to turn each outlet on/off separately.
The bottom portion of the page is used for scheduling the outlets to power on/off. The first drop
down box lets you choose whether to turn the outlet(s) on or off. Below that you can choose which
outlet(s) you want on or off. Then you are given the option to choose the time of day and date,
followed by if you want to repeat that job in the future.
7 | PAGE
Motion Sensor Option
The user can also choose to use a motion sensor option that makes the process more automated
but with less control. A motion sensor can be placed anywhere the user desires – such as
entrance to the office – and when motion is detected the outlets will all turn on. The outlets will
then turn off whenever a certain amount of time passes without motion being detected. The
amount of time that the user wants to pass before the outlets turn off can be changed in sensor.py.
8|P A G E
Appendix B - Source Code
login.php
<?php
if(isset($_POST['username']))
{
print '<script type="text/javascript">';
print 'alert("Login Successful")';
print '</script>';
}
?>
<!DOCTYPE HTML>
<html>
<head>
<title>
Login to Power Control
</title>
<style>
</style>
</head>
<body>
<form name="login" method="post" action="check.php">
<h2> Please enter your login information.</h2>
<label for="username">Username:</label><input type="text" name="username"
id="username"></br>
<label for="password">Password:</label><input type="password" name="password"
id="password"></br>
<input type="submit"></input>
</form>
</body>
</html>
9 | PAGE
check.php
<?php
if(isset($_POST['username']))
{
$username = $_POST['username'];
$password = $_POST['password'];
//Use this to change username or password
if($username == "HS" && $password == "capstone")
{
header('location:index.php');
}
else
{
header('location:login.php');
}
}
?>
10 | P A G E
index.php
<!DOCTYPE HTML>
<html>
<head>
<title>
Power Control
</title>
<style>
#wrapper {position:absolute;left:50%;width:640px;height:1136px;margin-left:-320px;}
#individual {width:640px;clear:both;}
#master {width:640px;}
#left1 {width:220px;float:left;}
#center1 {width:200px;float:left;padding:140px 0px 0px 0px;}
#right1 {width:220px;float:left;}
#left {width:220px;float:left;}
#center {width:200px;float:left;padding:20px 0px 0px 0px;}
#right {width:220px;float:left;}
#date {clear:both;}
.text {text-align:center;color:#A3A3A3}
.on {text-align:center;color:#06961c}
.off {text-align:center;color:#c20a0a}
h3 {padding:0px;margin:85px 0px;font-size:30px}
h1 {padding:0px;margin:10px 0px;font-size:80px;}
h2 {padding:0px;margin:10px 0px;font-size:50px;}
body {background-color:black;}
.large {margin:0px 0px 0px 10px;}
.small {margin:10px 0px 10px 60px;}
</style>
</head>
<body>
<div id="wrapper">
<form name="masterOn" action="index.php" method="post">
<div id="master">
<div id="left1">
<h1 class="on">ON</h1>
<input type="image" src="images/powerbuttonlarge.jpg" name="poweron" class="large"
id="poweron" value="4">
</div>
<div id="center1">
<h2 class="text"> All Outlets </h2>
</div>
<div id="right1">
<h1 class="off">OFF</h1>
<input type="image" src="images/powerbuttonlarge.jpg" name="poweroff" class="large"
id="poweroff" value="4">
</div>
</div>
<div id="individual">
<h2 class="text">Individual Controls</h2>
11 | PAGE
<div id="left">
<h2 class="on">ON</h2>
//<form name="on" action="index.php" method="post">
<input type="image" src="images/powerbutton.jpg" name="poweron" class="small" id="poweron"
value="1">
</br>
<input type="image" src="images/powerbutton.jpg" name="poweron" class="small" id="poweron"
value="2">
</br>
<input type="image" src="images/powerbutton.jpg" name="poweron" class="small" id="poweron"
value="3">
//</form>
</div>
<div id="center">
<h3 class="text">Outlet 1</h3>
<h3 class="text">Outlet 2</h3>
<h3 class="text">Outlet 3</h3>
</div>
<div id="right">
<h2 class="off">OFF</h2>
//<form name="off" action="index.php" method="post">
<input type="image" src="images/powerbutton.jpg" name="poweroff" class="small" id="poweroff"
value="1">
</br>
<input type="image" src="images/powerbutton.jpg" name="poweroff" class="small" id="poweroff"
value="2">
</br>
<input type="image" src="images/powerbutton.jpg" name="poweroff" class="small" id="poweroff"
value="3">
</div>
</div>
//</form>
<div id="date">
//<form name="date" action="index.php" method="post">
<h3 class="text" style="text-align:left;margin:0px"> Time delay for power on/off </h3>
<select name="onoff" id="onoff">
<option value="1">Turn On</option>
<option value="0">Turn Off</option>
</select></br>
<label class="text"><input type="checkbox" name="outletOne" class="text" id="delay"
value="1">Outlet 1</label>
<label class="text"><input type="checkbox" name="outletTwo" class="text" id="delay"
value="1">Outlet 2</label>
<label class="text"><input type="checkbox" name="outletThree" class="text" id="delay"
value="1">Outlet 3</label></br>
<label class="text" style="text-align:left"> Time: </label><select name="hour">
<option value="0">0</option>
<option value="1">1</option>
<option value="2">2</option>
<option value="3">3</option>
<option value="4">4</option>
12 | P A G E
<option value="5">5</option>
<option value="6">6</option>
<option value="7">7</option>
<option value="8">8</option>
<option value="9">9</option>
<option value="10">10</option>
<option value="11">11</option>
<option value="12">12</option>
<option value="13">13</option>
<option value="14">14</option>
<option value="15">15</option>
<option value="16">16</option>
<option value="17">17</option>
<option value="18">18</option>
<option value="19">19</option>
<option value="20">20</option>
<option value="21">21</option>
<option value="22">22</option>
<option value="23">23</option>
</select>
<select name="minute">
<option value="0">00</option>
<option value="5">05</option>
<option value="10">10</option>
<option value="15">15</option>
<option value="20">20</option>
<option value="25">25</option>
<option value="30">30</option>
<option value="35">35</option>
<option value="40">40</option>
<option value="45">45</option>
<option value="50">50</option>
<option value="55">55</option>
</select>
<select name="month">
<option value="1">Jan</option>
<option value="2">Feb</option>
<option value="3">Mar</option>
<option value="4">Apr</option>
<option value="5">May</option>
<option value="6">Jun</option>
<option value="7">Jul</option>
<option value="8">Aug</option>
<option value="9">Sept</option>
<option value="10">Oct</option>
<option value="11">Nov</option>
<option value="12">Dec</option>
</select>
<select name="day">
<option value="1">1</option>
<option value="2">2</option>
<option value="3">3</option>
13 | PAGE
<option value="4">4</option>
<option value="5">5</option>
<option value="6">6</option>
<option value="7">7</option>
<option value="8">8</option>
<option value="9">9</option>
<option value="10">10</option>
<option value="11">11</option>
<option value="12">12</option>
<option value="13">13</option>
<option value="14">14</option>
<option value="15">15</option>
<option value="16">16</option>
<option value="17">17</option>
<option value="18">18</option>
<option value="19">19</option>
<option value="20">20</option>
<option value="21">21</option>
<option value="22">22</option>
<option value="23">23</option>
<option value="24">24</option>
<option value="25">25</option>
<option value="26">26</option>
<option value="27">27</option>
<option value="28">28</option>
<option value="29">29</option>
<option value="30">30</option>
<option value="31">31</option>
</select></br>
<label class="text">Repeat: <select name="repeat">
<option value="0">No Repeat</option>
<option value="1">Hourly</option>
<option value="2">Daily</option>
<option value="3">Weekly</option>
<option value="4">Monthly</option>
</select></label>
<input type="submit" value="Submit">
</div>
</form>
</div>
<?php
if($_POST['poweron'] == 1)
{
system("python pulse25.py");
}
elseif($_POST['poweron'] == 2)
{
system("python pulse22.py");
}
elseif($_POST['poweron'] == 3)
14 | P A G E
{
system("python pulse23.py");
}
elseif($_POST['poweron'] == 4)
{
system("python pulse25.py");
system("python pulse22.py");
system("python pulse23.py");
}
if($_POST['poweroff'] == 1)
{
system("python pulse17.py");
}
elseif($_POST['poweroff'] == 2)
{
system("python pulse24.py");
}
elseif($_POST['poweroff'] == 3)
{
system("python pulse18.py");
}
elseif($_POST['poweroff'] == 4)
{
system("python pulse18.py");
system("python pulse17.py");
system("python pulse24.py");
}
if($_POST['onoff'] == 1 || $_POST['onoff'] == 0)
{
$job = '';
$file = '/home/pi/mycron.txt';
$minute = $_POST['minute'];
$hour = $_POST['hour'];
$day = $_POST['day'];
$month = $_POST['month'];
$repeat = $_POST['repeat'];
$week = "*";
if($repeat == 1)
{
$hour = "*";
$day = "*";
$month = "*";
}
elseif($repeat == 2)
{
$day = "*";
$month = "*";
}
elseif($repeat == 3)
{
$day = "*";
15 | PAGE
$month = "*";
$week = date("w", $timestamp);
}
elseif($repeat == 4)
{
$month = "*";
}
if(isset($_POST['outletOne']))
{
if($_POST['onoff'] == 1)
{
$job .= $minute.' '.$hour.' '.$day.' '.$month.' '.$week.' /var/www/cgibin/pulse25.py'.PHP_EOL;
}
else
{
$job .= $minute.' '.$hour.' '.$day.' '.$month.' '.$week.' /var/www/cgibin/pulse17.py'.PHP_EOL;
}
}
if(isset($_POST['outletTwo']))
{
if($_POST['onoff'] == 1)
{
$job .= $minute.' '.$hour.' '.$day.' '.$month.' '.$week.' /var/www/cgibin/pulse22.py'.PHP_EOL;
}
else
{
$job .= $minute.' '.$hour.' '.$day.' '.$month.' '.$week.' /var/www/cgibin/pulse24.py'.PHP_EOL;
}
}
if(isset($_POST['outletThree']))
{
if($_POST['onoff'] == 1)
{
$job .= $minute.' '.$hour.' '.$day.' '.$month.' '.$week.' /var/www/cgibin/pulse23.py'.PHP_EOL;
}
else
{
$job .= $minute.' '.$hour.' '.$day.' '.$month.' '.$week.' /var/www/cgibin/pulse18.py'.PHP_EOL;
}
}
$output = file_get_contents($file);
$output .= $job;
16 | P A G E
file_put_contents($file, $output);
echo exec('crontab /home/pi/mycron.txt');
}
?>
</body>
</html>
17 | PAGE
sensor.py
#!/usr/bin/python
import time
import wiringpi
wiringpi.wiringPiSetupSys()
wiringpi.pinMode(4, 0)
pulse17.py
#!/usr/bin/python
import time
import wiringpi
#wiringpi.wiringPiSetup()
#wiringpi.wiringPiSetupGpio()
time.sleep(0.5)
wiringpi.wiringPiSetupSys()
wiringpi.pinMode(17, 1)
wiringpi.digitalWrite(17,1)
time.sleep(0.1)
wiringpi.digitalWrite(17,0)
wiringpi.pinMode(17, 0)
pulse18.py
#!/usr/bin/python
import time
import wiringpi
#wiringpi.wiringPiSetup()
#wiringpi.wiringPiSetupGpio()
time.sleep(0.6)
wiringpi.wiringPiSetupSys()
wiringpi.pinMode(18, 1)
wiringpi.digitalWrite(18,1)
time.sleep(0.1)
wiringpi.digitalWrite(18,0)
wiringpi.pinMode(18, 0)
18 | P A G E
pulse22.py
#!/usr/bin/python
import time
import wiringpi
#wiringpi.wiringPiSetup()
#wiringpi.wiringPiSetupGpio()
time.sleep(0.4)
wiringpi.wiringPiSetupSys()
wiringpi.pinMode(22, 1)
wiringpi.digitalWrite(22,1)
time.sleep(0.1)
wiringpi.digitalWrite(22,0)
wiringpi.pinMode(22, 0)
pulse23.py
#!/usr/bin/python
import time
import wiringpi
#wiringpi.wiringPiSetup()
#wiringpi.wiringPiSetupGpio()
time.sleep(0.3)
wiringpi.wiringPiSetupSys()
wiringpi.pinMode(23, 1)
wiringpi.digitalWrite(23,1)
time.sleep(0.1)
wiringpi.digitalWrite(23,0)
wiringpi.pinMode(23, 0)
pulse24.py
#!/usr/bin/python
import time
import wiringpi
#wiringpi.wiringPiSetup()
#wiringpi.wiringPiSetupGpio()
time.sleep(0.2)
wiringpi.wiringPiSetupSys()
wiringpi.pinMode(24, 1)
wiringpi.digitalWrite(24,1)
time.sleep(0.1)
wiringpi.digitalWrite(24,0)
wiringpi.pinMode(24, 0)
19 | PAGE
pulse25.py
#!/usr/bin/python
import time
import wiringpi
#wiringpi.wiringPiSetup()
#wiringpi.wiringPiSetupGpio()
time.sleep(0.1)
wiringpi.wiringPiSetupSys()
wiringpi.pinMode(25, 1)
wiringpi.digitalWrite(25,1)
time.sleep(0.1)
wiringpi.digitalWrite(25,0)
wiringpi.pinMode(25, 0)
20 | P A G E
Appendix C – Bibliography
http://www.cs.colostate.edu/helpdocs/ftp.html
http://blog.newfocusphoto.com/projects/arduino-based-camera-control/
http://raspi.tv/2013/how-to-use-wiringpi2-for-python-on-the-raspberry-pi-inraspbian
http://electronics.stackexchange.com/questions/76682/shorting-a-remotecontrol-pushbutton-with-gpio-and-a-transistor
https://sites.google.com/site/semilleroadt/raspberry-pi-tutorials/gpio
http://en.wikipedia.org/wiki/Raspberry_Pi
http://www.instructables.com/id/Building-robots-with-Raspberry-Pi-andPython/
http://raspberrypi.stackexchange.com/questions/1247/what-should-be-doneto-secure-raspberry-pi
http://www.bartbania.com/index.php/iptables-security-part-ii/
http://theos.in/desktop-linux/removing-unwanted-startup-debian-files-orservices/
http://www.debian-administration.org/articles/56
http://www.clamav.net/lang/en/
21 | PAGE
22 | P A G E