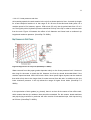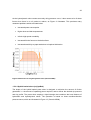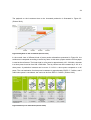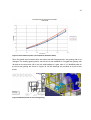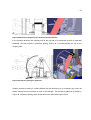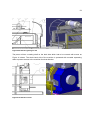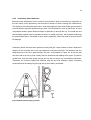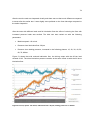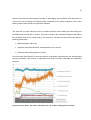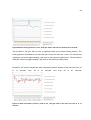
1
LAPPEENRANTA UNIVERSITY OF TECHNOLOGY
Faculty of Technology
New Packaging Solutions
Jyrki Mäntylä
Enhancement of water removal in the
press section
Examiners:
Professor Henry Lindell
Professor Juha Varis
Supervisors: Ilkka Jääskeläinen, M.Sc. (Tech.)
Riku Pihko, M.Sc. (Tech.)
ABSTRACT
Lappeenranta University of Technology
Faculty of Technology
New Packaging Solutions
Jyrki Mäntylä
Enhancement of water removal in the press section
Master’s thesis
2011
97 pages and 68 figures
Examiners:
Professor Henry Lindell
Professor Juha Varis
Keywords: Paper machine, board machine, press section, water removal, shoe press
The effectiveness of water removal on press section is very important for a paper and board
machine’s functioning, efficiency and economy. Today, the most effective method for wet
pressing is shoe press technology. Metso has carried out a number of studies concerning a new
type of water removal method for a press section, which has also been patented. These studies
include rough sketches and some test runs. These issues form the basis of this thesis.
The objective of this work was to gather together information for a new and enhanced water
removal method for a press section by studying the functioning of the device and carrying out
test runs. This method is referred to here as Hydronip. The main goal was to build a functional
test site which fulfills all the necessary requirements and has all the necessary information
gathering devices. The design process was carried out by emphasizing the safety aspects. The
goal was also to gather together information about the nip structure in running conditions, the
seal function, and to carry out the nip tests with paper or board wads.
This thesis consists of a theory part, the design and construction of the test site, and carrying out
test runs through information gathering. The theory part consists of the principals of water
removal from a press section, Hydronip construction, and the requirements for the test place.
The safety aspects were taken into account especially in test runs, but also in the assembly
stages. The design and construction of the test site includes the selection of equipment and
surroundings that are needed for managing the test runs in the best possible way at certain
premises. The test site included the equipment that was already on the premises. Some
equipment could be used as it was but some equipment had to be manufactured or modified
from existing equipment.
A functional test site with information gathering devices was accomplished as a result of the
thesis. Test runs demonstrated that the Hydronip concept is, at least on a small scale, functional.
Short-term tests for seal functioning showed that the seal can be lubricated sufficiently under
different kinds of nip load situations. Wad tests demonstrated that the metal belt is durable
against different sizes of external particles. The seal also endured wad tests even though the
pressure impacts impaired the lubrication. MTS tests showing dry content increases, combined
with a rough cost calculation and the basic function of the machine in test runs, show that with
some further study Hydronip could be a promising new product for water removal from a paper
or board machine’s press section.
TIIVISTELMÄ
Lappeenrannan teknillinen yliopisto
Teknillinen tiedekunta
New Packaging Solutions
Jyrki Mäntylä
Puristimen vedenpoiston parantaminen
Diplomityö
2011
97 sivua ja 68 kuvaa
Tarkastajat:
Professori Henry Lindell
Professori Juha Varis
Hakusanat: Paperikone, kartonkikone, puristinosa, vedenpoisto, kenkäpuristin
Vedenpoiston tehokkuus on erittäin tärkeää paperi- ja kartonkikoneiden toiminnan, tehokkuuden
ja kannattavuuden vuoksi. Kenkäpuristinteknologia on tänä päivänä tehokkain
vedenpoistomekanismi puristamalla. Metso on tutkinut uudenlaista vedenpoistomenetelmää
puristinosalle, mikä on myös patentoitu. Tutkimukset sisältävät karkeita luonnoksia ja joitain
koeajoja. Diplomityö perustuu näihin tutkimuksiin.
Tavoitteena oli kerätä tietoa uudesta vedenpoistomenetelmästä tutkimalla laitteen toimintaa ja
suorittamalla koeajoja. Vedenpoistomenetelmää kutsutaan tästä eteenpäin Hydronipiksi.
Päätavoite oli rakentaa toimiva, vaatimukset täyttävä koepaikka, mikä sisältää tarvittavat
tiedonkeruulaitteet. Suunnitteluprosessissa korostettiin turvallisuusnäkökohtia. Tavoittena oli
myös kerätä tietoa nippirakenteesta ajo-olosuhteissa, tiivisteen toiminnasta ja suorittaa
mällitestejä.
Työ koostuu teoria osuudesta, koepaikan suunnittelusta ja rakentamisesta sekä koeajojen
suorittamisesta tiedonkeruineen. Teoria osuus koostuu vedenpoiston perusperiaatteista
puristinosalla, Hydronipin rakenteen esittelystä ja koepaikan vaatimuksien esittelystä.
Turvallisuusnäkökulmat otettiin huomioon erityisesti kokoonpano- ja koeajovaiheissa. Koepaikan
suunnittelu ja rakentaminen sisälsi tarvittavien komponenttejen ja laitteiden valinnan sekä
valmistuttamisen onnistuneiden koeajojen toteutukseen ennalta määrätyllä paikalla. Koepaikka
sisälsi laitteita, joita käytettiin hyödyksi joko sellaisenaan tai muokattuina tarvetta vastaaviksi.
Työn tuloksena saatiin toimiva koepaikka mittalaitteineen. Koeajojen perusteella Hydronip
todettiin toimivaksi ainakin koelaiteympäristössä pienessä mittakaavassa. Testeissä tiivisteen
voitelu ja toiminta todettiin lyhyissä koeajoissa vaihtelevilla nippikuormilla riittäväksi, eikä
vaurioita esiintynyt. Mällitestit osoittivat, että metallihihna kestää suuriakin ulkoisia rasituksia.
Myös tiiviste kesti mälleistä johtuneet häiriöt voiteluolosuhteissa, vaikka pientä kulumista
esiintyikin. Näiden lisäksi MTS-testien perusteella saavutettavat kuiva-ainepitoisuuden nostot,
karkean kannattavuuslaskelman tulokset sekä laitteen toiminta koeajoissa osoittavat, että
Hydronipin ja sen osa-alueiden toiminnan tutkimista kannattaa jatkaa ja siitä voidaan saada uusi
tuote paperi- tai kartonkikoneen puristinosan vedenpoistoon.
Table of Contents
1
Introduction .......................................................................................................................... 1
1.1
Background .................................................................................................................. 1
1.2
Objective of the thesis................................................................................................... 1
1.3
Execution of the work.................................................................................................... 2
1.4
Paper, board and pulp drying on press section ............................................................. 3
1.4.1
Press section functions .......................................................................................... 3
1.4.2
Effects on paper properties .................................................................................... 4
1.4.3
Press sections: main concepts............................................................................... 4
1.4.4
Dewatering ............................................................................................................ 6
1.5
2
Hydronip ..................................................................................................................... 16
1.5.1
Function............................................................................................................... 17
1.5.2
Comparison of different dewatering methods ....................................................... 22
1.5.3
Nipload impulse curves and comparison of existing applications ......................... 25
1.5.4
Comparison of nip structure effects on dryness development .............................. 31
1.5.5
Comparison of the cost effects of roll and shoe press rebuilds ............................ 33
1.5.6
Profitability comparison of a shoe press and Hydronip rebuild ............................. 35
Test site requirements, design, implementation, and use................................................... 37
2.1
Objective for test site arrangement ............................................................................. 37
2.2
Starting point and existing facilities ............................................................................. 37
2.3
Basic requirements for the design............................................................................... 39
2.4
Basic functionality and layout of the Hydronip pilot machine ....................................... 42
2.4.1
Metal belt loop with guiding and stretching........................................................... 44
2.4.2
Felt loop with guiding and stretching .................................................................... 45
2.4.3
Drive and gearing ................................................................................................ 46
2.4.4
Lifting beam for metal belt installation and change............................................... 48
2.4.5
Frame beam modification .................................................................................... 49
2.4.6
Doctoring ............................................................................................................. 49
2.4.7
Save-alls .............................................................................................................. 50
2.4.8
Safety equipment ................................................................................................. 51
2.4.9
Measuring equipment .......................................................................................... 54
2.5
Hydronip arrangement and installation........................................................................ 55
2.5.1
Installation instruction .......................................................................................... 55
2.5.2
Felt and metal belt installation.............................................................................. 56
2.5.3
Pressure shoe seal change ................................................................................. 57
2.5.4
Hydronip user manual.......................................................................................... 57
2.5.5
2.6
Start-up and use .................................................................................................. 57
Trial runs..................................................................................................................... 61
2.6.1
Objective ............................................................................................................. 61
2.6.2
Preliminary runs ................................................................................................... 61
2.6.3
Trial runs with metal belt and felt ......................................................................... 63
2.6.4
Preliminary board wad tests................................................................................. 70
2.6.5
Changes before final tests ................................................................................... 71
3
Final test runs and results .................................................................................................. 71
4
Analysis and discussion ..................................................................................................... 87
5
Summary and conclusions ................................................................................................. 90
References ............................................................................................................................... 97
Table of Figures
Figure 1 OptiPress (Metso Paper 2010)...................................................................................... 5
Figure 2 SymPress B (Metso Paper 2010) .................................................................................. 5
Figure 3 Nip process stages (KnowPap 7.0 2005c)..................................................................... 7
Figure 4 Nip pressure in roll press (KnowPap 7.0 2005c).......................................................... 11
Figure 5 Shoe press nip structure (KnowPap 7.0 2005b) .......................................................... 12
Figure 6 Hydronip general function. (Pihko & Savela 2007) ...................................................... 17
Figure 7 Edge portion of a pressure chamber of a pressure means with a pressure-operated
sealing member. (Pihko & Savela 2007) ................................................................................... 18
Figure 8 Pressure chamber of a pressure means with several chambers and pressure- operated
sealing members. (Pihko Riku & Savela Jyrki, 2007) ................................................................ 20
Figure 9 Detaching the web after the web has passed through the nip (Pihko & Savela 2007) . 22
Figure 10 Condebelt drying process (Lehtinen 1998) ................................................................ 24
Figure 11 Hydrostatic and hydrodynamic pressure curve (Wasserman and Estermann 2002) .. 25
Figure 12 Shear forces in hydrodynamic shoe (Onnela 2009b)................................................. 26
Figure 13 Pressure zones in hybrid shoe (Onnela 2009b)......................................................... 27
Figure 14 Shoe length and pressure curve can be varied (Onnela 2009b) ................................ 27
Figure 15 Comparison of short and long pocket (Onnela 2009b) .............................................. 28
Figure 16 Hydrodynamic and hybrid shoe (Onnela 2009b) ....................................................... 28
Figure 17 Relative power consumption for hydrodynamic and hybrid shoe (Onnela 2009b)...... 29
Figure 18 MTS test run results (Pihko 2011) ............................................................................. 31
Figure 19 Principle graph of nip pressure profiles (Pirinen 2010) .............................................. 32
Figure 20 Dryness development through press (Pirinen 2010).................................................. 32
Figure 21 Dryness after press section (Onnela 2009b) ............................................................. 33
Figure 22 Break even comparison (Pirinen 2010) ..................................................................... 33
Figure 23 Payback on the investment (Pirinen 2010) ................................................................ 34
Figure 24 Shoe press alternatives (Pirinen 2010) ..................................................................... 34
Figure 25 Shoe nip rebuild scope (Kairus 2009) ....................................................................... 35
Figure 26 Superhydronip assembly........................................................................................... 38
Figure 27 Stretcher and guide test arrangement ....................................................................... 38
Figure 28 Metal belt loop with guide rolls .................................................................................. 44
Figure 29 Felt loop in Hydronip ................................................................................................. 45
Figure 30 Felt specification ....................................................................................................... 46
Figure 31 Pilot machine power consumptions (Snellman 2008) ................................................ 47
Figure 32 Modified parts for drive and gearing .......................................................................... 47
Figure 33 Lifting beam .............................................................................................................. 48
Figure 34 Frame beam modification.......................................................................................... 49
Figure 35 Doctor for metal belt .................................................................................................. 50
Figure 36 Outgoing side save-all............................................................................................... 50
Figure 37 Save-all beside the stretching roll.............................................................................. 51
Figure 38 Mechanical stoppers and inductive proximity switches .............................................. 52
Figure 39 Protective grating for metal belt................................................................................. 52
Figure 40 Protective grating for felt ........................................................................................... 53
Figure 41 Protective screen ...................................................................................................... 53
Figure 42 Measurement system ................................................................................................ 54
Figure 43 Hydronip arrangement .............................................................................................. 55
Figure 44 Instrumentation graph ............................................................................................... 58
Figure 45 Pressure shoe seal after adjustments and first tests ................................................. 65
Figure 46 Trial 1; speed: 190 m/min, lubrication flow: 50 lpm, loading pressure: 10 -70 bar ...... 68
Figure 47 Trial 2; speed: 400 m/min, lubrication flow: 50 lpm, loading pressure: 10 -70 bar ...... 69
Figure 48 Board wad dropping location ..................................................................................... 70
Figure 49 Test 1; speed: 110 m/min, lubrication flow: 45 lpm, loading pressure: 10 -40 bar ...... 72
Figure 50 Test 2; speed: 110 m/min, lubrication flow: 50 lpm, loading pressure: 10 -80 bar ...... 73
Figure 51 Test 3; speed: 110 m/min, lubrication flow: 30 lpm, loading pressure: 10 -80 bar ...... 74
Figure 52 Test 4; speed: 110 m/min, lubrication flow: 15 lpm, loading pressure: 10 -80 bar ...... 75
Figure 53 Test 5; speed: 120 m/min, lubrication flow: 50 -10 lpm, loading pressure: 20 bar ...... 76
Figure 54 Pressure shoe seal after test runs ............................................................................. 77
Figure 55 Press shoe seal edges after test runs ....................................................................... 77
Figure 56 Shoe loading pressure 13 bar, 160 g/m² wad in the time line from 10 to 13 seconds 79
Figure 57 Shoe loading pressure 13 bar, 640 g/m² wad in the time line from 48 to 51 seconds 79
Figure 58 Shoe loading pressure 13 bar, 1600 g/m² wad in the time line from 85 to 87 seconds
................................................................................................................................................. 80
Figure 59 Shoe lubrication pressure; load 13 bar, 160 g/m² wad in the time line from 10 to 13
seconds .................................................................................................................................... 80
Figure 60 Shoe lubrication pressure; load 13 bar, 640 g/m² wad in the time line from 48 to 51
seconds .................................................................................................................................... 81
Figure 61 Shoe lubrication pressure; load 13 bar, 1600 g/m² wad in the time line from 85 to 87
seconds .................................................................................................................................... 81
Figure 62 Shoe loading pressure 38 bar, 1600 g/m² wad in the time line from 73 to 75 seconds
................................................................................................................................................. 82
Figure 63 Shoe lubrication pressure; load 38 bar, 1600 g/m² wad in the time line from 73 to 75
seconds .................................................................................................................................... 83
Figure 64 Shoe loading pressure 60 bar, 1600 g/m² wad in the time line from 44 to 46 seconds
................................................................................................................................................. 84
Figure 65 Shoe lubrication pressure; load 60 bar, 1600 g/m² wad in the time line from 44 to 46
seconds .................................................................................................................................... 84
Figure 66 Shoe loading pressure 80 bar, 1600 g/m² wad in the time line from 86 to 88 seconds
................................................................................................................................................. 85
Figure 67 Shoe lubrication pressure; load 60 bar, 1600 g/m² wad in the time line from 44 to 46
seconds .................................................................................................................................... 86
Figure 68 Press shoe seal after wad tests ................................................................................ 86
1
1 Introduction
1.1 Background
The effectiveness of water removal from a press section is very important for a paper and board
machine’s functioning, efficiency, and economy. The better the wet pressing functions, the better
the paper machine runnability, and the shorter the expensive drying section. Today, the most
effective method for wet pressing is shoe press technology. Even though it is effective and
functional, a number of alternative solutions have been studied to further improve water removal.
Metso Paper’s Roll Development Department has conducted a number of studies concerning a
new type of water removal method for press sections. These studies include rough sketches of
the device and some test runs. The device is also patented. These studies form the basis for this
thesis.
1.2 Objective of the thesis
The objective of this thesis is to gather information for a new and enhanced water removal
method for press sections by studying the system and carrying out test runs. This method is
referred to in this thesis as Hydronip. The main goal is to build a functional testing place for
Hydronip which fulfills all the necessary requirements and has all the necessary information
gathering devices. The design process is carried out by emphasizing the safety aspects aimed
at safe assembly and the test runs stages. The goal is also to gather together usable information
about the nip structure in running conditions, about the seal function, and to test the nip against
paper or board wads.
The main research question in the study is: How will the Hydronip function in test runs? Another
relevant question is: How will the sealing work? A further aim is to get answers to the following
set of sub-questions:
What should be the nip geometry?
2
What should be the construction of the Hydronip?
What loadings can the nip have?
What are the water removal functions?
What are the economic aspects?
Where can it be used?
What are the biggest challenges?
What kinds of actuators are needed?
What kinds of calculations should be made?
What are the key materials?
1.3 Execution of the work
The thesis consists of a theory part, design and construction of the test place, and carrying out
the test runs with information collection. The theory part consists of the principals of water
removal from a press section, Hydronip construction, and the requirements for the test place.
The design and construction of the test place includes the equipment and surroundings that are
needed for executing test runs in the best possible way at certain premises. The safety aspects
are taken into account especially in the test runs but also during the assembly stages. The test
place includes the equipment that is already on the premises and the necessary equipment that
has to be purchased or modified from existing equipment. The test runs are carried out at the
test site at Metso Paper Rautpohja Technology Center and the information is collected by
suitable means. The results are presented in this thesis.
3
1.4 Paper, board and pulp drying on press section
1.4.1
Press section functions
The dry content of the web approaching from the forming section is in the range of 17 -20%.
After the forming section, water is removed from the web by mechanical pressing. This reduces
the web thickness and increases the interfiber contact area. The function of the press section is
to remove the maximum amount of water from the web and to compress it. The goal is to
achieve a sufficiently high wet strength with the press in order to ensure that the web is
transferred to the drying section without any breaks. On the other hand, compressing the web
enables the formation of strong interfiber bonds during web drying. (KnowPap 7.0 2005a)
Wet pressing takes place:
between a press felt and a smooth roll
between two press felts
between a press felt and a transfer belt.
At first, pressing is performed carefully so as not to crush the web formed by the wire.
Excessively strong or fast pressing flushes away fines from the web and, in the worst cases,
crushes the fiber network. In practice, pressing performed in stages is carried out with several
nips built up by rolls. When the web goes through the press nips, the nip forces can be gradually
increased. (KnowPap 7.0 2005a)
Although the objective of pressing is to achieve as high a dry content as possible, the press
power present in the last nip cannot be raised as high as present equipment technology allows.
With excessively high press power applied, the paper sheet thickness would diminish too much,
resulting in too low a level of bulk. Secondly, this would shorten the felt service life and cause
potential roll or felt marks in the paper. At high press powers, the press would be sensitive to
vibration. (KnowPap 7.0 2005a)
4
The dry content level after the press section is from 37% to 55%, depending on the paper grade
and press section. A 1% increase in dry content at the press will diminish the dryer-section
steam consumption by 3 -4%. At a specific web moisture level, pressing is the most economical
way of drying the web. (KnowPap 7.0 2005a)
1.4.2
Effects on paper properties
Wet pressing has a strong effect on paper properties. The press geometry, rolls and their
covers, felts, and linear pressure combinations must be selected to conform to the running
speed and the paper grade to be produced. Wet pressing affects the following quality properties:
(KnowPap 7.0, 2005a)
paper smoothness and symmetry
fines distribution
surface strength
moisture and moisture profile
porosity
bulk
1.4.3
Press sections: main concepts
1.4.3.1 OptiPress
The operating performance of the double-nip OptiPress, (Figure 1,) provides excellent efficiency,
easy tail threading, and speed potential. The closed web run reduces web breaks and improves
runnability. This solution provides very good paper and board quality with symmetrical sheet
properties, good moisture profiles, excellent dry content, and high production efficiency. (Metso
Paper 2010)
5
Figure 1 OptiPress (Metso Paper 2010)
OptiPress features SymBelt shoe press technology, which provides longer dwell times and
higher press impulses that improve dryness after the press section. A high web dry content
creates savings in drying energy. The two shoe presses produce a strong web and ensure a
good moisture profile in the web after the press section. The double-shoe press section
additionally offers extended felt life and lower investment cost through fewer cantilevering
beams, interchangeable counter rolls, and space savings. (Metso Paper 2010)
The OptiPress press section meets the great dewatering capacity requirements of high-speed
paper or containerboard machines. The concept can be applied to both new lines and rebuilds.
(Metso Paper 2010)
1.4.3.2 SymPress B
A SymPress B center roll-based press, (Figure 2,) is a reliable concept with modern shoe press
technology. With this solution, a shoe press replaces a roll before the first open draw. The
resulting boost in dryness fully benefits web runnability in the open draw. If necessary in meeting
end quality requirements, a center roll-based press can be followed by a separate roll press.
(Metso Paper 2010)
Figure 2 SymPress B (Metso Paper 2010)
6
Due to increased linear loads in the first and second press nips, today's center roll-based press
sections are setting new world speed and production records. The most modern center rollbased press sections produce printing paper at speeds in excess of 1900 m/min, and a speed of
2000 m/min is close at hand. (Metso Paper 2010)
In the containerboard production of packaging board from recycled fiber, machines dedicated to
high speeds and light basis weights can be equipped with a SymPress B pressing process. It
can be applied for both new lines and rebuilds. (Metso Paper 2010)
1.4.4
Dewatering
1.4.4.1 Wet pressing mechanism
Wet pressing is usually performed with two opposing rolls that are pressed against each other.
The one or two-felt assisted web is led through a nip built up by rolls. Several factors affect the
water transfer from the paper into the felt and from there on to the roll. The most important of
these factors are press power and the time used, felt and roll surface construction, temperature,
the pulp furnish and refining stage, machine speed and linear pressure as well as the nip
residence time. Web resistance to the flow will be notably increased by the use of intensely
refined pulp with a high fines content. (KnowPap 7.0 2005d)
The first to investigate the wet pressing mechanism in the 1960s was Wahlstrom. His theory was
later completed by Nilsson and Larsson. According to the theory, the nip process is composed of
four different stages as shown in Figure 3. In reality, there is actually no such accurate limit
between the various stages. (KnowPap 7.0 2005c)
7
Figure 3 Nip process stages (KnowPap 7.0 2005c)
Area 1: The total pressure starts increasing in the converging nip. The force between the rolls is
transferred through fiber elastic forces to not only the felt, but also to the web, and there are no
hydraulic forces affected. At this point, most of the air is removed from the nip. (KnowPap 7.0
2005c)
Area 2: The web is fully saturated with water, since there is no air in the web. An increasing
hydraulic pressure forces water to start flowing towards the felt with a lower hydraulic pressure.
Since water can easily find its way into roll grooves or holes, the roll-side hydraulic pressure of
the felt cannot increase. Furthermore, since the felt is also saturated and excess water is
removed to the roll side, the nip will determine the water content of the felt. At the end of Area 2,
the total pressure will reach its maximum. This stage is located before the nip's geometrical
middle point. (KnowPap 7.0 2005c)
Area 3: The nip starts diverging, while the total pressure starts decreasing. Compression of the
fiber structure will continue as long as the hydraulic gradient is positive, i.e. the water flow is
channeled to the roll. At the end of Area 3, the web will reach its maximum dry content in the
press nip. (KnowPap 7.0 2005c)
Area 4: The felt and web are no longer saturated with water. At the beginning of the area, the
web has a maximum dry content, but, during nip divergence, water is again absorbed from the
8
press felt into the paper. This is called rewetting. The rewetting level is affected by the press
temperature and capillary forces transferring water from the structurally coarser felt into the
denser paper. (KnowPap 7.0 2005c)
1.4.4.2 Factors affecting efficiency
Factors affecting wet pressing efficiency are indicated in the wet pressing theory. The maximum
dry content achieved depends on the thickness of the pressed web in the middle of the press
nip. If the web is thin, the thickness depends on the press power used, which is the most
important factor affecting efficiency on thin grades. This type of nip process is called
compression-limited pressing. (KnowPap 7.0 2005c)
On thick paper grades and board, the web has a significant flow resistance when water is
removed from the web by pressing. The hydraulic pressure will then prevent the compression of
the fiber network. This process is called flow-limited pressing. In reality, the nip process is
invariably a combination of pressure and flow-limited nip processes. (KnowPap 7.0 2005c)
On flow-limited paper and board grades, pressing can be increased by allowing water to flow for
a longer time. Then, when the level of the hydraulic pressure generated in pressing at a certain
pressure is not be so high, the web is compressed and the amount of water removed from the
web is greater. The maximum dry content of thick grades was discovered to be (approximately)
proportional to the product of the pressing period and linear load, otherwise known as the
pressing impulse. (KnowPap 7.0 2005c)
With thin grades, it was also discovered that pressing at a constant pressure can be boosted by
extending the pressing period, although the level of water flow is small and only a few fiber plies
can be expected to generate a relatively low flow resistance. Increased pressing results from the
visco-elastic nature of fibers. A visco-elastic web is compressed during a continued pressing
period, even when there is no water flow whatsoever. Moreover, it must be noted that water is
also contained within the fibers. KnowPap 7.0 2005c)
9
1.4.4.3 Factors affecting pressing
1.4.4.3.1 Furnish of paper and refining
Mechanical pulp fibers are considerably stiffer than those of chemical pulp. Accordingly, it is
easier for water to leave webs containing a large quantity of mechanical pulp. Pulp refining will
further soften the fibers and increase the amount of fines. The web flow resistance is essentially
increased by using pulp that has undergone an intense refining process. (KnowPap 7.0 2005c)
1.4.4.3.2 Fillers
The amount of fillers will vary from grade to grade. Fillers are used especially in the production
of SC and LWC-papers. The most common fillers are clay and calcium carbonate. Roughly
speaking, the greater the ash content of the web, the easier it is to remove water from the web
by pressing. An increase of approximately 5% increase in ash content will improve the dry
content level by about 1%. (KnowPap 7.0 2005c)
1.4.4.3.3 Two-sided web
There is a general trend to keep paper quality as uniform as possible for both bottom and top
surfaces. The press section affects the roughness of the surface and surface absorption. These
properties are affected by the water removal direction and felt roughness levels. (KnowPap 7.0
2005c)
1.4.4.3.4 Web bulk in the thickness direction
When using hot pressing, a bulk loss is often faced, resulting in excessive compression of the
web. The bulk indicates web thickness and bulk loss can be reduced by decreasing linear
pressures. The bulk loss is thus contradictory to the target set for dry content. (KnowPap 7.0
2005c)
1.4.4.3.5 Felt properties
There is a tendency to adjust felt properties so that a vacuum is formed in the felt in the
diverging nip in order to prevent water from flowing back to the paper web, i.e. rewetting. This
10
requires that the felt is saturated with water and the backing roll is not opened too wide. In the
nip air is removed from the felt, but in diverging stage the air is coming back first from the roll
side, thus preventing the formation of a vacuum. This often occurs in the last nip, where the
amount of water to be removed is minor and the felt used is new. (KnowPap 7.0 2005c)
1.4.4.3.6 Rewetting
The most significant factor affecting rewetting is the breaking of the water film found at the felt
and web junction, which results in water being channeled to the paper side and wetting the web.
To minimize rewetting, the felt must be separated from the web as fast as possible. Another
factor affecting rewetting is the felt structure. To minimize rewetting, the felt flow resistance must
be as low as possible. (KnowPap 7.0 2005c)
1.4.4.4 Pressing variables
1.4.4.4.1 Temperature
Dewatering is boosted by increasing the pressing temperature. Water viscosity will drop under
higher temperatures, thus diminishing the flow loss. This will also reduce the water surface
tension, facilitating water removal from the fiber mat. The temperature increase results in
softening of the fibers, thus compressing the web at a lower pressure. (KnowPap 7.0 2005c)
However, the paper web is weaker at an increased temperature and the improved runnability
achieved by the increased dry content will often be lost, since the web becomes weaker. The
use of increased temperature and linear pressure may result in the loss of bulk, thus limiting the
degree of temperature increase for some fine paper grades. (KnowPap 7.0 2005c)
In the press section, the increase in the dry content level achieved by an increase in temperature
is much more advantageous than drying performed in the dryer section. As a result, optimizing
the press dry content level must be the objective. (KnowPap 7.0 2005c)
11
1.4.4.4.2 Linear pressure and time
At increasing speeds, the web remains in the nip for a shorter period of time. A normal nip length
for a fast newsprint machine is in the range of 30 -40 mm at the third and fourth press. At a
machine speed of, for instance, approx. 1500 m/min (25 m/s), the nip period lasts from 1.5 to 2
ms. During this period, hydraulic pressure should be built up in the nip in order to remove water
from the web. Figure 4 illustrates the effect of roll diameter and linear load on achieved nip
length and maximum pressure. (KnowPap 7.0 2005c)
Figure 4 Nip pressure in roll press (KnowPap 7.0 2005c)
Water removal from thin paper grades depends mainly on the linear pressure level. It does not
take long for the water to reach the felt. However, the first nip should be double-felted, if the
machine speed exceeds 1000-1100 m/min. With a shoe press higher dryness can be reached
than with roll nip due to the longer time for water removal from the web. In addition to this, the
lower maximum pressure in the nip allows the usage of higher linear loads. (KnowPap 7.0
2005c)
In the production of thick grades (e.g. board), there is no time for the water to flow off the web,
which means that the nip residence time should be extended. For this reason, board machines
and pulp drying machines in particular will often consist of belt-assisted nips, with nips as long
as 250 mm. (KnowPap 7.0 2005c)
12
Shoe press
The shoe press, (Figure 5,) is composed of a variable-crown counter roll withstanding high linear
loads, one or two felts, and a belt or mat equipped with a hydrostatic or hydrodynamic loading
system. The loading shoes applied to first presses were merely hydrodynamic, which limited the
selection of pressing profile in the web's running direction. Subsequent extended nip designs
were equipped with a closed, tube-like belt, which resisted dirt well and did not allow any oil to
escape into the environment. These types of belt edges become more stressed, shortening its
service life. (KnowPap 7.0 2005b)
Figure 5 Shoe press nip structure (KnowPap 7.0 2005b)
Linear loads used in shoe nip presses are approximately 1000 kN/m (max 1500 kN/m), which is
a multiple loading compared to roll presses. The corresponding nip length is from approximately
200 to 300 mm. By means of combining a hydrostatic and hydrodynamic loading shoe (to form a
“hybrid shoe"), loading can be increased towards the end of the pressing period, leading to the
formation of a pressure pulse that resembles a roll nip. Then the pressure can be rapidly
decreased to reduce rewetting more than would be with a hydrodynamic loading system.
(KnowPap 7.0 2005b)
13
Shoe nip presses can be equipped with one or two felts. The double-felted structures are used in
locations where water amounts are large and the pressing process is clearly flow-controlled.
Typical locations of this type are the first presses of the board machine. Single-felted presses
are used in the last press position both in both board and paper machines. By using one felt,
excessive rewetting is avoided and the other side of the paper is smoother. The nip lengths are
the same for both types. (KnowPap 7.0 2005b)
1.4.4.4.3 Machine speed
Machine speed will affect the web's nip residence time, which is an important variable for flowlimited webs in particular. Increased speeds will reduce the dry content after the press, which is
compensated for, if possible, by increasing linear pressures. The higher the dry content is after
the press, the better the runnability at the drying section. Increasing machine speeds leave less
time for conditioning of press felts, thus resulting in a decreasing use of lubrication water. Often
the fourth press is run even without any felt conditioning (no water and suctions). The purpose is
to run felts as dry as possible to facilitate water removal into the felt. (KnowPap 7.0 2005c)
1.4.4.5 Improving nip dewatering
For nip to be as efficient as possible, in addition to higher loads and longer dwelling times, some
other measures should also be considered. Optimizing the entire nip system is essential for
maximizing press dewatering capability.
Nip dewatering can lead to improved press solids, a reduction in vacuum and improved press
fabric life. Modern machines have proven that controlled nip dewatering versus strictly vacuum
dewatering is an efficient way to improve press performance. Nip dewatering has some key
components that must be present in order for the total nip system to work. Doctor blades, saveall pans, moisture monitoring equipment, and proper press fabric designs need to be in place to
effectively nip dewater. This equipment allows for proper control of the nip system. (Buckman
2008)
14
The subject of nip dewatering is taking center stage in the North American marketplace.
European papermakers have been using this dewatering principle very effectively for many
years. Thought only to be possible on very intense press nips on high-speed graphics machines,
it is now taking place on almost every grade of paper. The benefits include:
Higher press solids
Reduction in steam consumption
Cleaner press fabrics
Reduction in chemical usage for press fabric cleaning
Reduced dependency on a vacuum
Less drag and wear on the press fabric surface
Vacuum studies and press water balances conducted today will almost always tell the mill they
do not have enough vacuum. Therefore, the press must be optimized using something other
than increased vacuum capacity. The energy requirements for a vacuum pump also make this
choice prohibitive. New machines and rebuilds are being sold with minimum vacuum in all press
positions. This almost ensures that press dryness figures will only be met by optimizing the nip
system. (Buckman 2008)
1.4.4.5.1 Optimizing the nip system
Nip dewatering requires several essential pieces to be effective:
Proper press fabric design
Proper nip venting (sleeve or roll)
Proper doctoring
Proper save-alls
Proper vacuum control
Proper water measurement equipment
15
1.4.4.5.2 Press fabric design
There are several press design concepts using endless press fabric technology that maximize
nip dewatering from a press fabric point of view. Nip dewatering is all about flow and what
direction the water tries to move in the press fabric. Maximizing straight through flow into the
press nip, while minimizing transversal flow in the machine direction of the press fabric, results in
high press solids. Press solids in excess of 52% have produced on a single nip shoe press with
these types of press fabric designs producing uncoated wood free grades. (Buckman 2008)
Seam press fabrics offer less flexibility in design because of the solid monofilament construction.
There have been development in weaving techniques over the last years that lower the mid nip
caliper of a seamed design. This in conjunction with non-woven materials allows for better nip
dewatering than conventionally woven seam designs. It is important to remember that nip
dewatering can also be achieved with a seamed design. Press solids after the press section
have been above 52% on packaging machines using solid monofilament constructions.
(Buckman 2008)
1.4.4.5.3 Roll and sleeve interaction
Properly designed roll covers and/or sleeves are essential to optimizing the nip. Press suction
rolls on some presses exceed 40% open area with blind drilled/grooved cover designs. These
kinds of roll cover designs have improved press solids in some cases by more than 1%. Sleeve
designs with grooves have added water handling capacity to allow a good flow in the nip.
Optimizing the roll and sleeve is essential to optimizing the nip's effectiveness to produce the
highest dry content. (Buckman 2008)
1.4.4.5.4 Save-alls, wipes and doctors
After the nip is saturated and intense dewatering begins to take place, the nip must be equipped
to remove this water. The roll surfaces and sleeve surfaces must be doctored effectively to
prevent rewet and uneven moisture profile. The water in the grooves must be removed
effectively to maintain the capacity of the grooves to accept the maximum amount of water as
the sleeve or roll returns to the nip. The location of the pans is critical to collecting the water
expressed on the outgoing side of the nip. Modern press concepts have pans that are placed
16
only millimeters from the outgoing side and only millimeters above the press fabric, ensuring that
no water escapes by the pan. The location of save-alls and proper doctoring have led to an
increase in dry content of more than 3% on some press sections. (Buckman 2008)
1.4.4.5.5 Vacuum control
To optimize nip dewatering it is necessary to control vacuum levels. There should be valve
settings that can change the vacuum levels on the uhle boxes to ensure maximum dewatering.
This can also allow a faster break in the press fabric because it will allow the fabric to compact in
the nip with the aid of additional water in the press fabric. This is essential to helping the press
fabric reach its saturation point, which begins the nip dewatering process. Then the vacuum
levels can be managed at that point to allow for maximum total water removal in the nip. It may
be found that a certain level of vacuum dewatering combined with nip dewatering would lead to
a higher total dewatering than simply dewatering exclusively in the nip. Also, in high water load
positions such as the suction pickup roll, the water level in the nip may be too high for the size of
the save-alls. The vacuum level would be critical to maintain a split of water removal that best
fits the machine. (Buckman 2008)
1.4.4.5.6 Water measurement system
To truly understand the behavior in the press nip, the equation of total water removed less total
water added must be known. Many applications do not have the capability to measure total nip
flows. It is essential to measure, graph and optimize water management in the nip. These
measurements can allow making informed decisions on the vacuum level, performance of the
press fabric, startup curve of newly installed clothing and so on. A water measurement system is
expensive but the payback period in production improvement, energy use, and press fabric
evaluation should help justify such an expense. (Buckman 2008)
1.5 Hydronip
Hydronip is based on the patent for “PRESSING APPARATUS FOR A PAPER- OR BOARDMAKING MACHINE FOR REMOVING FLUIDS FROM A WEB BY PRESSING, AND A
METHOD FOR TREATING A WEB IN A PAPER- OR BOARD-MAKING MACHINE”. The object
17
of the invention is to provide an improved pressing apparatus for a paper- or board-making
machine and an improved method for treating a web in a paper- or board-making machine for
removing fluids from a web by pressing, wherein the dewatering efficiency is improved with a
simple structural constitution of the pressing apparatus and simple control thereof. (Pihko &
Savela 2007)
1.5.1
Function
The general function of the Hydronip, (Figure 6,) is illustrated in as follows. The pressing
apparatus comprises at least one belt which guides the web, wherein the belt is impervious to
fluids and forms an endless loop. At least one nip is provided, which is formed between a press
roll and a pressure means, and the guided web is arranged to pass through the nip. The
pressure means comprises at least one pressure chamber containing a pressure medium and
extending along the length of the nip in the web moving direction so that the pressure medium
has direct contact with the belt. The pressure chamber has a pressure-operated sealing member
which cooperates with the belt. The sealing operating pressure is adjusted in accordance with
the pressure acting in the pressure chamber. (Pihko & Savela 2007)
Figure 6 Hydronip general function. (Pihko & Savela 2007)
1.5.1.1 Sealing member
The sealing member is adapted to act in accordance with the rising pressure of the pressure
medium in the pressure chamber in order to increase the pressure acting on the belt. Figure 7
presents an edge portion of the pressure chamber and a pressure operated sealing member.
18
This improves the dewatering efficiency of the pressing apparatus arrangement. The pressure
medium in the pressure chamber cooperates with the belt, i.e. has direct contact with the belt. A
predetermined pressing pressure is maintained only by the pressure in the chamber. As a result,
the structure of the whole pressing apparatus including the pressure chamber is simplified
because no further means for pressing are required. The sealing between the belt and the
pressure chamber is carried out using an adjustable gap between the belt and the pressure
means. This increases the range of pressure from very low pressures to high pressures in order
to avoid heavy leakage of the pressure medium. The lubrication between the belt and the
pressure means may be achieved by the pressure medium in order to reduce wear of the
corresponding contact portions between the belt and the pressure means (particularly the
pressure-operated sealing member). (Pihko & Savela 2007)
Figure 7 Edge portion of a pressure chamber of a pressure means with a pressure-operated
sealing member. (Pihko & Savela 2007)
1.5.1.2 Belt
The belt of the pressing apparatus consists of one metal, synthetic, and ceramic material or
various different combinations of at least two of these materials. Where the belt material is made
of metals, synthetics and/or ceramics, a corresponding hardness, durability, and heat transfer
capacity of the belt is achieved. Such materials exhibit only small deterioration phenomenon
during the operation of the belt, so that the pressing apparatus has good performance
characteristics throughout its durability. In addition, the heat transfer capacity of the belt supports
the dewatering effect of the web while pressing against the belt during the passage of the web
through the nip. (Pihko & Savela 2007)
19
The belt may have a smooth surface and/or an embossed surface. Also, the belt may be heated
by an auxiliary heating means which is located upstream of the nip in the web moving direction,
or is heated by the pressure medium itself, which is heated and has direct contact with the belt in
the pressure means. Where the belt is used to heat the web, a lot of heat is transferred from the
belt to the web. Due to the thermal conductivity of the belt, web dryness and smoothness is
increased. Also due to the heated belt, the water in the web is transferred to the felt. A
continuous steam pressure and vapor flow from the web to the felt prevents the occurrence of
rewetting water flows from the felt to the web after the nip in the web moving direction, where the
pressure caused by the nip ends and expansion of the web and felt occurs. This will increase the
dryness of the web after the nip. The nip is an extended nip which extends in the moving
direction of the web up to 150 cm, or more preferably up to 70 cm. (Pihko & Savela 2007)
1.5.1.3 Pressure means
The pressure means of the pressing apparatus comprises different pressure chambers which
are successively arranged along the length of the nip in the web moving direction and in which
different pressures and/or temperatures act as illustrated in Figure 8. The respective pressures
of at least part of the pressure chambers are adjusted by controlling sealing leakage flow from
one pressure chamber to another pressure chamber with a different pressure/temperature. In
one pressure chamber there is a higher pressure than in another pressure chamber. With the
above arrangements, in which several pressure chambers are successively arranged in the web
moving direction, the respective pressure chambers may be provided with sealing elements
between the chambers. These sealing elements may also be adjustable by pressure acting in
the respective chamber. The sealing leakage flow from one pressure chamber to another
pressure chamber may be controlled. This enables the use of a longer nip (an elongated nip)
and therefore a better shape of the pressure curve over the nip. That is, the pressures in the
chambers increase in the web moving direction so that a pressure impulse on the guided web
may be adjusted smoothly. Further, web rewetting decreases between the chambers in which
the pressures are relatively low. Higher heat transfer effects in the extended nip and higher
dryness of the web after passing through the nip are achieved. Additionally or alternatively to the
different pressures in the different pressing chambers, different temperatures may be provided
with the pressure medium. For example, when a high temperature pressure medium is used in
the end pressure chamber(s) in the web moving direction which heats the belt, the web drying
rate of the belt is improved so that a higher dryness and smoothness of the web can be
20
achieved. The sealing operating pressure is set to lock the pressure-operated sealing member in
a definite position. This further reduces the control effort but allows easy access to the belt when
the press section is switched off. (Pihko & Savela 2007)
Figure 8 Pressure chamber of a pressure means with several chambers and pressure- operated
sealing members. (Pihko Riku & Savela Jyrki, 2007)
The sealing member slidably contacts the belt on the rear side of the belt, on which rear side the
web is not guided. This definition includes an arrangement that the pressure medium within the
pressure chamber provides a finite lubrication film between the pressure-adjusted sealing
member and the rear side of the belt (i.e. sliding occurs on a thin liquid film). The rear side of the
belt is on the side opposite to the side on which the web is guided through the nip. This
lubrication effect decreases the friction forces between the sealing and the belt, and therefore
the wear resistance is increased. (Pihko & Savela 2007)
The nip is an extended nip between the press roll and the pressure means in the web moving
direction. Edge seals seal the pressure means against the belt at the outer edges of the
pressure means in order to avoid the escape of the pressure medium to the ambient outside
pressure means. Pressure means are adapted to press against the belt towards the press roll in
arbitrary radial directions. And, the pressure medium in the pressure chambers is pressed
against the belt so that the fluids in the web are transferred to at least one felt and/or to the
press roll. (Pihko & Savela 2007)
21
1.5.1.4 Nip geometry
On at least one side of the guided web, a felt is arranged to travel along the nip. The felt is
detached from the web immediately after the web has passed through the nip along the web
moving direction in order to avoid rewetting of the web after passing through the nip. The
detached felt may be guided downwards from the belt after passing through the nip so as to
quickly remove any collected water from the vicinity of the nip. According to the above preferred
process, the belt is immediately detached from the felt after the belt has passed through the nip.
This is to minimize web rewetting after the nip. Where the belt is underneath the felt, an opening
gap (i.e. a gap after the web has passed through the nip) between the belt and felt helps to lead
water flow coming from the nip away from the belt because this opening gap creates a negative
pressure. This means the rewetting of the web guided on the felt is minimized. It is possible to
arrange a save-all means after the nip in the web moving direction. The save-all means is able
to collect the water coming from the nip through the felt. (Pihko & Savela 2007)
Figure 9 shows examples for detaching the web W (see broken line in the figures) from the felt
100 immediately after the web W has passed through the press nip so that rewetting of the web
after passing through the nip can be limited or even avoided. According to the pressing
arrangement with the belt 20, the felt 100 and the pressing apparatus (i.e. the loading chamber 1
or 111 and the press roll 2) along the press nip, both the felt 100 and the belt 20 are guided
downwards after passing through the nip along the web moving direction. This pressing
arrangement (a so-called "downwards-directed" pressing arrangement of the belt 20 and the felt
100) ensures that the belt 20 still guides the web W after the press nip, wherein the web W is
smoothly detached from the felt 100. In order to further improve the water removal from the web
by pressing, it is preferable to use increasing pressure and/or temperature levels towards the
end of the press nip(s) formed by the pressure means having at least one pressure chamber, the
belt and the press roll as mentioned in the above embodiments. The last nip(s) of a press
section should have higher pressure levels compared to the previous nips in order to efficiently
remove water from the web. It is also preferable to use higher temperatures towards the end of
the respective press nip along the web moving direction. This provides a high dryness rate of the
web towards the end of the nip. (Pihko & Savela 2007)
22
Figure 9 Detaching the web after the web has passed through the nip (Pihko & Savela 2007)
1.5.2
Comparison of different dewatering methods
In the following chapters some advantages and disadvantages are compared between different
pressing methods that are or can be used in a press section. As is known, shoe press
technology is the most efficient solution for dewatering by pressing. Even though it is an effective
and efficient method it has some downsides that have to be taken into consideration. Another
method that could be used in a press section is Condebelt. Also this method has its advantages
and disadvantages. The last pressing method in the comparison is Hydronip.
1.5.2.1 SymBelt/SymBelt mini shoe
As already previously stated SymBelt shoe press technology has gained in the last few decades
its position as the most efficient pressing method used in press sections. Since it has been in
use already for a long time and it is proven technology that can be easily applied to new
machines and rebuilds. Some other advantages and disadvantages with shoe pressing are listed
in the following. (Onnela 2009a)
Shoe pressing benefits for printing and writing grades
Higher production capacity
23
Better runnability thanks to increased dry content
Lower draw
Possibilities for bulk preservation
Decreased web two-sidedness and improved printability.
Additional benefits for containerboard and cartonboard grades:
Improved density-related strength properties like burst and SCT
Increased bulk in the final product due to gentle dewatering and low specific pressure on
the fiber network
Improved bending stiffness properties.
Even though shoe press technology is well functioning and efficient there are some
disadvantages that can be developed and enhanced.
Belt durability is a key factor. Since the belt is made of polyurethane it is vulnerable for
inner and ambient impurities which can shorten its lifecycle notably and even without
impurities it is a wearing part that can fail without warning.
SymBelt construction is quite complex and there are quite many special parts.
1.5.2.2 Condebelt
Condebelt is a method to dry paper and board. Initially, the process was simply intended to
improve the drying of paper and board and it was only later that the big increases in strength
properties became evident. The Condebelt drying process is now used in drying sections but it
could be utilized also in the press section. In the Condebelt drying process paper is dried
between two steel belts, as shown in Figure 10. (Lehtinen 1998)
24
Figure 10 Condebelt drying process (Lehtinen 1998)
The web travels between a steam-heated upper and a water-cooled lower steel belt. The hot
upper belt evaporates the moisture in the web and which again will condense on the cooled
lower belt. Water is carried away by the steel belt and coarse wire. The fine wire between the
web and the coarse wire reduces wire marking on the backside. The web surface against the hot
belt becomes very smooth. (Lehtinen 1998)
If Condebelt were used in a press section, there would be some advantages and disadvantages
that are listed below.
Advantages: Long nip, high loads
Disadvantages: Expensive and complex structure, sealing system is still challenging
1.5.2.3 Hydronip
Hydronip combines the most essential features of both SymBelt shoe pressing technology and
Condebelt drying technology. Therefore it also has all the good qualities from both of these
drying technologies. Compared to SymBelt and Condebelt, Hydronip has a few advantages
which are listed below. (Pihko & Savela 2007)
Compared to SymBelt, it does not have a polyurethane belt, which is the most vulnerable
part in SymBelt technology. Instead it has a metal belt which is more durable and already
proven technology throughout Condebelt.
25
Compared to these other drying methods it is simpler.
Hydronip is still in the early stage of development so it has some unsolved issues that have to be
taken into account:
Sealing function
Construction
Durability against paper or board wads
1.5.3
Nipload impulse curves and comparison of existing applications
As earlier stated, what happens in the nip is the key for sufficient water removal. The pressure
distribution caused by the load applied to the nip is very important and affects greatly the paper
or board properties and water removal. The pressure distribution in the nip can also be
described with nipload impulse curves. The most typical nip structures with nipload impulse
curves, their advantages and disadvantages are discussed more precisely next.
1.5.3.1 Dynamically loaded shoe nip
Figure 11 shows the typical pressure curve of the hydrostatic press. The lubrication pockets in
the shoe cause a pressure plateau acting similar to the static press. The hydrodynamic shoe
allows a smaller maximum pressure in the nip with identical line force and shoe length,
contributing essentially to the densification of the web. (Wasserman and Estermann 2002)
Figure 11 Hydrostatic and hydrodynamic pressure curve (Wasserman and Estermann 2002)
26
As the hydrodynamic shoe creates an evenly rising pressure curve, it also causes a lot of shear
forces since there is no oil pocket to reduce, as Figure 12 illustrates. This produces many
unwanted problems which are listed below.
Increased power consumption
Higher shoe and belt temperatures
Inferior high-speed runnability
Increased friction forces on the belt surface
Increased sensitivity to paper wads due to impaired lubrication.
Figure 12 Shear forces in hydrodynamic shoe (Onnela 2009b)
1.5.3.2 Hybrid loaded shoe nip (SymBelt)
The shape of the hybrid loaded press shoe is designed to minimize the amount of friction
generated, i.e. the amount of operating power required, and to deliver the desired nip pressure
and nip profile. The press shoe employs a hybrid design that combines the best features of
hydrostatic and hydrodynamic shoes. The operation is based on three machine-direction
pressure zones, which are illustrated in Figure 13. (Onnela 2009b)
27
Dewatering stages in shoe pressing:
1. Slow pressure buildup for gentle dewatering
2. Stable dwell zone for high dewatering capacity
3. Peak pressure zone for maximum dryness.
Figure 13 Pressure zones in hybrid shoe (Onnela 2009b)
The length of the press shoe, and therefore also the pressure curve, can be varied, as Figure 14
shows. Press shoe loads can be up to 1500 kN/m. (Onnela 2009b)
Figure 14 Shoe length and pressure curve can be varied (Onnela 2009b)
Oil is fed through the hydrostatic part, the pocket, in the center of the press shoe. The pressure
curves of the nip can also be controlled with the length of the pocket as shown in Figure 15. A
short oil pocket creates a long and stable pressure buildup with a short stable dwell zone
compared to quite quick pressure buildup and a long stable dwell zone with long oil pocket.
(Onnela 2009b)
28
Figure 15 Comparison of short and long pocket (Onnela 2009b)
With optimal pocket length many benefits can be achieved:
Reduced power consumption
Lower shoe and belt temperatures
Improved high-speed runnability
Reduced friction forces on the belt surface
Reduced sensitivity to paper wads due to improved lubrication.
The pocket results in very low shear stress due to the thick oil film and that leads to a minimized
power loss. In Figure 16, a hydrodynamic and hybrid shoe shear stress distributions have been
compared. This shows the advantage of having an oil pocket and the effect of reduced shear
forces. (Onnela 2009b)
Figure 16 Hydrodynamic and hybrid shoe (Onnela 2009b)
29
The same issue can be seen from the relative power consumption. The Figure 17 illustrates the
relative power consumption at 1500 m/min machine speed for a hydrodynamic and hybrid shoe.
The hydrostatic oil pocket will decrease the total shear forces, which is beneficial for power
consumption, shoe temperature, and belt life. (Onnela 2009b)
Figure 17 Relative power consumption for hydrodynamic and hybrid shoe (Onnela 2009b)
1.5.3.3 Hybrid loaded shoe nip with multiple pressure levels (Hydronip)
Hydronip emphasizes the best properties of SymBelt shoe press technology. Therefore the
previously described features with the SymBelt shoe can also be applied to Hydronip. Hydronip
also has some other benefits compared to SymBelt shoe nips. The maximum loads can be
increased from the typical shoe press loads. According to Korolainen’s study, with today’s load
joint technology, maximum loads can be up to 1600 kN/m with wide paper and board machines.
With narrow paper and board machines the load can be 3200 kN/m. (Korolainen 2011)
The other limiting factor is the counter roll. The maximum diameter of the Sym roll with today’s
technology is 1700 mm. The maximum load with this kind of roll could be as much as 1500 kN/m
with wide paper and board machines. With narrow paper and board machines the load can be
3000 kN/m. (Korolainen 2011)
30
Another benefit is that the Hydronip shoe nip length can be increased many times compared to
the SymBelt shoe nip width, which can be over 300 mm. The construction of Hydronip is still not
totally finished, which has to be taken into consideration when comparing different technologies.
1.5.3.3.1 Hydronip test runs with MTS
Hydronip test runs were carried out with MTS (Material Test System) testing equipment. It is
universal test equipment for testing different materials. In this case it was modified to correspond
with paper and board machine surroundings. In addition, the samples were made especially to
correspond to paper and board samples. For analysis, precision scales and laboratory
measuring were used. (Pihko 2011)
The target for the tests was to study the dryness content of relatively thick carton samples after
different pressing dewatering measures. Samples were taken at a dryness level of 45% and they
were moistened to a dryness level of about 35%. The root length of the press shoe pulse was
about 38 ms. This corresponds to a shoe length of 500 mm at a speed of 800 m/min. The
samples were heated with a metal belt at temperatures of 40°C, 80°C, 90°C, and 100°C. (Pihko
2011)
Samples were kept 0.5 to 1 seconds against the metal belt before detaching. 0.5 seconds
corresponds to the web being in contact with metal belt at 4 meters with a speed of 500 m/min
and 1 second corresponds with the web in contact for 8 meters with a speed of 1000 m/min. The
dry content of samples was determined after nip pulses. A Tamfelt Ecostar felt and a smooth
warmed metal pressure mean were used as contact surfaces. The results are presented in
Figure 18. (Pihko 2011)
A basic pressure impulse with a 250 mm long shoe with nip pressure (6MPa) produces a
dry content of 46% with one felt and 44% with two felted constructions. When one felted
construction is impacted with a 100°C metal belt, it produces a dry content of 49%.
A Hydronip pressure impulse with a 500 mm long shoe with nip pressure (6MPa)
produces a dry content of 49% with one felt and 48% with two felted constructions. When
31
one felted construction is impacted with a 100°C metal belt, it produces a dry content of
51%.
A Hydronip pressure impulse with a 1000 mm long shoe with nip pressure (6MPa)
produces a dry content of 51% with one felt and 49% with two felted constructions. When
one felted construction is impacted with a 100°C metal belt, it produces a dry content of
57%.
A Hydronip pressure impulse with a 2000 mm long shoe with nip pressure (6MPa)
produces a dry content of 53% with one felt and 51% with two felted constructions. When
one felted construction is impacted with a 100°C metal belt it produces a dry content of
59%.
Figure 18 MTS test run results (Pihko 2011)
1.5.4
Comparison of nip structure effects on dryness development
As the SymBelt shoe nip and Hydronip have almost same types of nip profiles they can be
observed as a shoe press in the following demonstrations. Figure 19 shows the principle graph
for different nip profiles. The roll nip dwell zone is very short and the maximum pressure in the
nip rises as the load is increased from 70 kN/m to 130 kN/m. During drainage, steep pressure
gradients result in high flow velocities, possibly causing fiber displacements in the form of
crushing. When compared to shoe nip, the maximum pressure stays at a relatively low level, and
32
the dwell zone lengthens notably, which gives the water more time to move from the web and
provides a gentle pressing maintaining bulk. Also with a gradually ascending pressure profile,
the web structure in the z-direction shows more uniform densification over the web thickness.
(Pirinen 2010)
Figure 19 Principle graph of nip pressure profiles (Pirinen 2010)
Figure 20 illustrates the dryness development through a press section. As can be seen the
dryness level increases by the end of the press section, which means that the first nips merely
affect the paper or board web properties and the dewatering becomes more effective in the
following nips. (Pirinen 2010)
Figure 20 Dryness development through press (Pirinen 2010)
Press runnability is improved via a dryness increase with the shoe press compared to the roll
press, as Figure 21 illustrates. Depending on the machine speed, the dryness improvement can
be from 5% to approximately 8%. Also, the higher dryness leads to higher production capacity,
possibilities for bulk preservation, lower draw, decreased web two-sidedness, and improved
33
printability. It also provides improved density-related strength properties such as burst and SCT
as well as improved bending stiffness properties. (Onnela 2009b)
Figure 21 Dryness after press section (Onnela 2009b)
1.5.5
Comparison of the cost effects of roll and shoe press rebuilds
The cost effects of different press section solutions are compared next. Figure 22 illustrates the
break even points for shoe presses compared to roll presses. The rebuild for a standard shoe
press requires a shutdown of approximately 10 days. As machine speed can be increased by
20%, the added production covers the shutdown costs so that the cumulative profit loss because
of the shutdown will be covered in about six months. (Pirinen 2010)
Figure 22 Break even comparison (Pirinen 2010)
34
The payback on the investment due to the increased production is illustrated in Figure 23.
(Pirinen 2010)
Figure 23 Payback on the investment (Pirinen 2010)
In the overall view of different kinds of press section alternatives presented in Figure 24, the
solutions are compared according to some key facts. In this case a paper machine for fine paper
is used as the reference. The linear load in roll a press is approximately 120 -130 kN/m, whereas
in a shoe press it can be from 600 -1500 kN/m. The dry content can be increased by 3 -6% in a
shoe press. A production increase can be even 12 -24% in a shoe press compared to a roll
press. The cost estimation for shoe press investment is approximately EUR 5.5 -7 million, and if
a Mini shoe press is considered, the costs can be from EUR 2 -5 million. (Pirinen 2010)
Figure 24 Shoe press alternatives (Pirinen 2010)
35
1.5.6
Profitability comparison of a shoe press and Hydronip rebuild
The comparison of a shoe press against Hydronip is relatively difficult since there are no acute
rebuild specifications and cost estimations yet. Even then it can be achieved with some
simplifications and estimations.
Since shoe press deliveries have been part of Metso Paper’s product scope for a long time the
rebuild specification and cost estimation can be done exactly. In the following, a rebuild delivery
has been taken as the reference when compared to an estimated Hydronip rebuild. The press
section rebuild concerns the third nip in a SymPress B type of press section. New parts included
in the rebuild are shown in Figure 25 in blue. The existing machine was started up in 1995. The
machine produces uncoated wood-free paper and the wire width is approximately 7000 mm. The
machine speed is 1400 m/min. (Kairus 2009)
Figure 25 Shoe nip rebuild scope (Kairus 2009)
Delivery scope for SymBelt shoe press rebuild in this case includes:
SymBelt roll, spare shoe and inside support
SymZLC center roll with spare roll and drive for center roll
Frame parts, moving devices, roll doctor and save-all for SymBelt roll
36
Hydraulic center for SymBelt and SymZLC roll, Lubrication and controls
Supervising, start up and spare parts
The total costs of this kind of rebuild would be from EUR 5 -7 million, as presented earlier. A
SymBelt roll requires polyurethane belts that have a lifetime from a few months to a few years,
depending on the paper or board grade involved. Belts are vulnerable to inner and ambient
impurities and those may notably affect the belt life time. The total estimation for one year’s use
could be two to three belts. (Pirinen 2010)
The Hydronip structure is not yet fully developed and when it is compared to a typical shoe press
investment some simplifications and estimations have to be made. If it is assumed that the
rebuild for Hydronip would be similar to the previously described shoe press, the rebuild scope
would include the following items:
Hydronip and possible spare shoe
SymZLC center roll with spare roll and drive for center roll
Frame parts, moving devices, roll doctor and save-all for Hydronip roll
Hydraulic center for Hydronip and SymZLC roll, Lubrication and controls
Supervising, start up and spare parts
Hydronip metal belt total estimation for one year’s use is one piece. Hydronip metal belts, on the
other hand, may endure better against the inner and ambient impurities which may lead to much
longer belt lifetimes. The endurance against paper/board wads can be higher because of the
nonflexible structure compared to a polyurethane belt.
According to these estimations and simplifications, differences between component costs would
be SymBelt roll costs compared to Hydronip costs and polyurethane belt costs compared to
metal belt costs. Compared to a SymBelt roll, the Hydronip cost could be approximately the
same. The metal belt costs would be approximately half of the polyurethane belt costs.
37
The dry content increase with SymBelt would be from 3% to 6% and, as earlier presented, the
production increase or steam consumption decrease would be from 12% to 24%. According to
Pihko’s earlier research with Hydronip in this kind of position, the dry content increase could be
approximately 5% more than when compared to SymBelt (Pihko 2011). If the metal belt is
heated, the difference can be even more. Roughly estimated the production increase could be
broadly twice as much as with SymBelt. (Pirinen 2010)
If it is presupposed, according to Pirinen’s research, the shutdown for a Hydronip rebuild lasts
the same 10 days as it does with a SymBelt rebuild, the break even for Hydronip would be under
five months compared to six months with SymBelt. The payback on the investment in SymBelt is
approximately 30 months. With the same estimations for Hydronip the payback on the
investment would be approximately 24 months. (Pirinen 2010)
2 Test site requirements, design, implementation, and use
2.1 Objective for test site arrangement
As already stated earlier in the introduction, the main goal for this thesis is to build a functional
test site for Hydronip which fulfills all the needed requirements and has all the needed
information gathering devices. The goal is also to gather usable information about the nip
structure in running conditions, about the seal function, and to test nip loading against paper or
board wads.
2.2 Starting point and existing facilities
Test runs are carried out at the separate test site at the Technology Center Rautpohja. Test runs
had been conducted already for Superhydronip at these facilities. Figure 26 introduces the
Superhydronip assembly with its components. The aim then was to study press shoe lubrication
with water and the sealing system of the shoe. The test arrangement and equipment included:
38
Superhydronip assembly
Hydrostatic shoe
Hydrodynamic shoe
Press roll D1200
Press shoe
Motor M3BP225 SMA B3
4P 37 kW, with vee belt
gearing
Figure 26 Superhydronip assembly
Test runs for wire stretching and guide devices were also conducted at the same location. The
test arrangement and equipment included the following components and the assembly is
illustrated in Figure 27:
Stretcher and guide
test arrangement
Lead
rolls,
five
pieces D450
Edge
position
sensor
o
Mounting
tools
Hydraulic stretcher
Figure 27 Stretcher and guide test arrangement
Both of these arrangements can be utilized for Hydronip. All the essential components can be
utilized but some additional equipment and systems are needed to achieve all the required
properties from the machine and to be able to collect all the necessary information.
39
2.3 Basic requirements for the design
Metso Paper's products are designed to be safe. This also includes test site arrangements and
certain procedures have to be followed. Primarily known hazards are eliminated at the design
stage. Whenever this is not possible, guards are placed around hazards or they are pointed out
using warning signs. Operating and maintenance instructions provide further guidance with
respect to hazard areas. (Hakala 2002)
The risk assessment is a base in all design processes. In this case the risk assessment and risk
factor listing are combined to evaluate and indicate the risks and hazards that may occur during
the Hydronip assembly and use.
Risk analysis
Risk analysis was performed as part of the risk management process for this project. The data
was based on risk discussion workshops where potential issues and risks were identified.
The risk workshop was chaired by a small group of individuals from the various departmental
functions. The participants were: project manager, safety manager, development manager,
supervisors, and pilot plant manager, and the participants were collected together so as to cover
every risk element from different perspectives. (Hakala 2002)
The outcome of the risk analysis was the creation or review of the risk register to identify and
quantify risk elements for the project and their potential impacts. Given that risk management is
a continuous and iterative process, the risk workshop members would regroup at regular
intervals and at project milestones to review the risk register mitigation plans, make changes to it
as appropriate, and, following those changes, re-run the risk model. By constantly monitoring
risks these can be successfully mitigated, resulting in cost and schedule savings with a positive
impact on the project. (Hakala 2002)
40
During the assembly and modification phase the following risks may occur:
Dropping and tilting of objects while changing the metal belt
Incision danger while working with the metal belt
Sparks
Tripping, slipping, and crashing
Falling
Unexpected starting
Hand-operated machines
Risks that are originating from the machine or from test runs
Crushing / trapping in
Shearing
Clinging in moving / rotating part / nip
High-pressure liquid / gas jet, or the risk of ingress
Contact with energized parts
Eye damage
Loss of hearing
Flying of felt or metal belt pieces
Control of the machine
Electricity
Hydraulics
Pneumatics
41
The majority of the risks are taken into account by preparing extensive instructions and manuals
for assembly, implementation, use, and service. People working with the machine have to
become acquainted with the essential instructions and manuals. The main risks are minimized
through the construction and safety equipment of the machine. Some risks are reduced by
personal safety equipment that has to be used. Other risks can be managed with general
cleanliness, good order, and correct working methods.
Risk factor listing
The risk factor listing was prepared according to the SFS-EN 1050 standard. The outcome of the
risk factor listing includes risk elements and the explanation of those. It also includes examples
and footnotes concerning those mentioned earlier. The risk factor listing consists of different
categories that are presented below:
1. Mechanical risk factors
2. Risk factors due to electricity
3. Temperature related risks
4. Noise (due to work stage or surroundings)
5. Vibration (due to machine, device or working environment)
6. Radiation
7. Materials
8. Risks due to ignoring ergonomic principles
9. Risks due to machines used
10. Risks, hazards, and dangerous situations due to movement
11. Risks due to working place
12. Risks due to lifting
13. Risks due to lifting individuals
42
14. Mental risk factors
The risk factor listing presents risks more accurately. The risks are taken into account as
described in risk analysis.
2.4 Basic functionality and layout of the Hydronip pilot machine
To be able to create an efficient and functioning test site a preliminary layout had to be created
to outline what kinds of components, devices, and measuring equipment was needed. The basis
for the layout design was the Hydronip patent and some rough sketches that were done earlier.
Existing facilities also determined some limits because they were meant to be utilized as
effectively as possible.
As the earlier test runs with Superhydronip were carried out by loading a press shoe lubricated
with water against the mating roll, some additional equipment was needed to create the test
scene for Hydronip. This was discussed in meetings to be sure that all the necessary functions
and properties needed were covered.
In the Hydronip press solution the press shoe is pressed against the press roll which acts as a
counter roll. A metal belt loop is located around the press shoe which acts as a shell for
Hydronip. The metal belt loop consists of two corner guide rolls and a stretching guide roll. The
guiding and stretching of the belt is managed by crowned guide rolls and a stretching guide roll.
For the belt change a lifting beam was needed to cantilever the frame beam. By cantilevering the
frame, the metal belt is possible to install to the machine as a whole.
The press shoe is lubricated with water which is fed through the press shoe. Because of that the
existing water removal system had to be improved so as to prevent water misting around the test
place. For this purpose a doctor was also needed on the guide roll after the nip to clean the
43
metal belt and prevent the water from misting around. The doctor was also needed for the wad
test to collect the wads for the water removal system.
A press felt is located around the press roll which removes the water from the paper or board.
The felt has to be seamed felt because it cannot be installed to the machine as a whole. The felt
guiding and stretching is carried out with guide rolls, pneumatic guide, and hydraulic stretcher.
The Hydronip shoe with metal belt, felt and the press roll creates the nip.
Since the designed machine speed was 1500 m/min, the gearing had to be changed. The
existing gearing was a vee belt which was modified to a cogged belt. Because the machine
speeds can become quite high an efficient safety system was also required. The metal belt was
surrounded with safety nets and mechanical stops. The felt was surrounded with a safety net.
The measuring equipment plays a key role in the information gathering and that had to cover all
the necessary variables that had to be monitored.
The additional equipment needed for Hydronip is presented in the list below:
Seamed felt for shoe press application. The felt has to be seemed because there is no
possibility for cantilevering and that would be the prerequisite for having seamless felt.
Metal belt for Hydronip shoe loop.
Crowned felt rolls for metal belt loop
Crowned felt stretching roll for metal belt
Security limit switch for metal belt
Motor/drive
Measuring points and computer for analyzing
Doctor for metal belt
44
Water removal system
Safety net
Lifting beam for cantilevering the frame
2.4.1
Metal belt loop with guiding and stretching
Because the press shoe was already positioned for Superhydronip test runs, the metal belt loops
had to be located around it. Another issue was how to arrange guiding and stretching for the
metal belt so that it would maintain its position in the machine cross direction and keep the
desired belt tension. The experience from a freshly introduced metal belt calender demonstrated
that metal belt guiding should be arranged by crowned guide rolls which would also take care of
metal belt stretching. According to that, the metal belt loop was designed as shown in Figure 28.
The press shoe is in its original place. Crowned and coated guide roll was positioned on both
sides of the press shoe for position 81 in the figure below. The rolls were received from pilot
machine spare rolls and they were coated with rubber and balanced suitably for this position and
machine speed. Position 71 is a crowned and grooved guide roll that can also be moved in the
vertical direction. The roll was designed and manufactured for this position. This roll carries out
the metal belt stretching. All the guide rolls also needed bearing houses and pedestals that were
designed and manufactured for this. All the drawings are provided as a part of this thesis.
Figure 28 Metal belt loop with guide rolls
45
The metal belt material is an accurate steel belt which is laser cut and welded to the whole loop.
The dimensions are:
Thickness 0.6 mm
Width 500 mm
Length 4678 mm
2.4.2
Felt loop with guiding and stretching
As the stretching and guiding tests were carried out earlier at the same location, the devices
could be utilized for Hydronip. Some modifications had to be made though, and these are shown
in Figure 29. The hydraulic stretcher was in its position and it could not be changed, so the felt
stretching was carried out as it was earlier. The guide roll with pneumatic guide was previously
positioned on the vertical beam beside the metal belt loop in the Hydronip arrangement, so it
had to be relocated. Since the guide roll location towards felt geometry is essential for efficient
felt guiding, the guide roll with pneumatic guide had to be moved between the press roll and
stretching roll for optimal felt guidance. A felt edge position sensor with fabric guide valve was
also moved on the frame beside the guide roll.
Figure 29 Felt loop in Hydronip
46
The felt is seamed felt Ecoseam 9504 form Tamfelt. The felt is typically used in SymPress B
shoe press positions. The specification is shown in Figure 30.
The specification is as follows:
Thickness 3-4 mm
Length 13000 mm
Width 550 mm
Base weight 510 g/m²
Gross weight 1360 g/m²
Roving amount in the felt is 800 g/m²
Surface rovings are fine 6.7 dtex and bottom and
reverse side roving fine 17 dtex.
Figure 30 Felt specification
2.4.3
Drive and gearing
The existing drive had a 37 kW driving output. Since it was used only for rotating the wire, and in
the Hydronip application it would need to rotate felt while loaded with the shoe, it had to be
checked that the drive had enough power output. Since there are not very good calculations for
the required power, measurements made in the pilot machine were used to determine if the
output was sufficient. The machine speed target for Hydronip is 1500 m/min. The maximum
loading power is 400 kN/m and the nip length is 270 mm. Some trials were carried out in the in
pilot machine, where only the 3rd press was rotated with the felt and transfer belt in the SymBelt
nip. This corresponds quite well to the Hydronip application, which is press roll rotated with felt
and a metal belt in the nip. As can be seen from Figure 31, the power consumption with SymBelt
is approximately 120 kW with a speed of 1500 m/min. The SymBelt shoe nip is 700 mm and if it
is assumed that the Hydronip power consumption will be the same towards the width meter, the
required power need would be approximately 43 kW. Since it is quite near the existing drive
capacity it was decided to proceed with that.
47
Figure 31 Pilot machine power consumptions (Snellman 2008)
Since the speed was increased from the earlier test with Superhydronip, the gearing had to be
changed. The existing gearing was a vee belt, but it was modified to a cogged belt gearing with
40 teeth on the drive and 140 on the roll shaft leading to a gear ratio of 3.5. Modified parts for
the drive and gearing are shown in Figure 32. All the drawings are provided as a part of this
thesis.
Figure 32 Modified parts for drive and gearing
48
2.4.4
Lifting beam for metal belt installation and change
Because the metal belt must be installed in the machine as a continuous loop, some additional
equipment was needed to cantilever the frame beam including the guiding rolls. The lifting beam,
shown in Figure 33, is installed on the drive side of the frame beam. The cantilevering can be
done by lifting the frame beam with guide rolls from the lifting beam with a crane. When installing
the metal belt, it can be laid over the lifting beam before starting the lift so the installation is
easier.
Figure 33 Lifting beam
The lifting beam is a lifting accessory and it requires certain maneuvers to fulfill the aspects set
by law and safety regulations according to the Machinery Decision. At first the strength
calculation and loading test were carried out according to regulations with suitable safety factors.
Each lifting accessory should be included with the following details, which were attached on the
lifting beam sign: (Occupational Safety and Health Administration 2007)
manufacturer’s details
raw material information, if required
compatibility purposes
working load limit
CE marking.
49
In addition, each lifting accessory or lifting accessory must include an instruction manual
containing at least the following information: (Occupational Safety and Health Administration
2007)
standard operating conditions
use, assembly, and maintenance instructions
restrictions on use.
All the required documents are provided for Metso as a part of this thesis.
2.4.5
Frame beam modification
Because of new guide rolls attachments and lifting beam attachment, the frame beam needed to
be modified for these changes. The changes are illustrated in Figure 34. All the drawings are
provided as a part of this thesis.
Figure 34 Frame beam modification
2.4.6
Doctoring
To keep the metal belt loop clean of water and to prevent the wads spreading around the doctor
is located beside the corner guide roll on the nip outgoing side. The doctor, Figure 35, is weight
loaded with a carbon-fiber blade. It was acquired from the pilot plant surplus stock.
50
Figure 35 Doctor for metal belt
2.4.7
Save-alls
Because the press shoe seal is lubricated with water and there is water leakage coming from the
nip, a water collecting system had to be constructed around the nip. One save-all, Figure 36, is
located on the outgoing side of the nip to collect the water coming from the nip. This guides the
water flow to the save-all located below the nip. From the save-all below the nip the water is
drained to the canal.
Figure 36 Outgoing side save-all
51
The press shoe is pressed against the press roll and with high water lubrication pressures the
water mists around the nip. In order to see the nip action, the mist protection is built of plexiglass
around the nip.
The felt is saturated during the machine run and with higher speeds the water spatters before
the stretching roll. Therefore another save-all, Figure 37, is located beside the felt near the
stretching roll which guides the excess water to the save-all below the nip. All the drawings for
save-alls are provided as a part of this thesis.
Figure 37 Save-all beside the stretching roll
2.4.8
Safety equipment
There are several safety issues that have to be conducted with Hydronip. The one critical
location is metal belt loop. With high machine speeds breakage of the metal belt could lead to a
severe danger situation due to high velocity metal pieces. The metal belt had to be surrounded
with protective gratings. In the machine cross direction there are two rigid metal bars that
provide mechanical stoppers which will restrain the metal belt sliding out of the machine. There
are also two pieces of inductive proximity switches that will monitor the metal belt and stop the
machine if the belt slides out of the monitoring range. Mechanical stoppers and inductive
proximity switches are presented in Figure 38. Inductive proximity switches were received from
the Technology Center and the drawings for holders are provided as a part of this thesis.
52
Figure 38 Mechanical stoppers and inductive proximity switches
In the machine direction the outgoing side of the nip had to be protected in case of metal belt
breakage. For this purpose a protective grating, Figure 39, is located beside the nip on the
outgoing side.
Figure 39 Protective grating for metal belt
Another protective grating is located beside the felt stretching roll to eliminate any loose felt
pieces coming from the machine in case of felt damage. The protective grating is illustrated in
Figure 40. Protective gratings were acquired from the pilot plant surplus stock.
53
Figure 40 Protective grating for felt
The press roll has a rotating shaft on the back side which had to be covered with screen as
Figure 41 shows. The whole back side of the machine is protected with movable separating
walls to prevent access to the machine from that direction.
Figure 41 Protective screen
54
2.4.9
Measuring equipment
The measurement arrangement is an important part of the system to be able to analyze the
results of the test runs. The following sensors are used in Hydronip arrangement:
Shoe loading pressure
0...100 bar/4...20 mA
Shoe lubrication pressure
0...400 bar/4...20 mA
Shoe water flow
0...5 lpm/4...20 mA
Water temperature after the pump
0...100 C°/4...20 mA
Operation speed
0...1500 m/min/4...20m A
Driving output
0...37 kW/4...20 mA
A description of the measurement system and devices used can be seen in Figure 42.
25.11.2009 TPö
Hydronip pilot machine
Shoe loading
pressure
4 – 20 mA
Shoe lubrication pressure
0 – 400 bar
Ch 1
P1
0 – 100 bar
pressure sensor
amplifier
Metso
I/O
1 V = 12.5 bar
2 – 10 V
P2
Ch 2
1 V = 50.0 bar
2 – 10 V
4 – 20 mA
Shoe lubrication flow
0 – 50 lpm
4 – 20 mA
Endress-Hauser
Prosonic Flow
90U
Virt 1
Ch 3
1 V = 6.25 lpm
2 – 10 V
Water temperature
after pump
0 -100 C
Computer
DasyLab 7.0
Temperature
amplifier
HBM
T1
PR 129 M1
Loop Powered
Isolator
Nop
PR 129 M1
Loop Powered
Isolator
Teho
Ch 4
1 V = 10.0 C
0 – 10 V
Driving speed
0 -1500 m/min
4 – 20 mA
Ch 5
1 V = 187.5 m/min
2 – 10 V
Driving output
0 – 37 kW
4 – 20 mA
Figure 42 Measurement system
Ch 6
1 V = 4.625 kW
2 – 10 V
55
2.5 Hydronip arrangement and installation
The Hydronip arrangement is presented in Figure 43. All the required drawings, manuals, and
instructions according to the Machine Decision are provided as a part of this thesis. The content
of those are briefly presented in the following chapters.
Figure 43 Hydronip arrangement
2.5.1
Installation instruction
An installation instruction was prepared according to the machine safety instructions. The
following sections were handled:
Mechanical assembly instruction
Instrumentation assembly instruction
Measuring equipment assembly instruction
Testing equipment systems adjustment instruction
Felt and metal belt changing instruction
Pressure shoe seal change instruction
56
2.5.1.1 Mechanical installation
Mechanical installation is done according to the installation instruction. It includes illustrative and
detailed installation instructions for each component. It also provides the essential information
about layout and individual part drawing numbers.
2.5.1.2 Instrumentation installation
Instrumentation installation is done according to the installation instruction. It includes illustrative
and detailed installation instructions for each component and the bill of materials. It also provides
the essential information about the layout.
2.5.1.3 Lifting beam installation and use
Lifting beam installation is done according to the installation instruction manual for the lifting
beam. It includes all the required information according to the Machine Decision lifting accessory
guidelines presented earlier:
Safety instructions
Technical introduction and purpose of use
User manual
Service and inspection.
2.5.2
Felt and metal belt installation
The felt installation is done according to Tamfelt’s instruction. It includes illustrative and detailed
installation instructions for felt seaming.
The metal belt installation is done according to the felt and metal belt changing instruction. It
includes illustrative and detailed installation and safety instructions.
57
2.5.3
Pressure shoe seal change
The shoe seal installation and change is done according to the press shoe seal change
instructions. It includes illustrative and detailed installation and safety instructions.
2.5.4
Hydronip user manual
All the essential information for using the Hydronip safely and efficiently is gathered in the user
manual. It includes:
Safety instructions
Safety instructions during shutdowns
Safety instructions during running
Environmental aspects
Technical data
Construction
Function
Machine operating instructions
Measuring equipment operating instructions
2.5.5
Start-up and use
After the Hydronip assembly is completed and the security review has been done, the
adjustments before start-up can be done. Devices are presented in the instrumentation graph,
Figure 44.
58
Figure 44 Instrumentation graph
Before start-up there are also some mandatory adjustments that have to be done. The Hydronip
test equipment contains the following systems that have to be adjusted:
Control of the main driving motor
Metal belt tensioning and guiding
Felt tensioning and guiding
Hydronip nip load control
Hydronip shoe lubrication flow (water) control
Measurement system.
59
1) Control of the main driving motor
The main driving motor for the counter roll of Hydronip is controlled from the local control panel
switches (start, rotation direction, speed setting). Before starting the main driving motor, the
metal belt and felt have to be tensioned. When the main driving motor is started, the metal belt
must not be loaded.
2) Metal belt tensioning and guiding
The belt is tightened manually with tightening screws in the tending side and back side. While
rotating the metal belt, it is set parallel to the center of the guiding roll with adjusting screws.
Tension is determined by experience. When the belt is rotating in the middle, the edge
controlling inductive limit switches are set to stop the main driving motor as activated by the belt
when it moves outside the guiding roll edges.
3) Felt tensioning and guiding
Felt tensioning is done by the hydraulic stretcher, and it is powered by the hydraulic unit. Starting
the hydraulic unit is the first step while starting-up the stretcher. At the same time, the hand
valve for the feeding pressure line has to be opened and it has to be ensured that it is closed for
the other equipment that uses the same unit.
The stretcher is controlled by a separate local control panel with three position switch “loosestop-move ". The local control panel has a separate supply voltage source (24 VDC), which has
to be energized. The felt tension is adjusted manually by means of pressure-reducing valves.
The cylinders’ minus-chamber (the piston rod side) has a constant pressure of 10 bar, which
does not need to be changed. Tension is adjusted only by changing the pressure of the pluschambers (piston side). The tension control valve is located under the directional valve which
controls the stretcher stages (loose-stop-tightening. Tension is set to the desired constant value,
and usually it does not need to be changed often. The valve panel in the middle of the test
equipment includes two pressure gauges from where the pressure can be checked. The relation
60
of pressure to tightness force is illustrated in the form located in the local control panel beside
the machine.
The felt guide is pneumatic. When starting up the Hydronip, the hand valve for the input air line
of the guide has to be opened. The pneumatic cylinder turns the guiding roll of the felt. The
pressure of the cylinders’ piston side is controlled with a flap valve. The pressure on the piston
rod side is constant: the flap follows the felt edge. The spot where the felt is moving in the center
is located by moving the valve mounting position. Usually, a single adjustment is adequate (the
start-up adjustment).
4) Hydronip nip load control
The water lubrication for the shoe has to be switched on, if the nip loading is done while rotating
the metal belt. The load cylinder is pressurized with the hand pump (Part 2 in the Figure 44). By
the hand Pump is the directional valve that controls the pump flow to either the opening or nip
loading direction. The pressure will be monitored from the load pressure gauge. While loading
the nip, the ball valve (Part 9) beside the check valve (part 8) in the pressure line has to be
closed. While reducing the loading the ball valve has to be opened and the flow direction of the
hand pump has to be changed with the directional valve.
5) Hydronip shoe lubrication flow (water) control
Lubrication-flow pump is started from a separate safety switch. Before starting the pump, the
water input line that is connected to the suction connection must be opened. The pump is
rotating at a constant rotation speed and a flow moves to the loading shoe of the belt,
presupposing that the pump pressure limit is set to sufficiently high value. If the pressure falls
below the loading value of the shoe, the water flows back to the pump suction side and the pipe
leading to the shoe is pressurized, but the flow does not start because the pressure is not high
enough to open a gap between the belt and shoe. The pressure limit should be set to largest
value possible (approximately 100 bar) to ensure that the flow does not escape through the
61
pressure relief valve to the pump suction, but moves fully to the shoe. Lubrication flow pressure
can be followed from the gauge locating in the line.
6) Measurement system
Measurement system captures the power output of the main driving motor, machine speed, shoe
lubrication pressure, load, shoe water flow volume, and water temperature (from pressure line).
There is a separate instruction for using the measurement system.
After the adjustments the start-up can be done. For the correct and secure utilization of the
Hydronip pilot machine, the operating and safety instructions has to be viewed.
2.6 Trial runs
2.6.1
Objective
The object for the trial and test runs was to perform them with the loading press shoe against the
counter roll with water lubrication together with felt and metal belt loops to test the sealing
operation and overall function of Hydronip. Another object was to study the required amount of
seal lubrication flow. Trial runs are done before final test runs to ensure that all components and
data gathering devices are functioning.
The object for wad tests was to review what happens in the nip in web break situations. More
precisely, the target was to study the impacts on the seal and the metal belt.
2.6.2
Preliminary runs
At first some preliminary runs were carried out in different phases to check all the necessary
equipment and device adjustments that were executed. These were done in the following order.
62
2.6.2.1 Metal belt loop guiding and stretching adjustment
In the first preliminary runs, the metal loop was positioned to travel on the guiding rolls center
line. The metal belt was installed on the machine after all the rolls were aligned. Initially the
metal belt was positioned without a felt loop. While running, the metal belt tried to move towards
the front side. The metal belt tension was adjusted with the stretching and guiding roll’s adjusting
screws. Next the corner guide roll was lifted from the front side. Simultaneously, the stretching
and guiding roll was lifted from the back side. In addition, the spacers underneath the stretching
and guiding roll bearing houses were made thinner to achieve more allowance for metal belt
tightening and adjustment. After these measures the metal belt was travelling in the middle of
the rolls as planned.
At first the measurement of the rotational speed of the machine was problematic. Eventually, it
became clear that the measurement scaling factor doubled the correct speed. The speed on the
screen and measurement results was verified with a hand speed meter.
The metal belt surface roughness was also measured using a hand meter. The surface
roughness varied quite a lot, but it was outside the flat area of about Ra 0.1 - 0.3, and the
welding seam of about 3.5 Ra. Inside, the surface was rougher, and on the back side it was a
little smoother, about 1.3 Ra and on the front side it was approximately 2.2 to 3 Ra. The
thickness of the coating could not be measured because the meter does not work with austenitic
materials.
2.6.2.2 Press shoe alignment and adjustment
The press shoe was aligned as well as possible. The test load was done loading the press shoe
lubricated with water against the counter roll without rotation. The press shoe's incoming edge
squirted water a lot, which indicated that the shoe was not quite straight. At first the shoe was
moved to the incoming side as much as the bolt attachment clearance allowed. The bolts were
machined thinner to get more room for adjustment. In addition, the press shoe was removed and
the spacer plate between it and the shoe attachment was machined straight. Extra spacers were
also put on the outgoing side to turn the shoe to a better position against the counter roll.
63
2.6.2.3 Metal belt loop rotating, shoe loading, and lubrication
Next the metal belt rotation with press shoe loading and water lubrication was tested. The
running speed was 700 m/min and the power consumption was 16 kW. The press shoe loaded
at different pressure levels with the water lubrication at full (50 lpm). When the metal belt and
counter roll got wet, the friction between them lowered so much that slipping occurred. Some
solutions for this were considered and which included:
Use of a separate drive for the metal belt’s stretching and guiding roll. This would rotate
the metal belt, even if the friction between the belt and the counter roll would decrease
considerably.
Use of a doctor at the outgoing side of the counter roll, which would reduce the water
going to the corner guide roll and thus improve the grip.
Use of a grooved or coated guide roll, which would increase the friction between the
corner guide roll and the metal belt.
Use of a rubber list or seal (e.g. the spring loaded lock seal used in suction rolls), which
would prevent water from entering between the metal belt and the corner guide roll.
For the following tests, however, the effect of the felt installed on the machine was examined. A
long felt loop on the counter roll creates a lot more friction in the nip and thus also helps the
metal belt to rotate.
2.6.2.4 Hydraulic stretcher and pneumatic guide adjustment
The hydraulic stretcher and the pneumatic guide functioning to guide the press felt was tested
next. The felt tension was adjusted to approximately 3 kN/m. During the experimentation a
suitable place was sought for the fabric guide flap valve, which keeps the felt running in the
machine center line. Also, the response time of the guide was adjusted a little faster to guide the
felt smoothly. The felt tension and the control were managed to operate as planned.
2.6.3
Trial runs with metal belt and felt
The first trials were carried out with the entire lineup. Immediately a problem was discovered
with the shoe lubrication flow measurements, which did not give any result at all. The lubrication
64
flow valve was removed completely from the line, but this did not help. At that moment the metal
belt’s welded seam broke and the trials had to be stopped.
The metal belt was changed and the flow sensor was repaired. The metal belt was adjusted to
rotate in the center of the machine line and the flow sensor and other equipment operations
were tested to be functioning. The belt was rotating in the middle after just one adjustment and
the flow sensor functioned as well. Some short demonstration runs were done to be sure that
everything was functioning. The outcome from the three runs is presented below.
1st run:
Machine speed: 158 m/min
Pressure shoe loading: 35 bar
Pressure shoe lubrication pressure: 7 -28 bar
Pressure shoe lubrication flow: 15 lpm
Driving output: 1.49 kW
2nd run:
Machine speed: 15 m/min
Pressure shoe loading: 30 bar
Pressure shoe lubrication pressure: 7 -28 bar
Pressure shoe lubrication flow: 12 lpm
Driving output: 1.49 kW
3rd run:
Machine speed: 200 m/min
Pressure shoe loading: 20 bar
Pressure shoe lubrication pressure: 2 -20 bar
65
Pressure shoe lubrication flow: 12 lpm
Driving output: 1.93 kW
All equipment was functioning well and the measuring devices worked well. The press shoe
lubrication flow was restricted by controlling most of the water to drains. Shoe lubrication
pressure fluctuated a lot, and this was due to the fact that the shoe was not quite uniformly
loaded against the counter roll and the water escaped from all sides of the shoe seal. The shoe
lubrication pressure and flow should be balanced and the lubrication pressure should be steady.
The shoe was then taken out of the machine and the seal was inspected. The seal is shown in
Figure 45. The corner of the seal was well worn on the incoming side at the back side; there was
also some minor polishing on the outgoing side. The center of the incoming side seal had some
minor scratches and wear. Occasional minor traces of wear were also found in the other parts of
the seal. The seal was replaced with a new one and the shoe was installed back to the machine.
Outgoing side
BS
FS
Incoming side
Figure 45 Pressure shoe seal after adjustments and first tests
66
After this the shoe was positioned again by loading the shoe against the counter roll lubricated
with the water supply network pressure in the chamber to see how the shoe should be balanced.
0.5 mm spacers were added on the outgoing side of the shoe and the fastening bolts from the
side guides were loosened to settle the shoe better against the counter roll.
With the shoe positioned some trials with different machine speeds, different press shoe loads,
and different lubrication flows were carried out. The essence of the problem is still that the water
film between the seal and the metal belt is not smooth and the water escapes more than will
come back, which causes the pressure variation. When the water chamber pressure drops to
compress the seal and the leakage is reduced again until the seal opens and the pressure from
the edge collapses. A very small shoe misalignment can cause a pressure drop. The film of
water should be even throughout the whole seal or there should be a steadily tapering gap
towards the belt running direction.
To make the shoe alignment against the counter roll even better a 10 mm thick rubber plate was
assembled between the shoe and the loading cylinder and the guides. This enhanced the shoe
alignment. At the same time, some additional problems occurred. The shoe lubrication pressure
transmitter and the flow transmitter did not function properly. In addition, the power output
measurement had to be repaired.
These deficiencies were corrected. There were also problems with the main drive. When the
protective cover was taken away, it could be seen that in the acceleration and deceleration the
tooth of the belt tried to jump over the tooth of the gearwheel. The engine was aligned, but it did
not help. The adjustment was found to be incorrect. The drive did not control the inertial mass.
The current of the drive also varied so much that the drive was not able to calculate the
operating power output. It was also found that the trial run has been left undone. It has to be
done with only the motor without a load.
67
After that the adjustment parameters of the motor were changed, which were much too brisk and
the current varied exceedingly. After the changes the screen display was working. When driving
a steady speed, the power consumption is very low, approximately 2.5 kW, without a shoe load.
The measurements were collected next. The trials were done with different loads, different shoe
lubrication flows, and at different machine speeds. All the equipment functioned well. The first
trial was done with the following parameters:
Machine speed: 190 m/min
Pressure shoe lubrication flow: 50 lpm
Pressure shoe lubrication pressure, increased in the following phases: 10, 20, 30, 40, 50,
60, 70 bar.
The data collected by means of the measuring equipment was translated to an Excel graph and
it is presented in Figure 46. The horizontal axis represents the time line. The light blue line
represents the driving speed. It varies slightly for the whole measuring time, but rises at the end
when the load is released. The blue line represents the shoe loading pressure, which was
gradually increased in phases from 10 bar until 70 bar. The orange line represents the driving
output, values on the right vertical axis, and that follows quite accurately the amount of load
applied through the press shoe. The green line represents the shoe lubrication flow. The flow
remained quite stable but caused a little vibration with higher loads on the graph. The red color
represents the shoe lubrication pressure, which followed accurately the shoe loading pressure.
As also can be seen, it varied exceedingly and was not stable. The violet line represents the
water temperature, and it remained constant for the whole test.
68
Figure 46 Trial 1; speed: 190 m/min, lubrication flow: 50 lpm, loading pressure: 10 -70 bar
The second trial was done with the same parameters as in first test to check that the results
were comparable. The results are totally comparable to the first trial.
In the third trial the machine speed was increased to 400 m/min. All the graphs follow the same
pattern compared to test with the machine speed 190 m/min, which can be seen in Figure 47.
The speed varies during the different loads and quite heavily rises after the load is released.
69
Figure 47 Trial 2; speed: 400 m/min, lubrication flow: 50 lpm, loading pressure: 10 -70 bar
The metal belt moves towards the front side or the back side when the machine speed is
changed. At a constant speed it can be kept in place well, but when the speed is changed, the
stretching and guiding roll adjustments have to be reset. When the speed increases, the felt
guide response should also be accelerated.
Upon reflection it was noticed that the water pump is a piston pump, causing water supply
pressure to be uneven, which causes variations in pressure shoe lubrication pressure. As a
result, it was decided to move the lubricating pressure measurement to the pressure shoe
chamber and to assemble a pressure accumulator to the pump. This results in the pressure
measurement becoming more stable and reliable.
70
2.6.4
Preliminary board wad tests
Because some adjustments on the machine were planned, which would have an implication for
the test results, some preliminary wad tests were carried out before starting the modifications.
The target for the board wad tests was to study what happens when board wads go through the
nip with different machine speeds and nip loads. This illustrates the case of web brake or other
comparable situation where different shapes of particles go through the nip. The metal belt and
seal durability against wads is important because, as stated previously, with SymBelt technology
the polyurethane belt is vulnerable to these kinds of particles, which may lead to severe belt and
felt damage.
Preliminary board wad tests were performed using 200 g/m² carton sheets as wads. Wads were
dropped in the incoming side of the nip between the felt and metal belt. The distance from the
dropping point to the nip is approximately 500 mm, as illustrated in Figure 48. At first the test
was done with a 20 bar nip load, initially with one sheet and then adding more layers. The doctor
worked well, and the wads going through the nip did not cause any remarkable phenomena.
Thereafter, the machine speed was doubled, and the test was repeated. Again, everything
worked well and the wads going through the nip were barely noticeable.
Figure 48 Board wad dropping location
71
2.6.5
Changes before final tests
According to observations made in the first trial runs, some adjustments on the Hydronip
arrangement were made. Since the incoming side of the pressure shoe seal wore heavily it was
decided to add a shower pipe to get adequate lubrication to the seal.
For managing the shoe lubrication pressure variation caused by the piston pump, the pressure
transmitter was moved from the pressure line straight to the pressure chamber of the shoe. Also
a pressure accumulator was assembled for the water pump to reduce the variation of the
lubrication pressure.
3 Final test runs and results
The changes made after the trial runs were found to be working. Somehow the pressure shoe
seal did not wear that much even though the shower pipe on the incoming side was not in
operation. The shower pipe could still be used for moisturizing the felt before starting the test
runs. The seal lubrication pressure variations reduced notably after the changes, as can be
observed from the following results. All the other equipment functioned well.
The tests were carried out with different loads, different shoe lubrication flows, and at different
machine speeds. The trial runs carried out earlier showed that there are limits with machine
speeds and pressure shoe loads for the metal belt guiding to function as desired. As observed
the metal belt guiding loses its functionality after machine speed exceeds 150 m/min, while the
pressure shoe seal lubrication is on. This is due to the fact that the water coming out of the nip
outgoing side goes between the corner guide roll and the metal belt, which causes slipping and
the metal belt loses its controllability. The same phenomenon occurs when the pressure shoe
load is increased over 20 bar with pressure shoe seal lubrication. Therefore the machine speed
in the following tests was chosen below the limiting speed, which is approximately 150 m/min.
The plan with test runs was at first to start with full lubrication flow for the seal and gradually
increase the pressure shoe load. This was to study the correlation between different loads and
72
full lubrication flow to the seal wear. Between the runs the condition of the seal was monitored to
observe the possible wear and failure.
The first test was carried out with the following parameters:
Machine speed: 110 m/min
Pressure shoe lubrication flow: 45 lpm
Pressure shoe loading pressure, increased in the following phases: 10, 20, 30, 40 bar.
The data collected is presented in Figure 49. As can be seen, the shoe lubrication pressure (pink
line) is much more stable compared to trials presented earlier due to the change of measuring
point and the added pressure accumulator. The pressure variation stays within a few bar when
earlier it vibrated within 20 bar. Driving output is relatively low and it reaches approximately 1.5
kW with a load of 40 bar. The shoe lubrication pressure followed the increased load on a slightly
smaller scale.
Figure 49 Test 1; speed: 110 m/min, lubrication flow: 45 lpm, loading pressure: 10 -40 bar
73
After the test the seal was inspected visually and the following was found:
Incoming side: Minor polishing on the back side
Outgoing side: Minor polishing throughout the whole length
Front side edge: Minor scratches and polishing
Back side edge: Slightly more scratches and polishing.
The second test was done with the following parameters:
Machine speed: 110 m/min
Pressure shoe lubrication flow: 50 lpm
Pressure shoe loading pressure, increased in the following phases: 10, 20, 30, 40, 50,
60, 70, 80 bar.
As can be seen from Figure 50, with the full lubrication flow of 50 lpm and 80 bar load the driving
output is approximately 2 -2.3 kW.
Figure 50 Test 2; speed: 110 m/min, lubrication flow: 50 lpm, loading pressure: 10 -80 bar
74
After the test the seal was inspected visually and there was not that much difference compared
to traces after the earlier test. It was slightly more polished on the front side edge compared to
the earlier inspection.
After the tests with different loads and full lubrication flow the effect of reducing the flow with
increased pressure loads was studied. The third test was carried out with the following
parameters:
Machine speed: 110 m/min
Pressure shoe lubrication flow: 30 lpm
Pressure shoe loading pressure, increased in the following phases: 10, 20, 30, 40, 50,
60, 70, 80 bar.
Figure 51 shows that with reduced lubrication flow, the driving output with the 80 bar load
exceeds 3 kW. The shoe lubrication pressure remains at the same levels as with the full shoe
lubrication flow.
Figure 51 Test 3; speed: 110 m/min, lubrication flow: 30 lpm, loading pressure: 10 -80 bar
75
After the test the seal was inspected visually and there was not that much difference compared
to traces after the earlier test.
In the fourth test the lubrication flow was reduced more and the test was carried out with the
following parameters:
Machine speed: 110 m/min
Pressure shoe lubrication flow: 15 lpm
Pressure shoe loading pressure, increased in the following phases: 10, 20, 30, 40, 50,
60, 70, 80 bar.
Figure 52 illustrates that the driving output exceeds 3 kW already with the 40 bar load. The shoe
lubrication pressure remains at the same levels as with the full shoe lubrication flow.
Figure 52 Test 4; speed: 110 m/min, lubrication flow: 15 lpm, loading pressure: 10 -80 bar
76
After the test the seal was inspected visually. It was slightly more polished from the back side
corners from the incoming and outgoing side compared to the earlier inspection. Also, some
rubber particles were found in the pressure chamber.
The next test run was carried out with a constant pressure shoe loading and decreasing the
lubrication flow from 50 lpm to 10 lpm. This was to observe the correlation between diminishing
the lubrication flow and a certain load to the seal wear. The fifth test was carried out with the
following parameters:
Machine speed: 120 m/min
Pressure shoe lubrication flow: decreased from 50 to 10 lpm
Pressure shoe loading pressure: 20 bar.
As can be seen from Figure 53, when the amount of lubrication flow descends, the driving power
required increases. The change of lubrication flow does not affect noticeably the lubrication
pressure.
Figure 53 Test 5; speed: 120 m/min, lubrication flow: 50 -10 lpm, loading pressure: 20 bar
77
After the tests the seal was taken off the shoe and inspected. As can be seen in Figure 54 the
seal is in reasonable good condition.
Outgoing side
BS
FS
Incoming side
Figure 54 Pressure shoe seal after test runs
There is some minor polishing and wearing mainly on edge area on the front side and back side,
as can be seen from Figure 55; however, overall it is in good condition.
BS edge
BS
Figure 55 Press shoe seal edges after test runs
FS edge
FS
78
Before wad tests the seal was changed so any possible wear and damage could be observed
from the new seal. Wad tests were carried out with different loads. Starting with 13 bar and
gradually increasing the press shoe load to 80 bar. 80 g/m² carton strips were used as wads and
the samples were put in the nip in four stages, piled up as follows. The insertion time of each
wad was marked up in order to locate the impacts from the great amount of data collected.
1. 2 layers* 80 g/m² =160 g/m²
2. 8 layers * 80 g/m²= 640 g/m²
3. 20 layers * 80 g/m²= 1600 g/m²
4. 40 layers * 80 g/m²= 3200 g/m²
Tests were carried out at first with the following parameters:
Machine speed: 105 m/min
Pressure shoe lubrication flow: 28 lpm
Pressure shoe loading pressure: 13 bar.
Carton was fed into the nip in the stages mentioned earlier. The insertion times were as follows:
The first wad set with two layers after 10 seconds, the second set with eight layers after 48
seconds, and the third with twenty layers after 85 seconds. Figures 56, 57, and 58 illustrate the
shoe loading pressure variation in the time lines from 10 to 13 seconds, from 48 to 51 seconds,
and from 85 to 87 seconds.
79
Figure 56 Shoe loading pressure 13 bar, 160 g/m² wad in the time line from 10 to 13 seconds
Figure 57 Shoe loading pressure 13 bar, 640 g/m² wad in the time line from 48 to 51 seconds
80
Figure 58 Shoe loading pressure 13 bar, 1600 g/m² wad in the time line from 85 to 87 seconds
The first wad of 160 g/m² did not have a significant effect on the shoe loading pressure. The
loading pressure fluctuated from a little less than 12 bar to a little over 13 bar. The second wad
of 640 g/m² caused an approximately 3 bar peak on the pressure loading curve. The third wad of
1600 g/m² caused an approximately 5 bar peak on the pressure loading curve.
Figures 59, 60, and 61 illustrate the shoe lubrication pressure variation in the time lines from 10
to
13
seconds,
from
48
to
51
seconds,
and
from
85
to
87
seconds.
Figure 59 Shoe lubrication pressure; load 13 bar, 160 g/m² wad in the time line from 10 to 13
seconds
81
Figure 60 Shoe lubrication pressure; load 13 bar, 640 g/m² wad in the time line from 48 to 51
seconds
Figure 61 Shoe lubrication pressure; load 13 bar, 1600 g/m² wad in the time line from 85 to 87
seconds
82
The first wad of 160 g/m² did not have a significant effect on the shoe lubrication pressure. The
lubrication pressure fluctuated between 6 and 9 bar. The second wad of 640 g/m² caused a
minor drop on the pressure lubrication curve. The third wad of 1600 g/m² caused approximately
a few bar drop on the pressure lubrication curve. After the test the seal was inspected visually
and only some minor polishing was discovered.
The second wad test was carried out with the following parameters:
Machine speed: 105 m/min
Pressure shoe lubrication flow: 22 lpm
Pressure shoe loading pressure: 38 bar.
Carton was fed into the nip in the stages mentioned earlier. The insertion times were as follows:
the first wad after 7 seconds, the second after 34 seconds, and the third after 73 seconds. Since
the third wad made the largest impact, the Figure 62 illustrates the shoe loading pressure
variation in the time line from 73 seconds until 75 seconds.
Figure 62 Shoe loading pressure 38 bar, 1600 g/m² wad in the time line from 73 to 75 seconds
83
Figure 63 illustrates the shoe lubrication pressure variation in the time line from 73 seconds until
75 seconds.
Figure 63 Shoe lubrication pressure; load 38 bar, 1600 g/m² wad in the time line from 73 to 75
seconds
The third wad of 1600 g/m² caused an approximately 5 bar peak on the pressure loading curve
and approximately a few bar drop on the pressure lubrication curve. After the test the seal was
inspected visually and there was some more minor polishing.
The third wad test was carried out with the following parameters:
Machine speed: 105 m/min
Pressure shoe lubrication flow: 18 lpm
Pressure shoe loading pressure: 60 bar.
84
Carton was fed into the nip in three stages. The insertion times were as follows: the first wad
after 23 seconds, the second wad after 44 seconds, and the third wad after 63 seconds. Figure
64 illustrates the shoe loading pressure variation in the time line from 44 seconds until 46
seconds.
Figure 64 Shoe loading pressure 60 bar, 1600 g/m² wad in the time line from 44 to 46 seconds
Figure 65 illustrates the shoe lubrication pressure variation in the time line from 44 seconds until
46 seconds.
Figure 65 Shoe lubrication pressure; load 60 bar, 1600 g/m² wad in the time line from 44 to 46
seconds
85
The third wad of 1600 g/m² caused an approximately 6 bar peak on the pressure loading curve
and an approximately 5 bar drop on the pressure lubrication curve. After the test the seal was
inspected visually and there was again some more polishing.
The fourth wad test was carried out with the following parameters:
Machine speed: 105 m/min
Pressure shoe lubrication flow: 42 lpm
Pressure shoe loading pressure: 80 bar.
Carton was fed into the nip in the stages mentioned earlier. The insertion times were as follows:
the first wad after 25 seconds, the second wad after 36 seconds, the third wad after 45 seconds,
and the fourth wad after 86 seconds. Figure 66 illustrates the shoe loading pressure variation in
the time line from 86 seconds until 88 seconds.
Figure 66 Shoe loading pressure 80 bar, 1600 g/m² wad in the time line from 86 to 88 seconds
86
Figure 67 illustrates the shoe lubrication pressure variation in the time line from 86 seconds until
88 seconds.
Figure 67 Shoe lubrication pressure; load 60 bar, 1600 g/m² wad in the time line from 44 to 46
seconds
The third wad of 1600 g/m² caused an approximately 15 bar peak on the pressure loading curve
and an approximately 10 bar drop on the pressure lubrication curve. After the wad tests the seal
was taken out of the shoe and inspected. As Figure 68 illustrates, there was some wear on the
incoming side. Also, both edge areas on the front side and the back side were worn. The
outgoing side was almost intact. Overall, the condition of the seal was relatively good.
Outgoing side
BS
FS
Incoming side
Figure 68 Press shoe seal after wad tests
87
4 Analysis and discussion
The first test runs were carried out with full lubrication flow for the seal. At the same time the
pressure shoe load was gradually increased. The target was to study the correlation between
different loads and full lubrication flow to the seal wear.
Tests were carried out in relative short-term runs with relatively low running speeds. The reason
for this was, as mentioned earlier, that the guiding of the metal belt was not functioning anymore
with higher speeds and loads due to slippage between metal belt and guiding roll. Because of
the short duration of the runs the results do not correspond with the actual production
circumstances as well as was desired. Despite this, some valuable observations were made.
As can be seen from the graphs of the first and second test the required drive power increases
smoothly according to the increase of the pressure shoe load applied. Both graphs show that
with a 40 bar load the power output is approximately 1.5vkW. This indicates that the nip behavior
is stable and the results can be used as a reference in the following test. For tests to be more
reliable, they should be repeated many times. In this case, due to the lack of time, the tests were
performed only once. The second test shows that with an 80 bar load the power output is
approximately 2 kW. This can be used as a reference value while comparing results with
different lubrication flows. An efficient amount of lubrication medium between the seal and the
counterpart reduces friction and that can be viewed from the lower power consumption.
Inadequate lubrication increases the friction which leads to higher power consumption and
causes wearing to the seal.
After the tests the seal was checked and only some minor polishing was found. This would
suggest that with a full lubrication flow in different loads, the seal would have enough lubrication
and actual wear would not occur. It has to be pointed out that the seal was inspected while
attached to the shoe and, because of the location, the visual inspection is not very accurate.
Another point is that the test runs lasted only two to four minutes. This is a relatively short period
of time to examine wear as a phenomenon.
88
In the next tests the lubrication flow was gradually reduced together with gradually increased
pressure shoe loads. The target was to study the effect of these parameters on the required
power output and seal wear. As can be seen from the graphs, if the lubrication flow is reduced to
30 lpm with 40 bar shoe press load, the driving output is approximately 1.7 kW. Compared to
results found in the first tests the required power output is only slightly more. This would indicate
that the amount of lubrication between the seal and counterpart would diminish only a little. With
a pressure shoe load of 80 bar the power output rises to 3 kW compared to power output of 2
kW with full lubrication flow. This would indicate that the seal would slide substantially dryer,
which increases the friction between the seal and the counterpart. After the test the seal was
inspected again but there were no signs of further wear, even though the seal was not lubricated
as comprehensively as with full lubrication flow. Some more minor polishing was found on the
seal surfaces. This would indicate that the lubrication flow still decreases the friction and
lubricated the seal. Again it has to be pointed out that the test run lasted only three minutes and
was performed only once.
With a lubrication flow of 15 lpm the power output was approximately 2.7 kW with a press shoe
load of 40 bar. It is almost twice as much as with a full lubrication flow. The driving speed
fluctuates quite heavily, which affects the power output. The mean value of the power output
remains at the level of approximately 3 kW, even though the pressure shoe load increased to 80
bar. It is approximately at the same level compared to lubrication flow of 30 lpm. This would
indicate that the amount of lubrication between the seal and counterpart would correspond to the
situation with a lubrication flow of 30 lpm. After the test the seal was inspected again. Some
small rubber parts were found from the pressure chamber of the shoe but, except for minor
polishing, no more severe signs of further wear were observed.
The next test run was carried out with a constant pressure shoe loading and decreasing the
lubrication flow from 50 lpm to 10 lpm. The target was to study the correlation between
diminishing lubrication flow and a constant load on seal wear. When the amount of lubrication
flow decreases, the driving power required increases. The graph corresponds to the tests
performed earlier. After the test the seal was taken out of the machine and it could be
investigated thoroughly. As in Figure 54 and 55, it can be seen that the seal was in good
condition. There was only some minor polishing on the seal surfaces. The edge areas on both
89
the front and back side had polished slightly more, but the incoming and outgoing sides were in
relatively good condition. This indicates that the seal had enough lubrication during the whole
testing period.
Wad tests were carried out with moderate lubrication flow for the seal. At the same time, the
pressure shoe load was gradually increased. The target was to study what happens in the nip
when a wad goes through it with a shoe pressure load on. At first this was done with a relatively
small load of 13 bar. As can be seen from the graphs, the first wad of 160 g/m² did not have a
remarkable effect on the shoe loading or shoe lubrication pressure. The second wad of 640 g/m²
caused a pressure peak of 3 bar to the loading pressure curve and a small drop on the shoe
lubrication pressure curve. The third wad of 1600 g/m² caused a pressure peak of 5 bar to the
loading pressure curve and a remarkable drop on the shoe lubrication pressure curve. When the
wad goes through the nip, it causes a pressure impact on the incoming side of the press shoe
and also to the seal. This can be seen as a peak on the press shoe loading graph. This indicates
that if the wad is large enough, it has an effect even with smaller pressure shoe loads. Even
though it caused a pressure peak, and probably had some negative effects on the seal
lubrication, the seal was only slightly polished when checked. As discussed earlier, this is a
challenging situation for shoe nip rolls with polyurethane belt, which is vulnerable for external
impurities. During these tests there was no effect on the metal belt, and even the largest wads
did not cause any damage.
The second wad test was carried out with a 40 bar press shoe load. The third wad of 1600 g/m²
caused an approximately 5 bar peak on the pressure loading curve and approximately a few bar
drop on the pressure lubrication curve. The third wad test was carried out with a 60 bar press
shoe load. The third wad of 1600 g/m² caused an almost similar effect compared to the second
test, an approximately 6 bar peak on the pressure loading curve and an approximately 5 bar
drop on the pressure lubrication curve. After both of these tests the seal was inspected and
some more polishing had occurred.
The fourth wad test was carried out with an 80 bar press shoe load. The shoe lubrication flow
was 42 lpm. The third wad of 1600 g/m² caused an approximately 15 bar peak on the pressure
90
loading curve and an approximately 10 bar drop on the pressure lubrication curve. Even though
the pressure peak was very remarkable the metal belt remained intact. After the test the seal
was taken out of the shoe and inspected. Some more polishing and wear were found on the
incoming side of the seal. This is the challenging area in the case of wads. The high pressure
impact on the incoming side of the shoe inflicts some breakage on the lubrication of the seal and
then the seal will run dry, which causes wearing. Also, both edges on the front and back side
were worn. It is challenging to get sufficient lubrication to a relatively long part of the seal on the
machine direction due to metal belt contact on the long range. The outgoing side of the seal was
intact.
As an overview for test runs, a few things have to be pointed out. Since the function of the metal
belt guiding restricted the duration of each test run, it has to be taken into consideration that the
test runs were relatively short. As a consequence, studying the wear of the seal in short-term
does not give a result that would be comparable to a real production environment where the
running periods are much longer. Each test run was carried out only once. To achieve more
extensive results the test runs should be repeated multiple times.
5 Summary and conclusions
Hydronip test site lay-out and detail design was fairly demanding because the existing facilities,
equipment, and available components restricted the process. The timetable was challenging with
component and equipment planning and procurement, as well as implementing all the changes
that occurred during the project in practice. This was due to labor shortage, as well as many of
the changes that were not taken into account during the design process. Also, many things had
to be changed and adjusted in practice on the site in the installation stage, which was also very
time-consuming.
The installation phase itself went by reasonably quickly, although some challenges caused by
the availability of manpower as well as some delays outside the actual project.
91
The start-up phase of Hydronip and its components and equipment adjustments caused a lot of
challenges. Despite these, the end result was a functional test site with all the essential
measuring equipment and data collection means. Diverse and comprehensive instructions for
installation, use, and data collection were also produced. Also, from the safety point of view,
instructions for design and use were gathered.
Safety issues were the basis for the whole design, manufacture, assembly, and test stages.
These were carefully thought through in every step of the process and, as a result, the project
was managed safely and systematically. Consequently, versatile and illustrative instructions and
manuals were gathered, and they can be used for following projects or modifications relating to
Hydronip or some other machines. In particular, various documents for lifting accessories were
compiled and, based on those, some instruction material for Metso was prepared. Those official
documents can also be used as a basis for similar cases in the future.
As a conclusion for the first tests, it can be stated that when the lubrication flow decreases, it
also increases the required power output. To identify the exact amount of lubrication needed for
a seal to function properly is difficult. It could be calculated from the pressure balances between
the seal and the pressure chamber. Because the shoe is not floating it is challenging to align it
totally against the counter roll. During test runs the shoe was not entirely aligned and that
caused some pressure unbalance in the pressure chamber. With these studies the right amount
of lubrication can only be concluded from the visual inspection of the seal. If the seal is not fully
taken out of the machine, it can only be estimated roughly because of the location of the seal.
Also, the duration of test runs is quite short for studying the wear of the seal. When the seal was
taken out of the shoe after the first tests, it was in relatively good condition. From that it can be
concluded that a shoe lubrication flow of 15 lpm is enough even with high loads in short-term
test runs.
With modern carton machines the board can be up to 200 -300 g/m². In the case of web brake
the carton tail may end up in the nip folded in many layers, and that could build up to 400 to 600
g/m² thick carton wads. Wad tests were carried out even with 1600g/m² wads, which are many
times thicker than compared to maximum ones in the production environment. After the tests
92
there was only some minor polishing on the seal surfaces. The edge areas on both the front and
back side had polished slightly more, but the incoming and outgoing sides were in relatively
good condition. As a conclusion, it can be stated that the metal belt was remarkably durable
against the wads and no damage or wear occurred. Also, the seal lubrication seemed to be
sufficient enough because there was no severe damage on the seal.
MTS tests showed that with a heavy basis weight felt for cartonboard is required to have enough
water space. One felted dewatering seemed efficient, especially in combination with a heated
metal belt. A press nip with a 1000 mm long shoe is enough, and it is not worth making it much
longer. After the nip the felt should be detached and further dried with metal felt or a belt. An
overly long shoe leads to an intense felt marking. In addition to this, excessively high press
power applied reduces the felt service life and cause also potential roll or felt marks in the paper.
At high press powers, the press would also be sensitive to vibration. As discussed earlier, when
using hot pressing, it often leads to a bulk loss, resulting in excessive compression of the web.
The bulk indicates web thickness and bulk loss can be reduced by decreasing linear pressures.
However, the paper web is weaker at an increased temperature and the improved runnability
achieved by the increased dry content will often be lost, since the web becomes weaker. Since
the bulk loss is contradictory to the target set for dry content, it should be studied more in case of
Hydronip with a long shoe, high loads, and a warmed metal belt.
As discussed earlier, Hydronip costs could be at the same level with SymBelt costs in a similar
type of machine rebuild. The metal belt costs could be approximately half of the polyurethane
belt costs mainly because of the better durability. The dry content increase with Hydronip could
be approximately twice as much as with SymBelt and the same thing with the production
increase or steam consumption decrease. As also presented earlier, the break even for
Hydronip could be approximately one month less compared to SymBelt. The payback on the
investment for Hydronip could be six months shorter compared to SymBelt. Of course, it has to
be taken into account that these are only rough estimations and presumptions because the
Hydronip construction and process is still under development. But, overall, it seems that with the
information gathered within this thesis, the Hydronip could be a profitable investment in rebuilds
and also in new machines.
93
During the thesis some issues came up that should be examined more. The Hydronip pilot
machine, or some components of it, could be utilized for these purposes.
To be able to execute long-term test runs some adjustments for the Hydronip have to be made.
When accelerating the speed of the Hydronip without pressure shoe seal lubrication, the metal
belt guiding functions correctly and keeps the belt at the center of the machine. As observed in
the test runs, the metal belt guiding loses its functionality after the machine speed exceeds 150
m/min when pressure shoe seal lubrication is on. This is due to the fact that the water coming
out of the nip goes between the corner guide roll and metal belt, which causes slipping and the
metal belt loses its controllability. The same phenomenon occurs when the pressure shoe load is
raised over 20 bar with the shoe seal lubrication.
The metal belt loop could be arranged more suitably for guiding. When a guiding principle is
decided, the arrangement could be changed according to that and accordingly so that it could be
studied which parameters most affect the guiding of a stiff metal belt. The guiding of a metal belt
could also be examined by arranging the guide roll moving in the machine direction. This would
offer versatile adjustment possibilities for guide roll movement. For better metal belt guiding the
nip outgoing side could be covered or doctored so that the surface of the corner guide roll would
remain dry and no slippage would occur. Relating to that the effect of the friction coefficient
between the metal belt and guide roll could be studied with this Hydronip pilot machine. This
would enable longer test runs with larger loads.
Metal belt tension could be studied more. By setting up a tension measurement for a metal belt,
it could be seen what kinds of variables affect it (stretching the metal belt, warming the metal
belt, et cetera).
A pressure shoe seal wearing test should be carried out separately with a smaller scale test
machine where the condition of the seal can be monitored easily. With Hydronip it is too difficult
and time consuming to take the seal out of the machine to be evaluated. On the other hand, the
94
Hydronip could be used for a seal wearing test with a new type of pressure means so that the
seal can be fastened and removed easily.
The seal material used in Hydronip is the same as that is used in Condebelt. As the tests
demonstrated the seal material was good and it has good duration against wear in the Hydronip
circumstance. There are still some other good materials that could be used for this purpose. For
example, graphite rubber, which is used in demanding suction roll positions, could be an option
for this application.
As earlier stated with the MTS test, a heated metal belt itself can improve dewatering and thus
raise the dry content of the web. The Hydronip arrangement could be utilized for this purpose.
The heating could be managed, for example, with electricity, gas or some other means.
As described in the Hydronip theory, a use of multiple pressure chambers in the machine
direction could provide an optimal pressure curve and thus enhance nip dewatering. Different
pressure chambers could be arranged with water or steam as a medium and simultaneously the
sealing system between the chambers and shoe edges could be examined. The Hydronip pilot
machine could be utilized for this purpose with only minor changes to the arrangement.
As an outer seal, a spring loaded seal could be used in this application. This could be added
relatively easily to the present arrangement.
The pressure shoe attachment in Hydronip is quite rigid even though it was made slightly floating
with rubber plate. Therefore it does not settle completely evenly against the counter roll. With
some adjustments the shoe could be made more floating, such as the SymBelt roll shoe design.
This would reflect the real shoe nip construction and give more reliable information about the nip
and possible shoe sealing and pressure chamber solutions.
95
If the press shoe is made more floating, it would also allow studies for determining the
connection between the lubrication flow and lubrication pressure. This means the efficient
lubrication the seal requires with minimum lubrication flow could be determined. The needed
amount of lubrication for the seal is quite challenging to estimate but with easy access to seal
change it could be observed from the wear of the seal. It could also be observed from the
required drive output, but in this case it is very difficult since the driving output is relatively small.
The wear of the seal and the circumstances inside the press shoe could be studied more by
adding a temperature measurement into the shoe. This might give more information about what
is happening inside the shoe during nip process.
During the first tests that were done, the metal belt welding ruptured. The second metal belt had
a much better weld and it lasted well in the following test runs. The Hydronip pilot machine would
be an efficient place to study more the metal belt structure, welding, different coatings, etc. The
tests could be done on the small scale, and the results could be revalued easily due to easy
access and relatively fast metal belt change.
In the first tests the pressure shoe seal was wearing notably on the incoming side. A shower
pipe was assembled on the incoming side of the shoe to enhance the lubrication. In the following
tests the extra lubrication was not needed because there was not that significant wear occurring
on the incoming side. The reason for this is still an open question. Even though the incoming
side of the seal remained quite intact, both sides of the seal in the machine direction wore quite
heavily. Managing the lubrication on the seal edges could be one thing to study more in the
future and the Hydronip pilot machine could be utilized for that.
As an overall evaluation for the whole Hydronip arrangement, a little too much was implemented
based on earlier designs and components for Superhydronip and the wire guiding test place.
With some larger-scale modifications Hydronip could have been more versatile, and especially
easy to access the test arrangement, which could have been used for some other applications
96
as well. Even then the Hydronip was safely designed, assembled, and it could be used to
illustrate the function of a press shoe loaded nip surrounded with a metal belt and felt.
This thesis also demonstrated that even though there are still a considerable number of details
unsolved, the concept of Hydronip, at least on the small scale, is functioning. Short-term tests for
seal functioning showed that the seal can be lubricated sufficiently under different kinds of nip
load situations. Also, the wad tests demonstrated that the metal belt is durable against different
sizes of external particles going through the nip. The MTS tests showing remarkable dry content
increases combined with rough cost calculation and the basic function of the machine in test
runs show that with some more studying Hydronip could be a promising new product for water
removal from a press section. At least some parts or components of it can be shortly exploited in
the distinct production environment.
The sealing system of the pressure chamber was functioning well with the test site surrounding.
When moving to the larger scale production machines, some challenges will be met in arranging
the seal system for wide machines. Also, when using multiple pressure chambers, the function
of the sealing system will be crucial.
There are many things that have to be considered before implementing these kinds of solutions
in a real production environment. With the large scale of machines the correct function of a metal
belt guiding is challenging. The precise guiding requires very high accuracy from the guiding
devices. Also the water or some other medium between the metal belt and guiding rolls causes
serious challenges with guiding due to slippage, as observed also during test runs. With a stiff
metal belt guiding rolls should be very rigid or even deflection compensated with large machines.
If some irregularity occurs on the metal belt, it can damage the welded seam.
The counter roll plays an important role while implementing a Hydronip type of solution with
heavy linear loads. The counter roll has to be stiff or large enough to withstand heavy loads. If
the loads are increased, it also requires development of the counter rolls.
97
References
Buckman, D. 2008. Improving Dewatering, Energy Use and Press Fabric Life. Pulp & Paper
publication.
Hakala, J. 2002. General safety instructions. Metso standardi. Notes database.
Kairus, J. 2009. HANKUK2SP Press section rebuilt, Tasman Notes database.
KnowPap 7.0. 2005a. Functions of the PM press section. Learning Environment for
Papermaking and Automation, VTT Industrial Systems, prowledge Oy.
KnowPap 7.0. 2005b. Nip structures. Learning Environment for Papermaking and Automation,
VTT Industrial Systems, prowledge Oy.
KnowPap 7.0. 2005c. Wet pressing. Learning Environment for Papermaking and Automation,
VTT Industrial Systems, prowledge Oy.
Korolainen, T. 2011. Sym-telan ja telojen liitoksien maksimikuormat eri koneleveyksillä.
Calculations.
Lehtinen, J. 1998. Condebelt board and paper drying. Drying Technology Vol 16, No 6, p. 1047
Metso Paper. 2010. Pressing, Product technology brochure.
Occupational Safety and Health Administration, 2007. Lifting Accessories, Safety. Multiprint Oy,
Tampere 2007, p. 6. ISBN 978-952-479-064-2.
Onnela, J. 2009a. PM0901_SymBelt Roll_sales_presentation. Power Point presentation.
Onnela, J. 2009b. Enhanced production and dry content with better runnability through shoe
pressing. Power Point presentation.
Pirinen, T. 2010. Mini shoe press; Higher dryness, better machine runnabilty, and higher speed
with minimal changes to press section geometry. Power Point presentation.
Pihko, R. 2011. MTS Hydronippikokeet vko7/2011 TKK.
Pihko, R. & Savela, J. 2007. PRESSING APPARATUS FOR A PAPER- OR BOARD-MAKING
MACHINE FOR REMOVING FLUIDS FROM A WEB BY PRESSING, AND A METHOD FOR
TREATING A WEB IN A PAPER- OR BOARD-MAKING MACHINE, patent application.
Snellman, J. 2008. Measurements for pilot machine.
Wasserman, A. & Estermann, R. 2002. Shoe presses - the breakthrough for board from recycled
furnish. Technical papers and articles in TAPPSA Journal.