1
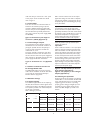
WCM-continuous
Version 4.0
Installation Manual
Contents
1. Introduction . . . . . . . . . . . . . . . . . . . . . . . . . . . . . . . . . . . . . . . . . . . . . . . . . . . . . . . . . . . . . .3
2. Components . . . . . . . . . . . . . . . . . . . . . . . . . . . . . . . . . . . . . . . . . . . . . . . . . . . . . . . . . . . . .3
3. Operating principle . . . . . . . . . . . . . . . . . . . . . . . . . . . . . . . . . . . . . . . . . . . . . . . . . . . . . .4
3.1
General information . . . . . . . . . . . . . . . . . . . . . . . . . . . . . . . . . . . . . . . . . . . . . . . . . . . .4
3.2
Specific information
4. The sensor
. . . . . . . . . . . . . . . . . . . . . . . . . . . . . . . . . . . . . . . . . . . . . . . . . . .4
. . . . . . . . . . . . . . . . . . . . . . . . . . . . . . . . . . . . . . . . . . . . . . . . . . . . . . . . . . . . . .4
5. The Buffer mounted on an aluminium buffer base . . . . . . . . . . . . . . . . . . . . . . .5
6. The mainbox
. . . . . . . . . . . . . . . . . . . . . . . . . . . . . . . . . . . . . . . . . . . . . . . . . . . . . . . . . . . .5
6.1
Connections . . . . . . . . . . . . . . . . . . . . . . . . . . . . . . . . . . . . . . . . . . . . . . . . . . . . . . . . . .5
6.1.1
The Power Supply . . . . . . . . . . . . . . . . . . . . . . . . . . . . . . . . . . . . . . . . . . . . . . . . . . . . .5
6.1.2
The Buffer . . . . . . . . . . . . . . . . . . . . . . . . . . . . . . . . . . . . . . . . . . . . . . . . . . . . . . . . . . . .6
6.1.3
The analogue outputs . . . . . . . . . . . . . . . . . . . . . . . . . . . . . . . . . . . . . . . . . . . . . . . . . .6
6.2
Mainbox settings . . . . . . . . . . . . . . . . . . . . . . . . . . . . . . . . . . . . . . . . . . . . . . . . . . . . . .6
6.2.1
Signal settings . . . . . . . . . . . . . . . . . . . . . . . . . . . . . . . . . . . . . . . . . . . . . . . . . . . . . . . . .6
6.3
Checking the operation . . . . . . . . . . . . . . . . . . . . . . . . . . . . . . . . . . . . . . . . . . . . . . . .6
7. Extra check . . . . . . . . . . . . . . . . . . . . . . . . . . . . . . . . . . . . . . . . . . . . . . . . . . . . . . . . . . . . . .7
8. Maintenance . . . . . . . . . . . . . . . . . . . . . . . . . . . . . . . . . . . . . . . . . . . . . . . . . . . . . . . . . . . . .7
9. Range and accuracy in stone wool . . . . . . . . . . . . . . . . . . . . . . . . . . . . . . . . . . . . . . . .8
10. Troubleshooting . . . . . . . . . . . . . . . . . . . . . . . . . . . . . . . . . . . . . . . . . . . . . . . . . . . . . . . . . .8
11. CE certification . . . . . . . . . . . . . . . . . . . . . . . . . . . . . . . . . . . . . . . . . . . . . . . . . . . . . . . . . . .9
12. Guarantee: Terms and conditions . . . . . . . . . . . . . . . . . . . . . . . . . . . . . . . . . . . . . . . .9
13. Manufacturer’s information . . . . . . . . . . . . . . . . . . . . . . . . . . . . . . . . . . . . . . . . . . . . .10
Appendices . . . . . . . . . . . . . . . . . . . . . . . . . . . . . . . . . . . . . . . . . . . . . . . . . . . . . . . . . . . . . .10
© Grodan B.V.
No part of this publication may be reproduced by any means without prior written permission from Grodan B.V.
2
1. Introduction
This manual contains an explanation of the installation and operation of the Grodan® WCM-continuous, whereby the attention is focused on the various connections and the (hardware) settings.
Notes included at several points in the manual refer to the appendices, which contain detailed photos with additional information. For the most up-to-date user manual of the WCM-continuous with
this model number, go to www.grodan.com and look under ‘Services’
2. Components
The WCM-continuous is comprised of 4 separate components and several cables:
a) Sensor
b) Cable between sensor and buffer fitted with
plug (fixed length of 1.35 metres)
c) Buffer on an aluminium buffer base with a
display for measurement readings
d) Covered cable* between buffer and mainbox
(variable length, maximum of 2000 metres,
2x twisted pair cable)*.
e) Mainbox with a display for measurement
readings
f) Wires in covered cable* (WC, EC and T)
between mainbox and computer or satellite
(recommended maximum length 3 m)1)
g) Adapter
h) RS232 cable for connections, if appropriate,
of WCM to PC via Gronow
i) CD with software and manual
* not included with standard order
figure 1: Schematic diagram of the
WCM-continuous. (Appendix 1)
) This cable is not supplied with the meter. Although lengths in excess
of 3 m can be used, the customer will bear the responsibility for any
resultant malfunctions.
1
3
3. Operating principle
6. The power supply is provided by the
adapter, not via the computer.
3.1 General information
The sensor performs digital measurements of
the WC (in volume%), EC (in mS/cm) and T
(in ºC). It constitutes the heart of the instrument.The buffer ensures communications.
The mainbox’s mother board provides for the
ultimate control and processing of the data.
The measurements are converted into a protocol that can be read by the various types of
irrigation and climate-control computers.
Specific settings (such as the analogue signal to
the horticulture computer) can be made only
on the mother board.
A once-only adjustment of the settings of the
mother board is required to ensure that the
mainbox communicates with the peripheral
equipment (horticulture computer) in the
appropriate manner. Further adjustments are
not required.The slab-type setting must be
adjusted in the buffer.
Attention:
The adapter provided with the meter works only
with 48 VDC. Improper voltage connections can
cause damage to the WCM!
Tip 1:
Pay due care during the installation of the components on location.The components must be dry,
and not exposed to direct sunlight. Preference
should also given to a location that is not in the
immediate vicinity of a boiler or CHP plant.
Tip 2:
When connecting the wires to the screw terminals,
it is important to ensure that the screw is fully
loosened prior to inserting the wire.This is necessary since it would otherwise be possible to insert
the wire under the catch and then tighten the
screw without achieving a good connection.Verify
the connection by pulling on the lead once the
screw has been tightened.
3.2 Specific information
1. The WCM-continuous is equipped with
3 separate digital/analogue converters for
3 outputs (WC, EC and T), including:
a. Dip switches for the selection of the
type of analogue output: 0-5VDC,
0-10VDC, 0-20mA, 4-20mA, 0-24mA;
The resolution is approximately 12 bits.
b. Galvanic separation of the analogue outputs from the earth of the power supply.
2. Specifications of the signals subsequent to
conversion into the selected analogue protocol:
a.WC: minimum signal = 0,
maximum signal = 100 (% v/v)
b. EC: minimum signal = 0,
maximum signal = 20 (mS/cm)
c.T: minimum signal = 0,
maximum signal = 50 (°C)
3. The meter carries out regular measurements, and refreshes the analogue output
signal at 3 minute intervals.
4. The mainbox, equipped with a display on
the front for reading off WC, EC and T
measurements (the last three minutes
measured):
a. displays the operation via LEDs.
b. is constructed from shielded prints
(EMC).
c. can, as an option, generate an alarm or a
start command via a separate output.
5. All instrument housings comply with IP65
requirements, subject to the proviso that
only one round cable is fed through each
gland.
4. The sensor
Refer to the instructions in the WCM-continuous Cultivation Manual (compiled by Grodan)
for the method used to determine the correct
measurement location of the sensor.The
installer should take account of the grower’s
need to be able to readily transfer the sensor
(and the buffer) to a new location.The buffer is
fitted with a buffer base, allowing the buffer to
be positioned near the measured slab. Ensure
that the buffer still has a few extra metres of
cable (5-10 metres) so that it can be moved
over a distance of several slabs.
Tip 3:
With the new sensor, it is possible to measure EC
levels between 0 and 20 mS.With the old meter,
this was possible for levels between
0 – 10 mS. Be alert to this when adjusting settings
regarding the horticulture computer.
Tip 4:
Before putting the sensor in place, use the hand
meter to carry out identical measurements of at
least 25 to 40 slabs within an irrigation compartment (placing the sensor cross-wise on the slab;
see figure 1, letter A) to find the average WC and
EC values. Place the WCM-continuous sensor in a
slab which corresponds with the average value.The
best position for the sensor is approximately
10 cm from the block and not close to the drain
4
removing the adapter from the electric socket.
After changing the settings, the adapter can be
plugged in again, whereupon the system will
reset itself.To find out which setting to choose
for which slab type, please consult the enclosed list.
opening. During the first few days, check whether
the measurements correspond with the measurements made using the hand meter.
Tip 5:
The cable between the sensor and the buffer has
a fixed length of 1.35 m. Account needs to be
taken of this length during the installation.The
cable between the buffer and the mainbox may be
of every required length, to a maximum of 2000
metres. It is recommended that at least an extra
10-metre length of cable is used, so that the sensor can be relocated to a different stone wool slab
during the cultivation period.This cable should
preferably not be placed in a cable channel due to
the possible interference with the WCM measurement signal.
5.3 Display
The buffer is equipped with a display for reading out the last measured values (WC, EC
and T) at intervals of 3 minutes (see app. III
photo III).The measurements are displayed in
the following order: Buffer number, Slab type,
WC, EC and T.While these measurements are
read out, a vertical line will be lit up on the left
display for Buffer number and Slab type. A horizontal line will be lit up for WC, EC and T.
Refer also to the text next to the left display
on the blue foil of the buffer cover.
Tip 6:
Consideration can be given to fitting a plug to the
cable between the mainbox and buffer. It will then
be possible to remove the buffer and sensor from
the greenhouse during the change of crops.The
plug needs to be watertight.
Attention: For this continuous meter, the buffer
number will always indicate '1'.
Tip 7:
The cover on the mainbox as well as on the buffer
is fitted with a display showing the latest measurements (WC, EC, and T) at intervals of 3 minutes.
This makes it possible to check whether the values
measured comply with the measurements displayed on the horticulture computer.This feature
also makes it easier to find a representative measurement slab, as the value measured can be read
on the spot.
5. The Buffer mounted on
aluminium buffer foot
5.1 Connections
The cable from CON2 from the mainbox to
the buffer must be connected to the terminals
of the buffer.The correct sequence is indicated
next to the connector; it is important to
ensure that the wires are connected to the
equivalent screw terminals, i.e.A to A and B to
B.
Next, connect the sensor to the buffer’s
CON2 using the plug.
6. The Mainbox
The mainbox’s mother board serves as the
measurement and processing unit of the
WCM-continuous. A minimum number of connections must be made to the mother board
prior to the use of the meter.
Attention:
Improper connections will cause damage!
6.1 Connections
The following sub-sections explain the various
connections in more detail.
5.2 Setting the slab type
Each Grodan slab type has its own unique moisture distribution. In order to obtain the best
results from your WCM-continuous meter, you
must select your slab type. In this way, you can
use the new meter for various types of substrates. For this purpose, a selector switch with 10
positions is integrated into the buffer.This is the
rightmost switch of the two switches positioned to the right of the display.The left switch,
with 15 positions, is meant for future applications (see app. II figure 7).The default manufacturer's setting is type 1.When changing the slab
type by means of this switch, the system must
be disconnected from the power supply by
Figure 2: View of the mother board in
the mainbox (Appendix II)
6.1.1 The Power Supply
The power supply from the adapter must be
connected to the + (= black wire, connection
21) and the - (= white wire, connection 20)
terminals of connector 8. Make sure that it is
possible to disconnect the wires when necessary.The voltage is 48 VDC and power consumption is 10 W.The polarity is important, so
5
make sure that you connect the + and - poles
to the proper access terminals. For details
refer to figure 3.
Table 1 lists the various forms of the output
signals.The settings of each canal are adjusted
using the dip switches of S3 (see figure 5) and
the jumpers J8 up to and including J13 (see figure 6). See table 2.
6.1.2 The Buffer
Four wires are used to connect the buffer to
CON2 on the mainbox (see figure 4).This
requires a shielded twisted-pair cable. Make
sure that one pair of wires (RS485) is used for
the communications (A and B), and that the
other pair is used for the power supply (GND
and POWER).
Tip 8:
It is important to ensure that the range of the
inputs to the WCM is compatible with the outputs
generated by the WCM, i.e. the water content should
be scaled to a range of 0-100, the EC to a range of
0-20, and the temperature to a range of 0-50.
Incorrect settings will result in the transmission of
incorrect measurement values to the computer.
figure 4: Connection of the buffer to
connector 2 (CON2) (Appendix II)
Tip 9:
Check the positions of the dip switches before
switching the power on!
Important:
Check to make sure that the + and - of the power
supply are correctly connected to the input terminals on the mainbox. It is also important to make
sure that the relevant wires between the mainbox
and the buffer, which transmit the power supply,
are also correctly connected. As this meter makes
use of a 48 VDC adapter, an incorrect connection
will cause damage to the system. Check the connections of the wires in the mainbox and buffer
before switching on the power.When carrying out
repairs or maintenance on the meter, always disconnect it from the power supply.
6.1.3 The analogue outputs
The connections for the analogue outputs of
the WC, EC and T are located in connector 8
(see figure 3). Make sure that the polarity is
correct; for this purpose the terminals are
marked with T+,T-, etc.
The T-, EC- and WC- are linked to each other,
and therefore have the same earth.This is not
the same earth as that of the power supply.The
three outputs are galvanically separate from the
power supply and all other connections.
Figure 3: Connections 22 - 27 (Appendix
II)
6.1.4 Direct connection and text on
PC through RS232 cable
The RS232 cable (figure 2.15) can be used to
make a direct connection to the PC.This allows
you to read out measurements directly in
Grodan’s Gronow programme.
Figure 5: The dip switches for the analogue outputs (Appendix III)
Figure 6: The jumpers for the analogue
outputs (Appendix III)
6.3 Checking the operation
On the front side of the mainbox, you will find
3 LEDs. LED 1 is an on/off switch for WC. LED
2 is an optional alarm sign for a low WC. LED
3 lights up green if the meter is operating
properly (power voltage), and lights up red if
something is wrong. When starting up the
meter, too, LED3 will light up red for a few
minutes.
6.2 Mainbox settings
6.2.1 Signal settings
The mainbox supplies three sets of output signals,WC, EC and T. Each of these signals can be
converted according to five different protocols.
The requisite protocol to be selected depends
on the type of computer.
Table 1: Analogue protocols
Protocol
Paramete Range
1
0-20mA
2
4-20mA
3
0-24mA
4
0-5V
5
0-10V
WC
0-100
0 mA = 0
20mA=100
4 mA = 0
20mA=100
0 mA = 0
24mA=100
0V = 0
5 V =100
0V = 0
10 V =100
EC
0-20mS/cm
0 mA = 0
20mA=20
4 mA = 0
20mA=20
0 mA = 0
24mA=20
0V = 0
5 V =20
0V = 0
10 V =20
T
0-50 C
0 mA = 0
20mA=50
4 mA = 0
20mA=50
0 mA = 0
24mA=50
0V = 0
5 V =50
0V = 0
10 V =50
0
6
Table 2: Analogue settings
Table for T output
Dipswitch S3, Dipswitch S3,
SW1
SW2
Jumper 8
Jumper 9
0-20 mA
protocol 1
On
Off
1+2, left
not relevant
4-20 mA
protocol 2
Off
On
1+2, left
not relevant
0-24 mA
protocol 3
Off
Off
1+2, left
not relevant
0-5 V
protocol 4
On
On
2+3, right
fitted
0-10 V
protocol 5
On
On
2+3, right
not fitted
These settings are also applicable to the EC, when they then pertain to SW3, SW4, J10 and J11, and to the WC, when they pertain to SW1, SW2, J12 and J13.
If LED 3 incidentally turns red, then the measurement is incorrect. If LED 3 frequently turns
red for longer periods, then one of the components is not working properly or there is a
wrong connection and/or improper setting.
Check all connections and settings again, and
then plug the adapter into the power mains.
Tip 11:
Take care when checking or setting the minimum and
maximum measurement values.With some climatecontrol computers, a few minutes may be required
before the correct value is displayed on the screen.
Tip 12:
No description has as yet been provided for a number of connections.These are intended for future
expansions such as digital communications with the
horticulture computer and diagnosis using a PC.
Tip 10:
LEDs 4, 5 and 6 are of significance only with the 420 mA setting.When the LEDs are not lit up, the
unit is operating correctly. If the current falls below
4 mA, then the red LED on the relevant channel
will light up, for example in case of a cable break.
8. Maintenance
7. Extra check
The mainbox and buffer of the WCM-continuous do not require any maintenance.The settings of the D/A converter may need to be
adjusted if a new horticulture computer is used
with the meter.The sensor does not need to be
calibrated. If you have any doubts, you can calibrate the meter by holding it in the air and
inserting the pins into water.The measurements
read off should then be 0% and 100% respectively (with a margin of 5%). In case of faulty
measurements, please contact your supplier.
However, it is a good idea to regularly remove
any deposits (for example nutrients) from the
sensor pins.When changing from one culture to
another, the sharp sensor pins should always be
well protected to prevent any damage or injury.
After connecting the meter, you can check its
operation by reading out the values measured
(WC, EC and T) on the displays of the mainbox
and buffer.These values must agree with each
other as well as with the values measured on
the horticulture computer. A hyperlink is not
needed to read out the measurements.
7
9. Range and accuracy in
stone wool
As indicated earlier, the WCM measures the
water content, EC, and temperature (the average over the depth of the slab).
Table 3 specifies the conditions under which
the WCM carries out measurements, and the
accuracy of these measurements.The accuracy
exhibits a gradual shift between the various
ranges and outside the ranges.
Table 3: Specifications
Parameter
Measurement Conditions
Min
WC (%v/v)
EC (mS/cm)
T (°C)
Max
Measurement range
Min
Max
Accuracy
Min
Resolution*
Max
Min
Max
25%
95%
0%
100%
2.5%
5.0%
0.1%
0.2%
0
10
0
20
0.1
0.5
0.01
0.02
10
40
0
50
0.5
1
0.1
0.1
* The resolution indicates the smallest interval which can be measured using the meter
Attention:
The EC measured using the WCM is calibrated via the international standard at 20 °C. Globally,
most EC meters are also calibrated at 20 °C. However, in the Netherlands it is more usual to calibrate EC meters at 25 °C, which results in a measurement 10% higher than when taken with a
meter calibrated at 20 °C.Therefore, if one compares the EC measured by the WCM with a sample
taken from the slab with a syringe and measured with a conventional EC meter, the latter value will
be about 10% higher.
Note: The specifications apply when taking measurements in water containing nutrients. Deviations
may occur in substrates depending on the type of substrate and the salts present.
10. Troubleshooting
• No measurement value or signal appears on
display of mainbox or buffer
- Check to make sure that the red-green LED
on the front side of the mainbox is lit up.
- Check to make sure that the adapter is
connected to the power mains and delivers
power.
• Extreme measurement values (WC, EC or T)
on display of buffer
- Extreme temperature readings (high or low)
indicate a defective temperature sensor.
- Extremely divergent values or unstable
readings one after another.
- The red LED on the front side of the mainbox regularly turns red.
- One of the three measured variables is not
transmitted.
In cases of extremely divergent readings, the
sensor is usually defective. Please contact
Grodan Customer Service so that a new
sensor can be sent in consultation.
• No measurement value or signal on display of
mainbox
- Check to make sure that the cables are
correctly connected and that there is no
cable break.
• No measurement value on display of buffer
- Check to make sure that the sensor is
properly connected to the buffer.
- Check the cables between sensor and
buffer.
• Measurement values on displays of buffer and
mainbox do not agree
- Check the cables between mainbox and
buffer for breakage or damage.
8
• Measurement values on display of mainbox do
not agree with readings on horticulture computer
- Check to make sure all dip switches or
jumpers have been properly set during the
last installation.
- When setting the 0% and 100% values on
the horticulture computer, wait a few minutes extra for the values to stabilize.
- Check whether the cables have been properly connected.
11. CE certification
In all cases in which the malfunction cannot be
corrected after the checks mentioned above,
you should contact Grodan Customer Service.
After consultation, a decision can be taken to
carry out repairs using advice from a distance
or to call in the help of a service technician.
Note:
The performance of the WCM can be influenced
by transmitters emitting radio frequencies in the
vicinity of the meter.
The WCM-continuous has been granted CE
certification, i.e. the instrument has been tested
and found to comply with the following EMC
guidelines:
EN61000-6-4
EN61000-6-2
EN61000-3-2
EN61000-3-3
(2001)
(2001)*
(1995) + A1 (1998) + A2 (1998)
(1995)
Tip for installer
For new installations, the measurement signal may
be influenced from the outside by a ground loop. If
the cable is laid in a common cable pipe together
with other cables (for example for frequency-regulated pumps or ventilators), it may be affected by
the other cables. Antenna cables may also interfere
with transporting the measurement signals. Make
sure that the cables shielding is properly grounded
via the horticulture computer and not via the
WCM-continuous.
Tip for user
If you are not sure whether the sensor is producing
correct measurements, you can remove the sensor
from the slab and wipe the pins dry.The meter
should then display the ambient temperature within
a few minutes, and WC and EC should = 0. If you
immerse the sensor pins completely under water,
the WC value should be practically 100%.The
ambient and measured values for EC can be
checked with a conventional EC meter or by using
water with a known EC value. Attention:You should
check which calibration method was used to calibrate the conventional EC meter (see comment
under Table 2). If any of these values is very divergent, you should contact Grodan Customer Service.
*Due to the operating principle of the sensor, certain frequencies may cause deviations in the measurements taken.The size of the deviation and
the frequencies involved are described in the laboratory documents 03C01265EUT1. If requested, Grodan can send you these documents.
9
Although all our information and advice is compiled with the greatest possible care and in accordance with the latest technical developments, we cannot accept any liability for the contents. May 2004.
12. Guarantee: Terms and
conditions
13. Manufacturer’s information
a) GRODAN guarantees that the best quality
materials are used for the manufacture of
the products supplied to the customer.
Should it nevertheless transpire that the
products supplied to the customer exhibit
defects as a result of problems with the
materials or errors made during manufacture, then GRODAN will decide whether to
repair these defects, arrange for them to be
repaired, supply the spare parts needed for
the repairs, replace the goods, or issue a
refund to a maximum amount of the value
of the goods.This guarantee is issued for a
period of 12 months subsequent to delivery.
In issuing this guarantee, GRODAN relies on
the liability of the supplier for the goods or
materials with respect to the warranty and
to complaints about the components or
materials in question. GRODAN cannot
accept liability for any other obligations such
as compensation for loss arising from the
dissolution of the contract. Any claims under
this guarantee must be submitted to
GRODAN, in writing, within eight days subsequent to the date on which the loss is
incurred.
b) In the event of the failure of the customer
to fulfil any obligation arising from the contract with GRODAN – or failure to do so in
due time – then GRODAN will be absolved
– in all instances – of all obligations with
respect to the guarantee or payment as laid
down in the contract.
Produced by Venne Electronics BV,
The Netherlands.
All rights reserved.
No part of this publication may be reproduced
or published by means of print, photoprint,
microfilm or any other means without prior
written permission from GRODAN.The reservation of these rights is also applicable to the
drawings and diagrams incorporated in this
publication.
GRODAN reserves the right to modify parts
of this instrument at any time without the
issue of prior or direct notification to the
client.The contents of this publication are also
subject to amendment without notification.
Please contact Grodan Customer Service for
additional information about settings, maintenance and repairs.
Although every care was taken during the
preparation of this publication GRODAN cannot accept any liability whatsoever for errors
in this publication, nor for their consequences.
More information
Grodan A/S
Denmark
Tel.: +45 4656 0400
Fax: +45 4656 1211
E-mail: [email protected]
Grodan BV
The Netherlands
Tel.: +31 475 353 020
Fax: +31 475 353 716
E-mail: [email protected]
www.grodan.com
10
Figure 1:
Schematic diagram of the
WCM-continuous
1
BUFFER
A • The sensor
B • Cable between sensor and
buffer
C • The buffer mounted on the
stand
D • Cable between the buffer
and mainbox (variable
length, maximum length
2000 metres, 2x twistedpair shielded cable (not
included).
E • The mainbox with main
printed circuit board
F • Covered cables (WC, EC
and T) between the mainbox and the computer or
satellite (recommended
maximum length of 3
metres.)
G • The adapter
C
B
A
D
E
MAINBOX
F
G
Photo 1:
The components of the
WCM-continuous (§ 2)
P E O P L E
P L A N E T
1
P R O F I T
Appendix I
Figure 2:
View of the mother board in
the mainbox
1 • Display: current values
for WC, EC, and T
2 • Connection for servicing
purposes
3 • Pump LEDs
4 • Status LEDs
5 • Alarm LED
6 • VCC and GND (see
figure 4)
7 • Cable to adapter
8 • Cable to computer
9 • Battery
10 • Status LEDs: OK (green)
reset + error (red)
11 • Cable to buffer
12 • See figure 3
13 • See figure 6
14 • See figure 5
15 • Cable for extention
(optional)
2
Figure 3:
A Connection 20 (+) and
21 (-) power input
B Connection 22-27 (analogue output) to computer
3
1
13
2
12
6
15
11
5
A
Figure 4:
The buffer connection to
connector 2 (CON2)
P E O P L E
P L A N E T
14
4
9
3 10
7
8
B
4
P R O F I T
Appendix II
Figure 5:
The DIP switches for the analogue outputs
• SW 3-6 of S3
Figure 6:
The jumpers for the analogue
outputs
• 1, 2 and 3
Figure 7:
Two rotary switches in the
buffer.
• Switch on your right: to
select slab type
• Switch on your left: future
applications
5
6
1
3
SW 3-6
7
2
Photo 2:
The sensor (§ 4)
2
3
Photo 3:
The buffer on the buffer foot
supplied with the unit (§ 6.1.2)
P E O P L E
P L A N E T
P R O F I T
Appendix III