1
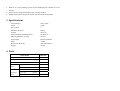
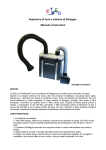
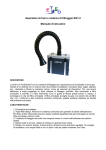
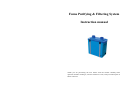
Fume Purifying & Filtering System
Instruction manual
Thank you for purchasing the unit. Please read the manual carefully before
operation and after reading it, store this manual in a safe, easily accessible place for
future reference.
1. Summary
The unit is a Fume Purifying & Filtering System for cleaning of both particles and
gases. The unit is double fuming arms design and during the process of soldering,
laser marking, laser carving, printing etcetera, to be used at filtrating the harmful
substances, such as hydrocarbon, cyanide etc.
For good efficiency, it designs a Triple-filter system: pre-Filter, middle filter and
main filter which including HEPA (high efficiency) filter and gas filter. The
pre-filter with large area ASHRAE and the middle filter can filter the bigger
powders for prolonging the main filter’s life. The HEPA cleans the gas and powders
filtering from the pre-filter and then output them to the gas filter, which with the
carbon and other chemical combination, filters off the deleterious substance and
then outputs the clean air.
Top
Four Knobs to
lock the top
Power socket and switch
Low
Emitting
Diode displaying
Connect with the outer
adjusting keyboard
2. Characters
1. It is easy to install and not lay pipelines.
2. Triple-filter design. Remove hazardous substances to ensure health. Pre-Filter
and Main Filter can be replaced separately for prolonging the filter’s life and
cutting down the cost.
3. Built-in air cycling filtering system avoids discharging the cool/hot air to the
outside.
4. Low noise and Long-life brush-less fan with large airflow.
5. Double fuming arms design, the airflow and arms both are adjustable.
3. Specifications
Voltage Range
Power
Qty of Arms
Stationary Pressure
Airflow
System Airflow (Including Filter)
Filtering Efficiency (0.3um)
Arm Length
Noise
Dimension (H×D×W)
Weight
198V~242V
120W
2
900Pa
320 m3/h
2*100 m3/h
99.97%
φ75mm*1000mm
<70dB
470*230*500mm
15.5kg
4. Parts
Name/model
Remark
Unit
1
Instruction manual
1
Power cord
1
P-type arm
2
Arm
S-type arm
Inlet
for
(option)
Circle
2
absorbing
Acryl cover
(option)
fume
Taper
(option)
3. The filter must be changed when the LED circularly displays “□”.
4. When the unit alarms, check the hose (fuming arms) and nozzles, clean if
necessary. If the suction is deficient after cleaning, change the main filter.
5. When changing the main filter, turn off the power supply and loosen the 4
knobs on the sides of the unit. Lift the top, prefilter and middle filer straight up
and put aside. Pull the main filter straight up.
6. Replace a new main filter and re-assembled it as the reverse order. Make sure
the inlet to the fan fits to the connection in the bottom of the filter and that the
new filter has the right side up.
7. Mark with the date of change when changing a new main filter.
Note: The two sides of the prefilter are different. When changing the
prefilter, the dense side is to the filter and the other side is to the
inlet.
Top part
Rubber casing
Prefilter
Regular φ75
Arm’s inlet
Adjustable φ75
2
(option)
2
Pre-filter
Inlet connecting & fixation
(option)
Soft hose for connecting
(option)
Outer keyboard for adjusting the airflow
1
Note: the length of the fuming arm can be ordered according to the
customer’s demands.
5. Putting into service
1. Connect the unit to the power socket and switch on the power supply. Adjust the
fuming arms according to the different working occasion, the unit can work and
purify the air.
2. After turn on the unit, the LED will display the upper limit airflow firstly and
then display the current airflow after twinkling three times.
3. It can adjust the airflow by the outer adjusting key and when turning off the key,
the LED will display “OFF”.
Note:
Middle filter
Main filter
Coat of the unit and
other parts
Note: If there are some other troubles shooting, please contract with our
company or agents.
z Please take out the foam under the main filter before firstly using the
unit.
z It must press the top part tightly and then fasten the knobs to lock the
top. Or else, it may cause damage to the knobs.
6. Manual setting
1. Press “ ▲ ” and “ ▼ ” keys at the same time, the LED will display the
recommended or setting uptime.
2. Press “▲” and “▼” keys at the same time, when the LED displaying “---”, it
must input the right password to the menu setting. The initial password is 000.
Password inputting: firstly, change the hundred digital by pressing “▲” or
“▼”key (The digital change order is from 0 to 9). And then pressing “▲” and
“▼” keys at the same time to save the hundred digital and enter into the ten
digital setting. The setting method of ten digital and one digital is the same as
the hundred digital setting.
3. Menu setting:
1) After into the menu setting interface, the LED displays “1”, which means it
can exit the menu setting and return to displaying the current work time by
pressing “▲” and “▼” keys at the same time.
2) In the menu setting interface, it can change the parameter by pressing “▲”
or “▼” key. The parameters may be “2” or “3” or “4”, which has
different functions.
3) When the LED displays “2”, which means it can set the upper limited work
time. Pressing “▲” and “▼” keys at the same time will enter to the upper
limited time setting and the LED will display “---”. The setting method is
same as the “password inputting”. After setting successfully, the upper
limited time will twinkle three times and then return to “1”.
4) When the LED displays “3”, which means it can reset the work time as
zero. The setting method is the same as the “password inputting”. After
setting successfully, the upper limited time and 000 will twinkle three
times and then return to “1”.
5) When the LED displays “4”, which means it can set the new password.
Pressing “▲” and “▼” keys at the same time will enter to the password
setting and the LED will display “---”. The setting method is same as the
“password inputting”.
If the next inputting password is the same as the previous inputting password,
the password setting is successful, the new password will twinkle three times
and then return to “1”. If the twice inputting password are different, it will
directly return to “1”.
7. Maintenance and replacement of filter
7.1
Trouble shooting
1. Phenomena: the LED clockwise displays circularly “□” and the unit
alarms, the fan still work but the airflow is small.
Reason: it may be the inlet of the fan has been blocked about half hour or may
be the main filter has in no effect.
Check: switch off the power supply, take up the top and check whether the
outlet has been block and clean the other thing if necessary. Switch on
the power supply and check the unit, if it is still block and it should
change the filter.
2. Phenomena: the LED anticlockwise displays circularly “□” and the unit
alarms, but the fan still work.
Reason: it may be the unit has worked up to the upper limit time.
Check: switch off the power supply, take up the top and pre-filter to change the
main filter. After that switch on the unit, enter to the menu setting and
clear the work time.
3. Phenomena: the LED displays “OFF” and “ERR” by turns and the unit
alarms, besides, the fan and motor stop work.
Reason: it may be something wrong with the fan or the circuit.
Check: switch off the power supply and then switch on again, if it cannot work
in gear and please check the fan.
7.2
1.
2.
Parts Maintenance and Changeable
The fuming arm should be often clean.
The pre-filter system should be often changed.
7.3
Disposal of Filter
How the fume extraction filter should be disposed off, depends
on the application that the system has been used for. The disposal
will be different for different types of applications, for example
solder fumes will be different from flammable vapors and gases
(iso-propyl alcohol).
Users must maintain precautions when handling or disposing the
used filters. The rule of the thumb is to follow the MSDS datasheets
of the substances that produce these fumes. Users should follow
all the safety and personnel handling guidelines outlined in the
MSDS datasheet of the substance producing fumes while handling
the used filter.