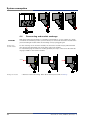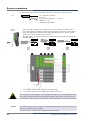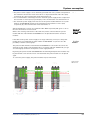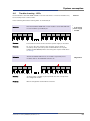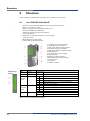
1
ricos FLEX ricos FLEX BC EtherNet/IP 83.036.1050.0 USER MANUAL Dok.-Nr. BA000975 Stand: 05/2014 (Rev. A) Content This work is copyrighted material. The resulting rights remain with Wieland Electric Inc. Any duplication of this document or parts thereof is permitted only within the limits of the statutory provisions of the Copyright Act. Alteration or abridgement of this document without the express written consent of Wieland Electric GmbH is prohibited. ricos FLEX is a trademark of Wieland Electric. Other names may in this assembly manual mentioned product and brand- trademarks or registered trademarks of their respective owners could be used, whose use by third parties for their own purposes could violate the rights of the owners. N OT E Every effort has been made to ensure that the information contained in this document was complete and accurate at the time of publishing. Nevertheless, the authors retain the right to modify the information. This customer document describes all the hardware units and functions known at the present time. Descriptions may be included for units which are not present at the customer site. The exact scope of delivery is described in the respective purchase contract. Conformity Information For more information regarding CE marking and Declaration of Conformity (DoC), please contact your local Wieland Electric customer service organization. Trademarks SPEED7 is a registered trademark of profichip GmbH. SIMATIC, STEP, SINEC, S7-300 and S7-400 are registered trademarks of Siemens AG. BLUETOOTH® is a registered trademark of Special Interest Group (SIG). Microsoft and Windows are registered trademarks of Microsoft Inc., USA. Portable Document Format (PDF) and Postscript are registered trademarks of Adobe Systems, Inc. All other trademarks, logos and service or product marks specified herein are owned by their respective companies. 2 Wieland Electric GmbH | BA000975 | 05/2014 (Rev. A) Content Content ...................................................................................................................... 3 1 About this manual........................................................................................... 4 1.1 1.2 Objective and contents .............................................................................................. 4 Target audiences........................................................................................................ 4 1.3 1.4 Structure of the manual ............................................................................................. 4 Icons Headings .......................................................................................................... 5 2 2.1 Safety information .......................................................................................... 6 Applications conforming with specifications ............................................................. 6 2.2 Safety precautions power module ............................................................................. 7 3 Basics and Assembly ...................................................................................... 9 3.1 Safety Information for Users ...................................................................................... 9 4 System conception ....................................................................................... 10 4.1 4.2 Overview.................................................................................................................. 10 Dimensions .............................................................................................................. 13 4.3 4.4 Installation ............................................................................................................... 13 Demounting and module exchange ......................................................................... 16 4.5 4.6 Wiring ...................................................................................................................... 19 Trouble-shooting - LEDs .......................................................................................... 23 4.7 4.8 Installation guidelines .............................................................................................. 24 General data............................................................................................................. 26 5 5.1 Structure ....................................................................................................... 28 ricos FLEX BC EtherNet/IP ....................................................................................... 28 6 6.1 Deployment .................................................................................................. 32 Basics EtherNet/IP ................................................................................................... 32 6.2 6.3 Basics - IP address and subnet ................................................................................ 33 Setting the IP address .............................................................................................. 34 6.4 6.5 Operating modes ..................................................................................................... 35 Web server .............................................................................................................. 36 6.6 6.7 Accessing the System ricos FLEX ............................................................................ 39 Deployment of FORWARD_OPEN ........................................................................... 42 6.8 EtherNet/IP - Objects ............................................................................................... 46 7 Recommended literature ............................................................................... 51 8 FAQ............................................................................................................... 52 9 Support ......................................................................................................... 53 Wieland Electric GmbH | BA000975 | 05/2014 (Rev. A) 3 About this manual 1 About this manual This manual describes the ricos FLEX power modules (PW) and ricos FLEX potential distributor modules (PD) from Wieland Electric GmbH. Here you may find besides of a product overview a detailed description of the single modules. You’ll receive information about the connection and the deployment of the system ricos FLEX PW and PD modules. Please read this section carefully before you use this manual and the digital input module from the system ricos FLEX from Wieland Electric GmbH. Here you will find all the information required for commissioning and operation. 1.1 Objective and contents This manual describes the System ricos FLEX power modules and clamp modules from Wieland Electric GmbH. It contains a description of the structure, project engineering and deployment. This manual is valid for the following ordering numbers: Product Order number ricos FLEX ETHERCAT 1.2 83.036.1050.0 Version: HW FW 01 1.0.0 Target audiences The manual is targeted at users who have a background in automation technology. 1.3 Structure of the manual The manual consists of chapters. Every chapter provides a self-contained description of a specific topic. Guide to the document As a guidance the overall table of contents is available in the manual at the beginning. Availability The manual is available in electronic form as PDF-file (Adobe Acrobat Reader). 4 Wieland Electric GmbH | BA000975 | 05/2014 (Rev. A) About this manual 1.4 Icons Headings Important passages in the text are highlighted by following icons and headings: Danger! Immediate or likely danger. Personal injury is possible. D A NG E R Warning! Possible danger. Not heeding this warning can lead to minor injuries. W A RN ING Attention! Damages to property is likely if these warnings are not heeded. AT TENT I ON Caution! Damages to property by electrostatic charges is likely if these warnings are not heeded. Note! Supplementary information and useful tips. Wieland Electric GmbH | BA000975 | 05/2014 (Rev. A) N OT E 5 Safety information 2 Safety information This chapter is for your safety and the safety of equipment operators. Please read this chapter carefully before working with a VPN-Router. W A RN ING General Safety • Personnel inalling, programming, operating or maintaining the wienet router must have read and understood this manual. • The personnel must be thoroughly familiar with all warnings, instructions and requirements contained in this manual. • The applicable local safety, protection and installation requirements must be observed. • The user is solely responsible for selecting the correct product and the technical design in accordance with appropriate local regulations 2.1 Appropriate use Applications conforming with specifications The system ricos FLEX is constructed and produced for: • communication and process control • general control and automation applications • industrial applications • operation within the environmental conditions specified in the technical data • installation into a cubicle This device is not certified for applications in • in explosive environments (EX-zone) D A NGE R Documentation N OT E Disposal 6 The manual must be available to all personnel in the • project design department • installation department • commissioning • operation The following conditions must be met before using or commissioning the components described in this manual: • Modification to the process control system should only be carried out when the system has been disconnected from power! • Installation and modifications only by properly trained personnel • The national rules and regulations of the respective country must be satisfied (installation, safety, EMC ...) National rules and regulations apply to the disposal of the unit! Wieland Electric GmbH | BA000975 | 05/2014 (Rev. A) Safety information Please note the following instructions: • The ricos FLEX system may only be used in accordance with applicable national and international regulations as well as any special restrictions on the use of the ricos FLEX system in prescribed applications and environments. • To avoid personal injury or damage to the equipment and ensure that all the relevant regulations have been complied with, use only original accessories. Unauthorized modifications or use of non -approved accessories may damage the system and violate the law. Unauthorized modifications or use of unauthorized accessories may result in a loss of warranty. • The voltage at ricos FLEX system must not be exceeded. • Do not expose the ricos FLEX system to extreme environmental conditions. Protect the system from dust, moisture and high temperatures. • If the ricos FLEX system is used in the vicinity of medical devices, such as pacemakers or hearing aids, special caution is required. Any other use or modification to the system - even in the assembly and installation resulting in a loss of warranty claims against the Wieland Electric GmbH. 2.2 AT TENT I ON Safety precautions power module The Power modules were designed and constructed: • to be installed on mounting rail along with system ricos FLEX components • for installation in a cabinet with sufficient ventilation • for industrial applications Appropriate use The following precautions apply to applications employing the System ricos FLEX power supplies. • The power modules may only be installed in areas that are only accessible to the maintenance! • The power modules are not approved for use in explosive atmospheres (hazardous location)! • The power module must be disconnected prior to the start of installation and maintenance, i.e. before work on a power supply or with the cabling, the voltage supply must be disconnected (Pull the plug, at fixed connection associated fuse)! • Installation and modifications may be performed only by properly trained personnel! • Due to the compact design, adequate cooling of the contact as and fire protection can not be guaranteed. For this reason, the fire protection must be guaranteed by the environment of the built-in power adapter (e.g. installation in a cabinet that meets the fire safety regulations)! • Please refer to the national rules and regulations of the respective country (installation, safety, EMC ...). Wieland Electric GmbH | BA000975 | 05/2014 (Rev. A) D A NGE R 7 Safety information AT TENT I ON 8 Please note the following instructions: • The ricos FLEX system may only be used in accordance with applicable national and international regulations as well as any special restrictions on the use of the ricos FLEX system in prescribed applications and environments. • To avoid personal injury or damage to the equipment and ensure that all the relevant regulations have been complied with, use only original accessories. Unauthorized modifications or use of non -approved accessories may damage the system and violate the law. Unauthorized modifications or use of unauthorized accessories may result in a loss of warranty. • The voltage at ricos FLEX system must not be exceeded. • Do not expose the ricos FLEX system to extreme environmental conditions. Protect the system from dust, moisture and high temperatures. • If the ricos FLEX system is used in the vicinity of medical devices, such as pacemakers or hearing aids, special caution is required. Any other use or modification to the system - even in the assembly and installation resulting in a loss of warranty claims against the Wieland Electric GmbH. Wieland Electric GmbH | BA000975 | 05/2014 (Rev. A) Basics and Assembly 3 Basics and Assembly The focus of this chapter is on the introduction of the Wieland Electric GmbH system ricos FLEX. Here you will find the information required to assemble and wire a controller system consisting of system ricos FLEX components. Overview Besides the dimensions the general technical data of System ricos FLEX will be found. 3.1 Safety Information for Users ricos FLEX modules make use of highly integrated components in MOS-Technology. These components are extremely sensitive to over-voltages that can occur during electrostatic discharges. The following symbol is attached to modules that can be destroyed by electrostatic discharges. Handling of electrostatic sensitive modules The symbol is located on the module, the module rack or on packing material and it indicates the presence of electrostatic sensitive equipment. It is possible that electrostatic sensitive equipment is destroyed by energies and voltages that are far less than the human threshold of perception. These voltages can occur where persons do not discharge themselves before handling electrostatic sensitive modules and they can damage components thereby, causing the module to become inoperable or unusable. Modules that have been damaged by electrostatic discharges can fail after a temperature change, mechanical shock or changes in the electrical load. Only the consequent implementation of protection devices and meticulous attention to the applicable rules and regulations for handling the respective equipment can prevent failures of electrostatic sensitive modules. Modules must be shipped in the original packing material. Shipping of modules When you are conducting measurements on electrostatic sensitive modules you should take the following precautions: • Floating instruments must be discharged before use. • Instruments must be grounded. Modifying electrostatic sensitive modules you should only use soldering irons with grounded tips. Measurements and alterations on electrostatic sensitive modules Personnel and instruments should be grounded when working on electrostatic sensitive modules. Wieland Electric GmbH | BA000975 | 05/2014 (Rev. A) 9 System conception 4 System conception 4.1 Overview System ricos FLEX is a modular automation system for assembly on a 35 mm mounting rail. By means of the peripheral modules with 2, 4 or 8 channels this system may properly be adapted matching to your automation tasks. The wiring complexity is low, because the supply of the DC 24 V power section is integrated to the backplane bus and defective modules may be replaced with standing wiring. By deployment of the power modules in contrasting colors within the system, further isolated areas may be defined for the DC 24 V power section supply, respectively the electronic power supply may be extended with 2 A.. Components The system ricos FLEX consists of the following components: • Bus coupler (head module) • Extension modules • Power modules • Accessories Bus coupler With a bus coupler bus interface and power module is integrated to one casing. With the bus interface you get access to a subordinated bus system. Via the integrated power module for power supply the bus interface is supplied as well as the electronic of the connected extension modules. The DC 24 V power section supply for the linked extension modules is established via a further connection at the power module. By installing of up to 64 extension modules at the bus coupler, these are electrically connected, this means these are assigned to the backplane bus, the electronic modules are power supplied and each extension module is connected to the DC 24 V power section supply. 10 Wieland Electric GmbH | BA000975 | 05/2014 (Rev. A) System conception Extension modules [1] Each extension module consists of a [1] terminal and an [2] electronic module. [2] Terminal module The terminal module serves to carry the electronic module, contains the backplane bus with power supply for the electronic, the DC 24 V power section supply and the staircase-shaped terminal for wiring. Additionally the terminal module has a locking system for fixing at a mounting rail. By means of this locking system your ricos FLEX system may be assembled outside of your switchgear cabinet to be later mounted there as whole system. Electronic module The functionality of a ricos FLEX extension module is defined by the electronic module, which is mounted to the terminal module by a safe sliding mechanism. With an error the defective module may be exchanged for a functional module with standing installation. By an integrated coding only the modules may be plugged, which may be combined. At the front side there are LEDs for status indication. For simple wiring each module shows a corresponding connection diagram at the front and at the side. Wieland Electric GmbH | BA000975 | 05/2014 (Rev. A) 11 System conception Power module In the system ricos FLEX the power supply is established by power modules. These are either integrated to the bus coupler or may be installed between the extension modules. Depending on the power module isolated areas of the DC 24 V power section supply may be defined respectively the electronic power supply may be extended with 2 A. For better recognition the color of the power modules are contrasting to the extension modules. Accessories The optional accessories can be ordered upon request at Wieland Electric GmbH. 12 Shield bus carrier The shield bus carrier serves to carry the shield bus (10 mm x 3 mm) to connect cable shields. Shield bus carriers, shield bus and shield fixings are not in the scope of delivery. They are only available as accessories. The shield bus carrier is mounted underneath the terminal of the terminal module. With a flat mounting rail for adaption to a flat mounting rail you may remove the spacer of the shield bus carrier. Bus cover With each bus coupler, to protect the backplane bus connectors, there is a mounted bus cover in the scope of delivery. You have to remove the bus cover of the bus coupler before mounting a ricos FLEX module. For the protection of the backplane bus connector you always have to mount the bus cover at the last module of your system again. Wieland Electric GmbH | BA000975 | 05/2014 (Rev. A) System conception 4.2 Dimensions 109 104 Dimensions bus coupler (in mm) 76.5 48.5 49 133 109 104 Dimensions extension module (in mm) 76.5 12.9 15 55.5 Dimensions electronic module (in mm) 62 4.3 12.9 Installation There is a locking lever at the top side of the terminal module. For mounting and demounting this locking lever is to be turned upwards until this engages audible. Now the module may be pulled forward. For mounting plug the module to the module installed before and push the module to the mounting rail guided by the strips at the upper and lower side of the module. Functional principle The module is fixed to the mounting rail by pushing downward the locking lever. The modules may either separately be mounted to the mounting rail or as block. Here is to be considered that each locking lever is opened. Wieland Electric GmbH | BA000975 | 05/2014 (Rev. A) 13 System conception Clack 1 2 3 For the exchange of an electronic module, the electronic module may be pulled forward after pressing the unlocking lever at the lower side of the module. For installation plug the electronic module guided by the strips at the lower side until this engages audible to the terminal module. 2. Pull Clack 1. Press 1 Mounting proceeding 2 3 The modules were directly be mounted to the mounting rail and so connected to the backplane bus and the power supply for the electronic and power section. Up to 64 modules may be mounted. Please consider here that the sum current of the electronic power supply does not exceed the maximum value of 3 A. By means of the power module PW 24 V / 5 V (order number: 83.036.0040.0) the current of the electronic power supply may be expanded with 2 A. More about this may be found at "Wiring". 80mm 80mm Mount the mounting rail! Please consider that a clearance from the middle of the mounting rail of at least 80 mm above and 60 mm below, respectively 80 mm by deployment of shield bus carriers, exist. 14 65mm • 60mm Mounting mounting rail Wieland Electric GmbH | BA000975 | 05/2014 (Rev. A) System conception • Start at the left side with the head module (e.g. bus coupler). For this turn both locking lever upwards, put the head module to the mounting rail and turn both locking lever downward. • Before mounting the extension modules you have to remove the bus cover at the right side of the Head module by pulling it forward. Keep the cover for later mounting. Mounting Head module (e. g bus coupler) 2 1 Mounting extension modules • Mount the extension modules you want. Clack 1 2 3 • After mounting the whole system, to protect the backplane bus connectors at the last module you have to mount the bus cover, now. • The shield bus carrier (available as accessory) serves to carry the shield bus to connect cable shields. The shield bus carrier is mounted underneath the terminal of the terminal module. With a flat mounting rail for adaption to a flat mounting rail you may remove the spacer of the shield bus carrier. Wieland Electric GmbH | BA000975 | 05/2014 (Rev. A) Mounting the bus cover Mounting shield bus carrier 15 System conception Clack 4.4 Demounting and module exchange Proceeding With demounting and exchange of a module, head module (e. g. bus coupler) or a group of modules for mounting reasons you have always to remove the electronic module of the just mounted right module. After the mounting it may be plugged again. Exchange of an electronic module For the exchange of an electronic module, the electronic module may be pulled forward after pressing the unlocking lever at the lower side of the module. For installation plug the electronic module guided by the strips at the lower side until this engages audible to the terminal module. 2. Pull Clack 1. Press 1 Exchange of a module 16 2 3 • Remove if exists the wiring. More about this may be found at "Wiring". Wieland Electric GmbH | BA000975 | 05/2014 (Rev. A) System conception • Press the unlocking lever at the lower side of the just mounted right module and pull it forward. • Turn the locking lever of the module to be exchanged upwards. • Pull the module forward. 2 1 3 • For mounting turn the locking lever of the module to be mounted upwards. • To mount the module put it to the gap between the both modules and push it, guided by the stripes at both sides, to the mounting rail. • Turn the locking lever downward again. • Plug again the electronic module, which you have removed before. 4 5 6 Bus interface and power module of a head module may not be separated! Here you may only exchange the electronic module! Exchange of a head module (e. g. bus coupler) • Remove if exists the wiring of the head module. More about this may be found at "Wiring". • Press the unlocking lever at the lower side of the just mounted right module and pull it forward. • Turn all the locking lever of the head module to be exchanged upwards. • Pull the head module forward. Wieland Electric GmbH | BA000975 | 05/2014 (Rev. A) 17 System conception 1 2 • For mounting turn all the locking lever of the head module to be mounted upwards. • To mount the head module put it to the left module and push it, guided by the stripes, to the mounting rail. • Turn all the locking lever downward again. • Plug again the electronic module, which you have removed before. 3 Exchange of a module group 4 5 • Remove if exists the wiring of the module group. More about this may be found at "Wiring". • Press the unlocking lever at the lower side of the just mounted right module of the module group and pull it forward. • Turn all the locking lever of the module group to be exchanged upwards. 1 • Pull the module group forward. 18 Wieland Electric GmbH | BA000975 | 05/2014 (Rev. A) System conception 2 • For mounting turn all the locking lever of the module group to be mounted upwards. • To mount the module group put it to the gap between the both modules and push it, guided by the stripes at both sides, to the mounting rail. 3 4 • Turn all the locking lever downward again. • Plug again the electronic module, which you have removed before. 5 4.5 Wiring Terminals with spring clamp technology are used for wiring. The spring clamp technology allows quick and easy connection of your signal and supply lines. Wieland Electric GmbH | BA000975 | 05/2014 (Rev. A) Connectors 19 System conception In contrast to screw terminal connections this type of connection is vibration proof. Data 10mm Wiring procedure Umax: 240 V AC / 30 V DC Imax: 10 A Cross section: 0,08 mm2 … 1,5 mm2 (AWG 28 … 16) Stripping length: 10 mm • Insert a suited screwdriver at an angel into the square opening as shown (step 1). Press and hold the screwdriver in the opposite direction to open the contact spring. • Insert the stripped end of wire into the round opening (step 2). You can use wires with a cross section of 0.08 mm² to 1.5 mm². • By removing the screwdriver, the wire is securely fixed via the spring contact to the terminal (step 3). 1 3 2 Standard wiring 1 2 AT TENT I ON N OT E 20 DC 24 V for power section supply I/O area (max 10 A) DC 24 V for electronic power supply bus coupler and I/O area Since the power section supply is not internally protected, it is to be externally protected with a fuse, which corresponds to the maximum current. This means max. 10 A is to be protected by a 10 A fuse (fast) respectively by a line circuit breaker 10 A characteristics Z! The electronic power section supply is internally protected against higher voltage by fuse. The fuse is within the power module. If the fuse releases, its electronic module must be exchanged! Wieland Electric GmbH | BA000975 | 05/2014 (Rev. A) System conception • The power section supply is to be externally protected with a fuse, which corresponds to the maximum current. This means max. 10 A is to be protected with a 10 A fuse (fast) respectively by a line circuit breaker 10 A characteristics Z! • It is recommended to externally protect the electronic power supply for bus coupler and I/O area with a 2 A fuse (fast) respectively by a line circuit breaker 2 A characteristics Z. • The electronic power supply for the I/O area of the power module PW 24 V / 5 V (order number: 83.036.0040.0) should also be externally protected with a 1 A fuse (fast) respectively by a line circuit breaker 1A characteristics Z. Fusing After PowerON of the system ricos FLEX the LEDs RUN respectively MF get on so far as the sum current does not exceed 3 A. With a sum current greater than 3 A the LEDs may not be activated. Here the power module with the order number 83.036.0040.0 is to be placed between the extension modules. State of the electronic power supply via LEDs If the 10 A for the power section supply is no longer sufficient, you may use the power module from ricos FLEX with the order number 83.036.0030.0. So you have also the possibility to define isolated groups. Deployment of the power modules The power module with the order number 83.036.0040.0 is to be used if the 3 A for the electronic power supply at the backplane bus is no longer sufficient. Additionally you get an isolated group for the DC 24 V power section supply with 4 A. By placing the power module 83.036.0040.0 at the following backplane bus modules may be placed with a sum current of max. 2 A. Afterwards the power module is to be placed again. To secure the power supply, the power modules may be mixed used. Power module PW DC 24 V Wieland Electric GmbH | BA000975 | 05/2014 (Rev. A) 21 System conception Power module PW 24 V / 5 V 1 2 3 4 Shield attachment DC 24 V for power section supply I/O area (max. 10 A) DC 24 V for electronic power supply bus coupler and I/O area DC 24 V for power section supply I/O area (max. 4 A) DC 24 V for electronic power supply I/O area To attach the shield the mounting of shield bus carriers are necessary. The shield bus carrier (available as accessory) serves to carry the shield bus to connect cable shields. The shield bus carrier is mounted underneath the terminal of the terminal module. With a flat mounting rail for adaption to a flat mounting rail you may remove the spacer of the shield bus carrier. After mounting the shield bus carrier with the shield bus, the cables with the accordingly stripped cable screen may be attached and fixed by the shield clamp. 1 3 2 Clack 4 1 2 3 4 22 Shield bus carrier Shield bus (10 mm x 3 mm) Shield clamp Cable shield Wieland Electric GmbH | BA000975 | 05/2014 (Rev. A) System conception 4.6 Trouble-shooting - LEDs Each module has the LEDs RUN and MF on its front side. Errors or incorrect modules may be located by means of these LEDs. General In the following illustrations flashing LEDs are marked by ☼. Behavior: RUN MF After PowerON the RUN LED of each module is off and the MF LED of each module is sporadically on. RUN MF RUN MF RUN MF RUN MF RUN MF RUN MF RUN MF RUN MF RUN MF Reason: The maximum current for the electronic power supply is exceeded. Remedy: As soon as the sum current of the electronic power supply is exceeded, always place the power module PW 24 V / 5 V (order number: 83.036.0040.0). More concerning this may be found above at "Wiring". Behavior: After PowerON the MF-LED of one module respectively more modules flashes. The RUN-LED remains off. RUN MF RUN MF RUN MF RUN MF RUN MF RUN MF RUN MF RUN MF RUN MF Error in configuration RUN MF Reason: At this position a module is placed, which does not correspond to the configured module. Remedy: Match configuration and hardware structure. Wieland Electric GmbH | BA000975 | 05/2014 (Rev. A) Sum current of the electronic power supply exceeded 23 System conception Module failure Behavior: RUN MF After PowerON all of the RUN LEDs up to the defective module are flashing. With all following modules the MF LED is on and the RUN LED is off. RUN MF RUN MF RUN MF RUN MF RUN MF RUN MF RUN MF RUN MF Reason: The module on the right of the flashing modules is defective. Remedy: Replace the defective module. 4.7 RUN MF Installation guidelines General The installation guidelines contain information about the interference free deployment of system ricos FLEX. There is the description of the ways, interference may occur in your control, how you can make sure the electromagnetic digestibility (EMC), and how you manage the isolation. What means EMC? Electromagnetic digestibility (EMC) means the ability of an electrical device, to function error free in an electromagnetic environment without being interferenced res. without interferencing the environment. All system ricos FLEX components are developed for the deployment in industrial environments and fulfill high demands on the EMC. Nevertheless you should project an EMC planning before installing the components and take conceivable interference causes into account. Possible interference causes Electromagnetic interferences may interfere your control via different ways: • • • • I/O signal conductors Bus system Current supply Protected earth conductor Depending on the spreading medium (lead bound or lead free) and the distance to the interference cause, interferences to your control occur by means of different coupling mechanisms. One differs: • • • • Basic rules for EMC galvanic coupling capacitive coupling inductive coupling radiant coupling In the most times it is enough to take care of some elementary rules to guarantee the EMC. Please regard the following basic rules when installing your PLC. • Take care of a correct area-wide grounding of the inactive metal parts when installing your components. − Install a central connection between the ground and the protected earth conductor system. − Connect all inactive metal extensive and impedance-low. − Please try not to use aluminum parts. Aluminum is easily oxidizing and is therefore less suitable for grounding. 24 Wieland Electric GmbH | BA000975 | 05/2014 (Rev. A) System conception • When cabling, take care of the correct line routing. − Organize your cabling in line groups (high voltage, current supply, signal and data lines). − Always lay your high voltage lines and signal res. data lines in separate channels or bundles. − Route the signal and data lines as near as possible beside ground areas (e. g. suspension bars, metal rails, tin cabinet). • Proof the correct fixing of the lead isolation. − Data lines must be laid isolated. − Analog lines must be laid isolated. When transmitting signals with small amplitudes the one sided laying of the isolation may be favorable. − Lay the line isolation extensively on an isolation/protected earth conductor rail directly after the cabinet entry and fix the isolation with cable clamps. − Make sure that the isolation/protected earth conductor rail is connected impedance-low with the cabinet. − Use metallic or metalized plug cases for isolated data lines. • In special use cases you should appoint special EMC actions. − Wire all inductivities with erase links, which are not addressed by the system ricos FLEX modules. • Create a homogeneous reference potential and ground all electrical operating supplies when possible. − Please take care for the targeted employment of the grounding actions. The grounding of the PLC is a protection and functionality activity. − Connect installation parts and cabinets with the System ricos FLEX in star topology with the isolation/protected earth conductor system. So you avoid ground loops. − If potential differences between installation parts and cabinets occur, lay sufficiently dimensioned potential compensation lines. Electrical, magnetically and electromagnetic interference fields are weakened by means of an isolation, one talks of absorption. Isolation of conductors Via the isolation rail, that is connected conductive with the rack, interference currents are shunt via cable isolation to the ground. Hereby you have to make sure, that the connection to the protected earth conductor is impedance-low, because otherwise the interference currents may appear as interference cause. When isolating cables you have to regard the following: • If possible, use only cables with isolation tangle. • The hiding power of the isolation should be higher than 80 %. Normally you should always lay the isolation of cables on both sides. Only by means of the both-sided connection of the isolation you achieve high quality interference suppression in the higher frequency area. Only as exception you may also lay the isolation one-sided. Then you only achieve the absorption of the lower frequencies. A one-sided isolation connection may be convenient, if: − the conduction of a potential compensating line is not possible − analog signals (some mV res. µA) are transferred − foil isolations (static isolations) are used. • With data lines always use metallic or metalized plugs for serial couplings. Fix the isolation of the data line at the plug rack. Do not lay the isolation on the PIN 1 of the plug bar! Wieland Electric GmbH | BA000975 | 05/2014 (Rev. A) 25 System conception • At stationary operation it is convenient to strip the insulated cable interruption free and lay it on the isolation/protected earth conductor line. • To fix the isolation tangles use cable clamps out of metal. The clamps must clasp the isolation extensively and have well contact. −Lay the isolation on an isolation rail directly after the entry of the cable in the cabinet. Lead the isolation further on to the system ricos FLEX module and don't lay it on there again! N OT E Please regard at installation! At potential differences between the grounding points, there may be a compensation current via the isolation connected at both sides. Remedy: Potential compensation line. 4.8 General data Conformity and approval Conformity CE Approval UL Others RoHS 2006/95/EG 2004/108/EG Low-voltage directive EMC directive UL 508 Approval for USA and Canada -- Product is lead-free Protection of persons and device protection Type of protection -Electrical isolation to the field bus -to the process level -Insulation resistance EN 61131-2 Insulation voltage to reference earth Inputs / outputs -Protective measures -- IP20 Electrically isolated Electrically isolated -AC / DC 50 V, test voltage AC 500 V Against short circuit Environmental conditions to EN 61131-2 Climatic Storage / transport Operation Horizontal installation Vertical installation Air humidity Pollution Mechanical Oscillation Shock EN 60068-2-14 -25 °C …+70 °C EN 61131-2 0 °C …+60 °C EN 61131-2 EN 60068-2-30 EN 61131-2 0 °C …+60 °C RH1 (without condensation, rel. humidity 10 % … 95 %) Degree of pollution 2 EN 60068-2-6 EN 60068-2-27 1 g, 9 Hz ... 150 Hz 15 g, 11 ms - In the control cabinet Horizontal and vertical Mounting conditions Mounting place Mounting position 26 Wieland Electric GmbH | BA000975 | 05/2014 (Rev. A) System conception EMC Standard Comment Emitted interference Noise immunity zone B EN 61000-6-4 Class A (Industrial area) EN 61000-6-2 Industrial area EN 61000-42 EN 61000-43 EN 61000-46 ESD 8 kV at air discharge (degree of severity 3), 4 kV at contact discharge (degree of severity 2) HF irradiation (casing) 80 MHz … 1000 MHz, 10 V/m, 80 % AM (1 kHz) 1.4 GHz ... 2.0 GHz, 3 V/m, 80 % AM (1 kHz) 2 GHz ... 2.7 GHz, 1 V/m, 80 % AM (1 kHz) HF conducted 150 kHz … 80 MHz, 10 V, 80 % AM (1 kHz) Burst, degree of severity 3 EN 61000-44 EN 61000-4Surge, installation class 3 *) 5 *) Due to the high-energetic single pulses with Surge an appropriate external protective circuit with lightning protection elements like conductors for lightning and overvoltage is necessary. Wieland Electric GmbH | BA000975 | 05/2014 (Rev. A) 27 Structure 5 Overview Structure In this chapter you will find the description of the modules of ricos FLEX. 5.1 Properties ricos FLEX BC EtherNet/IP • • • • • Ethernet coupler with EtherNet/IP for max. 64 peripheral modules I/O access of up to 8 stations Online configuration via integrated Web server RJ45 jack 100BaseTX, 10BaseTX Automatic polarity and speed recognition (auto negotiation) • Automatic recognition of parallel or crossed cable (auto crossover) • Network LEDs for link/activity • Status LEDs for Ready and Error 1 Locking lever terminal module 2 Labelling strip bus interface 3 LED status indication bus interface 4 Labelling strip power module 5 LED status indication power module 6 Backplane bus 7 DC 24V power section supply 8 Power module 9 Ethernet jack bus interface 10 Unlocking lever power module 11 Bus interface 12 Terminal 13 Address switch Structure Status indication bus interface LED Color PWR SF MS (module state) green red green/red NS (network state) green/red LNK1 green Description ● ☼ Bus interface is power supplied Error at Ethernet or at the System ricos FLEX bus ● ○ Module state: Operational ☼ ○ ○ ○ ☼ ● ☼ ○ ☼ ● ☼ ☼ ○ ○ ☼ ☼ Module state: Standby (Idle) - BASP activated Unrecoverable error 1 Recoverable error (e.g. error in configuration) Module state: Selftest ☼ ● EtherNet/IP communication: RUN There is no connection to a Scanner Recoverable Ethernet/IP error Module state: Selftest Network activity No network activity on: ● off: ○ blinking: ☼ 1) Please contact Wieland Electric GmbH. 28 Wieland Electric GmbH | BA000975 | 05/2014 (Rev. A) Structure LED Color PWR IO PF IO* PWR PF green red green red Description ● ● ● ● Power section supply OK Fuse power section supply defective (Power fail) Electronic section supply OK Fuse electronic section supply defective Status indication power module On: ● *) This LED is only available on the power module with hardware release 1. Information concerning the hardware release may be found underneath the label strip. For wires with a cross section of 0.08 mm² up to 1.5 mm². Terminal PM 1 1 2 2 3 3 4 4 Position Function 1 2 3 4 5 6 7 8 I: Input --DC 24V 0V Sys DC 24V --DC 24V 0V Sys 0V 5 6 7 8 Type --E E E --E E E 5 1 5 2 6 3 7 Sys 4 DC24V 8 DC24V 6 7 0V DC24V 0V 8 Description not connected DC 24V for power section supply GND for power section supply DC 24V for electronic section supply not connected DC 24V for power section supply GND for power section supply GND for electronic section supply The jack has the following pin assignment: 8pin RJ45 jack: Pin Signal 1 2 3 4 5 6 7 8 Transmit + Transmit Receive + Receive - 0V Wieland Electric GmbH | BA000975 | 05/2014 (Rev. A) Structure RJ45 jack bus interface 87654321 29 Structure Address switch The address switch serves for the configuration of the IP address. On delivery the switch 2 (position 2) is switched to "1". Here the EtherNet/IP coupler has the following IP address data: Subnet mask: 255.255.255.0 IP address: 192.168.1.1 The address switch has the following assignment: Position Description 1 0 = DHCP off 1 = DHCP on 4. Octet (x) of the IP address 192.168.1.x (max. value for x = 63) 20 = 1 (default switched to "1") 21 = 2 22 = 4 23 = 8 24 = 16 25 = 32 26 = 64 2 3 4 5 6 7 8 Structure Changes of the IP address only take effect on PowerON or an automatic reset. Changes during operation are not recognized! Technical Data Type Order no. ricos FLEX BC EtherNet/IP Technical data power supply 83.036.1050.0 Power supply (rated value) DC 24 V Power supply (permitted range) DC 20.4...28.8 V Reverse polarity protection available Current consumption (no-load 95 mA operation) Current consumption (rated value) 0.95 A Inrush current 3.9 A I²t 0.14 A²s Max. current drain at backplane bus 3A Max. current drain load supply 10 A Power loss 3W Status information, alarms, diagnostics Status display Interrupts Process alarm Diagnostic interrupt Diagnostic functions Diagnostics information read-out Supply voltage display Service Indicator Group error display Channel error display 30 yes yes, parameterizable yes, parameterizable yes, parameterizable yes, parameterizable possible green LED Bicolour green/red LED red SF LED none Wieland Electric GmbH | BA000975 | 05/2014 (Rev. A) Structure Hardware configuration Racks, max. Modules per rack, max. Number of digital modules, max. Number of analog modules, max. Communication 1 64 64 64 Fieldbus Type of interface Connector Topology Electrically isolated Number of participants, max. Node addresses Transmission speed, min. Transmission speed, max. Address range inputs, max. Address range outputs, max. Number of TxPDOs, max. Number of RxPDOs, max. Housing EtherNet/IP Ethernet 10/100 MBit RJ45 Star topology yes IP V4 address 10 Mbit/s 100 Mbit/s 1 KB 1 KB - Material Mounting PPE / PPE GF10 Profile rail 35 mm Mechanical data Dimensions (WxHxD) Weight Environmental conditions Operating temperature Storage temperature Certifications 48.5 x 109 x 76.5 mm 155 g UL508 certification yes 0 °C to 60 °C -25 °C to 70 °C Wieland Electric GmbH | BA000975 | 05/2014 (Rev. A) 31 Deployment 6 Overview Deployment This chapter describes the use of the BC EtherNet/IP. After a short introduction you'll find all information on structure and configuration. The error processing completes the chapter. 6.1 Basics EtherNet/IP General EtherNet/IP (Ethernet Industrial Protocol) is an open standard for industrial networks, which is real-time capable. EtherNet/IP is developed by ODVA (Open DeviceNet Vendor Association) and is standardized in IEC 61158. Especially in the U.S. market EtherNet/IP is a standard in communication. EtherNet/IP® EtherNet/IP bases on TCP/IP. As user protocol CIP (Common Industrial Protocol) is used. CIP bases on an object model, which consists of classes, attributes, methods, states and instances. In contrast to the classical source-destination model, EtherNet/IP uses a modern producer/consumer model that requires data packets with identifier fields for the identification of the data. This approach caters for multiple priority levels, more efficient transfers of I/O data and multiple consumers for the data. A device that has data to send produces the data on the network together with an identifier. All devices requiring data listen for messages. When devices recognize a suitable identifier, they act and consume the respective data. Via EtherNet/IP 2 types of messages are transported: EtherNet/IP in the ISO/OSIlayer model Implicit communication - Messages for time-critical and control-oriented data, which are exchanged in a single or multiple cyclic connections. This connection is especially used for I/O data. For this the UDP protocol is used. Explicit communication - Here multipurpose point-to-point communication paths between two devices can be established. These are used in the configuration of the physical coupler and for diagnostics. This data are transferred with the TCP/IP protocol. The so called ISO/OSI layer model is generally accepted for the standardization of computer communication. The layer model is based upon seven layers with guidelines for the deployment of hard- and software.logical ring. Layer Function Protocols Layer 7 Layer 6 Layer 5 Layer 4 IP Layer 2 Layer 1 Application Layer (application) Presentation Layer (presentation) Session Layer (session) Transport Layer (transport) Network Layer (network) Data Link Layer (security) Physical Layer (bit transfer) CIP TCP UDP IP Ethernet MAC Ethernet Transfer medium EtherNet/IP uses as transfer medium Ethernet cable. EtherNet/IP can be operated in star topology via an already existing company network. To operate an EtherNet/IP network at least 1 scanner (master) is required. The number of EtherNet/IP interface modules (slaves) is only limited by the number of available IP addresses and the performance of the scanner. Addressing All stations of the network must be uniquely identified by means of an IP address. Every EtherNet/IP device has addressing facilities. The cycle time to transfer the process data via EtherCAT and how this is synchronized for the transfer is specified with the SyncManager-Communication objects. 32 Wieland Electric GmbH | BA000975 | 05/2014 (Rev. A) Deployment From Wieland Electric GmbH there is an EDS (Electronic Data Sheet) file for the EtherNet/IP coupler available. The scanner can find all the information to establish a communication connection to the EtherNet/IP coupler there. EDS file This file may be found in the service area of www.wieland-electric.com. Please install the EDS file in your configuration tool. Details on the installation of the EDS file are available from the manual supplied with your configuration tool. 6.2 Basics - IP address and subnet Exclusively supported is IPv4. At IPv4 the IP address is a 32bit address that must be unique within the network and consists of 4 numbers that are separated by a dot. Every IP address is a combination of a Net-ID and a Host-ID and has the following structure: xxx.xxx.xxx.xxx Range: 000.000.000.000 to 255.255.255.255 IP address structure The Network-ID identifies a network res. a network controller that administrates the network. The Host-ID marks the network connections of a participant (host) to this network. Net-ID, Host-ID The Host-ID can be further divided into a Subnet-ID and a new Host-ID by using a bit for bit AND assignment with the Subnet mask. The area of the original Host-ID that is overwritten by 1 of the Subnet mask becomes the Subnet-ID, the rest is the new Host-ID. Subnet mask Subnet mask Binary all "1" IPv4 address Subnet mask and IPv4 address Net-ID Net-ID Binary all "0" Host-ID Subnet-ID new Host-ID A TCP-based communication via point-to-point, hub or switch connection is only possible between stations with identical Network-ID and Subnet-ID! Different areas must be connected with a router. The subnet mask allows you to sort the resources following your needs. This means e.g. that every department gets an own subnet and thus does not interfere another department.Safe-Operational (Safe-Op) With the transition from Pre-Op to Safe-Op the EtherCAT coupler checks if the SyncManager channels for process data communication are correct. Before it acknowledges the state change, the EtherCAT coupler copies current input data to the corresponding DP RAM areas of the EtherCAT coupler controller. In the state SafeOp mailbox and process data communication is possible. Here the input data are cyclically updated but the outputs are de-activated. Subnet For IPv4 addresses there are five address formats (class A to class E) that are all of a length of 4byte = 32bit. Address classes Class A Class B 0 Network-ID (1+7bit) Host-ID (24bit) 10 Network-ID (2+14bit) Host-ID(16bit) Class C 110 Network-ID (3+21bit) Host-ID (8bit) Class D 1110 Multicast group Class E 11110 Reserved The classes A, B and C are used for individual addresses, class D for multicast addresses and class E is reserved for special purposes. The address formats of the 3 classes A, B, C are only differing in the length of Network-ID and Host-ID. These addresses can be used as net-ID by several organizations without causing conflicts, for these IP addresses are neither assigned in the Internet nor are routed in the Internet. To build up private IP-Networks within the Internet, RFC1597/1918 reserves the following address areas: Wieland Electric GmbH | BA000975 | 05/2014 (Rev. A) Private IP networks 33 Deployment Network class Start IP A 10.0.0.0 B 172.16.0.0 C 192.168.0.0 The Host-ID is underlined. Reserved HostIDs N OT E N OT E Setting the IP address via web server 10.255.255.255 172.31.255.255 192.168.255.255 Standard subnet mask 255.0.0.0 255.255.0.0 255.255.255.0 Some Host-IDs are reserved for special purposes. Host-ID = "0": Host-ID = maximum (binary complete "1"): Identifier of this network, reserved! Broadcast address of this network Never choose an IP address with Host-ID=0 or Host-ID=maximum! (e.g. for class B with subnet mask = 255.255.0.0, the "172.16.0.0" is reserved and the "172.16.255.255" is occupied as local broadcast address for this network.) 6.3 Setting possibilities Start IP Setting the IP address • Setting the IP address via web server • Setting the IP address via address switch • Setting the IP address via standard object class With the EtherNet/IP coupler you should always use a static IP address. Please consider when using a DHCP server that the IP address assignment (lease) is not changed in the DHCP server. Otherwise, after a restart of the EtherNet/IP coupler the coupler can not be found by the EtherNet/IP scanner. On delivery the EtherNet/IP coupler has the following IP address data: Subnet mask: 255.255.255.0 IP address: 192.168.1.1 With this IP address the integrated web server can be accessed. There the IP address can be changed. Setting the IP address via address switch There is an address switch at the front of the EtherNet/IP coupler. The address switch serves for the configuration of the IP address. On delivery the switch 2 (position 2) is switched to "1". Here the EtherNet/IP coupler has the following IP address data: Subnet mask: 255.255.255.0 IP address: 192.168.1.1 The address switch has the following assignment: Position Description 1 0 = DHCP off 1 = DHCP on 4. Octet (x) of the IP address 192.168.1.x (max. value of x = 63) 20 = 1 (default switched to "1") 21 = 2 22 = 4 23 = 8 24 = 16 25 = 32 26 = 64 2 3 4 5 6 7 8 34 Wieland Electric GmbH | BA000975 | 05/2014 (Rev. A) Deployment Changes of the IP address only take effect on PowerON or an automatic reset. Changes during operation are not recognized! If there is an IP address or DHCP activated via the address switch, at "IP" on the web page the input fields are de-activated but the current settings are shown. The EtherNet/IP coupler supports the setting of the IP address by means of the standard object class TCP/IP (0xF5). 6.4 Operating modes The EtherNet / IP coupler can take the following operating states: which are described below: • • • • Setting the IP address via standard object class Overview Selftest mode Idle mode Operational mode Error mode Run/Idle header functionality is supported. Here you have the possibility to establish and release a communication connection by means of the scanner software. After PowerON the EtherNet/IP coupler executes a selftest in the Selftest mode. With a successful test the EtherNet/IP coupler automatically switches to Idle mode and shows this by the blinking green MS LED. Selftest mode In Idle mode the EtherNet/IP coupler is in standby. The coupler waits for scanner connections. In Idle mode BASP (Befehlsausgabesperre i.e. command output lock) is activated, this means all the module outputs are switched off and the inputs are not read. Idle mode As soon as at least one scanner establishes a communication connection to the EtherNet/IP coupler, the coupler switches to Operational mode. In Operational mode BASP is de-activated. The coupler copies the output data received from the scanner to its outputs and transmits the input values to the scanners. Operational mode As soon as an error occurs during startup or operation the EtherNet/IP coupler switches to Error mode and shows this via LEDs. Here BASP is activated. Error-Mode Wieland Electric GmbH | BA000975 | 05/2014 (Rev. A) 35 Deployment Transitions 1 Transition from Idle to Operational: As soon as a communication connection to at least one scanner exists respectively at least one scanner is in "Run mode". 2 Transition Operational to Idle: As soon there is no communication connection to a scanner respectively every scanner is in "Idle mode". With the release of the last communication connection by the scanner, the EtherNet/IP coupler automatically switches to Idle mode. With a configuration error e.g. in the FORDWARD_OPEN Config Assembly, the EtherNet/IP coupler switches directly from Operational mode to Error mode and shows this by the blinking red MS LED. 3 4 6.5 Access via IP address N OT E 36 If e.g. the Ethernet cable is removed during operation the EtherNet/IP coupler switches directly from Operational mode to Error mode. BASP is activated. By plugging the Ethernet cable the EtherNet/IP coupler automatically returns to Operational mode, if a communication connection to a scanner still exists. Otherwise it switches to Idle mode. Web server The integrated web server can be accessed by means of this IP address data and these may be changed there. On delivery the EtherNet/IP coupler has the following IP address data: Subnet mask: 255.255.255.0 IP address: 192.168.1.1 Please consider the System ricos FLEX power and clamp modules do not have any module ID. These may not be recognized by the EtherNet/IP coupler and so are not listed and considered during slot allocation. Further within EtherNet/IP the slots are designated an "EtherNet/IP-Slot". The counting always begins with 0. Wieland Electric GmbH | BA000975 | 05/2014 (Rev. A) Deployment The web page is built dynamically and depends on the number of modules, which are connected to the EtherNet/IP coupler. [1] [2] [3] Structure of the web page Module list: EtherNet/IP coupler and System ricos FLEX modules in installed order Functions for the module selected in the module list Information respectively input area of the corresponding function N OT E For fast diagnostics, missing or wrong configured modules are represented red colored in the module list after refreshing the web page. Web page of the selected EtherNet/IP coupler Here order number, serial number and the version of firmware and hardware of the EtherNet/IP coupler are listed. Info Here you can define that the configuration, which is stored in the flash memory of the EtherNet/IP coupler, is ignored during start-up. Parameter All functions for the writing access to the EtherNet/IP coupler can be secured by a password. Security Here you can enter IP address data for the EtherNet/IP coupler. Only if the bus is in BASP, an input is possible, this means no scanner is connected or every connected scanner is in Idle mode. Otherwise the input fields are de-activated but the settings shown. For valid IP address data please contact your system administrator. Directly after entering the IP address will be accepted; the web server can now only be reached via the new IP address. IP With this function you can bring in a firmware update. You can get the appropriate firmware file from Wieland Electric GmbH. Firmware Wieland Electric GmbH | BA000975 | 05/2014 (Rev. A) 37 Deployment Configuration N OT E In this dialog field you have the possibility to store the current module configuration or to import a module configuration. With [Delete] the parameterization of all modules may be deleted in the EtherNet/IP coupler. Export Station Configuration - With [Save] a window is opened and shows the configuration as XML. Select File > Safe as and safe the current configuration as XML file. Import Station and Modules Configuration - Select with [Search...] the according XML file and load this with [Load]. While loading the parameters of the EtherNet/IP coupler and the modules are loaded. Import Modules Configuration - Select with [Search...] the according XML file and load this with [Load]. While loading only the parameters of the modules are loaded. The parameters of the EtherNet/IP coupler further exist. Save Configuration of all Modules - With [Save] the current configuration is stored in the EtherNet/IP coupler. If the current module ID deviates from the just configured module ID after a system start-up, the EtherNet/IP coupler does not go into RUN and shows the error on its web page. Delete Configuration of all Modules - With [Delete] the configuration in the EtherNet/IP coupler may be deleted. Only there is a configuration for a module, this may be used to check preset and current configuration. If the current configuration differs from the preset (e.g. module was removed) the system reports an error and does not go to RUN. If there is no preset module configuration and the current configuration is changed during operation, the EtherNet/IP coupler performs a restart and switches again to RUN. Web page with selected module Info Here product name, order number, serial number, firmware version and hardware state number of the according module are listed. Data At Data the states of the inputs respectively outputs are listed. In addition, you can directly control the outputs of the corresponding module. Parameter If available the parameter data of the corresponding module may be shown and changed if necessary. Here BASP must be activated the EtherNet/IP coupler. 38 Wieland Electric GmbH | BA000975 | 05/2014 (Rev. A) Deployment 6.6 Accessing the System ricos FLEX • The EtherNet/IP coupler can control maximally 64 system ricos FLEX modules. • A system ricos FLEX module can contain 1 ... 60byte I/O data. • For the transport of this data stream, the data must be divided into EtherNet/IP packages and encapsulated. • Each package starts with the interrupt flags (1byte). With a pending hardware interrupt respectively diagnostics interrupt the according flag is set. • Behind the interrupt flags there is the length ModLen located in the data stream followed by the I/O data of the modules in plugged sequence. Information concerning the allocation of the I/O area of a module may be found in the description of the corresponding System ricos FLEX module. Overview From Wieland Electric GmbH you may receive an EDS file (Electronic Data Sheet) for your EtherNet/IP coupler. The file may be found in the service area at www.wielandelectric.com. Please install the EDS file in your configuration tool. In the following you will find the description of accessing I/O area, parameter data and diagnostics data of the System ricos FLEX via EtherNet/IP. Here "I stream" is according to assembly class with Instance-ID 0x0A and "O stream" is according to assembly class with instance-ID 0x14. You can start the communication with a Class1 connection. This should be a point-to-point connection in both directions. Here the frame size depends on the configured assembly class. Please consider the System ricos FLEX power and clamp modules do not have any module ID. These may not be recognized by the EtherNet/IP coupler and so are not listed and considered during slot allocation. Further within EtherNet/IP the slots are designated as EtherNet/IP-Slot. The counting always begins with 1. Wieland Electric GmbH | BA000975 | 05/2014 (Rev. A) N OT E 39 Deployment Accessing I/O area The EtherNet/IP coupler determines automatically the modules on the System ricos FLEX bus and generates from this the number of input and output bytes. Information concerning the I/O allocation of a module may be found in the corresponding manual. The position (offset) of the input respectively output bytes within the input respectively output data results from the order of the modules (EtherNet/IP-Slot 1 ... 64). By means of the base address, which is to be preset in the EtherNet/IP scanner for the bus coupler and the offset you may access the input or output data of a module. During operation the EtherNet/IP coupler cyclically reads the input data of the peripheral modules and serves for the last state of these data for the EtherNet/IP scanner. Output data, which the EtherNet/IP coupler has received from the EtherNet/IP scanner, were directly transferred to the modules, as soon as they were received. Structure of the Input data (Instance ID 0x0A) Structure Field name Data type Field value Header InterruptFlags USINT Interrupt and diagnostics flags. An interrupt is pending when the corresponding bit is set. Bit 0: Hardware interrupt Bit 1: Diagnostics interrupt Bit 7 ... 0: reserved ModLen UINT Length of the module data ModData ARRAY of USINT Module data (see manual System ricos FLEX module) Module packages 40 Wieland Electric GmbH | BA000975 | 05/2014 (Rev. A) Deployment With the first start-up modules, which were parameterizable, operate with their default parameters. If you want to change parameters the EtherNet/IP coupler respectively the corresponding modules may be parameterized via the integrated Web page. Here by means of the corresponding EtherNet/IP-Slot parameter may be viewed and changed. Parameterization via the web page With this method the EtherNet/IP scanner passes in the FORWARD_OPEN call a config assembly to the EtherNet/IP coupler. The config assembly is a collection of commands and has a fixed size of 400byte. Parameterization via Here the corresponding System ricos FLEX module can be parameterized with the command SetModParam by specifying the EtherNet/IP-Slot at "Pos" and the module parameters at "Param". "FORWARD_ OPEN" The description of the parameters can be found in the manual of the according System ricos FLEX module. Code Description 0x0000 Command has been executed without error. 0x0001 Configuration in FORWARD_OPEN could not be read. 0x0002 Unknown command in config assembly. 0x0003 Length in config assembly is not correct. 0x0004 Data missing for the command. 0x0005 SetIOStart twice in config assembly. 0x0006 SetModCnt twice in config assembly. 0x0007 SetModCnt overflows max available number of modules. 0x0008 SetModType overflows max available number of modules. 0x0009 SetModType for same module twice in config assembly. 0x000A NoFwdOpenCfg twice in config assembly. 0x000B IgnoreWebCfg twice in config assembly. 0x000C UseExistingCfg twice in config assembly. 0x000D SetModCnt underflows min. available modules. 0x000E SetModCnt doesn't match EtherNet/IP coupler module count. 0x000F System ricos FLEX Bus could not return the module ID. 0x0010 SetModType found wrong-plugged module. 0x0011 DeleteWebCfg twice in config assembly. 0x0012 This function is not supported. 0x0013 SlioModGetParameterLength is wrong in SetModParam. 0x0014 The length of SetModParam differs to the expected length of the module. 0x0015 SlioModSetParameters faulty in SetModParam. 0x0016 SetModParam is greater than the max. possible number of modules. 0x0017 SetIOStart could not find assembly information. 0x0018 SetIOStart: The assembly has the wrong type. 0x0019 SetIOStart is behind the available data length of the module. Wieland Electric GmbH | BA000975 | 05/2014 (Rev. A) Error codes 41 Deployment Accessing diagnostics data Code Description 0x001A Initialization: ClientStart was faulty. 0x001B Initialization: Assembly with input data could not be added. 0x001C Initialization: Assembly with output data could not be added. 0x001D Initialization: Config assembly could not be added. 0x001E Initialization: Identity object could not be initialized. 0x001F Initialization: Identity object could not be set. 0x0022 SetModTypeRange: There were more modules configured as exist. 0x0023 SetModTypeRange: A wrong plugged module was found. 0x0024 Initialization: Initialization could not be executed. As soon as a module reports an interrupt via the backplane bus, this is automatically recognized by the EtherNet/IP coupler. By setting the according interrupt bit in the I/O data stream the EtherNet/IP coupler reports this to the EtherNet/IP scanner. In the EtherNet/IP scanner you can adequately respond to the alarm. Parts of the diagnostics data can be accessed by means of EtherNet/IP objects. 6.7 Structure Deployment of FORWARD_OPEN The FORWARD_OPEN config assembly can be combined by various commands and has the following structure: • • • • • The length of the config assembly is always 400byte. Unused areas are to be zeroed. The config assembly is always to be finished with END_OF_CFG! The data within the config assembly always consist of a collection of commands. A command always consists of command header and command parameter. A command header always consists of a command ID and a length (number bytes of command parameters). • In command parameter the command specific data are specified. 42 Wieland Electric GmbH | BA000975 | 05/2014 (Rev. A) Deployment Example Here an example of FWD_OPEN: CMD 1: Ignore Webconfig: 01 00 CMD 2: Number of modules (5): 03 01 CMD 3: SetModuleType yy to Pos 3: 04 05 y4 y3 y2 y1 03 The specification for the type has to take place here in the little-endian format (leastsignificant byte first) CMD 4: End of Config: 00 CMD 1...4: 01 00 | 03 01 05 | 04 05 y4 y3 y2 y1 03 | 00 FWD_OPEN command: 010003010405y4y3y2y10300 Below there is a list of all the commands, which can be used in a FORWARD_OPEN config assembly. Please configure that the config assembly can be limited any time by means of the command EndOfCfg. After you insert the command EndOfCfg all subsequent commands are ignored. Command IDs Elementary data types Name BOOL SINT INT DINT LINT USINT UINT UDINT ULINT STRING SHORT_STRING BYTE WORD DWORD LWORD Description Boolean Short integer Integer Double integer Long integer Unsigned short Integer Unsigned integer Unsigned double Integer Unsigned long Integer Character String (1byte per character) Character String (1byte per character + 1byte length) Bit string 8Bits Bit string 16Bits Bit string 32Bits Bit string 64Bits Wieland Electric GmbH | BA000975 | 05/2014 (Rev. A) Area Minimum Maximum 0: False -128 -32768 -231 -263 0 1: True 127 32767 231-1 263-1 255 0 0 65535 232-1 0 264-1 - - - - - - 43 Deployment EndOfCfg (0x00) H I N WE IS IgnoreWebCfg (0x01) DeleteWebCfg (0x02) UseExistingCfg (0x08) SetIOStart (0x07) 44 The command EndOfCfg (0x00) specifies that the configuration finishes at the inserted position. The subsequent commands after this command are ignored. Structure Field name Data type Value Designation Command header ID USINT 0x00 EndOfCfg Length USINT 0x00 No parameters The config assembly is always to be finished with END_OF_CFG! The command IgnoreWebCfg (0x01) specifies that the EtherNet/IP coupler has to ignore an existing web configuration and may only be configured by a FORWARD_OPEN config assembly. Structure Field name Data type Value Designation Command header ID USINT 0x01 IgnoreWebCfg Length USINT 0x00 No parameters The command DeleteWebCfg (0x02) specifies that the EtherNet/IP coupler has to delete an existing web configuration and may only be configured by a FORWARD_OPEN config assembly. Structure Field name Data type Value Designation Command header ID USINT 0x02 DeleteWebCfg Length USINT 0x00 No parameters The command UseExistingCfg (0x08) commits the EtherNet/IP coupler to use an existing I/O connection for configuration. With this command all the configuration parameters in the config assembly are ignored, except SetIOStart (0x07). Structure Field name Data type Value Designation Command header ID USINT 0x08 UseExistingCfg Length USINT 0x00 No parameters The command SetIOStart (0x07) defines the I/O area of the System ricos FLEX bus image, which is to be cyclically transferred in the selected assembly AsmId. Since an I/O connection may only transfer max. 496byte I/O data (excluding interrupt header and length), with SetIOStart a second connection may be opened to transfer the specified start area. This command can be used e.g. with UseExistingCfg. Structure Field name Data type Value Designation Command header ID Length USINT USINT 0x07 0x03 Command specific data AsmId USINT Start UINT SetIOStart Length of the command data Number of the assembly Start of the I/O data area of the according assembly Wieland Electric GmbH | BA000975 | 05/2014 (Rev. A) Deployment The command SetModCnt (0x03) specifies the number of modules by the parameter ModCnt. Structure Field name Data type Value Designation Command header ID USINT 0x03 SetModCnt Length USINT 0x01 Length of the command data Command specific data ModCnt USINT 1 ... 64 Number of modules The command SetModType (0x04) specifies the module ID ModID of the module at position Pos. Structure Field name Data type Value Designation Command header ID USINT 0x04 SetModType Length USINT 0x05 Length of the command data Command specific data ModID UDINT POS USINT 1 ... 64 Module position Structure Field name Data type Value Designation Command header ID USINT 0x05 SetModTypeRange Length USINT 0x06 Length of the command data ModID UDINT PosStart USINT 1 ... 63 Start position PosEnd USINT 2 ... 64 End position SetModTypeRange (0x05) Module ID (see technical data System ricos FLEX) The command SetModParam (0x06) specifies the module parameter Para of the module at position Pos. A description of the parameters may be found in the manual of the according System ricos FLEX module. To get the current parameters as basis record set for parameterization, you can use a "class3 connection"! Wieland Electric GmbH | BA000975 | 05/2014 (Rev. A) SetModType (0x04) Module ID (see technical data System ricos FLEX) The command SetModTypeRange (0x05) specifies the module ID ModID of the modules starting with position PosStart to position PosEnd. Command specific data SetModCnt (0x03) SetModParam (0x06) N OT E 45 Deployment Structure Field name Data type Value Designation Command header ID USINT 0x06 SetModParam Length USINT 0x01 + n Length of the command data Command specific data Pos UDINT 1 ... 64 Module position Param ARRAY of USINT n = number Module parameter 6.8 Classes, Objects, Instances and Attributes EtherNet/IP - Objects "Objects" are specified by their properties. The properties are called attributes. Similar objects are summarized in "object classes". An "object", which was built during run-time of an class is an "instance". The EtherNet/IP coupler supports the following objects: • Standardized EtherNet/IP objects • Wieland Electric GmbH specified EtherNet/IP objects Standardized EtherNet/IP Objects The following standardized object classes are supported by the EtherNet/IP coupler: Object classes Description Message Router (0x02) Connection Manager (0x06) Port (0x55) Identity (0x01) Distributed explicit requests to the associated handler Responsible for different areas of the connection Ethernet Link (0xF6) TCP/IP (0xF5) Assembly (0xF4) Custom Objects N OT E ricos FLEX specific EtherNet/IP objects More information about the standardized EtherNet/IP object classes may be found in the according EtherNet/IP respectively CIP standard of the ODVA (Open DeviceNet Vendor Association). The following Wieland Electric GmbH specific object classes are supported by the EtherNet/IP coupler: Object class Description I/O data (0x64) Diagnostics and interrupt (0x65) Module (0x66) Access to the I/O data of the System ricos FLEX Access to the diagnostics and interrupt specific settings Coupler (0x67) Assembly (0x04) 46 Abstraction of a physical network connection Provides identification and general information about the device. Shows information about the network interface (Error counter, …) Configuration of the TCP/IP interface (e.g. IP address, Netmask, Gateway) Combines more attributes in one I/O connection Self-defined objects Access to the configuration, diagnostics and status data of the modules Access to the configuration and status data of the EtherNet/IP coupler Access to the I/O and diagnostics data Wieland Electric GmbH | BA000975 | 05/2014 (Rev. A) Deployment With this class the I/O data, which were configured via FORWARD_OPEN before, may be accessed. I/O data class (code: 0x64) The instances represent the INPUT respectively OUTPUT assemblies. Is the ID assigned to the first INPUT assembly e.g. number 20, so the instance 20 is directly assigned with this assembly. The attribute IDs of the object class can be found in the following table: Attribute ID Access Name Data type Description 0x64 0x65 Set Get I/O Set I/O Get ARRAY of BYTE ARRAY of BYTE Setpoint (outputs) Actual value (inputs) With this class the diagnostics and interrupt specific settings can be accessed. If this data have to be manually reset, this happens by the module class. With Instance you can define which System ricos FLEX slot is to be accessed (0: EtherNet/IP coupler, 1:1. System ricos FLEX module, 2:2. System ricos FLEX module, etc. ...). Please consider the System ricos FLEX power and clamp modules do not have any module ID. These may not be recognized by the EtherNet/IP coupler and so are not considered during slot allocation. Diagnostics and interrupt class (code: 0x65) N OT E The attribute IDs of the object class can be found in the following table: Attribute ID 0x64 Access Name Data type Description Get Status USINT 0x65 Set Process Reset Config BYTE 0x66 Set Diagnostic Reset Config BYTE 0x67 Set no data 0x68 Get Reset Process and Diagnostic Data Next Process Alarm Access to the status byte of the I/O data. An interrupt is pending, if the according bit is set: Bit 0: Process interrupt Bit 1: Diagnostics interrupt Bit 7 ... 2: reserved Here is specified when a hardware interrupt is to be reset: 0: Active reset by attribute 0x6D of the module class 1: Automatically after request (standard) Here is specified when a diagnostics interrupt is to be reset: 0: Active reset by attribute 0x6E of the module class 1: Automatically after request (standard) Deletes each available process and diagnostic data (API SlioModClearAllErrors) 0x69 Get Next Diagnostic Data see table below see table below Wieland Electric GmbH | BA000975 | 05/2014 (Rev. A) Reads the next available hardware interrupt. Contains the raw data of the interrupt type IO_EVENT_PROCESS_ALARM Reads the next available diagnostics interrupt. Contains the raw data of the interrupt type IO_EVENT_DIAGNOSTIC_ALAR M 47 Deployment Structure of the interrupt and diagnostic data Field name Data type Field value Pos Length USINT UINT Data ARRAY of BYTE Module position (1 ... 64) Length of the interrupt and diagnostics data Interrupt and diagnostics data in raw format Module class (code: 0x66) This class offers access to the configuration, diagnostics and status data of the System ricos FLEX modules. Besides the module descriptive attributes there are the attributes 0x6B and 0x6C to read the module-specific hardware interrupt and diagnostics data. If the manual reset of hardware and diagnostics interrupts is set by the diagnostics and interrupt class, an interrupt can be acknowledged by means of the attributes Attribute 0x6D respectively 0x6E. With Instance the System ricos FLEX slot is defined, which is to be accessed. N OT E Please consider the System ricos FLEX power and clamp modules do not have any module ID. These may not be recognized by the EtherNet/IP coupler and so are not considered during slot allocation. The attribute IDs of the object class can be found in the following table: Attribute ID 0x64 Access Name Data type Description Get/Set Config Module configuration 0x65 Set 0x66 0x67 0x68 Get Get Get ClearCounter GetMDL GetNDL VerFPGA ARRAY of BYTE no data WORD WORD WORD Module MDL read counter Module NDL read counter FPGA version 0x69 Get VerFW Firmware version 0x6A Get Serial 0x6B Get HardwareInterrupt ARRAY of BYTE ARRAY of BYTE see table below 0x6C Get Diagnostics Data see table below 0x6D Set no data 0x6E Set HardwareInterruptReset Diagnostics InterruptReset no data Clear module counter Serial number Contains the raw data of the interrupt type IIO_EVENT_PROCESS_ ALARM Contains the raw data of the interrupt type IO_EVENT_DIAGNOSTIC_ ALARM Reset of the hardware interrupt Reset if the diagnostics interrupt Structure of the interrupt and diagnostics data 48 Field name Data type Field value Pos Length Data USINT UINT ARRAY of BYTE Module position (1 ... 64) Length of the interrupt and diagnostics data Interrupt and diagnostics data in raw format Wieland Electric GmbH | BA000975 | 05/2014 (Rev. A) Deployment This class offers access to the parameter and status data of the Ethernet/IP coupler. The Instance is always 0. The attribute IDs of the object class can be found in the following table: Attribute ID 0x64 Access Name Data type Description Get/Set Config Coupler configuration 0x65 Set 0x66 0x67 0x68 0x69 0x6A 0x6B 0x6C 0x6D 0x6E 0x6F 0x70 0x71 0x72 0x73 0x74 0x75 0x76 Get Get Get Get Get Get Get Get Get Get Get Get Get Get Get Get Get ClearCount er GetMC GetELE GetTOE GetSBE GetFCSE GetTLE GetTTE GetARE GetBITE GetWNA GetTV GetML VerSLIO VerFPGA VerBus VerFwPkt VerMxFile ARRAY of BYTE no data BYTE WORD WORD WORD WORD WORD WORD WORD WORD WORD WORD WORD BYTE WORD WORD DWORD STRING Read master counter Expected length error Time-out error Stop-bit error FCS error Telegram length error Telegram type error Alarm retry error Bus idle time error Wrong node address Telegram valid Master load ricos FLEX version FPGA version ricos FLEX bus version Firmware packet version Name and version of the Mx file Coupler class (code: 0x67) Clear master counter In the following the Wieland Electric GmbH specific instances are listed for R/W access and for read access to the diagnostics data. Assembly-class (code: 0x04) Instance ID 0x0A (10) to 0x13 (19) - Setpoint values (496byte). Instances Byte Type Content 0 ARRAY of BYTE Setpoint values (outputs) - output assembly Since an I/O connection can only transfer a maximum of 496byte I/O data (less interrupt header and length), with SetIOStart a second connection can be opened over which the defined start area is transferred. Instance ID 0x14 (20) to 0x1d (29) - Actual values (496byte). Byte Type Content 0 ARRAY of BYTE Actual values (inputs) - input assembly Since an I/O connection can only transfer a maximum of 496byte I/O data (less interrupt header and length), with SetIOStart a second connection can be opened over which the defined start area is transferred. Instance-ID 0x1E (30) - Config (400byte). Byte Type Content 0 ARRAY of BYTE ForwardOpen Wieland Electric GmbH | BA000975 | 05/2014 (Rev. A) 49 Deployment Instance ID 0x79 (121) - Diagnostics (4byte). Byte Type Content System diagnostics: Bit 0: Scanner for time x lost Bit 1: Sporadic interrupt Bit 2: Long response time Bit 3: Module permutation Bit 15 ... 4: reserved Module diagnostics: 2 BYTE Bit 0: Hardware interrupt (group interrupt) Bit 1: Diagnostics interrupt (group interrupt) Bit 7 ... 2: reserved 3 BYTE reserved Instance ID 0x7A (122) - Extended diagnostics (20byte). 0 WORD Byte Type 0 WORD Byte Type 0 4 DWORD ARRAY of BYTE Byte Type Content 0 DWORD LWORD LWORD ARRAY of BYTE Instance ID 122 (extended diagnostics) Content System diagnostics: Bit 0: Scanner for time x lost Bit 1: Sporadic interrupt Bit 2: Long response time Bit 3: Module permutation Bit 15 ... 4: reserved 2 reserved WORD 4 Hardware interrupt: LWORD Bit 0: Module 1 Bit 1: Module 2 Bit 63 ... 2: reserved 12 Diagnostics interrupt: LWORD Bit 0: Module 1 Bit 1: Module 2 Bit 63 ... 2: reserved Instance ID 0x7B (123) - Diagnostics & actual values (500byte). Content Instance ID 121 (diagnostics) Instance ID 120 (actual values) (input assembly 1) Instance ID 0x7C (124) - Extended Diagnostics & actual values (516byte). 20 50 Instance ID 120 (actual values) (input assembly 1) Wieland Electric GmbH | BA000975 | 05/2014 (Rev. A) Recommended literature 7 Recommended literature Wieland Electric GmbH | BA000975 | 05/2014 (Rev. A) 51 FAQ 8 52 FAQ Wieland Electric GmbH | BA000975 | 05/2014 (Rev. A) Support 9 Support For the latest information about our product please check the following websites: http://www.wieland-electric.com/ http://eshop.wieland-electric.com/ Technical Support Industrieautomation Elektronik Hotline: +49 951 / 93 24-995 E-Mail: [email protected] Wieland Electric GmbH | BA000975 | 05/2014 (Rev. A) 53 Wieland Electric GmbH | BA000975 | 05/2014 (Rev. A)