1
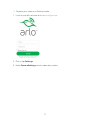
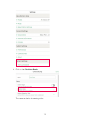
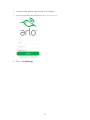
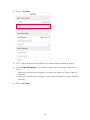
User Manual
December 2014
202-11380-01
NETGEAR, Inc.
350 East Plumeria Drive
San Jose, CA 95134, USA
Support
For product updates and web support, visit http://support.arlo.com.
Trademarks
© NETGEAR, Inc. NETGEAR and the NETGEAR Logo are trademarks of NETGEAR, Inc. Any non‑NETGEAR trademarks are used for
reference purposes only.
Compliance
For the current EU Declaration of Conformity, visit:
http://support.netgear.com/app/answers/detail/a_id/11621/.
For regulatory compliance information, visit:
http://www.netgear.com/about/regulatory/.
See the regulatory compliance document before connecting the power supply.
2
Contents
1. Set Up Your System
4
Set Up Your Base Station��������������������������������������������������������������������������������������������������������������������������������� 4
Register for an Arlo Account��������������������������������������������������������������������������������������������������������������������� 5
Set Up and Sync Your Cameras�������������������������������������������������������������������������������������������������������������� 6
Position Your Cameras������������������������������������������������������������������������������������������������������������������������������������������� 8
Position Mode......................................................................................................................................................................10
Adjust Motion Sensitivity�������������������������������������������������������������������������������������������������������������������������������13
2. Personalize Your System
16
Name Your Cameras�����������������������������������������������������������������������������������������������������������������������������������������������16
Set Up Rules...........................................................................................................................................................................17
Set Up Modes.......................................................................................................................................................................20
Personalize Modes�����������������������������������������������������������������������������������������������������������������������������������������������������20
Create a New Mode������������������������������������������������������������������������������������������������������������������������������������������������22
Manage Modes�����������������������������������������������������������������������������������������������������������������������������������������������������������������23
Create a Schedule�����������������������������������������������������������������������������������������������������������������������������������������������������24
Add Friends..............................................................................................................................................................................25
Change Your Preferences���������������������������������������������������������������������������������������������������������������������������27
3. View Your Content
30
View Recordings and Snapshots�����������������������������������������������������������������������������������������������������30
Use the Filter.......................................................................................................................................................................32
4. Manage Your Subscription
33
Service Levels��������������������������������������������������������������������������������������������������������������������������������������������������������������������33
Renew Your Service Plans���������������������������������������������������������������������������������������������������������������������������35
Downgrade Your Service Plan��������������������������������������������������������������������������������������������������������������35
Cancel Your Paid Service Plan��������������������������������������������������������������������������������������������������������������36
3
1. Set Up Your System
Setting up your Arlo system involves these steps: set up your base station, register for
an Arlo account, set up and sync your cameras, and position your cameras.
Set Up Your Base Station
The base station connects to your home network and allows you to view your
camera streams from anywhere.
¾¾ To install your base station:
1. Connect the base station to your router using an Ethernet cable.
2. Connect the AC adapter to the base station.
3. Plug the AC adapter into an electrical outlet.
4
4. Press the On-Off button on the back of the base station to turn on the base
station..
The Power LED and Internet LED light green in about two minutes.
Your base station is set up.
Register for an Arlo Account
After you set up your base station, you must register for an Arlo account. Your
Arlo account is linked to your Arlo system and allows you to view videos from any
Internet-connected computer or mobile device.
On mobile devices, use the Arlo app for the best viewing experience. Visit the Apple
App Store or the Google Play Store to download the Arlo app for iOS and Android
devices.
5
¾¾ To register for an Arlo account:
1. In a browser, enter https://arlo.netgear.com/ in the address bar.
2. Click or tap New System Setup.
3. Complete the required fields.
4. Click or tap Continue.
5. Choose your base station’s serial number from the drop down menu.
Note:  If the serial number is not listed, you can enter it manually. The serial number is on
the bottom of the base station, on the product label.
6. Click or tap Continue.
7. Choose your time zone from the drop-down menu.
8. Click or tap Continue.
9. Choose a service plan.
Note:  For more information, see Service Levels on page 33.
Your Arlo account is set up.
Set Up and Sync Your Cameras
After the base station is setup and you registered for an Arlo account, you are
ready to set up your cameras and sync them to the base station. The Basic service
plan supports up to five synced cameras. You can upgrade to a paid service plan to
support more cameras.
¾¾ To set up your cameras:
1. Slide and hold the latch on the bottom of the camera.
6
2. Slide the battery door back and lift it to open the battery compartment.
3. Insert the batteries according to the following illustration.
Your cameras are ready to sync.
¾¾ To sync your cameras:
1. Bring the camera within one to three feet (30cm-100cm) from the base station.
2. Press the Sync button on the side of the base station.
7
3. Wait for the Sync Status LED to light green.
4. Press the Sync button on top of the camera.
A blue LED blinks rapidly to confirm a successful sync.
5. Repeat for each additional camera.
Position Your Cameras
It’s important to keep distance in mind when placing your Arlo cameras:
• Maximum. You can place your Arlo camera a maximum of 300 feet (90 meters)
from the base station. In indoor installations, the range might be less if metal
objects or thick walls and ceilings are between a camera and the base station.
Note:  Note: Check the Camera LED on the base station; if it’s blinking amber, the base
station detects a low data rate, a sign that a camera is too far from the base station.
• Minimum. Place your Arlo cameras at least ten feet from the base station, and
allow at least 6 ½ feet (2 meters) between cameras. Follow these guidelines to
prevent WiFi signals between the devices from interfering with each other.
8
When positioning your Arlo camera, keep these tips in mind:
• Keep active locations in the camera’s field of view. Your Arlo camera has
a 130-degree viewing angle. Position your camera so that the space that you
want to monitor is within the camera’s field of view.
• Aim with the cloud. Use Arlo’s Position mode to send video to the cloud as
quickly as possible. This allows you to aim the camera while watching the video
feed on your Arlo smartphone app to make near real-time adjustments to the
camera’s position. Go to your camera’s Setting options to turn on Position mode.
After the camera is in place, you can turn off Position mode, or it automatically
turns off after five minutes.
• Elevate your camera. Mount your Arlo motion-detection camera at least
seven feet (two meters) above the floor and aim it slightly down for the best
sensor performance.
• Ensure that side-to-side traffic crosses Arlo’s field of view. Arlo’s motion
sensor is much more sensitive to side-to-side movement across its field of view
than to movement directly toward or away from the camera. The best area
for motion detection is five feet to 20 feet (1.5 to 6 meters) from the camera
position.
9
For best results, the path of expected motion should cross Arlo’s field-of-view and
not head directly into or away from the camera. For example, if you want to detect
motion near a couch, place the camera to the side of the couch, rather than above
it or opposite it.
You can use the Motion Detection Test feature to verify if motion can be detected
in a camera’s current placement. The camera’s LED flashes amber when motion is
detected. Go to your camera’s setting options to turn on the Motion Detection Test
feature.
Position Mode
Position mode allows you to quickly and easily see what your camera sees. Using
Position mode, you can make sure that your Arlo camera is positioned to monitor
the precise area you want. Position mode is available only when the camera is not
streaming, recording motion, or in Motion Detection mode.
10
¾¾ To place your camera in Position mode:
1. Log in to your Arlo account at www.arlo.netgear.com.
2. Click or tap Settings.
3. Under Camera Settings, select a camera to position.
11
4. Click or tap Position Mode.
The camera starts streaming video.
12
Note:  Position mode streams video as fast as possible, without buffering, so that you can
aim the camera while watching on a smartphone and make near real-time adjustments to
the camera position. This means that you might see lower quality video while in Position
mode.
Adjust Motion Sensitivity
You can adjust the motion sensitivity of an Arlo camera after a motion rule is
applied to it. For more information, see Set Up Your Base Station on page 4.
13
¾¾ To adjust the motion sensitivity of a camera:
1. Log in to your Arlo account at www.arlo.netgear.com.
2. Click or tap Settings.
14
3. Click or tap Rules.
4. Click or tap a motion rule assigned to the camera that you want to adjust.
5. Under IF the following, use the slider to adjust the sensitivity of the motion
sensor:
• Raise the sensitivity percentage to increase the number of videos that Arlo
captures.
• Lower the sensitivity percentage to decrease the number of videos that Arlo
captures.
6. Click or tap Done.
15
2. Personalize Your System
Your Arlo system can be customized to meet your unique needs. After you create rules
and modes for cameras, Arlo does the rest. You can name your cameras so that they
are easier to identify and set up alerts so you always know what’s going on.
Name Your Cameras
You can easily customize your Arlo cameras by renaming them.
¾¾ To rename your camera:
1. Log in to your Arlo account at www.arlo.netgear.com.
2. Click or tap Settings.
3. Under Camera Settings, click or tap a camera.
16
4. In the Name field, delete the current name and enter a new name that reminds
you of the camera’s location, such as Garage or Front Door.
Camera names are limited to 32 characters.
5. Click or tap Done.
Set Up Rules
With rules, you can tell your Arlo system what to do in certain situations. For
example, you can set your Arlo system to record videos when the motion sensor is
activated on a specific camera and alert you with an email message.
17
You can use the rules you create within modes and schedules to customize your
Arlo system.
¾¾ To create a rule:
1. Log in to your Arlo account at www.arlo.netgear.com.
2. Click or tap Settings.
3. Click or tap Rules.
18
4. Click or tap Add.
5. Enter a name for the rule.
6. Under IF the following, select the camera to which you want Arlo to apply the
rule.
7. Use the slider to adjust the sensitivity of the motion sensor.
• Raise the sensitivity percentage to increase the number of videos that Arlo
captures.
• Lower the sensitivity percentage to decrease the number of videos that Arlo
captures.
8. Under THEN do the following, select the action you want your Arlo system to
take.
9. Select the camera from which you want to record the video.
10.Use the slider to adjust the length of video that is captured.
11.To be alerted by email when your Arlo system activates this rule, click or tap To
this list and enter at least one email address.
12.Click or tap Done.
19
Set Up Modes
A mode is a way to set and control automated actions. With modes, Arlo can be on
the lookout for you, even when you are not logged in. Modes start working when
triggered by actions that you can define. You can personalize the default modes or
add your own.
You might want to create a mode in which some motion sensors and cameras are
active but others are not. For example, when you are sleeping, you might want your
exterior cameras to be active, but your interior cameras to be inactive.
Modes are made up of rules. To create a new mode or change an existing one, you
must first create a rule. To learn more about rules and how to create your own, see
Set Up Rules on page 17
Arlo is pre-configured with two default modes:
• All motion on. The motion sensor on each camera is active. When motion is
detected, the camera records a video clip and sends an email message to the
primary Arlo account holder. This mode works well when nobody is at home.
• All motion off. No motion sensors are active, no video is recorded and no
motion alerts are sent. This mode works well when people are at home.
Personalize Modes
Arlo can be on the lookout for you when you’re not at home. Modes start working
when triggered by actions that you can define. For example, you can tell Arlo to
record a video clip when it detects motion.
20
¾¾ To personalize an existing mode:
1. Log in to your Arlo account at www.arlo.netgear.com.
2. Click or tap Settings > Define a Mode.
A list of your modes displays.
3. Click or tap a mode name.
A list of available rules displays.
4. Tap or click rules to add them to the mode.
Note:  Some devices cannot be used multiple times in the same mode; otherwise they
might be given contradictory instructions. Once a device is used, contradictory rules are
deactivated.
The settings specific to that rule are shown using icons:
• Camera icon. The camera records.
• Paper plane icon. Email alerts are sent.
• Push notification. Notifications are pushed to your smartphone.
Note:  You must install the Arlo app on your smartphone to receive push
notifications.
21
• Running Icon. Motion sensors are on.
Note:  You can use the Motion Detection Test feature to adjust your camera’s motion
detection sensitivity.
5. To delete a mode, click or tap the trash can icon.
Note:  You must have at least one mode. The Arlo system is always in a mode, even if
that mode is set to do nothing.
Create a New Mode
¾¾ To create a new mode:
1. Log in to your Arlo account at www.arlo.netgear.com.
2. Click or tap Settings.
3. Click or tap Modes.
A list of your modes displays.
4. Click or tap Add.
5. Name your new mode.
6. Click or tap rules to add them to the mode.
22
Note:  Some devices cannot be used multiple times in the same mode; otherwise they
might be given contradictory instructions. Once such a device is used, other rules that
use that device are unavailable.
7. Click or tap Save to create your new mode.
8. To apply your new mode, click or tap Mode.
Manage Modes
You can turn modes on and off manually or set modes to activate according to a
schedule.
¾¾ To make immediate changes to a mode:
Use this method when you are not using a schedule to control a mode or to
override an existing schedule.
1. Log in to your Arlo account at www.arlo.netgear.com.
2. Click or tap Mode.
3. Make sure that the Schedule switch is set to off.
4. Select a mode to activate it.
If the mode is turned off, it turns on immediately. The mode stays active until
23
you change it or turn the schedule on.
If the mode is turned on, it turns off immediately. The mode stays inactive until
you change it or turn the schedule on.
¾¾ To change modes using a schedule:
Use this method to turn on an existing schedule or to edit an existing schedule.
1. Log in to your Arlo account at www.arlo.netgear.com.
2. Click or tap Modes.
3. Slide the Schedule switch to on.
4. To edit or create a schedule, drag the divider between modes to change the
start and stop times.
Note:  A schedule recurs weekly. For example, the schedule for Tuesday is repeated
every Tuesday as long as the schedule is turned on. Arlo is pre-configured with the
following schedule:
• Monday through Friday, 8:00 a.m. to 5:00 p.m. All motion sensors are on.
• All other times. All motion sensors are off.
Create a Schedule
You can set a schedule to activate and deactivate modes automatically. Schedules
recur weekly. For example, the schedule for Tuesday is repeated every Tuesday as
long as the schedule is turned on. Arlo is pre-configured with the following schedule:
• Monday through Friday, 8:00 a.m. to 5:00 p.m. All motion sensors are on.
• All other times. All motion sensors are off.
24
¾¾ To set a schedule:
1. Log in to your Arlo account at www.arlo.netgear.com.
2. Click or tap Mode.
3. Make sure that the Schedule switch is set to on.
4. Drag and drop modes to the weekly schedule to add them.
5. Drag the dividers between modes to change the start and stop times.
Add Friends
You can add friends to your Arlo account. Friends can view live streams from your
cameras, record video clips, view, share, favorite and delete clips from your library,
and take snapshots. Friends have limited access to some of the settings and
features on your Arlo account. You can select which cameras friends can see and
what administrative rights are available to them.
25
¾¾ To add a friend to your Arlo Account:
1. Log in to your Arlo account at www.arlo.netgear.com.
2. Click or tap Settings.
3. Under Account Settings, click or tap Friends.
4. Click or tap Add.
5. Enter the first name, last name, and email address of the person that you want
to add as a friend.
6. Click or tap the cameras that you want the friend to be able to access.
7. Click or tap the administrative rights that you want to assign to the friend.
8. Click or tap Send Invite.
26
¾¾ To edit a friend’s privileges:
1. Log in to your Arlo account at www.arlo.netgear.com.
2. Click or tap Settings.
3. Under Account Settings, click or tap Friends.
A list of your friends displays with the status of their accounts.
4. Click or tap the status next to the name of the Friend that you want to edit.
5. Click or tap cameras and administrative rights to select or deselect them.
6. Click or tap Done
Change Your Preferences
Preferences allow you to control when Arlo notifies you of important events, like
when your storage is full or a camera battery is low. You can also tell Arlo how to
behave when your cloud storage is full. You can modify the following preferences:
• Manage Storage. When you turn on Manage Storage, Arlo automatically
moves any unlocked files that are seven days or older to the recycle bin.
• If storage is full. Arlo lets you control how the system behaves when your
cloud storage is full. Arlo can delete files to make room for new recordings, or
Arlo can save your files and not make new recordings when your storage is full.
27
• Storage Full Notification. You can tell Arlo to notify you by email if your files
exceed your cloud storage capacity.
• Low Battery Notification. You can tell Arlo to notify you by email if your
camera’s battery level is low.
¾¾ To change your Arlo Preferences:
1. Log in to your Arlo account at www.arlo.netgear.com.
2. Click or tap Settings.
28
3. Under System Settings, click or tap Preferences.
4. To change the manage storage feature, tap or drag the slider.
The slider turns green when the Manage Storage feature is turned on, and
turns gray when it is turned off.
5. If you turn on the manage storage feature, choose an option for handling files
when storage is full:
• To delete files to make room for new recordings if your storage is full, select
the delete oldest files to make room radio button.
• To save your files and not make new recordings if your storage is full, select
the do not make new recordings radio button.
6. To change the storage full notification feature, tap or drag the slider.
The slider turns green when the Storage Full Notification feature is turned on,
and turns gray when it is turned off.
7. To change the low battery notification, tap or drag the slider.
The slider turns green when the Low Battery Notification feature is turned on,
and turns gray when it is turned off.
8. Click or tap the Done button.
29
3. View Your Content
Videos recorded by your Arlo system are stored in the library. You can view your
recordings and snapshots, favorite them, and search through them using the filter.
View Recordings and Snapshots
Your Arlo system stores recordings and snapshots in the library. In the library, you
can view recordings and snapshots by the day or month they were taken using the
calendar.
¾¾ To use the calendar:
1. Log in to your Arlo account at www.arlo.netgear.com.
2. Click or tap Library.
The calendar interface displays on the left side of the screen.
3. Use the arrows on either side of the month to choose a month to view.
30
Days where a video clip was recorded are highlighted with a green circle.
Recordings from the month display to the right of the calendar.
4. Click or tap a highlighted day.
Recordings from that date display to the right of the calendar.
31
Use the Filter
You can use the filter function to view a specific set of recordings in your library.
¾¾ To filter your library:
1. Log in to your Arlo account at www.arlo.netgear.com.
2. Click or tap Library.
3. Click or tap Filter.
4. Choose to view favorite recordings, non-favorite recordings, or all.
5. Choose camera names to view video clips recorded by those cameras.
6. Click or tap Done.
Recordings that match your filter parameters display. Dates with recordings
that match the filter parameters are highlighted in dark green.
32
4. Manage Your Subscription
Every Arlo system includes free Basic service that offers basic features and
functionality. When activating your Arlo system, you can choose between the Basic,
Premier, and Elite service plans.
Service Levels
Upgrading to a paid service level gives you the ability to expand your Arlo system
to suit your specific needs. Depending on your service level, you can add additional
cameras, base stations, or cloud storage and share recordings with friends and
family. See the following table for more information about different service plans
and features.
You can upgrade a Basic or Premier subscription at any time. When you upgrade
from a paid subscription to a higher service level, the system automatically
calculates any unused portion of the current term and deducts that pro-rated
amount from the total cost of the upgrade.
33
¾¾ To change your subscription level:
1. Log in to your Arlo account at www.arlo.netgear.com.
2. Click or tap Settings > Subscription > Update Service.
3. Select a service level.
The charge for the new service term displays.
4. Click or tap Change Service.
5. Enter a valid payment method by entering the credit card number, expiration
date, and CVV Security code.
Note:  Visa and MasterCard are accepted at this time.
6. Enter the billing name and address.
The billing name and address you enter must match the credit card billing
address information.
7. (Optional) Select the Automatically Renew my Service Plan check box.
8. Click or tap CONTINUE and wait while the payment is verified.
If the CONTINUE button is dimmed, make sure that you completed all of the
34
required fields.
You are prompted to confirm the service change.
9. Click or tap PURCHASE and wait while the payment is processed.
10.Wait while the payment is processed.
Your new service level is updated on the subscription page.
Renew Your Service Plans
Monthly plans automatically renew each month until you upgrade to an annual
plan or cancel, effective the next billing cycle.
Annual plans auto-renew by default but can be configured to expire at the end of
the current annual term.
Downgrade Your Service Plan
You can downgrade your Premier or Elite (annual or monthly) service plan at any
time.
¾¾ To downgrade your service plan:
1. Log in to your Arlo account at www.arlo.netgear.com.
35
2. Click or tap Settings > Subscription > Update Service.
3. Select a lower service plan and click or tap CHANGE SERVICE.
An email message is sent to you to confirm service level update, the effective
date, and any pro-rated refund amount for any unused portion of the current
term.
Cancel Your Paid Service Plan
You can cancel your Premier or Elite (annual or monthly) service plan at any time.
¾¾ To cancel your paid service level:
1. Log in to your Arlo account at www.arlo.netgear.com.
2. Click or tap Settings > Subscription > Cancel Service.
3. Wait while the cancellation is processed.
You are prompted to confirm the cancellation.
4. Click or tap CANCEL SERVICE.
Your Arlo account defaults to the free Basic service plan.
36