1
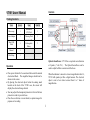
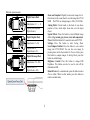
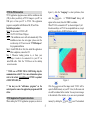
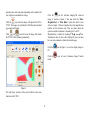
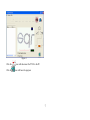
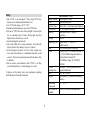
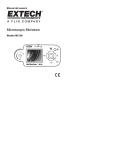
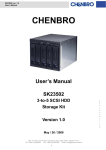
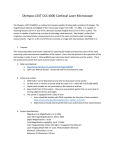
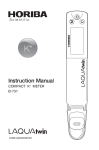
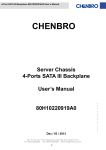
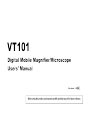
Controls
VT101 Users’ Manual
Packing Contents
Name
Quantity
Name
Quantity
Microscope
1
Installation
(CD) Disk
1
Power Adaptor
1
Cleaning Cloth
1
Mini-USB
Cable
1
AAA Ni-MH
Rechargeable
Battery
3
Manual
1
Wrist Strap
1
Optical Zoom/Focus : VT101 has an optical zoom function
at 2 points ( 7x & 27x ). The Optical Zoom/Focus can be
used to adjust both the zoom rate and the focus.
Operation
x Press power button for 2 seconds and then enter the normal
observation Mode. The magnified images should now be
shown on the screen.
x By placing the observed object below the aiming mark
located on the back of the VT101 case, the screen will
display the observed image desired.
x You may adjust the transparent protector in front of the lens
protector in order to provide focus.
x Press the save button, or zoom wheel, to capture images for
purposes of recording.
When the indicator is moved to a lower magnification than 7x,
VT101 will operate just like a digital camera. The observed
object is not to be in direct contact from 1 to 7 times of
magnification.
1
Different operation mode:
Zoom and Snapshot: Digitally zoom in/out images for 4x.
Press down on the zoom wheel to save the image into VT101
RAM. TheVT101 can enlarge image to 108x. (27x4=108x).
Aiming Mark: Circular mark on the back of case shows
position of lens, which helps locate lens over the target
object.
Special Effects: Press this button to select different image
effects. (E.g. normal, gray, inverse, ruler and comparison)
Power: Hold this button for 2 seconds to turn on/off VT101.
Settings: Press this button to enter Setting Mode.
Save/Compare/Confirm: Press this button to save current
image into VT101 RAM. You can also save image by
pressing down on the Zoom wheel. In Preview Mode, press
this button to compare images. In Setting Mode, press this
button to confirm image.
Brightness Control: Press this button to change LED
brightness. This button can also be used to turn off the
illumination LED.
Return/Preview: In a normal mode, press this button to enter
Preview Mode. When in other modes, press this button to
return to normal mode.
Digital Camera Mode
Magnification: 1/
7x
Optical Zoom Adjustable
Digital Zoom 4x
Digital Magnifier Mode
Magnification: 7x~25x
Optical Zoom 7x
Digital Zoom to 25x
Digital Microscope Mode
Magnification: 27x~108x
Optical Zoom 27x
Digital Zoom to 108x
2
Accessories
Power Supply
Power-adapter: Plugs into wall socket and into USB cable.
Will accept 100V ~ 240V AC and output 5V DC.
VT101 includes three Ni-MH
rechargeable batteries.
VT101 can run from batteries or
from the USB cable.
The Ni-MH batteries will recharge
automatically, without removal of the
batteries, if you use the USB cable to
connect VT101 to your computer or the
USB power adapter.
When the recharger is in the power-off
mode, the white LEDs will flash
twice every three seconds. If the
recharger is in power-on mode, the
icon will be shown on screen.
After completely charging in the power-off mode, the white
LEDs will flash once every three seconds. After completely
charging in the power-on mode, the
icon will be shown
on screen.
Recharge Ni-MH batteries every few months, even if the
system is not used to maintain battery strength, this is
suggested to extend longevity.
For lengthy storage periods, remove batteries to prevent
damage due to battery leakage/ discharge.
VT101 may also use alkaline batteries. Do not mix battery
types in use and do not recharge alkaline batteries.
Mini-USB cable: Used for data communications and
battery charging.
Settings
Power Saving: To set the time
period for automatic power shut off.
To push any key except “ Power “
to dismiss the sleepy mode.
Status Display: To turn on/off
display of screen status.
Brightness: To set 4 phases of LED brightness .
White Balance: To turn on/off Auto- White correction.
Delete all pictures: To delete all pictures in memory.
Factory Default: Returns to all original settings.
Image Effects
Gray (G): To remove color and create a gray-scale image for
easier image discrimination.
Inverse (I): To reverse color and/or grayscale to help
highlight some given features.
Emboss (E): Normal emboss algorithm. Useful to accentuate
some given image features.
Dual Window View (D): Allows two window views
including the left max. Magnification of the highlighted
3
Status
image and the original left observed image.
Ruler: Hold the Special Effects button for 2 seconds and the
ruler will appear at the bottom of screen. The value at the
right side of the ruler is the entire length. It varies by
changing magnification of the targeted object.
For Example The value of the ruler is 0.5mm for 10 lattice.
Each small lattice is 0.05mm. The scale is not exact due to
the variable distance from lens to image, which is changeable
as the user holds the VT101.
Battery Low
Battery power is low.
N: Normal Mode G: Gray Mode
Image Effect I: Inverse Mode E: Emboss Mode
D: Dual Window View Mode
Freeze
The ruler is shown only when the indicator is located at
text 7 & 27. It is intended for user’s convenience, not for
scientific accuracy.
Magnifying
When VT101 uses Dual Window View
mode or Dual Window Compare mode.
Press Confirm button will enter Freeze
mode. Press Confirm button again to
leave Freeze mode.
Current magnification rate is shown
when the indicator is located at text 7
and 27.
Image Quality
and LED
Four phases of adjustment.
Brightness
Preview: In normal observation mode, press Preview
button to recall the saved image in the RAM. A saved
image will be shown on the lower left of the screen. The
button can be used to change page and erase image. Press the
Preview button again to depart this mode.
Frame-center Hold the Special Effects button for 3
seconds to switch between
frame-center mark and ruler.
Ruler
Power Supply
Power is supplied by USB cable to PC
by USB or
or an adaptor. .
adapter
Dual Window Compare: While in Preview mode, press
Compare button to enter Compare mode. The recall image
will show in the left window and the targeted image will be
shown in the right window. Press Preview button again to
leave this mode.
Charging
4
Recharging batteries engaged.
figure 1), click the “Language” to select preference, then
VT101-to-PC Connection
VT101 application program comes with the installation disk
(CD), to allow you delivery of VT101 images to your PC via
USB port, or from your PC to VT101. This application
program is compatible with Windows 2K, XP, and Vista.
Installation procedure:
Step 1: Do not connect VT-101 to PC.
Step 2: Put VT-101 CD into CD player.
Step 3: The installation screen will start automatically. If the
installation screen does not appear, please enter the
root directory of CD and execute “VT101Setup.exe”
for program installation.
Step 4: Install USB driver first, then install the application.
After completion, remove the CD.
Step 5: Whenever loading pictures to, or from, your
microscope, it needs to be connected it to your PC via
mini-USB cable. Click the VT-101icon on the desktop
screen to execute.
click the
icon. A “VT-101 Found” dialog will
appear on the screen, then click “OK” to continue.
When VT-101 is connected to PC (as shown in figure 2), all
functions and keys on VT-101 are suspended from use, except
variable magnification & LED brightness control.
* VT-101 uses a CP2102 USB to UART bridge chip for
communications with PC. For more information please
refer to the website www.siliabs.com. CP2102 is a product
of SILICON LABS, Inc.
Figure 1.
** You may use the “add/remove programs” on the
control panel to remove the application program and USB
driver.
icon and the image inside VT-101 will be
Click the
copied to RAM memory on your PC. Also, the file name and
size will be indicated in the window. You can preview images
in the mid-side of the window, or you can save to permanent
VT101 Application Program Instructions
When starting the VT101 application program (as shown in
memory by clicking the
5
or the
icon. The download
procedure may take some time depending on the number and
size of pictures committed for storage.
Click the
icon for real-time imaging.The observed
image is shown as figure 3. You may click the “Show
Magnification” or “Show Ruler” option, the effect is also
shown as figure 3. Please remember ruler and magnification
number are for reference only. They are shown when the
optical zoom/focus indicator is located at text 7 and 27.
Magnification is variable by clicking the
or
icon.
Transmission may be slow, after clicking the icon; you may
have to wait a moment to obtain the desired image.
Click the
icon, then the image will upload from PC to
VT101. The image size is limited to 320x240 pixels standard
jpg compressed format.
Click
and
icon will erase the image files inside
the VT101’s Flash-Memory permanently.
Figure 2.
The right lower portions of the screen both have the same
function in the VT101
6
Click the
PC.
icon in figure 3 to save the display image to
Click the
mode.
icon to leave Continuous Image Transfer
Figure 3.
Click the
Click the
icon will disconnect the VT101 to the PC.
icon will leave the program.
7
Safety
x The VT101 is not-waterproof! Please keep VT101 dry.
Do not use in a humid place(bathrooms, etc.)
x Use VT101 only temps. of -5qC~ 50qC .
x Sudden varied temperatures may cloud VT101 lens.
x Do not let VT101 lens face direct sunlight or intense light
for an extended period of time. Strong light may hurt
light-sensitive electronics as a result.
x Avoid touching the lens directly.
x The white LEDs have strong luminosity. Avoid directly
staring at them. May damage your eyes. Caution!
x If the transparent protector in front of lens contacts any
toxic observed materials or contaminated materials, avoid
contact! Remove transparent protection from time to time
to disinfect.
x Do not remove power/batteries when VT101 is on. May
cause information loss or circuit damage as a result.
Specifications: VT101
300,000 pixels CMOS
High sensitivity lens
White LED × 3 with super high brightness
1.8” TFT color LCD screen
2MB Data FLASH -- capacity ~
60 pictures
Linkage
USB 2.0
Magnifying rate Optical zoom 1 ~ 7x and 27x.
Digital zoom 4x.
Plug
DC IN terminal (mini USB plug)
Power
3 x AAA, RO3, 1.5V alkaline batteries or
3 x 1.2V Ni-MH rechargeable batteries.
AC transformer (Output: DC
5.0V/1000mA; Input: AC 100-240V
50/60Hz).
Current
Maximum = 220mA (with LEDs on at
consumption
highest illumination)
Size
120 × 56 × 25 mm
Weight
Approximately 70 grams (not including
batteries)
Operational
-5ºC ~ 50ºC
temperature
Environmental Below 85% (no dew) recommended
humidity:
Sensor element
Lens
Auxiliary light
LCD screen
Memory
To dispose of the battery, obey local regulations regarding
lawful disposal of hazardous materials.
8