1
Magellan Jr User Manual Magellan Jr User Manual 1 Contents 1)
2)
3)
4)
5)
6)
7)
8)
Synthesizer, p. 3 FX, p. 11 Arppegiator, p. 12 Chordmaker, p. 14 Sequencer, p. 15 Prefs (including MIDI), p. 18 Recording, Sharing, and Metronome, p. 25 Keyboards, Touchpads, and Other Controls, p. 27 9)
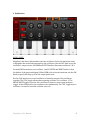
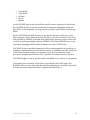
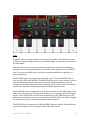
Presets, p. 29 10) Tips and Troubleshooting, p. 31 11) Specifications and Minimum Requirements, p. 33 Magellan Jr User Manual 2 1. Synthesizer OSCILLATORS Magellan Jr has three independent real-‐time oscillators. Select the waveform icons to designate the waveform generated by the oscillators. Use the OCT knob to set the oscillator’s output octave, and SEMI and CENT knobs to fine-‐tune oscillators 2 & 3. For non-‐PWM waveforms, use oscillator 1 and 2 DEPTH and DRIFT knobs to alter the timber of the generated signal. When PWM is the selected waveform, use the PW knob to specify the duty-‐cycle of the output pulse wave. Use the VOL knobs next to each oscillator to blend the output of the oscillators together. The SYNC toggle allows phase-‐syncing oscillator 2 to oscillator 1. The PHASE RESET toggle is used to force oscillators’ phases to reset upon each note trigger. In the OFF position, the oscillators run continuously. The “ON” toggle next to oscillator 3 is used to turn that oscillator on or off. Magellan Jr User Manual 3 The KB TRACK toggle is used to couple oscillator 3 to the keyboard/controller input. In the OFF position, oscillator 3 is decoupled and operates as an audible LFO. In the ON position, oscillator 3 works like oscillators 1 and 2. OSC UNISON The OSC Unison module multiplies the output signal from the oscillators in order to provide a “super-‐wave” effect. You can specify the pitch difference among the multiple signals to varying effect. Use the toggle to turn OSC Unison on or off. Use DETUNE and WIDTH to specify the amount of pitch difference among the generated signals to obtain different unison effects. GLIDE and NOISE Use the GLIDE knob to specify the length of glissando between two notes. When set in “0” position, glissando is turned off. Use the VOL knob to blend in signal from Magellan Jr’s noise generator with the output from oscillators and FM. Use TONE to adjust the noise color. Magellan Jr User Manual 4 FM The FM module in Magellan Jr is designed as an additional signal generator over the three oscillators and unison generator. This module allows you to obtain tones that result from a sound formation technique called “Frequency Modulation Synthesis”. The FM module user interface in Magellan Jr is configured to behave similarly to that of a subtractive filter to help user intuition. The O2>1 FM knob specifies the amount of frequency modulation imposed on Oscillator 1 (carrier signal) by Oscillator 2 (modulator signal). The higher this knob is set, the more the characteristics of the modulator signal will be imparted on the carrier. Use the O2>1 RING knob to specify the amount of ring modulation of the oscillator 1 signal by the oscillator 2 signal. The MIX knob allows you to blend in as much of the FM signal as you would like with the rest of Magellan Jr’s sound generators. This feature allows you to set other customary FM parameters, and blend in the FM signal during performance or statically to obtain unusual overtones or timbral variety, resulting in a form of hybrid sound synthesis. The FM module has its own ADSR envelope, in addition to a CONTOUR setting. Use these parameters together for changing the frequency modulation effect on a synth voice: the O2>1 FM knob specifies the initial modulation amount upon note attack, the ATTK parameter specifies the amount of time it takes to reach the modulation level specified by the CONTOUR knob. The DCY fader determines the time it takes to Magellan Jr User Manual 5 reach from the contour level to the level specified by SUS slider. The REL slider additionally determines the time it takes for the modulation amount to reach the initial level specified by O2>1. When CONTOUR is set to 0, the envelope becomes disengaged to provide a flat response. AMP Use the settings on this module to modify the amplitude characteristics of the generated sound. The ATTK (attack) fader is used to set the length of time that the sound triggered by the keyboard or other controller to rise from zero to full amplitude. The DCY (decay) fader specifies the amount of time that the sound takes to reach the level specified by SUS (sustain) fader. The REL (release) fader determines how fast or slowly the sound disappears once its associated note has been released. Magellan Jr User Manual 6 FILTERS Magellan Jr has two filter banks that can run simultaneously. As of the writing of this document, each bank is able to receive one of 11 unique filter types that are specially designed to modify the bare signal provided by the sound generators talked about in the previous sections. In addition, each bank is able to perform in a true-‐bypass mode. The filter banks are operable in series or parallel. In the serial mode, the signal output by FILTER 1 is input to FILTER 2. In the parallel mode, the signal from generators is input to both banks simultaneously. In this parallel mode, the BALANCE knob is used to specify how much of the signal from Filter 1 vs. Filter 2 is sent to the final audio output. In addition, each bank is provided with its own ADSR contoured envelope with frequency tracking and curve selection. Use the drop-‐down Filter Selection Menu to choose the filter operator for each bank. Currently available filter types are: • Magellan LP • Victor LP • Victor HP • Victor BP • Formant • Comb • Voyvoda LP Magellan Jr User Manual 7 Voyvoda HP Voyvoda BP All-‐Pass Notch Bypass Use the CUTOFF knob to specify the filter cutoff or center frequency for each bank. Use the RESO/Q knob to specify the amount of resonance in Magellan and Victor type filters, or the frequency coverage on the Voyvoda, Comb, Allpass or Notch type filters. Use the CONTOUR and ADSR controls to specify the envelope cutoff curve of the filter. Negative contour values will cause the filter to reach cutoff values lower than that specified by CUTOFF at the end of the attack stage, whereas positive values will result in an attack peak higher than the CUTOFF value. With CONTOUR set to 0, the envelope is disengaged and the filter is always set to the CUTOFF value. The TRACK selector specifies the amount of filter tracking applied. At 0 position, no tracking is applied and all sound is filtered equally. At 1 position, the filter is fully set to filter each sound according to its frequency to provide a consistent sound perception along the musical notes. The ½ position is a balance between the two. The CURVE toggle is used to specify whether the ADSR curve is linear or exponential. The parallel/series behavior of the filters is specified by the FLOW toggle. The BALANCE knob is active only when the parallel configuration is selected, and is used to blend the sound output from Filter 1 against that from Filter 2. •
•
•
•
•
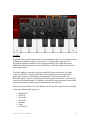
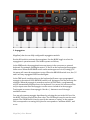
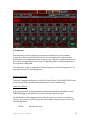
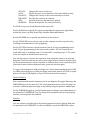
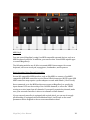
Magellan Jr User Manual 8 LFOs Magellan Jr has two independent Low Frequency Oscillators. The LFOs are used to modulate certain sound parameters so as to add change or variation to the nature of the final signal. Each LFO can receive up to three destinations, with their individual modulation amounts. You can assign a destination to an LFO by selecting the text in the DESTS box. You can use the AMP knob to specify how much modulation is applied to a given destination. Use the RATE knob to specify how fast the LFO “runs”. Turn on the BPM SYNC to sync the LFO RATE with the BPM. The BPM SYNC gives you 16 note values to choose from, including dotted and triplet notes. Select the waveform display to choose among various modulating waveforms, including “hard random” and “soft random” waveforms, which are randomly generated for added expressiveness. Use the PHASE knob to change the locus of the waveform. Use the TRIG selector (the LED array located next to the waveform display) to cycle among various LFO trigger modes: in the CONT mode, the LFO runs continuously. In the TRIG mode, the LFO phase is reset each time a new note is played. In the SHOT mode, the LFO is engaged for only one full cycle of the waveform when a note is played. The DELAY knob is operational in TRIG and SHOT modes to specify how much time it passes from when a note is played and the LFO fully kicks in. Magellan Jr User Manual 9 The KB TRACK is used to force the LFO to follow the frequency of the latest played musical note. In the OFF position, the LFO is disengaged from the keyboard or controller and runs at the same speed. In the ON position, the LFO “speeds up” or “slows down” according to the frequency of the latest audible note. Magellan Jr User Manual 10 2. FX Magellan Jr has built-‐in audio effects racks complete with delay, reverb, and multiple modulation and waveshaping effects. The effects in the rack include, • PURPLEBoost waveshaper/distortion • Bit Mistress bitcrusher • Flanger Danger flanger • XPANDER sonic enhancer • Phased n Confuzed Multi-‐Parameter Phaser • ChorusStar chorus • Echoplasm DLX stereo delay • Big Be-‐Verb reverb Magellan Jr User Manual 11 3. Arpeggiator Magellan Jr has its own fully-‐configurable arpeggiator module. Use the ON switch to activate the arpeggiator. Use the MODE toggle to select the arpeggiator’s operation mode. The modes operate as follows, In the PERF mode, the arpeggiated notes are input via the on-‐screen or external keyboard. For example, holding the notes C, E and G on the keyboard will arpeggiate those notes. When the KB HOLD switch on the main upper area is off, letting go of the notes will cause the arpeggiator to stop. When the KB HOLD switch is on, the C, E and G will stay arpeggiated until touched again. In the TRIG mode, touching a key on the keyboard will cause a pre-‐programmed arpeggio to be started. If the KB HOLD switch is off, letting go of the key will stop the arpeggio. When the arpeggio is turned on and set in TRIG mode, a programming strip is automatically displayed over the keyboard. You can use the selectors on the strip to input notes into the arpeggio: touch a note to include it in the arpeggio. Touch again to remove from arpeggio. Use the +/-‐ buttons to scroll through available octaves. You can select among arpeggio algorithms by selecting the text in the ALG box. Use the NOTE VAL box to specify the note value. The GATE knob is used to set the notes’ sustain. The SWING knob is used to specify the amount of “swing” in the pattern: 50% corresponds to no swing, 66% percent corresponds to “medium shuffle”, and so on. Magellan Jr User Manual 12 Use OCT RANGE and OCT RPT to specify the octave range of the arpeggio and the number of times each octave is repeated. Use NOTE RPT to specify how many times each note is repeated. When you save a preset, the arpeggio notes and settings are also saved. Magellan Jr User Manual 13 4. Chordmaker Magellan Jr has its own Chordmaker module. The Chordmaker module is used to play chords containing up to four voices by touching a single note. In addition, Chordmaker can be coupled with the sequencer or arpeggiator for added effect. Browse and select the factory or user-‐generated Chordmaker configurations by selecting the PROG box. You can edit the selected progression via the configuration matrix. Touch one of the cells on the ROOT column to specify the key for the progression. Touch the cells in the INTERVAL matrix to specify chord components for the tonic of that row. You can also touch the cells on the CHORD column to cycle through common chord formulas such as minor, major, 4th, etc. You can save or delete configuration files via the buttons next to the PROG box. Magellan Jr User Manual 14 5. Sequencer The Magellan Jr built-‐in polyphonic sequencer is inspired by revered analog sequencers, and is geared towards live use. You can employ the sequencer as a performance or accompaniment device by directly using the sequencer interface, or you can create stand-‐alone pieces by pre-‐composing patterns and placing them in the sequencer TIMELINE. The sequencer is able to program 16 steps per pattern in 8 track polyphony, or 32 steps per pattern in 4 track polyphony. Create a New Song Touch the Composition Display to reveal the Song Library. Touch NEW SONG on the lower left and follow the onscreen instructions to create a blank song. Sequence a Pattern Select the pattern to be programmed on the Patterns number pad. Make sure the TIMELINE toggle is turned off, so you can view the sequencer panel. Use the knob on each sequencer step to specify a note, note octave, note gate, or velocity. You can use the SET box on the lower right of sequencer panel to specify what the knobs do: PITCH: Specifies the note. Magellan Jr User Manual 15 OCTAVE: Changes the octave of the note. GATE: Adjusts the gate, or the duration, of the note within its step. VELOCITY: Changes the velocity of the note from softer to louder. END NOTE: Specifies the end step of a pattern. SKIP: Specifies if the note on that step is played. KB ENTRY: Shows the keyboard, for easier pitch entry. To CLEAR a step, turn its pitch knob all the way to left. Use the FLOW box to specify the sequence algorithm for the pattern. Algorithms include Up, Down, Up Skip, Down Skip, Alternate Ends and Random. Use the DIVISION box to specify step division for the pattern. Use the TRACK NO box to select a track to edit. A pattern can have up to 8 tracks, resulting in a maximum of 8-‐voice polyphony. Use the 32-‐STEPS button to switch between 8-‐track, 16-‐step programming and 4-‐
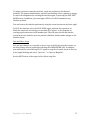
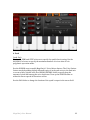
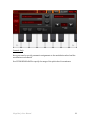
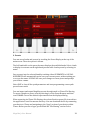
track, 32-‐step programming. In the latter mode, tracks 1 & 2 are coupled as one track, with track 1 containing steps 1-‐16 and track 2 containing steps 17-‐32, tracks 3 & 4 are coupled as another track, and so on. You can also enter a note into the sequencer steps using the virtual or an external keyboard. Touch the switches on one or more target steps so that the switches light up. Press the desired note on the controller to load that note on the selected steps. If you wish to cancel without keyboard-‐entry, press the switches again. To copy a selected pattern, hold your finger on it on the pattern numpad and a COPY or CLEAR option will pop up. Hold your finger on another pattern to PASTE a copied pattern. Use the CLEAR option to clear all tracks in the selected pattern. Pattern Playback Select a pattern and turn the sequencer on by touching the ON toggle. Make sure the TIMELINE button is not turned on. The selected pattern will now start looping. You can select a different pattern to play at any time by using the patterns number pad. Use the TIMELOCK toggle to specify whether pattern changes occur immediately or are scheduled. If TIMELOCK is on, the newly selected pattern will not start playing until the current pattern has finished. Timeline You can compose extended pieces by entering patterns from the Pattern Bank into the positions in the TIMELINE. To view the timeline, touch the TIMELINE button. Magellan Jr User Manual 16 To assign a pattern to timeline positions, touch the switches for the desired positions. The pattern bank number pad will start flashing. Select a pattern to assign, or cancel the assignment by touching the switches again, or pressing the EXIT EDIT MODE button. In addition, you can assign a STOP or a LOOP command to any timeline position. You can browse the timeline positions by using the arrow buttons on the lower right. To PLAY the timeline, select the PLAY SONG toggle, and turn the sequencer on. While the sequencer is running, you can make live “splices” to the program by touching a pattern button on the number pad. This will play the selected pattern, return back to the timeline once the pattern is finished, and not make changes to the timeline layout. Save and Share Songs You can save changes to a song file or save a copy of the file by using the buttons on the Song Library screen (opened by selecting the COMPOSITION box). In addition, you can email the selected song file. To import a song file via email, touch its file icon in the Apple Mail app and select “Open In…” or “Open in Magellan”. Use the EDIT button on the upper left to delete song files. Magellan Jr User Manual 17 6. Prefs Synth Prefs Use the A4, SEMI and CENT selectors to specify the synth’s basic tuning. Use the MAX POLY selectors to specify the maximum number of voices when it is in polyphonic operation mode. Use the UNISON area to enable Magellan Jr’s Voice Unison feature. The Voice Unison feature works by adding slightly detuned copies of each synth voice to the final mix to create a fuller, thicker tone. Use UNISON DETUNE slider to specify how the amount of pitch shift among the voice duplicates. Turn up the SPREAD slider to widen the stereo spread of the unison voices. Use the PAN slider to change the location of the synth’s output in the stereo field. Magellan Jr User Manual 18 Controls Prefs Here you can also specify parametric assignments to the modulation wheel and the modulation touch matrix. Use PITCH BEND RANGE to specify the range of the pitch wheel in semitones. Magellan Jr User Manual 19 MIDI Prefs You can control Magellan Jr using CoreMIDI compatible external devices, such as a MIDI keyboard controller. In addition, you can use other Virtual MIDI capable apps to control Magellan Jr. The following modules are all able to transmit MIDI Out messages: On-‐screen keyboard, on-‐screen touch pad, arpeggiator, chordmaker, and sequencer. Basic Operation Using External Controllers Use an iOS compatible MIDI interface, such as iRig MIDI, to connect a CoreMIDI compatible USB MIDI controller to your iPhone’s dock connector. (NOTE: some USB MIDI controllers may require a power adaptor to work with iPhone / iPod Touch). Once connected, go to the MIDI preferences screen on Magellan Jr to specify the input channel. You can choose any of the 16 MIDI channels, or select the “OMNI” setting to receive input from all channels. If you specify a particular channel, make sure your external controller is also set to transmit on that channel. If your external controller is equipped with a pitch wheel, you can use it to apply pitch bending. If equipped with a modulation wheel, it will work on the same parameter that is assigned to the on-‐screen modulation wheel. Magellan Jr User Manual 20 If your external controller is able to transmit Control Code (“CC”) messages, you can use this feature to control Magellan Jr parameters. Please refer to Midi Learn below for more information. Controlling Magellan Jr using CoreMIDI Networking Magellan Jr is capable of being controlled via a networked CoreMIDI session. Please refer to Apple’s documentation on Audio MIDI Setup to configure a network session on your Mac to connect to your iOS device. Using Magellan Jr with other Virtual MIDI Apps To control Magellan Jr using another Virtual MIDI app on the same device, follow these steps, 1) Turn on the BG AUDIO switch on the MIDI Prefs screen. CAUTION: when Magellan Jr will not be used for a long time period, make sure to turn off the BG AUDIO feature to conserve device battery! 2) Navigate to a Virtual MIDI compatible app that you wish to use to control Magellan Jr. Make sure the app has a virtual MIDI Out port. 3) Refer to the app’s user manual for connecting to Magellan Jr’s MIDI IN port. 4) Return to Magellan Jr if necessary to specify the input channel. Additionally, you can see a list of currently available Virtual MIDI or networked input ports detected by Magellan Jr by touching the INPUTS arrow button. Using Magellan Jr to Control Other MIDI Apps or Devices Configure the Virtual MIDI target app as indicated in its user manual, or connect an external MIDI-‐capable device using the appropriate adapter. If the app or device is connected correctly, you will see it listed in the MIDI OUTPUTS table accessible though the OUTPUTS arrow button. Select the desired app or device on this table: when connected, a checkmark will appear next to its name. Set the MIDI channel that you wish Magellan Jr to send MIDI messages on by using the OUT CH buttons, or select OMNI to broadcast on all MIDI channels. Enable MIDI OUT feature by turning on the MIDI OUT toggle and start using the Magellan Jr keyboards, touch controllers, arp, sequencer or chordmaker to control the target app or device. External MIDI Clock Syncing You can use an external MIDI clock to synchronize the sequencer and arpeggiator modules in Magellan Jr with another Virtual MIDI app or a physical device that is Magellan Jr User Manual 21 able to send standard MIDI clock messages. When enabled, Magellan Jr will perform at the BPM specified by the “master” clock. Please refer to the user manual of the master app or device to set up clock messages to be sent to Magellan Jr. Once ready, put the CLOCK toggle in the Magellan Jr MIDI preferences area to EXT to start receiving clock messages. NOTE: To start or stop the arpeggiator or the sequencer via an external clock, those modules should be left in the ON state. MIDI Learn Magellan Jr has an extensive number of parameters which you can control using an external device or app that is able to send MIDI control messages. You can configure this feature by accessing the MIDI Learn / CC Map screen through the MIDI LEARN button in the Magellan Jr MIDI preferences area. Make sure your MIDI controller is correctly connected to your iOS device. Turn on MIDI Learn by touching the LEARN toggle. Choose the target Magellan Jr module by selecting one of the boxes on the left. Select the parameter to control on the CC MAP table. Manipulate a control element on the MIDI device to assign it to the selected parameter. If recognized, the second column on the CC MAP table will display the MIDI out channel of the device, and the final column will display the Control Code of the device element. When finished, touch LEARN again to stop the MIDI learn session. You are now able to control the selected parameter using the device element on the specified MIDI channel. You can change the channel assignment for a parameter at any time by selecting it and using the CHANNEL SELECT arrow buttons. Aside from MIDI Channel 1-‐16, you are able to specify “OM” (for OMNI) to receive the control change message on any MIDI Channel, or “IN” (for “Input Channel”) to receive the control message on the same input channel as specified on the main Magellan Jr MIDI preferences screen. You can also enter a Control Change code manually by selecting a parameter and using the provided number pad. When finished, touch SET to finalize code entry. Magellan Jr comes with a default MIDI CC MAP. You can save a CC MAP configuration for later use. Touch the SAVE AS button to save the CC MAP to file. To browse and load a CC MAP, touch the arrow button next to PROFILE display. MIDI Program & Bank Changes Magellan Jr is able to handle MIDI Program and MSB Bank change messages broadcast on the MIDI channel as specified on the PREFS > MIDI screen. Use MSB Bank messages to select a bank. Use Program Change messages to select a preset in the currently active bank. Magellan Jr User Manual 22 WIST Korg’s WIST technology allows you to sync Magellan Jr’s sequencer or arpeggiator with another WIST-‐capable application. Magellan Jr’s WIST button can be found in the MIDI section on the PREFS screen. You can make a connection with Magellan Jr as either “slave” or “master.” Slave: When the “master” app is started, each of Magellan Jr’s selected targets will also start. The Arpeggiator can only be started if it is in PERF mode. Master: Turning on Magellan Jr’s selected source on or off should also cause the “slave” app to start or stop. Turning a selected source on or off will also simultaneously toggle all the other selected sources in Magellan Jr. The Arpeggiator can be started or stopped only in PERF mode. WIST is a trademark and software of KORG INC. For more information, please visit http://www.korguser.net/wist/ Magellan Jr User Manual 23 Pad Prefs Use the toggle on the upper left to choose either the upper or the lower touch pad to edit. Select the SCALE box to choose the musical scale and the ROOT button to choose the key for the touch controller. The OCTAVING button turns vertical octaving on the touch controller on or off. In the on position, moving your finger up or down will cause the octave of the played note to change. Use the EDIT SCALE pad to change notes in your selected scale for the touch pad. Use the GLIDE slider to specify the amount of glissando / note-‐snapping when moving from one step to another on the touchpad. At “NONE” position, all the notes are discrete and no glide is applied. At “FULL”, the pitch change is continuous. (Note: glissando effect works best when the LEGATO toggle on the Magellan Jr. main screen is in ON position.) Magellan Jr User Manual 24 7. Recording, Sharing, and Metronome To start an audio recording, simply touch the REC button. The switch will glow red, indicating that the recorder is on. Touch again to stop. The recording will automatically be saved to a file. You can browse and select recordings on the table on the left. Press the NAME, SIZE or DATE cells to sort recordings by that parameter, either ascending or descending. To play an audio file, select it on the table; its name will appear on the screen to the right of the table. To rename the selected audio file, touch its name in the screen area on the right. To change the position of the selected audio, use the “scrub” below the recording’s title. Use the LOOP switch to specify whether the audio loops or stops when its end is reached. Use the VOL knob to set the output volume of the playback. Use the EXPORT and IMPORT buttons to display audio file sharing options. As of the writing of this document, Magellan is able to share your recordings via email, WiFi, SoundCloud (SoundCloud user account required), Intua Audio Copy/Paste, and Sonoma Audio Copy/Paste. You can access the recording settings by selecting the PREFS button. The metronome BPM is set using the MASTER BPM tap tempo control on the main Magellan Jr screen. Use the REC COUNT-‐IN button to enable metronome count-‐in when a recording has been started. When enabled, the recording will automatically start after the metronome goes through the number of specified measures, and will Magellan Jr User Manual 25 stay on throughout the recording unless manually turned off. Use the FIXED-‐
LENGTH RECORDING button to only record the specified number of measures. Metronome & BPM Access the Metronome settings via the Magellan Jr main menu. Use the METRONOME to change the BPM at increments of 1 (touch) or 10 (touch down and hold). Use BEAT COUNT and BEAT VALUE to specify a time signature, and the VOL fader to set the metronome volume. Magellan Jr User Manual 26 8. Keyboards, Touchpads, and Other Controls KB Settings Select the KB settings button at the top of the synth to access the keyboard settings. You can choose from three different layouts: half screen, full screen, or two keyboards. You can also choose either the keyboard or touchpad for both the upper and lower manuals. Use the “SCROLL LOCK” switch to allow scrolling the keyboard. When done, put the switch in the locked state. Use the KEY / STEP COUNT buttons to change the size of the keys or steps on the visible controller. The MORE button will take you directly to the PAD section of the PREFS. Main Screen Options Use the POLY button to choose between polyphonic or monophonic operation for the synth engine. Similarly, use the LEGATO switch to enable legato operation. Use the KB HOLD button to let the synth sustain a triggered note after the touch or key has been released. Use the PITCH WHEEL on the left to apply pitch bending. You can set the step range of the pitch bend wheel under the PREFS -‐ CTRLS screen. Use the MOD WHEEL to control its assigned synth parameter. You can also browse and assign mod wheel parameters under the PREFS -‐ CTRLS menu. Use the MODULATION TOUCH MATRIX to manipulate the synth parameters specified on screen. You can browse and assign parameters to each axis by going to PREFS -‐ CTRLS. On the iPhone 4S, 5, and iPod Touch 5, the touch matrix also features a real-‐time oscilloscope that displays the signal being generated by the synth engine. Use the MASTER BPM tap control to tap the master tempo for the system. You can also use METRONOME to change the BPM at increments of 1 (touch) or 10 (touch down and hold). Use the PANIC button to reset the synth system. When touched, this button will clear all audible notes and reset the audio engines. Magellan Jr User Manual 27 The CPU display shows the current CPU usage by the synth system. For more information about CPU use, please refer to the Tips section further along this document. The VOL slider is used to control the master output volume for the synth engine. Use this knob to set the optimal output volume in accordance with the active synth patches. Turn down this volume control (rather than the device’s physical volume control) sufficiently if a given patch is too loud and audio distortion is perceived. Magellan Jr User Manual 28 9. Presets You can access banks and presets by touching the Preset Display at the top of the main screen. The active preset is shown. The left-‐hand table on the preset browser displays the available banks. Select a bank to display its contents on the right-‐hand presets table. Load a preset by selecting its name. Save a preset into the selected bank by touching either OVERWRITE or SAVE AS. OVERWRITE will automatically write over your current preset, without asking you to re-‐type the name. SAVE AS will save your changes as a new preset and prompt you to enter a name. Select INIT to clear all the synth parameters and start programming a new synth preset from scratch. You can import and export Magellan presets through email or iTunes File Sharing. To export a bank or a preset, start by selecting it on the Preset Browser and then touch SHARE. Choose the desired export method on the displayed dialog. When exporting via iTunes File Sharing, the selected bank or preset file is saved into the application’s root Documents directory. You can download the file by connecting your device to iTunes and navigating to the “Apps” section of your device within iTunes. Below your list of apps, you will find the “File Sharing” section. Select Magellan Jr User Manual 29 Magellan Jr, and then save the exported bank or preset files to your computer. Bank files have the extension “YBAN”, whereas preset files have the extension “YPAT”. To import via iTunes, upload a YBAN or YPAT file to the Magellan Jr root directory shown in the iTunes app file-‐sharing section. When finished, launch Magellan Jr on your device and open the presets browser. Press SHARE on the lower bar and choose “iTunes: Import Files” and follow the instructions. Any compatible files found on the Magellan Jr root directory will be automatically added to the preset system. You can also email the selected preset file. To import a preset file via email, touch its file icon in the Apple Mail app and select “Open In…” or “Open in Magellan Jr”. Note that an email should contain only one YBAN or YPAT file. You can delete or re-‐order banks and presets by touching the EDIT button on the upper right. When finished, pressed done to get back to browsing mode. Magellan Jr User Manual 30 10. Tips and Troubleshooting Tips 1) CPU Usage Due to the vast number of modules and parameters available in Magellan Jr, Magellan Jr is designed to operate “on-‐demand” to save CPU power and make sure the maximum amount of resources are available for clear and continuous sound generation. To ensure the optimal use of the CPU, make sure all unused features or effects are turned off. If you observe that the built-‐in CPU monitor is displaying higher values, or the audio starts to stutter, turn off any unused effects, Oscillator Unison or Voice Unison modules and remove any unused LFO destinations and filters. You can additionally reduce MAX POLYPHONY by going to the PREFS > SYNTH panel, if a lower voice polyphony is sufficient. 2) Master Volume Use the Master Volume slider on the Magellan Jr main screen to find the optimal output level for the system output. The optimal output level may depend on the active synth preset. When you perceive that the output is suffering from distortion, reduce the Master Volume until distortion disappears. Troubleshooting No Sound 1) Make sure the iOS device is not on mute, and that the device volume is turned up 2) Make sure that the Magellan Jr Master Volume is not turned all the way down 3) If using filters, effects or LFOs, make sure that they are all set correctly so as to not silence the synth output. Also, make sure that not all the oscillator volumes are set to 0. 4) Make sure that if the arpeggiator is on and set in TRIG mode, there are programmed notes entered in the arpeggiator. 5) If the silence is caused by a sudden overload, press the PANIC button on the main panel to reset the audio system. Following this, go to the presets browser, first select a different preset, and then select the preset you wish to use. 6) If the above procedure does not work, exit and completely shut down the app by going to the iOS task bar. You can access the task bar from your iOS home screen by double-‐clicking the device home button. 7) In some cases, reboot your iOS device. Magellan Jr User Manual 31 Stuttering Audio Depending on the generation of your iOS device, a high load on the CPU may cause the audio output to “stutter” or sound “glitchy”. To address this, turn off any unused audio effects, filters, LFO destinations and unison modules. Also, completely shut down any other apps you are no longer using by going to the iOS taskbar. Please refer to “CPU Use” in the Tips section for more information. Distorting Audio Please turn down the Master Volume on the Magellan Jr main panel until the sound clears up. You may also want to tweak certain effects in the audio effects rack to achieve a cleaner audio. Magellan Jr User Manual 32 11. Specifications SYSTEM •
Analog-‐Modelling Subtractive/FM Hybrid synthesis •
32-‐Bit Floating Point Pro-‐Grade Digital Signal Processing •
44100 Hz, 32-‐bit “Better-‐Than-‐CD” quality audio output •
Ultra Low-‐Latency audio generation •
Extensive MIDI capabilities; MIDI I/O Ports •
Built in Arp, Sequencer, Chordmaker, Recording and More AUDIO SYNTHESIS •
3 Virtual-‐Analog Oscillators with selectable waveforms •
Oscillator unison stage with adjustable detune and width, giving up to 12 simultaneous wave generators per voice for super-‐saw type effects •
Oscillator phase reset and sync •
Real-‐time PWM Modulation for oscillators 1 & 2 •
Depth and Drift settings for oscillators 1 & 2 for additional shaping of waveforms •
FM synthesis module with dedicated blend, ADSR envelope, and adjustable contour •
Oscillator 2-‐>1 ring modulation •
Noise generator with adjustable tone •
VCA ADSR envelope •
Dedicated voice unison stage with settable stereo spread and detune •
Polyphonic, Monophonic, Poly or Mono Legato operation modes •
Adjustable glide •
Up to 8 voice polyphony (4 voice for iPhone 4 & iPod Touch 4) FILTERS •
Two filter banks, configurable in series or parallel with signal blending •
Dedicated ADSR envelope for each bank with selectable envelope curve and adjustable contour •
11 unique filter types available for each bank: • "Magellan" -‐24dB Resonant Low Pass • "Victor" -‐24dB Resonant Low, High or Band Pass • "Voyvoda" -‐12dB Low, High or Band Pass • Formant, Comb, All-‐Pass and Notch filters •
True bypass for each filter bank •
Adjustable filter tracking MODULATION / LFOs Magellan Jr User Manual 33 •
•
•
•
•
•
•
•
Dual independent LFOs 9 waveforms per LFO, including random hard and random soft Up to three freely assignable destinations per LFO LFO BPM Sync with 16 note values Dedicated amplitude setting for each LFO destination 3 phase reset modes Adjustable phase and delay Frequency tracking SEQUENCER •
Analog inspired 16/32 step polyphonic sequencer •
8 track polyphonic output per pattern in 16-‐step, 4 track poly out in 32-‐step "link" mode •
Settable pitch, velocity, gate, or octave per step •
Settable step division for each pattern •
6 sequence direction algorithms for each pattern •
Pattern bank •
Timelock •
Swing •
Timeline for creating song-‐length sequences out of patterns •
Import/Export song files containing sequences or compositions ARPEGGIATOR •
Professional, dedicated arp module •
10 arp algorithms •
Settable note value and gate •
Dedicated swing •
6 octaving modes, as well as settable note and octave repeats •
Trigger or Program/Perform modes CHORDMAKER •
Dedicated Chordmaker module, compatible for use with the arp or sequencer •
Create and save chord progressions; play a chord by pressing a single key •
Chord programming matrix •
Factory chord progressions and chord definitions included MIDI •
CoreMIDI enabled •
Virtual MIDI enabled, with both vMIDI In and vMIDI Out ports available •
Audio Backgrounding •
Control Magellan using external MIDI controllers or Virtual MIDI apps Magellan Jr User Manual 34 •
•
•
•
•
•
•
•
•
•
MIDI Out with settable channel or omni MIDI Out from keyboards, touchpads, arpeggiator, chordmaker or sequencer MIDI Learn with 256 control destinations Use MIDI CCs to control Synth, Effects, Arp or Sequencer modules Save MIDI CC configurations to file for later use Default MIDI CC map, developed from General MIDI Level 2 Sustain Pedal support Support for MIDI Program and MSB Bank changes Sync with external MIDI clocks to control the sequencer or arp modules WIST integration as both Master and Slave EFFECTS •
Comprehensive FX rack with: • Reverb • Stereo Delay with BPM sync • Phaser • Chorus • Flanger • Waveshaper / Distortion • Bitcrusher • Sonic Expander PRESETS •
Over 300 factory presets ranging from basses to pads to arpeggios •
Two banks designed by Sunsine Audio •
INIT function, to create presets from scratch •
Export or Import presets or banks via email or iTunes File Sharing •
Create and save unlimited banks and presets RECORDING, FILES, and SHARING •
Built-‐in tape deck for recording app audio •
Fixed-‐duration recording option for easy loop creation •
Rec count in option •
Start rec on first touch option •
Built-‐in metronome with settable time signature •
Export audio files via email, WiFi, SoundCloud, Intua or Sonoma Audio Copy •
Import audio files via WiFi, Intua or Sonoma Audio Paste PERFORMANCE & CONTROLS •
Dual Onscreen Keyboards with settable key width •
Dual Touch Pad controllers with individually settable musical key and scale Magellan Jr User Manual 35 and individual voice parameterization •
Settable note-‐snapping ("glide") for each touchpad •
Touchpad octaving-‐mode option for added expressiveness •
Matrixpad modulation interface with configurable x/y destinations and optional snapback •
Configurable Modulation Wheel destination •
Choose among 56 synth parameters to control using modulation controls •
Realtime oscilloscope displaying the output signal (not available for iPhone 4 & iPod Touch 4) •
Tap tempo •
Built-‐in CPU usage meter •
Settable A4 reference frequency, semitones and cents •
Settable maximum polyphony •
Settable panning •
Adjustable pitch wheel bend radius •
Rotary or fader-‐like operation option for knobs •
MIDI controller velocity recognition •
Note hold •
System panic button SYSTEM REQUIREMENTS •
iPhone 4, 4S or 5 •
iPod Touch Gen 4 or Gen 5 •
iOS 5.1 or newer Magellan Jr User Manual 36