Transcript
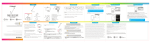
PCR220: User Manual 2/17/2011 Location of controls In the box Setting the alarm: BIG Button Talking Alarm Clock BIG Button Talking Alarm Clock PCR220 Talking Alarm Clock AAA AAA PCR220 User Manual Talking Alarm Clock 2 - “AAA” Alkaline Batteries User Manual 1 Talking Alarm Clock Installing the batteries 1. Open the battery cover. 2. Insert 2- “AAA” alkaline batteries (included) into the battery compartment. Make sure that the (+) and (-) poles are correctly aligned. 3. The alarm will sound at this point. Press the [TALK] button to stop the alarm. 4. Close the battery cover. User Manual Basic Operation Setting the time: Polaroid and Polaroid & Pixel are trademarks of PLR IP Holdings, LLC, used under license. PLR IP Holdings, LLC does not manufacture this product or provide any Manufacturer’s Warranty or support. VOLUME MAX MIN 3 2 4 MODE HR 12/24 MIN/ALM 6 5 7 1. Press the [MODE] button once. The time (hours and minutes) will start flashing. 2. Press the [HR 12/24] button to change the hours (press and HOLD to fast scan the hours). 3. Press the [MIN/ALM] button to change the minutes (press and HOLD to fast scan the minutes). 4. Press the [MODE] button three times to exit the time setting mode OR do not press any buttons and after ten seconds of inactivity the time will be saved. 12/24 hour format: 1. Press the [HR 12/24] button to change the clock between 12 and 24 hour formats. Volume: 1. The clock has two volume settings: MAX and MIN. 2. The volume switch is located just above the LCD screen. 3. MAX is the higher volume setting. 4. MIN is the lower volume setting. 8 Checking the time: 1. Press the [TALK] button at any time to check the time and temperature. The clock will announce the current time then the current temperature. 1. [Talk] button 2. Volume switch 3. Speaker 4. LCD 5. [MODE] button 6. [MIN/ALM] button 7. [HR 12/24] button 8. Battery compartment Safety precautions Important Battery Precautions • Use only the type of battery specified in this user manual. • Batteries may present a risk of fire, explosion, or chemical burn if abused. Do nottry to charge a battery that is not intended to be recharged. • Do not dispose of the battery (ies) in a fire. They may explode. Check with localcodes for disposal instructions. • Non-rechargeable batteries, such as alkaline batteries, may leak if left in your product for a long period of time. Remove the batteries from the product if you are not going to use it for a month or more. • If your product uses more than one battery, do not mix types and make sure they are inserted correctly. Mixing different types of batteries or inserting them incorrectly, may cause them to leak. • Discard any leaky or deformed battery immediately. Leakage from battery acid can cause skin burns or other personal injury. • Please help to protect the environment by recycling or disposing of batteriesaccording to federal, state, and local regulations. CAUTION RISK OF ELECTRIC SHOCK DO NOT OPEN The lightning flash with arrowhead symbol, within an equilateral triangle, is intended to alert the user to the presence of uninsulated “dangerous voltage” within the product’s enclosure that may be of sufficient magnitude to constitute a risk of electric shock to persons. WARNING: TO REDUCE THE RISK OF ELECTRIC SHOCK, DO NOT REMOVE COVER (OR BACK). NO USER SERVICEABLE PARTS INSIDE. REFER SERVICING TO QUALIFIED SERVICE PERSONNEL. The exclamation point within the equilateral triangle is intended to alert the user to the presence of important operating and maintenance (servicing) instructions in the literature accompanying the product. When using your product, basic safety precautions should always be followed to reduce the risk of fire, electric shock and injury, including the following: • Read and understand all instructions and safety precautions. • Follow all warnings and instructions marked on the product. • If the LCD display breaks, do not touch the glass or liquid, and contact customer support. • The use of a NON- RECOMMENDED accessory may cause fire, electric shock, or injury. For approved accessories, please contact customer support. • Do not expose the Alarm Clock to rain or moisture. • Clean only with a dry cloth. Make sure the Alarm Clock is turned off before cleaning. Do not use a liquid cleanser. • Do not use this product near water (for example, near a bath tub, kitchen sink or swimming pool). • Do not place this product on an unstable surface. • Slots and openings in the back or bottom of this product are provided for ventilation. To protect them from overheating, these openings must not be blocked by placing the product on a soft surface such as a bed, sofa or rug. • This product should never be placed near or over a radiator or heat register. • This product should not be placed in any area where proper ventilation is not provided. • Never push objects of any kind into the ventilation slots of this product as they may touch dangerous voltage points or create a short circuit that could result in a risk of fire or electric shock. Never spill liquid of any kind on the product. • Use only the power cord included with this product. • This product should be operated only from the type of power source indicated on the marking label. If you are not sure of the type of power supply in your home, consult your dealer or local power company. • Plug the adaptor to the socket - outlet that is closest to the equipment and which is easily accessible. • To reduce the risk of electric shock, do not disassemble this product, but take it to an authorized service facility. Opening or removing parts of the product other than specified access doors may expose you to dangerous voltages or other risks. Incorrect reassembling can cause electric shock when the product is subsequently used. • Do not overload wall outlets and extension cords as this can result in the risk of fire or electric shock. • The power adapter is intended to be correctly oriented in a vertical or floor mount position. The prongs are not designed to hold the plug in place if it is plugged into a ceiling or an under-the-table/cabinet outlet. Thermometer: The clock has a thermometer and will announce the time and temperature each time the [TALK] button is pressed. To change between Fahrenheit and Celsius, press and HOLD the [HR 12/24] button for two seconds. You can view the temperature setting in the lower right corner of the LCD screen. 1. Press the [MODE] button twice. The alarm hours and minutes will start flashing and you will see a small bell [ ] between the hours and minutes. 2. Press the [HR 12/24] button to change the hours (press and HOLD to fast scan the hours). 3. Press the [MIN/ALM] button to change the minutes (press and HOLD to fast scan the minutes). 4. Press the [MODE] button two times to exit the alarm setting mode OR do not press any buttons and after ten seconds of inactivity the alarm time will be saved. Turning the alarm on or off: 1. Press the [MODE] button three times. The alarm icon [ corner of the LCD will start flashing. 2. Press the [MIN/ALM] to turn the alarm on or off. 3. If the [ ] icon is showing, the alarm is ON. ALM ] in the lower right ALM 4. If the [ ] icon is not showing, the alarm OFF. 5. Press the [MODE] button once to exit the alarm setting mode OR do not press any buttons and after ten seconds of inactivity the alarm setting will be saved. ALM Changing the alarm ring tone: 1. Press the [MIN/ALM] button to scroll through the different alarm ring tones. 2. When you hear a ringtone that you like, do not press any buttons, and the alarm ringtone will be saved. Snooze function: 1. When the alarm rings it will sound for one minute. You can enter the snooze function by pressing the [TALK] button. The alarm will stop ringing, the time and temperature will be announced and the alarm will ring again after ten minutes. The snooze function can be activated up to six times. 2. To stop the alarm and deactivate the snooze function, press the [TALK] button twice OR press any other button on the clock. Hourly announcement chime: The clock can announce the hour every hour. There are three chime options: CHM1 - CHM1 – The clock will chime every hour for 24 hours. CHM2 - CHM2 – The clock will chime every hour from 7am to 9pm. OFF (no icon) - The clock will not chime. To activate the hourly chime: 1. Press the [MODE] button three times. The chime icons in the lower left corner of the LCD will start flashing. 2. Press the [HR 12/24] button to choose between CHM1, CHM2 or OFF (no icon). 3. Press the [MODE] button once to exit the chime setting mode OR do not press any buttons and after ten seconds of inactivity the chime setting will be saved. Legal information Limited Warranty FCC Part 15: This equipment has been tested and found to comply with the requirements for a Class B digital device under Part 15 of the Federal Communications Commission (FCC) rules. These requirements are intended to provide reasonable protection against harmful interference in a residential installation. This equipment generates, uses and can radiate radio frequency energy and, if not installed and used in accordance with the instructions, may cause harmful interference to radio communications. However, there is no guarantee that interference will not occur in a particular installation. If this equipment does cause harmful interference to radio or television reception, which can be determined by turning the equipment off and on, the user is encouraged to try to correct the interference by one or more of the following measures: This product as supplied and distributed new by AIT, Inc. (“AIT”) to the original consumer purchaser is warranted by AIT against defects in material and workmanship for a period of one year from your date of purchase (“Warranty”). In the unlikely event that this product is defective, or does not perform properly, you may within one year from your original date of purchase return it to the authorized service center for repair or exchange. ● Re-orient or relocate the receiving antenna. ● Increase the separation between the equipment and receiver. ● Connect the equipment into an outlet on a circuit different from that to which the receiver is connected. ● Consult the dealer or an experienced radio/TV technician for help. Do not attempt to repair or modify this equipment. Warning: Changes or modifications to this equipment not expressly approved by the party responsible for compliance could void the user’s authority to operate the equipment. “This device complies with Part 15 of the FCC Rules. Operation is subject to the following two conditions: (1) this device may not cause harmful interference, and (2) this device must accept any interference received, including interference that may cause undesired operation.” Shielded USB cables must be used with this unit to ensure compliance with the Class B FCC limits. PLR IP Holdings, LLC, its licensees and affiliates, fully support all electronic waste initiatives. As responsible stewards of the environment, and to avoid violating established laws, you should properly dispose of this product in compliance with all applicable regulations, directives or other governances in the area where you reside. Please check with local authorities or the retailer where you purchased this product to determine a location where you can appropriately dispose of the product. You may also go to HYPERLINK "http://www.polaroid.com" www.polaroid.com and reference About / Electronic Recycling to learn more about the specific laws in your area and to locate a collection facility near your home. If your electronic device has internal memory on which personal or other confidential data may be stored, you may want to perform a data sanitization process before you dispose of your device to assure another party cannot access your personal data. Data sanitization varies by the type of product and its software, and you may want to research the best sanitization process for your device before disposal. You may also check with your local recycling facility to determine their data sanitization procedures during the recycling process. TO OBTAIN WARRANTY SERVICE: - Provide proof of the date of purchase within the package (Dated bill of sale) - Prepay all shipping costs to the authorized service center, and remember to insure your return. - Include a return shipping address (no P.O. Boxes), a telephone contact number, and the defective unit within the package. - Describe the defect or reason you are returning the product. Your product will be repaired or replaced, at our option, for the same or similar model of equal value if examination by the service center determines this product is defective. Products received damaged as a result of shipping, will require you to file a claim with the carrier. The shipping address of the authorized service center is: AIT, Inc. ATTN: Returns Department 14-C 53rd Street Brooklyn, NY 11232 IN NO EVENT WILL AIT, ITS MANUFACTURERS, DISTRIBUTORS OR PLR IP HOLDINGS, LLC BE LIABLE FOR ANY INCIDENTAL, DIRECT, INDIRECT, SPECIAL, PUNITIVE OR CONSEQUENTIAL DAMAGES (SUCH AS, BUT NOT LIMITED TO, DAMAGES FOR LOSS OF PROFITS, BUSINESS, SAVINGS, DATA OR RECORDS) RELATED TO THIS PRODUCT. EXCEPT AS STATED HEREIN, NO OTHER WARRANTIES SHALL APPLY. Should you have any questions or problems concerning this product, please contact our customer service department at: Customer Support: 1-877-768-8483 (Toll Free) [email protected] Monday - Thursday: 9AM - 5PM (EST) Friday: 9AM - 3PM (EST)
![[PMP75] User Manual [FINAL] 20121212](http://vs1.manualzilla.com/store/data/005950946_1-9749e714ad96604218308e863819f9e2-150x150.png)
![[PTV430] User Manual [DRAFT 03] 20101118](http://vs1.manualzilla.com/store/data/005752465_1-73626d2dd1963e340afb824a3fa33262-150x150.png)


![[EM2116] Owner`s Manual [Spanish] [FINAL]](http://vs1.manualzilla.com/store/data/006206465_1-d3ad7dbcd7cf5aee49c7d97315c94e8e-150x150.png)