Download User Manual - Newegg.com
Transcript
Camera User Guide Y P O • Makesureyoureadthisguide,includingthe“Safety Precautions”section,beforeusingthecamera. • Readingthisguidewillhelpyoulearntousethecamera properly. • Storethisguidesafelysothatyoucanuseitinthefuture. C ENGLISH Package Contents Beforeuse,makesurethefollowingitemsareincludedinthepackage. Ifanythingismissing,contactyourcameradealer. Camera BatteryPackNB-5L (withterminalcover) WristStrap WS-DC11 InterfaceCable IFC-400PCU DIGITALCAMERA SolutionDisk* (CD-ROM) BatteryCharger CB-2LX/CB-2LXE GettingStarted WarrantyCard *ContainssoftwareandPDFmanuals(=27). • Amemorycardisnotincluded(seebelow). Y P O Compatible Memory Cards C Thefollowingmemorycards(soldseparately)canbeused,regardlessof capacity. • SDmemorycards* • SDHCmemorycards* • SDXCmemorycards* • Eye-Ficards *ConformstoSDspeciications.However,notallmemorycardshavebeenveriiedto workwiththecamera. AboutEye-FiCards ThisproductisnotguaranteedtosupportEye-Ficardfunctions(including wirelesstransfer).IncaseofanissuewithanEye-Ficard,pleasecheck withthecardmanufacturer. AlsonotethatanapprovalisrequiredtouseEye-Ficardsinmanycountries orregions.Withoutapproval,useofthecardisnotpermitted.Ifitisunclear whetherthecardhasbeenapprovedforuseinthearea,pleasecheckwith thecardmanufacturer. 2 Preliminary Notes and Legal Information • Takeandreviewsometestshotsinitiallytomakesuretheimageswere recordedcorrectly.PleasenotethatCanonInc.,itssubsidiariesand afiliates,anditsdistributorsarenotliableforanyconsequentialdamages arisingfromanymalfunctionofacameraoraccessory,includingmemory cards,thatresultsinthefailureofanimagetoberecordedortobe recordedinawaythatismachinereadable. • Imagesrecordedbythecameraareintendedforpersonaluse.Refrain fromunauthorizedrecordingthatinfringesoncopyrightlaw,andnotethat evenforpersonaluse,photographymaycontravenecopyrightorother legalrightsatsomeperformancesorexhibitions,orinsomecommercial settings. • Thecamerawarrantyisvalidonlyintheareaofpurchase.Incaseof cameraproblemswhileabroad,returntotheareaofpurchasebefore contactingaCanonCustomerSupportHelpDesk. • AlthoughtheLCDmonitorisproducedunderextremelyhigh-precision manufacturingconditionsandmorethan99.99%ofthepixelsmeet designspeciications,inrarecasessomepixelsmaybedefectiveormay appearasredorblackdots.Thisdoesnotindicatecameradamageor affectrecordedimages. • TheLCDmonitormaybecoveredwithathinplasticilmforprotection againstscratchesduringshipment.Ifcovered,removetheilmbefore usingthecamera. • Whenthecameraisusedoveranextendedperiod,itmaybecomewarm. Thisdoesnotindicatedamage. Y P O C Organization of Camera User Guide Thefollowingguidesareincluded,eachusedfordifferentpurposes. BasicGuide(=13) • Givesbasicinstructions,frominitialpreparationstoshooting,playback, andsavingonacomputer WirelessLANGuide(=35) • Describeshowtosendimageswirelesslyfromthecameratoavarietyof compatibledevices,andhowtousethecamerawithonlineservices AdvancedGuide(=85) • Practicalguidethatintroducesothercamerabasicsanddescribes shootingandplaybackoptions 3 Part Names and Conventions in This Guide Zoomlever Shooting:<i(telephoto)>/ <j(wideangle)> Playback:<k(magnify)>/ <g(index)> Microphone Lens Modedial Shutterbutton Lamp Powerbutton Flash Controlring Tripodsocket Memorycard/batterycover DCcouplerterminalcover Y P O • Inthisguide,iconsareusedtorepresentthecorrespondingcamera buttonsanddialsonwhichtheyappearorwhichtheyresemble. • Thefollowingcamerabuttonsandcontrolsarerepresentedbyicons. <o> Upbutton onback <q> Leftbutton onback <r> Rightbutton onback <p> Downbutton onback <7> Controldial onback <y> Controlring onfront • Shootingmodesandon-screeniconsandtextareindicatedinbrackets. • :Importantinformationyoushouldknow • :Notesandtipsforexpertcamerause • :Indicatestouch-screenoperations • =xx:Pageswithrelatedinformation(inthisexample,“xx”representsa pagenumber) • Instructionsinthisguideapplytothecameraunderdefaultsettings. C 4 PartNamesandConventionsinThisGuide Strapmount Screen(LCDmonitor)* Indicator < (Ringfunctionselector)>/ <a(Singleimageerase)>button Indicator Moviebutton Speaker DIGITALterminal HDMITMterminal <n>button <1(Playback)>button <b(Exposurecompensation)>/ < (WirelessLAN)>/Upbutton <e(Macro)>/<f(Manual focus)>/Leftbutton Controldial FUNC./SETbutton <h(Flash)>/Rightbutton <l(Display)>/Downbutton Y P O C *Gesturesmaynotbedetectedaseasilyifyouapplyascreenprotector.Inthiscase, increasethesensitivityofthetouch-screenpanel(=273). zz Turningthecontroldialisonewayto choosesettingitems,switchimages,and performotheroperations.Mostofthese operationsarealsopossiblewiththe <o><p><q><r>buttons. • Forconvenience,allsupportedmemorycardsaresimplyreferredtoas “thememorycard”. • Thetabsshownabovetitlesindicatewhetherthefunctionisusedforstill images,movies,orboth. StillImages : Indicatesthatthefunctionisusedwhenshootingor viewingstillimages. Movies : Indicatesthatthefunctionisusedwhenshootingor viewingmovies. 5 Table of Contents PackageContents.........................2 CompatibleMemoryCards............2 PreliminaryNotesandLegal Information.....................................3 OrganizationofCameraUser Guide.............................................3 PartNamesandConventionsin ThisGuide......................................4 TableofContents...........................6 Contents:BasicOperations...........8 SafetyPrecautions.......................10 GeotaggingImagesonthe Camera........................................78 OtherInformation.........................78 Advanced Guide ............. 85 1 On/Off..........................................86 ShutterButton..............................87 ShootingModes...........................88 ShootingDisplayOptions............88 FUNC.Menu................................89 MENUMenu................................91 IndicatorDisplay..........................93 Clock............................................93 Basic Guide .................... 13 InitialPreparations.......................14 TryingtheCameraOut................21 IncludedSoftware, PDFManuals...............................27 Accessories..................................34 Wireless LAN Guide ....... 35 WhatYouCanDoWiththe WirelessLANFunction................36 Glossary.......................................37 WirelessLANPrecautions...........38 SecurityPrecautions....................41 UsingWirelessLANtoSend ImagesFromtheCamera............42 RegisteringaCameraNickname (Firsttimeonly)............................43 ConnectingtoWebServices........45 ConnectingtoaSmartphone.......50 ConnectingtoAnotherCamera...54 ConnectingtoaComputer...........56 ConnectingtoaPrinter................72 SendingImages...........................75 2 SmartAutoMode.................95 Y P O Shooting(SmartAuto).................96 Common,Convenient Features.....................................105 UsingFaceID............................ 113 ImageCustomization Features.....................................123 HelpfulShootingFeatures.........129 CustomizingCamera Operation...................................132 C 6 CameraBasics.....................85 3 OtherShootingModes......135 AutoClipRecording (MovieDigest)............................136 SpeciicScenes.........................137 ImageEffects (CreativeFilters)........................142 SpecialModesforOther Purposes....................................154 ShootingVariousMovies...........161 TableofContents 4 PMode................................165 ShootinginProgramAEMode (<P>Mode)................................166 ImageBrightness(Exposure Compensation)..........................166 ColorandContinuous Shooting.....................................174 ShootingRangeand Focusing....................................181 Flash..........................................193 ShootingRAWImages...............198 OtherSettings............................199 5 Tv,Av,M,andCMode.......201 SpeciicShutterSpeeds (<Tv>Mode)..............................202 SpeciicApertureValues (<Av>Mode)..............................203 SpeciicShutterSpeedsand ApertureValues(<M>Mode).....204 CustomizationforShooting Styles.........................................206 7 SettingMenu......................261 AdjustingBasicCamera Functions...................................262 8 Accessories.......................277 TipsonUsingIncluded Accessories................................278 OptionalAccessories.................278 UsingOptionalAccessories.......281 PrintingImages..........................286 UsinganEye-FiCard.................300 9 Appendix............................303 Troubleshooting.........................304 On-ScreenMessages................310 On-ScreenInformation..............314 FunctionsandMenuTables.......318 HandlingPrecautions.................332 Speciications.............................333 Index..........................................337 Y P O C 6 PlaybackMode..................215 Viewing......................................216 BrowsingandFiltering Images.......................................224 EditingFaceIDInformation.......231 ImageViewingOptions..............233 ProtectingImages......................236 ErasingImages..........................240 RotatingImages.........................243 ImageCategories......................244 ConvenientControl:Touch Actions.......................................248 EditingStillImages....................250 EditingMovies............................256 7 Contents: Basic Operations 4 Shoot zz Usecamera-determinedsettings(AutoMode).................................... 96 Shootingpeoplewell I P Portraits (=137) AgainstSnow (=138) SmoothSkin (=141) Matchingspeciicscenes S UnderWater (=138) NightScenes (=137) t Fireworks (=138) Y P O Applyingspecialeffects C VividColors (=142) PosterEffect (=142) “Aged”Photos (=144) Fish-EyeEffect (=145) MiniatureEffect (=146) ToyCameraEffect (=148) SoftFocus (=149) Monochrome (=150) zz Focusonfaces............................................................. 96,137,184,190 zz Withoutusingthelash(FlashOff)......................................................111 zz Withmyselfintheshot(Self-Timer)........................................... 107,157 zz Adddatestamps.................................................................................112 8 Contents:BasicOperations zz UseFaceID................................................................................113,222 zz Movieclipsandphotostogether(MovieDigest)................................ 136 1 View zz Viewimages(PlaybackMode)........................................................... 216 zz Automaticplayback(Slideshow)........................................................ 234 zz OnaTV.............................................................................................. 281 zz Onacomputer..................................................................................... 28 zz Browsethroughimagesquickly......................................................... 224 zz Eraseimages..................................................................................... 240 E Shoot/ViewMovies zz Shootmovies............................................................................... 96,161 zz Viewmovies(PlaybackMode)........................................................... 216 zz Fast-movingsubjects,slow-motionplayback..................................... 162 Y P O c Print zz Printpictures...................................................................................... 286 Save C zz Saveimagestoacomputer................................................................. 28 9 Safety Precautions • Beforeusingtheproduct,pleaseensurethatyoureadthesafetyprecautions describedbelow.Alwaysensurethattheproductisusedcorrectly. • Thesafetyprecautionsnotedonthefollowingpagesareintendedto preventinjuriestoyourselfandotherpersons,ordamagetotheequipment. • Besuretoalsochecktheguidesincludedwithanyseparatelysold accessoriesyouuse. Warning Denotesthepossibilityofseriousinjuryordeath. • Donottriggerthelashincloseproximitytopeople’seyes. Exposuretotheintenselightproducedbythelashcoulddamageeyesight. Inparticular,remainatleast1meter(39inches)awayfrominfantswhen usingthelash. • Storethisequipmentoutofthereachofchildrenandinfants. Strap:Puttingthestraparoundachild’sneckcouldresultinasphyxiation. • Useonlyrecommendedpowersources. • Donotattempttodisassemble,alterorapplyheattotheproduct. • Avoiddroppingorsubjectingtheproducttosevereimpacts. • Toavoidtheriskofinjury,donottouchtheinterioroftheproductif ithasbeendroppedorotherwisedamaged. • Stopusingtheproductimmediatelyifitemitssmoke,astrange smell,orotherwisebehavesabnormally. • Donotuseorganicsolventssuchasalcohol,benzine,orthinnerto cleantheproduct. • Donotlettheproductcomeintocontactwithwater(e.g.seawater) orotherliquids. • Donotallowliquidsorforeignobjectstoenterthecamera. Thiscouldresultinelectricalshockorire. Ifliquidsorforeignobjectscomeintocontactwiththecamerainterior, immediatelyturnthecameraoffandremovethebattery. Ifthebatterychargerbecomeswet,unplugitfromtheoutletandconsult yourcameradistributororaCanonCustomerSupportHelpDesk. Y P O C • Useonlytherecommendedbattery. • Donotplacethebatterynearorindirectlame. • Unplugthepowercordperiodically,andusingadrycloth,wipeaway anydustanddirtthathascollectedontheplug,theexteriorofthe poweroutlet,andthesurroundingarea. • Donothandlethepowercordwithwethands. • Donotusetheequipmentinamannerthatexceedstheratedcapacity oftheelectricaloutletorwiringaccessories.Donotuseifthepower cordorplugaredamaged,ornotfullypluggedintotheoutlet. • Donotallowdirtormetalobjects(suchaspinsorkeys)tocontact theterminalsorplug. 10 SafetyPrecautions Thebatterymayexplodeorleak,resultinginelectricalshockorire.This couldcauseinjuryanddamagethesurroundings.Intheeventthatabattery leaksandthebatteryelectrolytecontactseyes,mouth,skinorclothing, immediatelylushwithwater. • Turnthecameraoffinplaceswherecamerauseisprohibited. Theelectromagneticwavesemittedbythecameramayinterferewiththe operationofelectronicinstrumentsandotherdevices.Exerciseadequate cautionwhenusingthecamerainplaceswhereuseofelectronicdevicesis restricted,suchasinsideairplanesandmedicalfacilities. • DonotplaythesuppliedCD-ROM(s)inanyCDplayerthatdoesnot supportdataCD-ROMs. Itispossibletosufferhearinglossfromlisteningwithheadphonestothe loudsoundsofaCD-ROMplayedonanaudioCDplayer(musicplayer). Additionally,thiscoulddamagethespeakers. Caution Denotesthepossibilityofinjury. • Whenholdingthecamerabythestrap,becarefulnottobangit,subject ittostrongimpactsorshocks,orletitgetcaughtonotherobjects. • Becarefulnottobumporpushstronglyonthelens. Thiscouldleadtoinjuryordamagethecamera. Y P O • Becarefulnottosubjectthescreentostrongimpacts. Ifthescreencracks,injurymayresultfromthebrokenfragments. C • Whenusingthelash,becarefulnottocoveritwithyouringersorclothing. Thiscouldresultinburnsordamagetothelash. • Avoidusing,placingorstoringtheproductinthefollowingplaces: -Placessubjecttostrongsunlight -Placessubjecttotemperaturesabove40°C(104°F) -Humidordustyareas Thesecouldcauseleakage,overheatingoranexplosionofthebattery, resultinginelectricalshock,ire,burnsorotherinjuries. Hightemperaturesmaycausedeformationofthecameraorbatterychargercasing. • Theslideshowtransitioneffectsmaycausediscomfortwhenviewed forprolongedperiods. • Takecarenottopinchyouringerwhenthe lashlowers. Thiscouldresultininjury. 11 SafetyPrecautions Caution Denotesthepossibilityofdamagetotheequipment. • Donotaimthecameraatbrightlightsources(suchasthesunona clearday). Doingsomaydamagetheimagesensor. • Whenusingthecameraonabeachoratawindylocation,becareful nottoallowdustorsandtoenterthecamera. • Donotpushdownonthelash,orpryitopen. Thismaycausetheproducttomalfunction. • Inregularuse,smallamountsofsmokemaybeemittedfromthelash. Thisisduetothehighintensityofthelashburningdustandforeignmaterials stucktothefrontoftheunit.Pleaseuseacottonswabtoremovedirt,dustorother foreignmatterfromthelashtopreventheatbuild-upanddamagetotheunit. • Removeandstorethebatterywhenyouarenotusingthecamera. Ifthebatteryisleftinsidethecamera,damagecausedbyleakagemayoccur. • Beforeyoudiscardthebattery,covertheterminalswithtapeorother insulators. Contactingothermetalmaterialsmayleadtoireorexplosions. Y P O • Unplugthebatterychargerfromthepoweroutletafterchargingis complete,orwhenyouarenotusingit. • Donotplaceanything,suchascloth,ontopofthebatterycharger whileitischarging. Leavingtheunitpluggedinforalongperiodoftimemaycauseitto overheatanddistort,resultinginire. C • Donotplacethebatterynearpets. Petsbitingthebatterycouldcauseleakage,overheatingorexplosion, resultinginireordamage. • Donotsitdownwiththecamerainyourpocket. Doingsomaycausemalfunctionsordamagethescreen. • Whenputtingthecamerainyourbag,ensurethathardobjectsdo notcomeintocontactwiththescreen. • Donotattachanyhardobjectstothecamera. Doingsomaycausemalfunctionsordamagethescreen. 12 Basic Guide Givesbasicinstructions,frominitial preparationstoshooting,playback,and savingonacomputer Y P O C 13 Initial Preparations Prepareforshootingasfollows. Attaching the Strap Attachthestrap. zz Threadtheendofthestrapthroughthe straphole( ),andthenpulltheother endofthestrapthroughthelooponthe threadedend( ). zz Thestrapcanalsobeattachedtotheleft sideofthecamera. Holding the Camera Y P O zz Placethestraparoundyourwrist. zz Whenshooting,keepyourarmscloseto C yourbodyandholdthecamerasecurely topreventitfrommoving.Ifthelashis up,donotrestyouringersonit. 14 InitialPreparations Charging the Battery Beforeuse,chargethebatterywiththeincludedcharger.Besuretocharge thebatteryinitially,becausethecameraisnotsoldwiththebatterycharged. 1 Removethebatterycoverand insertthebatteryinthecharger. zz Removethecoverfromthebattery,align the▲marksonthebatteryandcharger, andinsertthebatterybypushingitin( ) anddown( ). 2 Chargethebattery. zz CB-2LX:Flipouttheplug( )andplug thechargerintoapoweroutlet( ). CB-2LX zz CB-2LXE:Plugthepowercordintothe charger,thenplugtheotherendintoa poweroutlet. XX Thecharginglampturnsorangeand chargingbegins. XX Whenthechargingisinished,thelamp turnsgreen. Y P O CB-2LXE C 3 Removethebattery. zz Afterunpluggingthebatterycharger, removethebatterybypushingitin( ) andup( ). • Toprotectthebatteryandkeepitinoptimalcondition,donot chargeitcontinuouslyformorethan24hours. • Forbatterychargersthatuseapowercord,donotattach thechargerorcordtootherobjects.Doingsocouldresultin malfunctionordamagetotheproduct. 15 InitialPreparations • Fordetailsonchargingtimeandthenumberofshotsandrecordingtime possiblewithafullychargedbattery,see“Speciications”(=333). Inserting the Battery and Memory Card Inserttheincludedbatteryandamemorycard(soldseparately). Notethatbeforeusinganewmemorycard(oramemorycardformatted inanotherdevice),youshouldformatthememorycardwiththiscamera (=267). 1 Checkthecard’swrite-protect tab. zz Recordingisnotpossibleonmemory cardswithawrite-protecttabwhenthe tabisinthelocked(downward)position. Slidethetabupuntilitclicksintothe unlockedposition. 2 Openthecover. Y P O zz Slidethecover( )andopenit( ). C 3 Insertthebattery. zz Whilepressingthebatterylockinthe Terminals 16 Battery Lock directionofthearrow,insertthebattery asshownandpushitinuntilitclicksinto thelockedposition. zz Ifyouinsertthebatteryfacingthewrong way,itcannotbelockedintothecorrect position.Alwaysconirmthatthebattery isfacingtherightwayandlockswhen inserted. InitialPreparations 4 Insertthememorycard. zz Insertthememorycardfacingasshown untilitclicksintothelockedposition. zz Makesurethememorycardisfacingthe rightwaywhenyouinsertit.Inserting memorycardsfacingthewrongwaymay damagethecamera. Terminals 5 Closethecover. zz Lowerthecover( )andholditdownas youslideit,untilitclicksintotheclosed position( ). • Forguidelinesonhowmanyshotsorhoursofrecordingcanbesavedon onememorycard,see“Speciications”(=333). Y P O RemovingtheBatteryandMemoryCard Removethebattery. C zz Openthecoverandpressthebattery lockinthedirectionofthearrow. XX Thebatterywillpopup. Removethememorycard. zz Pushthememorycardinuntilitclicks, andthenslowlyreleaseit. XX Thememorycardwillpopup. 17 InitialPreparations Setting the Date and Time Setthecurrentdateandtimecorrectlyasfollowsifthe[Date/Time]screen isdisplayedwhenyouturnthecameraon.Informationyouspecifythisway isrecordedinimagepropertieswhenyoushoot,anditisusedwhenyou manageimagesbyshootingdateorprintimagesshowingthedate. Youcanalsoaddadatestamptoshots,ifyouwish(=112). 1 Turnthecameraon. zz Pressthepowerbutton. XX The[Date/Time]screenisdisplayed. 2 Setthedateandtime. zz Pressthe<q><r>buttonstochoosean option. zz Pressthe<o><p>buttonsorturnthe <7>dialtospecifythedateandtime. Y P O zz Wheninished,pressthe<m>button. C 3 Setthehometimezone. zz Pressthe<q><r>buttonsorturnthe <7>dialtochooseyourhometimezone. 4 Finishthesetupprocess. zz Pressthe<m>buttonwheninished. 18 Afteraconirmationmessage,thesetting screenisnolongerdisplayed. zz Toturnoffthecamera,pressthepower button. InitialPreparations • Unlessyousetthedate,time,andhometimezone,the[Date/ Time]screenwillbedisplayedeachtimeyouturnthecameraon. Specifythecorrectinformation. • Tosetdaylightsavingtime(1hourahead),choose[ ]instep2andthen choose[ ]bypressingthe<o><p>buttonsorturningthe<7>dial. • Youcanalsosetthedateandtimebytouchingthedesiredsettingonthe ].Similarly,you screeninstep2andthentouching[o][p],followedby[ canalsosetyourhometimezonebytouching[q][r]onthescreeninstep3, ]. followedby[ ChangingtheDateandTime Adjustthedateandtimeasfollows. 1 Accessthecameramenu. zz Pressthe<n>button. Y P O 2 Choose[Date/Time]. C zz Movethezoomlevertochoosethe[3] tab. zz Pressthe<o><p>buttonsorturnthe <7>dialtochoose[Date/Time],andthen pressthe<m>button. 3 Changethedateandtime. zz Followstep2on=18toadjustthe settings. zz Pressthe<n>buttontoclosethe menu. 19 InitialPreparations • Date/timesettingscanberetainedforabout3weeksbythecamera’sbuilt-in date/timebattery(backupbattery)afterthebatterypackisremoved. • Thedate/timebatterywillbechargedinabout4hoursonceyouinserta chargedbatteryorconnectthecameratoanACadapterkit(soldseparately, =278),evenifthecameraisleftoff. • Oncethedate/timebatteryisdepleted,the[Date/Time]screenwillbe displayedwhenyouturnthecameraon.Followthestepson=18toset thedateandtime. Display Language Changethedisplaylanguageasneeded. 1 EnterPlaybackmode. zz Pressthe<1>button. Y P O 2 Accessthesettingscreen. zz Pressandholdthe<m>button,and thenimmediatelypressthe<n> button. C 3 Setthedisplaylanguage. zz Pressthe<o><p><q><r>buttonsor turnthe<7>dialtochoosealanguage, andthenpressthe<m>button. XX Oncethedisplaylanguagehasbeenset, thesettingscreenisnolongerdisplayed. 20 TryingtheCameraOut • Thecurrenttimeisdisplayedifyouwaittoolonginstep2afterpressingthe <m>buttonbeforeyoupressthe<n>button.Inthiscase,pressthe <m>buttontodismissthetimedisplayandrepeatstep2. • Youcanalsochangethedisplaylanguagebypressingthe<n>button andchoosing[Language ]onthe[3]tab. • Youcanalsosetthedisplaylanguagebytouchingalanguageonthescreen instep3andthentouchingitagain. StillImages Movies Trying the Camera Out Followtheseinstructionstoturnthecameraon,shootstillimagesor movies,andthenviewthem. Shooting (Smart Auto) Forfullyautomaticselectionoftheoptimalsettingsforspeciicscenes, simplyletthecameradeterminethesubjectandshootingconditions. Y P O 1 Turnthecameraon. zz Pressthepowerbutton. XX Thestartupscreenisdisplayed. C 2 Enter<A>mode. zz Setthemodedialto<A>. zz Aimthecameraatthesubject.The camerawillmakeaslightclickingnoise asitdeterminesthescene. XX Iconsrepresentingthesceneandimage stabilizationmodearedisplayedinthe upperrightofthescreen. XX Framesdisplayedaroundanydetected subjectsindicatethattheyareinfocus. 21 TryingtheCameraOut 3 Composetheshot. zz Tozoominandenlargethesubject,move thezoomlevertoward<i>(telephoto), andtozoomawayfromthesubject,move ittoward<j>(wideangle). 4 Shoot. ShootingStillImages Focus. zz Presstheshutterbuttonlightly,halfway down.Thecamerabeepstwiceafter focusing,andgreenframesaredisplayed toindicateimageareasinfocus. XX Thelashautomaticallyrisesinlow-light conditions. Y P O Shoot. zz Presstheshutterbuttonalltheway C down. XX Asthecamerashoots,ashuttersoundis played,andinlow-lightconditionswhen thelashisup,itiresautomatically. zz Keepthecamerastilluntiltheshutter soundends. XX Yourshotisonlydisplayeduntilthe cameraisreadytoshootagain. 22 TryingtheCameraOut ShootingMovies Startshooting. zz Pressthemoviebutton.Thecamera ElapsedTime beepsonceasrecordingbegins,and [ Rec]isdisplayedwiththeelapsedtime. XX Blackbarsdisplayedonthetopand bottomedgesofthescreenindicate imageareasnotrecorded. XX Framesdisplayedaroundanydetected facesindicatethattheyareinfocus. zz Oncerecordingbegins,youcantakeyour ingeroffthemoviebutton. Finishshooting. zz Pressthemoviebuttonagaintostop shooting.Thecamerabeepstwiceas recordingstops. Y P O C 23 TryingtheCameraOut Viewing Aftershootingimagesormovies,youcanviewthemonthescreenas follows. 1 EnterPlaybackmode. zz Pressthe<1>button. XX Yourlastshotisdisplayed. 2 Browsethroughyourimages. zz Toviewthepreviousimage,press the<q>buttonorturnthe<7>dial counterclockwise.Toviewthenext image,pressthe<r>buttonorturnthe <7>dialclockwise. zz Pressandholdthe<q><r>buttonsto browsethroughimagesquickly. Y P O zz ToaccessScrollDisplaymode,turnthe C <7>dialrapidly.Inthismode,turnthe <7>dialtobrowsethroughimages. zz Toreturntosingle-imagedisplay,press the<m>button. zz Moviesareidentiiedbya[ playmovies,gotostep3. 24 ]icon.To TryingtheCameraOut 3 Playmovies. zz Pressthe<m>buttontoaccessthe Volume moviecontrolpanel,choose[ ](either pressthe<q><r>buttonsorturnthe <7>dial),andthenpressthe<m> buttonagain. XX Playbacknowbegins,andafterthemovie ]isdisplayed. isinished,[ zz Toadjustthevolume,pressthe<o><p> buttons. • ToswitchtoShootingmodefromPlaybackmode,presstheshutterbutton halfway. Touch-ScreenOperations zz Toviewthenextimageonthescreenin step2,dragleftacrossthescreen,andto viewthepreviousimage,dragright. zz ToaccessScrollDisplaymode,quickly dragleftorrightrepeatedly. zz Toreturntosingle-imagedisplayfrom ScrollDisplaymode,touchtheimagein themiddleofthescreen. zz Chooseamovie,andtouch[ ]tostart playback. zz Toadjustthevolumeduringmovie playback,quicklydragupordownacross thescreen. Y P O C 25 TryingtheCameraOut ErasingtheImages Youcanchooseanderaseunneededimagesonebyone.Becarefulwhen erasingimages,becausetheycannotberecovered. 1 Chooseanimagetoerase. zz Pressthe<q><r>buttonsorturnthe <7>dialtochooseanimage. 2 Erasetheimage. zz Pressthe<a>button. zz After[Erase?]isdisplayed,pressthe <q><r>buttonsorturnthe<7>dialto choose[Erase],andthenpressthe<m> button. XX Thecurrentimageisnowerased. zz Tocancelerasure,pressthe<q><r> buttonsorturnthe<7>dialtochoose [Cancel],andthenpressthe<m> button. Y P O • Youcanalsoeraseallimagesatonce(=241). C • Youcanalsoerasethecurrentimagebytouching[Erase]onthescreenin step2. • ImagescanalsobeerasedbyusingTouchActions(=248). 26 Included Software, PDF Manuals ThesoftwareandPDFmanualsontheincludedDIGITALCAMERASolution Disk(CD-ROM)(=2)areintroducedbelow,withinstructionsfor installation,andsavingimagestoacomputer. Software AfterinstallingthesoftwareontheCD-ROM,youcandothefollowing thingsonyourcomputer. CameraWindow zz Importimagesandchangecamerasettings ImageBrowserEX zz Manageimages:view,search,andorganize zz Printandeditimages DigitalPhotoProfessional zz Browse,processandeditRAWimages AutoUpdateFunction Usingtheincludedsoftware,youcanupdatetothelatestversion,and downloadnewfunctionsviatheInternet(somesoftwareexcluded).Besure toinstallthesoftwareonacomputerwithanInternetconnectionsoyoucan usethisfunction. Y P O C • Internetaccessisrequiredtousethisfunction,andanyISP accountchargesandaccessfeesmustbepaidseparately. PDF Manuals CameraUserGuide zz Refertothisguideforamorein-depthunderstandingofcamera operation. SoftwareGuide zz Refertothisguidewhenusingtheincludedsoftware.Theguidecanbe accessedfromthehelpsystemofincludedsoftware(somesoftware excluded). 27 IncludedSoftware,PDFManuals System Requirements Theincludedsoftwarecanbeusedonthefollowingcomputers.Adobe ReaderisrequiredtoviewthePDFmanuals. Windows Operating System Macintosh Windows7SP1 WindowsVistaSP2 MacOSX10.6–10.7 WindowsXPSP3 (OSX10.6.8orlaterrequiredfor (Windows7SP1orlaterrequired wirelessconnections) forwirelessconnections) Computer Computersrunningoneoftheaboveoperatingsystems (preinstalled),withanincludedUSBportandInternetconnection* Processor Stillimages:1.6GHzorhigher Movies:Core2Duo2.6GHz orhigher Stillimages:MacOSX10.7: Core2Duoorhigher, MacOSX10.6:CoreDuo1.83 GHzorhigher Movies:Core2Duo2.6GHz orhigher RAM Stillimages Windows7(64bit):2GBor more Windows7(32bit),Vista, XP:1GBormore Movies 2GBormore Stillimages MacOSX10.7:2GBormore, MacOSX10.6:1GBormore Movies 2GBormore Y P O C Interfaces USBandwirelessLAN FreeHardDisk Space 640MBormore* Display 1024x768resolutionorhigher 750MBormore *Silverlight4orlater(max.100MB)mustbeinstalled,andinWindowsXP,Microsoft .NETFramework3.0orlater(max.500MB)mustbeinstalled.Installationmaytake sometime,dependingoncomputerperformance. • ChecktheCanonwebsiteforthelatestsystemrequirements,including supportedOSversions. 28 IncludedSoftware,PDFManuals Installing the Software Windows7andMacOSX10.6areusedhereforthesakeofillustration. Usingthesoftwareautoupdatefunction,youcanupdatetothelatest versionanddownloadnewfunctionsviatheInternet(somesoftware excluded),sobesuretoinstallthesoftwareonacomputerwithanInternet connection. 1 InserttheCD-ROMinthe computer’sCD-ROMdrive. zz InserttheincludedCD-ROM(DIGITAL CAMERASolutionDisk)(=2)inthe computer’sCD-ROMdrive. zz OnaMacintoshcomputer,afterinserting thedisc,double-clickthedesktopdisc icontoopenit,andthendouble-clickthe [ ]icondisplayed. 2 Begintheinstallation. Y P O zz Click[EasyInstallation]andfollowthe C on-screeninstructionstocompletethe installationprocess. 29 IncludedSoftware,PDFManuals 3 Whenamessageisdisplayed promptingyoutoconnect thecamera,connectittoa computer. zz Withthecameraturnedoff,openthe cover( ).Withthesmallerplugofthe includedinterfacecable(=2)inthe orientationshown,inserttheplugfully intothecameraterminal( ). zz Insertthelargerplugoftheinterface cableinthecomputer’sUSBport.For detailsaboutUSBconnectionsonthe computer,refertothecomputeruser manual. Y P O 4 Installtheiles. zz Turnthecameraon,andfollowthe C on-screeninstructionstocompletethe installationprocess. XX ThesoftwarewillconnecttotheInternet toupdatetothelatestversionand downloadnewfunctions.Installationmay takesometime,dependingoncomputer performanceandtheInternetconnection. zz Click[Finish]or[Restart]onthescreen afterinstallationandremovetheCDROMwhenthedesktopisdisplayed. zz Turnthecameraoffanddisconnectthe cable. 30 IncludedSoftware,PDFManuals • WhennotconnectedtotheInternet,therearethefollowinglimitations. -Thescreeninstep3willnotbedisplayed. -Somefunctionsmaynotbeinstalled. • Theirsttimeyouconnectthecameratothecomputer,driverswillbe installed,soitmaytakeafewminutesuntilcameraimagesareaccessible. • IfyouhaveseveralcamerasthatwerebundledwithImageBrowserEXon theincludedCD-ROMs,besuretouseeachcamerawiththeirincludedCDROMandfollowtheon-screeninstallationinstructionsforeach.Doingsowill ensurethateachcamerawillreceivethecorrectupdatesandnewfunctions viatheautoupdatefunction. Saving Images to a Computer Windows7andMacOSX10.6areusedhereforthesakeofillustration. 1 Connectthecameratothe computer. zz Followstep3on=30toconnectthe cameratoacomputer. Y P O 2 Turnthecameraontoaccess CameraWindow. zz Pressthe<1>buttontoturnthecamera C on. zz OnaMacintoshcomputer, CameraWindowisdisplayedwhena connectionisestablishedbetweenthe cameraandcomputer. zz ForWindows,followthestepsintroduced below. zz Inthescreenthatdisplays,clickthe[ linktomodifytheprogram. ] 31 IncludedSoftware,PDFManuals zz Choose[DownloadsImagesFromCanon CamerausingCanonCameraWindow] andthenclick[OK]. zz Doubleclick[ CameraWindow ]. 3 Savetheimagestothe computer. zz Click[ImportImagesfromCamera],and thenclick[ImportUntransferredImages]. XX ImagesarenowsavedtothePictures Y P O folderonthecomputer,inseparate foldersnamedbydate. zz Afterimagesaresaved,close CameraWindow,pressthe<1>button toturnthecameraoff,andunplugthe cable. zz Forinstructionsonviewingimageson acomputer,refertotheSoftware Guide (=27). C 32 IncludedSoftware,PDFManuals • InWindows7,ifthescreeninstep2isnotdisplayed,clickthe[ ]iconin thetaskbar. • TostartCameraWindowinWindowsVistaorXP,click[DownloadsImages FromCanonCamerausingCanonCameraWindow]onthescreendisplayed whenyouturnthecameraoninstep2.IfCameraWindowisnotdisplayed, clickthe[Start]menuandchoose[AllPrograms]►[CanonUtilities]► [CameraWindow]►[CameraWindow]. • OnaMacintoshcomputer,ifCameraWindowisnotdisplayedafterstep2, clickthe[CameraWindow]iconintheDock(thebaratthebottomofthe desktop). • Althoughyoucansaveimagestoacomputersimplybyconnectingyour cameratothecomputerwithoutusingtheincludedsoftware,thefollowing limitationsapply. -Itmaytakeafewminutesafteryouconnectthecameratothecomputer untilcameraimagesareaccessible. -Imagesshotinverticalorientationmaybesavedinhorizontalorientation. -RAWimages(orJPEGimagesrecordedwithRAWimages)maynotbe saved. -Imageprotectionsettingsmaybeclearedfromimagessavedtoa computer. -Someproblemsmayoccurwhensavingimagesorimageinformation, dependingontheoperatingsystemversion,thesoftwareinuse,orimage ilesizes. -Somefunctionsprovidedbytheincludedsoftwaremaynotbeavailable, suchaseditingmoviesorreturningimagestothecamera. Y P O C Using the PDF Manuals CameraUserGuide zz Accessthisguidebydouble-clickingthedesktopshortcuticon. SoftwareGuide zz Theguidecanbeaccessedfromthehelpsystemofincludedsoftware (somesoftwareexcluded). • ItmaynotbepossibletoinstallthePDFmanualsoncomputersthatdo notmeetthesystemrequirements(=28).However,youcanviewthe manualsonacomputerthatsupportsAdobeReaderbycopyingthePDF ilesintheReadmefolderontheCD-ROMdirectlytoaconvenientlocation onthecomputer. 33 Accessories IncludedAccessories WristStrap WS-DC11 BatteryPack NB-5L* (withterminalcover) BatteryCharger CB-2LX/CB-2LXE* DIGITAL CAMERA SolutionDisk InterfaceCableIFC-400PCU* MemoryCard Power ACAdapterKit ACK-DC30 FlashUnit CardReader Cable HDMICableHTC-100 StereoAVCableAVC-DC400ST Y P O Case C High-PowerFlash HF-DC2 Windows/ Macintosh Computer TV/ Video System CanonPictBridgeCompatiblePrinters WaterproofCase WP-DC47 * Alsoavailableforpurchaseseparately. UseofgenuineCanonaccessoriesisrecommended. Thisproductisdesignedtoachieveexcellentperformancewhenusedwithgenuine Canonaccessories. Canonshallnotbeliableforanydamagetothisproductand/oraccidentssuchasire, etc.,causedbythemalfunctionofnon-genuineCanonaccessories(e.g.,aleakage and/orexplosionofabatterypack).Pleasenotethatthiswarrantydoesnotapplyto repairsarisingoutofthemalfunctionofnon-genuineCanonaccessories,althoughyou mayrequestsuchrepairsonachargeablebasis. 34 Wireless LAN Guide Describeshowtosendimageswirelesslyfrom thecameratoavarietyofcompatibledevices, andhowtousethecamerawithonline services Y P O C 35 What You Can Do With the Wireless LAN Function ThiscameraisanapprovedWi-Fi®*product.Youcanwirelesslyconnectto andsendimagestothefollowingdevices. *Wi-FiisabrandnamethatindicatesinteroperabilitycertiicationofwirelessLAN devices. ConnectingtoWebServices Videosharingsites YouTube E-mail Social networking services Facebook Twitter CANONiMAGEGATEWAYisanonline photoserviceavailabletothosewho havepurchasedthisproduct.Ifyou registerforfreeasamember,you canuseCANONiMAGEGATEWAY toaccessvariousWebservices,such associalnetworkingservicessetona computer. ConnectingtoaSmartphone Sendimagestosmartphonesandtabletcomputersthathave wirelessfunctions.Youcanalsogeotagyourshotsfroma connectedsmartphoneortablet.Installationofadedicated applicationonthesmartphoneortabletisrequired.Seethe Canonwebsitefordetails. Y P O C ConnectingtoAnotherCamera UsethewirelessfunctiontosendimagesbetweenCanon-brand cameras. ConnectingtoaComputer Usetheincludedsoftwaretowirelesslysendimagesfromthe cameratoacomputer.RefertotheSoftware Guidefordetails. ConnectingtoaPrinter SendimageswirelesslytoaPictBridge-compatibleprinter (supportingDPSoverIP)toprintthem. 36 Glossary TermsrelatedtowirelessLANareexplainedhere.Alsorefertothe explanationsoftermsgivenintherespectivesectionsofthisguide. • Accesspoint AdevicethatrelaysradiowavesignalstocreateawirelessLANnetwork. ThistermalsoreferstoaplacewhereyoucanconnecttotheInternetvia wirelessLAN. • Firewall Thisisasystemthatprotectscomputersfromelectronicviruses,external unauthorizedaccess,andsecuritythreats.Thisissetinyourwireless LANrouterorcomputer. • SSID/ESSID Numbersandlettersusedtoidentifyaspeciicexistingaccesspoint.This isalsocalledthe“accesspointname”or“networkname”. • Encryptionkey Thisisakeyusedtoencryptdatafortransmissiontoandfromanaccess point. • IPaddress Thisisanaddressusedtoidentifyadevicewithinanetwork. • MACaddress Thisisauniqueaddresspre-assignedtoanetworkdevice.Itisalso referredtoasa“physicaladdress”. Y P O C ThecameracanprinttoPictBridge-compatibleprintersvia wirelessLAN.PictBridgetechnicalstandardsmakeiteasy toconnectdigitalcameras,printers,andotherdevices directly.Additionally,anewstandardcalledDPSoverIP enablesPictBridgeconnectionsinnetworkenvironments, andthecameraisalsocompatiblewiththisstandard. 37 Wireless LAN Precautions • ThemodelnumberisPC1819orPC1882 (includingWLANmodulemodelWM217).To identifyyourmodel,checkthelabelonthe bottomofthecameraforanumberbeginning withPC. • CountriesandRegionsPermittingWLANUse - UseofWLANisrestrictedinsomecountriesandregions,andillegal usemaybepunishableundernationalorlocalregulations.Toavoid violatingWLANregulations,visittheCanonwebsitetocheckwhereuse isallowed. NotethatCanoncannotbeheldliableforanyproblemsarisingfrom WLANuseinothercountriesandregions. • Doinganyofthefollowingmayincurlegalpenalties: -Alteringormodifyingtheproduct -Removingthecertiicationlabelsfromtheproduct • Accordingtoforeignexchangeandforeigntradelawregulations,export permission(orservicetransactionpermission)fromtheJapanese governmentisnecessarytoexportstrategicresourcesorservices (includingthisproduct)outsideJapan. Y P O • BecausethisproductincludesAmericanencryptionsoftware,itfalls underU.S.ExportAdministrationRegulations,andcannotbeexportedto orbroughtintoacountryunderU.S.tradeembargo. C • BesuretomakenotesofthewirelessLANsettingsyouuse. ThewirelessLANsettingssavedtothisproductmaybeeraseddueto incorrectoperationoftheproduct,theeffectsofradiowavesorstatic electricity,accidentormalfunction.Besuretomakenotesofwireless LANsettingsasaprecaution.PleasenotethatCanonacceptsno responsibilityfordegradationofcontent,directorindirectdamagesor lossofrevenuearisingfromuseoftheproduct. • Whentransferringthisproducttoanotherperson,disposingofit,or sendingitforrepair,besuretonotethewirelessLANsettingsandreset theproducttoitsdefaultsettings(erasesettings)ifnecessary. • Canonwillnotmakecompensationforlossortheftoftheproduct. Canonacceptsnoresponsibilityfordamagesincurreddueto unauthorizedaccesstoregistereddata(imagetransferdestinations,etc.) iftheproductislostorstolen. 38 WirelessLANPrecautions • Besuretousetheproductasdirectedinthisguide. BesuretousethewirelessLANfunctionofthisproductwithinthe guidelinesnotedinthisguide.Canonacceptsnoresponsibilityfor damagesorlossevenifthefunctionandproductareusedinwaysother thanasdescribedinthisguide. • DonotusethewirelessLANfunctionofthisproductnearmedical equipmentorotherelectronicequipment. UseofthewirelessLANfunctionnearmedicalequipmentorother electronicequipmentmayaffectoperationofthosedevices. Radio Wave Interference Precautions • Thisproductmayreceiveinterferencefromotherdevicesthatemitradio waves.Toavoidinterference,besuretousethisproductasfarawayas possiblefromsuchdevices,oravoidusingthedevicesatthesametime asthisproduct. Y P O C 39 WirelessLANPrecautions FCC/ICNotice Model:PC1882(includingWLANModuleModelWM217,FCCID: AZD217) Theavailablescientiicevidencedoesnotshowthatanyhealthproblems areassociatedwithusinglowpowerwirelessdevices.Thereisno proof,however,thattheselowpowerwirelessdevicesareabsolutely safe.LowpowerWirelessdevicesemitlowlevelsofradiofrequency energy(RF)inthemicrowaverangewhilebeingused.Whereashigh levelsofRFcanproducehealtheffects(byheatingtissue),exposure tolow-levelRFthatdoesnotproduceheatingeffectscausesnoknown adversehealtheffects.Manystudiesoflow-levelRFexposureshavenot foundanybiologicaleffects.Somestudieshavesuggestedthatsome biologicaleffectsmightoccur,butsuchindingshavenotbeencon-i rmedbyadditionalresearch.Thismodelhasbeentestedandfoundto complywithFCC/ICradiationexposurelimitssetforthforanuncontrolled equipmentandmeetstheFCCradiofrequency(RF)ExposureGuidelines inSupplementCtoOET65andRSS-102oftheICradiofrequency(RF) Exposurerules. ThisdevicecomplieswithPart15ofFCCRulesandIndustryCanada licence-exemptRSSstandard(s).Operationissubjecttothefollowingtwo conditions:(1)thisdevicemaynotcauseinterference,and(2)thisdevice mustacceptanyinterference,includinginterferencethatmaycause undesiredoperationofthisdevice. Thistransmittermustnotbeco-locatedoroperatedinconjunctionwith anyotherantennaortransmitter. Y P O C ThisproductisinstalledwiththeWLANModulewhichiscertiiedto standardssetbyIDASingapore. 40 Security Precautions SincewirelessLANusesradiowavestotransmitsignals,tightersecurity precautionsarenecessarythanwhenusingaLANcable. WhenusingwirelessLAN,keepthefollowingpointsinmind. • Onlyusenetworksyouareauthorizedtouse. ThisproductsearchesforwirelessLANnetworksinthevicinityand displaystheresultsonthescreen.Networksyouarenotauthorizedto use(unknownnetworks)mayalsobedisplayed.However,connectingto orattemptingtousethosenetworkscouldberegardedasunauthorized access.Besuretouseonlynetworksyouareauthorizedtouse,anddo notattempttoconnecttootherunknownnetworks. Ifsecuritysettingshavenotbeenproperlyset,thefollowingproblemsmay occur. • Transmissionmonitoring ThirdpartieswithmaliciousintentmaymonitorwirelessLAN transmissionsandattempttoacquirethedatayouaresending. • Unauthorizednetworkaccess Thirdpartieswithmaliciousintentmaygainunauthorizedaccessto thenetworkyouareusingandsteal,modify,ordestroyinformation. Additionally,youcouldfallvictimtoothertypesofunauthorizedaccess suchasimpersonation(wheresomeoneassumesanidentitytogain accesstounauthorizedinformation)andspringboardattacks(where someonegainsunauthorizedaccesstoyournetworkasaspringboardto covertheirtrackswheniniltratingothersystems). Y P O C Topreventthesetypesofproblemsfromoccurring,besuretothoroughly secureyourwirelessLANnetwork. BesuretousethewirelessLANfunctionofthiscamerawithaproper understandingofwirelessLANsecurity,andbalanceriskandconvenience whenadjustingsecuritysettings. 41 Using Wireless LAN to Send Images From the Camera Connectthecameraanddestinationwirelessly(imagesenddestination) Webservices Another camera Smartphone Computer Printer Registeringacameranickname(=43) •Installingthesupplied software*1 •Installingthe suppliedsoftware*1 •Connectingwiththecomputer •Connectingwiththe computer Preparations •RegisteringWebservices (=45) •Preparingto registeracomputer (=56) •Adjustingsettingsforusing WebservicesfromCANON iMAGEGATEWAY(=46) Y P O •Installingthededicated CameraWindow applicationonthe smartphone C Connection (=45) Addingthetargetdevice/destinationtothecamera (=50) (=54) (=62) Send/Print/ Import Sendingimages(=75) Transferring imagestoa computer (=69) (=72) Printing images (=72)*2 *1Instructionsinthisguideapplywhenthesoftwarehasbeeninstalledcorrectlyfrom theincludedCD-ROM(=27). *2Fordetailedprintinginstructions,see=286. 42 Registering a Camera Nickname (First time only) Tostartwith,registeracameranickname. Thisnicknamewillbedisplayedonthescreenoftargetdeviceswhen connectingtootherdevicesviawirelessLAN. 1 AccessthewirelessLAN screen. zz Pressthe<1>buttontoturnthecamera on. zz Pressthe<o>button. 2 Accessthekeyboard. zz Pressthe<m>button. Y P O 3 Enteranickname. zz Touchcharactersonthekeyboardto enterthem. zz Upto16characterscanbeused. zz Touch[q][r]tomovethecursor. zz Touch[ ]toentercapitalletters. zz Touch[ ]toenternumbersorsymbols. zz Touch[ ]todeletetheprevious C character. zz Eithertouch[ ]orpressthe<n> button. zz Pressthe<o><p>buttonsorturnthe <7>dialtochoose[OK],andthenpress the<m>button. 43 RegisteringaCameraNickname(Firsttimeonly) • Whenconnectingwirelesslywithanydeviceotherthanacomputer,a memorycardmustbeinsertedinthecamera.Additionally,thememorycard mustcontainimagesinorderforyoutoaccessWebservicesorconnecttoa smartphoneorprinterwirelessly. • Tochangethecamera’snickname,choose[WirelessLANSettings]onthe [3]tab,andthenchoose[ChangeDeviceNickname]. • Youcanalsoenterinformationbypressingthe<o><p><q><r>buttons orturningthe<7>dialtoselectcharacters,andthenpressingthe<m> >button button.Movethecursorbyturningthe<y>ring,andpressthe< todeletecharacters,asneeded. • ThewirelessLANmenucannotbeaccessedbypressingthe<o>button duringdetailedinformationdisplay(=219).Toaccessthemenu,irst switchtheviewingmodebypressingthe<p>button. Y P O C 44 Connecting to Web Services SetupthecameratouseavarietyofWebservicesasfollows. • AcomputerisrequiredforWebservicesettings,startingwithCANON iMAGEGATEWAY. • ForinformationoncountriesandregionswhereCANONiMAGE GATEWAYisavailable,visittheCanonwebsite(http://canon.com/cig). Registering Web Services First,signupforafreeCANONiMAGEGATEWAYaccount. CANONiMAGEGATEWAYoffersvariousservices,suchastheabilityto shareimagesinanonlinephotoalbum.CANONiMAGEGATEWAYalso servesasabridgesitetosendimageswirelesslytoe-mailaddresses, socialnetworkingservices,andotherWebservices.Clickhttp://canon.com/ cig,accesstheappropriateCANONiMAGEGATEWAYsiteforyourcountry ofresidence,andfollowtheon-screeninstructionstoregisterasamember. YoucancontinuetoregisterotherWebservicesotherthanCANONiMAGE GATEWAYtoyouraccount.Forfurtherdetails,checkthewebsitesforeach webserviceyouwanttoregister. CANONiMAGEGATEWAY Y P O In[Camera-linkedinformation],youcancheckarecordofimageuploading toWebservices,andin[Library],youcanviewtheimagesuploadedby date. C 45 ConnectingtoWebServices • AnInternetconnectionisrequiredtoaccessCANONiMAGE GATEWAY(anInternetbrowsermustbeinstalledonthecomputer, youmusthaveanaccountwithanInternetserviceprovider,and anInternetconnectionmustbeestablished). • CheckCANONiMAGEGATEWAYforbrowser(MicrosoftInternet Explorer,etc.)settings,conditionsandversioninformationwhen connectingtoCANONiMAGEGATEWAY. • SeparateISPconnectionandaccesspointfeesmaybe applicable. Adjusting Settings for Using Web Services From CANON iMAGE GATEWAY AdjustaccountsettingsfortheWebservicesyouwanttouse.Because CameraWindowisusedtoadjustsettings,besuretoinstallitfromthe includedCD-ROMbeforehand.Installationinstructionscanbefoundin “IncludedSoftware,PDFManuals”(=27). Y P O 1 Connectthecameratoa computerwiththeinterface cable. zz WhenusingaWindowscomputer,you C canconnectwirelessly,withoutusingan interfacecable,howeversettingsmustbe completedbeforehand(=59). 2 StartCameraWindow. zz Pressthe<1>buttontoturnthecamera on. zz Fordetailsonhowtostart CameraWindow,see“Using CameraWindowtoTransferImagestoa Computer”(=69). 46 ConnectingtoWebServices 3 Choose[SetUpWebServices]. zz Click[SetUpWebServices]. 4 LogintoCANONiMAGE GATEWAY. zz EnteryourCANONiMAGEGATEWAY loginnameandpassword,andthenclick [Login]. 5 SetaWebserviceyouwantto Y P O use. zz Followtheon-screeninstructionsto completesettingsforWebservicesyou wanttouse. zz OncetheWebservicesettingsare complete,click[Finish]atthebottomof thewindowtocloseit. C 47 ConnectingtoWebServices 6 ApplyWebservicesettingsto thecamera. zz ChoosethenameoftheWebserviceyou wanttoset,andclick[ ]inthemiddle ofthelists. XX ThenameoftheWebservicethatwillbe savedtothecamerawillbedisplayedin the[Camera]list. zz Click[▲]or[▼]tochangetheorderof theWebservicesthatwillbedisplayedin thecamera’swirelessLANmenu. zz Afteryouinishadjustingsettingsinthe [Camera]listtoyourliking,closethe window. XX Webservicesettingswillbeappliedto thecamera. Y P O • IfCameraWindowisnotdisplayedinstep2,see“UsingCameraWindowto TransferImagestoaComputer”(=69)fordetails. • Upto20e-mailaddressescanberegisteredtothecameraforsending imagesase-mail. • AfterloggingintoCANONiMAGEGATEWAYthesecondtimeinstep4,the screeninstep6willbedisplayed.TochangesettingsforWebservicesyou use,click[EditWebServices]. • ToaddorchangeWebservices,repeattheaboveproceduresstartingfrom step1. C Connecting to Web Services ConnecttoWebservicesregisteredtothecamera. 1 AccessthewirelessLAN screen. zz Pressthe<o>button. 48 ConnectingtoWebServices 2 ChooseaWebservice. zz Pressthe<o><p><q><r>buttonsor turnthe<7>dialtochoosetheiconof thedestinationWebservice,andthen pressthe<m>button. zz Whenyouhaveselectedemail,choose therecipientonthe[SelectRecipient] screenandpressthe<m>button. 3 Connecttoanaccesspoint. zz Pressthe<o><p>buttonsorturnthe <7>dialtochoose[AddanAccess Point],andthenpressthe<m>button. XX Alistofdetectedaccesspointswillbe displayedinthe[AccessPointConnect] screen. XX Forfurtherinstructions,see“Preparing toRegisteraComputer”(=56)or “ConnectingtoAccessPointsintheList” (=67). XX Forinstructionsafterconnectingtoan accesspoint,see“AdjustingSettings forUsingWebServicesFromCANON iMAGEGATEWAY”(=46). Y P O C • Youcanalsoconigurethissettingthroughtouch-screenoperations (=91). • WhenaconnectiondestinationissetusingtheTouchActionssetting (=248),youcanautomaticallyaccessthefunctiontoconnecttothelast connecteddestinationfromthenexttimebyjustdraggingonthescreen withoutneedingtoperformtheconnectionoperation. 49 Connecting to a Smartphone AddasmartphonewithwirelessLANfunctionalitytothelistofavailable devicesasfollows. Adding a Smartphone AddasmartphonetoyourlistofdevicestoconnecttoviawirelessLAN. Whenestablishingawirelessconnectionwithasmartphone,youcaneither usethecameraasanaccesspoint(CameraAccessPointmode)oruse anotheraccesspoint. Followtheseinstructionswhenusingthecameraasanaccesspoint.When usinganotheraccesspoint,see“ConnectingtoAccessPointsintheList” (=67). • BeforeconnectingtoacameraviawirelessLAN,downloadandinstallthe dedicatedCameraWindow(free)applicationonyoursmartphone.Fordetails onthisapplication(supportedsmartphonesandincludedfunctions),referto theCanonwebsite. 1 AccessthewirelessLAN screen. zz Pressthe<o>button. Y P O 2 Chooseasmartphone. C zz Pressthe<o><p><q><r>buttonsor turnthe<7>dialtochoose[ thenpressthe<m>button. 50 ],and ConnectingtoaSmartphone 3 Choose[AddaDevice]. zz Pressthe<o><p>buttonsorturnthe <7>dialtochoose[AddaDevice],and thenpressthe<m>button. 4 Selectthecameraastheaccess point. zz Pressthe<o><p>buttonsorturnthe <7>dialtochoose[SetCameraAs AccessPoint],andthenpressthe<m> button. Y P O C 5 Usethesmartphonetoconnect tothenetworkdisplayedonthe camerascreen. zz ChoosethedisplayedSSID(network name)fromthesmartphone’sWi-Fi settingmenu. zz Entertheencryptionkeydisplayedonthe camerascreenintothepasswordieldon thesmartphone. 51 ConnectingtoaSmartphone 6 StartCameraWindowonthe smartphone. XX Oncethesmartphoneisrecognizedon thecamera,thedeviceconnectionscreen willbedisplayedonthecamera. 7 Chooseasmartphoneto connectto. zz Choosethesmartphoneforthe connection(eitherbypressingthe <o><p>buttonsorbyturningthe<7> dial),andthenpressthe<m>button. Y P O 8 Adjusttheprivacysettings. zz Pressthe<q><r>buttonsorturnthe <7>dialtochoose[Yes],andthenpress the<m>button. XX Youcannowusethesmartphoneto receiveimagessentfromthecamera, ortogeotagimagesonthecamera (=78). XX Whenthesmartphonehasbeenadded successfully,theimagetransferscreen willbedisplayed(=75). C 52 ConnectingtoaSmartphone • Allcameraimagescanbeviewedfromtheconnectedsmartphone whenyouchoose[Yes]instep8.Tokeepcameraimagesprivate, sothattheycannotbeviewedfromthesmartphone,choose[No] instep8. • Theimagequalitylevelformoviesthatcanbesentmaydifferdepending onthesmartphone.Refertotheinstructionmanualprovidedwithyour smartphonefordetails. • Toaddmultiplesmartphones,repeattheaboveproceduresstartingfrom step1. • Onceasmartphoneisadded,thesmartphonenamewillbedisplayedon thescreeninstep3.Toconnecttoasmartphoneagain,simplychoosethe smartphonenamefromthelist. • Tochangeprivacysettingsforsmartphonesaddedtothelist,choosethe smartphonewhosesettingsyouwanttochangefrom[EditaDevice]instep 3,andthenchoose[ViewSettings]. • Youcanalsoconigurethissettingthroughtouch-screenoperations (=91). • WhenaconnectiondestinationissetusingtheTouchActionssetting (=248),youcanautomaticallyaccessthefunctiontoconnecttothelast connecteddestinationfromthenexttimebyjustdraggingonthescreen withoutneedingtoperformtheconnectionoperation. Y P O C 53 Connecting to Another Camera ConnecttwocamerasviawirelessLANandsendimagesbetweenthemas follows. Adding a Camera AddacameratoyourlistofdevicestoconnecttoviawirelessLAN. • OnlyCanon-brandcamerasequippedwithawirelessLANfunctioncanbe connectedtowirelessly.EvenCanon-brandcamerasthatsupportEye-Fi cardscannotbeconnectedtoiftheydonothaveawirelessLANfunction. YoucannotconnecttoPowerShotSD430DIGITALELPHWIRELESS/ DIGITALIXUSWIRELESScameraswiththiscamera. 1 AccessthewirelessLAN screen. zz Pressthe<o>button. 2 Chooseacamera. zz Pressthe<o><p><q><r>buttonsor Y P O turnthe<7>dialtochoose[4],and thenpressthe<m>button. C 54 ConnectingtoAnotherCamera 3 Choose[AddaDevice]. zz Pressthe<o><p>buttonsorturnthe <7>dialtochoose[AddaDevice],and thenpressthe<m>button. zz Followsteps1–3onthetargetcamera. XX Cameraconnectioninformationwillbe addedwhen[Startconnectionontarget camera]isdisplayedonbothcamera screens. XX Whenthetargetcamerahasbeenadded successfully,theimagetransferscreen willbedisplayed(=75). Y P O • Toaddmultiplecameras,repeattheaboveproceduresstartingfromstep1. • Onceacameraisadded,thecameranamewillbedisplayedonthescreen instep3.Toconnecttoacameraagain,simplychoosethecameraname fromthelist. C • Youcanalsoconigurethissettingthroughtouch-screenoperations (=91). • WhenaconnectiondestinationissetusingtheTouchActionssetting (=248),youcanautomaticallyaccessthefunctiontoconnecttothelast connecteddestinationfromthenexttimebyjustdraggingonthescreen withoutneedingtoperformtheconnectionoperation. 55 Connecting to a Computer Conigurecamerasettingsforawirelesscomputerconnection,andthen transferimagestothecomputerwirelesslyusingtheincludedsoftware CameraWindowasfollows. • Whenconnectedtoacomputer,thecameraisusedtoestablishthe connectionandthenthecomputer(includedsoftwareCameraWindow)is usedtotransferimages. • Fordetailsontheincludedsoftware,seetheSoftware Guide. Preparing to Register a Computer Preparetoregisteracomputer. CheckingtheComputerandWirelessLANSetup ThecameracanconnecttothefollowingcomputersviawirelessLAN. Windows • Windows7ServicePack1 Macintosh • MacOSX10.6.8orlater • Windows7StarterandHomeBasiceditionsarenotsupported. • Windows7N(Europeanversion)andKN(SouthKoreanversion) requireaseparatedownloadandinstallofWindowsMedia FeaturePack. Forfurtherdetails,seethefollowingwebsites. http://go.microsoft.com/fwlink/?LinkId=159730 Y P O C TousewirelessLAN,anaccesspointbaseunit(wirelessLANrouter,etc.) connectedtoacomputerisrequired. Additionally,theincludedsoftware,CameraWindowmustbeinstalled. 56 ConnectingtoaComputer • BesuretouseawirelessLANbaseunitthatconformstostandardslistedon “Speciications”(=333). • Arouterisadevicethatcreatesanetwork(LAN)structureforconnecting multiplecomputers.Arouterthatcontainsaninternalwirelessfunctionis calledawireless(LAN)router. • Thisguidewillrefertoallwirelessroutersandbasestationsas“access points”. • Whenunsureofyourcomputersetup,refertotheusermanualprovidedwith thecomputer. CheckingYourWirelessLANSettings IfyouarealreadyusingawirelessLAN,checkthefollowingitemsandmark eachoneonthechecksheet. • Ifsystemadministratorstatusisneededtoadjustnetworksettings, contactthesystemadministratorfordetails. • Thesesettingsareveryimportantfornetworksecurity.Exercise adequatecautionwhenchangingthesesettings. • Forinstructionsonhowtochecksettings,refertotheuserguide includedwithyouraccesspoint. Y P O Checksheet C Networkname(SSID/ESSID) TheSSIDorESSIDfortheaccesspointyouuse. ○None ○WEP(opensystem Networkcertiicate/dataencryption authentication) (encryptionmethod/encryptionmode) ○WPA-PSK(TKIP) Themethodforencryptingdataduringwirelesstransmission. ○WPA-PSK(AES) ○WPA2-PSK(TKIP) ○WPA2-PSK(AES) Encryptionkey(networkkey) Thekeyusedwhenencryptingdataduringwireless transmission. Keyindex(sentkey) Networkcertiicate/dataencryptionisthesetkeywhenusing ○1 WEP. 57 ConnectingtoaComputer • IfyouuseMACaddressilteringonyourwirelessLAN,besuretoenter thecamera’sMACaddresstoyouraccesspoint.YoucanchecktheMAC addressforyourcamerabychoosingthe[3]tab,[WirelessLANSettings], andthen[CheckMACAddress]. • Thedifferenttypesofsecurityareasfollows. -None:Encryptionisnotusedwhenconnectingtoanaccesspoint. -WEP:AstandardofencryptionsupportedbymostwirelessLANdevices. -WPA-PSK(TKIP):AnimprovedWEPstandardthatusesTKIPencryption. -WPA-PSK(AES):AnimprovedWEPstandardthatusesAESencryption. -WPA2-PSK(TKIP):AnimprovedWPAstandardthatusesTKIPencryption. -WPA2-PSK(AES):AnimprovedWPAstandardthatusesAESencryption. • AESuseshighersecuritythanTKIP. • ThereisnodifferenceinsecuritylevelsbetweenWPAandWPA2. Y P O C 58 ConnectingtoaComputer Computer Settings for Connecting to a Wireless LAN (Windows only) WhenusingaWindowscomputer,wirelessLANconnectionsettingsonthe computerarenecessarytoconnecttoacamerawirelessly. ConirmthatyourcomputerisconnectedtoawirelessLAN,andthenfollow eachofthenextsteps. TurningOnMediaStreamingandNetworkDiscovery Ifyouactivatemediastreaming,thecamerawillbeabletodetectand searchyourcomputerwhentheyareconnectedwirelessly. Ifyouactivatenetworkdiscovery,yourcomputerwillbeabletodetectand searchthecamera. 1 OpentheControlPanelwindow. zz Click[ControlPanel]fromtheStartmenu. 2 Choose[NetworkandInternet]. zz Click[NetworkandInternet]. Y P O 3 Choose[NetworkandSharing C Center]. zz Click[NetworkandSharingCenter]. 4 Choose[Changeadvanced sharingsettings]. zz Click[Changeadvancedsharing settings]. 5 Choose[Choosemedia streamingoptions...]. zz Click[Choosemediastreamingoptions...] forthecurrentproile. 59 ConnectingtoaComputer 6 Turnonmediastreaming. zz Click[Turnonmediastreaming]. 7 Choose[OK]. zz Click[OK]. 8 Turnonnetworkdiscovery. zz Click[Turnonnetworkdiscovery]forthe currentproile. 9 Savethechanges. zz Click[Savechanges]. 10 ClosetheControlPanelwindow. EnablingICMPInboundEchoRequestsandUPnP Services Y P O EnablingICMP(InternetControlMessageProtocol)willallowyoutocheck thenetworkconnectionstatus. EnablingUPnP(UniversalPlug&Play)willallowthenetworkto automaticallyrecognizenetworkdevices. C 1 OpentheControlPanelwindow. zz Click[ControlPanel]fromtheStartmenu. 2 Choose[SystemandSecurity]. zz Click[SystemandSecurity]. 60 ConnectingtoaComputer 3 Choose[WindowsFirewall]. zz Click[WindowsFirewall]. 4 Choose[Advancedsettings]. zz Click[Advancedsettings]. 5 Choose[InboundRules]. zz Click[InboundRules]. 6 EnableICMPinboundecho requests. zz Choose[FileandPrinterSharing]items endingin[ICMPv4],andthenclick [EnableRule]ontherightsideofthe window. 7 TurnonUPnPservices. zz Choose[WirelessPortableDevices Y P O (UPnP-In)],andthenclick[EnableRule] ontherightsideofthewindow. 8 Closethe[WindowsFirewall C withAdvancedSecurity] window. 9 ClosetheControlPanelwindow. • If[DisableRule]isdisplayedinsteps6–7,theitemisalreadyenabled,and canbeleftasis. 61 ConnectingtoaComputer Adding a Computer AddacomputertoyourlistofdevicestoconnecttoviawirelessLAN. • Besuretoalsoreadtheuserguideincludedwithyouraccesspoint. 1 AccessthewirelessLAN screen. zz Pressthe<o>button. 2 Chooseacomputer. zz Pressthe<o><p><q><r>buttonsor turnthe<7>dialtochoose[ thenpressthe<m>button. Y P O C 62 ],and ConnectingtoaComputer 3 Choose[AddaDevice]. zz Pressthe<o><p>buttonsorturnthe <7>dialtochoose[AddaDevice],and thenpressthe<m>button. XX Alistofdetectedaccesspointswillbe displayedinthe[AccessPointConnect] screen. XX Proceedtoeither“ConnectingtoaWPS SupportedAccessPoint”(=64)or “ConnectingtoAccessPointsintheList” (=67). XX Tomanuallychooseandconnecttoan accesspoint,seethe supplemental explanationcolumn(=68)in “ConnectingtoAccessPointsintheList”. • Onceacomputerisadded,thecomputernamewillbedisplayedonthe screeninstep3.Toconnecttoacomputeragain,simplychoosethe computernamefromthelist. Y P O • Youcanalsoconigurethissettingthroughtouch-screenoperations (=91). • WhenaconnectiondestinationissetusingtheTouchActionssetting (=248),youcanautomaticallyaccessthefunctiontoconnecttothelast connecteddestinationfromthenexttimebyjustdraggingonthescreen withoutneedingtoperformtheconnectionoperation. C 63 ConnectingtoaComputer ConnectingtoaWPSSupportedAccessPoint WPS(Wi-FiProtectedSetup)isastructureforsimplifyingsettingswhen connectingonewirelessLANdevicetoanother.Youcanuseeither PushButtonConigurationMethodorPINMethodforsettingsonaWPS supporteddevice. Thepushbuttonconigurationmethodisusedinthefollowingexplanation. • Refertotheuserguideprovidedwithyouraccesspointtocheckifitsupports WPS. 4 Choose[WPSConnection]. zz Pressthe<o><p>buttonsorturnthe <7>dialtochoose[WPSConnection], andthenpressthe<m>button. Y P O C 5 Choose[PBCMethod]. zz Pressthe<o><p>buttonsorturnthe <7>dialtochoose[PBCMethod],and thenpressthe<m>button. 64 ConnectingtoaComputer 6 Establishtheconnection. zz Ontheaccesspoint,holddowntheWPS connectionbuttonforafewseconds. zz Onthecamera,pressthe<m>button. XX Thecamerawillconnecttotheaccess point. XX Alistofcomputersconnectedtothe accesspointwillappearinthe[Selecta Device]screen. 7 Chooseacomputertoconnect to. zz Pressthe<o><p>buttonsorturnthe <7>dialtochoosethecomputername, andthenpressthe<m>button. zz WhenusingaMacintoshcomputer, see“UsingCameraWindowtoTransfer ImagestoaComputer”(=69). Y P O C 8 Installadriver(Windowsonly). zz Onthecomputer,clicktheStartmenu andchoose[ControlPanel].Click[Adda device]. 65 ConnectingtoaComputer zz Doubleclicktheconnectedcameraicon. XX Driverinstallationwillbegin. XX Afterdriverinstallationiscomplete,and thecameraandcomputerconnection isenabled,theAutoPlayscreenwillbe displayed.Nothingwillbedisplayedon thecamerascreen. zz Proceedto“UsingCameraWindow toTransferImagestoaComputer” (=69). • Ifyouchose[PINMethod]instep5,aPINcodewillbedisplayedonthe screen.Besuretosetthiscodeintheaccesspoint.Chooseadeviceinthe [SelectaDevice]screen.Forfurtherdetails,refertotheuserguideincluded withyouraccesspoint. • Toaddmultiplecomputers,repeattheaboveproceduresstartingfromstep1. • Wheninishedaddingcomputers,pressthe<n>buttonontheimage transmissionscreendisplayedafteryouconnecttoacomputerinstep7. Choose[OK]aftertheconirmationmessage,andthenpressthe<m> button. Y P O • Youcanalsoconigurethissettingthroughtouch-screenoperations (=91). C 66 ConnectingtoaComputer ConnectingtoAccessPointsintheList 4 Chooseanaccesspoint. zz Pressthe<o><p>buttonsorturnthe <7>dialtochooseanaccesspoint,and thenpressthe<m>button. 5 Enteranencryptionkey. zz Pressthe<m>buttontoaccessthe keyboard,andthenentertheencryption key(=43). zz Pressthe<o><p>buttonsorturnthe <7>dialtochoose[Next],andthen pressthe<m>button. Y P O C 6 Choose[Auto]. zz Pressthe<o><p>buttonsorturnthe <7>dialtochoose[Auto],andthen pressthe<m>button. XX Alistofotherdevicesconnectedtothe accesspointwillappearinthe[Selecta Device]screen. 67 ConnectingtoaComputer 7 Chooseacomputertoconnect to. zz Choosethecomputertoconnectto, followingsteps7–8on=65.The computerisnowaddedtothelist. • Upto16accesspointswillbedisplayed.Ifnoaccesspointsaredetected, choose[ManualSettings]instep4tomanuallysetanaccesspoint. Followon-screeninstructionsandenteranSSID,securitysettings,andan encryptionkey. • [***]isdisplayedfortheencryptionkeyinstep5whenthesameaccess pointisusedtoconnecttoanotherdevice.Tousethesameencryptionkey, choose[Next](eitherpressthe<q><r>buttonsorturnthe<7>dial)and pressthe<m>button. • Toaddmultiplecomputers,repeattheaboveproceduresstartingfromstep1. • Youcanalsoconigurethissettingthroughtouch-screenoperations (=91). Y P O C 68 ConnectingtoaComputer Using CameraWindow to Transfer Images to a Computer Usethecomputer(includedsoftwareCameraWindow)totransferimages fromthecameratothecomputer. • FordetailsonhowtouseCameraWindow,seetheSoftware Guide (=27). StartCameraWindow Windows zz Click[DownloadsImagesFromCanon CamerausingCanonCameraWindow]. XX CameraWindowwillbedisplayed. XX Proceedto“ImportingUntransferred ImagestoaComputer”(=70)or “ChoosingImagestoImport”(=71). Macintosh Y P O XX CameraWindowwillbeautomatically C displayedwhenawirelessconnection isestablishedbetweenthecameraand computer. • IfCameraWindowisnotdisplayedwhenusingaMacintoshcomputer,click theCameraWindowiconintheDock. 69 ConnectingtoaComputer ImportingUntransferredImagestoaComputer Importimagestoacomputerthathavenotyetbeentransferred. Importuntransferredimages. zz Click[ImportImagesfromCamera]. zz Click[ImportUntransferredImages]. XX Imagesthathavenotyetbeentransferred toacomputerwillbeimported. zz Click[OK]inthescreenthatisdisplayed afterimageimportiscomplete. • CameraWindowdefaultsettingswillsaveimagestothePicturesorMy Picturesfoldersonacomputer.Fordetailsonhowtochangethedestination foldersforsavedimages,seetheSoftware Guide(=27). • Ifyouclick[ImportAllImages],allimagesonthecamerawillbeimported. • Movieswilltakelongertoimportsincetheilesizeislargerthanstillimages. • Todisconnectfromthecamera,turnoffthecamera. Y P O C 70 ConnectingtoaComputer ChoosingImagestoImport Choosewhicheverimagesyouliketoimporttoacomputer. 1 Displaytheimageimport screen. zz Click[ImportImagesfromCamera]. zz Click[SelectImagestoImport]. 2 Chooseanimage. zz Clickimagesyouwanttoimport. XX Thebackgroundofselectedimages willturnblue.Click[ ]todeselectthe images,andthebackgroundwillturn gray. Y P O 3 Importimages. zz Click[ C ](import). XX Theselectedimageswillbeimportedto thecomputer. zz Click[OK]inthescreenthatisdisplayed afterimageimportiscomplete. • CameraWindowdefaultsettingswillsaveimagestothePicturesorMy Picturesfoldersonacomputer.Fordetailsonhowtochangethedestination foldersforsavedimages,seetheSoftware Guide(=27). • Movieswilltakelongertoimportsincetheilesizeislargerthanstillimages. • Todisconnectfromthecamera,turnoffthecamera. 71 Connecting to a Printer Addawirelessprintertothelistofavailabledevicesasfollows. Adding a Printer AddaprintertoyourlistofdevicestoconnecttoviawirelessLAN. Whenestablishingawirelessconnectionwithaprinter,youcaneitheruse thecameraasanaccesspoint(CameraAccessPointmode)oruseanother accesspoint. • Followtheseinstructionswhenusingthecameraasanaccesspoint.When usinganotheraccesspoint,see“ConnectingtoAccessPointsintheList” (=67)in“AddingaComputer”. 1 AccessthewirelessLAN screen. zz Pressthe<o>button. 2 Chooseaprinter. zz Pressthe<o><p><q><r>buttonsor Y P O turnthe<7>dialtochoose[2],and thenpressthe<m>button. C 72 ConnectingtoaPrinter 3 Choose[AddaDevice]. zz Pressthe<o><p>buttonsorturnthe <7>dialtochoose[AddaDevice],and thenpressthe<m>button. 4 Selectthecameraastheaccess point. zz Pressthe<o><p>buttonsorturnthe <7>dialtochoose[SetCameraAs AccessPoint],andthenpressthe<m> button. Y P O C 5 Usetheprintertoconnectto thenetworkdisplayedonthe camerascreen. zz ChoosethedisplayedSSID(network name)fromtheprinter’sWi-Fisetting menu. 73 ConnectingtoaPrinter 6 Choosetheprinter. zz Oncetheprinterisreadyforthe connection,pressthe<m>buttonwhen theprinternameisdisplayedonthe camera. XX Whentheprinterhasbeenadded successfully,theprintingscreenwillbe displayed. 7 Chooseanimagetoprint. zz Chooseanimagetoprint(eitherby pressingthe<q><r>buttonsorby turningthe<7>dial),andthenpress the<m>buttontoaccesstheprinting screen. zz Pressthe<o><p>buttonsorturnthe <7>dialtochoose[Print],andthen pressthe<m>button. XX Printingnowbegins. zz Fordetailedprintinginstructions,see =286. Y P O C • Onceaprinterisadded,theprinternamewillbedisplayedonthescreenin step3.Toconnecttoaprinteragain,simplychoosetheprinternamefrom thelist. • WhenaconnectiondestinationissetusingtheTouchActionssetting (=248),youcanautomaticallyaccessthefunctiontoconnecttothelast connecteddestinationfromthenexttimebyjustdraggingonthescreen withoutneedingtoperformtheconnectionoperation. 74 Sending Images Sendimageswirelesslytodestinationsregisteredonthecameraasfollows. • Imagescanbeuploadedtosocialnetworkingservicesorsenttoemail addresses,viaCANONiMAGEGATEWAY.SeeCANONiMAGEGATEWAY fordetails. • Youcansendupto50imagestogetherwithonesendoperation.Youcan sendmoviestogetheraslongasthetotalplaybacktimeiswithin2minutes. However,ifthedestinationisaWebservice,thenumberofmoviesand imagesthatcanbesentmaybelessdependingontheWebservice.Seethe desiredWebservicefordetails. • Dependingontheconditionofthenetworkyouareusing,itmaytakealong timetosendmovies.Besuretokeepaneyeonthecamerabatterylevel. • Whenconnectedtoacomputer,imagesaretransferredusingthecomputer (includedsoftwareCameraWindow)insteadofthecamera(=69). Sending Images Individually 1 Chooseanimage. zz Turnthe<7>dialtochooseanimage tosend. Y P O 2 Sendtheimage. zz Pressthe<q><r>buttonstochoose [Sendthisimage],andthenpressthe <m>button. zz WhenuploadingtoYouTube,readthe termsofservice,choose[IAgree],and pressthe<m>button. XX Imagetransferwillbegin. XX AfterimagesareuploadedtoaWeb service,[OK]isdisplayed.Pressthe <m>buttontoreturntotheplayback screen. XX Aftersendingimagestoacamera orsmartphone,[Imagesent]willbe displayed,andthedisplaywillreturnto theimagetransferscreen. C 75 SendingImages • Todisconnectfromthecamera,pressthe<n>button,andafterthe conirmationmessage,choose[OK](eitherpressthe<q><r>buttonsor turnthe<7>dial)andpressthe<m>button. • Onthescreen,wirelesssignalstrengthisindicatedbythefollowingicons. [ ]high,[ ]medium,[ ]low,[ ]weak However,noiconisdisplayedwhenthecameraisusedasanaccesspoint. • Youcanalsosendimagesbytouching[Sendthisimage]. ChoosingtheImageResolution(Size) Onthescreendescribedon=75,youcanchoosetheresolution(size) ofimagestosendbypressingthe<o><p>buttons. • Tosendimagesatoriginalsize,select[No]astheresizingoption. • Choosing[ ]or[ ]willresizeimagesthatarelargerthantheselected sizebeforesending. Y P O • Moviescannotberesized. Sending Multiple Images C 1 Choose[Selectandsend]. zz Pressthe<q><r>buttonstochoose [Selectandsend],andthenpressthe <m>button. 76 SendingImages 2 Chooseimages. zz Pressthe<o><p><q><r>buttonsto chooseanimagetosend,andthenpress the<m>button.[ ]isdisplayed. zz Tocancelselection,pressthe<m> buttonagain.[ ]isnolongerdisplayed. zz Repeatthisprocesstochooseadditional images. zz Afteryouinishchoosingimages,press the<n>button. 3 Sendtheimages. zz Pressthe<q><r>buttonsorturnthe <7>dialtochoose[Send],andthen pressthe<m>button(=75). Y P O C • Youcanalsochooseimagesinstep2bypressingthezoomlevertwice toward<k>toaccesssingle-imagedisplayandthenpressingthe<q><r> buttonsorturningthe<7>dial. • Instep3,youcanchoosetheresolution(size)toresizeimagestobefore sending(=76). • Youcanalsoaccessthescreeninstep2bytouching[Selectandsend]in step1,andsendimagesbytouching[Send]instep3. • Youcanalsochooseimagesbytouchingthemonthescreeninstep2. ]willdisplaythescreeninstep3. Touching[ 77 Geotagging Images on the Camera GPSdatarecordedonasmartphoneusingthededicatedCameraWindow application(=50)canbeaddedtoimagesonthecamera.Imagesare taggedwithinformationincludingthelatitude,longitude,andelevation. • Beforeshooting,makesurethedateandtimeandyourhome timezonearesetcorrectly.(See“SettingtheDateandTime” (=18).)Additionally,in[TimeZone](=264),specifyany shootingdestinationsthatareinothertimezones. • Thesmartphoneyouwilluseforgeotaggingmustbeauthorizedto viewtheimagesonthecamera(=52). • Othersmaybeabletolocateoridentifyyoubyusinglocationdata inyourgeotaggedstillimagesormovies.Becarefulwhensharing theseimageswithothers,aswhenpostingimagesonlinewhere manyotherscanviewthem. Other Information EditorerasewirelessLANsettingsasfollows. Y P O Editing Connection Information Editconnectioninformationsavedtothecamera.Youcanchangedevice nicknames(displaynames)thataredisplayedonthecamera,anderase connectioninformation. Thefollowingexplainstheprocedurewhenthetargetdeviceisacomputer. C 1 AccessthewirelessLAN screen. zz Pressthe<o>button. 78 OtherInformation 2 Chooseadevicetoedit. zz Pressthe<o><p><q><r>buttons orturnthe<7>dialtochoosetheicon ofthedevicetoedit,andthenpressthe <m>button. 3 Choose[EditaDevice]. zz Pressthe<o><p>buttonsorturnthe <7>dialtochoose[EditaDevice],and thenpressthe<m>button. Y P O C 4 Chooseadevicetoedit. zz Pressthe<o><p>buttonsorturnthe <7>dialtochoosethedevicetoedit, andthenpressthe<m>button. 79 OtherInformation 5 Chooseanoptiontoedit. zz Pressthe<o><p>buttonsorturnthe <7>dialtochooseanoptiontoedit,and thenpressthe<m>button. zz Forinstructionsonerasingconnection informationorchangingnicknames,see “ErasingConnectionInformation”and latersections,below. • Editableitemsdifferdependingonthedeviceordestination. Webservices •Eraseconnectioninformation(accesspoints) Smartphones •Changenicknamethatisdisplayedonthecamera •Changeprivacysettingsforimages •Eraseconnectioninformation Anothercamera/ computer/ printer •Changenicknamethatisdisplayedonthecamera •Eraseconnectioninformation Y P O • Connectioninformationreferstoinformationonhowthecameraconnectsto anotherdeviceordestination. C • Youcanalsoconigurethissettingthroughtouch-screenoperations (=91). ErasingConnectionInformation 6 Choose[Select&Delete ConnectionInfo]. zz Pressthe<o><p>buttonsorturnthe <7>dialtochoose[Select&Delete ConnectionInfo],andthenpressthe <m>button. zz Whenthetargetdeviceisacamera, pressthe<o><p>buttonsorturnthe <7>dialtochoose[EraseAllConnection Info],andthenpressthe<m>button. 80 OtherInformation 7 Choosetheconnectioninfoto delete. zz Pressthe<o><p>buttonsorturn the<7>dialtochoosetheconnection informationtoerase,andthenpressthe <m>button. zz When[Erase(connectioninformation)?] isdisplayed,pressthe<q><r>buttons orturnthe<7>dialtochoose[OK],and thenpressthe<m>button. XX Theselectedconnectioninformationwill beerased. XX Thedisplayrevertstothescreeninstep 6. Y P O • Whenyoueraseallconnectioninformationfromatargetdevice,itisno longerlisted,andthedisplayrevertstothescreeninstep4. • Whenyouerasealltargetdevices,thedisplayrevertstothescreeninstep3. • Toeraseallconnectioninformationforadeviceatonce,choose[EraseAll ConnectionInfo]instep6. C • Youcanalsoconigurethissettingthroughtouch-screenoperations (=91). 81 OtherInformation ChangingaDeviceNickname Youcanchangethedevicenickname(displayname)thatisdisplayedon thecamera. 6 Changethenickname. zz Choose[ChangeDeviceNickname]. zz Selecttheinputieldandpressthe<m> button.Usethekeyboarddisplayedto enteranewnickname(=43). XX Thecamerawillreturntothedisplayin step4andthenewnicknamewillbe displayed. • Youcanalsoconigurethissettingthroughtouch-screenoperations (=91). Y P O Returning the Wireless LAN Settings to Default C ReturnthewirelessLANsettingstodefaultifyoutransferownershipofthe cameratoanotherperson,ordisposeofit. 1 Accessthemenu. zz Pressthe<n>button. 2 Choose[WirelessLANSettings]. zz Movethezoomlevertochoosethe[3] tab. zz Pressthe<o><p>buttonsorturn the<7>dialtochoose[WirelessLAN Settings],andthenpressthe<m>button. 82 OtherInformation 3 Choose[ResetSettings]. zz Pressthe<o><p>buttonsorturnthe <7>dialtochoose[ResetSettings],and thenpressthe<m>button. zz Whenthe[ResetSettings]screenis displayed,pressthe<q><r>buttonsor turnthe<7>dialtochoose[OK],and thenpressthe<m>button. XX WirelessLANsettingswillberesetto defaults,andthecamerawillreturnto initialscreenforthissetting. • WhenreturningthewirelessLANsettingstodefaults,allWebservicesset usingacomputerwillalsobeerasedfromthecamera.Besuretoconirm thatyouwanttoresetallwirelessLANsettingsbeforeusingthisoption. • Toresetothersettings(asidefromwirelessLAN)todefaults,choose[Reset All]inthe[3]tab. Y P O • Youcanalsoconigurethissettingthroughtouch-screenoperations (=91). C 83 Y P O C 84 Advanced Guide 1 Camera Basics Practicalguidethatintroducesothercamerabasicsand describesshootingandplaybackoptions Y P O C 85 On/Off ShootingMode zz Pressthepowerbuttontoturnthe cameraonandprepareforshooting. zz Toturnthecameraoff,pressthepower buttonagain. PlaybackMode zz Pressthe<1>buttontoturnthecamera onandviewyourshots. zz Toturnthecameraoff,pressthe<1> buttonagain. • ToswitchtoPlaybackmodefromShootingmode,pressthe<1>button. • ToswitchtoShootingmodefromPlaybackmode,presstheshutterbutton halfway(=87). • Thelenswillberetractedafteraboutoneminute,oncethecameraisin Playbackmode,andthelashwillbeloweredifitwasup.Youcanturnthe cameraoffwhenthelensisretractedbypressingthe<1>button. Y P O Power-Saving Features (Auto Power Down) Asawaytoconservebatterypower,thecameraautomaticallydeactivates thescreen(DisplayOff)andthenturnsitselfoffafteraspeciicperiodof inactivity. C PowerSavinginShootingMode Thescreenisautomaticallydeactivatedafteraboutoneminuteofinactivity. Inabouttwomoreminutes,thelensisretractedandthecameraturnsitself off.Toactivatethescreenandprepareforshootingwhenthescreenisoff butthelensisstillout,presstheshutterbuttonhalfway(=87). PowerSavinginPlaybackMode Thecameraturnsitselfoffautomaticallyafteraboutiveminutesof inactivity. • Adjustthetimingofautomaticcameraandscreendeactivationasneeded (=271). • Powersavingisnotactivewhilethecameraisconnectedtoacomputervia USB(=31),orwhenconnectedtootherdeviceswirelessly(=35). 86 Shutter Button Toensureyourshotsareinfocus,alwayspresstheshutterbuttonlightly (halfway)initially.Oncethesubjectisinfocus,pressthebuttonalltheway downtoshoot. Inthismanual,shutterbuttonoperationsaredescribedaspressingthe buttonhalfwayorall the way down. 1 Presshalfway.(Presslightlyto focus.) zz Presstheshutterbuttonhalfway.The camerabeepstwice,andAFframesare displayedaroundimageareasinfocus. 2 Pressallthewaydown.(From thehalfwayposition,pressfully toshoot.) XX Thecamerashoots,asashuttersound isplayed. Y P O zz Keepthecamerastilluntiltheshutter soundends. • Imagesmaybeoutoffocusifyoushootwithoutinitiallypressing theshutterbuttonhalfway. • Lengthofshuttersoundplaybackvariesdependingonthetime requiredfortheshot.Itmaytakelongerinsomeshootingscenes, andimageswillbeblurryifyoumovethecamera(orthesubject moves)beforetheshuttersoundends. C 87 Shooting Modes Usethemodedialtoaccesseachshootingmode. P,Tv,Av,M,andCModes Takeavarietyofshotsusing yourpreferredsettings (=165,201). AutoMode Fullyautomaticshooting, withcamera-determined settings(=96). MovieDigestMode Youcanmakeashortmovieofaday justbyshootingstillimages(=136). SceneMode Shootwithoptimalsettingsforspeciic scenes(=137). CreativeFiltersMode Addavarietyofeffectstoimageswhen shooting(=142). MovieMode Forshootingmovies(=161). Youcanalsoshootmovies whenthemodedialisnot settoMoviemode,simplyby pressingthemoviebutton. Y P O Shooting Display Options Pressthe<p>buttontoviewotherinformationonthescreen,ortohide theinformation.Fordetailsontheinformationdisplayed,see=314. C Informationis displayed Noinformationis displayed • Screenbrightnessisautomaticallyincreasedbythenightdisplayfunction whenyouareshootingunderlowlight,makingiteasiertocheckhowshots arecomposed.However,on-screenimagebrightnessmaynotmatchthe brightnessofyourshots.Notethatanyon-screenimagedistortionorjerky subjectmotionwillnotaffectrecordedimages. • Forplaybackdisplayoptions,see=219. 88 FUNC. Menu ConigurecommonlyusedshootingfunctionsthroughtheFUNC.menuas follows. Notethatmenuitemsandoptionsvarydependingontheshootingmode (=320–323). 1 AccesstheFUNC.menu. zz Pressthe<m>button. 2 Chooseamenuitem. zz Pressthe<o><p>buttonstochoosea menuitem. XX Availableoptionsareshownatthebottom ofthescreen. Y P O Options MenuItems 3 Chooseanoption. zz Pressthe<q><r>buttonsorturnthe C <7>dialtochooseanoption. ]iconcan beconiguredbypressingthe<n> button. zz Optionslabeledwitha[ 4 Finishthesetupprocess. zz Pressthe<m>button. XX Thescreenbeforeyoupressedthe <m>buttoninstep1isdisplayedagain, showingtheoptionyouconigured. • Toundoanyaccidentalsettingchanges,youcanrestorethecamera’s defaultsettings(=276). 89 FUNC.Menu UsingTouch-ScreenOperationstoConigureSettings zz AccesstheFUNC.menubypressingthe Options MenuItems <m>button,andtheneitherdragthe menuupordowntoscrollit,ortouchan itemtochooseit. zz Touchanoptiontochooseit.Touchthe optionagaintoconirmyourchoice,and thenpressthe<m>buttontoreturnto thepreviousscreen. zz Youcanaccessthescreenforoptions ]iconbytouching labeledwitha[ ]. [ Y P O C 90 MENU Menu Conigureavarietyofcamerafunctionsthroughothermenusasfollows. Menuitemsaregroupedbypurposeontabs,suchasshooting[4], playback[1],andsoon.Notethatavailablesettingsvarydependingon theselectedshootingorplaybackmode(=324–330). 1 Accessthemenu. zz Pressthe<n>button. 2 Chooseatab. zz Movethezoomlevertochooseatab. zz Afteryouhavepressedthe<o><p> buttonstochooseatabinitially,youcan switchbetweentabsbypressingthe <q><r>buttons. Y P O C 3 Chooseasetting. zz Pressthe<o><p>buttonsorturnthe <7>dialtochooseasetting. zz Tochoosesettingswithoptionsnot shown,irstpressthe<m>or<r> buttontoswitchscreens,andtheneither pressthe<o><p>buttonsorturnthe <7>dialtoselectthesetting. zz Toreturntothepreviousscreen,press the<n>button. 91 MENUMenu 4 Chooseanoption. zz Pressthe<q><r>buttonstochoosean option. 5 Finishthesetupprocess. zz Pressthe<n>buttontoreturntothe screendisplayedbeforeyoupressedthe <n>buttoninstep1. • Toundoanyaccidentalsettingchanges,youcanrestorethecamera’s defaultsettings(=276). Touch-ScreenOperations zz Toaccesstabs,pressthe<n>buttontoaccessthemenu,and Y P O thentouchthedesiredtab. zz Dragthesettingsupordowntoscrollthem,ortouchasettingto chooseit. zz Touchanoptiontochooseit.Settingsshownwith[q][r]iconsoneither sidecanalsobeconiguredbytouchingtheseicons. zz Foroptionsdisplayedwithabartoindicatethelevel,touchthedesired positiononthebar. zz Toconiguresettingsforwhichoptionsarenotshown,irsttouchthe settingtoaccessthesettingscreen.Onthesettingscreen,eitherdrag ortouchtochoosethesettingitem,andthentouchtochoosethe option.Toreturntothepreviousscreen,touch[ ]. zz Youcanalsotouchinputelements(suchascheckboxesortextields) toselectthem,andyoucanentertextbytouchingtheon-screen keyboard. zz When[ ]isshown,youcantouch[ ]insteadofpressingthe<m> button,ifyouprefer. zz When[ ]isshown,youcantouch[ ]insteadofpressingthe <n>button,ifyouprefer. zz Todismissthemenu,pressthe<n>buttonagain. C 92 Indicator Display Theindicatorofthecamera(=5)lightsuporblinksdependingonthe camerastatus. Indicator Color Indicator Status Connectedtoacomputer(=31),ordisplay off(=86,271) On Indicator (onback) Green Indicator (ontop) Blue CameraStatus Startingup,recording/reading/transmitting Blinking images,orshootinglongexposures(=202, 204) On WirelessLANconnectionestablished WirelessLANconnectionordatatransferin Blinking progress • Whentheindicatorblinksgreen,neverturnthecameraoff,open thememorycard/batterycover,orshakeorjoltthecamera,which maycorruptimagesordamagethecameraormemorycard. Clock Y P O Youcancheckthecurrenttime. zz Pressandholdthe<m>button. XX Thecurrenttimeappears. C zz Ifyouholdthecameraverticallywhile usingtheclockfunction,itwillswitch toverticaldisplay.Pressthe<q><r> buttonsorturnthe<7>dialtochange thedisplaycolor. zz Pressthe<m>buttonagaintocancel theclockdisplay. • Whenthecameraisoff,pressandholdthe<m>button,thenpressthe powerbuttontodisplaytheclock. 93 Y P O C 94 2 Smart Auto Mode Convenientmodeforeasyshotswithgreatercontrol overshooting Y P O C 95 StillImages Movies Shooting (Smart Auto) Forfullyautomaticselectionatoptimalsettingsforspeciicscenes,simply letthecameradeterminethesubjectandshootingconditions. 1 Turnthecameraon. zz Pressthepowerbutton. XX Thestartupscreenisdisplayed. 2 Enter<A>mode. zz Setthemodedialto<A>. zz Aimthecameraatthesubject.The camerawillmakeaslightclickingnoise asitdeterminesthescene. XX Iconsrepresentingthesceneandimage stabilizationmodearedisplayedinthe upperrightofthescreen(=101,103). XX Framesdisplayedaroundanydetected subjectsindicatethattheyareinfocus. Y P O 3 Composetheshot. C zz Tozoominandenlargethesubject,move ZoomBar FocusRange(approx.) 96 thezoomlevertoward<i>(telephoto), andtozoomawayfromthesubject,move ittoward<j>(wideangle).(Azoombar showingthezoompositionisdisplayed.) Shooting(SmartAuto) 4 Shoot. ShootingStillImages Focus. zz Presstheshutterbuttonhalfway.The camerabeepstwiceafterfocusing,and AFframesaredisplayedtoindicate imageareasinfocus. XX SeveralAFframesaredisplayedwhen multipleareasareinfocus. XX Thelashautomaticallyrisesinlow-light conditions. Shoot. zz Presstheshutterbuttonalltheway down. XX Asthecamerashoots,ashuttersoundis Y P O played,andinlow-lightconditionswhen thelashisup,itiresautomatically. zz Keepthecamerastilluntiltheshutter soundends. XX Yourshotisonlydisplayeduntilthe cameraisreadytoshootagain. C 97 Shooting(SmartAuto) ShootingMovies Startshooting. zz Pressthemoviebutton.Thecamera ElapsedTime beepsonceasrecordingbegins,and [ Rec]isdisplayedwiththeelapsedtime. XX Blackbarsdisplayedonthetopand bottomedgesofthescreenindicate imageareasnotrecorded. XX Framesdisplayedaroundanydetected facesindicatethattheyareinfocus. zz Oncerecordingbegins,youcantakeyour ingeroffthemoviebutton. Resizethesubjectand recomposetheshotasneeded. zz Toresizethesubject,dothesamething asinstep3on=96.However,note thatthesoundofcameraoperationswill berecorded,andmoviesshotatzoom factorsshowninbluewilllookgrainy. zz Whenyourecomposeshots,the focus,brightness,andcolorswillbe automaticallyadjusted. Y P O C Finishshooting. zz Pressthemoviebuttonagaintostop shooting.Thecamerabeepstwiceas recordingstops. zz Recordingwillstopautomaticallywhen thememorycardbecomesfull. StillImages/Movies • Torestorecamerasoundifyouhaveaccidentallydeactivatedit(by holdingthe<p>buttondownwhileturningthecameraon),press the<n>buttonandchoose[Mute]onthe[3]tab,andthen pressthe<q><r>buttonstochoose[Off]. 98 Shooting(SmartAuto) StillImages • Alashing[ ]iconwarnsthatimagesaremorelikelytobeblurred bycamerashake.Inthiscase,mountthecameraonatripodor takeothermeasurestokeepitstill. • Ifyourshotsaredarkdespitethelashiring,movecloserto thesubject.Fordetailsonthelashrange,see“Speciications” (=333). • Thesubjectmaybetoocloseifthecameraonlybeepsoncewhen youpresstheshutterbuttonhalfway.Fordetailsonthefocusing range(shootingrange),see“Speciications”(=333). • Toreducered-eyeandtoassistinfocusing,thelampmaybe activatedwhenshootinginlow-lightconditions. • Ablinking[h]icondisplayedwhenyouattempttoshootindicates thatshootingisnotpossibleuntilthelashhasinishedrecharging. Shootingcanresumeassoonasthelashisready,soeitherpress theshutterbuttonallthewaydownandwait,orreleaseitand pressitagain. • TheshuttersoundwillnotbeplayedwhentheSleepingand Babies(Sleeping)icons(=101)aredisplayed. • Restartthecameraifthemessage[Wronglashposition.Restart thecamera]displayed,whichindicatesthatyouringerorsome otherobjectisobstructingthemovementofthelash. Y P O C • Thelashiringduringshotsindicatesthatthecamerahasautomatically attemptedtoensureoptimalcolorsinthemainsubjectandbackground (Multi-areaWhiteBalance). 99 Shooting(SmartAuto) Movies • Keepyouringersawayfromthe microphonewhileshootingmovies. Blockingthemicrophonemayprevent audiofrombeingrecordedormay causetherecordingtosoundmufled. Microphone • Avoidtouchingcameracontrolsotherthanthemoviebuttonwhen shootingmovies,becausesoundsmadebythecamerawillbe recorded. • Tocorrectsuboptimalimagecolorthatmayoccurin[ ]movie shooting(=127)afteryourecomposeshots,pressthemovie buttontostoprecording,andthenpressitagaintoresume recording. • Audioisrecordedinstereo. Y P O C 100 Shooting(SmartAuto) StillImages Movies Scene Icons In<A>mode,shootingscenesdeterminedbythecameraareindicated bytheicondisplayed,andcorrespondingsettingsareautomatically selectedforoptimalfocusing,subjectbrightness,andcolor.Dependingon thescene,continuousimagesmaybeshot(=102). Subject Background Normal Backlit Dark* Sunsets Spotlights – People InMotion – – – – – – – Smiling – – – Sleeping – – – Babies – – – – – – – – – – – – InMotion – – – AtCloseRange – – ShadowsonFace Y P O Smiling Sleeping Children(InMotion) C OtherSubjects *TripodUsed Thebackgroundcoloroficonsislightbluewhenthebackgroundisabluesky, darkbluewhenthebackgroundisdark,andgrayforallotherbackgrounds. Thebackgroundcoloroficonsislightbluewhenthebackgroundisabluesky, andgrayforallotherbackgrounds. •Thebackgroundcolorof[ ],[ ],[ ],[ ],and[ ]isdarkblue,andthe backgroundcolorof[ ]isorange. •Whenshootingmovies,onlyPeople,OtherSubjects,andAtCloseRangeiconswill bedisplayed. •Whenshootingwiththeself-timer,People(InMotion),Smiling,Sleeping,Babies (Smiling),Babies(Sleeping),Children,OtherSubjects(InMotion)iconswillnotbe displayed. 101 Shooting(SmartAuto) •Whenthedrivemodeissetto[ ](=179),andwhen[HgLampCorr.]issetto [On]andscenesareautomaticallycorrected(=126),Smiling,Sleeping,Babies (Smiling),Babies(Sleeping),andChildreniconswillnotbedisplayed. •Ifthelashissetto[ ],theBackliticonsforSmilingandChildrenwillnotbe displayed. •Babies,Babies(Smiling),Babies(Sleeping),andChildreniconswillbedisplayed when[FaceID]issetto[On],andthefaceofaregisteredbaby(undertwoyearsold) orchild(fromtwototwelveyearsold)isdetected(=113).Conirmbeforehandthat thedateandtimearecorrect(=18). • Tryshootingin<G>mode(=165)ifthesceneicondoesnot matchactualshootingconditions,orifitisnotpossibletoshoot withyourexpectedeffect,color,orbrightness. ContinuousShootingScenes Ifyoushootastillimagewhenthefollowingiconsaredisplayed,thecamera willshootcontinuously.Ifyoupresstheshutterbuttonhalfwaywhenoneof theiconsinthetablebelowisdisplayed,oneofthefollowingiconswillbe displayedtoinformyouthatthecamerawillshootcontinuousimages:[ ], [ ],or[W]. Y P O Smiling(includingBabies) : Consecutiveimagesarecaptured,andthecamera analyzesdetailssuchasfacialexpressionstosave theimagedeterminedtobethebest. Sleeping(includingBabies) : Beautifulshotsofsleepingfaces,createdby combiningconsecutiveshotstoreducecamera shakeandimagenoise.TheAFassistbeamwillnot lightup,thelashwillnotire,andtheshuttersound willnotbeplayed. C Children W: Soyoudon’tmissaphotoopportunityofchildren whomovearound,thecamerawillcapturethree consecutiveimagesforeachshot. • Insomescenes,expectedimagesmaynotbesaved,andimages maynotlookasexpected. • Focus,imagebrightness,andcoloraredeterminedbytheirstshot. • Whenyouwanttoshootsingleimagesonly,pressthe<m>button,choose [ ]inthemenu,andthenchoose[ ]. 102 Shooting(SmartAuto) StillImages Movies Image Stabilization Icons Optimalimagestabilizationfortheshootingconditionsisautomatically applied(IntelligentIS).Additionally,thefollowingiconsaredisplayedin <A>mode. Imagestabilizationforstill images Imagestabilizationformovies, reducingstrongcamerashake, aswhenshootingwhilewalking (DynamicIS) Imagestabilizationforstill images,whenpanning* Imagestabilizationforslow camerashake,suchaswhen shootingmoviesattelephoto (PoweredIS) Imagestabilizationformacro shots(HybridIS) Noimagestabilization,because thecameraismountedon atripodorheldstillbyother means *Displayedwhenyoupan,followingmovingsubjectswiththecamera.Whenyoufollow subjectsmovinghorizontally,imagestabilizationonlycounteractsverticalcamera shake,andhorizontalstabilizationstops.Similarly,whenyoufollowsubjectsmoving vertically,imagestabilizationonlycounteractshorizontalcamerashake. Y P O • Tocancelimagestabilization,set[ISMode]to[Off](=199).Inthiscase, anISiconisnotdisplayed. C 103 Shooting(SmartAuto) StillImages Movies On-Screen Frames Avarietyofframesaredisplayedoncethecameradetectssubjectsyouare aimingthecameraat. • Awhiteframeisdisplayedaroundthesubject(orperson’sface) determinedbythecameratobethemainsubject,andgrayframesare displayedaroundotherdetectedfaces.Framesfollowmovingsubjects withinacertainrangetokeeptheminfocus. However,ifthecameradetectssubjectmovement,onlythewhiteframe willremainonthescreen. • Whenyouarepressingtheshutterbuttonhalfwayandthecamera detectssubjectmovement,ablueframeisdisplayed,andthefocusand imagebrightnessareconstantlyadjusted(ServoAF). • Tryshootingin<G>mode(=165)ifnoframesaredisplayed,if framesarenotdisplayedarounddesiredsubjects,orifframesare displayedonthebackgroundorsimilarareas. Y P O • Tochoosesubjectstofocuson,touchthedesiredsubjectonthescreen. ]isdisplayed,andthecameraentersTouchAFmode.Pressingthe [ shutterbuttonhalfwaywilldisplayablueAFframe,andthecamerawillkeep thesubjectinfocusandimagebrightnessadjusted(ServoAF). • TouchAFisnotavailablewhenshootingmovies. C 104 Common, Convenient Features StillImages Movies Zooming In Closer on Subjects (Digital Zoom) Whendistantsubjectsaretoofarawaytoenlargeusingtheopticalzoom, usedigitalzoomforuptoabout20xenlargement. 1 Movethezoomlevertoward <i>. zz Holdtheleveruntilzoomingstops. XX Zoomingstopsatthelargestpossible zoomfactor(beforetheimagebecomes noticeablygrainy),whichisthenindicated onthescreen. ZoomFactor 2 Movethezoomlevertoward <i>again. XX Tocontinuemagnifyingthesubject,keep zooming. Y P O • Movingthezoomleverwilldisplaythezoombar(whichindicates thezoomposition).Thecolorofthezoombarwillchange dependingonthezoomrange. -Whiterange:opticalzoomrangewheretheimagewillnotappear grainy. -Yellowrange:digitalzoomrangewheretheimageisnot noticeablygrainy(ZoomPlus). -Bluerange:digitalzoomrangewheretheimagewillappear grainy. Becausethebluerangewillnotbeavailableatsomeresolution settings(=124)themaximumzoomfactorcanbeachievedby followingstep1. C • Focallengthwhenopticalanddigitalzoomarecombinedisasfollows (35mmilmequivalent). 24–480mm(24–120mmwithopticalzoomalone) • Todeactivatedigitalzoom,pressthe<n>button,choose[DigitalZoom] onthe[4]tab,andthenchoose[Off]. 105 Common,ConvenientFeatures StillImages Movies Shooting at Preset Focal Lengths (Step Zoom) Youcanshootatpresetfocallengthsof24,28,35,50,85,100or120mm (35mmilmequivalent).Thisisconvenientwhenyouwanttoshootatthe angleofviewofthosefocallengths. Chooseafocallength. zz Tochangethefocallengthfrom24to28 mm,turnthe<y>ringcounterclockwise untilitclicks.Keepturningthe<y>ringto increasethefocallength,whichchanges to35,50,85,100,and120mmateach click. • Stepzoomisnotavailablewhenshootingmovies,soturningthe <y>ringhasnoeffect. Y P O • Whenyouareusingdigitalzoom(=105),youcannotadjustthezoom factorbyturningthe<y>ringcounterclockwise.However,youcansetthe focallengthto120mmbyturningitclockwise. C 106 Common,ConvenientFeatures StillImages Movies Using the Self-Timer Withtheself-timer,youcanincludeyourselfingroupphotosorothertimed shots.Thecamerawillshootabout10secondsafteryoupresstheshutter button. 1 Conigurethesetting. zz Pressthe<m>button,choose[ ] inthemenu,andthenchoosethe[]] option(=89). XX Oncethesettingiscomplete,[]]is displayed. Y P O 2 Shoot. zz ForStillImages:Presstheshutterbutton halfwaytofocusonthesubject,andthen pressitallthewaydown. zz ForMovies:Pressthemoviebutton. C XX Onceyoustarttheself-timer,thelamp willblinkandthecamerawillplayaselftimersound. XX Twosecondsbeforetheshot,theblinking andsoundwillspeedup.(Thelampwill remainlitincasethelashires.) zz Tocancelshootingafteryouhave triggeredtheself-timer,pressthe <n>button. zz Torestoretheoriginalsetting,choose [ ]instep1. 107 Common,ConvenientFeatures • Youcanalsocancelshootingafterthetimerbeginsbytouching[ StillImages ]. Movies UsingtheSelf-TimertoAvoidCameraShake Thisoptiondelaysshutterreleaseuntilabouttwosecondsafteryouhave pressedtheshutterbutton.Ifthecameraisunsteadywhileyouarepressing theshutterbutton,itwillnotaffectyourshot. Conigurethesetting. zz Followstep1on=107andchoose [[]. XX Oncethesettingiscomplete,[[]is displayed. zz Followstep2on=107toshoot. Y P O StillImages Movies CustomizingtheSelf-Timer Youcanspecifythedelay(0–30seconds)andnumberofshots(1–10). C 1 Choose[$]. zz Followingstep1on=107,choose[$] andpressthe<n>button. 108 Common,ConvenientFeatures 2 Conigurethesetting. zz Turnthe<y>ringtochoose[Delay], eitherpressthe<q><r>buttonsorturn the<7>dialtochoose[Shots],andthen pressthe<n>button. XX Oncethesettingiscomplete,[$]is displayed. zz Followstep2on=107toshoot. • Formoviesshotusingtheself-timer,[Delay]representsthedelay beforerecordingbegins,butthe[Shots]settinghasnoeffect. • Whenyouspecifymultipleshots,imagebrightnessandwhitebalanceare determinedbytheirstshot.Moretimeisrequiredbetweenshotswhenthe lashiresorwhenyouhavespeciiedtotakemanyshots.Shootingwillstop automaticallywhenthememorycardbecomesfull. • Whenadelaylongerthantwosecondsisspeciied,twosecondsbeforethe shot,thelampblinkingandself-timersoundwillspeedup.(Thelampwill remainlitincasethelashires.) Y P O C • Youcanalsocancelshootingafterthetimerbeginsbytouching[ ]. 109 Common,ConvenientFeatures StillImages Shooting By Touching the Screen (Touch Shutter) Withthisoption,insteadofpressingtheshutterbutton,youcansimply touchthescreenandreleaseyouringertoshoot.Thecamerawillfocuson subjectsandadjustimagebrightnessautomatically. 1 Preparetousetouchshutter. zz Pressthe<n>button,choose [TouchShutter]onthe[4]tab,andthen choose[On](=91). Y P O 2 Chooseasubjecttofocuson. zz Touchthesubjectonthescreenandkeep C youringeronthescreen. zz Thecamerabeepstwiceafterfocusing.A blueframeisdisplayed,andthecamera willkeepthesubjectinfocusandimage brightnessadjusted(ServoAF). 3 Shoot. zz Releaseyouringerfromthescreen.A shuttersoundisplayedasthecamera shoots. zz Tocanceltouchshutter,choose[Off]in step1. • Evenwhiletheshotisdisplayed,youcanprepareforthenextshot bytouching[^]. 110 Common,ConvenientFeatures StillImages Deactivating the Flash Preparethecameraforshootingwithoutthelashasfollows. Conigurethesetting. zz Pressthe<r>button,choose[!](either pressthe<q><r>buttonsorturnthe <7>dial),andthenpressthe<m> button. XX Ifthelashisalreadyup,itwillbelowered automatically. XX Oncethesettingiscomplete,[!]is displayed. zz Torestoretheoriginalsetting,repeatthis processbutchoose[ ]. Y P O • Ifalashing[ ]iconisdisplayedwhenyoupresstheshutter buttonhalfwayinlow-lightconditions,mountthecameraona tripodortakeothermeasurestokeepitstill. C • Youcanalsoconigurethissettingbypressingthe<r>button,touching[!], andthentouchingitagain. 111 Common,ConvenientFeatures StillImages Adding a Date Stamp Thecameracanaddtheshootingdatetoimages,inthelower-rightcorner. However,notethatdatestampscannotbeeditedorremoved,soconirm beforehandthatthedateandtimearecorrect(=18). 1 Conigurethesetting. zz Pressthe<n>button,choose[Date Stamp]onthe[4]tab,andthenchoose thedesiredoption(=91). XX Oncethesettingiscomplete,[DATE]is displayed. Y P O 2 Shoot. XX Asyoutakeshots,thecameraaddsthe shootingdateortimetothelower-right cornerofimages. zz Torestoretheoriginalsetting,choose [Off]instep1. C • Datestampscannotbeeditedorremoved. • Shotstakenwithoutaddingadatestampcanbeprintedwithoneasfollows. However,addingadatestampthiswaytoimagesthatalreadyhaveonemay causeittobeprintedtwice. -Usetheincludedsoftwaretoprint Fordetails,refertotheSoftware Guide(=27). -Printusingprinterfunctions(=286) -UsecameraDPOFprintsettings(=293)toprint 112 Using Face ID Ifyouregisterapersonaheadoftime,thecamerawilldetectthatperson’s face,andprioritizefocus,brightness,andcolorforthatpersonwhen shooting.In<A>mode,thecameracandetectbabiesandchildren basedonregisteredbirthdaysandoptimizesettingsforthemwhen shooting. Thisfunctionisalsousefulwhensearchingforaspeciicregisteredperson amongalargenumberofimages(=225). PersonalInformation • Informationsuchasimagesofaface(faceinfo)registeredwithFaceID, andpersonalinformation(name,birthday)willbesavedonthecamera. Additionally,whenregisteredpeoplearedetected,theirnameswillbe recordedinstillimages.WhenusingtheFaceIDfunction,becareful whensharingthecameraorimageswithothers,andwhenposting imagesonlinewheremanyotherscanviewthem. • Whendisposingofacameraortransferringittoanotherpersonafter usingFaceID,besuretoeraseallinformation(registeredfaces,names, andbirthdays)fromthecamera(=121). Registering Face ID Information Y P O Youcanregisterinformation(faceinfo,name,birthday)forupto12people tousewithFaceID. 1 Accessthesettingscreen. C zz Pressthe<n>button,choose[Face IDSettings]onthe[4]tab,andthen pressthe<m>button(=91). zz Pressthe<o><p>buttonsorturnthe <7>dialtochoose[AddtoRegistry], andthenpressthe<m>button. 113 UsingFaceID zz Pressthe<o><p>buttonsorturnthe <7>dialtochoose[AddaNewFace], andthenpressthe<m>button. 2 Registerfaceinformation. zz Aimthecamerasothatthefaceofthe personyouwanttoregisterisinsidethe grayframeatthecenterofthescreen. zz Awhiteframeontheperson’sface indicatesthatthefaceisrecognized. Makesureawhiteframeisdisplayedon theface,andthenshoot. zz Ifthefaceisnotrecognized,youcannot registerfaceinformation. Y P O 3 Savethesettings. zz After[Register?]isdisplayed,pressthe <q><r>buttonsorturnthe<7>dialto choose[OK],andthenpressthe<m> button. C XX The[EditProile]screenisdisplayed. 114 UsingFaceID 4 Enteraname. zz Pressthe<m>button. zz Touchcharactersonthekeyboardto enterthem. zz Upto10characterscanbeused. zz Pressthe<n>buttontoreturntothe editproilescreen. 5 Enterabirthday. zz Pressthe<o><p>buttonsorturnthe <7>dialtochoose[Birthday],andthen pressthe<m>button. zz Pressthe<q><r>buttonstochoosea setting. zz Pressthe<o><p>buttonsorturnthe <7>dialtospecifythedate. zz Wheninished,pressthe<m>button. Y P O 6 Savethesettings. zz Pressthe<o><p>buttonsorturnthe <7>dialtochoose[Save],andthen pressthe<m>button. zz Afteramessageisdisplayed,pressthe <q><r>buttonsorturnthe<7>dialto choose[Yes],andthenpressthe<m> button. C 7 Continueregisteringface information. zz Toregisterupto4morepointsofface information(expressionsorangles), repeatsteps2–3. zz Registeredfacesaremoreeasily recognizedifyouaddavarietyofface information.Inadditiontoaheadon angle,addaslightsideangle,ashotwhen smiling,andshotsinsideandoutside. 115 UsingFaceID • Thelashwillnotirewhenfollowingstep2. • Ifyoudonotregisterabirthdayinstep5,BabiesorChildrenicons (=101)willnotdisplayin<A>mode. • Youcanoverwriteregisteredfaceinfo,andaddfaceinfolaterifyouhavenot illedall5faceinfoslots(=119). • Youcanalsoenteranameonthescreeninstep4bypressingthe <o><p><q><r>buttonsorturningthe<7>dialtoselectcharacters,and thenpressingthe<m>button.Movethecursorbyturningthe<y>ring,and >buttontodeletecharacters,asneeded. pressthe< Shooting Ifyouregisterapersonaheadoftime,thecamerawillprioritizethatperson asthemainsubject,andoptimizefocus,brightness,andcolorforthat personwhenshooting. XX Whenyoupointthecameratowarda subject,thenamesofupto3registered peoplewillbedisplayedwhentheyare detected. zz Shoot. XX Displayednameswillberecordedinstill images.Evenifpeoplearedetected,but theirnamesarenotdisplayed,thenames (upto5people)willberecordedinthe image. Y P O C • Peopleotherthanthoseregisteredmaybemistakenlydetectedas theregisteredpersoniftheysharesimilarfacialfeatures. 116 UsingFaceID • Registeredpeoplemaynotbecorrectlydetectedifthecapturedimageor scenediffersdrasticallyfromtheregisteredfaceinformation. • Ifaregisteredfaceisnotdetected,ornoteasilydetected,overwrite registeredinformationwithnewfaceinfo.Registeringfaceinforightbefore shootingwillallowforeasierdetectionofregisteredfaces. • Ifapersonismistakenlydetectedasanotherpersonandyoucontinue shooting,youcaneditorerasethenamerecordedintheimageduring playback(=231). • Becausefacesofbabiesandchildrenchangequicklyastheygrow,you shouldupdatetheirfaceinforegularly(=119). • Nameswillstillberecordedinimagesevenifyouclearthe[ShootingInfo] checkboxin[CustomDisplay](=210)onthe[4]tabsothatthenames arenotdisplayed. • Ifyoudon’twantnamestoberecordedinstillimages,choose[FaceID Settings]onthe[4]tab,choose[FaceID],andthenchoose[Off]. • Youcanchecknamesrecordedinimagesintheplaybackscreen(simple informationdisplay)(=216). Checking and Editing Registered Information Y P O CheckingRegisteredFaceIDInformation 1 Accessthe[Check/EditInfo] screen. C zz Followingstep1on=113,choose [Check/EditInfo]andpressthe<m> button. 2 Chooseapersontocheck. zz Pressthe<o><p><q><r>buttonsor turnthe<7>dialtochooseaperson, andthenpressthe<m>button. 117 UsingFaceID 3 Checktheregistered information. zz Pressthe<o><p>buttonsorturnthe <7>dialtochooseanitem,andthen pressthe<m>button. zz Checktheregisteredinformation. ChangingtheNameorBirthday 1 Accessthe[EditProile]screen. zz Followingsteps1–3above,choose[Edit Proile]andpressthe<m>button. 2 Inputchanges. zz Pressthe<o><p>buttonsorturnthe <7>dialtochooseanitem,andfollow steps4–5on=115toinputchanges. Y P O C • Evenifyouchangenamesin[EditProile],thenamesrecordedin previouslyshotimageswillremainthesame. • Youcanusetheincludedsoftwaretoeditregisterednames.Some charactersenteredwiththeincludedsoftwaremaynotdisplayonthe camera,butwillbecorrectlyrecordedinimages. 118 UsingFaceID OverwritingandAddingFaceInformation Youcanoverwriteexistingfaceinformationwithnewfaceinfo.Youshould updatefaceinformationregularly,especiallywithbabiesandchildren,as theirfaceschangequicklyastheygrow. Youcanalsoaddfaceinformationwhenall5faceinfoslotshavenotbeen illed. 1 Accessthe[AddFaceInfo] screen. zz Onthescreeninstep1on=113, choose[AddFaceInfo]andpressthe <m>button. 2 Choosethenameoftheperson tooverwrite. zz Pressthe<o><p><q><r>buttonsor Y P O turnthe<7>dialtochoosethenameof apersontooverwrite,andthenpressthe <m>button. zz If4orlessfaceinformationslotsare registered,followstep5on=120to addmorefaceinfo. C 3 Accessthefaceinfoscreen. zz Readthemessagethatdisplays,press the<q><r>buttonsorturnthe<7>dial tochoose[OK],andthenpressthe<m> button. XX Thefaceinfoscreenisdisplayed. 4 Choosethefaceinfoto overwrite. zz Pressthe<o><p><q><r>buttonsor turnthe<7>dialtochoosethefaceinfo tooverwrite,andthenpressthe<m> button. 119 UsingFaceID 5 Registerfaceinformation. zz Followsteps2–3on=114to shoot,andthenregisterthenewface information. zz Registeredfacesaremoreeasily recognizedifyouaddavarietyofface information.Inadditiontoahead-on angle,addaslightsideangle,ashot whensmiling,andshotsinsideand outside. • Youcannotaddfaceinformationifall5informationslotsareilled.Followthe stepsabovetooverwritefaceinformation. • Youcanfollowtheabovestepstoregisternewfaceinfowhenthereisat leastoneslotopen,howeveryoucannotoverwriteanyfaceinformation. Insteadofoverwritingfaceinfo,irsteraseunwantedexistinginfo(see below),andthenregisternewfaceinformationasneeded. Y P O ErasingFaceInformation 1 Accessthe[Check/EditInfo] screen. zz Followingstep1on=113,choose C [Check/EditInfo]andpressthe<m> button. 2 Choosethenameoftheperson whosefaceinfoyouwantto erase. zz Pressthe<o><p><q><r>buttonsor turnthe<7>dialtochoosethenameof thepersonwhosefaceinfoyouwantto erase,andthenpressthe<m>button. 120 UsingFaceID 3 Accessthe[FaceInfoList] screen. zz Pressthe<o><p>buttonsorturnthe <7>dialtochoose[FaceInfoList],and thenpressthe<m>button. 4 Choosethefaceinfotoerase. zz Pressthe<m>button,pressthe <o><p><q><r>buttonsorturnthe <7>dialtochoosethefaceinfoyou wanttoerase,andthenpressthe<m> button. zz After[Erase?]isdisplayed,pressthe <q><r>buttonsorturnthe<7>dialto choose[OK],andthenpressthe<m> button. XX Theselectedfaceinfowillbeerased. Y P O Erasing Registered Information Youcaneraseinformation(faceinfo,name,birthday)registeredtoFaceID. However,namesrecordedinpreviouslyshotimageswillnotbeerased. C 1 Accessthe[EraseInfo]screen. zz Followstep1on=113andchoose [EraseInfo]. 121 UsingFaceID 2 Choosethenameoftheperson whoseinfoyouwanttoerase. zz Pressthe<o><p><q><r>buttonsor turnthe<7>dialtochoosethename ofapersontoerase,andthenpressthe <m>button. zz After[Erase?]isdisplayed,pressthe <q><r>buttonsorturnthe<7>dialto choose[OK],andthenpressthe<m> button. • Ifyouerasearegisteredperson’sinfo,youwillnotbeableto displaytheirname(=116),overwritetheirinfo(=231),or searchimagesforthem(=225). • Youcanalsoeraseaperson’snameonlyfromimages(=232). Y P O C 122 Image Customization Features StillImages Changing the Aspect Ratio Changetheimageaspectratio(ratioofwidthtoheight)asfollows. Conigurethesetting. zz Pressthe<m>button,choose[ ]in themenu,andchoosethedesiredoption (=89). XX Oncethesettingiscomplete,thescreen aspectratiowillbeupdated. zz Torestoretheoriginalsetting,repeatthis processbutchoose[ ]. UsedfordisplayonwidescreenHDTVsorsimilardisplaydevices. Y P O Sameaspectratioas35mmilm,usedforprintingimagesat5x7-inchor postcardsizes. Nativeaspectratioofthecamerascreen,alsousedfordisplayonstandarddeinitiontelevisionsorsimilardisplaydevices,orforprintingimagesat3.5x 5-inchorA-seriessizes. C Squareaspectratio. Aspectratiocommonlyusedforportraits. 123 ImageCustomizationFeatures StillImages Changing Image Resolution (Size) Choosefrom4levelsofimageresolution,asfollows.Forguidelineson howmanyshotsateachresolutionsettingcanitonamemorycard,see “Speciications”(=333). Conigurethesetting. zz Pressthe<m>button,choose[ ]in themenu,andchoosethedesiredoption (=89). XX Theoptionyouconiguredisnow displayed. zz Torestoretheoriginalsetting,repeatthis processbutchoose[ ]. Y P O GuidelinesforChoosingResolutionBasedonPaper Size(for4:3Images) A2(16.5x23.4in.) A3–A5(11.7x 16.5–5.8x8.3in.) 5x7in. Postcard 3.5x5in. 124 zz [ ]:Fore-mailingimages. C ImageCustomizationFeatures StillImages Red-Eye Correction Red-eyethatoccursinthelashphotographycanbeautomatically correctedasfollows. 1 Accessthe[FlashSettings] screen. zz Pressthe<n>button,choose[Flash Settings]onthe[4]tab,andthenpress the<m>button(=91). Y P O 2 Conigurethesetting. zz Choose[Red-EyeCorr.],andthen choose[On](=91). XX Oncethesettingiscomplete,[R]is C displayed. zz Torestoretheoriginalsetting,repeatthis processbutchoose[Off]. • Red-eyecorrectionmaybeappliedtoimageareasotherthan eyes(ifthecameramisinterpretsredeyemakeupasredpupils, forexample). • Youcanalsocorrectexistingimages(=255). • Youcanalsoaccessthescreeninstep2bypressingthe<r>buttonand thenthe<n>button. • Youcanalsoaccessthescreeninstep2bypressingthe<r>buttonand ]. thentouching[ 125 ImageCustomizationFeatures StillImages Correcting Greenish Image Areas from Mercury Lamps Inshotsofeveningsceneswithsubjectsilluminatedbymercurylamps,the subjectsorbackgroundmayappeartohaveagreenishtinge.Thisgreenish tingecanbecorrectedautomaticallywhenshooting,usingMulti-areaWhite Balance. Conigurethesetting. zz Pressthe<n>button,choose[Hg LampCorr.]onthe[4]tab,andthen choose[On](=91). XX Oncethesettingiscomplete,[ ]is displayed. zz Torestoretheoriginalsetting,repeatthis processbutchoose[Off]. Y P O • Afteryouareinishedshootingundermercurylamps,youshould set[HgLampCorr.]backto[Off].Otherwise,greenhuesnot causedbymercurylampsmaybecorrectedbymistake. C • Trytakingsometestshotsirsttomakesureyouobtainthedesiredresults. 126 ImageCustomizationFeatures Movies Changing Movie Image Quality 3imagequalitysettingsareavailable.Forguidelinesonthemaximum movielengthateachlevelofimagequalitythatwillitonamemorycard, see“Speciications”(=333). Conigurethesetting. zz Pressthe<m>button,choose[ ]in themenu,andchoosethedesiredoption (=89). XX Theoptionyouconiguredisnow displayed. zz Torestoretheoriginalsetting,repeatthis processbutchoose[ ]. Image Quality Y P O Resolution 1920x1080* FrameRate Details 24fps ForshootinginFullHD 1280x720 30fps ForshootinginHD 640x480 30fps Forshootinginstandard deinition C *FineDetailMovieProcessing(Thisfunctionquicklyprocessesalargeamountof information,makingitpossibletorecordeveninerdetailsinmovies.) • In[ ]and[ ]modes,blackbarsdisplayedonthetopandbottomedges ofthescreenindicateimageareasnotrecorded. 127 ImageCustomizationFeatures Movies Using the Wind Filter Distortedaudiocausedbyrecordingwhenthewindisstrongcanbe reduced.However,therecordingmaysoundunnaturalwhenthisoptionis usedwhenthereisnowind. Conigurethesetting. zz Pressthe<n>button,choose[Wind Filter]onthe[4]tab,andthenchoose [On](=91). zz Torestoretheoriginalsetting,repeatthis processbutchoose[Off]. Y P O C 128 Helpful Shooting Features StillImages Movies Using the Electronic Level Anelectroniclevelcanbedisplayedonthescreenwhenshootingasa guidelinetodetermineifthecameraislevel. 1 Displaytheelectroniclevel. zz Pressthe<p>buttonseveraltimesto displaytheelectroniclevel. Y P O 2 Levelthecameraasneeded. zz Levelthecamerasothatthecenterofthe electroniclevelisgreen. C • Iftheelectroniclevelisnotdisplayedinstep1,pressthe<n>button, andonthe[4]tab,choose[CustomDisplay].Adda[ ]to[ ]or[ ]to choosetheelectroniclevel. • Tiltingthecameratoofarforwardorbackwardwillpreventyoufromusing theelectroniclevel,whichwillturngray. • Theelectroniclevelisnotdisplayedduringmovierecording. • Ifyouholdthecameravertically,theorientationoftheelectroniclevelwillbe updatedautomaticallytomatchthecameraorientation. • Ifyourshotsarenotlevelevenifyouusetheelectroniclevel,trycalibrating theelectroniclevel(=272). 129 HelpfulShootingFeatures StillImages Magnifying the Area in Focus Youcancheckthefocusbypressingtheshutterbuttonhalfway,whichwill enlargetheportionoftheimageinfocusintheAFframe. 1 Conigurethesetting. zz Pressthe<n>button,choose[AFPointZoom]onthe[4]tab,andthen choose[On](=91). Y P O 2 Checkthefocus. zz Presstheshutterbuttonhalfway.The facedetectedasthemainsubjectisnow magniied. zz Torestoretheoriginalsetting,choose [Off]instep1. C • Theareainfocuswillnotbemagniiedwhenyoupresstheshutter buttonhalfwayifafacewasnotdetected,ifthepersonistooclose tothecameraandtheirfaceistoolargeforthescreen,orifthe cameradetectssubjectmovement. • Theareainfocusisnotmagniiedwhiledigitalzoomisinuse(=105)or whenaTVisusedasadisplay(=284). 130 HelpfulShootingFeatures Checking for Closed Eyes [ ]isdisplayedwhenthecameradetectsthatpeoplemayhaveclosed theireyes. 1 Conigurethesetting. zz Pressthe<n>button,choose[Blink Detection]onthe[4]tab,andthen choose[On](=91). 2 Shoot. XX [ ]isdisplayedwhenthecamera detectsapersonwhoseeyesareclosed. zz Torestoretheoriginalsetting,choose [Off]instep1. Y P O • Whenyouhavespeciiedmultipleshotsin[$]mode,thisfunctionisonly availablefortheinalshot. • Thisfeatureisnotavailableduringcontinuousshootingin[ ]mode (=102). • Aframeisdisplayedaroundpeoplewhoseeyesareclosedwhenyou haveselected2–10secondsin[Review],orifyouhaveselected[Hold] (=133). C 131 Customizing Camera Operation Customizeshootingfunctionsonthe[4]tabofthemenuasfollows. Forinstructionsonmenufunctions,see“MENUMenu”(=91). StillImages Deactivating the AF Assist Beam Youcandeactivatethelampthatnormallylightsuptohelpyoufocuswhen youpresstheshutterbuttonhalfwayinlow-lightconditions. Conigurethesetting. zz Pressthe<n>button,choose[AF- assistBeam]onthe[4]tab,andthen choose[Off](=91). zz Torestoretheoriginalsetting,repeatthis processbutchoose[On]. StillImages Deactivating the Red-Eye Reduction Lamp Y P O Youcandeactivatethered-eyereductionlampthatlightsuptoreduceredeyewhenthelashisusedinlow-lightshots. 1 Accessthe[FlashSettings] C screen. zz Pressthe<n>button,choose[Flash Settings]onthe[4]tab,andthenpress the<m>button(=91). 2 Conigurethesetting. zz Choose[Red-EyeLamp],andthen choose[Off](=91). zz Torestoretheoriginalsetting,repeatthis processbutchoose[On]. 132 CustomizingCameraOperation StillImages Changing the Image Display Period After Shots Changehowlongimagesaredisplayedaftershotsasfollows. Conigurethesetting. zz Pressthe<n>button,choose [Review]onthe[4]tab,andthen choosethedesiredoption(=91). zz Torestoretheoriginalsetting,repeatthis processbutchoose[Quick]. Quick Displaysimagesonlyuntilyoucan shootagain. Displaysimagesforthespeciied time.Evenwhiletheshotis 2–10sec. displayed,youcantakeanother shotbypressingtheshutterbutton halfwayagain. Y P O C Hold Displaysimagesuntilyoupress theshutterbuttonhalfway. Off Noimagedisplayaftershots. 133 CustomizingCameraOperation StillImages Changing the Image Display Style After Shots Changethewayimagesaredisplayedaftershotsasfollows. 1 In[Review],chooseeither2–10 secondsor[Hold](=133). 2 Conigurethesetting. zz Pressthe<n>button,choose [ReviewInfo]onthe[4]tab,andthen choosethedesiredoption(=91). zz Torestoretheoriginalsetting,repeatthis processbutchoose[Off]. Off Displaysonlytheimage. Detailed Displaysshootingdetails (=316). Y P O Focus Check ShowstheareaintheAFframe magniied,enablingyoutocheck thefocus.Followthestepsin “CheckingtheFocus”(=222). C • Thissettingissetto[Off]andcannotbechangedwhen[Review](=133)is setto[Quick]or[Off]. 134 3 Other Shooting Modes Shootmoreeffectivelyinvariousscenes,andtakeshots enhancedwithuniqueimageeffectsorcapturedusing specialfunctions Y P O C 135 StillImages Movies Auto Clip Recording (Movie Digest) Youcanmakeashortmovieofadayjustbyshootingstillimages. Beforeeachshot,thecamerawillautomaticallyrecordamovieclipofthe scene.Eachcliprecordedthatdayiscombinedintoasingleile. 1 Enter< >mode. zz Setthemodedialto< >. 2 Shoot. zz Toshootastillimage,presstheshutter buttonallthewaydown. XX Beforeshooting,thecamerawill automaticallyrecordaclipabout2–4 secondslong. • Clipsmaynotberecordedifyoushootastillimageimmediately afterturningthecameraon,choosing< >mode,oroperatingthe camerainotherways. • Batterylifeisshorterinthismodethanin<A>mode,because clipsarerecordedforeachshot. • Anysoundsfromcameraoperationsduringmovierecordingwill beincludedinthemovie. Y P O C • Moviescreatedin< >modecanbeviewedbydate(=229). • Moviescreatedin< >modearesavedasiFramemovies(=162). • Althoughtheclipsrecordedonaparticulardayarecombinedintoasingle ile,individualclips(chapters)canbeedited(=259). • Clipsaresavedasseparatemovieilesinthefollowingcasesevenifthey wererecordedonthesamedayin< >mode. -Ifthemovieilesizereachesabout4GBorthetotalrecordingtimereaches approx.29minutesand59seconds -Ifamovieisprotected(=236) -Ifthedaylightsavingtime(=19)ortimezone(=264)settingshave beenchanged -Ifanewfolderiscreated(=270) -Ifthecopyrightinformationischangedordeleted(=273) • Somecamerasoundswillbemuted.Soundsarenotplayedwhenyoupressthe shutterbuttonhalfway,usecameracontrols,ortriggertheself-timer(=263). 136 Speciic Scenes Chooseamodematchingtheshootingscene,andthecamerawill automaticallyconigurethesettingsforoptimalshots. 1 Enter<K>mode. zz Setthemodedialto<K>. 2 Chooseashootingmode. zz Pressthe<m>button,choose[I]inthe menu,andthenchooseashootingmode (=89). 3 Shoot. Y P O StillImages Movies IShootportraits(Portrait) zz Takeshotsofpeoplewithasoftening C effect. StillImages Shooteveningsceneswithout usingatripod(Handheld NightScene) zz Beautifulshotsofeveningscenesor portraitswitheveningsceneryinthe background,withouttheneedtoholdthe cameraverystill(aswithatripod). zz Asingleimageiscreatedbycombining consecutiveshots,reducingcamera shakeandimagenoise. 137 SpeciicScenes StillImages Movies S Shootunderwater(Underwater) zz Natural-coloredshotsofsealifeand underwaterscenery,whenyouusean optionalwaterproofcase(=280). zz Thismodecancorrectwhitebalanceand matchtheeffectofusingacommercially availablecolor-compensatingilter (=174). StillImages Movies P Shootwithsnowybackgrounds (Snow) zz Bright,natural-coloredshotsofpeople againstsnowybackgrounds. Y P O StillImages Movies t Shootireworks(Fireworks) zz Vividshotsofireworks. C 138 SpeciicScenes • Subjectsappearlargerin[ ]modecomparedtoothermodes. • In[ ]and[S]modes,shotsmaylookgrainybecausetheISO speed(=169)isincreasedtosuittheshootingconditions. • Becausethecamerawillshootcontinuouslyin[ ]mode,holdit steadywhileshooting. • In[ ]mode,excessivecamerashakeorcertainshooting conditionsmaypreventyoufromobtainingthedesiredresults. • In[t]mode,mountthecameraonatripodortakeother measurestokeepitstillandpreventcamerashake.Additionally, youshouldset[ISMode]to[Off]whenusingatripodorother meanstoholdthecamerastill(=199). • Whenyouuseatripodforeveningscenes,shootingin[A]modeinstead of[ ]modewillgivebetterresults(=96). Y P O C 139 SpeciicScenes StillImages ShootingWithanUnderwaterFocusingRange Iffocusingisdificultin[S]mode(=138)withafocusrangeof[ ], usingafocusrangedesignedforunderwatershootingcanensureoptimal underwatershots. 1 Conigurethesetting. zz Followsteps1–2on=137and choose[S]. zz Pressthe<q>button,choosethedesired focusrange(eitherpressthe<q><r> buttonsorturnthe<7>dial),andthen pressthe<m>button. 2 Shoot. FocusingRange Underwater Macro 8 Quick Description Y P O Takeclose-upsofsealife,usingthedigitalzoomforevencloser shots. Avoidmissingunexpectedunderwatershootingopportunities whenshootingsubjectssomedistanceaway.Especiallyeffective formovingsubjects. C f ManualFocus Focusonsubjectsmanually(=182). Referto“Speciications”(=333)fordetailsontherangeofeachfocus range. • In[ ]mode,opticalzoomissettomaximumwideangle. • In[ ]mode,useofdigitalzoommaycauseimagestoappear grainyatsomeresolutions(=124). • In[8]mode,subjectsatcloserangemaynotbeinfocus.Inthis case,trysettingthefocusrangeto[ ]. 140 SpeciicScenes • Youcanalsoconigurethissettingbypressingthe<q>button,touchingthe desiredfocusingrange,andthentouchingitagain. StillImages Making Skin Look Smoother (Smooth Skin) Youcanapplyasmootheningeffectwhenshootingimagesofpeople. Theeffectlevelandcolor([LighterSkinTone],[DarkerSkinTone])canbe chosenasfollows. 1 Choose[ ]. zz Followsteps1–2on=137and choose[ ]. 2 Accessthesettingscreen. zz Pressthe<p>button. 3 Conigurethesetting. zz Pressthe<o><p>buttonstochoose Y P O anoption.Chooseaneffectlevel(either pressthe<q><r>buttonsorturnthe <7>dial),andthenpressthe<m> button. zz Apreviewisshownofhowyourshotwill lookwiththeeffectapplied. C 4 Shoot. • Areasotherthanpeople’sskinmaybemodiied. • Trytakingsometestshotsirsttomakesureyouobtainthe desiredresults. • Theeffectwillbestrongerforthefaceofthepersondetectedasthemain subject. • Youcanalsoconigurethissettingbytouching[ ]toaccessthesetting ]. screen,touching[q][r]toselecttheeffect,andthentouching[ 141 Image Effects (Creative Filters) Addavarietyofeffectstoimageswhenshooting. 1 Enter< >mode. zz Setthemodedialto< >. 2 Chooseashootingmode. zz Pressthe<m>button,choose[ ]in themenu,andthenchooseashooting mode(=89). 3 Shoot. StillImages Movies Shootinvividcolors(Super Vivid) Y P O zz Shotsinrich,vividcolors. C StillImages Movies Posterizedshots(PosterEffect) zz Shotsthatresembleanoldposteror illustration. • In[ ]and[ ]modes,trytakingsometestshotsirst,tomake sureyouobtainthedesiredresults. 142 ImageEffects(CreativeFilters) StillImages Shooting High-Contrast Scenes (High Dynamic Range) Threeconsecutiveimagesarecapturedatdifferentbrightnesslevels eachtimeyoushoot,andthecameracombinesimageareaswithoptimal brightnesstocreateasingleimage.Thismodecanreducethewashed-out highlightsandlossofdetailinshadowsthattendstooccurinhigh-contrast shots. 1 Choose[ ]. zz Followsteps1–2on=142and choose[ ]. 2 Holdthecamerastill. zz Mountthecameraonatripodortake othermeasurestokeepitstilland preventcamerashake. Y P O 3 Shoot. zz Whenyoupresstheshutterbuttonall C thewaydown,thecamerawilltakethree shotsandcombinethem. • Set[ISMode]to[Off](=199)inthismode. • Anysubjectmovementwillcauseimagestolookblurry. • Therewillbeadelaybeforeyoucanshootagain,asthecameraprocesses andcombinestheimages. 143 ImageEffects(CreativeFilters) AddingColorEffects zz Followsteps1–2on=142and choose[ ]. zz Pressthe<p>button,chooseacolor effect(eitherpressthe<q><r>buttons orturnthe<7>dial),andthenpressthe <m>button. EffectOff ― Sepia Sepiatoneshots. B/W Blackandwhiteshots. SuperVivid Shotsinrich,vividcolors. PosterEffect Shotsthatresembleanoldposterorillustration. Y P O • Youcanalsoconigurethissettingbytouching[ ]toaccessthesetting screen,touchingthedesiredcoloreffect,andthentouchingthesameitem ]. or[ C StillImages Movies Shooting with Faded Colors (Nostalgic) Thiseffectmakescolorslookfadedandimageslookweathered,asinold photographs.Choosefromiveeffectlevels. 1 Choose[ ]. zz Followsteps1–2on=142and choose[ 144 ]. ImageEffects(CreativeFilters) 2 Chooseaneffectlevel. zz Turnthe<y>ringtochooseaneffect level. XX Apreviewisshownofhowyourshotwill lookwiththeeffectapplied. 3 Shoot. • Trytakingsometestshotsirst,tomakesureyouobtainthe desiredresults. • Colorswilllookfadedontheshootingscreen,buttheimageagingeffectis notshown.ReviewtheimageinPlaybackmodetoseetheeffect(=216). • Theimageagingeffectisnotshowninmovies. StillImages Shooting with a Fish-Eye Lens Effect (Fish-eye Effect) Y P O Shootwiththedistortingeffectofaish-eyelens. C 1 Choose[ ]. zz Followsteps1–2on=142and choose[ ]. 2 Chooseaneffectlevel. zz Turnthe<y>ringtochooseaneffect level. XX Apreviewisshownofhowyourshotwill lookwiththeeffectapplied. 3 Shoot. • Trytakingsometestshotsirst,tomakesureyouobtainthe desiredresults. 145 ImageEffects(CreativeFilters) StillImages Movies Shots Resembling Miniature Models (Miniature Effect) Createstheeffectofaminiaturemodel,byblurringimageareasaboveand belowyourselectedarea. Youcanalsomakemoviesthatlooklikescenesinminiaturemodelsby choosingtheplaybackspeedbeforethemovieisrecorded.Peopleand objectsinthescenewillmovequicklyduringplayback.Notethatsoundis notrecorded. 1 Choose[ ]. zz Followsteps1–2on=142and choose[ ]. XX Awhiteframeisdisplayed,indicatingthe imageareathatwillnotbeblurred. 2 Choosetheareatokeepin Y P O focus. zz Pressthe<p>button. zz Movethezoomlevertoresizetheframe, andturnthe<7>dialtomoveit. C 3 Formovies,choosethemovie playbackspeed. zz Turnthe<y>ringtochoosethespeed. 4 Returntotheshootingscreen andshoot. zz Pressthe<m>buttontoreturntothe shootingscreen,andthenshoot. 146 ImageEffects(CreativeFilters) PlaybackSpeedandEstimatedPlaybackTime(forOneMinuteClips) Speed PlaybackTime Approx.12sec. Approx.6sec. Approx.3sec. • Thezoomisnotavailablewhenshootingmovies.Besuretoset thezoombeforeshooting. • Trytakingsometestshotsirst,tomakesureyouobtainthe desiredresults. • Toswitchtheorientationoftheframetovertical,pressthe<q><r>buttons instep2.Toreturntheframetohorizontalorientation,pressthe<o><p> buttons. • Tomovetheframewhenitisinhorizontalorientation,pressthe<o><p> buttons,andtomovetheframewhenitisinverticalorientation,pressthe <q><r>buttons. • Holdingthecameraverticallywillchangetheorientationoftheframe. • Movieimagequalityis[ ]atanaspectratioof[ ]and[ ]atanaspect ratioof[ ](=123).Thesequalitysettingscannotbechanged. Y P O C • Youcanalsomovetheframebytouchingordraggingacrossthescreen. 147 ImageEffects(CreativeFilters) StillImages Shooting with a Toy Camera Effect (Toy Camera Effect) Thiseffectmakesimagesresembleshotsfromatoycamerabyvignetting (darker,blurredimagecorners)andchangingtheoverallcolor. 1 Choose[ ]. zz Followsteps1–2on=142and choose[ ]. 2 Chooseacolortone. zz Turnthe<y>ringtochooseacolortone. XX Apreviewisshownofhowyourshotwill lookwiththeeffectapplied. 3 Shoot. Standard Y P O Shotsresembletoycameraimages. Warm Imageshaveawarmertonethanwith[Standard]. Cool Imageshaveacoolertonethanwith[Standard]. C • Trytakingsometestshotsirst,tomakesureyouobtainthe desiredresults. 148 ImageEffects(CreativeFilters) StillImages Shooting With a Soft Focus Effect Thisfunctionallowsyoutoshootimagesasifasoftfocusilterisattached tothecamera.Youcanadjusttheeffectlevelasdesired. 1 Choose[ ]. zz Followsteps1–2on=142and choose[ ]. 2 Chooseaneffectlevel. zz Turnthe<y>ringtochooseaneffect level. XX Apreviewisshownofhowyourshotwill lookwiththeeffectapplied. 3 Shoot. Y P O • Trytakingsometestshotsirst,tomakesureyouobtainthe desiredresults. C 149 ImageEffects(CreativeFilters) StillImages Movies Shooting in Monochrome Shootimagesinblackandwhite,sepia,orblueandwhite. 1 Choose[ ]. zz Followsteps1–2on=142and choose[ ]. 2 Chooseacolortone. zz Turnthe<y>ringtochooseacolortone. XX Apreviewisshownofhowyourshotwill lookwiththeeffectapplied. 3 Shoot. B/W Blackandwhiteshots. Sepia Sepiatoneshots. Blue Blueandwhiteshots. 150 Y P O C ImageEffects(CreativeFilters) StillImages Movies Shooting with Color Accent Chooseasingleimagecolortokeepandchangeothercolorstoblackand white. 1 Choose[T]. zz Followsteps1–2on=142and choose[T]. 2 Accessthesettingscreen. zz Pressthe<p>button. XX TheoriginalimageandtheColorAccent imagearedisplayedoneafteranother. XX Bydefault,greenisthecolorthatwillbe kept. 3 Specifythecolor. zz Positionthecenterframeoverthecolor Y P O tokeep,andthenpressthe<q>button. XX Thespeciiedcolorisrecorded. 4 Specifytherangeofcolorsto C RecordedColor keep. zz Pressthe<o><p>buttonsorturnthe <7>dialtoadjusttherange. zz Tokeeponlyyourspeciiedcolor,choose alargenegativevalue.Tokeepcolors similartoyourspeciiedcoloraswell, choosealargepositivevalue. zz Pressthe<m>buttontoreturntothe shootingscreen. 5 Shoot. • Usingthelashinthismodemaycauseunexpectedresults. • Insomeshootingscenes,imagesmaylookgrainyandcolorsmay notlookasexpected. 151 ImageEffects(CreativeFilters) • Youcanalsoconigurethissettingbytouching[ ]toaccessthesetting screen,recordingthecolortokeepbytouchingtheframewhenitisilled ]. withthecolor,andthentouching[ StillImages Movies Shooting with Color Swap Youcanreplaceoneimagecolorwithanotherbeforeshooting.Notethat onlyonecolorcanbereplaced. 1 Choose[Y]. zz Followsteps1–2on=142and choose[Y]. 2 Accessthesettingscreen. zz Pressthe<p>button. XX TheoriginalimageandtheColorSwap Y P O imagearedisplayedoneafteranother. XX Bydefault,greenwillbereplacedwith gray. C 3 Specifythecolortoreplace. zz Positionthecenterframeoverthecolor toreplace,andthenpressthe<q> button. XX Thespeciiedcolorisrecorded. 4 Specifythenewcolor. zz Positionthecenterframeoverthenew color,andthenpressthe<r>button. XX Thespeciiedcolorisrecorded. 152 ImageEffects(CreativeFilters) 5 Specifytherangeofcolorsto replace. zz Pressthe<o><p>buttonsorturnthe <7>dialtoadjusttherange. zz Toreplaceonlyyourspeciiedcolor, choosealargenegativevalue.Toreplace colorssimilartoyourspeciiedcoloras well,choosealargepositivevalue. zz Pressthe<m>buttontoreturntothe shootingscreen. 6 Shoot. • Usingthelashinthismodemaycauseunexpectedresults. • Insomeshootingscenes,imagesmaylookgrainyandcolorsmay notlookasexpected. Y P O • Youcanalsoconigurethissettingbytouching[ ]toaccessthesetting screen,touchingintheframeatlefttorecordthecolortoreplace,touchingin ]. theframeatrighttorecordthenewcolor,andthentouching[ C 153 Special Modes for Other Purposes StillImages Auto Shooting After Face Detection (Smart Shutter) AutoShootingAfterSmileDetection Thecamerashootsautomaticallyafterdetectingasmile,evenwithoutyou pressingtheshutterbutton. 1 Choose[ ]. zz Followsteps1–2on=137and choose[ ],andthenpressthe<p> button. zz Pressthe<q><r>buttonsorturnthe <7>dialtochoose[ ],andthenpress the<m>button. XX Thecameranowentersshootingstandby mode,and[SmileDetectionon]is displayed. Y P O 2 Aimthecameraataperson. zz Eachtimethecameradetectsasmile,it C willshootafterthelamplightsup. zz Topausesmiledetection,pressthe<q> button.Pressthe<q>buttonagainto resumedetection. • Switchtoanothermodewhenyouinishshooting,orthecamera willcontinueshootingeachtimeasmileisdetected. • Youcanalsoshootasusualbypressingtheshutterbutton. • Thecameracandetectsmilesmoreeasilywhensubjectsfacethecamera andopentheirmouthwideenoughsothatteetharevisible. • Tochangethenumberofshots,pressthe<o><p>buttonsafterchoosing [ ]instep1.[BlinkDetection](=131)isonlyavailablefortheinalshot. 154 SpecialModesforOtherPurposes • Youcanalsochoosetheshootingmodebychoosing[ ]insteps1–2on ]toaccessthesettingscreen,touching[ ],andthen =137,touching[ ]. touchingthesameitemor[ StillImages UsingtheWinkSelf-Timer Aimthecameraatapersonandpresstheshutterbuttonallthewaydown. Thecamerawillshootabouttwosecondsafterawinkisdetected. 1 Choose[ ]. zz Followsteps1–2on=137and choose[ ],andthenpressthe<p> button. zz Pressthe<q><r>buttonsorturnthe <7>dialtochoose[ ],andthenpress the<m>button. Y P O 2 Composetheshotandpress theshutterbuttonhalfway. zz Onthescreen,touchthefaceofthe C personwhowillwinktochooseit(Touch AF),andthenpresstheshutterbutton halfway. zz Makesureagreenframeisdisplayed aroundthefaceofthepersonwhowill wink. 3 Presstheshutterbuttonallthe waydown. XX Thecameranowentersshootingstandby mode,and[Winktotakepicture]is displayed. XX Thelampblinksandtheself-timersound isplayed. 155 SpecialModesforOtherPurposes 4 Facethecameraandwink. XX Thecamerawillshootabouttwoseconds afterdetectingawinkbytheperson whosefaceisinsidetheframe. zz Tocancelshootingafteryouhave triggeredtheself-timer,pressthe <n>button. • Ifthewinkisnotdetected,winkagainslowlyanddeliberately. • Winkingmaynotbedetectedifeyesareobscuredbyhair,ahat,orglasses. • Closingandopeningbotheyesatoncewillalsobedetectedasawink. • Ifwinkingisnotdetected,thecamerawillshootabout15secondslater. • Tochangethenumberofshots,pressthe<o><p>buttonsafterchoosing [ ]instep1.[BlinkDetection](=131)isonlyavailablefortheinalshot. • Ifnooneisintheshootingareawhentheshutterbuttonispressedallthe waydown,thecamerawillshootafterapersonenterstheshootingareaand winks. Y P O • Youcanalsochoosetheshootingmodebychoosing[ ]insteps1–2on ]toaccessthesettingscreen,touching[ ],andthen =137,touching[ ]. touchingthesameitemor[ C 156 SpecialModesforOtherPurposes StillImages UsingtheFaceSelf-Timer Thecamerawillshootabouttwosecondsafterdetectingthatthefaceof anotherperson(suchasthephotographer)hasenteredtheshootingarea (=184).Thisisusefulwhenincludingyourselfingroupphotosorsimilar shots. 1 Choose[ ]. zz Followsteps1–2on=137andchoose [ ],andthenpressthe<p>button. zz Pressthe<q><r>buttonsorturnthe <7>dialtochoose[ the<m>button. ],andthenpress 2 Composetheshotandpress theshutterbuttonhalfway. zz Makesureagreenframeisdisplayed Y P O aroundthefaceyoufocusonandwhite framesaroundotherfaces. 3 Presstheshutterbuttonallthe C waydown. XX Thecameranowentersshootingstandby mode,and[Lookstraightatcamerato startcountdown]isdisplayed. XX Thelampblinksandtheself-timersound isplayed. 4 Jointhesubjectsintheshooting areaandlookatthecamera. XX Afterthecameradetectsanewface,the lampblinkingandself-timersoundwill speedup.(Whenthelashires,thelamp willremainlit.)Abouttwosecondslater, thecamerawillshoot. zz Tocancelshootingafteryouhave triggeredtheself-timer,pressthe <n>button. 157 SpecialModesforOtherPurposes • Evenifyourfaceisnotdetectedafteryoujointheothersintheshooting area,thecamerawillshootabout15secondslater. • Tochangethenumberofshots,pressthe<o><p>buttonsafterchoosing [ ]instep1.[BlinkDetection](=131)isonlyavailablefortheinalshot. • Youcanalsochoosetheshootingmodebychoosing[ ]insteps1–2on ]toaccessthesettingscreen,touching[ ],andthen =137,touching[ ]. touchingthesameitemor[ StillImages High-Speed Continuous Shooting (High-speed Burst HQ) Youcanshootaseriesofshotsinrapidsuccessionbyholdingtheshutter buttonallthewaydown.Fordetailsonthecontinuousshootingspeed,see “Speciications”(=333). HQ:HighQuality Y P O 1 Choose[ ]. zz Followsteps1–2on=137and choose[ C 2 Shoot. ]. XX Holdtheshutterbuttonallthewaydown toshootcontinuously. zz Shootingstopswhenyoureleasethe shutterbuttonorreachthemaximum numberofshots,afterwhich[Busy]is displayedandtheshotsareshowninthe orderyoutookthem. • Focus,imagebrightness,andcoloraredeterminedbytheirstshot. • Thescreenisblankwhileyouareshooting. • Theremaybeadelayaftercontinuousshootingbeforeyoucanshootagain. Notethatsometypesofmemorycardsmaydelayyournextshoteven longer. • Shootingmayslowdowndependingonshootingconditions,camerasettings, andthezoomposition. 158 SpecialModesforOtherPurposes ImagesDisplayedDuringPlayback Eachsetofimagesshotcontinuouslyismanagedasasinglegroup,and onlytheirstimageinthatgroupwillbedisplayed.Toindicatethatthe imageispartofagroup,[ ]isdisplayedintheupperleftofthescreen. • Ifyoueraseagroupedimage(=240),allimagesinthegroup arealsoerased.Becarefulwhenerasingimages. • Groupedimagescanbeplayedbackindividuallyandungrouped(=230). • Protecting(=236)agroupedimagewillprotectallimagesinthegroup. • GroupedimagescanbeviewedindividuallywhenplayedbackusingImage Search(=225)orSmartShufle(=235).Inthiscase,imagesare temporarilyungrouped. • Groupedimagescannotbesentindividually(=75),andFaceID informationcannotbeedited(=231).Theycannotbetaggedasfavorites (=244),edited(=243–255),categorized(=245),assignedasa start-upimage(=266),printed(=286),speciiedforprintingindividually (=294),oraddedtoaphotobook(=296).Todothesethings,eitherview groupedimagesindividually(=230)orcancelgrouping(=230)irst. Y P O C 159 SpecialModesforOtherPurposes StillImages Shooting Stitch Assist Images Shootalargesubjectbytakingmultipleshotsatvariouspositions,andthen usetheincludedsoftware(=27)tocombinethemintoapanorama. 1 Choose[x]or[v]. zz Followsteps1–2on=137and choose[x]or[v]. 2 Taketheirstshot. XX Theirstshotwilldeterminetheexposure andwhitebalance. 3 Takeadditionalshots. zz Composethesecondshotsothatit Y P O partiallyoverlapstheimageareaofthe irstshot. zz Minormisalignmentofoverlapping portionswillbecorrectedautomatically whentheimagesarecombined. zz Youcantakeupto26shots,thesame wayyoutookthesecondshot. C 4 Finishshooting. zz Pressthe<m>button. 5 Usethesoftwaretocombinethe images. zz Forinstructionsonmergingimages,refer totheSoftware Guide(=27). • TouseAFlock,assign[%]tothe< 160 >button(=211). Movies Shooting Various Movies Movies Shooting Movies in <E> Mode 1 Enter<E>mode. zz Setthemodedialto<E>. XX Blackbarsdisplayedonthetopand bottomedgesofthescreenindicate imageareasnotrecorded. 2 Conigurethesettingstosuit themovie(=318–329). 3 Shoot. zz Pressthemoviebutton. zz Tostopmovierecording,pressthemovie buttonagain. Y P O Movies LockingorChangingImageBrightnessBeforeShooting Beforeshooting,youcanlocktheexposureorchangeitin1/3-stop incrementswithinarangeof–3to+3. C 1 Locktheexposure. zz Pressthe<o>buttontolockthe exposure.Theexposureshiftbaris displayed. zz Tounlocktheexposure,pressthe<o> buttonagain. 2 Adjusttheexposure. zz Turnthe<7>dialtoadjusttheexposure, asyouwatchthescreen. 3 Shoot. 161 ShootingVariousMovies Movies Shooting iFrame Movies ShootmoviesthatcanbeeditedwithiFrame-compatiblesoftwareor devices.Youcanquicklyedit,save,andmanageiFramemoviesusingthe includedsoftware(=27). 1 Choose[ ]. zz Setthemodedialto<E>. zz Pressthe<m>button,choose[E]inthe menu,andthenchoose[ ](=89). XX Blackbarsdisplayedonthetopand bottomedgesofthescreenindicate imageareasnotrecorded. 2 Shoot(=161). • Theresolutionis[ ](=127)andcannotbechanged. • iFrameisavideoformatdevelopedbyApple. Y P O Movies Shooting Super Slow Motion Movies C Youcanshootfast-movingsubjectsforplaybacklaterinslowmotion.Note thatsoundisnotrecorded. 1 Choose[ ]. zz Setthemodedialto<E>. zz Pressthe<m>button,choose[E]inthe menu,andthenchoose[ ](=89). 2 Chooseaframerate. zz Pressthe<m>button,choose[ ]in themenu,andchoosethedesiredframe rate(=89). XX Theoptionyouconiguredisnow displayed. 162 ShootingVariousMovies 3 Shoot(=161). FrameRate ImageQuality PlaybackTime (Fora30-sec.Clip) 240fps (320x240) Approx.4min. 120fps (640x480) Approx.2min. • Zoomingisnotavailableduringrecording,evenifyoumovethe zoomlever. • Focus,exposure,andcoloraredeterminedwhenyoupressthe moviebutton. • Themoviewillbeplayedbackinslowmotionwhenyoufollowsteps1–3 on=216. • Youcanchangetheplaybackspeedofmoviesshotin[ ]modebyusing theincludedsoftware.Fordetails,refertotheSoftware Guide(=27). Y P O C 163 Y P O C 164 4 P Mode Morediscerningshots,inyourpreferredshootingstyle Y P O C • Instructionsinthischapterapplytothecamerawiththemodedialsetto <G>mode. • <G>:ProgramAE;AE:AutoExposure • Beforeusingafunctionintroducedinthischapterinmodesotherthan <G>,makesurethefunctionisavailableinthatmode(=318–329). 165 StillImages Movies Shooting in Program AE Mode (<P> Mode) Youcancustomizemanyfunctionsettingstosuityourpreferredshootingstyle. 1 Enter<G>mode. zz Setthemodedialto<G>. 2 Customizethesettingsas desired(=166–199),and thenshoot. • Ifadequateexposurecannotbeobtainedwhenyoupresstheshutterbutton halfway,shutterspeedsandaperturevaluesaredisplayedinorange.To obtainadequateexposure,tryadjustingthefollowingsettings. -Activatethelash(=193) -ChangetheISOspeed(=169) • Moviescanberecordedin<G>modeaswell,bypressingthemoviebutton. However,someFUNC.(=89)andMenu(=91)settingsmaybe automaticallyadjustedformovierecording. • Fordetailsontheshootingrangein<G>mode,see“Speciications”(=333). Y P O Image Brightness (Exposure Compensation) C StillImages Movies Adjusting Image Brightness (Exposure Compensation) Thestandardexposuresetbythecameracanbeadjustedin1/3-stop increments,inarangeof–3to+3. zz Pressthe<o>button.Asyouwatch thescreen,turnthe<7>dialtoadjust brightness,andthenpressthe<o> buttonagainwheninished. XX Thecorrectionlevelyouspeciiedisnow displayed. 166 ImageBrightness(ExposureCompensation) • Youcanalsoadjustbrightnessbypressingthe<o>button,andthen touchingordraggingthebar. • Youcanalsoadjustthecorrectionlevelbytouchingtherightedgeofthe screenwhileturningthe<y>ring(=209). StillImages Locking Image Brightness/Exposure (AE Lock) Beforeshooting,youcanlocktheexposure,oryoucanspecifyfocusand exposureseparately. 1 Locktheexposure. zz Aimthecameraatthesubjecttoshoot withtheexposurelocked.Withthe shutterbuttonpressedhalfway,pressthe <o>button. XX [ ]isdisplayed,andtheexposureis locked. zz TounlockAE,releasetheshutterbutton andpressthe<o>buttonagain.Inthis case,[ ]isnolongerdisplayed. Y P O C 2 Composetheshotandshoot. zz Afteroneshot,AEisunlockedand[ nolongerdisplayed. ]is • AE:AutoExposure • Aftertheexposureislocked,youcanadjustthecombinationofshutter speedandaperturevaluebyturningthe<7>dial(ProgramShift). 167 ImageBrightness(ExposureCompensation) StillImages Changing the Metering Method Adjustthemeteringmethod(howbrightnessismeasured)tosuitshooting conditionsasfollows. zz Pressthe<m>button,choose[ ]in themenu,andchoosethedesiredoption (=89). XX Theoptionyouconiguredisnow displayed. Evaluative Fortypicalshootingconditions,includingbacklitshots. Automaticallyadjustsexposuretomatchtheshootingconditions. Determinestheaveragebrightnessoflightacrosstheentire Center imagearea,calculatedbytreatingbrightnessinthecentralarea WeightedAvg. asmoreimportant. Spot Y P O Meteringrestrictedtowithinthe[ ](SpotAEPointframe). YoucanalsolinktheSpotAEPointframetotheAFframe(see below). C StillImages LinkingtheSpotAEPointFrametotheAFFrame 1 Setthemeteringmethodto[ ]. zz Followthestepsabovetochoose[ ]. 2 Conigurethesetting. zz Pressthe<n>button,choose [SpotAEPoint]onthe[4]tab,andthen choose[AFPoint](=91). XX TheSpotAEPointframewillnowbelinked tothemovementoftheAFframe(=185). • Notavailablewhen[AFFrame]issetto[FaceAiAF](=184). 168 ImageBrightness(ExposureCompensation) StillImages Changing the ISO Speed zz Turnthe<y>ringtochoosetheISO speed. XX Theoptionyouconiguredisnow displayed. AutomaticallyadjuststheISOspeedtosuitthe shootingmodeandconditions. Forshootingoutdoorsinfairweather. Low Forshootingincloudyconditions,orat twilight. High Forshootingnightscenes,orindark rooms. Y P O • ToviewtheautomaticallysetISOspeedwhenthecameraissetto[ ], presstheshutterbuttonhalfway. • AlthoughchoosingalowerISOspeedmayreduceimagegraininess,there maybeagreaterriskofsubjectblurrinessinsomeshootingconditions. • ChoosingahigherISOspeedwillincreaseshutterspeed,whichmayreduce subjectblurrinessandincreasethelashrange.However,shotsmaylook grainy. • YoucanalsosettheISOspeedbypressingthe<m>button,choosing[ ], choosinganoption(eitherbypressingthe<q><r>buttonsorturningthe <7>dial),andthenpressingthe<m>button.Tospecify[ ],pressthe >buttononthesettingscreen. < C 169 ImageBrightness(ExposureCompensation) StillImages Adjustingthe Setting Whenthecameraissetto[ ],maximumISOspeedcanbespeciiedin arangeof[ ]–[ ],andsensitivitycanbespeciiedinarangeofthree levels. 1 Accessthesettingscreen. zz Pressthe<n>button,choose[ISO AutoSettings]onthe[4]tab,andthen pressthe<m>button(=91). 2 Conigurethesetting. zz Chooseamenuitemtoconigure,and thenchoosethedesiredoption(=91). • Youcanalsoaccessthe[ISOAutoSettings]screenwhenchoosingtheISO speedintheFUNC.menu,bypressingthe<n>button. Y P O Changing the Noise Reduction Level (High ISO NR) C Youcanchoosefrom3levelsofnoisereduction:[Standard],[High],[Low]. ThisfunctionisespeciallyeffectivewhenshootingathighISOspeeds. Chooseanoisereductionlevel. zz Pressthe<n>button,choose[High ISONR]onthe[4]tab,andthenchoose thedesiredoption. • Notavailablewith[ 170 ]or[ ](=198). ImageBrightness(ExposureCompensation) StillImages Auto Exposure Bracketing (AEB Mode) Threeconsecutiveimagesarecapturedatdifferentexposurelevels (standardexposure,underexposure,andthenoverexposure)eachtime youshoot.Youcanadjusttheamountofunderexposureandoverexposure (relativetostandardexposure)from–2to+2stopsin1/3-stopincrements. 1 Choose[ ]. zz Pressthe<m>button,choose [ ]inthemenu,andthenchoose[ (=89). ] 2 Conigurethesetting. zz Pressthe<n>button,andthen adjustthesettingbypressingthe <q><r>buttonsorturningthe<7>dial. Y P O C • AEBisonlyavailablein[!]mode(=111). • Continuousshooting(=179)isnotavailableinthismode. • Ifexposurecompensationisalreadyinuse(=166),thevaluespeciiedfor thatfunctionistreatedasthestandardexposurelevelforthisfunction. • Youcanalsoaccessthesettingscreenofstep2bypressingthe<n> buttonwhentheexposurecompensationscreen(=166)isdisplayed. • Threeshotsaretaken,regardlessofanyquantityspeciiedin[$](=108). • In[BlinkDetection]mode(=131),thisfunctionisonlyavailableforthe inalshot. • Toaccessthesettingscreeninstep2,youcaneithertouch[ ]onthescreen ]ontheexposurecompensationscreen(=166). instep1ortouch[ • Youcanalsoconigurethissettingbytouchingordraggingthebaronthe ]. settingscreeninstep2tospecifyavalueandthentouching[ 171 ImageBrightness(ExposureCompensation) StillImages Correcting Image Brightness (i-Contrast) Beforeshooting,excessivelybrightordarkimageareas(suchasfacesor backgrounds)canbedetectedandautomaticallyadjustedtotheoptimal brightness. Toavoidwashed-outhighlights,specifyDynamicRangeCorrection.To preserveimagedetailinshadows,specifyShadowCorrect. • Undersomeshootingconditions,correctionmaybeinaccurateor maycauseimagestoappeargrainy. • Youcanalsocorrectexistingimages(=254). • Youcancustomizecameraoperationsothatturningthe<y>ringadjustsDR CorrectionorShadowCorrectsettings(=206). StillImages DynamicRangeCorrection(DRCorrection) Y P O Tonedownbrightimageareas,whichmightotherwiselookwashedout,as follows. zz Pressthe<m>button,choose[ ]in themenu,andchoosethedesiredoption (=89). XX Oncethesettingiscomplete,[@]is displayed. C Item AvailableISOSpeed (=169) Details ― 172 Automaticadjustmenttopreventwashed-out highlights [ ],[ ]–[ ] Tonedownhighlightsbyabout200%relative tothebrightnesslevelof[ ]. [ ],[ ]–[ ] Tonedownhighlightsbyabout400%relative tothebrightnesslevelof[ ]. [ ],[ ]–[ ] ImageBrightness(ExposureCompensation) • ISOspeed(=169)willbeadjustedtoaspeedwithinthe supportedrangeifyouhavespeciiedavalueoutsidethe supportedrangeindicatedhere. StillImages ShadowCorrect Automaticallypreserveimagedetailinshadowsasfollows. zz Pressthe<m>button,choose[ ]in themenu,pressthe<n>button, andchoose[ ](=89). XX Oncethesettingiscomplete,[@]is displayed. Using the ND Filter Y P O Toshootatslowershutterspeedsandsmalleraperturevalues,usetheND ilter,whichreduceslightintensityto1/8theactuallevel(equivalentto3 stops). C zz Pressthe<m>button,choose [ ]inthemenu,andthenchoose[ (=89). ] • Mountthecameraonatripodortakeothermeasurestokeepit stillandpreventcamerashake.Additionally,youshouldset[IS Mode]to[Off]whenusingatripodorothermeanstoholdthe camerastill(=199). 173 Color and Continuous Shooting StillImages Movies Adjusting White Balance Byadjustingwhitebalance(WB),youcanmakeimagecolorslookmore naturalforthesceneyouareshooting. zz Pressthe<m>button,choose[ ]in themenu,andchoosethedesiredoption (=89). XX Theoptionyouconiguredisnow displayed. h S 174 Auto Automaticallysetstheoptimalwhitebalancefortheshooting conditions. DayLight Forshootingoutdoorsinfairweather. Cloudy Forshootingincloudyconditions,intheshade,orattwilight. Tungsten Forshootingunderordinaryincandescent(tungsten)lighting andsimilarlycoloredluorescentlighting. Fluorescent Forshootingunderwarm-white(orsimilarlycolored)orcoolwhiteluorescentlighting. FluorescentH Forshootingunderdaylightluorescentandsimilarlycolored luorescentlighting. Flash Forshootingwiththelash. Underwater Setstheoptimalwhitebalanceforshootingunderwater.Tones downbluestoproducenatural-lookingcolorsoverall. Custom Formanuallysettingacustomwhitebalance(=175). Y P O C ColorandContinuousShooting StillImages Movies CustomWhiteBalance Forimagecolorsthatlooknaturalunderthelightinyourshot,adjustwhite balancetosuitthelightsourcewhereyouareshooting.Setthewhite balanceunderthesamelightsourcethatwillilluminateyourshot. zz Followthestepson=174andchoose [ ]or[ ]. zz Aimthecameraataplainwhitesubject, sothattheentirescreeniswhite.Press the< >button. XX Thetintofthescreenchangesoncethe whitebalancedatahasbeenrecorded. • Colorsmaylookunnaturalifyouchangecamerasettingsafter recordingwhitebalancedata. Y P O • Youcanalsorecordwhitebalancedataonthescreenabovebytouching ]. [ StillImages C Movies ManuallyCorrectingWhiteBalance Youcancorrectwhitebalance.Thisadjustmentcanmatchtheeffectof usingacommerciallyavailablecolortemperatureconversionilterorcolorcompensatingilter. 1 Conigurethesetting. zz Followthestepson=174tochoose [ ]. zz Turnthe<y>ringtoadjustthecorrection levelforBandA. XX Oncethesettingiscomplete,[ displayed. ]is 175 ColorandContinuousShooting 2 Conigureadvancedsettings. zz Toconiguremoreadvancedsettings, pressthe<n>buttonandadjust thecorrectionlevelbyturningthe <y>ringor<7>dialorpressingthe <o><p><q><r>buttons. zz Toresetthecorrectionlevel,pressthe < >button. zz Pressthe<n>buttontocomplete thesetting. • Thecamerawillretainwhitebalancecorrectionlevelsevenif youswitchtoanotherwhitebalanceoption(byfollowingstepson =174),butcorrectionlevelswillberesetifyourecordcustom whitebalancedata. • B:blue;A:amber;M:magenta;G:green • YoucancustomizecameraoperationsothattheBandAadjustmentscreen canbeaccessedsimplybyturningthe<y>ring(=206). • Onelevelofblue/ambercorrectionisequivalenttoabout7miredsonacolor temperatureconversionilter.(Mired:Colortemperatureunitrepresenting colortemperatureconversionilterdensity) Y P O C • Youcanalsochoosethecorrectionlevelbytouchingordraggingthebarin step1ortheframeinstep2. ]instep1. • Youcanalsoaccessthescreeninstep2bytouching[ ]torestoretheoriginalleveland • Onthescreeninstep2,youcantouch[ ]toreturntotheshootingscreen. touch[ 176 ColorandContinuousShooting StillImages Movies Changing Image Color Tones (My Colors) Changeimagecolortonesasdesired,suchasconvertingimagestosepia orblackandwhite. zz Pressthe<m>button,choose[ ]in themenu,andchoosethedesiredoption (=89). XX Theoptionyouconiguredisnow displayed. MyColorsOff ― Vivid Emphasizescontrastandcolorsaturation,makingimages sharper. Neutral Tonesdowncontrastandcolorsaturationforsubdued images. Sepia Createssepiatoneimages. Y P O B/W Createsblackandwhiteimages. PositiveFilm CombinestheeffectsofVividBlue,VividGreen,and VividRedtoproduceintenseyetnatural-lookingcolors resemblingimagesonpositiveilm. C LighterSkinTone Lightensskintones. DarkerSkinTone Darkensskintones. VividBlue Emphasizesbluesinimages.Makesthesky,ocean,and otherbluesubjectsmorevivid. VividGreen Emphasizesgreensinimages.Makesmountains,foliage, andothergreensubjectsmorevivid. VividRed Emphasizesredsinimages.Makesredsubjectsmore vivid. CustomColor Adjustcontrast,sharpness,colorsaturation,andother qualitiesasdesired(=178). 177 ColorandContinuousShooting • Whitebalance(=174)cannotbesetin[ ]or[ ]modes. • With[ ]and[ ]modes,colorsotherthanpeople’sskintone maybemodiied.Thesesettingsmaynotproducetheexpected resultswithsomeskintones. StillImages Movies CustomColor Choosethedesiredlevelofimagecontrast,sharpness,colorsaturation, red,green,blue,andskintonesinarangeof1–5. 1 Accessthesettingscreen. zz Followthestepson=177tochoose [ ],andthenpressthe<n>button. 2 Conigurethesetting. zz Pressthe<o><p>buttonstochoose Y P O anoption,andthenspecifythevalueby pressingthe<q><r>buttonsorturning the<7>dial. zz Forstronger/moreintenseeffects(or darkerskintones),adjustthevalueto theright,andforweaker/lightereffects (orlighterskintones),adjustthevalueto theleft. zz Pressthe<n>buttontocomplete thesetting. C • Youcanalsospecifyavaluebytouchingordraggingthebar. 178 ColorandContinuousShooting StillImages Continuous Shooting Holdtheshutterbuttonallthewaydowntoshootcontinuously. Fordetailsonthecontinuousshootingspeed,see“Speciications” (=333). 1 Conigurethesetting. zz Pressthe<m>button,choose[ ]in themenu,andchoosethedesiredoption (=89). XX Theoptionyouconiguredisnow displayed. 2 Shoot. XX Holdtheshutterbuttonallthewaydown toshootcontinuously. Mode W Continuous Description Y P O Continuousshooting,withthefocusandexposuredetermined whenyoupresstheshutterbuttonhalfway. Continuous ShootingAF Continuousshootingandfocusing. [AFFrame]issetto[1-point]andcannotbechanged. Continuous ShootingLV* Continuousshooting,withthefocusixedattheposition determinedinmanualfocusing.In[t]mode,focusisdetermined bytheirstshot. C *In[t]mode(=138),AFlock(=191),ormanualfocusmode(=182),[ ]is changedto[ ]. *Fordetailsonthecontinuousshootingspeedineachmode,see“Speciications” (=333). 179 ColorandContinuousShooting • Cannotbeusedwiththeself-timer(=107)or[BlinkDetection] (=131). • Shootingmaystopmomentarilyorcontinuousshootingmayslow downdependingonshootingconditions,camerasettings,andthe zoomposition. • Asmoreshotsaretaken,shootingmayslowdown. • Shootingmayslowdownifthelashires. • WithTouchShutter(=110),thecamerawillonlytakeoneshot insteadofshootingcontinuously. • IfyouuseFaceID(=113)in[W],thenamerecordedintheimagewillbe ixedtothelocationwhereitisdisplayedintheirstshot.Evenifthesubject moves,thenamewillstayixedinthesamepositionforanysubsequent shots. Y P O C 180 Shooting Range and Focusing StillImages Shooting Close-ups (Macro) Torestrictthefocustosubjectsatcloserange,setthecamerato[e].For detailsonthefocusingrange,see“Speciications”(=333). zz Pressthe<q>button,choose[e](either pressthe<q><r>buttonsorturnthe <7>dial),andthenpressthe<m> button. XX Oncethesettingiscomplete,[e]is displayed. • Ifthelashires,vignettingmayoccur. • WiththeAFframemodesetto[FaceAiAF],usingTouchShutter returnsthecamerato[ ]. Y P O • Topreventcamerashake,trymountingthecameraonatripodandshooting withthecamerasetto[[](=108). • Youcanalsoconigurethissettingbypressingthe<q>button,touching[e], andthentouchingitagain. C 181 ShootingRangeandFocusing StillImages Movies Shooting in Manual Focus Mode WhenfocusingisnotpossibleinAFmode,usemanualfocus.Youcan specifythegeneralfocalpositionandthenpresstheshutterbuttonhalfway tohavethecameradeterminetheoptimalfocalpositionneartheposition youspeciied.Fordetailsonthefocusingrange,see“Speciications” (=333). 1 Choose[ ]. zz Pressthe<q>button,choose[ ] (eitherpressthe<q><r>buttonsorturn the<7>dial),andthenpressthe<m> button. XX [ ]andtheMFindicatoraredisplayed. 2 Specifythegeneralfocal position. zz Referringtotheon-screenMFindicator Y P O bar(whichshowsthedistanceandfocal position)andthemagniieddisplayarea, pressthe<o><p>buttonsorturnthe <7>dialtospecifythegeneralfocal position,andthenpressthe<m>button. C MFIndicator 3 Fine-tunethefocus. zz Presstheshutterbuttonhalfwaytohave thecameraine-tunethefocalposition (SafetyMF). • AFframemodeorsizecannotbechangedwhilefocusing manually(=184).IfyouwanttochangetheAFframemodeor size,cancelmanualfocusmodeirst. • Focusingispossiblewhenusingthedigitalzoom(=105)or digitaltele-converter(=183),orwhenusingaTVasadisplay (=284),butthemagniieddisplaywillnotappear. 182 ShootingRangeandFocusing • Youcanalsoadjustthefocusbyturningthe<y>ring(=206). • Tofocusmoreaccurately,tryattachingthecameratoatripodtostabilizeit. • Tohidethemagniieddisplayarea,pressthe<n>buttonandset[MFPointZoom]onthe[4]tabto[Off](=91). • Todeactivateautomaticfocusine-tuningwhentheshutterbuttonispressed halfway,pressthe<n>buttonandset[SafetyMF]onthe[4]tabto [Off](=91). StillImages Movies Digital Tele-Converter Thefocallengthofthelenscanbeincreasedbyapproximately1.5xor2.0x. Thiscanreducecamerashakebecausetheshutterspeedisfasterthanit wouldbeifyouzoomed(includingusingdigitalzoom)intothesamezoom factor. zz Pressthe<n>button,choose [DigitalZoom]onthe[4]tab,andthen choosethedesiredoption(=91). XX Theviewisenlargedandthezoomfactor isdisplayedonthescreen. Y P O C • Thedigitaltele-convertercannotbeusedwithdigitalzoom (=105)andAF-pointzoom(=130). • Therespectivefocallengthswhenusing[1.5x]and[2.0x]are36.0–180.0 mmand48.0–120.0mm(35mmilmequivalent). • Theshutterspeedmaybeequivalentwhenyoumovethezoomleverallthe waytoward<i>formaximumtelephoto,andwhenyouzoomintoenlarge thesubjecttothesamesizefollowingstep2on=105. 183 ShootingRangeandFocusing StillImages Movies Changing the AF Frame Mode ChangetheAF(autofocus)framemodetosuittheshootingconditionsas follows. zz Pressthe<n>button,choose[AF Frame]onthe[4]tab,andthenchoose thedesiredoption(=91). StillImages Movies FaceAiAF • Detectspeople’sfaces,andthensetsthefocus,exposure(evaluative meteringonly),andwhitebalance([ ]only). • Afteryouaimthecameraatthesubject,awhiteframeisdisplayedaround theperson’sfacedeterminedbythecameratobethemainsubject,andup totwograyframesaredisplayedaroundotherdetectedfaces. • Whenthecameradetectsmovement,frameswillfollowmovingsubjects, withinacertainrange. • Afteryoupresstheshutterbuttonhalfway,uptoninegreenframesare displayedaroundfacesinfocus. Y P O C • Iffacesarenotdetected,orwhenonlygrayframesaredisplayed (withoutawhiteframe),uptoninegreenframesaredisplayedin theareasinfocuswhenyoupresstheshutterbuttonhalfway. • IffacesarenotdetectedwhenServoAF(=187)issetto[On], theAFframeisdisplayedinthecenterofthescreenwhenyou presstheshutterbuttonhalfway. • Examplesoffacesthatcannotbedetected: -Subjectsthataredistantorextremelyclose -Subjectsthataredarkorlight -Facesinproile,atanangle,orpartlyhidden • Thecameramaymisinterpretnon-humansubjectsasfaces. • NoAFframesaredisplayedifthecameracannotfocuswhenyou presstheshutterbuttonhalfway. 184 ShootingRangeandFocusing StillImages Movies 1-point OneAFframeisdisplayed.Effectiveforreliablefocusing. • AyellowAFframeisdisplayedwith[ ]ifthecameracannot focuswhenyoupresstheshutterbuttonhalfway.NotethatAFpointzooming(=130)isnotpossible. • Tocomposeshotssothatsubjectsarepositionedattheedgeorinacorner, irstaimthecameratocapturethesubjectinanAFframe,andthenhold theshutterbuttonhalfwaydown.Asyoucontinuetoholdtheshutterbutton halfway,recomposetheshotasdesired,andthenpresstheshutterbuttonall thewaydown(FocusLock). StillImages MovingandResizingAFFrames(1-point) WhenyouwanttochangethepositionorsizeoftheAFframe,settheAF framemodeto[1-point]. Y P O 1 MovetheAFframe. zz Touchthescreen.AnAFframeis C displayedinorangewhereyoutouched (TouchAF). zz Youcanturnthe<7>dialtomovetheAF frameandpressthe<o><p><q><r> buttonstoine-tunetheposition. zz ToreturntheAFframetotheoriginal positioninthecenter,pressthe<n> button. 2 ResizetheAFframe. zz ToreducetheAFframesize,turnthe <y>ring.Turnitagaintorestoreittothe originalsize. 3 Finishthesetupprocess. zz Pressthe<m>button. 185 ShootingRangeandFocusing • AFframesaredisplayedatnormalsizewhenyouusethedigital zoom(=105)ordigitaltele-converter(=183),andinmanual focusmode(=182). • YoucanalsolinktheSpotAEPointframetotheAFframe(=168). • YoucanalsoconiguretheAFframesizebypressingthe<n>button andchoosing[AFFrameSize]onthe[4]tab. • Onthescreeninstep2,youcanalsomovetheAFframebytouchingthe ],or screen,restoretheAFframetotheoriginalpositionbytouching[ ]. exitthesettingbytouching[ Y P O C 186 ShootingRangeandFocusing StillImages ShootingwithServoAF Thismodehelpsavoidmissingshotsofsubjectsinmotion,becausethe cameracontinuestofocusonthesubjectandadjusttheexposureaslong asyoupresstheshutterbuttonhalfway. 1 Conigurethesetting. zz Pressthe<n>button,choose [ServoAF]onthe[4]tab,andthen choose[On](=91). 2 Focus. zz Thefocusandexposurearemaintained wheretheblueAFframeisdisplayed whileyouarepressingtheshutterbutton halfway. Y P O • Focusingmaynotbepossibleinsomeshootingconditions. • Inlow-lightconditions,ServoAFmaynotbeactivated(AFframes maynotturnblue)whenyoupresstheshutterbuttonhalfway. Inthiscase,thefocusandexposurearesetaccordingtothe speciiedAFframemode. • Ifadequateexposurecannotbeobtained,shutterspeedsand aperturevaluesaredisplayedinorange.Releasetheshutter button,andthenpressithalfwayagain. • AFlockshootingisnotavailable. • [AF-PointZoom]onthe[4]tabisnotavailable. • Notavailablewhenusingtheself-timer(=107). C 187 ShootingRangeandFocusing StillImages Changing the Focus Setting Youcanchangedefaultcameraoperationofconstantlyfocusingon subjectsitisaimedat,evenwhentheshutterbuttonisnotpressed.Instead, youcanlimitcamerafocusingtothemomentyoupresstheshutterbutton halfway. zz Pressthe<n>button,choose [ContinuousAF]onthe[4]tab,andthen choose[Off](=91). On Helpsavoidmissingsuddenphoto opportunities,becausethecamera constantlyfocusesonsubjectsuntilyou presstheshutterbuttonhalfway. Off Conservesbatterypower,becausethe cameradoesnotfocusconstantly. Y P O StillImages Movies Choosing Subjects to Focus On (Touch AF) Youcanshootafterchoosingaperson’sfaceoranothersubjecttofocuson. C 1 SettheAFframeto[FaceAiAF] (=184). 2 Chooseaperson’sfaceor anothersubjecttofocuson. zz Touchthesubjectorpersononthe screen. 188 ShootingRangeandFocusing XX Whenthesubjectisdetected,thecamera beepsand[ ]isdisplayed.Thecamera willcontinuetotrackthesubject,evenif itmoves. zz TocancelTouchAF,touch[^]. 3 Shoot. zz Presstheshutterbuttonhalfway.After thecamerafocuses,[ ]changestoa green[ ]. zz Presstheshutterbuttonallthewaydown toshoot. • Ifyoupreferthecameranottoshootwhenyoutouchthescreen, makesure[TouchShutter]modeisdeactivated.Pressthe <n>button,andonthe[4]tab,select[TouchShutter:Off] (=110). • Trackingmaynotbepossiblewhensubjectsaretoosmallormove toorapidly,orwhenthereisinadequatecontrastbetweensubjects andthebackground. • Evenifyouareshootingin[e]mode(=181),thecamerawill revertto[ ]modeifyoutouchthescreentospecifywhereto focus. • If[FaceID]issetto[On],nameswillnotdisplaywhenregistered peoplearedetected,butthenameswillberecordedinthestill images(=113).However,anamewilldisplayifthesubject chosentofocusonisthesameasapersondetectedwithFaceID. Y P O C 189 ShootingRangeandFocusing StillImages Choosing a Person to Focus On (Face Select) Youcanshootafterchoosingaspeciicperson’sfacetofocuson. 1 PreparethecameraforFace Select. zz SettheAFframeto[FaceAiAF](=184). zz Assign[ ]tothe< >button(=211). 2 EnterFaceSelectmode. zz Aimthecameraattheperson’sfaceand pressthe< >button. XX After[FaceSelect:On]isdisplayed,a faceframe[ ]isdisplayedaroundthe facedetectedasthemainsubject. zz Evenifthesubjectmoves,thefaceframe [ ]followsthesubjectwithinacertain range. Y P O 3 Choosethefacetofocuson. zz Toswitchthefaceframe[ ]toanother detectedface,pressthe< >button. zz Afteryouhaveswitchedthefaceframe toalldetectedfaces,[FaceSelect:Off] isdisplayed,andthespeciiedAFframe modescreenisdisplayedagain. C 4 Shoot. zz Presstheshutterbuttonhalfway.Afterthe camerafocuses,[ ]changesto[ ]. zz Presstheshutterbuttonallthewaydown toshoot. • When[FaceID]issetto[On],namesofanyregisteredpeopledetectedare notdisplayedwhenyouhaveselectedanother,unregisteredfacetofocus on.However,theirnameswillberecordedinthestillimages(=113). 190 ShootingRangeandFocusing StillImages Movies Shooting with the AF Lock Thefocuscanbelocked.Afteryoulockthefocus,thefocalpositionwillnot changeevenwhenyoureleaseyouringerfromtheshutterbutton. 1 Lockthefocus. zz Withtheshutterbuttonpressedhalfway, pressthe<q>button. XX Thefocusisnowlocked,and[ ]is displayed. XX Tounlockthefocus,holdtheshutter buttonhalfwaydownandpressthe<q> buttonagain. 2 Composetheshotandshoot. Y P O • CannotbeusedwithTouchShutter(=110)orTouchAF(=188). C StillImages Focus Bracketing (Focus-BKT Mode) Threeconsecutiveimagesarecapturedeachtimeyoushoot,withthe irstoneatthefocaldistanceyousetmanuallyandtheothersatfarther andnearerfocalpositionsdeterminedbypresets.Thedistancefromyour speciiedfocuscanbesetinthreelevels. 1 Choose[ ]. zz Pressthe<m>button,choose[ themenu,andthenchoose[ (=89). ] ]in 191 ShootingRangeandFocusing 2 Conigurethesetting. zz Pressthe<n>button,andthen adjustthesettingbypressingthe <q><r>buttonsorturningthe<7>dial. • Focusbracketingisonlyavailablein[!]mode(=111). • Continuousshooting(=179)isnotavailableinthismode. • Youcanalsoaccessthesettingscreeninstep2bychoosing[ ]instep1 on=182andpressingthe<n>button. • Threeshotsaretaken,regardlessofanyquantityspeciiedin[$](=108). • In[BlinkDetection]mode(=131),thisfunctionisonlyavailablefortheinal shot. Y P O • Toaccessthescreeninstep2,youcaneithertouch[ ]onthescreenin ]onthemanualfocusscreen(=182). step1ortouch[ • Youcanalsoconigurethissettingbytouchingordraggingthebaronthe ]. screeninstep2tospecifyavalueandthentouching[ C 192 Flash StillImages Activating Flash Youcanhavethelashireforeachshot.Fordetailsonthelashrange,see “Speciications”(=333). 1 Conigurethesetting. zz Pressthe<r>button,choose[h](either pressthe<q><r>buttonsorturnthe <7>dial),andthenpressthe<m> button. XX Ifthelashisdown,itwillberaised automatically. XX Oncethesettingiscomplete,[h]is displayed. • Youcanalsoconigurethissettingbypressingthe<r>button,touching[h], andthentouchingitagain. Y P O C 193 Flash StillImages Shooting with Slow Synchro Withthisoption,thelashirestoincreasethebrightnessofthemain subject(suchaspeople)whilethecamerashootsataslowshutterspeedto increasethebrightnessofthebackgroundthatisoutofthelashrange. Fordetailsonthelashrange,see“Speciications”(=333). 1 Conigurethesetting. zz Pressthe<r>button,choose[Z](either pressthe<q><r>buttonsorturnthe <7>dial),andthenpressthe<m> button. XX Ifthelashisdown,itwillberaised automatically. XX Oncethesettingiscomplete,[Z]is displayed. 2 Shoot. Y P O zz Evenafterthelashires,ensurethat themainsubjectdoesnotmoveuntilthe shuttersoundisinishedplaying. C • Mountthecameraonatripodortakeothermeasurestokeepit stillandpreventcamerashake.Additionally,youshouldset[IS Mode]to[Off]whenusingatripodorothermeanstoholdthe camerastill(=199). • Youcanalsoconigurethissettingbypressingthe<r>button,touching[Z], andthentouchingitagain. 194 Flash StillImages Adjusting the Flash Exposure Compensation Justaswithregularexposurecompensation(=166),youcanadjustthe lashexposurefrom–2to+2stops,in1/3-stopincrements. zz Pressthe<r>buttonandimmediately turnthe<y>ringtochoosethe compensationlevel,andthenpressthe <m>button. XX Oncethesettingiscomplete,[X]is displayed. • Whenthereisariskofoverexposure,thecameraautomaticallyadjuststhe shutterspeedoraperturevalueduringthelashshotstoreducewashedouthighlightsandshootatoptimalexposure.However,youcandeactivate automaticadjustmentoftheshutterspeedandaperturevaluebyaccessing <n>(=91)andsetting[SafetyFE]in[FlashSettings]onthe[4] tabto[Off]. • Youcanalsoconigurethelashexposurecompensationbyaccessing <n>(=91)andchoosing[FlashExp.Comp]in[FlashSettings]on the[4]tab. • Youcanalsoaccessthe[FlashSettings]<n>screenbypressingthe <r>buttonandthenthe<n>button. Y P O C • Youcanalsoaccessthe[FlashSettings]<n>screenbypressingthe ]. <r>buttonandtouching[ 195 Flash StillImages Shooting with the FE Lock JustaswiththeAElock(=167),youcanlocktheexposureforthelash shots. 1 Setthelashto[h](=193). 2 Lockthelashexposure. zz Aimthecameraatthesubjecttoshoot withtheexposurelocked.Withthe shutterbuttonpressedhalfway,pressthe <o>button. XX Thelashires,andwhen[ ]is displayed,thelashoutputlevelis retained. zz TounlockFE,releasetheshutterbutton andpressthe<o>buttonagain.Inthis case,[ ]isnolongerdisplayed. Y P O 3 Composetheshotandshoot. zz Afteroneshot,FEisunlockedand[ C nolongerdisplayed. ]is • FELockcannotbeusedwithTouchShutter(=110)orTouchAF (=188),becausetouchingthescreenwillcancelFELock. • FE:FlashExposure 196 Flash StillImages Changing the Flash Timing Changethetimingofthelashandshutterreleaseasfollows. 1 Accessthesettingscreen. zz Pressthe<n>button,choose[Flash Settings]onthe[4]tab,andthenpress the<m>button(=91). 2 Conigurethesetting. zz Choose[ShutterSync.],andthenchoose thedesiredoption(=91). 1st-curtain Thelashiresimmediatelyafter theshutteropens. 2nd-curtain Thelashiresimmediatelybefore theshuttercloses. Y P O C 197 StillImages Shooting RAW Images RAWimagesare“raw”(unprocessed)data,recordedwithessentiallyno lossofimagequalityfromthecamera’sinternalimageprocessing.Usethe DigitalPhotoProfessional(=27)toadjustRAWimagesasdesiredwith minimallossofimagequality. zz Pressthe<m>button,choose[ ]in themenu,andchoosethedesiredoption (=89). RecordsJPEGimages.JPEGimagesareprocessedinthecameraforoptimal imagequalityandcompressedtoreduceilesize.However,thecompression processisirreversible,andimagescannotberestoredtotheiroriginal, unprocessedstate.Imageprocessingmayalsocausesomelossofimagequality. RecordsRAWimages.RAWimagesare“raw”(unprocessed)data,recordedwith essentiallynolossofimagequalityfromthecamera’simageprocessing.The datacannotbeusedinthisstateforviewingorprintingonacomputer.Youmust irstusetheincludedsoftware(DigitalPhotoProfessional)toconvertimagesto ordinaryJPEGorTIFFiles.Imagescanbeadjustedwithminimallossofimage quality. Fordetailsonresolutionandthenumberofshotsthatwillitonacard,see “Speciications”(=333). Y P O C Recordstwoimages,bothaRAWimageandaJPEGimage,foreachshot. TheJPEGimagecanbeprintedorviewedonacomputerwithoutusingthe includedsoftware. • WhentransferringRAWimages(orRAWandJPEGimages recordedtogether)toacomputer,alwaysusetheincluded software(=27). • Digitalzoom(=105),datestamps(=112),andred-eye reduction(=125)aresetto[Off]in[ ]and[ ]modes. Additionally,i-Contrast(=172),MyColors(=177)andnoise reductionlevel(=170)cannotbeconigured. • TheileextensionforJPEGimagesis.JPG,andtheextensionforRAW imagesis.CR2. 198 Other Settings StillImages Changing the Compression Ratio (Image Quality) Choosefromtwocompressionratios,asfollows:[ ](SuperFine), [ ](Fine).Forguidelinesonhowmanyshotsateachcompressionratio canitonamemorycard,see“Speciications”(=333). Conigurethesetting. zz Pressthe<m>button,choose[ ]in themenu,pressthe<n>button, andchoosethedesiredoption(=89). StillImages Movies Changing the IS Mode Settings Y P O Conigurethesetting. zz Pressthe<n>button,choose[IS C Mode]onthe[4]tab,andthenchoose thedesiredoption(=91). Optimalimagestabilizationforthe Continuous shootingconditionsisautomatically applied(IntelligentIS)(=103). Shoot Only* Imagestabilizationisactiveonlyat themomentofshooting. Off Deactivatesimagestabilization. *Thesettingischangedto[Continuous]formovie recording. • Ifimagestabilizationcannotpreventcamerashake,mountthe cameraonatripodortakeothermeasurestoholditstill.Inthis case,set[ISMode]to[Off]. 199 Y P O C 200 5 Tv, Av, M, and C Mode Takesmarter,moresophisticatedshots,andcustomize thecameraforyourshootingstyle Y P O C • Instructionsinthischapterapplytothecameraassettotherespective mode. 201 StillImages Speciic Shutter Speeds (<Tv> Mode) Setyourpreferredshutterspeedbeforeshootingasfollows.Thecamera automaticallyadjuststheaperturevaluetosuityourshutterspeed. Fordetailsonavailableshutterspeeds,see“Speciications”(=333). 1 Enter<M>mode. zz Setthemodedialto<M>. 2 Settheshutterspeed. zz Turnthe<y>ringtosettheshutter speed. • Withshutterspeedsof1.3secondsorslower,therewillbeadelay beforeyoucanshootagain,asimagesareprocessedtoremove noise. • Whenshootingatlowshutterspeedsonatripod,youshouldset [ISMode]to[Off](=199). • Thespeedyousetmaybeloweredautomaticallyasneededifthe lashires. • Withshutterspeedsof1.3secondsorslower,ISOspeedis[ ] andcannotbechanged. • Orangedisplayofaperturevalueswhenyoupresstheshutter buttonhalfwayindicatesthatthesettingsdeviatefromstandard exposure.Adjusttheshutterspeeduntiltheaperturevalueis displayedinwhite,orusesafetyshift(=203). Y P O C • <M>:Timevalue • Youcancustomizecameraoperationsothatturningthe<7>dialchanges theshutterspeed(=206). 202 StillImages Speciic Aperture Values (<Av> Mode) Setyourpreferredaperturevaluebeforeshootingasfollows.Thecamera automaticallyadjuststheshutterspeedtosuityouraperturevalue. Fordetailsonavailableaperturevalues,see“Speciications”(=333). 1 Enter<B>mode. zz Setthemodedialto<B>. 2 Settheaperturevalue. zz Turnthe<y>ringtosettheaperture value. • Orangedisplayofshutterspeedswhenyoupresstheshutter buttonhalfwayindicatesthatthesettingsdeviatefromstandard exposure.Adjusttheaperturevalueuntiltheshutterspeedis displayedinwhite,orusesafetyshift(seebelow). Y P O • <B>:Aperturevalue(sizeoftheopeningmadebytheirisinthelens) • Toavoidexposureproblemsin<M>and<B>modes,youcanhavethe cameraautomaticallyadjusttheshutterspeedoraperturevalue,evenwhen standardexposurecannototherwisebeobtained.Pressthe<n>button andset[SafetyShift]onthe[4]tabto[On](=91). However,safetyshiftisdisabledwhenthelashires. • Youcancustomizecameraoperationsothatturningthe<7>dialchanges theaperturevalue(=206). C 203 StillImages Speciic Shutter Speeds and Aperture Values (<M> Mode) Followthesestepsbeforeshootingtosetyourpreferredshutterspeedand aperturevaluetoobtainthedesiredexposure. Fordetailsonavailableshutterspeedsandaperturevalues,see “Speciications”(=333). 1 Enter<D>mode. zz Setthemodedialto<D>. 2 Conigurethesetting. zz Turnthe<7>dialtosettheshutter ApertureValue ShutterSpeed Standard ExposureLevel ExposureLevel Mark ExposureLevel Indicator speed,andturnthe<y>ringtosetthe aperturevalue. XX Anexposurelevelmarkbasedonyour speciiedvalueisshownontheexposure levelindicatorforcomparisontothe standardexposurelevel. XX Theexposurelevelmarkisshown inorangewhenthedifferencefrom standardexposureexceeds2stops.“–2” or“+2”isdisplayedinorangeinthelower rightwhenyoupresstheshutterbutton halfway. Y P O C • Afteryousettheshutterspeedoraperturevalue,theexposure levelmaychangeifyouadjustthezoomorrecomposetheshot. • Screenbrightnessmaychangedependingonyourspeciied shutterspeedoraperturevalue.However,screenbrightness remainsthesamewhenthelashmodeissetto[h]. • Tohaveboththeshutterspeedandaperturevalueautomatically adjustedtoobtainstandardexposure,holdtheshutterbutton halfwayandpressthe<o>button.Notethatstandardexposure maynotbepossiblewithsomesettings. • Withshutterspeedsof1.3secondsorslower,ISOspeedis[ ] andcannotbechanged. 204 SpeciicShutterSpeedsandApertureValues(<M>Mode) • <D>:Manual • Calculationofstandardexposureisbasedonthespeciiedmeteringmethod (=168). • Youcancustomizecameraoperationsothatturningthe<y>ringadjuststhe shutterspeedandturningthe<7>dialadjuststheaperturevalue(=206). StillImages Adjusting the Flash Output Choosefromthethreelashlevelsin<D>mode. 1 Enter<D>mode. zz Setthemodedialto<D>. 2 Conigurethesetting. zz Pressthe<r>buttonandimmediately turnthe<y>ringtochoosethelash level,andthenpressthe<m>button. XX Oncethesettingiscomplete,[X]is displayed. Y P O C • Youcanalsosetthelashlevelbychoosing[X]intheFUNC.menu (=89),orbyaccessing<n>(=91)andchoosing[FlashOutput] in[FlashSettings]onthe[4]tab. • Youcansetthelashlevelin<M>or<B>modebyaccessing<n> (=91),choosing[FlashSettings]onthe[4]tab,andthensetting[Flash Mode]to[Manual]. • Youcanalsoaccessthe[FlashSettings]<n>screenbypressingthe <r>buttonandthenthe<n>button. • Youcanalsoaccessthe[FlashSettings]<n>screenbypressingthe ]. <r>buttonandtouching[ 205 Customization for Shooting Styles StillImages Movies Changing Control Ring Settings Reassigncontrolringfunctionsasfollows.Usingthecontrolringisan enjoyablewaytocontrolthecameraasyouwouldafullymanualcamera. 1 Chooseafunctiontoassignto the<y>ring. zz Pressthe< >button. zz Chooseanoption,eitherbypressingthe < >or<q><r>buttonsorbyturning the<y>ringor<7>dial. zz Pressthe<m>buttontocompletethe setting. Y P O 2 Conigurethefunctionto assign. zz Turnthe<y>ringorthe<7>dialto C coniguretheassignedfunction. • Youcanalsoconigurethissettingbypressingthe< optiontochooseit,andthentouchingitagain. 206 >button,touchingan CustomizationforShootingStyles FunctionsAssignabletotheControlRing Functionsyoucanassigntothecontrolringvarydependingonshooting mode,andthoseassignmentsdeterminewhichfunctionsyoucanassignto thecontroldial. Shooting Mode Assignable Function y b @ D B M G Av Av Tv ISO 7 Tv – – – y ISO ISO ISO ISO 7 Tv,Av* Av Tv – y Tv +/– +/– +/– Av Av Tv – 7 y Manualfocusingispossible(=182). y Whitebalancecanbecorrected(=174). Y P O y Stepzoomingispossible(=106). y i-Contrastcanbeset(=172). y Theaspectratiocanbechanged(=123). – Functionscanbeassignedasdesired(=208). C •Av:aperturevalue(=203);Tv:shutterspeed(=202); ISO:ISOspeed(=169);+/–:exposurecompensation(=166);MF:manualfocus (=182). ],[@],or[ ]tothe<y>ring,thefunctionsyou •Whenyouassign[ ],[ ],[ canassigntothe<7>dialarethesameasfor[ ]. *TvandAvsettingscanbetoggledbypressingthe<o>button. • Iconslabeledwith[ ]indicatethatthefunctionisnotavailableinthe currentshootingmodeorundercurrentfunctionconditions. • The<y>ringcanbeusedforstepzoomingin<A>,<K>,ormovie mode(=106). 207 CustomizationforShootingStyles StillImages Movies AssigningFunctionstotheControlRing Assignfunctionstothecontrolringbasedoneachshootingmode. 1 Choose[ ]. zz Followingstep1on=206,choose[ andpressthe<n>button. ] 2 Conigurethesetting. zz Pressthe<q><r>buttonsorturnthe FunctionsYouCanAssignto theControlRing <7>dialtochoosetheshootingmode withfunctionstoassign. zz Pressthe<o><p>buttonsorturnthe <y>ringtochooseafunctiontoassignto thecontrolring. XX Functionsyoucanassigntothecontrol dialwillbeupdatedautomatically. zz Pressthe<n>buttontoreturntothe shootingscreen. Y P O C • Youcanalsoaccessthesettingscreenbychoosing[ ]instep1on ]. =206andthentouching[ • Onthesettingscreen,youcanalsoswitchthecontrolringfunctionsby ]. touchingthefunctionsandthen[ 208 CustomizationforShootingStyles StillImages Switching Control Ring Functions While Coniguring Settings Asyoutouchthescreentoswitchbetweenthefunctionsyouare coniguring,youcanturnthecontrolringtospecifyISOspeed,exposure compensation,shutterspeed,andaperturevalueimmediately. zz Aftertouchingtherightedgeofthe screen(insidetheframeshownatleft)to viewsettings,youcandragupordownto chooseanitemandturnthe<y>ringto specifyavalue. Y P O C Availablesettingitemsvarybyshootingmode.Notethatthefunctions assignedtothecontrolring(=206)arenotdisplayed. D B M G ISO Tv Av ISO +/– Av ISO +/– Tv ISO +/– •+/–:exposurecompensation(=166);ISO:ISOspeed(=169);Tv:shutterspeed (=202);Av:aperturevalue(=203) 209 CustomizationforShootingStyles StillImages Movies Customizing Display Information Customizewhatinformationisshowninvariousdisplaymodes(switchedby pressingthe<p>button),andwhetherornottheinformationisshownon theLCDmonitororviewinder. 1 Accessthesettingscreen. zz Pressthe<n>button,choose [CustomDisplay]onthe[4]tab,and thenpressthe<m>button(=91). 2 Conigurethesetting. zz Pressthe<o><p><q><r>buttonsor turnthe<7>dialtochooseanitem,and thenpressthe<m>button.Itemsyou choosefordisplayarelabeledwith[ ]. XX Selecteditems(labeledwitha[ ])will beincludedindisplay. Y P O ShootingInfo Displaysshootinginformation(=314). GridLines Displaysareferencegrid. C ElectronicLevel Displaystheelectroniclevel(=129). Histogram Displaysahistogram(=219),in<G>,<M>,<B>,and<D> modes. • Settingswillnotbesavedifyoupresstheshutterbuttonhalfwayand returntotheshootingscreenfromthecustomdisplaysettingsscreen. • Grayed-outitemscanalsobespeciied,buttheymaynotbe displayedinsomeshootingmodes. • Gridlinesarenotrecordedinyourshots. • Youcanalsochooseanitemtodisplaybytouchingit. 210 CustomizationforShootingStyles StillImages Assigning Functions to the < Movies > Button 1 Accessthesettingscreen. zz Pressthe<n>button,choose[Set button]onthe[4]tab,andthen pressthe<m>button(=91). 2 Conigurethesetting. zz Pressthe<o><p><q><r>buttonsor turnthe<7>dialtochooseafunctionto assign,andthenpressthe<m>button. 3 Usetheassignedfunctionas needed. zz Pressthe< >buttontoactivatethe assignedfunction. Y P O • Torestoredefaultsettings,choose[ ]. • Iconslabeledwith[ ]indicatethatthefunctionisnotavailableinthe currentshootingmodeorundercurrentfunctionconditions. ],youcanmoveandresizetheAFframebypressingthe< > • With[ buttonin[1-point]AFframemode(=185). >button • Whenthe[ ]or[ ]functionisused,eachpressofthe< recordswhitebalancedata(=175),andthewhitebalancesettingschange to[ ]or[ ]. >buttonadjustsand • Whenthe[%]functionisused,eachpressofthe< locksthefocus,and[%]isdisplayedonthescreen. >buttonwhenthe[ ]functionisuseddeactivatesscreen • Pressingthe< display.Torestorethedisplay,doanyofthefollowing. -Pressanybutton(otherthanthepowerbutton) -Holdthecamerainanotherorientation C • Youcanalsoconiguresettingsbytouchingadesiredoptionandthen ]. touchingitagainortouching[ 211 CustomizationforShootingStyles StillImages Saving Shooting Settings Savecommonlyusedshootingmodesandyourconiguredfunctionsettings forreuse.Toaccesssavedsettingslater,simplyturnthemodedialto< >. Evensettingsthatareusuallyclearedwhenyouswitchshootingmodesor turnthecameraoff(suchasself-timersettings)canberetainedthisway. Settingsthatcanbesaved • Shootingmodes(<G>,<M>,<B>,and<D>) • Itemssetin<G>,<M>,<B>,or<D>modes(=166–204) • Shootingmenusettings • Zoompositions • Manualfocuspositions(=182) • MyMenusettings(=213) 1 Enterashootingmodewith Y P O settingsyouwanttosave,and changethesettingsasdesired. 2 Conigurethesetting. zz Pressthe<n>button,choose[Save C Settings]onthe[4]tab,andthenpress the<m>button. 3 Savethesettings. zz Pressthe<q><r>buttonsorturnthe <7>dialtochoose[OK],andthenpress the<m>button. 212 CustomizationforShootingStyles • Toeditsavedsettings(excepttheirshootingmode),choose< >, changethesettings,andthenrepeatsteps2–3.Thesesetting detailsarenotappliedinothershootingmodes. • Toclearinformationyouhavesavedto< >andrestoredefaultvalues,turn themodedialto< >andchoose[ResetAll](=276). StillImages Movies Saving Commonly Used Shooting Menus (My Menu) Saveuptoivecommonlyusedshootingmenusasmenusonthe[ forinstantaccesstoalloftheseitemsfromasinglescreen. ]tab, 1 Accessthesettingscreen. zz Pressthe<n>button,choose[My Menusettings]onthe[ ]tab,andthen pressthe<m>button(=91). Y P O C 2 Conigurethesetting. zz Pressthe<o><p>buttonsorturnthe <7>dialtochoose[Selectitems],and thenpressthe<m>button. zz Pressthe<o><p>buttonsorturnthe <7>dialtochoosemenustosave(upto ive),andthenpressthe<m>button. XX [ ]isdisplayed. zz Tocancelsaving,pressthe<m>button. [ ]isnolongerdisplayed. zz Pressthe<n>button. 213 CustomizationforShootingStyles 3 Rearrangethemenulistorder, asneeded. zz Pressthe<o><p>buttonsorturnthe <7>dialtochoose[Sort],andthenpress the<m>button. zz Pressthe<o><p>buttonsorturnthe <7>dialtochooseamenutomove,and thenpressthe<m>button. zz Pressthe<o><p>buttonsorturnthe <7>dialtochangetheorder,andthen pressthe<m>button. zz Pressthe<n>button. • Grayed-outitemsinstep2canalsobespeciied,buttheymaynot beavailableinsomeshootingmodes. • TomakeMyMenuimmediatelyaccessiblebypressingthe<n>button inShootingmode,choose[Setdefaultview]andpressthe<q><r>buttons tochoose[Yes]. Y P O • Onthe[Selectitems]screenforsavingorclearingitems,youcanalsotouch itemstoselectthem. • Onthe[Sort]screen,youcanalsodragitemstochangethedisplayorder. C 214 6 Playback Mode Havefunreviewingyourshots,andbrowseoreditthem inmanyways Y P O • Topreparethecamerafortheseoperations,pressthe<1>buttonto enterPlaybackmode. C • Itmaynotbepossibletoplaybackoreditimagesthatwere renamedoralreadyeditedonacomputer,orimagesfromother cameras. 215 StillImages Movies Viewing Aftershootingimagesormovies,youcanviewthemonthescreenas follows. 1 EnterPlaybackmode. zz Pressthe<1>button. XX Yourlastshotisdisplayed. 2 Chooseanimage. zz Toviewthepreviousimage,press the<q>buttonorturnthe<7>dial counterclockwise.Toviewthenext image,pressthe<r>buttonorturnthe <7>dialclockwise. zz Pressandholdthe<q><r>buttonsto browsethroughimagesquickly. Y P O zz ToaccessScrollDisplaymode,turnthe C <7>dialrapidly.Inthismode,turnthe <7>dialtobrowsethroughimages. zz Toreturntosingle-imagedisplay,press the<m>button. zz Tobrowseimagesgroupedbyshooting date,pressthe<o><p>buttonsin ScrollDisplaymode. zz Moviesareidentiiedbya[ playmovies,gotostep3. 216 ]icon.To Viewing 3 Playmovies. zz Tostartplayback,pressthe<m>button toaccessthemoviecontrolpanel, choose[ ](eitherpressthe<q><r> buttonsorturnthe<7>dial),andthen pressthe<m>buttonagain. Volume 4 Adjustthevolume. zz Pressthe<o><p>buttonstoadjustthe volume. 5 Pauseplayback. zz Topauseorresumeplayback,pressthe <m>button. XX Afterthemovieisinished,[ displayed. ]is • ToswitchtoShootingmodefromPlaybackmode,presstheshutterbutton halfway. • TodeactivateScrollDisplay,pressthe<n>button,choose[Scroll Display]onthe[1]tab,andthenchoose[Off]. • Ifyouprefertohavethemostrecentshotdisplayedwhenyouenter Playbackmode,pressthe<n>button,andonthe[1]tab,choose [Resume]andthen[Lastshot]. • Tochangethetransitionshownbetweenimages,pressthe<n>button, choose[Transition]onthe[1]tab,andthenpressthe<q><r>buttonsto choosetheeffect. Y P O C Touch-ScreenOperations zz Toviewthenextimage,dragleftacross thescreen,andtoviewtheprevious image,dragright. 217 Viewing zz ToaccessScrollDisplaymode,quickly dragleftorrightrepeatedly. zz YoucanalsochooseimagesinScroll Displaymodebydraggingleftorright. zz Touchingthecentralimagewillrestore single-imagedisplay. zz Tobrowseimagesgroupedbyshooting dateinScrollDisplaymode,scrollupor down. zz Tostartplayback,touch[ ]instep3on =217. zz Toadjustthevolumeduringmovie playback,quicklydragupordownacross thescreen. zz Tostopplayback,touchthescreen.The screenshownatleftisdisplayed,andthe followingoperationsareavailable. zz Touch[ ]todisplaythevolume panel,andthentouch[o][p]toadjust thevolume.Atavolumeof0,[ ]is displayed. zz Toswitchframes,touchthescrollbaror dragleftorright. zz Toresumeplayback,touch[ ]. zz Touch[^]toreturntothescreeninstep 2on=216. Y P O C 218 Viewing StillImages Movies Switching Display Modes Pressthe<p>buttontoviewotherinformationonthescreen,ortohide theinformation.Fordetailsontheinformationdisplayed,see=314. NoInformation Display SimpleInformation Display Detailed Information Display Enablesyouto checkthefocus (=222)* *Notshownformovies. • Switchingdisplaymodesbypressingthe<p>buttonisalsopossible immediatelyafteryoushoot,whileyourshotisdisplayed.However,simple informationdisplayisnotavailable.Tochangetheinitialdisplaymode,press the<n>buttonandchoose[ReviewInfo]onthe[4]tab(=134). • Switchingdisplaymodesisnotpossiblewhilethecameraiswirelessly connectedtodevicesotherthanprinters. Y P O C StillImages Movies OverexposureWarning(forImageHighlights) Washed-outhighlightsintheimagelashonthescreenindetailed informationdisplay. StillImages Histogram High Low Dark Bright Movies zz Thegraphindetailedinformationdisplay isahistogramshowingthedistributionof brightnessintheimage.Thehorizontalaxis representsthedegreeofbrightness,and theverticalaxis,howmuchoftheimage isateachlevelofbrightness.Viewingthe histogramisawaytocheckexposure. zz Thehistogramcanalsobeaccessed whileshooting(=210,314). 219 Viewing StillImages Movies RGBHistogram,GPSInformationDisplay zz SwitchbetweentheRGBhistogram (stillimagesonly)andGPSinformation displaybypressingthe<o>buttonin detailedinformationdisplay. zz TheRGBhistogramshowsthe distributionofshadesofred,green,and blueinanimage.Thehorizontalaxis representsR,G,orBbrightness,andthe verticalaxis,howmuchoftheimageis atthatlevelofbrightness.Viewingthis histogramenablesyoutocheckimage colorcharacteristics. zz Usingasmartphoneconnectedwirelessly tothecamera,youcangeotagimages onthecamera,addinginformationsuch aslatitude,longitude,andelevation (=78). Youcanreviewthisinformationinthe GPSinformationdisplay. Latitude,longitude,elevation,andUTC (shootingdateandtime)arelistedfrom toptobottom. Y P O C • GPSinformationdisplayisnotavailableforimagesthatlackthis information. • UTC:CoordinatedUniversalTime,essentiallythesameasGreenwichMean Time 220 Viewing Movies Viewing Movie Digest Clips Viewmovieclipsrecordedautomaticallyin[ stillimageshootingasfollows. ]mode(=136)onadayof 1 Chooseanimage. zz Stillimagesshotin[ ]modearelabeled ]icon. withan[ zz Chooseastillimagelabeledwith[ ] andpressthe<m>button. 2 Playtheclip. zz After[Playback movie?]isdisplayed, pressthe<q><r>buttonsorturnthe <7>dialtochoose[OK],andthenpress the<m>button. XX Themoviecliprecordedautomaticallyon thedayofstillimageshootingisplayed back,fromthebeginning. Y P O C • Moviescreatedin[ ]modecanalsobeviewedbydate(=229). ]willnolongerbedisplayedwhenyouareusingthe • Afteramoment,[ camerawithinformationdisplaydeactivated(=219). • Youcanalsoplayclipsbytouching[ touching[OK]onthescreeninstep2. ]onthescreeninstep1and 221 Viewing StillImages Checking People Detected in Face ID Ifyouswitchthecameratosimpleinformationdisplaymode(=219),the namesofuptoivedetectedpeopleregisteredinFaceID(=113)willbe displayed. Switchtosimpleinformation displaymodeandcheck. zz Pressthe<p>buttonrepeatedlyuntil simpleinformationdisplayisactivated, andthenpressthe<q><r>buttonsto chooseanimage. zz Nameswillbedisplayedondetected people. • IfyoudonotwantnamestodisplayonimagesshotusingFaceID,pressthe <n>button,choose[FaceIDInfo]onthe[1]tab,andthenset[Name Display]to[Off]. Y P O StillImages C Checking the Focus Tocheckthefocusofyourshots,youcanmagnifytheareaoftheimage thatwasintheAFframeatthetimeofshooting. 1 AccessFocusCheck. zz Pressthe<p>button(=219). XX AwhiteframeisdisplayedwheretheAF framewaswhenthefocuswasset. XX Grayframesaredisplayedoverfaces detectedlater,inPlaybackmode. XX Theportionoftheimageintheorange frameismagniied. 222 Viewing 2 Switchframes. zz Movethezoomlevertoward<k>once. XX Thescreenatleftisdisplayed. zz Toswitchtoadifferentframewhenthere aremultipleframes,pressthe<m> button. 3 Zoominorout,orviewother imageareas. zz Asyouexaminethefocus,usethe zoomlevertozoominorout.Pressthe <o><p><q><r>buttonstoadjustthe displayposition. zz Pressthe<n>buttontorestorethe originaldisplayinstep1. • Youcanalsoaccessthescreeninstep2bytouchingthelower-rightimage instep1. • Toadjustthedisplayposition,dragacrosstheimageinthelowerrightofthe ]onthe screeninstep2.Youcanswitchbetweenframesbytouching[ ]. screen,oryoucanreturntostep1bytouching[ Y P O C 223 Browsing and Filtering Images StillImages Movies Navigating Through Images in an Index Bydisplayingmultipleimagesinanindex,youcanquicklyindtheimages youarelookingfor. 1 Displayimagesinanindex. zz Movethezoomlevertoward<g>to displayimagesinanindex.Movingthe leveragainwillincreasethenumberof imagesshown. zz Todisplayfewerimages,movethezoom levertoward<k>.Fewerimagesare showneachtimeyoumovethelever. 2 Chooseanimage. zz Turnthe<7>dialtoscrollthroughthe images. zz Pressthe<o><p><q><r>buttonsto Y P O chooseanimage. XX Anorangeframeisdisplayedaroundthe selectedimage. zz Pressthe<m>buttontoviewthe selectedimageinsingle-imagedisplay. C Touch-ScreenOperations zz Pinchintoswitchfromsingle-image displaytoindexdisplay. zz Toviewmorethumbnailsperscreen, pinchinagain. zz Dragupordownonthescreentoscroll throughdisplayedimages. 224 BrowsingandFilteringImages zz Toviewfewerthumbnailsperscreen, spreadyouringersapart. zz Touchanimagetochooseit,andtouchit againtoviewitinsingle-imagedisplay. StillImages Movies Finding Images Matching Speciied Conditions Finddesiredimagesquicklyonamemorycardfullofimagesbyiltering imagedisplayorjumpingbetweenimagesaccordingtoyourspeciied conditions.Youcanalsoprotect(=236)ordelete(=240)theseimages allatonce. Favorites Displaysimagestaggedasfavorites(=244). ShotDate Displaystheimagesshotonaspeciicdate. ; MyCategory Stillimage/Movie Name Y P O Displaystheimagesofaspeciiccategory (=245). Displaysstillimages,movies,ormoviesshotin [ ]mode(=136). C Displaysimagesofaregisteredperson(=113). StillImages Movies FilteringDisplayby[ ],[ ],[;],or[ ] 1 Choose[ImageSearch]. zz Pressthe<n>button,andthen choose[ImageSearch]onthe[1]tab (=91). 225 BrowsingandFilteringImages 2 Choosetheirstconditionfor imagedisplayornavigation. zz Pressthe<o><p>buttonstochoosea displayilter. ]isselected,youcanview onlyimagesmatchingthisconditionby pressingthe<q><r>buttons.Toperform anactionforalloftheseimagestogether, pressthe<m>buttonandgotostep4. zz When[ 3 Choosethesecondcondition andchecktheimagesfound. zz Pressthe<q><r>buttonstochoose anothercondition.Onceyouturnthe <7>dial,youcanviewtheimages narroweddownbyyourconditions. zz Tocancelthismode,pressthe<n> button. zz Toswitchtoilteredimagedisplay,press the<m>buttonandgotostep4. Y P O 4 Viewtheilteredimages. C zz Imagesmatchingyourconditionsare displayedinyellowframes.Toview onlytheseimages,pressthe<q><r> buttons,orturnthe<7>dial. zz Toexitilteredimagedisplay,pressthe <o>button,andafter[Imagesearch canceled]isdisplayed,pressthe<m> button. • Whenthecamerahasfoundnocorrespondingimagesforsome conditions,thoseconditionswillnotbeavailable. 226 BrowsingandFilteringImages • Optionsforviewingtheimagesfound(instep4)include“Navigating ThroughImagesinanIndex”(=224),“ViewingSlideshows”(=234), and“MagnifyingImages”(=233).Youcanprotect,erase,orprintall imagesfoundoraddthemtoaphotobookbychoosing[SelectAllImages inSearch]in“ProtectingImages”(=236),“ErasingAllImages”(=241), “AddingImagestothePrintList(DPOF)”(=293),or“AddingImagestoa Photobook”(=296). • However,ifyourecategorizeimages(=245)oreditthemandsavethem asnewimages(=251–256),amessageisdisplayedandilteredimage displayends. • Youcanalsochooseconditionsbytouchingthescreensinsteps2and3. • Afterchoosingconditions,youcanviewimagesmatchingyourconditionsby ]. touchingaconditionagainorbytouching[ StillImages FilteringDisplayby[ ] Y P O 1 Choose[ ]. zz Followingsteps1–2on=225,choose [ ]andpressthe<m>button. C 2 Chooseaperson. zz Pressthe<o><p><q><r>buttons tochooseaperson,andthenpressthe <m>button. 3 Viewtheilteredimages. zz Followstep4on=226toviewthe images. • [ ]isnotavailableunlesspeopleareregistered(=113). 227 
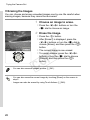
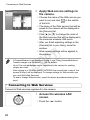
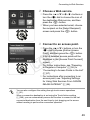
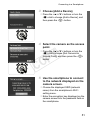
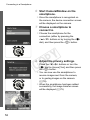
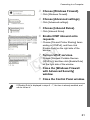
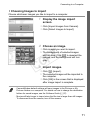
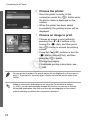
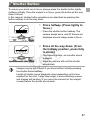
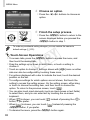
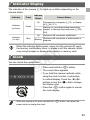
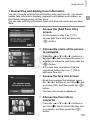
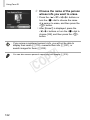
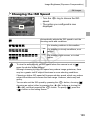
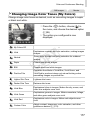
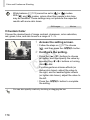
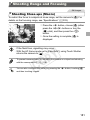
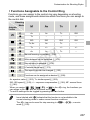
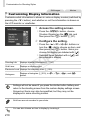
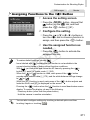
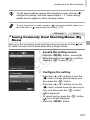
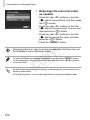
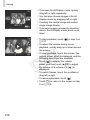
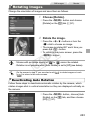
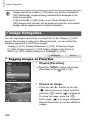
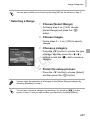
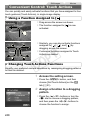
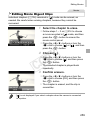
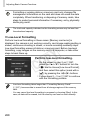
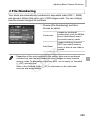
BrowsingandFilteringImages • Youcanalsoviewimagesthatincludeaspeciicpersonbytouchingthe personinstep2andthentouchingthepersonagain. StillImages Movies Using the Control Ring to Jump Usethecontrolringtoindandjumpbetweendesiredimagesquicklyby ilteringimagedisplayaccordingtoyourspeciiedconditions. JumptoFavorites Displaysimagestaggedasfavorites(=244). JumpShotDate Jumpstotheirstimageineachgroupofimagesthat wereshotonthesamedate. Jump10Images Jumpsby10imagesatatime. Jump100Images Jumpsby100imagesatatime. 1 Chooseacondition. zz Chooseacondition(orjumpmethod)in Y P O single-imagedisplaybyturningthe<y> ringandthenpressingthe<o><p> buttons. 2 Viewimagesmatchingyour C speciiedcondition,orjumpby thespeciiedamount. zz Turnthe<y>ringtoviewonlyimages matchingtheconditionorjumpbythe speciiednumberofimagesforwardor back. • Turningthe<y>ringwhenbrowsingimagesinindexdisplaywilljumptothe previousornextimageaccordingtothejumpmethodchoseninsingle-image display.However,ifyouhavechosen[ ]or[ ],thejumpmethodwillbe switchedto[ ]. 228 BrowsingandFilteringImages Touch-ScreenOperations zz Youcanalsojumptothepreviousornext imageaccordingtoyourjumpmethod choseninstep1on=228bydragging leftorrightwithtwoingers. Movies Viewing Movie Digest Movies Moviescreatedin[ ]mode(=136)canbeviewedbydate. 1 Chooseamovie. zz Pressthe<n>button,choose [MovieDigestPlayback]onthe[1]tab, andthenchoosethedate. Y P O C 2 Playthemovie. zz Pressthe<m>buttontostartplayback. • Youcanalsostartmovieplaybackinstep1bytouchingadesireddate. 229 BrowsingandFilteringImages StillImages Viewing Individual Images in a Group Groupedimagesshotin[ ]mode(=158)aregenerallydisplayed together,buttheycanalsobeviewedindividually. 1 Chooseanimagegroup. zz Pressthe<q><r>buttonsorturnthe <7>dialtochooseanimagelabeled ],andthenpressthe<m>button. [ 2 Viewindividualimagesinthe group. zz Pressingthe<q><r>buttonsorturning the<7>dialwilldisplayonlyimagesin thegroup. zz Pressingthe<o>buttonwilldisplay [Displayallimages].Press<m>to cancelgroupplayback. Y P O C • Duringgroupplayback(step2),youcanbrowsethroughimagesquickly “NavigatingThroughImagesinanIndex”(=224)andmagnifythem “MagnifyingImages”(=233).Youcanprotect,erase,orprintallimages inagroupatonceoraddthemtoaphotobookbychoosing[AllImagesin Group]in“ProtectingImages”(=236),“ErasingAllImages”(=241), “AddingImagestothePrintList(DPOF)”(=293),or“AddingImagestoa Photobook”(=296). • Toungroupimagessothatyoucanviewthemindividually,pressthe <n>button,choose[GroupImages]onthe[1]tab,andthenchoose [Off](=91).However,groupedimagescannotbeungroupedduring individualplayback. • Youcanalsoviewgroupimagesindividuallybytouching[ instep1. 230 ]onthescreen Editing Face ID Information Ifyounoticethatanameisincorrectduringplayback,youcanchangeitor eraseit. However,youcannotaddnamesforpeoplewhoarenotdetectedbyFace ID(namesarenotdisplayed),andforpeoplewhosenameshavebeen erased. ChangingNames 1 Accessthesettingscreen. zz Pressthe<n>buttonandchoose [FaceIDInfo]onthe[1]tab(=91). zz Pressthe<o><p>buttonsorturnthe <7>dialtochoose[EditIDInfo],and thenpressthe<m>button. 2 Chooseanimage. zz Followingtheprocedureon=216, chooseanimageandpressthe<m> button. zz Anorangeframeisdisplayedaroundthe selectedface.Whenmultiplenamesare displayedinanimage,pressthe<q><r> buttonsorturnthe<7>dialtochoose thenametochange,andthenpressthe <m>button. Y P O C 3 Choosetheitemtoedit. zz Pressthe<o><p><q><r>buttonsor turnthe<7>dialtochoose[Overwrite], andthenpressthe<m>button. 4 Choosethenameoftheperson tooverwrite. zz Followstep2on=119tochoose thenameofthepersonyouwantto overwrite. 231 EditingFaceIDInformation • Youcanalsoaccessthe[EditIDInfo]screenbytouchinganimageon ]todisplaytheorangeframe,andthen thescreeninstep2,touching[ touchingthefacetooverwrite. • Youcanalsochooseitemstoeditbytouchingtheminstep3. ErasingNames zz Followingstep3on=231,choose [Erase]andpressthe<m>button. zz After[Erase?]isdisplayed,pressthe <q><r>buttonsorturnthe<7>dialto choose[OK],andthenpressthe<m> button. • Youcanalsoerasenamesbytouching[OK]after[Erase?]isdisplayed. Y P O C 232 Image Viewing Options StillImages Magnifying Images 1 Magnifyanimage. zz Movingthezoomlevertoward<k>will zoominandmagnifytheimage.You canmagnifyimagesuptoabout10xby continuingtoholdthezoomlever. zz Tozoomout,movethezoomlever toward<g>.Youcanreturntosingleimagedisplaybycontinuingtoholdit. 2 Movethedisplaypositionand switchimagesasneeded. ApproximatePosition ofDisplayedArea zz Tomovethedisplayposition,pressthe <o><p><q><r>buttons. zz Toswitchtootherimageswhilezoomed, turnthe<7>dial. Y P O • Youcanreturntosingle-imagedisplayfrommagniieddisplaybypressing the<n>button. C Touch-ScreenOperations zz Spreadyouringersapart(pinchout)to zoomin. zz Youcanmagnifyimagesuptoabout10x byrepeatingthisaction. zz Tomovethedisplayposition,dragacross thescreen. 233 ImageViewingOptions zz Pinchintozoomout. zz Touch[ ]torestoresingle-image display. StillImages Movies Viewing Slideshows Automaticallyplaybackimagesfromamemorycardasfollows. 1 Accessthesettingscreen. zz Pressthe<n>button,andthen choose[Slideshow]onthe[1]tab (=91). Y P O 2 Conigurethesetting. zz Chooseamenuitemtoconigure,and C thenchoosethedesiredoption(=91). 3 Startautomaticplayback. zz Pressthe<o><p>buttonsorturnthe <7>dialtochoose[Start],andthen pressthe<m>button. XX Theslideshowwillstartafewseconds after[Loadingimage...]isdisplayed. zz Pressthe<n>buttontostopthe slideshow. • Thecamera’spower-savingfunctions(=86)aredeactivated duringslideshows. 234 ImageViewingOptions • Topauseorresumeslideshows,pressthe<m>button. • Youcanswitchtootherimagesduringplaybackbypressingthe<q><r> buttonsorturningthe<7>dial.Forfast-forwardorfast-rewind,holdthe <q><r>buttonsdown. • [PlayTime]cannotbemodiiedwhen[Bubble]ischosenin[Effect]. • Youcanalsostopslideshowsbytouchingthescreen. StillImages Auto Playback of Similar Images (Smart Shufle) Basedonthecurrentimage,thecameraoffersfourimagessimilartoit thatyoumaywishtoview.Afteryouchoosetoviewoneofthoseimages, thecameraoffersfourmoreimages.Thisisanenjoyablewaytoplayback imagesinanunexpectedorder.Trythisfeatureafteryouhavetakenmany shots,inmanykindsofscenes. Y P O 1 ChooseSmartShufle. zz Pressthe<n>button,choose [SmartShufle]onthe[1]tab,andthen pressthe<m>button(=91). XX Fourcandidateimagesaredisplayed. C 2 Chooseanimage. zz Pressthe<o><p><q><r>buttonsto choosetheimageyouwanttoviewnext. XX Yourchosenimageisdisplayedinthe center,surroundedbythenextfour candidateimages. zz Forfull-screendisplayofthecenter image,pressthe<m>button.Torestore theoriginaldisplay,pressthe<m> buttonagain. zz Pressthe<n>buttontorestore single-imagedisplay. 235 ProtectingImages • Onlystillimagesshotwiththiscameraareplayedbackusing SmartShufle. • SmartShufleisnotavailableinthefollowingcases: -Therearelessthan50shotstakenwiththiscamera -Anunsupportedimageiscurrentlydisplayed -Imagesareshowniniltereddisplay(=225) -Duringgroupplayback(=230) • Onthescreeninstep2,touchinganimageabove,below,oroneitherside willshowyourchosenimageinthecenter,surroundedbythenextfour candidateimages. • Forfull-screendisplayofthecenterimageinstep2,touchthatimage.To restoretheoriginaldisplay,touchthescreenagain. StillImages Movies Protecting Images Y P O Protectimportantimagestopreventaccidentalerasurebythecamera (=240,241). Choosing a Selection Method C 1 Accessthesettingscreen. zz Pressthe<n>buttonandchoose [Protect]onthe[1]tab(=91). 2 Chooseaselectionmethod. zz Chooseamenuitemandasettingas desired(=91). zz Toreturntothemenuscreen,pressthe <n>button. 236 ProtectingImages • Protectedimagesonamemorycardwillbeerasedifyouformat thecard(=267,268). • Protectedimagescannotbeerasedusingthecamera’serasurefunction.To erasethemthisway,irstcancelprotection. Choosing Images Individually 1 Choose[Select]. zz Followingstep2on=236,choose [Select]andpressthe<m>button. 2 Chooseanimage. zz Pressthe<q><r>buttonsorturnthe <7>dialtochooseanimage,andthen pressthe<m>button.[ ]isdisplayed. zz Tocancelselection,pressthe<m> buttonagain.[ ]isnolongerdisplayed. zz Repeatthisprocesstospecifyother images. Y P O 3 Protecttheimage. C zz Pressthe<n>button.A conirmationmessageisdisplayed. zz Pressthe<q><r>buttonsorturnthe <7>dialtochoose[OK],andthenpress the<m>button. • ImageswillnotbeprotectedifyouswitchtoShootingmodeorturn thecameraoffbeforeinishingthesetupprocessinstep3. • Youcanalsoselectorclearimagesbytouchingthescreeninstep2,and ]. youcanaccesstheconirmationscreenbytouching[ • Youcanalsoprotectimagesbytouching[OK]onthescreeninstep3. 237 ProtectingImages Selecting a Range 1 Choose[SelectRange]. zz Followingstep2on=236,choose [SelectRange]andpressthe<m> button. 2 Chooseastartingimage. zz Pressthe<m>button. zz Pressthe<q><r>buttonsorturnthe <7>dialtochooseanimage,andthen pressthe<m>button. Y P O C 3 Chooseanendingimage. zz Pressthe<r>buttontochoose[Last image],andthenpressthe<m>button. zz Pressthe<q><r>buttonsorturnthe <7>dialtochooseanimage,andthen pressthe<m>button. zz Imagesbeforetheirstimagecannotbe selectedasthelastimage. 238 ProtectingImages 4 Protecttheimages. zz Pressthe<p>buttontochoose [Protect],andthenpressthe<m> button. • Youcanalsochoosetheirstorlastimagebyturningthe<7>dialwhenthe topscreeninsteps2and3isdisplayed. • Youcanalsochoosetheirstorlastimagebytouchingoneoftheimageson thetopofthescreeninsteps2and3. • Youcanalsoprotectimagesbytouching[Protect]onthescreeninstep4. Specifying All Images at Once 1 Choose[SelectAllImages]. zz Followingstep2on=236,choose Y P O [SelectAllImages]andpressthe<m> button. C 2 Protecttheimages. zz Pressthe<o><p>buttonsorturnthe <7>dialtochoose[Protect],andthen pressthe<m>button. • Tocancelprotectionforgroupsofimages,choose[Unlock]instep4of “SelectingaRange”orinstep2of“SpecifyingAllImagesatOnce”. • Youcanalsoprotectorunlockimagesbytouching[Protect]or[Unlock]on thescreensdescribedabove. 239 StillImages Movies Erasing Images Youcanchooseanderaseunneededimagesonebyone.Becarefulwhen erasingimages,becausetheycannotberecovered.However,protected images(=236)cannotbeerased. 1 Chooseanimagetoerase. zz Pressthe<q><r>buttonsorturnthe <7>dialtochooseanimage. 2 Erasetheimage. zz Pressthe<a>button. zz After[Erase?]isdisplayed,pressthe <q><r>buttonsorturnthe<7>dialto choose[Erase],andthenpressthe<m> button. XX Thecurrentimageisnowerased. zz Tocancelerasure,pressthe<q><r> buttonsorturnthe<7>dialtochoose [Cancel],andthenpressthe<m> button. Y P O • Pressingthe<a>buttonwhile[ ]imagesaredisplayedwillgiveyou theoptionofchoosing[Erase ],[EraseJPEG],or[Erase +JPEG]for deletion. C • Youcanalsoerasethecurrentimagebytouching[Erase]onthescreenin step2. • ImagescanalsobeerasedbyusingTouchActions(=248). 240 ErasingImages Erasing All Images Youcaneraseallimagesatonce.Becarefulwhenerasingimages, becausetheycannotberecovered.However,protectedimages(=236) cannotbeerased. ChoosingaSelectionMethod 1 Accessthesettingscreen. zz Pressthe<n>button,andthen choose[Erase]onthe[1]tab(=91). 2 Chooseaselectionmethod. zz Chooseamenuitemandasettingas desired(=91). zz Toreturntothemenuscreen,pressthe Y P O <n>button. C ChoosingImagesIndividually 1 Choose[Select]. zz Followingstep2above,choose[Select] andpressthe<m>button. 2 Chooseanimage. zz Onceyoufollowstep2on=237to chooseanimage,[ ]isdisplayed. zz Tocancelselection,pressthe<m> buttonagain.[ ]isnolongerdisplayed. zz Repeatthisprocesstospecifyother images. 241 ErasingImages 3 Erasetheimage. zz Pressthe<n>button.A conirmationmessageisdisplayed. zz Pressthe<q><r>buttonsorturnthe <7>dialtochoose[OK],andthenpress the<m>button. SelectingaRange 1 Choose[SelectRange]. zz Followingstep2on=241,choose [SelectRange]andpressthe<m>button. 2 Chooseimages. zz Followsteps2–3on=238tospecify images. 3 Erasetheimages. zz Pressthe<p>buttontochoose[Erase], Y P O andthenpressthe<m>button. C SpecifyingAllImagesatOnce 1 Choose[SelectAllImages]. zz Followingstep2on=241,choose [SelectAllImages]andpressthe<m> button. 2 Erasetheimages. zz Pressthe<q><r>buttonsorturnthe <7>dialtochoose[OK],andthenpress the<m>button. 242 StillImages Movies Rotating Images Changetheorientationofimagesandsavethemasfollows. 1 Choose[Rotate]. zz Pressthe<n>buttonandchoose [Rotate]onthe[1]tab(=91). 2 Rotatetheimage. zz Pressthe<q><r>buttonsorturnthe <7>dialtochooseanimage. zz Theimageisrotated90°eachtimeyou pressthe<m>button. zz Toreturntothemenuscreen,pressthe <n>button. Y P O • Movieswithanimagequalityof[ ]or[ ]cannotberotated. • Rotationisnotpossiblewhen[AutoRotate]issetto[Off](seebelow). C • Onthescreeninstep2,youcanalsotouch[ ]toreturntothemenuscreen. [ ]torotateimagesortouch Deactivating Auto Rotation Followthesestepstodeactivateautomaticrotationbythecamera,which rotatesimagesshotinverticalorientationsotheyaredisplayedverticallyon thecamera. zz Pressthe<n>button,choose[Auto Rotate]onthe[1]tab,andthenchoose [Off](=91). 243 ImageCategories • Imagescannotberotated(=243)whenyouset[AutoRotate]to [Off].Additionally,imagesalreadyrotatedwillbedisplayedinthe originalorientation. • InSmartShufle(=235)mode,evenif[AutoRotate]issetto [Off],imagesshotverticallywillbedisplayedvertically,androtated imageswillbedisplayedintherotatedorientation. Image Categories YoucantagimagesasfavoritesorassignthemtoMyCategory(=245) groups.Bychoosingacategoryinilteredplayback,youcanrestrictthe followingoperationstoallofthoseimages. • Viewing(=216),ViewingSlideshows(=234),ProtectingImages (=236),ErasingImages(=240),AddingImagestothePrintList (DPOF)(=293),AddingImagestoaPhotobook(=296) StillImages Movies Y P O Tagging Images as Favorites 1 Choose[Favorites]. zz Pressthe<n>buttonandchoose C [Favorites]onthe[1]tab(=91). 2 Chooseanimage. zz Pressthe<q><r>buttonsorturnthe <7>dialtochooseanimage,andthen pressthe<m>button.[ ]isdisplayed. zz Tountagtheimage,pressthe<m> buttonagain.[ ]isnolongerdisplayed. zz Repeatthisprocesstochooseadditional images. 244 ImageCategories 3 Finishthesetupprocess. zz Pressthe<n>button.A conirmationmessageisdisplayed. zz Pressthe<q><r>buttonsorturnthe <7>dialtochoose[OK],andthenpress the<m>button. • ImageswillnotbetaggedasfavoritesifyouswitchtoShooting modeorturnthecameraoffbeforeinishingthesetupprocessin step3. • Favoriteimageswillhaveathree-starrating( )when transferredtocomputersrunningWindows7orWindowsVista.(Doesnot applytomoviesorRAWimages.) • Youcanalsoselectorclearcurrentimagesbytouchingthescreeninstep2. • ImagescanalsobetaggedasfavoritesbyusingTouchActions(=248). Y P O StillImages Movies Organizing Images by Category (My Category) C Youcanorganizeimagesintocategories.Notethatimagesare automaticallycategorizedatthetimeofshooting,accordingtoshooting conditions. : Imageswithdetectedfaces,orimagesshotin[I]or[ ]mode. : Imagesdetectedas[ ],[ ],or[ ]in<A>mode,orimages shotin[ ]mode. : Imagesshotin[S],[P],or[t]mode. ChoosingaSelectionMethod 1 Accessthesettingscreen. zz Pressthe<n>button,andthen choose[MyCategory]onthe[1]tab (=91). 245 ImageCategories 2 Chooseaselectionmethod. zz Chooseamenuitemandasettingas desired(=91). zz Toreturntothemenuscreen,pressthe <n>button. ChoosingImagesIndividually 1 Choose[Select]. zz Followingstep2above,choose[Select] andpressthe<m>button. 2 Chooseanimage. zz Pressthe<q><r>buttonsorturnthe <7>dialtochooseanimage. 3 Chooseacategory. Y P O zz Pressthe<o><p>buttonstochoose acategoryandthenpressthe<m> button.[ ]isdisplayed. zz Tocancelselection,pressthe<m> buttonagain.[ ]isnolongerdisplayed. zz Repeatthisprocesstochooseadditional images. C 4 Finishthesetupprocess. zz Pressthe<n>button.A conirmationmessageisdisplayed.Press the<q><r>buttonsorturnthe<7>dial tochoose[OK],andthenpressthe<m> button. • ImageswillnotbeassignedtoacategoryifyouswitchtoShooting modeorturnthecameraoffbeforeinishingthesetupprocessin step4. 246 ImageCategories • Youcanalsoconirmyourchoicebytouching[OK]onthescreeninstep4. SelectingaRange 1 Choose[SelectRange]. zz Followingstep2on=245,choose [SelectRange]andpressthe<m> button. 2 Chooseimages. zz Followsteps2–3on=238tospecify images. 3 Chooseacategory. zz Pressthe<p>buttontochoosethetype ofimage,andthenpressthe<q><r> buttonsorturnthe<7>dialtochoosea category. Y P O 4 Finishthesetupprocess. C zz Pressthe<p>buttontochoose[Select], andthenpressthe<m>button. • Youcancleartheselectionofallimagesinthe[SelectRange]categoryby choosing[Deselect]instep4. • Youcanalsochooseacategorybytouchingit(ortouching[q][r])onthe screeninstep3,andyoucanconirmyourchoicebytouching[Select]. 247 StillImages Movies Convenient Control: Touch Actions Youcanquicklyandeasilyactivatefunctionsthatyouhaveassignedtofour touchgestures(TouchActions),insingle-imagedisplay. Using a Function Assigned to [ ] zz Dragacrossthescreenasshown. XX Thefunctionassignedto[ activated. ]isnow zz Similarly,youcanalsoactivatefunctions assignedto[ ],[ ],and[ ]by draggingacrossthescreen. zz CustomizefunctionsassignedtoTouch Actionsasdesired. Y P O Changing Touch Actions Functions Simplifyyourpreferredcameraoperationsbyreassigningdraggingpatterns tothemasdesired. C 1 Accessthesettingscreen. zz Pressthe<n>button,andthen choose[SetTouchActions]onthe[1] tab(=91). 2 Assignafunctiontoadragging pattern. zz Pressthe<o><p>buttonsorturnthe <7>dialtochooseadraggingpattern, andthenpressthe<q><r>buttonsto choosethefunctiontoassign. 248 ConvenientControl:TouchActions AssignableFunctions Favorites Tagimagesasfavorites,oruntagtheimage. NextFavorite Switchtodisplayingthenextimagetaggedasafavorite. PreviousFavorite Switchtodisplayingthepreviousimagetaggedasafavorite. NextDate Switchtodisplayingtheirstimagewiththenextshooting date. PreviousDate Switchtodisplayingtheirstimagewiththepreviousshooting date. SmartShufle StartSmartShufleplayback. ToCamera ToSmartphone ToComputer ToPrinter AccessthewirelessLANconnectionscreen. ForinstructionsonthewirelessLANfunction,refertothe WirelessLANGuide(=35). ToWebService Slideshow Startaslideshow. Erase Eraseanimage. Y P O Protect Protectanimageorcancelprotection. Rotate Rotateanimage. C 249 Editing Still Images • Imageediting(=250–255)isonlyavailablewhenthememory cardhassuficientfreespace. • Youcanaccesseditingscreensforvariousfunctionsbytouchinganimage afterchoosingthefunctioninthemenu. ]isshownonaneditingscreen,youcantouch[ ]insteadof • When[ pressingthe<n>button,ifyouprefer. ]isshownonaneditingscreen,youcantouch[ ]insteadof • When[ pressingthe<m>button,ifyouprefer. StillImages Resizing Images Saveacopyofimagesatalowerresolution. 1 Choose[Resize]. zz Pressthe<n>buttonandchoose [Resize]onthe[1]tab(=91). Y P O C 2 Chooseanimage. zz Pressthe<q><r>buttonsorturnthe <7>dialtochooseanimage,andthen pressthe<m>button. 3 Chooseanimagesize. zz Pressthe<q><r>buttonsorturnthe <7>dialtochoosethesize,andthen pressthe<m>button. XX [Savenewimage?]isdisplayed. 250 EditingStillImages 4 Savethenewimage. zz Pressthe<q><r>buttonsorturnthe <7>dialtochoose[OK],andthenpress the<m>button. XX Theimageisnowsavedasanewile. 5 Reviewthenewimage. zz Pressthe<n>button.[Displaynew image?]isdisplayed. zz Pressthe<q><r>buttonsorturnthe <7>dialtochoose[Yes],andthenpress the<m>button. XX Thesavedimageisnowdisplayed. • Editingisnotpossibleforimagessavedas[ • RAWimagescannotbeedited. ]instep3. Y P O • Imagescannotberesizedtoahigherresolution. C • Youcanalsoconigurethissettingbytouchingthesizeonthescreeninstep 3,touchingitagain,andthentouching[OK]. • Youcanalsoviewsavedimagesbytouching[Yes]onthescreeninstep5. StillImages Cropping Youcanspecifyaportionofanimagetosaveasaseparateimageile. 1 Choose[Cropping]. zz Pressthe<n>button,andthen choose[Cropping]onthe[1]tab (=91). 251 EditingStillImages 2 Chooseanimage. zz Pressthe<q><r>buttonsorturnthe <7>dialtochooseanimage,andthen pressthe<m>button. CroppingArea 3 Adjustthecroppingarea. XX Aframeisdisplayedaroundtheportionof theimagetobecropped. XX Theoriginalimageisshownintheupper left,andapreviewoftheimageas croppedisshowninthelowerright. zz Toresizetheframe,movethezoom lever. Tomovetheframe,pressthe PreviewofImageAfterCropping zz <o><p><q><r>buttons. ResolutionAfterCropping zz Tochangetheframeorientation,press the<m>button. zz Facesdetectedintheimageare enclosedingrayframesintheupper-left image.Tocroptheimagebasedonthis frame,turnthe<7>dialtoswitchtothe otherframe. zz Pressthe<n>button. Y P O C 4 Saveasanewimageand review. zz Followsteps4–5on=251. • Editingisnotpossibleforimagesshotataresolutionof[ (=124)orresizedto[ ](=250). • RAWimagescannotbeedited. ] • Imagessupportedforcroppingwillhavethesameaspectratioafter cropping. • Croppedimageswillhaveasmallerresolutionthanuncroppedimages. 252 EditingStillImages • Tomovetheframe,drageitherimageonthescreeninstep3. • Youcanalsoresizeframesbypinchinginorout(=233)onthescreenin step3. StillImages Changing Image Color Tones (My Colors) Youcanadjustimagecolorsandthensavetheeditedimageasaseparate ile.Fordetailsoneachoption,see=177. 1 Choose[MyColors]. zz Pressthe<n>button,andthen choose[MyColors]onthe[1]tab (=91). 2 Chooseanimage. zz Pressthe<q><r>buttonsorturnthe <7>dialtochooseanimage,andthen pressthe<m>button. Y P O 3 Chooseanoption. zz Pressthe<q><r>buttonsorturnthe C <7>dialtochooseanoption,andthen pressthe<m>button. 4 Saveasanewimageand review. zz Followsteps4–5on=251. • Imagequalityofpicturesyourepeatedlyeditthiswaywillbealittle lowereachtime,andyoumaynotbeabletoobtainthedesired color. • ColorsofRAWimagescannotbeedited. • Thecolorofimageseditedusingthisfunctionmayvaryslightlyfromthe colorofimagesshotusingMyColors(=177). 253 EditingStillImages • Youcanalsoconigurethissettingbytouchinganoptiontoselectitonthe screeninstep3andthentouchingitagain. StillImages Correcting Image Brightness (i-Contrast) Excessivelydarkimageareas(suchasfacesorbackgrounds)canbe detectedandautomaticallyadjustedtotheoptimalbrightness.Insuficient overallimagecontrastisalsoautomaticallycorrected,tomakesubjects standoutbetter.Choosefromfourcorrectionlevels,andthensavethe imageasaseparateile. 1 Choose[i-Contrast]. zz Pressthe<n>button,andthen choose[i-Contrast]onthe[1]tab (=91). Y P O 2 Chooseanimage. zz Pressthe<q><r>buttonsorturnthe C <7>dialtochooseanimage,andthen pressthe<m>button. 3 Chooseanoption. zz Pressthe<q><r>buttonsorturnthe <7>dialtochooseanoption,andthen pressthe<m>button. 4 Saveasanewimageand review. zz Followsteps4–5on=251. 254 EditingStillImages • Forsomeimages,correctionmaybeinaccurateormaycause imagestoappeargrainy. • Imagesmaylookgrainyafterrepeatededitingusingthisfunction. • RAWimagescannotbeeditedthisway. • If[Auto]doesnotproducetheexpectedresults,trycorrectingimagesusing [Low],[Medium],or[High]. • Youcanalsoconigurethissettingbytouching[q][r]onthescreeninstep 3. StillImages Correcting Red-Eye Automaticallycorrectsimagesaffectedbyred-eye.Youcansavethe correctedimageasaseparateile. Y P O 1 Choose[Red-EyeCorrection]. zz Pressthe<n>button,andthen C choose[Red-EyeCorrection]onthe[1] tab(=91). 2 Chooseanimage. zz Pressthe<q><r>buttonsorturnthe <7>dialtochooseanimage. 3 Correcttheimage. zz Pressthe<m>button. XX Red-eyedetectedbythecameraisnow corrected,andframesaredisplayed aroundcorrectedimageareas. zz Enlargeorreduceimagesasneeded. Followthestepsin=233. 255 EditingMovies 4 Saveasanewimageand review. zz Pressthe<o><p><q><r>buttonsor turnthe<7>dialtochoose[NewFile], andthenpressthe<m>button. XX Theimageisnowsavedasanewile. zz Followstep5on=251. • Someimagesmaynotbecorrectedaccurately. • Tooverwritetheoriginalimagewiththecorrectedimage,choose [Overwrite]instep4.Inthiscase,theoriginalimagewillbe erased. • Protectedimagescannotbeoverwritten. • RAWimagescannotbeeditedthisway. • Red-eyecorrectioncanbeappliedtoJPEGimagesshotin[ ], buttheoriginalimagecannotbeoverwritten. Y P O • Youcansaveimagesbytouching[NewFile]or[Overwrite]onthescreenin step4. C Movies Editing Movies Youcancutmoviestoremoveunneededportionsatthebeginningorend. 1 Choose[*]. zz Followingsteps1–3on=216–217, choose[*]andpressthe<m>button. XX Themovieeditingpanelandeditingbar arenowdisplayed. 256 EditingMovies MovieEditingPanel 2 Specifyportionstocut. zz Pressthe<o><p>buttonstochoose [ ]or[ ]. zz Toviewtheportionsyoucancut MovieEditingBar (identiiedby[ ]onthescreen),press the<q><r>buttonsorturnthe<7> dialtomove[ ].Cutthebeginningofthe movie(from[ ])bychoosing[ ],and cuttheendofthemoviebychoosing [ ]. zz Evenifyoumove[ ]toapositionother thana[ ]mark,choosing[ ]willonly cuttheportionfromthenearest[ ]to theleft,andchoosing[ ]willcutthe portionfromthenearest[ ]totheright. 3 Reviewtheeditedmovie. zz Pressthe<o><p>buttonstochoose Y P O [ ],andthenpressthe<m>button. Theeditedmovieisnowplayed. zz Toeditthemovieagain,repeatstep2. zz Tocancelediting,pressthe<o><p> buttonstochoose[ ].Pressthe<m> button,choose[OK](eitherpressthe <q><r>buttonsorturnthe<7>dial), andthenpressthe<m>buttonagain. C 4 Savetheeditedmovie. zz Pressthe<o><p>buttonstochoose [ ],andthenpressthe<m>button. zz Pressthe<o><p><q><r>buttonsor turnthe<7>dialtochoose[NewFile], andthenpressthe<m>button. XX Themovieisnowsavedasanewile. 257 EditingMovies • Tooverwritetheoriginalmoviewiththecutone,choose [Overwrite]instep4.Inthiscase,theoriginalmoviewillbeerased. • [Overwrite]isonlyavailablewhenmemorycardslacksuficient freespace. • Moviesmaynotbesavedifthebatteryrunsoutwhilesavingisin progress. • Wheneditingmovies,youshoulduseafullychargedbatteryoran ACadapterkit(soldseparately,=278). Y P O C 258 EditingMovies Movies Editing Movie Digest Clips Individualchapters(=136)recordedin[ ]modecanbeerased,as needed.Becarefulwhenerasingchapters,becausetheycannotbe recovered. 1 Selectthechaptertoerase. zz Followsteps1–2on=216tochoose amovierecordedin[ ]mode,andthen pressthe<m>buttontoaccessthe moviecontrolpanel. zz Pressthe<q><r>buttonsorturnthe <7>dialtochoose[ ]or[ ],andthen pressthe<m>button. 2 Choose[ ]. zz Pressthe<q><r>buttonsorturnthe Y P O <7>dialtochoose[ ],andthenpress the<m>button. XX Theselectedchapterisplayedback repeatedly. C 3 Conirmerasure. zz Pressthe<q><r>buttonsorturnthe <7>dialtochoose[OK],andthenpress the<m>button. XX Thechapteriserased,andtheclipis overwritten. • [ ]isnotdisplayedifyouselectachapterwhenthecameraisconnected toaprinter. 259 Y P O C 260 7 Setting Menu Customizeoradjustbasiccamerafunctionsforgreater convenience Y P O C 261 Adjusting Basic Camera Functions Functionscanbeconiguredonthe[3]tab.Customizecommonlyused functionsasdesired,forgreaterconvenience(=91). Silencing Camera Operations Silencecamerasoundsandmoviesasfollows. zz Choose[Mute],andthenchoose[On]. • Operationcanalsobesilencedbyholdingdownthe<p>buttonasyouturn thecameraon. • Soundisnotplayedduringmoviesifyoumutecamerasounds(=216).To restoresoundduringmovies,pressthe<o>buttonordragupacrossthe screen.Adjustvolumeasneededbypressingthe<o><p>buttonsorby draggingupordown. Y P O Adjusting the Volume Adjustthevolumeofindividualcamerasoundsasfollows. C zz Choose[Volume],andthenpressthe <m>button. zz Chooseanitem,andthenpressthe <q><r>buttonstoadjustthevolume. 262 AdjustingBasicCameraFunctions Customizing Sounds Customizecameraoperatingsoundsasfollows. zz Choose[SoundOptions],andthenpress the<m>button. zz Chooseanitem,andthenpressthe <q><r>buttonstochooseanoption. 1,2 Presetsounds (cannotbemodiied) 3 Presetsounds Canbechangedbyusingtheincluded software. • Thedefaultshuttersoundisusedin[ changesto[ShutterSound]. ]mode(=158),regardlessofany Y P O Hiding Hints and Tips HintsandtipsarenormallyshownwhenyouchooseFUNC.menu (=89)orMenu(=91)items.Ifyouprefer,youcandeactivatethis information. C zz Choose[Hints&Tips],andthenchoose [Off]. 263 AdjustingBasicCameraFunctions Changing the Date and Time Adjustthedateandtimeasfollows. 1 Accessthe[Date/Time]screen. zz Choose[Date/Time],andthenpressthe <m>button. 2 Conigurethesetting. zz Pressthe<q><r>buttonstochoosean item,andthenadjustthesetting,either bypressingthe<o><p>buttonsor turningthe<7>dial. World Clock Toensurethatyourshotswillhavethecorrectlocaldateandtimewhenyou travelabroad,simplyregisterthedestinationinadvanceandswitchtothat timezone.ThisconvenientfeatureeliminatestheneedtochangetheDate/ Timesettingmanually. Beforeusingtheworldclock,besuretosetthedateandtimein“Settingthe DateandTime”(=18)andyourhometimezone. Y P O 1 Specifyyourdestination. C zz Choose[TimeZone],andthenpressthe <m>button. zz Pressthe<o><p>buttonsorturnthe <7>dialtochoose[ World],andthen pressthe<m>button. zz Pressthe<q><r>buttonsorturnthe <7>dialtochoosethedestination. zz Tosetdaylightsavingtime(1hour ahead),pressthe<o><p>buttonsto choose[ ]. zz Pressthe<m>button. 264 AdjustingBasicCameraFunctions 2 Switchtothedestinationtime zone. zz Pressthe<o><p>buttonsorturnthe <7>dialtochoose[ World],andthen pressthe<n>button. XX [ ]isnowshownontheshootingscreen (=314). • Adjustingthedateortimewhilein[ ]mode(=264)willautomatically updateyour[ Home]timeanddate. Screen Brightness Adjustscreenbrightnessasfollows. zz Choose[LCDBrightness],andthen pressthe<q><r>buttonstoadjustthe brightness. Y P O C • Formaximumbrightness,pressandholdthe<p>buttonforatleastone secondwhentheshootingscreenisdisplayedorwheninsingle-image display.(Thiswilloverridethe[LCDBrightness]settingonthe[3]tab.)To restoretheoriginalbrightness,pressandholdthe<p>buttonagainforat leastonesecondorrestartthecamera. 265 AdjustingBasicCameraFunctions Start-up Screen Customizethestart-upscreenshownafteryouturnthecameraonas follows. zz Choose[Start-upImage],andthenpress the<m>button. zz Pressthe<q><r>buttonsorturnthe <7>dialtochooseanoption. Nostart-upimage 1,2 Presetimage (cannotbemodiied) 3 Presetimage Assignadesiredshot,orusethe includedsoftwaretochangetheimage. CustomizingtheStart-upScreen 1 Accessthe[Start-upImage] screeninPlaybackmode. Y P O zz Pressthe<1>button. zz Followingthepreviousprocedure,choose C [3]andpressthe<m>button. 2 Chooseoneofyourshots. zz Chooseanimageandpressthe<m> button.After[Register?]isdisplayed, choose[OK](eitherpressthe<q><r> buttonsorturnthe<7>dial),andthen pressthe<m>button. • Thepreviousstart-upsettingisoverwrittenwhenyouassignanew start-upimage. 266 AdjustingBasicCameraFunctions • Youcanassigntheoperatingsoundsandstart-upimageforyourcamera fromtheincludedsoftware.RefertotheSoftware Guide(=27)fordetails. Formatting Memory Cards Beforeusinganewmemorycardoracardformattedinanotherdevice,you shouldformatthecardwiththiscamera. Formattingerasesalldataonamemorycard.Beforeformatting,copy imagesonthememorycardtoacomputer,ortakeotherstepstobackthem up. AnEye-Ficard(=300)containssoftwareonthecarditself.Before formattinganEye-Ficard,installthesoftwareonacomputer. 1 Accessthe[Format]screen. zz Choose[Format],andthenpressthe <m>button. 2 Choose[OK]. zz Pressthe<o><p>buttonstochoose Y P O [Cancel],choose[OK](eitherpressthe <q><r>buttonsorturnthe<7>dial), andthenpressthe<m>button. C 3 Formatthememorycard. zz Tobegintheformattingprocess,press the<o><p>buttonsorturnthe<7> dialtochoose[OK],andthenpressthe <m>button. zz Whenformattingisinished,[Memory cardformattingcomplete]isdisplayed. Pressthe<m>button. 267 AdjustingBasicCameraFunctions • Formattingorerasingdataonamemorycardonlychangesile managementinformationonthecardanddoesnoterasethedata completely.Whentransferringordisposingofmemorycards,take stepstoprotectpersonalinformationifnecessary,asbyphysically destroyingcards. • Thetotalcardcapacityindicatedontheformattingscreenmaybelessthan theadvertisedcapacity. Low-LevelFormatting Performlow-levelformattinginthesecases:[Memorycarderror]is displayed,thecameraisnotworkingcorrectly,cardimagereading/writingis slower,continuousshootingisslower,ormovierecordingsuddenlystops. Low-levelformattingerasesalldataonamemorycard.Beforelow-level formatting,copyimagesonthememorycardtoacomputer,ortakeother stepstobackthemup. Performlow-levelformatting. Y P O zz Onthescreeninstep2on=267, pressthe<o><p>buttonsorturnthe <7>dialtochoose[LowLevelFormat], andthenselectthisoption(markwitha [ ])bypressingthe<q><r>buttons. zz Followsteps2–3on=267tocontinue withtheformattingprocess. C • Low-levelformattingtakeslongerthan“FormattingMemoryCards” (=267),becausedataiserasedfromallstorageregionsofthememory card. • Youcancancellow-levelformattinginprogressbychoosing[Stop].Inthis case,alldatawillbeerased,butthememorycardcanbeusednormally. 268 AdjustingBasicCameraFunctions File Numbering Yourshotsareautomaticallynumberedinsequentialorder(0001–9999) andsavedinfoldersthatstoreupto2,000imageseach.Youcanchange howthecameraassignsilenumbers. zz Choose[FileNumbering],andthen chooseanoption. Continuous Imagesarenumbered consecutively(untilthe9999th shotistaken/saved)evenif youswitchmemorycards. AutoReset Imagenumberingisresetto 0001ifyouswitchmemory cards,orwhenanewfolderis created. • Regardlessoftheoptionselectedinthissetting,shotsmaybenumbered consecutivelyafterthelastnumberofexistingimagesonnewlyinserted memorycards.Tostartsavingshotsfrom0001,useanempty(orformatted (=267))memorycard. • RefertotheSoftware Guide(=27)forinformationonthecardfolder structureandimageformats. Y P O C 269 AdjustingBasicCameraFunctions Date-Based Image Storage Insteadofsavingimagesinfolderscreatedeachmonth,youcanhavethe cameracreatefolderseachdayyoushoottostoreshotstakenthatday. zz Choose[CreateFolder],andthenchoose [Daily]. XX Imageswillnowbesavedinfolders createdontheshootingdate. Lens Retraction Timing Thelensisnormallyretractedforsafetyaboutoneminuteafteryoupress the<1>buttoninShootingmode(=86).Tohavethelensretracted immediatelyafteryoupressthe<1>button,settheretractiontimingto[0 sec.]. Y P O zz Choose[LensRetract],andthenchoose [0sec.]. C 270 AdjustingBasicCameraFunctions Power-Saving Adjustment Adjustthetimingofautomaticcameraandscreendeactivation(AutoPower DownandDisplayOff,respectively)asneeded(=86). 1 Accessthe[PowerSaving] screen. zz Choose[PowerSaving],andthenpress the<m>button. 2 Conigurethesettings. zz Afterchoosinganitem,pressthe <q><r>buttonstoadjustitasneeded. • Toconservebatterypower,youshouldnormallychoose[On]for [AutoPowerDown]and[1min.]orlessfor[DisplayOff]. • The[DisplayOff]settingisappliedevenifyouset[AutoPowerDown]to [Off]. Y P O Metric/Non-Metric Display ChangetheunitofmeasurementshownintheMFindicator(=182), zoombar(=96),andGPSinformationforelevation(=78)fromm/ cmtoft/inasneeded. C zz Choose[Units],andthenchoose[ft/in]. 271 AdjustingBasicCameraFunctions Electronic Level Calibration Calibratetheelectroniclevelifitseemsineffectiveinhelpingyoulevelthe camera. Forgreatercalibrationaccuracy,displaygridlines(=210)tohelpyou levelthecamerainadvance. 1 Levelthecamera. zz Placethecameraonalatsurface,such asatable. 2 Accessthe[ElectronicLevel] screen. zz Choose[ElectronicLevel],andthenpress the<m>button. 3 Calibratetheelectroniclevel. zz Choose[Calibrate]andpressthe<m> Y P O button.Aconirmationmessageis displayed. zz Choose[OK],andthenpressthe<m> button. C ResettingtheElectronicLevel Restoretheelectronicleveltoitsoriginalstateasfollows.Notethatthisis notpossibleunlessyouhavecalibratedtheelectroniclevel. zz Choose[ElectronicLevel],andthenpress the<m>button. zz Choose[Reset],andthenpressthe <m>button. zz Choose[OK]andpressthe<m>button toresettheelectroniclevelandreturnto themenuscreen. 272 AdjustingBasicCameraFunctions StillImages Movies Increasing Touch-Screen Panel Sensitivity Sensitivityofthetouch-screenpanelcanbeincreased,sothatthecamera respondstoalightertouch. zz Choose[TouchResponse],andthen choose[High]. Setting Copyright Information to Record in Images Torecordtheauthor’snameandcopyrightdetailsinimages,setthis informationbeforehandasfollows. Y P O 1 Accessthesettingscreen. zz Choose[CopyrightInfo],andthenpress the<m>button. zz Pressthe<o><p>buttonsorturn C the<7>dialtochoose[EnterAuthor’s Name]or[EnterCopyrightDetails],and thenpressthe<m>button. 2 Enteraname. zz Touchcharactersonthekeyboardto enterthem. zz Upto63characterscanbeused. 273 AdjustingBasicCameraFunctions 3 Savethesettings. zz Pressthe<n>button.[Accept changes?]isdisplayed. zz Pressthe<q><r>buttonsorturnthe <7>dialtochoose[Yes],andthenpress the<m>button. XX Theinformationsetherewillnowbe recordedinimages. • Tochecktheinformationentered,choose[DisplayCopyrightInfo]onthe screeninstep1,andthenpressthe<m>button. • Youcanalsousetheincludedsoftware(=27)toenter,change,and deletecopyrightinformation.Somecharactersenteredwiththeincluded softwaremaynotdisplayonthecamera,butwillbecorrectlyrecordedin images. • Youcanview,change,anddeletecopyrightinformationrecordedinimages byusingtheincludedsoftwaretosaveimagestoacomputer. • Youcanalsoenteranameonthescreeninstep2bypressingthe <o><p><q><r>buttonsorturningthe<7>dialtoselectcharacters,and thenpressingthe<m>button.Movethecursorbyturningthe<y>ring,and >buttontodeletecharacters,asneeded. pressthe< Y P O C DeletingAllCopyrightInformation Youcandeleteboththeauthor’snameandcopyrightdetailsatthesame timeasfollows. zz Followstep1on=273andchoose [DeleteCopyrightInfo]. zz Pressthe<q><r>buttonsorturnthe <7>dialtochoose[OK],andthenpress the<m>button. • Thecopyrightinfoalreadyrecordedinimageswillnotbedeleted. 274 AdjustingBasicCameraFunctions Checking Certiication Logos Somelogosforcertiicationrequirementsmetbythecameracanbeviewed onthescreen.Othercertiicationlogosareprintedinthisguide,onthe camerapackaging,oronthecamerabody. zz Choose[CertiicationLogoDisplay],and thenpressthe<m>button. Display Language Changethedisplaylanguageasneeded. 1 Accessthe[Language]screen. zz Choose[Language Y P O the<m>button. ],andthenpress 2 Conigurethesetting. zz Pressthe<o><p><q><r>buttonsor C turnthe<7>dialtochoosealanguage, andthenpressthe<m>button. • Youcanalsoaccessthe[Language]screeninPlaybackmodebypressing andholdingthe<m>buttonandimmediatelypressingthe<n>button. Adjusting Other Settings Thefollowingsettingscanalsobeadjustedonthe[3]tab. • [VideoSystem](=284) • [CtrlviaHDMI](=282) • [WirelessLANSettings](=35) • [Eye-FiSettings](=300) 275 AdjustingBasicCameraFunctions Restoring Defaults Ifyouaccidentallychangeasetting,youcanrestoredefaultcamera settings. 1 Accessthe[ResetAll]screen. zz Choose[ResetAll],andthenpressthe <m>button. 2 Restoredefaultsettings. zz Pressthe<q><r>buttonsorturnthe <7>dialtochoose[OK],andthenpress the<m>button. XX Defaultsettingsarenowrestored. • Thefollowingfunctionsarenotrestoredtodefaultsettings. -[3]tabsettings[Date/Time](=18),[Language ](=20),[Time Zone](=264),[VideoSystem](=284),andtheimageassignedto [Start-upImage](=266) -InformationregisteredusingFaceID(=113) -Customwhitebalancedatayouhaverecorded(=175) -ColorschoseninColorAccent(=151)orColorSwap(=152) -Shootingmodechosenin<K>(=137)or< >(=142)mode -Themoviemode(=161) -Copyrightinformation(=273) -Wirelessnetworksettings(=35) Y P O C 276 8 Accessories Useincludedaccessorieseffectivelyandenjoythe camerainmorewayswithoptionalCanonaccessories andothercompatibleaccessoriessoldseparately Y P O C 277 Tips on Using Included Accessories Effective Battery and Charger Use • Chargethebatteryon(orimmediatelybefore)the dayofuse Chargedbatteriesgraduallylosetheircharge,evenwhen theyarenotused. Youcaneasilycheckthechargestateofthebatteryby attachingthecoversothat▲isvisibleonacharged battery,andattachingitsothat▲isnotvisibleonan unchargedbattery. • Long-termbatterystorage Afterusingupallremainingbatterypower,removethebatteryfromthecamera.Store thebatterywiththecoverattached.Storingapartiallychargedbatteryoverextended periods(aboutayear)mayshortenitslifeoraffectperformance. • Usingthebatterychargerabroad Thechargercanbeusedinareaswith100–240VACpower(50/60Hz).Forpower outletsinadifferentformat,useacommerciallyavailableadapterfortheplug.Never useanelectricaltransformerdesignedfortraveling,whichmaydamagethebattery. Y P O Optional Accessories Thefollowingcameraaccessoriesaresoldseparately.Notethatavailability variesbyarea,andsomeaccessoriesmaynolongerbeavailable. Power Supplies C BatteryPackNB-5L zz Rechargeablelithium-ionbattery BatteryChargerCB-2LX/CB-2LXE zz ChargerforBatteryPackNB-5L 278 OptionalAccessories ACAdapterKitACK-DC30 zz Forpoweringthecamerausing householdpower.Recommendedwhen usingthecameraoverextendedperiods, orwhenconnectingthecameratoa printerorcomputer.Cannotbeusedto chargethecamerabattery. • ThebatterychargerandACadapterkitcanbeusedinareaswith 100–240VACpower(50/60Hz). • Forpoweroutletsinadifferentformat,useacommercially availableadapterfortheplug.Neveruseanelectricaltransformer designedfortraveling,whichmaydamagethebattery. Y P O C 279 OptionalAccessories Flash Unit High-PowerFlashHF-DC2 zz Externallashforilluminatingsubjects thatareoutofrangeofthebuilt-inlash. Other Accessories WaterproofCaseWP-DC47 zz Forunderwaterphotographyatdepthsof upto40meters(130ft.).Alsousefulfor shootingintherain,atthebeach,oron skislopes. StereoAVCableAVC-DC400ST zz ConnectthecameratoaTVtoenjoy Y P O playbackonthelargerTVscreen. HDMICableHTC-100 zz ForconnectingthecameratoanHDMI C inputofahigh-deinitionTV. Printers CanonPictBridge-Compatible Printers zz Printingimageswithoutacomputeris possiblebyconnectingthecameratoa CanonPictBridge-compatibleprinter.For details,visityournearestCanondealer. 280 StillImages Movies Using Optional Accessories StillImages Movies Playback on a TV ByconnectingthecameratoaTV,youcanviewyourshotsonthelarger screenoftheTV. Fordetailsonconnectionorhowtoswitchinputs,refertotheTVmanual. • SomeinformationmaynotbedisplayedontheTV(=316). StillImages Movies PlaybackonaHigh-DeinitionTV ConnectingthecameratoanHDTVwiththeHDMICableHTC-100(sold separately)enablesyoutoviewyourshotsonthelargerscreenoftheTV. Moviesshotataresolutionof[ ]or[ ]canbeviewedinhigh-deinition. 1 MakesurethecameraandTV areoff. Y P O 2 ConnectthecameratotheTV. zz OntheTV,insertthecableplugfullyinto C theHDMIinputasshown. zz Onthecamera,opentheterminalcover andinsertthecableplugfullyintothe cameraterminal. 281 UsingOptionalAccessories 3 TurntheTVonandswitchto videoinput. zz SwitchtheTVinputtothevideoinputyou connectedthecabletoinstep2. 4 Turnthecameraon. zz Pressthe<1>buttontoturnthecamera on. XX Imagesfromthecameraarenow displayedontheTV.(Nothingis displayedonthecamerascreen.) zz Wheninished,turnoffthecameraand TVbeforedisconnectingthecable. • Touch-screenoperationsarenotsupportedwhilethecamerais connectedtoatelevision. Y P O • Cameraoperatingsoundsarenotplayedwhilethecameraisconnectedto anHDTV. C StillImages Movies ControllingtheCamerawithaTVRemote ConnectingthecameratoanHDMICEC-compatibleTVenablesplayback (includingslideshowplayback)usingtheTVremotecontrol. Inthiscase,youwillneedtoadjustsomeTVsettings.Fordetails,referto theTVusermanual. 1 Conigurethesetting. zz Pressthe<n>button,choose [CtrlviaHDMI]onthe[3]tab,andthen choose[Enable](=91). 2 ConnectthecameratotheTV. zz Followsteps1–2on=281toconnect thecameratotheTV. 282 UsingOptionalAccessories 3 Displayimages. zz TurnontheTV.Onthecamera,pressthe <1>button. XX Imagesfromthecameraarenow displayedontheTV.(Nothingis displayedonthecamerascreen.) 4 ControlthecamerawiththeTV remote. zz Pressthe<q><r>buttonsontheremote tobrowseimages. zz Todisplaythecameracontrolpanel, presstheOK/Selectbutton.Select controlpanelitemsbypressingthe <q><r>buttonstochooseanitem,and thenpressingtheOK/Selectbuttonagain. Y P O CameraControlPanelOptionsShownontheTV . Return Closesthemenu. GroupPlayback Displayssetsofimagesshotin[ ]mode(=158).(Only displayedwhenagroupedimageisselected.) PlayMovie Startsmovieplayback.(Onlydisplayedwhenamovieis selected.) Slideshow Startsslideshowplayback.Toswitchimagesduring playback,pressthe<q><r>buttonsontheremotecontrol. IndexPlayback Displaysmultipleimagesinanindex. C l ChangeDisplay Switchesdisplaymodes(=88). • Pressingthe<n>buttononthecamerawillswitchcontroltothe cameraitself,whichwillpreventremotecontroluntilyoureturntosingleimagedisplay. • Movingthezoomleveronthecamerawillswitchcontroltothecameraitself, whichwillpreventremotecontroluntilyoureturntosingle-imagedisplay. • Thecameramaynotalwaysrespondcorrectlyeveniftheremoteisforan HDMICEC-compatibleTV. 283 UsingOptionalAccessories StillImages Movies PlaybackonaStandard-DeinitionTV ConnectingthecameratoaTVwiththeStereoAVCableAVC-DC400ST (soldseparately)enablesyoutoviewyourshotsonthelargerscreenofthe TVasyoucontrolthecamera. 1 MakesurethecameraandTV areoff. Yellow Yellow White Red 2 ConnectthecameratotheTV. zz OntheTV,insertthecableplugsfullyinto thevideoinputsasshown. Red White zz Onthecamera,opentheterminalcover andinsertthecableplugfullyintothe cameraterminal. Y P O 3 Displayimages. zz Followsteps3–4on=282todisplay C images. • Correctdisplayisnotpossibleunlessthecameravideooutput format(NTSCorPAL)matchestheTVformat.Tochangethe videooutputformat,pressthe<n>buttonandchoose[Video System]onthe[3]tab. • Touch-screenoperationsarenotsupportedwhilethecamerais connectedtoatelevision. • WhenthecameraandTVareconnected,youcanalsoshootwhile previewingshotsonthelargerscreenoftheTV.Toshoot,followthesame stepsaswhenusingthecamerascreen.However,AF-PointZoom(=130), MF-PointZoom(=182)andStitchAssist(=160)arenotavailable. 284 UsingOptionalAccessories StillImages Movies Powering the Camera with Household Power PoweringthecamerawithACAdapterKitACK-DC30(soldseparately) eliminatestheneedtomonitortheremainingbatterylevel. 1 Makesurethecameraisoff. 2 Insertthecoupler. zz Followstep2on=16toopenthe cover. zz Insertthecouplerfacingthedirection Terminal shown,justasyouwouldabattery (followingstep3on=16). zz Followstep5on=17toclosethe cover. 3 Connecttheadaptertothe Y P O coupler. zz Openthecoverandinserttheadapter plugfullyintothecoupler. C 4 Connectthepowercord. zz Insertoneendofthepowercordintothe compactpoweradapter,andthenplug theotherendintoapoweroutlet. zz Turnthecameraonanduseitasdesired. zz Wheninished,turnthecameraoffand unplugthepowercordfromtheoutlet. 285 PrintingImages • Donotdisconnecttheadapterorunplugthepowercordwhile thecameraisstillon.Thismayeraseyourshotsordamagethe camera. • Donotattachtheadapteroradaptercordtootherobjects.Doing socouldresultinmalfunctionordamagetotheproduct. StillImages Movies Printing Images Yourshotscaneasilybeprintedbyconnectingthecameratoaprinter.On thecamera,youcanspecifyimagestosetupbatchprinting,prepareorders forphotodevelopmentservices,andprepareordersorprintimagesfor photobooks. ACanonSELPHYCPseriescompactphotoprinterisusedhereforthe sakeofillustration.Screensdisplayedandavailablefunctionsvaryby printer.Alsorefertotheprintermanualforadditionalinformation. Y P O Easy Print StillImages EasilyprintyourshotsbyconnectingthecameratoaPictBridge-compatible printer(soldseparately)withtheincludedinterfacecable(=2). C 1 Makesurethecameraand printerareoff. 2 Connectthecameratothe printer. zz Openthecover.Holdingthesmaller cableplugintheorientationshown,insert theplugfullyintothecameraterminal. zz Connectthelargercableplugtothe printer.Forotherconnectiondetails,refer totheprintermanual. 286 PrintingImages 3 Turntheprinteron. 4 Turnthecameraon. zz Pressthe<1>buttontoturnthecamera on. XX [ ]isdisplayed. 5 Chooseanimage. zz Pressthe<q><r>buttonsorturnthe <7>dialtochooseanimage. 6 Accesstheprintingscreen. zz Pressthe<m>button. 7 Printtheimage. zz Pressthe<o><p>buttonsorturnthe Y P O <7>dialtochoose[Print],andthen pressthe<m>button. XX Printingnowbegins. zz Toprintotherimages,repeatsteps5–6 afterprintingisinished. zz Whenyouareinishedprinting,turnthe cameraandprinteroffanddisconnectthe interfacecable. C • ForCanonPictBridge-compatibleprinters(soldseparately),see=280. • RAWimagescannotbeprinted. 287 PrintingImages StillImages Coniguring Print Settings 1 Accesstheprintingscreen. zz Followsteps1–6on=286–287to accessthescreenatleft. 2 Conigurethesettings. zz Pressthe<o><p>buttonsorturn the<7>dialtochooseanitem,and thenchooseanoptionbypressingthe <q><r>buttons. Default Date FileNo. Both Off Default Matchescurrentprintersettings. Printsimageswiththedateadded. Printsimageswiththeilenumberadded. Printsimageswithboththedateandilenumberadded. Y P O – Matchescurrentprintersettings. Off – On Usesinformationfromthetimeofshootingtoprintunder optimalsettings. Red-Eye1 C Correctsred-eye. No.ofCopies Choosethenumberofcopiestoprint. Cropping – Specifyadesiredimageareatoprint(=289). Paper Settings – Specifythepapersize,layout,andotherdetails (=290). 288 PrintingImages StillImages CroppingImagesBeforePrinting(Cropping) Bycroppingimagesbeforeprinting,youcanprintadesiredimagearea insteadoftheentireimage. 1 Choose[Cropping]. zz Afterfollowingstep1on=288to accesstheprintingscreen,choose [Cropping]andpressthe<m>button. XX Acroppingframeisnowdisplayed, indicatingtheimageareatoprint. 2 Adjustthecroppingframeas needed. zz Toresizetheframe,movethezoom lever. zz Tomovetheframe,pressthe Y P O <o><p><q><r>buttons. zz Torotatetheframe,turnthe<7>dial. zz Wheninished,pressthe<m>button. C 3 Printtheimage. zz Followstep7on=287toprint. zz Onthescreeninstep1,pressthe <o><p>buttonsorturnthe<7>dialto choose[Print],andthenpressthe<m> button. • Croppingmaynotbepossibleatsmallimagesizes,oratsome aspectratios. • Datesmaynotbeprintedcorrectlyifyoucropimagesshotwith [DateStamp]selected. 289 PrintingImages StillImages ChoosingPaperSizeandLayoutBeforePrinting 1 Choose[PaperSettings]. zz Afterfollowingstep1on=288to accesstheprintingscreen,choose [PaperSettings]andpressthe<m> button. 2 Chooseapapersize. zz Pressthe<o><p>buttonsorturnthe <7>dialtochooseanoption,andthen pressthe<m>button. Y P O 3 Chooseatypeofpaper. zz Pressthe<o><p>buttonsorturnthe <7>dialtochooseanoption,andthen pressthe<m>button. C 4 Choosealayout. zz Pressthe<o><p>buttonsorturnthe <7>dialtochooseanoption. zz Whenchoosing[N-up],pressthe <q><r>buttonstospecifythenumberof imagespersheet. zz Pressthe<m>button. 5 Printtheimage. 290 PrintingImages AvailableLayoutOptions Default Matchescurrentprintersettings. Bordered Printswithblankspacearoundtheimage. Borderless Borderless,edge-to-edgeprinting. N-up Choosehowmanyimagestoprintpersheet. IDPhoto Printsimagesforidentiicationpurposes. OnlyavailableforimageswitharesolutionofLandanaspectratioof 4:3. FixedSize Choosetheprintsize. Choosefrom3.5x5in.,postcard,orwide-formatprints. StillImages PrintingIDPhotos 1 Choose[IDPhoto]. zz Followingsteps1–4on=290,choose Y P O [IDPhoto]andpressthe<m>button. 2 Choosethelongandshortside length. zz Pressthe<o><p>buttonsorturnthe C <7>dialtochooseanitem.Choosethe lengthbypressingthe<q><r>buttons, andthenpressthe<m>button. 3 Choosetheprintingarea. zz Followstep2on=289tochoosethe printingarea. 4 Printtheimage. 291 PrintingImages Movies Printing Movie Scenes 1 Accesstheprintingscreen. zz Followsteps1–5on=286–287 tochooseamovie,andthenpressthe <m>button. zz Pressthe<q><r>buttonsorturnthe <7>dialtochoose[c],andthenpress the<m>button.Thescreenatleftis displayed. 2 Chooseaprintingmethod. zz Pressthe<o><p>buttonsorturn the<7>dialtochoose[ ],andthen pressthe<q><r>buttonstochoosethe printingmethod. zz Pressthe<o><p>buttonstochoose [ ],andthenpressthe<q><r>buttons tochoosetheprintingmethod. Y P O 3 Printtheimage. C MoviePrintingOptions Single Printsthecurrentsceneasastillimage. Sequence Printsaseriesofscenes,acertainintervalapart,onasinglesheetof paper.Youcanalsoprintthefoldernumber,ilenumber,andelapsed timefortheframebysetting[Caption]to[On]. • Tocancelprintinginprogress,pressthe<m>button. • [IDPhoto]and[Sequence]cannotbechosenonCanonPictBridgecompatibleprintersfromCP720/CP730andearliermodels. 292 PrintingImages StillImages Adding Images to the Print List (DPOF) Batchprinting(=296)andorderingprintsfromaphotodevelopment servicecanbesetuponthecamera.Chooseupto998imagesona memorycardandconigurerelevantsettings,suchasthenumberofcopies, asfollows.TheprintinginformationyoupreparethiswaywillconformDPOF (DigitalPrintOrderFormat)standards. • RAWimagescannotbeincludedinprintlist. StillImages ConiguringPrintSettings Specifytheprintingformat,whethertoaddthedateorilenumber,and othersettingsasfollows.Thesesettingsapplytoallimagesintheprintlist. zz Pressthe<n>button,andthen choose[PrintSettings]onthe[2]tab. Chooseandconiguresettingsasdesired (=91). Y P O C Standard PrintType Date FileNo. ClearDPOF data Oneimageisprintedpersheet. Index Smallerversionsofmultipleimagesareprinted persheet. Both Bothstandardandindexformatsareprinted. On Imagesareprintedwiththeshootingdate. Off – On Imagesareprintedwiththeilenumber. Off – On Allimageprintlistsettingsareclearedafter printing. Off – 293 PrintingImages • NotallofyourDPOFsettingsmaybeappliedinprintingbythe printerorphotodevelopmentservice,insomecases. • [ ]maybedisplayedonthecameratowarnyouthatthememory cardhasprintsettingsthatwereconiguredonanothercamera. Changingtheprintsettingsusingthiscameramayoverwriteall previoussettings. • Setting[Date]to[On]maycausesomeprinterstoprintthedate twice. • Specifying[Index]willpreventyoufromchoosing[On]forboth[Date]and [FileNo.]atthesametime. • IndexprintingisnotavailableonsomeCanonPictBridge-compatibleprinters (soldseparately). • Thedateisprintedinaformatmatchingsettingdetailsin[Date/Time]onthe [3]tab(=18). StillImages Y P O SettingUpPrintingforIndividualImages 1 Choose[SelectImages&Qty.]. zz Pressthe<n>button,choose [SelectImages&Qty.]onthe[2]tab, andthenpressthe<m>button. C 2 Chooseanimage. zz Pressthe<q><r>buttonsorturnthe <7>dialtochooseanimage,andthen pressthe<m>button. XX Youcannowspecifythenumberof copies. zz Ifyouspecifyindexprintingfortheimage, itislabeledwitha[ ]icon.Tocancel indexprintingfortheimage,pressthe <m>buttonagain.[ ]isnolonger displayed. 294 PrintingImages 3 Specifythenumberofprints. zz Pressthe<o><p>buttonsorturnthe <7>dialtospecifythenumberofprints (upto99). zz Tosetupprintingforotherimagesand specifythenumberofprints,repeatsteps 2–3. zz Printingquantitycannotbespeciiedfor indexprints.Youcanonlychoosewhich imagestoprint,byfollowingstep2. zz Wheninished,pressthe<n>button toreturntothemenuscreen. StillImages SettingUpPrintingforaRangeofImages 1 Choose[SelectRange]. zz Followingstep1on=294,choose Y P O [SelectRange]andpressthe<m>button. 2 Chooseimages. zz Followsteps2–3on=238tospecify C images. 3 Coniguretheprintsettings. zz Pressthe<o><p>buttonstochoose [Order],andthenpressthe<m>button. StillImages SettingUpPrintingforAllImages 1 Choose[SelectAllImages]. zz Followingstep1on=294,choose [SelectAllImages]andpressthe<m> button. 2 Coniguretheprintsettings. zz Pressthe<q><r>buttonsorturnthe <7>dialtochoose[OK],andthenpress the<m>button. 295 PrintingImages StillImages ClearingAllImagesfromthePrintList 1 Choose[ClearAllSelections]. zz Followingstep1on=294,choose [ClearAllSelections]andpressthe<m> button. 2 Conirmclearingtheprintlist. zz Pressthe<q><r>buttonsorturnthe <7>dialtochoose[OK],andthenpress the<m>button. StillImages PrintingImagesAddedtothePrintList(DPOF) zz Whenimageshavebeenaddedtothe printlist(=293–295),thescreen atleftisdisplayedafteryouconnect thecameratoaPictBridge-compatible printer.Pressthe<o><p>buttonsto choose[Printnow],andthensimplypress the<m>buttontoprinttheimagesinthe printlist. zz AnyDPOFprintjobthatyoutemporarily stopwillberesumedfromthenextimage. Y P O C StillImages Adding Images to a Photobook Photobookscanbesetuponthecamerabychoosingupto998images onamemorycardandimportingthemintotheincludedsoftwareonyour computer,wheretheyarestoredintheirownfolder.Thisisconvenient whenorderingprintedphotobooksonlineorprintingphotobookswithyour ownprinter. 296 PrintingImages ChoosingaSelectionMethod zz Pressthe<n>button,choose [PhotobookSet-up]onthe[1]tab,and thenchoosehowyouwillselectimages. • [ ]maybedisplayedonthecameratowarnyouthatthememory cardhasprintsettingsthatwereconiguredonanothercamera. Changingtheprintsettingsusingthiscameramayoverwriteall previoussettings. • Afterimportingimagestoyourcomputer,alsorefertotheSoftware Guide (=27)andtheprintermanualforfurtherinformation. Y P O StillImages AddingImagesIndividually 1 Choose[Select]. C zz Followingtheprocedureon=297, choose[Select]andpressthe<m> button. 297 PrintingImages 2 Chooseanimage. zz Pressthe<q><r>buttonsorturnthe <7>dialtochooseanimage,andthen pressthe<m>button. XX [ ]isdisplayed. zz Toremovetheimagefromthephotobook, pressthe<m>buttonagain.[ ]isno longerdisplayed. zz Repeatthisprocesstospecifyother images. zz Wheninished,pressthe<n>button toreturntothemenuscreen. • Youcanalsochoosetheimagesbytouchingthemonthescreeninstep2. Y P O StillImages AddingAllImagestoaPhotobook 1 Choose[SelectAllImages]. zz Followingtheprocedureon=297, C choose[SelectAllImages]andpressthe <m>button. 2 Coniguretheprintsettings. zz Pressthe<q><r>buttonsorturnthe <7>dialtochoose[OK],andthenpress the<m>button. 298 PrintingImages StillImages RemovingAllImagesfromaPhotobook 1 Choose[ClearAllSelections]. zz Followingtheprocedureon=297, choose[ClearAllSelections]andpress the<m>button. 2 Conirmclearingthephotobook. zz Pressthe<q><r>buttonsorturnthe <7>dialtochoose[OK],andthenpress the<m>button. Y P O C 299 StillImages Movies Using an Eye-Fi Card BeforeusinganEye-Ficard,alwaysconirmthatlocaluseispermitted (=2). InsertingapreparedEye-Ficardenablesautomaticwirelesstransferof imagestoacomputeroruploadingtoaphoto-sharingwebsite. ImagesaretransferredbytheEye-Ficard.Refertothecard’susermanual orcontactthemanufacturerforinstructionsonpreparingandusingcardsor resolvingtransferproblems. • WhenusinganEye-Ficard,keepthefollowingpointsinmind. -Cardsmaycontinuetotransmitradiowavesevenwhen[EyeFitrans.]issetto[Disable](=301).RemovetheEye-Fi cardbeforeenteringhospitals,aircraft,orotherareaswhere transmissionisprohibited. -Whentroubleshootingimagetransferissues,checkthecardand computersettings.Fordetails,refertothecard’susermanual. -PoorEye-Ficonnectionsmaycauseimagetransfertotakealong time,andtransfermaybeinterruptedinsomecases. -Eye-Ficardsmaybecomehot,duetotheirtransferfunctions. -Batterypowerwillbeconsumedfasterthaninnormaluse. -Cameraoperationmaybecomesluggish.Toresolvethis,try setting[Eye-Fitrans.]to[Disable]. -Eye-Fitransmissionisnotpossiblewhenthecamerais connectedtoawirelessLAN. Y P O C ConnectionstatusofEye-Ficardsinthecameracanbecheckedonthe shootingscreen(inregularinformationdisplaymode)orplaybackscreen(in simpleinformationdisplaymode). (Gray) Notconnected Interrupted (Blinkingwhite) Connecting Notcommunicating (White) Connected (Animated) Transferin progress*1 Erroracquiring Eye-Ficardinformation*2 *1Powersaving(=86)onthecameraistemporarilydisabledduringimagetransfer. *2Restartthecamera.Repeateddisplayofthisiconmayindicateaproblemwiththe card. 300 UsinganEye-FiCard Imageslabeledwitha[ ]iconhavebeentransferred. • Choosing[ ]modewillinterrupttheEye-Ficonnection.AlthoughtheEye-Fi connectionwillberestoredafteryouchooseanothershootingmodeorenter Playbackmode,thecameramaytransferanymoviesmadein[ ]mode again. Checking Connection Information ChecktheaccesspointSSIDusedbytheEye-Ficardortheconnection status,asneeded. zz Pressthe<n>button,choose [Eye-FiSettings]onthe[3]tab,andthen pressthe<m>button. zz Choose[Connectioninfo],andthenpress the<m>button. XX Theconnectioninformationscreenis displayed. Y P O Disabling Eye-Fi Transfer ConigurethesettingasfollowstodisableEye-Fitransferbythecard,if necessary. C Choose[Disable]in[Eye-Fitrans.]. zz Pressthe<n>button,choose [Eye-FiSettings]onthe[3]tab,andthen pressthe<m>button. zz Choose[Eye-Fitrans.],andthenchoose [Disable]. • [Eye-FiSettings]isnotshownunlessanEye-Ficardisinthe camerawithitswrite-protecttabintheunlockedposition.Forthis reason,youcannotchangesettingsforaninsertedEye-Ficardif thewrite-protecttabisinthelockedposition. 301 Y P O C 302 9 Appendix Helpfulinformationwhenusingthecamera Y P O C 303 Troubleshooting Ifyouthinkthereisaproblemwiththecamera,irstcheckthefollowing. Iftheitemsbelowdonotsolveyourproblem,contactaCanonCustomer SupportHelpDesk. Power Nothinghappenswhenthepowerbuttonispressed. • Conirmthatthebatteryischarged(=15). • Conirmthatthebatteryisinsertedfacingthecorrectway(=16). • Conirmthatthememorycard/batterycoverisfullyclosed(=17). • Dirtybatteryterminalsreducebatteryperformance.Trycleaningtheterminalswitha cottonswabandreinsertingthebatteryafewtimes. Thebatteryisdepletedquickly. • Batteryperformancedecreasesatlowtemperatures.Trywarmingthebatteryalittle byputtingitinyourpocket,forexample,withtheterminalcoveron. • Ifthesemeasuresdonothelpandthebatteryisstilldepletedsoonaftercharging,it hasreachedtheendofitslife.Purchaseanewbattery. Thelensisnotretracted. • Donotopenthememorycard/batterycoverwhilethecameraison.Closethecover, turnthecameraon,andthenturnitoffagain(=17). Y P O Thebatteryisswollen. • Batteryswellingisnormalanddoesnotposeanysafetyconcerns.However,ifbattery swellingpreventsthebatteryfromittinginthecamera,contactaCanonCustomer SupportHelpDesk. C Display on a TV CameraimageslookdistortedornotdisplayedonaTV(=284). Shooting Cannotshoot. • InPlaybackmode(=20),presstheshutterbuttonhalfway(=87). Strangedisplayonthescreenunderlowlight(=88). Strangedisplayonthescreenwhenshooting. Notethatthefollowingdisplayproblemsarenotrecordedinstillimagesbutare recordedinmovies. • ThescreenmaylickerunderluorescentorLEDlighting. Nodatestampisaddedtoimages. • Conigurethe[DateStamp]setting(=112).Notethatdatestampsarenotadded toimagesautomatically,merelybecauseyouhaveconiguredthe[Date/Time]setting (=264). 304 Troubleshooting • Datestampsarenotaddedinshootingmodes(=328–329)inwhichthissetting cannotbeconigured. [h]lashesonthescreenwhentheshutterbuttonispressed,and shootingisnotpossible(=99). • Set[ISMode]to[Continuous](=199). • Setthelashmodeto[h](=193). • IncreasetheISOspeed(=169). • Mountthecameraonatripodortakeothermeasurestokeepitstill.Inthiscase,you shouldset[ISMode]to[Off](=199). Shotsareoutoffocus. • Presstheshutterbuttonhalfwaytofocusonsubjectsbeforepressingitalltheway downtoshoot(=87). • Makesuresubjectsarewithinfocusingrange(=335). • Set[AF-assistBeam]to[On](=132). • Conirmthatunneededfunctionssuchasmacroaredeactivated. • TryshootingwithfocuslockorAFlock(=185,191). Shotsareblurry. Y P O • BlurringmayoccurmoreoftenwhenTouchShutterisusedtoshoot,dependingon shootingconditions.Holdthecamerastillwhenshooting. NoAFframesaredisplayedandthecameradoesnotfocuswhenthe shutterbuttonispressedhalfway. C • TohaveAFframesdisplayedandthecamerafocuscorrectly,trycomposingthe shotwithhigher-contrastsubjectareascenteredbeforeyoupresstheshutterbutton halfway.Otherwise,trypressingtheshutterbuttonhalfwayrepeatedly. Subjectsinshotslooktoodark. • Setthelashmodeto[h](=193). • Adjustbrightnessbyusingexposurecompensation(=166). • Adjustcontrastbyusingi-Contrast(=172,254). • UseAElockorspotmetering(=167,168). Subjectslooktoobright,highlightsarewashed-out. • Setthelashmodeto[!](=111). • Adjustbrightnessbyusingexposurecompensation(=166). • UseAElockorspotmetering(=167,168). • Reducethelightingonsubjects. Shotslooktoodarkdespitethelashiring(=99). • Shootwithinlashrange(=335). 305 Troubleshooting • Adjustbrightnessbyusinglashexposurecompensationorchangingthelashoutput level(=195,197). • IncreasetheISOspeed(=169). Subjectsinlashshotslooktoobright,highlightsarewashed-out. • Shootwithinlashrange(=335). • Setthelashmodeto[!](=111). • Adjustbrightnessbyusinglashexposurecompensationorchangingthelashoutput level(=195,205). Whitedotsorsimilarimageartifactsappearinlashshots. • Thisiscausedbylightfromthelashrelectingoffdustorairborneparticles. Shotslookgrainy. • LowertheISOspeed(=169). • HighISOspeedsinsomeshootingmodesmaycausegrainyimages(=139). Subjectsareaffectedbyred-eye(=125). • Set[Red-EyeLamp]to[On](=132)toactivatethered-eyereductionlamp (=4)inlashshots.Forbestresults,havesubjectslookatthered-eyereduction lamp.Alsotryincreasingthelightinginindoorscenesandshootingatcloserrange. Y P O • Editimagesusingred-eyecorrection(=255). Recordingtothememorycardtakestoolong,orcontinuousshooting isslower. • Usethecameratoperformlow-levelformattingofthememorycard(=268). C ShootingsettingsorFUNC.menusettingsarenotavailable. • Availablesettingitemsvarybyshootingmode.Referto“FunctionsAvailableinEach ShootingMode”,“FUNC.Menu”,and“ShootingMenu”(=318–324). TheBabiesorChildrenicondoesnotdisplay. • TheBabiesandChildreniconswillnotdisplayifthebirthdayisnotsetinface information(=113).Iftheiconsstilldonotdisplayevenwhenyousetthebirthday, re-registerfaceinformation(=119),ormakesurethatthedate/timeareset correctly(=264). TouchAF/TouchShuttercannotbeactivated. • TouchAFandTouchShuttercannotbeactivatedbytouchingtheedgesofthescreen. Trytouchingclosertothecenterofthescreen. 306 Troubleshooting Shooting Movies Theelapsedtimeshownisincorrect,orrecordingisinterrupted. • Usethecameratoformatthememorycard,orswitchtoacardthatsupportshighspeedrecording.Notethateveniftheelapsedtimedisplayisincorrect,thelength ofmoviesonthememorycardcorrespondstotheactualrecordingtime(=334, 267). [ ]isdisplayedandshootingstopsautomatically. Thecamera’sinternalmemorybufferilledupasthecameracouldnotrecordtothe memorycardquicklyenough.Tryoneofthefollowingmeasures. • Usethecameratoperformlow-levelformattingofthememorycard(=268). • Lowertheimagequality(=127). • Switchtoamemorycardthatsupportshigh-speedrecording(=334). Zoomingisnotpossible. • Zoomingisnotpossiblewhenshootingmoviesin[ modes. ](=146)and[ ](=162) Subjectslookdistorted. • Subjectsthatpassinfrontofthecameraquicklymaylookdistorted.Thisisnota malfunction. Playback Playbackisnotpossible. Y P O • Imageormovieplaybackmaynotbepossibleifacomputerisusedtorenameilesor alterthefolderstructure.RefertotheSoftware Guide(=27)fordetailsonfolder structureandilenames. C Playbackstops,oraudioskips. • Switchtoamemorycardthatyouhaveperformedlow-levelformattingonwiththe camera(=268). • Theremaybebriefinterruptionswhenplayingmoviescopiedtomemorycardsthat haveslowreadspeeds. • Whenmoviesareplayedonacomputer,framesmaybedroppedandaudiomayskip ifcomputerperformanceisinadequate. Soundisnotplayedduringmovies. • Adjustthevolume(=217)ifyouhaveactivated[Mute](=262)orthesoundin themovieisfaint. • Nosoundisplayedformoviesshotin[ ](=146)or[ becauseaudioisnotrecordedinthesemodes. ](=162)modes 307 Troubleshooting Computer Cannottransferimagestoacomputer. Whenattemptingtotransferimagestothecomputerviaacable,tryreducingthe transferspeedasfollows. • Pressthe<1>buttontoenterPlaybackmode.Holdthe<n>buttondownas youpressthe<o>and<m>buttonsatthesametime.Onthenextscreen,press the<q><r>buttonstochoose[B],andthenpressthe<m>button. Eye-Fi Cards Cannottransferimages(=300). Wireless LAN CannotaccessthewirelessLANmenubypressing<o>. • YoucannotaccessthewirelessLANmenufromashootingmode.SwitchtoPlayback modeandtryagain. • NotethatinPlaybackmode,thewirelessLANmenucannotbedisplayedduring detailedinformationdisplay,magniieddisplay,orindexdisplay.Switchtosingleimagedisplayandaviewingmodeotherthandetailedinformationdisplay.Similarly, thewirelessLANmenucannotbeaccessedduringilteredimagedisplayaccordingto speciiedconditions.Canceltheplaybackstateoftheimageinimagesearchmode. Y P O • ThewirelessLANmenucannotbedisplayedwhilethecameraisconnectedtoa printerorcomputerviaacable.Disconnectthecable. Cannotaddadevice/destination. C • Atotalof20itemsofconnectioninformationcanbeaddedtothecamera.Erase unneededconnectioninformationfromthecamerairst,andthenaddnewdevices/ destinations(=78). • E-mailistheonlywebserviceforwhichmultipleaccountscanbeset.Use CameraWindowtochangethedesiredWebserviceaccounts(=46). • Toaddasmartphoneasadevice,irstinstallthededicatedapplication CameraWindowonyoursmartphone. • Toaddacomputerasadevice,irstinstalltheincludedsoftwareCameraWindowon thecomputer.Alsochecktheenvironmentandsettingsofyourcomputerandwireless LAN(=56,59). • Avoidusingthecamera’swirelessLANfunctionaroundmicrowaveovens,Bluetooth devices,andotherdevicesthatoperateonthe2.4GHzband,asthiswillweaken wirelessLANsignals. • Bringthecameraclosertotheotherdeviceyouaretryingtoconnectto(suchasthe accesspoint),andmakesuretherearenoobjectsbetweenthedevices. 308 Troubleshooting Cannotsendimages. • Thedestinationdevicehasinsuficientstoragespace.Increasethestoragespaceon thedestinationdeviceandresendtheimages. • Thewrite-protecttaboftheSD/SDHC/SDXCmemorycardorEye-Ficardofthe destinationcameraissettothelockedposition.Slidethewrite-protecttabtothe unlockedposition. • Imagesshotin[ ]modearegrouped.Cancelgroupingandthensendtheimages. • RAWimagescannotbesent.In[ ]mode,onlytheJPEGimagesaresent. Cannotresizeimagesforsending. • Imagescannotberesizedtobebiggerthantheresolutionsettingoftheiroriginalsize. • Moviescannotberesized. Imagestakealongtimetosend./Thewirelessconnectionisdisrupted. • Multipleimagesmaytakealongtimetosend.Tryresizingtheimageto[ toreducesendingtime(=76). ]or[ ] • Moviesmaytakealongtimetosend. • Avoidusingthecamera’swirelessLANfunctionaroundmicrowaveovens,Bluetooth devices,andotherdevicesthatoperateonthe2.4GHzband,asthiswillweaken wirelessLANsignals. Y P O • Notethatimagesmaytakealongtimetosendevenwhen[ ]isdisplayed. • Bringthecameraclosertotheotherdeviceyouaretryingtoconnectto(suchasthe accesspoint),andmakesuretherearenoobjectsbetweenthedevices. • Whensendingimagestoacomputerfromamemorycardwithalargeamount ofimages(approximately1,000),theconnectionmaybedisrupted.Importany necessaryimagestoacomputer,andthenreducethenumberofimagesonthe memorycardbyerasingunnecessaryimages. C Erasingwirelessconnectioninformationwhentransferringownership ofordisposingofthecamera. • ResetthewirelessLANtodefaultsettings(=82). 309 On-Screen Messages Ifanerrormessageisdisplayed,respondasfollows. Nomemorycard • Thememorycardmaybeinsertedfacingthewrongway.Reinsertthememorycard facingthecorrectway(=17). Memorycardlocked • Thewrite-protecttabofthememorycardissettothelockedposition.Switchthe write-protecttabtotheunlockedposition(=16). Cannotrecord! • Shootingwasattemptedwithoutamemorycardinthecamera.Toshoot,inserta memorycardfacingthecorrectway(=17). Memorycarderror(=268) • Ifthesameerrormessageisdisplayedevenwhenyouhaveinsertedaformatted memorycardfacingthecorrectway,contactaCanonCustomerSupportHelpDesk (=17). Insuficientspaceoncard • Thereisnotenoughfreespaceonthememorycardtoshoot(=95,135,165, 201)oreditimages(=250–255).Eithereraseunneededimages(=240, 241)orinsertamemorycardwithenoughfreespace(=16). Y P O TouchAFunavailable • TouchAFisnotavailableinthecurrentshootingmode(=318). TouchAFcanceled C • ThesubjectselectedforTouchAFcannolongerbedetected(=188). Chargethebattery(=15) NoImage. • Thememorycarddoesnotcontainanyimagesthatcanbedisplayed. Protected!(=236) UnidentiiedImage/IncompatibleJPEG/Imagetoolarge./Cannotplay backAVI/RAW • Unsupportedorcorruptimagescannotbedisplayed. • Itmaynotbepossibletodisplayimagesthatwereeditedorrenamedonacomputer, orimagesshotwithanothercamera. 310 On-ScreenMessages Cannotmagnify!/CannotplaybackthiscontentinSmartShufle/ Cannotrotate/Cannotmodifyimage/Cannotregisterthisimage!/ Cannotmodify/Cannotassigntocategory/Unselectableimage./No identiicationinformation • Thefollowingfunctionsmaybeunavailableforimagesthatwererenamedoralready editedonacomputer,orimagesshotwithanothercamera.Notethatstarred(*) functionsarenotavailableformovies.Magnify*(=233),SmartShufle*(=235), Categorize(=245),Rotate(=243),Edit*(=250–255),AssignasStart-up Image*(=266),PrintList*(=293),PhotobookSet-up*(=296),andEditID Info*(=231–232). • Groupedimagescannotbeprocessed(=159). Invalidselectionrange • Whenspecifyingarangeforimageselection(=238,242,247,295),you attemptedtochooseaninitialimagethatwasaftertheinalimage,orvice-versa. Exceededselectionlimit • Morethan998imageswereselectedforPrintList(=293)orPhotobookSet-up (=296).Choose998imagesorless. • PrintList(=293)orPhotobookSet-up(=296)settingscouldnotbesaved correctly.Reducethenumberofselectedimagesandtryagain. Y P O • Youattemptedtochoosemorethan500imagesinProtect(=236),Erase (=240),Favorites(=244),MyCategory(=245),PrintList(=293),or PhotobookSet-up(=296). Communicationerror C • Anexcessiveamountofimages(approx.1,000)onthememorycardprevented printingorimagetransfertoacomputer.Totransfertheimages,useacommercially availableUSBcardreader.Toprint,insertthememorycarddirectlyintotheprinter cardslot. Namingerror! • Thefoldercouldnotbecreatedorimagescouldnotberecorded,becausethehighest supportedfoldernumber(999)forstoringimagesonthecardhasbeenreachedand thehighestsupportedimagenumber(9999)forimagesinfoldershasbeenreached. Inthe[3]menu,change[FileNumbering]to[AutoReset](=269),orformatthe memorycard(=267). LensError • Thiserrormayoccurifthelensisheldwhileitismoving,orwhenthecameraisused industyorsandylocations. • Frequentdisplayofthiserrormessagemayindicatecameradamage.Inthiscase, contactaCanonCustomerSupportHelpDesk. 311 On-ScreenMessages Acameraerrorwasdetected(error number) • Ifthiserrormessageisdisplayedimmediatelyafterashot,theimagemaynothave beensaved.SwitchtoPlaybackmodetocheckfortheimage. • Frequentdisplayofthiserrormessagemayindicatecameradamage.Inthiscase, writedowntheerrornumber(Exx)andcontactaCanonCustomerSupportHelp Desk. FileError • Correctprinting(=286)maynotbepossibleforphotosfromothercamerasor imagesthathavebeenalteredusingcomputersoftware,evenifthecamerais connectedtotheprinter. Printerror • Checkthepapersizesetting(=290).Ifthiserrormessageisdisplayedwhenthe settingiscorrect,restarttheprinterandcompletethesettingonthecameraagain. Inkabsorberfull • ContactaCanonCustomerSupportHelpDesktorequestassistancewithink absorberreplacement. Wireless LAN Y P O Connectionfailed • Noaccesspointswererecognized.Checktheaccesspointsettings.(=57) • Adevicecouldnotbefound.Turnthecameraoffandonagain,andretrythe connection. C • Checkthedeviceyouwanttoconnecttoandmakesureitisreadyforconnection. Cannotdetermineaccesspoint • TheWPSbuttononnumerousaccesspointswerepressedsimultaneously.Try reconnectingagain. Noaccesspointsfound • Checktomakesurethattheaccesspointisturnedon. • Whenconnectingtoanaccesspointmanually,makesurethatyouenteredthe correctSSID. IncorrectwirelessLANencryptionkey/IncorrectwirelessLANsecurity settings • Checktheaccesspointsecuritysettings(=57). IPaddressconlict • ResettheIPaddresssothatitdoesnotconlictwithanother. 312 On-ScreenMessages Disconnected/Receivingfailed/Sendingfailed • TheenvironmentyouareinmaynotbesuitableforwirelessLANuse. • Avoidusingthecamera’swirelessLANfunctionaroundmicrowaveovens,Bluetooth devices,andotherdevicesthatoperateonthe2.4GHzband. • Bringthecameraclosertotheotherdeviceyouaretryingtoconnectto(suchasthe accesspoint),andmakesuretherearenoobjectsbetweenthedevices. • Checktheconnecteddevicetomakesureitisnotexperiencingerrors. Sendingfailed Memorycarderror • Ifthesameerrormessageisdisplayedevenwhenyouhaveinsertedaformatted memorycardfacingthecorrectway,contactaCanonCustomerSupportHelpDesk. Receivingfailed Insuficientspaceoncard • Thereisnotenoughfreespaceonthememorycardtoreceiveimages.Eraseimages tocreatespaceonthememorycard,orinsertanemptymemorycard. Receivingfailed Memorycardlocked • Thewrite-protecttaboftheSD/SDHC/SDXCmemorycardorEye-Ficardofthe cameratoreceivetheimagesissettothelockedposition.Slidethewrite-protecttab totheunlockedposition. Receivingfailed Namingerror! Y P O C • Whenthehighestfoldernumber(999),andthehighestimagenumber(9999)have beenreachedonthereceivingcamera,imagescannotbereceived. Insuficientspaceonserver • DeleteunnecessaryimagesuploadedtoCANONiMAGEGATEWAYtocreatespace. SSLcertiicatenotvalid Connecttoacomputer,usethesuppliedsoftwaretoreset • Checktomakesurethedate/timesettingsonthecameraarecorrect.Afterconirming thatthesettingsarecorrect,followtheon-screeninstructionsandresetthesettings. Checknetworksettings • ChecktomakesureyourcomputercanconnecttotheInternetwiththecurrent networksettings. 313 On-Screen Information Shooting (Information Display) Batterylevel (=315) Cameraorientation* Eye-Ficonnection status(=300) Whitebalance correction(=175) MyColors(=177) AEBshooting (=171)/Focus bracketing(=191) Drivemode (=102,179) Meteringmethod (=168) Compression(image quality)(=199), Resolution (=124),RAW (=198) 314 Histogram(=210, 219) Recordableshots (=334) Self-timer(=107) Moviequality (=127) Focallength (=106) Remainingtime (=334) Digitalzoom magniication (=105),Digital tele-converter (=183) Focusingrange (=140,181, 182),ISmodeicon (=103) Shootingmode (=318),Scene icon(=101) Flashmode (=111,193, 194) AFframe(=184) Red-eyecorrection (=125) Flashexposure compensation/ Flashoutputlevel (=195,205) SpotAEpointframe (=168) Switchingcontrol ringfunctions (=209) Datestamp (=112) ISOspeed(=169) Y P O C On-ScreenInformation NDilter(=173) AElock(=167), FElock(=196) Gridlines(=210) Shutterspeed (=202,204) Electroniclevel (=210) Aspectratio (=123) Aperturevalue (=203,204) Exposure compensationlevel (=166) i-Contrast(=172) Whitebalance (=174) Mercurylamp correction(=126) TouchShutter (=110) Camerashake warning(=99) Exposureshiftbar (=161) Zoombar(=96) Blinkdetection (=131) Exposurelevel (=204) MFindicator (=182) Imagestabilization (=199) Timezone(=264) Windilter(=128) Exposure compensationbar (=166) * :Regularorientation, :Heldvertically Thecameradetectstheshootingorientationandadjustssettingsforoptimalshots. Orientationisalsodetectedduringplayback,andineitherorientation,thecamera automaticallyrotatesimagesasneeded. However,theorientationmaynotbedetectedcorrectlywhenthecameraispointed straightupordown. BatteryLevel Y P O C Anon-screeniconormessageindicatesthebatterychargelevel. Display Details Suficientcharge Slightlydepleted,butsuficient (Blinkingred) [Chargethebattery] Nearlydepleted—chargethebatterysoon Depleted—chargethebatteryimmediately 315 On-ScreenInformation Playback (Detailed Information Display) Switchdisplay:RGB histogram(=220), GPSinformation (=220) MyCategory (=245) Whitebalance (=174)/White balancecorrection (=175) Histogram(=219) NDilter(=173) Exposure compensationlevel (=166),Exposure shiftlevel(=161) ISOspeed(=169), Playbackspeed (=147,162) Shootingmode (=318) TransferredviaEyeFi(=300) 316 Batterylevel (=315) Meteringmethod (=168) Foldernumber-File number(=269) Currentimageno./ Totalno.ofimages Shutterspeed(still images)(=202), Imagequality/ Framerate(movies) (=127) Aperturevalue (=203,204) i-Contrast(=172, 254) Flash(=193, 194),Flash exposure compensation (=195) Focusingrange (=140,181, 182) Filesize(=334) Stillimages: Resolution(=334) Movies:Movie length(=334) Compression(image quality)(=199)/ Resolution(=124, 127),RAW (=198),MOV (movies) Groupplayback (=230),Image editing(=250– 255) Protection(=236) Favorites(=244) MyColors(=177, 253) Mercurylamp correction(=126) Red-eyecorrection (=125,255) Shootingdate/time (=18) Y P O C On-ScreenInformation • SomeinformationmaynotbedisplayedwhenviewingimagesonaTV (=281). SummaryofMovieControlPanelin“Viewing”(=216) Exit Touchtodisplaythevolumepanel,andthentouch[o][p]toadjustthe volume.Atavolumeof0,[ ]isdisplayed. Play SlowMotion(Toadjusttheplaybackspeed,pressthe<q><r>buttonsorturn the<7>dial.Nosoundisplayed.) SkipBackward*orPreviousClip(=136)(Tocontinueskippingbackward, keepholdingdownthe<m>button.) PreviousFrame(Forfast-rewind,keepholdingdownthe<m>button.) Y P O NextFrame(Forfast-forward,keepholdingdownthe<m>button.) SkipForward*orNextClip(=136)(Tocontinueskippingforward,keep holdingdownthe<m>button.) * Edit(=256) C Shownwhenyouhaveselectedamoviecreatedin[ c ]mode(=259). ShownwhenthecameraisconnectedtoaPictBridge-compatibleprinter (=286). *Displaystheframeapprox.4sec.beforeorafterthecurrentframe. • Duringmovieplayback,youcanskipbackorforward(ortothepreviousor nextchapter)bypressingthe<q><r>buttons. 317 Functions and Menu Tables Functions Available in Each Shooting Mode ShootingMode K D B M G A Function ExposureCompensation(=166) Flash(=111,193,194) h Z ! FlashExposureCompensation(=195) FlashOutput(=205) ApertureValue(=203) ShutterSpeed(=202) ProgramShift(=167) AELock(=167)/FELock(=196)*3 AELock(Movie)/ExposureShift(=161) *1 – *1 – O *1 – *1 O *1 – *1 O *1 O *1 O O – O – – – *1 O O – – – O O O O O O O – O O – O – O O O – O O O – O O O O – – – O O – O – O Y P O >button AFLock(whenassignedtothe< (=211)) FocusingRange(=140,181,182) e C (=182)/AFLock(=191) MoveAFFrame(=185) FaceSelect(=190) TouchAF(=185,188) TouchShutter(=110) ScreenDisplay(=88) O O O O – – – – – – – O O O O – – – O O – *2 O – O – – – – – – – O – O – – – – – – – O O O O O – O O O O – O – O – O – – – O O O – – – – O – O – O – O – O – O O O – – – *1 O O O O – O O O O O O O O O O O O O O O O O O O – O O O O – O – O *1 O O O O O O O O *1 O O O O O O O – *1 – *1 8 I O O O *1 O – O O O O – O – O OAvailableorsetautomatically.–Notavailable. *1Optionsvarydependingontheassignedshootingmode.*2Notavailable,but switchesto[Z]insomecases.*3FElocknotavailablein[!]lashmode.*4Only availablewhenfacesaredetected.*5Onlyavailableforshooting.Subjectdesignation notavailable. 318 FunctionsandMenuTables K E T E Y x S P t v O O O O O O O O O – O O O O O O O – – – – – O O O – O O O – – – O O O O O O O O O – – – O O O – O O O – O – O O O O O O O O O – – – – – – – *2 – – – O – – – – – – – – – – – – – O O O O O O O O O O O O O O O O O O O O O O – – – – – – – – – – – – – – – – – – – – – – – – – – – – – – – – – – – – – – – – – – – – – – – – – – – – – – – – – – – – – – – – – – – – – – – – – – – – – – – – – – – – – – – – – – – – – – – – – – – – – – – – – – – – – – – – – – – – – – – – – – – – – – – – – – – – – – – – – – – – – – – – – – – – – – – O O – – – Y P O – O O O O – O O O O O O O O O O O O O O O O – O – – O – – – O O O O O O O O O O O O O O – – – – – – – – – – – – – – – – – – – – C O O O O O O O O O O O O O O O – – – – – O – – – – – – – – – – – – O O O O – – O O O O O O – – – – – – – – – – – – – – – O O O O – – O – – O O – – O O *4 *4 *4 O – – O – – O O – – – – – – – O *5 – O *5 – O O *5 – O O O O O O O O O – – – – – – – O – O O O O – O O O O – O O O O O O O – – – – O O O O O – – – O O O O O O O O O O O O O O O O O O O O O O O O O O – – – O O O O O O – O O – O O O O O – O O O 319 FunctionsandMenuTables FUNC. Menu ShootingMode K D B M G A I Function DRCorrection(=172) ShadowCorrect(=173) *1 O O O O – *1 – O O O O – – – *1 O O O O – – – – *1 O O O O – O O O *1 O O O O O O – *1 – O O O O O O O *1 O O O O – O – *1 O O O O O O O O *1 O O O O – O – – *1 O O O O O O O O – – O – – – – – *1 O O O O O O O O *1 O O O O – O – *1 O O O O O O O O *1 – O O O – – – – *1 O O O O – – – – O O O O O O – ISOSpeed(=169) – WhiteBalance(=174) *2 Y P O hS *2 *1 WhiteBalanceCorrection(=175) MyColors(=177) C *5 *5 Bracketing(=171,191) *6 – – DriveMode(=179) *7 *1 O O O O O – – – – – O – *1 O O O O – – O O *1 O O O O – – – – – – *1Optionsvarydependingontheassignedshootingmode.*2Notavailablein[x]or [v].*3[h]notavailable.*4Advancedsettingsnotavailable.*5Whitebalanceisnot available.*6Setinarangeof1–5:contrast,sharpness,colorsaturation,red,green, blue,andskintone.*7[ ]issetwith[ ],AFlock,or[t]. 320 FunctionsandMenuTables K E T E Y x S P t v O O O O O – O O O O O O O O O O O O O – – – – – – – – O – – – – – – – – – – – – – – – – – – – – – – – – – – – – – – – – – – – – – – O O O O O O O O O O O O O O O O O O O – – – – – – – – – – – – – – – – – – – – – – – – – O O O O O O O O O O O O O O O O O O O O O O – – – – – – – – – – – – – – – – – – – – – – O O O O O O O O O O O O O O O O O O O O O O Y P O O O O – – – – – O – – – – – – – – – – *3 *3 – O O O – – – – – – – O – – – – O – – – – – – – – – – – – – – – – – – – – – O O – – – – *4 C O O O O O O O O O O O O O O O O O O O O O O O O O – – – – – O – – – – – – – – – – O O – O O O O O O O O O O O O O O O O O O O O O O – – – – – – – – – – – – – – – – – – – – – – – – – – – – – – – – – – – – – – – – – – – – O O O – O O O O O O O O O O O O O O O O O O – – – – – – – – – – – – – – – – – O – O O O – – O O O O O O O O O – – – – – – O – O O O – – – – – – – – – – O O O O O O O O O – – – OAvailableorsetautomatically.–Notavailable. 321 FunctionsandMenuTables ShootingMode K D B M G A I Function Self-Timer(=107) O O O O O O O O O O O O O O O O O O O O O O O O *1 O O O O O O O O O O O O O – O O *1 O O O O O O O O *1 O O O O – O – – *1 O O O O – O – – *1 O O O O O O O O *1 O O O O O – O – *1 O O O O – – *1 O O O O O O O O *1 O O O O O O O – *1 O O O O – – *1 O O O O O O O O *1 O O O O O O O O *1 O O O O O O O O *1 O O O O O O O O – – – – – – – *1 ] [$ Self-TimerSettings(=108) Delay*2 Shots*3 MeteringMethod(=168) *1 *1 *1 NDFilter(=173) StillImageAspectRatio(=123) ImageType(=198) Y P O Resolution(=124) Compression(=199) C – – – – MovieQuality(=127) – *1Optionsvarydependingontheassignedshootingmode.*2Cannotbesetto0 secondsinmodeswithoutselectionofthenumberofshots.*3Oneshot(cannotbe modiied)inmodeswithoutselectionofthenumberofshots.*4Only[ ]and[ ] areavailable.*5Synchronizeswiththeaspectratiosettingandisautomaticallyset (=147). 322 – FunctionsandMenuTables K E T E Y x S P t v O O O O O O O O O O O O O O O O O O O O O O – – – – O O O O O O O O O O O O O O O O O O – – – – O O O O O O O O O O O O O O O O O O – – – – – – – – O O O O O O O O O O O O O O O O O O O O O O – O O O O O O O O O O – – – O O O O O O O O O O O O O O O O O O O O O O – – – – – – – – – – – – – – – – – – – – – – – – – – – – – – – – – – – – – – – – – O O O O O O O O O O O O O O O O O O O O O O O O O O O O – – O O O – O – – *4 – – O O O O – – – – – – – – – – – – – – – – – – – – – – Y P O – – – O O O O O O O O O O O O O O O O O O O O O O C O O O – – O O O O – – – – – – – – – – O O O – – – – – – – – – – – – – – – – – – – – – – O O O O O O O O O O O O O O O O O O O O O O O O O O O O O O O O O O – O O O O O O O O O O O O O O O O O O O *5 O O O O O O O O – O O O O O O O O O O O O *5 O O O O O O O – – – – – – – – – – – – – – – – – – – – – – – – – O OAvailableorsetautomatically.–Notavailable. 323 FunctionsandMenuTables 4 Shooting Menu ShootingMode K D B M G A Function AFFrame(=184) FaceAiAF*2 1-point AFFrameSize(=185)*3 Normal Small DigitalZoom(=105,183) Standard Off DigitalTele-converter(1.5x/2.0x) AF-PointZoom(=130) On Off ServoAF(=187) On Off*4 ContinuousAF(=188) On Off TouchShutter(=110) On Off AF-assistBeam(=132) On Off MF-PointZoom(=182) On Off SafetyMF(=182) On Off C *1 *1 *1 *1 *1 *1 *1 *1 *1 O O O O O O O O O – O O O O O – O O O O O O O O – – O O – O O – O O O O O O O O O O O O O O – – O – O O O – – – O O O O O O O O O O – O – O O O Y P O *1 *1 *1 *1 *1 *1 *1 *1 *1 *1 *1 *1 I O O O O O O O O – O – O – O O O O O O O O O O O O – O O O – O O O O O O O O O O O O O O O O O O O O O O O O O O O O O O O O O O O O O O O O O O – O – O – O O O O O O O O O O O – O O O – O O O *1Optionsvarydependingontheassignedshootingmode.*2Operationwhenno facesaredetectedvariesbyshootingmode.*3AvailablewhentheAFframeisset to[1-point].*4[On]whensubjectmovementisdetectedin[A]mode.*5Only availableforshooting.Subjectdesignationnotavailable. 324 FunctionsandMenuTables K E T E Y x S P t v O O O O O – O – – O O – – – – O – O O O O – O O – – O O O O O O O O O O O O O O O O O O – – – – O O O O O O O O O O O O O O O O O O – – – – O O – – O O O O O O – – – – O O O – O O O – – O O O – – – – – – – – – – – O O – O O O O O O O O O O O O O O O O O O O O O O – – – – – – – – – – – – – – – – – – – – – – O O O O – O O – – O O – – – – O O O O – – – O O O O O O O O O O O O O O O O O O O O O O Y P O – – – – – O O – – – O – – – – O O O O – – – O O O O O O O O O O O O O O O O O O O O O O O O O O O O O – O O O O O O O O O O O O O O – – – – O O O O O O O O O O O O O O O – – – C – – – O *5 O O O O O – – O *5 – O O *5 – O O O O O O O O O O O O O O O O O O O O O O O O O O O O O O – O – O O O O O O O O O O O O O O – O O O O O O O O O O O O O O O O O O O O O – – – O – O O – – O O – – – – O O O O – – – O O O O O O O O O O O O O O O O O O O O O O – – – O O O O – – O O O O O O O O O O O O O O O O O O O O O O O O O O O O O O O O O O O OAvailableorsetautomatically.–Notavailable. 325 FunctionsandMenuTables ShootingMode K D B M G A Function FlashSettings(=125,132,195,197,205) Auto FlashMode Manual FlashExp.Comp FlashOutput 1st-curtain ShutterSync. 2nd-curtain On Red-EyeCorr. Off On Red-EyeLamp Off On SafetyFE Off ISOAutoSettings(=170) MaxISOSpeed RateofChange HighISONR(=170) HgLampCorr.(=126) On/Off SpotAEPoint(=168) Center AFPoint SafetyShift(=203) On Off WindFilter(=128) On Off Review(=133) Off/Quick/2–10sec./Hold ReviewInfo(=134) Off Detailed/FocusCheck BlinkDetection(=131) On Off – O – O O O O O O O – O O O O O O O O O O O O O O O O O O O O O O O O O O – O – O O O O O O O O O – – – O – O O O O O – O – O – O O O O O O O O O – – – O – O O O O O – O – – – O – – O O O O – *1 – – O O O O O – O O O O – – – O – O – – – – – – – – – – – O – – – O O O O O O O O – – O – – – – – – O O O O O – O – O – – – O O O *1 O O O O O O O O O O O O O O O O *1 O O O O O O O O O O O O O O O O O O O O O O O O O O O O O O O O O O O O O O O O *1 *1 *1 *1 *1 *1 *1 *1 *1 *1 *1 *1 *1 *1 Y P O C *1 *1 *1 *1 *1 *1 *1 *1 *1 *1Optionsvarydependingontheassignedshootingmode. 326 I FunctionsandMenuTables K E T E Y x S P t v O – – – O – O O O O O – O – – – O – O O O O O – O – – – O – O O O O O – – – – – – – – – – – – – O – – – O – O O O O O – O – – – O – – O – O O – O – – – O – O O O O O – – – – – – – – – – – – – O – – – O – – O O O O – – – – – – – – – – – – – O – – – O – – O O O O – O – – – O – – O O O O – O – – – O – – O O O O – O – – – O – – O O O O – O – – – O – – O O O O – O – – – O – – O O O O – O – – – O – – O O O O – O – – – O – – O O O O – O – – – O – – O O O O – – – – – – – – – – – – – – – – – – – – – – – – – – – – – – – – – – – – – – – – – – – – – – – – – – – – – – – – – – – – – – – – – – – – – – – – – – – – – – – – – – – – – – – – – – – – – – – – – – – – – – – – – – – – – – – – – – – – – – – – – – – – – – – – – – – – – – – – – – – – – – – – – – – – – – – – – – – – – – – – – – – – – – – – – C Y P O – – – – – – – – – – – – – – – – – – – – – – O O O O O O O O O O O O O O O O O O O O O O O O O O O O O O O O O O O O O O O O O O O O O O – – O O O O O O O O O O O O O O O O – – O O O O O O O O O O O O O O O O O O O – – – O O O O O O O O O O O O O O O O O O O O O O O O O O O – O O O O O O O O O O – – – – – – O O O – – – O – – – O – – – – – O O O – – – O O O O O O O O O O O O O O O O O O O O O O OAvailableorsetautomatically.–Notavailable. 327 FunctionsandMenuTables ShootingMode K D B M G A Function CustomDisplay(=210) ShootingInfo GridLines ElectronicLevel Histogram ISMode(=199) Off Continuous ShootOnly DateStamp(=112) Off Date/Date&Time FaceIDSettings(=113) SetControlRingFunc.(=208) Set button(=211) O O O O O O O O O O O O O O O O O O O O O O O O O O O O O O O O O O O O O O – O O O O O O – O O O O *1 O *1 O *1 O O O O O O O O O O O O O O O O O O O O O O O O – – – O O O – – – *1 *1 *1 *1 *1 *1 *1 *1 *1 SaveSettings(=212) Y P O *1Optionsvarydependingontheassignedshootingmode. C 328 I O O O O O O O – – – O O O O O – O – – – FunctionsandMenuTables K E T E Y x S P t v O O O O O O O O O O O O O O O O O O O O O O O O O O O O O O O O O O O O O O O O O O O O O O O O O O O O O O O O O O O O O O O O O O O O O O O O O O O O O O O O O O O O O O O O O O O O – O O O O O O O O O O O O O O O O O O O O O O O O O O O O O O O O O O O O O O O O O O O – O O O O O O O O O O O O O O – – – O O O O O O O O O O O O O O O O O O O O O O O O O – – O O O – – – – – – – – – – – – – – O O O O O O O O O O O O O O O O O O O O O O – – – – – – – – – – – – – – – – – – – – – – – – – – – – – – – – – – – – – – – – – – – – – – – – – – – – – – – – – – – – – – – – – – OAvailableorsetautomatically.–Notavailable. Y P O –Whenusing[FaceID](=113)toshoot,nameswillnotbedisplayedin[ ],[ ],or [ ],buttheywillberecordedinstillimages. –Settingavailable,butwhenusing[FaceID](=113)toshoot,nameswillnotbe displayedin[E],[ ],or[ ],andtheywillnotberecordedinmovies. C 329 FunctionsandMenuTables 3 Set up Menu Item Item Ref.Page Ref.Page Mute =262 PowerSaving Volume =262 Units =271 SoundOptions =263 ElectronicLevel =129 Hints&Tips =263 VideoSystem =284 Date/Time =18 CtrlviaHDMI =282 TimeZone =264 TouchResponse =273 LCDBrightness =265 WirelessLANSettings =35 Start-upImage =266 Eye-FiSettings =300 Format =267,268 FileNumbering =269 Y P O CopyrightInfo =273 CertiicationLogoDisplay =275 =20 =276 CreateFolder =270 Language LensRetract =270 ResetAll C =86,271 My Menu Menu Item MyMenusettings 330 Ref.Page =213 FunctionsandMenuTables 1 Playback Menu Item Ref.Page Item Ref.Page ImageSearch =225 Red-EyeCorrection =255 MovieDigestPlayback =229 Cropping =251 SmartShufle =235 Resize =250 Slideshow =234 MyColors =253 Erase =240 FaceIDInfo =222 Protect =236 ScrollDisplay =217 Rotate =243 GroupImages =230 Favorites =244 AutoRotate =243 MyCategory =245 PhotobookSet-up =296 i-Contrast C Y P O =254 Resume =217 Transition =217 SetTouchActions =248 2 Print Menu Item Print Ref.Page – Item Ref.Page SelectAllImages =295 SelectImages&Qty. =294 ClearAllSelections =296 SelectRange =295 PrintSettings =293 331 Handling Precautions • Thecameraisahigh-precisionelectronicdevice.Avoiddroppingitor subjectingittostrongimpact. • Neverbringthecameranearmagnets,motors,orotherdevicesthat generatestrongelectromagneticields,whichmaycausemalfunctionor eraseimagedata. • Ifwaterdropletsordirtadherestothecameraorscreen,wipewithadry softcloth,suchasaneyeglasscloth.Donotrubhardorapplyforce. • Neverusecleanerscontainingorganicsolventstocleanthecameraor screen. • Useablowerbrushtoremovedustfromthelens.Ifcleaningisdificult, contactaCanonCustomerSupportHelpDesk. • Topreventcondensationfromformingonthecameraaftersudden temperaturechanges(whenthecameraistransferredfromcoldtowarm environments),putthecamerainanairtight,resealableplasticbagand letitgraduallyadjusttothetemperaturebeforeremovingitfromthebag. • Ifcondensationdoesformonthecamera,stopusingitimmediately. Continuingtousethecamerainthisstatemaydamageit.Removethe batteryandmemorycard,andwaituntilthemoisturehasevaporated beforeresuminguse. Y P O C 332 Speciications CameraEffective Pixels(Max.) Approx.12.1millionpixels 5xzoom:5.2(W)–26.0(T)mm (35mmilmequivalent:24(W)–120(T)mm) 3.0typecolorTFTLCD(touch-screenpanel) LCDMonitor EffectivePixels:Approx.461,000dots DesignruleforCameraFilesystem,DPOF(version1.1) FileFormat compliant StillImages:Exif2.3(JPEG),RAW(CR2(CanonOriginal)) DataType Movies:MOV(Imagedata:H.264;Audiodata:LinearPCM(stereo)) Hi-speedUSB HDMIoutput Interface Analogaudiooutput(stereo) Analogvideooutput(NTSC/PAL) BatteryPackNB-5L PowerSource ACAdapterKitACK-DC30 WirelessLAN IEEE802.11b/g/n* *2.4GHzbandonly Speciication WirelessLAN OFDMmodulation(IEEE802.11g/n) TransmissionMethod DSSSmodulation(IEEE802.11b) WirelessLAN Infrastructuremode*,Adhocmode *SupportsWi-FiProtectedSetup ConnectionMode SupportedWireless 1–13(PC1819)or1–11(PC1882) Modelnumbersindicatedinparentheses(=38) Channels WirelessLAN WEP,WPA-PSK(AES/TKIP),WPA2-PSK(AES/TKIP) Security Dimensions(Based 98.8x59.0x26.9mm(3.89x2.32x1.06in.) onCIPAGuidelines) Approx.198g(approx.6.98oz.;includingthebatteryand Weight(Basedon memorycard) CIPAGuidelines) Approx.173g(approx.6.10oz.;camerabodyonly) LensFocalLength Y P O C NumberofShots/RecordingTime,PlaybackTime NumberofShots MovieRecordingTime*1 Continuous Shooting*2 PlaybackTime Approx.200 Approx.40minutes Approx.1hour,10minutes Approx.4hours *1Timeunderdefaultcamerasettings,whennormaloperationsareperformed,suchas shooting,pausing,turningthecameraonandoff,andzooming. *2Timeavailablewhenshootingthemaximummovielength(untilrecordingstops automatically)repeatedly. •Thenumberofshotsthatcanbetakenisbasedonmeasurementguidelinesofthe Camera&ImagingProductsAssociation(CIPA). •Undersomeshootingconditions,thenumberofshotsandrecordingtimemaybeless thanmentionedabove. •Numberofshots/timewithafullychargedbattery. 333 Speciications Numberof4:3ShotsperMemoryCard RecordingPixels Compression Ratio NumberofShotsperMemoryCard (Approx.shots) 8GB 32GB (Large) 12M/4000x3000 1379 5568 2192 8850 (Medium1) 6M/2816x2112 2431 9814 3721 15020 (Medium2) 2M/1600x1200 (Small) 0.3M/640x480 RAWImages 4160x3124 – 7442 30040 12927 52176 27291 110150 40937 165225 446 1804 •ThevaluesinthetablearemeasuredaccordingtoCanonstandardsandmaychange dependingonthesubject,memorycardandcamerasettings. •Thevaluesinthetablearebasedon4:3aspectratio.Iftheaspectratioischanged (=123),moreimagescanbeshotbecausethedatasizeperimagewillbesmaller thanwith4:3images.However,since[ ]16:9imageshaveasettingof1920x1080 pixels,theirdatasizewillbelargerthan4:3images. Y P O C RecordingTimeperMemoryCard ImageQuality RecordingTimeperMemoryCard 8GB 32GB 29min.39sec. 1hr.59min.43sec. 42min.11sec.*1 2hr.50min.19sec.*2 1hr.28min.59sec. 5hr.59min.10sec. *127min.39sec.foriFramemovies(=162). *21hr.51min.37sec.foriFramemovies(=162). •ThevaluesinthetablearemeasuredaccordingtoCanonstandardsandmaychange dependingonthesubject,memorycardandcamerasettings. •Recordingwillautomaticallystopwhentheclipilesizereaches4GB,orwhenthe recordingtimereachesapproximately29minutes59secondswhenshootingin[ ] or[ ],andapproximately1hourwhenshootingin[ ]or[ ]. •Recordingmaystopevenifthemaximumcliplengthhasnotbeenreachedonsome memorycards.SDSpeedClass6orhighermemorycardsarerecommended. 334 Speciications FlashRange Maximumwideangle(j) 50cm–7.0m(1.6ft.–23ft.) Maximumtelephoto(i) 50cm–2.3m(1.6ft.–7.5ft.) ShootingRange ShootingMode FocusingRange A – e * Othermodes f* 8 MaximumWide MaximumTelephoto Angle(j) (i) 3cm(1.2in.)–ininity 30cm(1.0ft.)–ininity 5cm(2.0in.)–ininity 30cm(1.0ft.)–ininity 30cm–50cm 3cm–50cm (1.0ft.–1.6ft.) (1.2in.–1.6ft.) 3cm(1.2in.)–ininity 30cm(1.0ft.)–ininity 3cm–50cm – (1.2in.–1.6ft.) 1.5m–20m 1.5m–20m (4.9ft.–66ft.) (4.9ft.–66ft.) *Notavailableinsomeshootingmodes. ContinuousShootingSpeed ShootingMode G Y P O ContinuousShooting Mode W C Speed Approx.2.1shots/sec. Approx.0.9shot/sec. Approx.0.9shot/sec. – Approx.10shots/sec. ShutterSpeed <A>mode,automaticallysetrange 1–1/2000sec. Rangeinallshootingmodes 15–1/2000sec. 15,13,10,8,6,5,4,3.2,2.5,2,1.6,1.3,1, 0.8,0.6,0.5,0.4,0.3,1/4,1/5,1/6,1/8,1/10, 1/13,1/15,1/20,1/25,1/30,1/40,1/50,1/60, <M>modeavailablevalues(sec.) 1/80,1/100,1/125,1/160,1/200,1/250,1/320, 1/400,1/500,1/640,1/800,1/1000,1/1250, 1/1600,1/2000 335 Speciications Aperture f/number <B>modeavailablevalues* f/2.0–f/8.0(W),f/5.9–f/8.0(T) f/2.0,f/2.2,f/2.5,f/2.8,f/3.2,f/3.5,f/4.0,f/4.5, f/5.0,f/5.6,f/5.9,f/6.3,f/7.1,f/8.0 *Dependingonthezoomposition,someaperturevaluesmaynotbeavailable. BatteryPackNB-5L Type: Rechargeablelithium-ionbattery RatedVoltage: 3.7VDC RatedCapacity: 1120mAh ChargingCycles: Approx.300times OperatingTemperature:0–40°C(32–104°F) Dimensions: 32.0x44.9x7.9mm(1.26x1.77x0.31in.) Weight: Approx.25g(approx.0.88oz.) BatteryChargerCB-2LX/CB-2LXE RatedInput: 100–240VAC(50/60Hz),0.085A(100V)–0.05A(240V) RatedOutput: 4.2VDC,0.7A ChargingTime: Approx.2hours5min.(whenusingNB-5L) ChargeIndicator: Charging:orange/Fullycharged:green OperatingTemperature:0–40°C(32–104°F) Dimensions: 57.5x81.6x21.0mm(2.26x3.21x0.83in.) Weight: CB-2LX: Approx.65g(approx.2.29oz.) CB-2LXE:Approx.59g(approx.2.08oz.)(excludingpower cord) Y P O C • AlldataisbasedontestsbyCanon. • Cameraspeciicationsorappearancearesubjecttochangewithout notice. 336 Index Numbers 1-point(AFframemode)................... 185 Roman Camera Addingtargetdevice..................... 54 Nickname...................................... 43 Resetall...................................... 276 Cameraaccesspointmode........... 50,72 Camerashake................................... 199 A ACadapterkit............................ 279,285 Accessories....................................... 278 Accesspoint Manualsettings............................. 68 Numberofdisplayitems................ 68 Addingtargetdevice Camera......................................... 54 Computer...................................... 62 Printer............................................ 72 Smartphone................................... 50 Webservices................................. 45 AEBmode......................................... 171 AElock.............................................. 167 CameraWindow Display.......................................... 69 Smartphone................................... 50 CANONiMAGEGATEWAY................. 45 Settings......................................... 46 Clock.................................................... 93 ColorAccent(shootingmode)........... 151 ColorSwap(shootingmode)............. 152 Color(whitebalance)......................... 174 Compressionratio(imagequality)..... 199 Computer Addingtargetdevice..................... 62 Environment.................................. 56 Preparation.................................... 56 Connection Webservices................................. 48 Connectioninformation Changingnickname...................... 82 Editing........................................... 78 Erasingindividually....................... 80 Continuousshooting.......................... 179 High-speedburstHQ(shooting mode).......................................... 158 Controlring........................................ 206 Y P O AFframes.................................. 184,185 AFlock............................................... 191 Aspectratio........................................ 123 C AUTOmode(shootingmode).. 21,88,96 AVcable............................................ 281 Av(shootingmode)........................... 203 B BatteriesDate/timebattery Battery Charging........................................ 15 Level............................................ 315 Powersaving................................. 86 Batterycharger.............................. 2,278 Creativeilters(shootingmode)......... 142 Cropping............................................ 251 Customwhitebalance....................... 175 Blackandwhiteimages............. 144,177 D Blinkdetection................................... 131 Date/time Addingdatestamps.....................112 Changing....................................... 19 Date/timebattery........................... 20 Setting........................................... 18 C C1/C2(shootingmode)..................... 212 337 Index Worldclock.................................. 264 DCcoupler......................................... 285 DefaultsResetall DIGITALCAMERASolutionDisk........... 2 Digitaltele-converter.......................... 183 Digitalzoom....................................... 105 Displaylanguage................................. 20 DPOF................................................. 293 Drivemode........................................ 179 DynamicRangeCorrection............... 172 E Editing Cropping...................................... 251 i-Contrast..................................... 254 MyColors.................................... 253 Red-eyecorrection...................... 255 Resizingimages.......................... 250 Erasing.............................................. 240 Errormessages................................. 310 Exposure AElock........................................ 167 Compensation............................. 166 FElock........................................ 196 Eye-Ficards.................................. 2,300 C F FaceAiAF(AFframemode).............. 184 FaceID...............................................113 Faceselect........................................ 190 Faceself-timer(shootingmode)........ 157 Favorites............................................ 244 FElock............................................... 196 Filenumbering................................... 269 Fireworks(shootingmode)................ 138 Fish-eyeeffect(shootingmode)........ 145 Flash Deactivatinglash......................... 111 Flashexposurecompensation.... 195 338 On............................................... 193 Slowsynchro............................... 194 Focusbracketing............................... 191 Focuscheck...................................... 222 Focusing AFframes.................................... 184 AFlock........................................ 191 AF-pointzoom............................. 130 Faceselect.................................. 190 ServoAF..................................... 187 TouchAF..................................... 188 Focusingrange Macro.......................................... 181 Manualfocus............................... 182 Focuslock......................................... 185 FUNC.menu Basicoperations............................ 89 Table............................................ 320 Y P O G GPSinformationdisplay.................... 220 Gridlines........................................... 210 H Handheldnightscene (shootingmode)................................. 137 Highdynamicrange (shootingmode)................................. 143 High-speedburstHQ (shootingmode)................................. 158 Householdpower............................... 285 I i-Contrast................................... 172,254 iFramemovies(moviemode)............ 162 ImagequalityCompressionratio (imagequality) Images Displayperiod............................. 133 Erasing........................................ 240 Index PlaybackViewing Protecting.................................... 236 Indicator............................................... 93 Device........................................... 82 Nostalgic(shootingmode)................. 144 Interfacecable................................. 2,30 P ISOspeed.......................................... 169 Packagecontents.................................. 2 Photobookset-up.............................. 296 L Lamp.................................................. 132 PictBridge.................................. 280,286 PlaybackViewing Portrait(shootingmode).................... 137 M MACaddress....................................... 58 Macro(focusmode)........................... 181 Magniieddisplay............................... 233 Manualfocus(focusmode)............... 182 Memorycards.................................. 2,44 Recordingtime............................ 334 Menu Basicoperations............................ 91 Table............................................ 318 Mercurylampcorrection.................... 126 Postereffect(shootingmode)........... 142 PowerACadapterkit Battery Batteryandchargerkit Compactpoweradapter Powersaving....................................... 86 Printing.............................................. 286 ProgramAE....................................... 166 Protecting.......................................... 236 Y P O Meteringmethod................................ 168 Miniatureeffect(shootingmode)....... 146 C Monochrome(shootingmode)........... 150 MovieDigest(shootingmode)........... 136 Movies Editing......................................... 256 Imagequality (resolution/framerate)................. 127 Recordingtime............................ 334 M(shootingmode)............................. 204 Multi-areaWhiteBalance.................. 126 MyCategory...................................... 245 MyColors.................................. 177,253 N NDilter.............................................. 173 NeckstrapStrap Nickname Camera......................................... 43 P(shootingmode)............................. 166 R RAW.................................................. 198 Red-eyecorrection.................... 125,255 Resetall............................................. 276 Resizingimages................................ 250 Resolution(imagesize)..................... 124 ReturningwirelessLANsettingsto default.................................................. 82 Ringfunctionselectorbutton............. 206 Rotating............................................. 243 S Savingimagestoacomputer.............. 69 Selectedimages............................ 71 Untransferredimages.................... 70 Screen Displaylanguage........................... 20 Icons.................................... 314,316 MenuFUNC.menu,Menu 339 Index SD/SDHC/SDXCmemorycards Memorycards Superslowmotionmovie (moviemode)..................................... 162 Self-timer........................................... 107 2-secondself-timer...................... 108 Customizingtheself-timer........... 108 Faceself-timer (shootingmode).......................... 157 Winkself-timer (shootingmode).......................... 155 Sendingimages................................... 75 Maximumnumberofimagesthat canbesenttogether..................... 75 Resize..................................... 75,76 Sendingindividually...................... 75 Sendingmultipleimages............... 76 Sepiatoneimages..................... 144,177 Supervivid(shootingmode).............. 142 T Terminal..................... 281,284,285,286 TouchActions............ 49,53,55,63,248 TouchAF............................................ 188 TouchShutter.....................................110 Toycameraeffect(shootingmode)... 148 Travelingwiththecamera......... 264,278 Troubleshooting................................. 304 TVdisplay.......................................... 281 Tv(shootingmode)............................ 202 ServoAF............................................ 187 ShadowCorrect................................. 173 Shooting Shootingdate/timeDate/time Shootinginformation........... 210,314 Slideshow.......................................... 234 Smartphone Addingtargetdevice..................... 50 CameraWindow............................. 50 Changingprivacysettings............. 53 Privacysettings............................. 52 SmartShufle..................................... 235 C SmartShutter(shootingmode)......... 154 U Underwater(shootingmode)............. 138 Y P O V Viewing................................................ 24 Imagesearch.............................. 225 Indexdisplay............................... 224 Magniieddisplay........................ 233 Single-imagedisplay..................... 24 Slideshow.................................... 234 SmartShufle.............................. 235 TVdisplay................................... 281 Smile(shootingmode)....................... 154 W Snow(shootingmode)....................... 138 Webservices Addingtargetdevice..................... 45 Connection.................................... 48 Displayorder................................. 48 Maximumnumberofmail addresses...................................... 48 Whitebalance(color)......................... 174 Softfocus(shootingmode)................ 149 Software DIGITALCAMERASolutionDisk.... 2 Installation..................................... 29 Savingimagestoacomputer........ 29 Sounds.............................................. 262 StereoAVcable................................. 281 StitchAssist(shootingmode)............ 160 Strap................................................ 2,14 340 Widescreen(resolution)..................... 124 Wi-Fi.................................................... 36 Windows CameraWindowdisplay................ 69 Index Settings......................................... 59 Winkself-timer(shootingmode)........ 155 WirelessLAN Accesspoint.................................. 56 Security......................................... 58 Settings......................................... 57 Worldclock........................................ 264 WPS.................................................... 64 PBCMethod.................................. 64 PINMethod................................... 66 WriststrapStrap Z Zoom..................................... 22,96,105 Y P O C 341 CAUTION RISKOFEXPLOSIONIFBATTERYISREPLACEDBYANINCORRECTTYPE. DISPOSEOFUSEDBATTERIESACCORDINGTOLOCALREGULATION. BatteryChargerCB-2LX IMPORTANTSAFETYINSTRUCTIONSSAVETHESEINSTRUCTIONS. DANGER-TOREDUCETHERISKOF FIREORELECTRICSHOCK,CAREFULLY FOLLOWTHESEINSTRUCTIONS. ForconnectiontoasupplynotintheU.S.A.,useanattachmentplugadapterofthe properconigurationforthepoweroutlet,ifneeded. USAandCanadaonly: TheLithiumion/polymerbatterythatpowerstheproductisrecyclable. Pleasecall1-800-8-BATTERYforinformationonhowtorecyclethis battery. Y P O C 342 FCCNotice (DigitalCamera,ModelPC1882systems) ThisdevicecomplieswithPart15oftheFCCRules.Operationissubjecttothe followingtwoconditions; (1)thisdevicemaynotcauseharmfulinterference,and (2)thisdevicemustacceptanyinterferencereceived,includinginterferencethatmay causeundesiredoperation. Note:ThisequipmenthasbeentestedandfoundtocomplywiththelimitsforClass Bdigitaldevices,pursuanttoPart15oftheFCCrules.Theselimitsaredesigned toprovidereasonableprotectionagainstharmfulinterferenceinaresidential installation. Thisequipmentgenerates,usesandcanradiateradiofrequencyenergyand,if notinstalledandusedinaccordancewiththeinstructions,maycauseharmful interferencetoradiocommunications.However,thereisnoguaranteethat interferencewillnotoccurinaparticularinstallation.Ifthisequipmentdoescause harmfulinterferencetoradioortelevisionreception,whichcanbedetermined byturningtheequipmentoffandon,theuserisencouragedtotrytocorrectthe interferencebyoneormoreofthefollowingmeasures: •Reorientorrelocatethereceivingantenna. •Increasetheseparationbetweentheequipmentandreceiver. •Connecttheequipmentintoanoutletonacircuitdifferentfromthattowhichthe receiverisconnected. •Consultthedealeroranexperiencedradio/TVtechnicianforhelp. Y P O Thecablewiththeferritecoreprovidedwiththedigitalcameramustbeusedwiththis equipmentinordertocomplywithClassBlimitsinSubpartBofPart15oftheFCC rules. C Donotmakeanychangesormodiicationstotheequipmentunlessotherwise speciiedinthemanual.Ifsuchchangesormodiicationsshouldbemade,youcould berequiredtostopoperationoftheequipment. CanonU.S.A.,Inc. OneCanonPlaza,LakeSuccess,NY11042,U.S.A. TelNo.(516)328-5600 CanadianRadioInterferenceRegulations ThisClassBdigitalapparatuscomplieswithCanadianICES-003. ForCA,USAonly IncludedlithiumbatterycontainsPerchlorateMaterial-specialhandlingmayapply. Seewww.dtsc.ca.gov/hazardouswaste/perchlorate/fordetails. 343 TrademarkAcknowledgments • TheSDXClogoisatrademarkofSD-3C,LLC. • ThisdeviceincorporatesexFATtechnologylicensedfromMicrosoft. • HDMI,theHDMIlogoandHigh-DeinitionMultimediaInterfaceare trademarksorregisteredtrademarksofHDMILicensingLLC. • TheiFramelogoandtheiFramesymbolaretrademarksofAppleInc. AboutMPEG-4Licensing ThisproductislicensedunderAT&TpatentsfortheMPEG-4standard andmaybeusedforencodingMPEG-4compliantvideoand/ordecoding MPEG-4compliantvideothatwasencodedonly(1)forapersonaland non-commercialpurposeor(2)byavideoproviderlicensedundertheAT&T patentstoprovideMPEG-4compliantvideo. NolicenseisgrantedorimpliedforanyotheruseforMPEG-4standard. *NoticedisplayedinEnglishasrequired. Disclaimer • Reprinting,transmitting,orstoringinaretrievalsystemanypartofthis guidewithoutthepermissionofCanonisprohibited. • Canonreservestherighttochangethecontentsofthisguideatanytime withoutpriornotice. • Illustrationsandscreenshotsinthisguidemaydifferslightlyfromthe actualequipment. • Theaboveitemsnotwithstanding,Canonacceptsnoliabilityfordamages duetomistakenoperationoftheproducts. Y P O C 344 Y P O C 345 Y P O C CDD-E491-010 ©CANONINC.2012