1
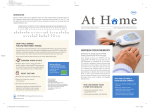
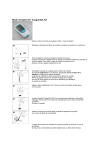
573-23878 Coag S QRG NA
7/18/05
9:58 AM
Page a
CoaguChek S
System
®
This is a CLIA-waived System
Quick
Reference
Guide
Coagulation
Testing with
Fresh Whole Blood
Read your User’s Manual
for additional information.
Front Cover
May not print or
view at 100%
All unmarked
prints black.
Coag Swoosh
prints gradients
of PMS 300 on
top and PMS
194 on bottom.
Swoosh bleeds
right.
The letter “S” in
the Coag logo
prints PMS300
The word
“System” in the
Coag logo prints
50% black.
Roche Logo
prints PMS 300.
Inside front and
back covers are
blank.
573-23878 Coag S QRG NA
7/18/05
9:58 AM
Page b
Table of Contents
Patient Testing..........................................................................3
Liquid Quality Control Testing...................................................8
Changing Result Units............................................................12
Reviewing Memory ................................................................12
Inside front
cover is blank.
THROUGHOUT:
Bar at top prints
PMS 300 with
type reversed
out white.
All unmarked
prints black.
Photos are b/w
and grayscale.
1
573-23878 Coag S QRG NA
7/18/05
9:58 AM
Page 2
Patient Testing
1. What you need:
• CoaguChek S monitor
• Test Strips in foil pouch
• Test Strip Code Chip
• Cotton balls or tissue
• Alcohol wipe
ALC
O
PRE HOL
P
Code Chip
For a capillary sample:
• Lancet
• Capillary tube and bulb Cat. No. 461
(REF 11621173001) (optional)
• Lancet device (optional)
10pt italic subs
print PMS 300
throughout
For a venous sample:
• Plastic syringe (anticoagulant-free)
• Syringe needle should be 23 gauge or larger.
A 21 gauge or larger needle is recommended.
• Tourniquet
2. Test strips must be out of the refrigerator for at least five
minutes before use. Keep remaining pouches in
refrigerator.
Make sure Test Strip Code Chip number matches the
first three numbers after the lot symbol on the test strip
pouch. If numbers do not match, see User’s Manual.
3. For capillary sample:
Prepare lancet device. Firmly
insert end of capillary tube
into capillary bulb to the line.
For venous sample:
Prepare a plastic syringe that
is free of anticoagulant.
3
573-23878 Coag S QRG NA
7/18/05
9:58 AM
Page 4
Patient Testing
Patient Testing
4. Place monitor on a flat
surface, free of vibrations,
and turn on.
7. When the flashing blood drop
icon appears, the monitor
begins a 180-second
countdown, beeping every 30
seconds, until sample is
applied. Sample must be
applied before the countdown
reaches zero.
Monitor displays code number.
Make sure it matches the
code number of the test strips
you are using. The test strip
icon flashes.
A flashing yellow light through
the test strip indicates where
to apply the blood.
5. Open test strip pouch and
remove the test strip. It must
be used within FOUR minutes
of opening.
6. Gently insert test strip—in the
direction of the arrows—with
printed side facing up. Push
test strip in until it stops.
Monitor displays the test strip
icon. The clock icon flashes.
Do not apply sample until the
flashing blood drop icon
appears.
01
For a capillary sample:
Clean the finger with an
alcohol wipe or use soap and
warm water. Dry thoroughly.
Perform fingerstick and gently
squeeze finger to develop a
hanging drop of blood. Use
the first drop of blood.
For a venous sample:
Disinfect venipuncture site with an alcohol wipe. Allow
to dry. Draw sample into syringe.
8. For capillary collection only:
Touch the capillary tube to the
drop of blood. Keep the tube
level and allow it to fill by
capillary action. Fill the
capillary tube halfway. Do not
place finger over hole in bulb.
Note: Blood may also be applied directly from the finger
to the sample target area.
4
5
573-23878 Coag S QRG NA
7/18/05
9:58 AM
Page 6
Patient Testing
Patient Testing
To apply a capillary sample:
Place finger over hole in end
of capillary bulb and gently
push down on top of bulb until
sample has been completely
expelled onto the sample
target area. Avoid introducing
air bubbles when applying the sample.
11. Remove test strip and discard according to proper
infection control guidelines.
12. The flashing test strip icon
reappears on the display. If
you are finished testing, turn
monitor off.
To apply a venous sample:
Discard the first four drops of blood from the needle,
then immediately place one drop of blood from syringe
needle directly onto sample target area of test strip.
Avoid introducing air bubbles when applying the sample.
9. Monitor displays the clock
icon. Do not touch the test
strip or add more blood.
If an up or down arrow is in front
of the result, the test result is
higher than or lower than the
measuring range of the system.
10. The result appears in about
one minute. Results are
stored in memory.
Refer to the Unexpected Results
section of the test strip package
insert for more information.
or
or
6
7
573-23878 Coag S QRG NA
7/18/05
9:58 AM
Page 8
Liquid Quality Control Testing
Liquid Quality Control Testing
What you need:
• CoaguChek S monitor
• Test Strips in foil pouch
• Test Strip Code Chip
• CoaguChek S System
Controls Level 1 and 2
• Timer
Place monitor on a flat surface, free of vibrations, and turn on.
Monitor displays code number. Make sure it matches the
code number of the test strips you are using. The test strip
icon flashes.
4. To avoid the danger of
injuries, it is recommended to always
wrap a cloth or gauze
tightly around the vial
before squeezing it.
Squeeze to break glass
capsule. DO NOT BEND vial. Bending may cause glass
to cut through the exterior wall of the vial.
The capsule must break.
Code Chip
1. Remove test strips and controls from the refrigerator.
Test strips must be out of the refrigerator for at least five
minutes before use.
Please Note: Test strips may be stored at room
temperature for up to 60 days. Controls may be stored
at room temperature for up to 30 days.
2. Remove control seal by pulling tab.
3. Tap vial to settle glass capsule
to bottom of vial.
5. Start a timer for two and a
half minutes. While timer
runs, immediately tap vial
HARD on table top ten times
to mix contents.
6. Lay control on table for the
rest of the two and a half
minutes.
Large
directional
arrows and
large “x” print
PMS 300
throughout.
7. At the end of two and a half
minutes, turn the monitor ON.
8. When the test strip icon
flashes, open test strip pouch
and remove test strip.
8
9
573-23878 Coag S QRG NA
7/18/05
9:58 AM
Page 10
Liquid Quality Control Testing
Liquid Quality Control Testing
9. Insert test strip. The test strip
icon appears and the clock
icon flashes.
12. Discard the first drop of
control solution into cap.
Discard cap with drop.
13. Apply the second drop of
control solution to test strip.
Avoid introducing air bubbles
into the sample. A hanging
drop must be formed on the
bottle tip before applying the
sample to the test strip.
10. Once the flashing blood drop
icon appears, shake contents
of vial down to dropper end.
Shake down hard.
Approximately three minutes
should have elapsed since
breaking the glass ampule.
14. Monitor beeps as it detects
the drop.
11. With dropper end down,
remove cap.
15. Remove test strip and dispose of control vial and test
strip according to proper infection control guidelines.
Do not disturb test strip while
testing.
Wait for result. Control result,
followed by a “c”, appears in
the display. Compare result to
Control Value sheet.
16. Turn monitor off if you are
finished testing.
10
11
573-23878 Coag S QRG NA
7/18/05
9:58 AM
Page 12
Memory
Changing Result Units
Note: This procedure changes both the test results as well as
the results stored in memory to the selected unit(s). You also
have the option to switch from single unit display to dual unit
display. See the User’s Manual for specific instructions on
dual unit display.
1. Place the monitor on a level surface and turn it on.
2. When the test strip icon flashes on the display, press the
SET button located at the back of the monitor. The
monitor enters the Set mode.
3. Press the SET button until the primary unit line flashes.
4. Press the Mem button to select the primary units.
5. Press the SET button. The secondary unit line flashes.
6. Press the Mem button to select the secondary units.
7. Press the SET button.
8. Turn the monitor off.
Reviewing Memory
Place monitor on a flat surface and turn it on.
Wait for the flashing test strip icon to appear.
Press the Mem button. The monitor stores the last 60
results in memory, along with the time and date. The most
recent result is displayed first.
Use the Mem button to scroll through the monitor’s memory.
The control test results are followed by a “c”.
Turn the monitor off.
12
Inside Back
Cover Blank
573-23878 Coag S QRG NA
7/18/05
9:58 AM
Page 14
COAGUCHEK is a trademark of Roche.
The CoaguChek S system (monitor and test strips) and its use are covered by
one or more of the following U.S. Patents: 4,849,340; 5,110,727; 5,164,598;
5,300,779; 5,522,255; 5,710,622; 5,789,664; 5,792,944; and 5,886,252.
The CoaguChek S monitor and its use are covered by one or more of the
following U.S. Patents: 5,053,199; 5,526,111; 5,792,944; 5,841,023; and
5,886,252.
The CoaguChek test strips are covered by U.S. Patent No. 5,488,816; and
5,975,153.
©2005 Roche Diagnostics. All rights reserved.
12137909003-0705
Our medical professionals are
ready to answer your questions,
24 hours a day, 7 days a week,
365 days a year. Call Roche
Diagnostics Technical Service
Center at 1-800-428-4674.
Roche Diagnostics
9115 Hague Road
Indianapolis, IN 46256
www.coaguchek.com