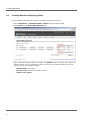
1
Skin Creation User Manual Copyright Copyright © 2011 NHN Corp. All Rights Reserved. This document is provided for information purpose only. NHN Corp. has endeavored to verify the completeness and accuracy of information contained in this document, but it does not take the responsibility for possible errors or omissions in this document. Therefore, the responsibility for the usage of this document or the results of the usage falls entirely upon the user, and NHN Corp. does not make any explicit or implicit guarantee regarding this. Software products or merchandises mentioned in this document, including relevant URL information, conform to the copyright laws of their respective owners. The user is solely responsible for any results occurred by not complying with applicable laws. Important Information Regarding Open Source Licenses There are several types of open source licenses. XE is licensed under the GNU Lesser General Public License (LGPL) v2. As there is a slight difference between LGPL v2 and LGPL v3, it is important to keep the version in mind. LGPL is basically the same as GPL, but its scope of application is more restrictive. Like GPL, LGPL has the effect of forcing all software that includes any LGPL-licensed software to have the same license. While GPL requires all software that includes any GPL-licensed software to unconditionally open its source codes, LGPL-licensed programs do not need to open their source code when they are used under specific conditions. Therefore, LGPL-licensed software can also be used for developing proprietary software. For more information, see the website below. LGPL License: http://www.gnu.org/copyleft/lesser.html GPL License: http://www.gnu.org/licenses/gpl.html Introduction to Document Document Overview This document describes how to create XE skins. The information in this document is based on XE core 1.4.4.2. Audience The intended audience of this document is users who want to create their own XE skins. Knowing HTML, CSS, JavaScript and jQuery helps the audience understand how to create XE skins more easily. For the information on how to install and use XE, see "XE User Manual." Contact For any comments or inquiries regarding the document, contact via email below. Email: [email protected] Revision History Ver. Date Changes Mode 1.1 Dec. 30, 2011 Updated based on XE core 1.5 1.0 Dec. 31, 2010 1.0 version distributed. Conventions Note Symbol Note A note provides information that is useful for readers. Caution Symbol Caution A caution provides information that you should know in order to prevent system damages. Window, Site, Menu, and Field Names/Selected Value and Symbol Window, site, menu and field names, a selected value, and a symbol are marked as follows: • Window name: In bold type such as window name window. Note that this convention is not applied in source code. • Site name: Enclosed in single quotations such as 'Naver Desktop Download’ site. • Menu name: In bold type such as Menu > Submenu. • Input value: In italic type such as homepage. Source Code Source code is written in black on a gray background in this document. COPYDATASTRUCT st; st.dwData = PURPLE_OUTBOUND_ENDING; st.cbData = sizeof(pp); st.lpData = &pp; ::SendMes(GetTargetHwnd(), WM_COPYDATA, (WPARAM)this->m_hWnd, (LPARAM)&st); Table of Contents 1. XE Skin Overview __________________________________ 11 1.1 What Is an XE Skin? _____________________________________________________________________ 12 1.2 Elements Required for Creating XE Skins _______________________________________________ 13 2. XE Skin Basic _____________________________________ 15 2.1 Understanding HTML ____________________________________________________________________ 16 2.1.1 Elements, Attributes, and Values __________________________________________________ 16 2.1.2 The Start and End of an HTML Element __________________________________________ 16 2.1.3 Parent Elements and Child Elements _____________________________________________ 17 2.1.4 Inline Elements and Block Elements ______________________________________________ 17 2.2 Understanding CSS ______________________________________________________________________ 18 2.2.1 Selectors, Properties, and Values _________________________________________________ 18 2.2.2 Types of CSS Selectors____________________________________________________________ 18 2.3 Using JavaScript and jQuery ____________________________________________________________ 23 2.3.1 Including jQuery Libraries ________________________________________________________ 23 2.3.2 Declaring JavaScript in XE Template Syntax_______________________________________ 23 2.3.3 Declaring JavaScript in Standard Syntax __________________________________________ 24 2.3.4 Executing jQuery after Parsing HTML _____________________________________________ 24 2.3.5 jQuery in Practice_________________________________________________________________ 25 2.4 XE Template Syntax _____________________________________________________________________ 27 2.4.1 Variables __________________________________________________________________________ 27 2.4.2 XE core Variables _________________________________________________________________ 28 2.4.3 Conditional Statements ___________________________________________________________ 29 2.4.4 Iteration Statements ______________________________________________________________ 30 2.4.5 Using Simple PHP Statements ____________________________________________________ 30 2.4.6 include Statements _______________________________________________________________ 31 2.4.7 Referring to CSS Files _____________________________________________________________ 31 2.4.8 Referring to JS Files_______________________________________________________________ 33 2.4.9 Applying XML JS Filter ____________________________________________________________ 34 2.4.10 Inserting Widgets _________________________________________________________________ 35 2.4.11 New Template Syntax for XE core 1.4.4 ___________________________________________ 35 3. Creating Layout Skins ______________________________ 37 3.1 What is a Layout Skin? __________________________________________________________________ 38 3.2 Downloading Example Layout Skin _____________________________________________________ 39 3.3 Location and Directory Structure of Layout Skin _______________________________________ 40 3.3.1 Location of Layout Skin ___________________________________________________________ 40 3.3.2 Structure of the Layout Skin Directory ____________________________________________ 40 3.4 Creating Layout Skin Information _______________________________________________________ 42 3.5 Creating a Layout ________________________________________________________________________ 45 3.6 Creating Layout Skins ____________________________________________________________________ 47 3.7 Creating a Site Map ______________________________________________________________________ 52 3.8 Connecting Site Map to Layout _________________________________________________________ 54 3.9 Connecting Layouts to Page Modules __________________________________________________ 55 3.10 Applying CSS _____________________________________________________________________________ 60 3.11 Applying JavaScript ______________________________________________________________________ 62 4. Creating Board Skins _______________________________ 63 4.1 What is a Board Skin? ___________________________________________________________________ 64 4.2 Installing Board Modules ________________________________________________________________ 65 4.3 Downloading Example Board Skin ______________________________________________________ 66 4.4 Location and Required Files of Board Skins ____________________________________________ 67 4.4.1 Location of Board Skin ____________________________________________________________ 67 4.4.2 Required Files for Board Skin _____________________________________________________ 67 4.5 Creating Board Skin Information ________________________________________________________ 69 4.6 Creating Boards and Applying Skins ____________________________________________________ 72 4.7 Creating Board Header and Footer _____________________________________________________ 75 4.7.1 Creating Board Header ___________________________________________________________ 75 4.7.2 Creating Board Footer ____________________________________________________________ 75 4.8 Creating a List Page _____________________________________________________________________ 76 4.9 Creating a Write Page ___________________________________________________________________ 89 4.10 Creating a Read Page ____________________________________________________________________ 94 4.11 Creating Trackback/Comment Lists _____________________________________________________ 102 4.11.1 Creating Trackback List ___________________________________________________________ 102 4.11.2 Creating Comment List ___________________________________________________________ 103 4.11.3 Creating the Page for Adding a Comment to a Comment and Modifying a Comment 4.12 Creating Delete Pages ___________________________________________________________________ 108 4.12.1 Creating a Delete Post Page ______________________________________________________ 108 4.12.2 Creating a Delete Comment Page ________________________________________________ 109 105 4.12.3 Creating the Delete Trackback Page ______________________________________________ 111 4.13 Creating a Permissions Page ____________________________________________________________ 114 4.14 Creating the Input Password Page ______________________________________________________ 116 4.15 Applying CSS_____________________________________________________________________________ 118 4.16 Applying JavaScript ______________________________________________________________________ 121 List of Tables and Figures List of Tables Table 2-1 Pseudo Class Selectors ________________________________________________________ 20 Table 2-2 Pseudo Element Selectors _____________________________________________________ 20 Table 2-3 Attribute Selectors _____________________________________________________________ 21 Table 2-4 XE core Variables ______________________________________________________________ 28 Table 2-5 Examples of Conditional Statement ____________________________________________ 29 Table 2-6 Examples of Iteration Statement _______________________________________________ 30 Table 2-7 Examples of include Statement ________________________________________________ 31 Table 2-8 Media Attribute Values ________________________________________________________ 32 Table 2-9 Template Syntax Added to XE core Version 1.4.4 ______________________________ 35 Table 4-1 Required Files for Board Skins _________________________________________________ 67 List of Figures Figure 1-1 Application of Various Skins __________________________________________________ 12 Figure 3-1 Typical Screen Layout Using a Layout Skin ___________________________________ 38 Figure 3-2 Structure of the Layout Skin Directory ________________________________________ 40 Figure 3-3 Page with a Layout Skin Applied _____________________________________________ 57 Figure 3-4 Page with CSS Applied Correctly _____________________________________________ 60 Figure 4-1 Structure of Board Module Directory _________________________________________ 65 Figure 4-2 Board List Page _______________________________________________________________ 76 Figure 4-3 Configure Board List __________________________________________________________ 79 Figure 4-4 Board List Screen - No Articles _______________________________________________ 87 Figure 4-5 Board List Screen - Articles Exist______________________________________________ 87 Figure 4-6 Write Page ____________________________________________________________________ 89 Figure 4-7 Write Page without Logging in _______________________________________________ 93 Figure 4-8 Write Page After Logging in __________________________________________________ 93 Figure 4-9 Read Page ____________________________________________________________________ 95 Figure 4-10 Add a Comment to a Comment Page _______________________________________ 105 Figure 4-11 Delete Post Page ____________________________________________________________ 108 Figure 4-12 Delete Comment Page ______________________________________________________ 110 Figure 4-13 Delete Trackback Page ______________________________________________________ 112 Figure 4-14 Permissions Page ____________________________________________________________ 114 Figure 4-15 Input Password Page ________________________________________________________ 116 1. XE Skin Overview This chapter describes the definition of an XE skin and the elements needed to make it. 1. XE Skin Overview 1.1 What Is an XE Skin? A skin is a theme that determines how the data created with XE is displayed on the user’s screen. There are one or more skins available for each module, layout, widget and widget style. XE users can download a variety of skins from the official XE Website (http://www.xpressengine.com), or create one with the help of this document. The figure below is an example of applying different skins to a Website (textile). Figure 1-1 Application of Various Skins The skins for a module or widget are stored in the "skins" subdirectory of the directory in which the module or widget is installed. The skins for a layout or widget style are stored in the directory in which the layout or widget style is installed. 12 1. XE Skin Overview 1.2 Elements Required for Creating XE Skins To create an XE skin, you need to understand HTML, CSS, JavaScript, and XE template syntax. Hyper Text Markup Language (HTML) HTML is used to describe the structure of Web pages. The Web browser can interpret titles, paragraphs, lists, and other contents written with HTML tags and display them as a Web page. A well-formed HTML document in standard syntax enables faster access with search engines, and can be used in a variety of access environments. The HTML language does more than just format a document. Cascading Style Sheet (CSS) While HTML handles the structure of a Web page, CSS controls its formatting. CSS enhances the default presentation semantics of a Web browser. The CSS property can be applied to an HTML element in order to modify its visual components, such as position, color scheme, lines, shape, background, or even images. JavaScript and jQuery While HTML and CSS represent an XE document statically, JavaScript represents it dynamically. With JavaScript, it is possible to display the result of a user action on the screen without having it actually executed in a different page. It can also show or hide pre-loaded contents, check the integrity of user-defined data, and even provide detailed description of errors if they are found. XE utilizes jQuery, a JavaScript library, to ensure the smooth operation of JavaScript. However, exclusively replacing features that can be implemented with HTML alone with those of JavaScript is not recommended for reasons of interoperability - JavaScript may be unavailable in certain environments. For this reason, consider possible accessibility issues when using JavaScript. XE Template Syntax The syntax of XE template is recognized and parsed by the server as PHP. It is used to retrieve a desired piece of data from a DB and display it on a user’s screen. Using the XE template syntax allows the functions of a module or widget to be extended or reduced within the allowed range. 13 2. XE Skin Basic This chapter describes HTML, CSS, JavaScript (or jQuery), and the syntax of XE template, all of which are necessary to create an XE skin. 2. XE Skin Basic 2.1 Understanding HTML HTML is used to change disordered data into useful contents by giving it meaning. CSS must be used to format and decorate HTML documents. If you carefully separate contents from its presentation by using the proper language when creating HTML documents, other users will easily understand and edit your skins. Separating the representation part of a document by using CSS enables you to change the design of the document without editing the HTML code. 2.1.1 Elements, Attributes, and Values HTML consists of elements, attributes, and values. Elements <h1 title="Xpress Engine">XE</h1> In the code above, everything from the <h1> to the </h1> is an element. The name of this element is <h1> element; the <h1> and </h1> are called the start tag and end tag, respectively. The "XE" between the <h1> and </h1> tags is the content of this element. The "h" in <h1> stands for the word "heading." Abbreviations are commonly found in the names of tags. The number following the "h" indicates the level of the heading used in formatting; 1 means that the heading is the title of the document. The example code above is a way of saying that "the main title of this document is XE" in HTML. It is well known that most Web browsers display headings in a large and bold font, but do not apply such changes to the content with HTML. Such cosmetic changes of data belong to the realm of presentation, which CSS is designed to handle. Attributes <h1 title="Xpress Engine">XE</h1> The "title" in the example code above is an attribute. An attribute is used to distinguish one element from another. The title attribute is a reference heading, which in this case means that the XE is an abbreviation of Xpress Engine. Each element of HTML uses different types of attributes. Values <h1 title="Xpress Engine">XE</h1> An attribute must have a value. In the example code above, Xpress Engine is the value of the title attribute. The value of an element determines in detail what attributes it has, and might change how it will be displayed on the screen. An incorrect value, therefore, might result in the wrong thing being displayed. The values of some attributes are pre-defined, while others can be defined by a user. "Xpress Engine" is a user-defined value. 2.1.2 The Start and End of an HTML Element Each HTML element has a start and an end to demarcate the data it contains. <h1 title="Xpress Engine">XE</h1> 16 • The start of this element is the <h1>. The first heading starts from this point. • The end of this element is the </h1>. The first heading ends at this point. 2. XE Skin Basic For non-text elements, the HTML element itself can be the data, in which case it starts and ends at the same time. The following is an example of an HTML element that starts and ends at the same time because it does not contain any content. <img /> 2.1.3 Parent Elements and Child Elements In HTML, an element can include other elements. The following example code redirects a user to the main screen when the user clicks the first heading 'XE'. <h1 title="Xpress Engine"> <a href="index.html">XE</a> </h1> The <h1> element includes the <a> element. It is possible to nest multiple elements in a piece of data this way. The element that wraps another element is called the parent element, and the element that is wrapped by another element is called the child element. The <a> element defines a reference link to a resource that exists somewhere else. The 'href' attribute specifies the link's destination. Therefore, the example code can be expressed in plain English as "the first heading of XE referring to index.html." It is important to follow the order of using the start and end tags in the nested elements. The following is an example that violates the order of declaration. <h1 title="Xpress Engine"> <a href="index.html">XE</h1> </a> 2.1.4 Inline Elements and Block Elements A block element is considered an independent cluster; it takes up the full width available, and has a line break before and after it. The <div>, <h>, and <p> elements are examples of block elements. An inline element only takes up as much width as necessary, and does not force line breaks. The <span>, <img>, and <a> elements are examples of inline elements. A block element may contain inline elements, but an inline element may not contain block elements. The HTML specifications determine whether an element is a block element or an inline element. The following is an example of the correct markup of a block element wrapping an inline element. The <h1> and <a> elements in the example code are the block and inline elements, respectively. <h1><a>XE</a></h1> <!--correct markup--> The following is an incorrect markup of an inline element wrapping a block element. <a><h1>XE</h1></a> <!--incorrect markup--> Note W3C HTML 4.01 Specifications: http://trio.co.kr/webrefer/html/cover.html W3C HTML 4.01 Element Indexes: http://trio.co.kr/webrefer/html/index/elements.html W3C HTML 4.01 Attribute Indexes: http://trio.co.kr/webrefer/html/index/attributes.html W3C XHTML 1.0 Specifications: http://trio.co.kr/webrefer/xhtml/overview.html W3C Markup Validation: http://validator.w3.org/ W3 Schools Online Tutorial: http://www.w3schools.com/ 17 2. XE Skin Basic 2.2 Understanding CSS While HTML changes data into information by assigning meaning to the Web document, CSS makes the document that contains such information easy to understand and convenient to view by controlling its layouts and presentation. For most XE skins, the CSS file is separate from HTML code, but a user will see the combined output of both HTML and CSS files on the screen, as the HTML document refers to the corresponding CSS file when displaying the content. Having good knowledge and experience in CSS allows you to neatly decorate your documents, and increases your fluency in HTML. 2.2.1 Selectors, Properties, and Values CSS consists of selectors, properties, and values. A selector is used to select a specific element from an HTML document. Its properties and values define the way the selected element will be displayed on the screen. Selectors h1 { font-size:24px; } The "h1" is a selector. It refers to the <h1> element. Properties h1 { font-size:24px; } The "font-size" is a property. It is the declaration to control the font size of the <h1> element. Values h1 { font-size:24px; } The "24px" is a value. It specifies the value of the font-size property for the <h1> element. 2.2.2 Types of CSS Selectors A CSS selector is used to select a specific element from an HTML document. You can apply unique CSS styles to the selected element. CSS supports a wide range of selectors. Type Selectors h1 { … } The type selector uses the name of an HTML element as the name of the selector. It selects all elements with the same name from an HTML document. Standard HTML element names can be used as selector names. ID Selectors #selector { … } The ID selector is distinguished by the number sign (#) placed in front of its name. It selects elements with the same ID value in an HTML document. You can define the name of an ID selector. The rules used to define the name of an ID selector are as follows: 18 • Use any words in natural language as the name of an ID selector, but it is recommended to use a combination of alphanumeric characters (lowercase and uppercase). • Do not contain any special characters except underscore (_) and hyphen (-). • Do not start with a numeral. 2. XE Skin Basic HTML does not allow more than one ID value in a single page. The ID value of an HTML document must be unique. Class Selectors .selector { … } The class selector is distinguished by a period (.) placed in front of its name. It selects elements with the same class value in an HTML document. You can define the name of a class selector. The rules used to define the name of a class selector are as follows: • Use any word as the name of a class selector, but it is recommended to use a combination of alphanumeric characters (lowercase and uppercase). • Do not contain any special characters except underscore (_) and hyphen (-). • Do not start with a numeral. HTML does not allow more than one identical class value in a single page. Child Selectors h1>a { … } The child selector is distinguished by a greater-than sign (>) placed between selectors. It selects all elements that are the immediate children of a specified element. Please be aware that it only matches the direct child, and does not cover all descendants (children of children). Caution The IE6 browser does not support child selectors. Descendant Selectors h1 a { … } The descendant selector is distinguished by a space placed between selectors. It selects all elements that are descendants of a specified element. In the example code below, it will select only the <a> element nested in the <h1> element. <h1><a>XE</a></h1> All the <a> elements outside the <h1> element are not affected by this declaration. Universal Selector *{…} The universal selector is distinguished by an asterisk (*). It selects all elements of an HTML document. By using the universal selector, you can reset all default CSS styles of HTML elements stored by the Web browser so that all of them will have the same value. It is recommended to use the universal selector only when it is absolutely necessary; using it will reduce the page display speed. Pseudo Selectors a:focus { … } The pseudo selector is distinguished by a colon (:) placed in front of its name. Pseudo class selectors consist of two groups: pseudo class selectors that are used to select the status of an element, and pseudo element selectors that are used to select a pseudo element that does not exist in HTML code. While other selectors select static HTML elements, the pseudo selector selects dynamic HTML elements or pseudo elements that do not exist in HTML code. 19 2. XE Skin Basic The types of pseudo selectors are as follows: Table 2-1 Pseudo Class Selectors Pseudo Class Selector Description Example :link Selects a link that has not been visited. a:link It is used in conjunction with a type selector called "a." :visited Selects a link that has been visited. a:visited It is used in conjunction with a type selector called "a." :hover Selects the status of whatever the mouse pointer is hovering a:hover over. :active Selects the status at which a mouse button has been clicked or the enter key has been pressed. a:active :focus Selects the status of the focused element. a:focus :first-child Selects the first child element. li:first-child :lang(language) Selects if the language properties are identical. p:lang(en) Caution The IE6 browser does not support the ':first-child and :lang()' pseudo class selector. It does not support the combination of pseudo class selectors such as ':hover, :active, or :focus' and other elements except for 'a.' It is recommended to keep the following sequence when specifying a variety of pseudo class selectors to the 'a' element: :link (When a link is), :visited (visited), :hover (hovering), :active (activity), and :focus (will be focused). The class declared last takes priority over other classes, and thus it overwrites all previously declared ones. For example, if you declare :hover followed by a:visited, :hover is not applied when you put a mouse pointer over the link that has been visited. To make :hover take effect for links that has been visited, you must declare :visited followed by :hover. The types of pseudo element selectors are as follows: Table 2-2 Pseudo Element Selectors Pseudo Element Description Selector Example :first-line p:first-line Selects the first line. This can only be applied to a block element. :first-letter Selects the first character. p:first-letter This can only be applied to a block element. :before :after 20 Selects a pseudo element that is inside of the start point of an element. div:before{ content:"…" } (Creates the "…" pseudo string before the start point of a div element and selects it.) Selects a pseudo element that comes div:after{ content:"…" } after the end point of an element. (Creates the "…" pseudo string after 2. XE Skin Basic Pseudo Element Description Selector Example the end point of a div element and selects it.) Caution The IE6 browser does not support pseudo element selectors. Selector Grouping .apple, .tomato { color:red } Multiple selectors can be declared simultaneously as a group. To do this, list each selector in a group by separating them with commas, and declare the common attribute and value only once. Selectors that share the same attribute and value can be grouped together by a single selector. The selector group declaration shown in the example above has the same meaning as the code shown below: .apple { color:red } .tomato { color:red } Adjacent Sibling Selector h1+h2 { color:red } The sibling selector is distinguished by a plus sign (+) placed in front of its name. It selects the latter from a pair of sibling elements that are listed in the specified order. The code shown in the example above will display the <h2> element in the example below in red because it follows the <h1> element in the HTML code. <h1>XE</h1> <h2>Textyle</h2> Caution The IE6 browser does not support sibling selectors. Attribute Selectors input[checked] { ... } /* selects any elements that contains checked attribute in input element */ input[type=text] { ... } /* selects an element when the value of type attribute in input element is 'text' */ img[alt~=dog] { ... } /* selects an element when the value of alt attribute in img element includes 'dog' */ p[lang|=en] { ... } /* selects an element when the value of lang attribute in p element starts with 'en-' like 'en-us' */ Selects the corresponding element according to the attributes declared in HTML elements. The types of attribute selectors are as follows: Table 2-3 Attribute Selectors Attribute Selector Description Example [attribute] Selects any HTML elements that contain attributes, regardless of their values. input[checked] [attribute=value] Selects an HTML element in which a unique attribute is input[type=text] 21 2. XE Skin Basic Attribute Selector Description Example used and its value is identical to the specified value. [attribute~=value Selects an HTML element in which one of the values of ] attributes that are separated by a space is identical to the specified value. img[alt~=dog] [attribute|= value] p[lang|=en] Selects an element in which the value of the attribute used is identical to the value specified. Caution The IE6 browser does not support attribute selectors. Note CSS Reference: http://www.w3schools.com/css/css_reference.asp 22 2. XE Skin Basic 2.3 Using JavaScript and jQuery XE uses jQuery, a JavaScript library, to allow users to easily implement JavaScript. It is designed to help skin creators who are not proficient in JavaScript to handle it with ease. This section describes how to include JavaScript in an HTML document when you create XE skins. 2.3.1 Including jQuery Libraries You do not have to manually declare and import the jQuery libraries, because the XE core in the default setting contains and refers to them in all pages. All Web documents created through XE include the jQuery library reference code in the <head> element of HTML code as shown below: <script type="text/javascript" src="./common/js/jquery.js"></script> The JavaScript reference code can be placed anywhere in the <head> element or the <body> element of HTML code. However, it is a common practice to include the reference code in the <head> element of an HTML document in XE. The order of declarations might affect the display output of the JavaScript code, as the Web browser parses them in the order they are written. The jQuery library reference declaration should be placed in the <head> element of an HTML document because jQuery must be parsed before jQuery-dependent code is parsed such code must be executed the moment it is parsed. Note The reference path of the jquery.js file might vary depending on the XE installation path. 2.3.2 Declaring JavaScript in XE Template Syntax The jQuery code is JavaScript; it must observe the syntax of JavaScript. JavaScript must be declared in the <head> or <body> of an HTML document. Declaring it in other places causes an HTML syntax error. Strict Web browsers might not parse JavaScript that is written in a place that is not allowed according to the HTML syntax. JavaScript code can be directly included in the HTML document, or it can be loaded by the HTML document as a separate .js file. Declare JavaScript at different positions according to its usage. Referring to JS File in the <head> Element It is recommended to insert the JavaScript code in the <head> element of an HTML document if you want to show or hide part of the document's content by using JavaScript code before the Web browser finishes displaying the content on the screen. If such code is inserted in the <body> element, thus allowing HTML to be parsed first, you might get an undesirable display output, albeit a temporary one. The JavaScript included in the <head> element is parsed before the HTML document, but you must write it so that it will be executed after the document has been completely loaded. Referring to JS File in the <body> Element If the JavaScript in an HTML document is not expected to be executed while the document is being loaded, it is a good idea to declare it at the end of the <body> element. Doing so will 23 2. XE Skin Basic help the document to be displayed on the screen faster, as the Web browser parses the code in the order it appears. For more information on how to declare JavaScript in XE template syntax, please see "Referring to JS Files." 2.3.3 Declaring JavaScript in Standard Syntax If you import a separate JavaScript file to an HTML document using the XE template syntax, you can specify the insertion point as at the end of the <head> element or the <body> element of the HTML document. If, however, you want to precisely insert the file at a specific point in the <body> element, instead of at the end of the <body> element, declare the standard HTML code at the specific point, as shown below: <body> ... <script type="text/javascript" src="xxx.js"></script> ... </body> If you want to directly write JavaScript code in an HTML document itself, write it as shown below: <body> ... <script type="text/javascript"> // <![CDATA[ Write JavaScript code here. // ]]> </script> ... </body> Note <![CDATA[...]]> is declared at the start and end of the JavaScript code to prevent characters included in the JavaScript code from being parsed as HTML code. If you do not declare <![CDATA[...]]>, angle brackets (< and >) and various JavaScript operators may be mistakenly parsed as the start of an HTML tag or entity. Since the <![CDATA[...]]> declaration is not part of JavaScript, the declaration will be handled as a single line comment. 2.3.4 Executing jQuery after Parsing HTML Since all XE documents refer to jQuery libraries, the jQuery syntax can be used in the <script> element. If, however, JavaScript is executed before an HTML document has been completely parsed, an error may occur in JavaScript statements that are dependent on the structure of HTML. To prevent such an error from occurring, you may separate the parsing point and the execution point of a jQuery document. To execute jQuery after the HTML document is completely loaded, declare a jQuery function as shown below: <script type="text/javascript"> // <![CDATA[ jQuery(function($){ Write jQuery code here. }); // ]]> </script> 24 2. XE Skin Basic Caution In jQuery syntax, the dollar sign ($) can replace the word 'jQuery.' However, XE does not allow the start of a jQuery function to be replaced by $, in order to avoid possible conflicts with other JavaScript libraries that also use the $ symbol. For this reason, the start of a jQuery function in XE must be jQuery(function($){ ... }). 2.3.5 jQuery in Practice The essence of jQuery is selection and execution. In other words, jQuery selects an HTML element and executes it when necessary. The following is a simple example. <head> <style type="text/css"> #help { display:none; } </style> <script type="text/javascript" src="jquery.js"></script> </head> <body> <a href="#help" class="helpBtn">Help</a> <p id="help">This is not displayed on the screen by CSS declaration.<p> <script type="text/javascript"> // <![CDATA[ jQuery(function($){ $('a.helpBtn').click(function(){ // selects an HTML element, $('p#help').css('display','block'); // and executes actions. }); }); // ]]> </script> </body> The code above is an implementation of changing the status of "p#help" from display:none (initial status), to display:block when a user clicks the a.helpBtn element. This code selects an HTML element in the jQuery function, waits for a user-click event, and then changes the CSS of the selected element. Since actions such as hiding a specific HTML element from the screen or showing it on the screen happen frequently, jQuery provides internal functions, such as show() and hide(), to make implementing these actions easier. The code above can be simplified even further, as shown below: <head> <style type="text/css"> #help { display:none; } </style> <script type="text/javascript" src="jquery.js"></script> </head> <body> <a href="#help" class="helpBtn">Help</a> <p id="help">This is not displayed on the screen by CSS declaration.<p> <script type="text/javascript"> // <![CDATA[ jQuery(function($){ $('a.helpBtn').click(function(){ // selects an HTML element, $('p#help').show(); // and executes show(). }); }); // ]]> </script> </body> 25 2. XE Skin Basic The following is an example of a toggle function that hides or shows the a.help.Btn link in turn every time when a user clicks it. <head> <style type="text/css"> #help { display:none; } </style> <script type="text/javascript" src="jquery.js"></script> </head> <body> <a href="#help" class="helpBtn">Help</a> <p id="help">This is not displayed on the screen by CSS declaration.<p> <script type="text/javascript"> // <![CDATA[ jQuery(function($){ $('a.helpBtn').click(function(){ // selects an HTML element, $('p#help').toggle(); // and executes toggle(). }); }); // ]]> </script> </body> We have covered the basics of jQuery and its applications. For more information on how to implement a variety of jQuery actions, see the jQuery manual or related books. Note More detailed information on how to select HTML elements and what can be executed by using jQuery is also available from the official jQuery Website (http://jquery.com/). 26 2. XE Skin Basic 2.4 XE Template Syntax The XE template syntax is parsed as PHP syntax at the server side to retrieve the desired data from a DB and to display them on the user’s screen. The functionality or content of a module or widget can be extended or reduced by the XE template syntax. There are four ways to create XE skins by applying XE template syntax. • Writing it inside an HTML comment (<!--...-->): Ex) <!--@if(...)-->...<!--@end--> • Writing it in a pseudo <block> element: Ex) <block>...</block> • Directly writing it in an HTML element: Ex) <p cond="conditional statement">...</p> • Writing it independently from a comment or element: Ex) Outputting data by using {$content} content variable. Note The <block> element is not a standard HTML element but a pseudo element that has been newly introduced in XE core version 1.4.4. It is in the form of an HTML element, but it only executes control statements without displaying the element on the screen. Another new addition to XE core version 1.4.4 is cond, a pseudo attribute that functions as a conditional statement. 2.4.1 Variables Variables are needed to display the pre-declared contents of a program, or the user-input contents on the screen. It is not too much to say that most content on the user’s screen is displayed with the help of variables. The formats applied to use variables are as follows: Basic Format {$string} To represent a variable, it must be enclosed with a pair of braces. The name of a variable must be followed by a dollar sign ($). A variable name must be a character string, and it must be one of the preset names. Nested Variables {$string->string} {$string->string->string} A variable can contain another variable. To implement such a variable, connect the two variables by using a hyphen and an angle bracket with no space in between (->). Functions Nested in a Variable {$string->string()} {$string->string(string | integer)} To connect a function to a variable, connect the function to the variable by using a hyphen and an angle bracket with no space in between (->). A pair of parentheses must be appended at the end of the function name. The contents of a function must be placed inside the parentheses as a character string and/or an integer. A function name must be one of the preset names. 27 2. XE Skin Basic 2.4.2 XE core Variables An XE core variable is a variable that is used by XE core. XE core variables can be used in many different modules. Variables that can be used only in a specific module are simply called variables. The following is a list of XE core variables. Table 2-4 XE core Variables XE core Variable Description Checks users’ login status $is_logged <!--@if($is_logged)-->Welcome!<!--@end--> <p cond="$is_logged">Welcome!</p> 28 $current_url Current page's URL $request_uri XE core installation URL $logged_info Shows the membership information of a logged-in user. $logged_info->member_srl A unique number assigned to a logged-in user $logged_info->user_id ID of the a logged-in user $logged_info->email_address The e-mail address of a logged-in user $logged_info->email_id The e-mail ID of a logged-in user $logged_info->email_host The e-mail host of a logged-in user $logged_info->user_name The user name of a logged-in user $logged_info->nick_name The alias of a logged-in user $logged_info->homepage The homepage of a logged-in user $logged_info->blog The blog of a logged-in user $logged_info->birthday The birth date of a logged-in user, in YYYYMMDD format $logged_info->profile_image The profile image of a logged-in user $logged_info->image_name The path of the name image of a logged-in user $logged_info->image_mark The path of the user group image of a logged-in user $logged_info->signature The signature of a logged-in user $logged_info->group_list The list of groups to which a logged-in user subscribes $logged_info->is_admin Checks whether the logged-in user is an administrator. $logged_info->is_site_admin Checks whether the logged-in user is an administrator of a virtual site. $module_info Shows the current module information. $module_info->module Module name $module_info->use_mobile Whether or not to use mobile skins for a module $module_info->mid Module ID $module_info->skin Module skin name $module_info->mskin Name of mobile module skin $module_info->browser_title Title of a module document $module_info->string Extended variables that are created in a module 2. XE Skin Basic 2.4.3 Conditional Statements Conditional statements are needed to determine whether or not to display the necessary contents according to the given context. A conditional statement consists of 'if, elseif, else or end', and the conditional expression. An if statement must be closed with an end statement to declare the end of that conditional statement. Since the content of a conditional expression is parsed as if it were written in PHP, the conditional statement can use operators that are available in PHP (&&, ||, ==, !, and others). The following is an example of various expressions that are used to express the same sentence, "Welcome XE!" Table 2-5 Examples of Conditional Statement Conditional statement Description <!--@if(conditional expression)--> Displays the content if the condition is true. <p>Welcome XE!</p> Remark <!--@end--> <block cond="conditional expression"> Displays the content if the condition is true. XE Core 1.4.4 or higher <p>Welcome XE!</p> </block> <p cond="conditional expression"> Welcome XE! Displays the content along with the <p> XE core version element if the condition is true. 1.4.4 or higher </p> <p attr="value"|cond="conditional expression"> Welcome XE! </p> Displays the attr="value" attribute and XE core version its value along with the <p> element if 1.4.4 or higher the condition is true. If not, displays only the <p> element. Note The <block> element is not a standard HTML element but a pseudo element that has been newly introduced in XE core version 1.4.4. It is in the form of an HTML element, but it only executes control statements without displaying the element on the screen. The cond attribute is not a standard HTML attribute but a part of The XE template syntax that has been newly introduced in XE core version 1.4.4. 'cond' is a virtual attribute used to form a conditional expression. The attribute can be used to check many different conditions as well as the Boolean condition, and display different result in different conditions, by using a combination of if, elseif, and else statements. <!--@if(condition A)--> <p>If condition A is satisfied, this sentence is displayed.</p> <!--@elseif(condition B)--> <p>If condition A is not satisfied and condition B is, this sentence is displayed.</p> <!--@else--> <p>If both condition A and condition B are not satisfied, this sentence is displayed.</p> <!--@end--> The conditional expression shown above can be further simplified by using the cond attribute, which has been available since XE core version 1.4.4. <p cond="condition A">If condition A is satisfied, this sentence is displayed.</p> <p cond="condition B">If condition B is satisfied, this sentence is displayed.</p> <p cond="!condition A && !condition B">If both condition A and condition B are not satisfied, this sentence is displayed.</p> 29 2. XE Skin Basic 2.4.4 Iteration Statements An iteration statement, or a loop, is needed when certain content must be repeatedly displayed according to a given condition. A loop consists of 'foreach or end', and a conditional expression. A foreach statement must be closed with an end statement to declare the end of the loop. Table 2-6 Examples of Iteration Statement Iteration statement Description <!--@foreach(variable name as $val)--> <tr>...</tr> Iterates <tr>...</tr> without the $key value. Remark <!--@end--> <block loop="variable name=>$val"> <tr>...</tr> </block> Iterates <tr>...</tr> without the XE Core version $key value. 1.4.4 or higher <tr loop="variable name=>$val">...</tr> Iterates <tr>...</tr> without the XE Core version $key value. 1.4.4 or higher <!--@foreach(variable name as $key => $val)--> <tr>...</tr> <!--@end--> Iterates <tr>...</tr> with the $key value. <block loop="variable name=>$key, $val"> <tr>...</tr> </block> Iterates <tr>...</tr> with the $key value. XE Core version 1.4.4 or higher <tr loop="variable name=>$key,$val">...</tr> Iterates <tr>...</tr> with the $key value. XE Core version 1.4.4 or higher <!--@foreach($i=0;$i<100;$i++)--> <tr>...</tr> <!--@end--> Iterates <tr>...</tr> 100 times, starting from the initial value of 0. <block loop="$i=0;$i<100;$i++"> <tr>...</tr> </block> Iterates <tr>...</tr> 100 times, XE Core version starting from the initial value of 1.4.4 or higher 0. <tr loop="$i=0;$i<100;$i++">...</tr> Iterates <tr>...</tr> 100 times, XE Core version starting from the initial value of 1.4.4 or higher 0. <!--@while(conditional expression)--> Iterates <li>…</li> if the conditional expressions is "true"(if the conditional expression cannot be "false", this may cause an infinite loop error.) <li>…</li> <!--@end--> Note The loop attribute is not a standard HTML attribute but a part of The XE template syntax that has been newly introduced in XE core version 1.4.4. 'loop' is a virtual attribute that is used to form the conditional expression of a foreach statement. 2.4.5 Using Simple PHP Statements You cannot use PHP syntax in an XE skin file, but can use simple PHP sentences when an at symbol (@) is added in the braces, as shown below: {@$is_logged=Context::get('is_logged')} 30 2. XE Skin Basic When using PHP statements, you must contain only one sentence in a line. For example, the sentence shown below has no problem in the PHP syntax, but it might cause a critical error in XE, because multiple sentences are present in a single line. {@$test=364; $test=$test*$test} The sentence above must be modified as follows, one sentence in a line. {@ } 2.4.6 $test=364; $test=$test*$test include Statements When creating a skin, it is convenient to manage content blocks that appear in multiple pages in a separate file. This is the case because a user can modify multiple pages by modifying the content of this separate file. 'include' is a command used to import separate files to the current page. Table 2-7 Examples of include Statement include Statements Description <!--#include("header.html")--> Includes head.html. <include target="header.html" /> Includes header.html. Remark XE Core version 1.4.4 or higher Note The <include /> element is not a standard HTML element but a virtual element that has been newly added in XE core version 1.4.4. It is in the form of an HTML element, but it only executes include statements without displaying the <include /> element on the screen. Another addition to XE core version 1.4.4 is the target attribute, which is a part of the new template syntax. In the target attribute, write the path of the file that is to be included. 2.4.7 Referring to CSS Files This section describes how to refer to CSS files in HTML documents. It is recommended to merge all CSS files into a single file because the optimizer function, which integrates multiple CSS files into a single file, has been removed from XE core version 1.4.4. Referring to CSS Files <!--%import("xe.css")--> or <load target="xe.css" /> Refer to the xe.css file in the <head> element of an HTML document. The <load /> element is available from XE core version 1.4.4. The result code is shown below: <head> <link rel="stylesheet" type="text/css" href="xe.css" /> </head> CSS files can be referred only in the <head> element of an HTML document. If a separate CSS file is referred in the <body> element, an HTML syntax error will occur. Specifying Media <load target="xe.css" media="print" /> 31 2. XE Skin Basic You can select and specify the target media for a CSS file. Both the <load /> element and the media attribute are available from XE core 1.4.4. The result code is shown below: <head> <link rel="stylesheet" type="text/css" href="xe.css" media="print" /> </head> Multiple values can be specified at once by using commas to separate the values of media attributes. The default value is "all." The following is a list of available values. Table 2-8 Media Attribute Values Attribute value Description all Default value to be used when media is not specified. Available for all output devices. aural Voice output devices (text-to-speech devices and screen readers) braille Braille displays embossed Braille embosser handheld Mobile devices print Printers projection Projectors screen Monitor screens tty Teletypewriters tv Televisions Note When specifying the CSS media attribute, make sure that the target device is in compliance with the CSS standard. Unsupported media attributes cannot be used. Using IE Conditional Comments <load target="xe.css" targetie="IE 6" /> Using the targetie attribute allows CSS files to be output as conditional comments, so that they can be read only by a specific version of IE. Both the <load /> element and the targetie attribute are available from XE core version 1.4.4. The resulting code is shown below: <!--[if IE 6]> <link rel="stylesheet" type="text/css" href="xe.css" /> <![endif]--> This code is handled as a comment in all browsers except for IE versions 6.x, in which it is normally parsed. Changing the Reference Declaration Sequence of CSS Files <load target="xe.css" index="-1" /> The declaration sequence of a CSS file can be changed using the index attribute. Both the <load /> element and the index attribute are available from XE core version 1.4.4. The value of the index attribute must be an integer with a positive or negative value. A negative integer will cause the CSS file to be declared at an earlier time, while a positive integer will cause the CSS file to be declared at a later time, based on the current time. If the value of index="1" is specified, it will be declared a line before all other CSS files. 32 2. XE Skin Basic When two identical commands conflict with each other in a CSS file, the priority will be given to the latter. For this reason, it is recommended to declare more important items later. 2.4.8 Referring to JS Files This section describes how to refer to .js files in HTML documents. It is recommended to merge all .js files into a single file because the optimizer function, which integrates multiple .js files into a single file, has been removed from XE core version 1.4.4. .js files can be imported only in the <head> or <body> element of an HTML document. Referring a .js file outside of these two elements may result in an HTML syntax error, depending on the browser. Referring to .js Files in the <head> Element The following is an example of importing xe.js to the <head> element of an HTML document. <!--%import("xe.js")--> or <load target="xe.js" /> The <load /> element is available from XE core version 1.4.4. The resulting code is shown below: <head> <script type="text/javascript" src="xe.js"></script> </head> Referring to .js Files in the <body> Element The following is an example of importing xe.js to the <body> element of an HTML document. <load target="xe.js" type="body" /> The <load /> element is used to import a target file to an HTML document, and may have the following attributes and values: • media="all | aural | braille | embossed | handheld | print | projection | screen | tty | tv" – Used to selectively specify a target medium for the CSS file. When specifying multiple values, separate each item with a comma (,). The default value is "all," and if omitted, media="all". • targetie="IE 6 | IE 7 | IE8 | ..." - Use the IE conditional comments to select a browser to which CSS and JS are applied, within the range of IE browsers. The default value is null, meaning "do not apply." • index="integer" – This is used to change the declaration point of a CSS/JS reference. The value must be an integer with a positive or negative value. If the value is positive, the declaration will occur at a later time. If the value is negative, the declaration occurs at an earlier time, based on the current position. The default value is null, in which case the declaration sequence is not changed. If the default value is used, it will be declared after other CSS files. • type="head | body" – This is used to determine whether the position of the JS reference declaration is placed in the <head> element, or the <body> element in a document. The default value is "head," and if omitted, .js files are included in the <head> element of the document. The <load /> element is available from XE core version 1.4.4. A .js file that is imported to the <body> element will be referred to at the end of the <body> element. The resulting code is shown below: <body> ... <script type="text/javascript" src="xe.js"></script> </body> 33 2. XE Skin Basic Using IE Conditional Comments <load target="xe.js" targetie="IE 6" /> Using the targetie attribute allows .js files to be output as conditional comments, so that they can be read only by a specific version of IE. Both the <load /> element and the targetie attribute are available from XE core version 1.4.4. The resulting code is shown below: <!--[if IE 6]> <script type="text/javascript" src="xe.js"></script> <![endif]--> This code is handled as a comment in all browsers except for IE versions 6.x, in which it is normally parsed. Changing the Declaration Sequence of .js Files <load target="xe.js" index="-1" /> The declaration sequence of a .js file can be changed using the index attribute. Both the <load /> element and the index attribute are available from XE core version 1.4.4. The value of the index attribute must be an integer with a positive or negative value. A negative integer will cause the CSS file to be declared at an earlier time, while a positive integer will cause the CSS file to be declared at a later time, based on the current time. If the value of index="1" is specified, it will be declared a line before all other CSS files. 2.4.9 Applying XML JS Filter XML JS filter automatically performs validity check for the form whose input has been defined in XML. Since the validity check is performed by XML based JavaScript, you do not have to create complicated JavaScript code. XML JS filter also determines which command of module the form data that passes the validity check will be sent to. The XML JS filter shares the same syntax with CSS files and .js files. <!--%import("xe.xml")--> If the XML JS filter is imported, as shown above, the XML document is compiled into a JS document and shown as source code. Previous versions of XE core unconditionally included the compiled .js files to the <head> element. The following shows the result of the output. <head> <script type="text/javascript" src="xe.js"></script> </head> Compiled .js files are included at the end of the <body> element from XE core version 1.4.4. <!--%import("xe.xml")--> or <load target="xe.xml" /> The following shows the result of the output. <body> ... <script type="text/javascript" src="xe.js"></script> </body> In XE core version 1.4.4, it is output right before the end of <body> element, instead of in the <head> element. 34 2. XE Skin Basic 2.4.10 Inserting Widgets A widget works as interface that is used to process the data included in XE core or a module into information that is meaningful to the users. XE core contains a widget for showing recently posted items on the home page of a Website, and a widget for designing the login format. Widgets help you to easily implement desired functions without a deep understanding of the complex programming logics behind the process. By using widgets, you can implement a desired function with a single template code. The template code to be inserted to a widget has the widget attribute in the <img /> element. The <img /> element is a standard HTML element. But if it contains a widget as an attribute, it is parsed in XE template syntax, and then converted back to standard HTML later by the server. The following is an example of code to be inserted in order to output the login format. <img widget="login_info" skin="xe_official" /> To automatically create the code for inserting a widget, select Construction > Widget and use the Generate Code function. For more information, see the XE User Manual. 2.4.11 New Template Syntax for XE core 1.4.4 This section describes only The XE template syntax that is newly added to XE core version 1.4.4. If your XE core version has been upgraded to 1.4.4. or higher, check the table below for reference: Table 2-9 Template Syntax Added to XE core Version 1.4.4 Template syntax added Description <block cond="conditional expression"> Displays the content if the condition is true. <p>Welcome XE!</p> </block> <p cond="conditional expression"> Welcome XE! Displays the content along with the <p> element if the condition is true. </p> <p attr="value"|cond="conditional expression"> Welcome XE! </p> Displays the attr="value" attribute and its value along with the <p> element if the condition is true. If not, displays only the <p> element. <block loop="variable name=>$val"> <tr>...</tr> </block> Iterates <tr>...</tr> without the $key value. <tr loop="variable name=>$val">...</tr> Iterates <tr>...</tr> without the $key value. <block loop="variable name=>$key, $val"> <tr>...</tr> </block> Iterates <tr>...</tr> with the $key value. <tr loop="variable name=>$key,$val">...</tr> Iterates <tr>...</tr> with the $key value. <block loop="$i=0;$i<100;$i++"> <tr>...</tr> </block> Iterates <tr>...</tr> 100 times, starting from the initial value of 0. <tr loop="$i=0;$i<100;$i++">...</tr> Iterates <tr>...</tr> 100 times, starting from the initial value of 0. <include target="header.html" /> Includes header.html. 35 2. XE Skin Basic 36 Template syntax added Description <load target="xxx.xxx" /> Includes CSS/JS/SML JS filter files to the <head> element. <load target="xxx.xxx" type="body" /> Includes JS/SML JS filter files to the <body> element. <unload target="xxx.xxx" /> Excludes CSS/JS/XML JS filter files with the same path. 3. Creating Layout Skins This chapter describes how to create and apply layout skins by using the example layout skin. 3. Creating Layout Skins 3.1 What is a Layout Skin? In XE, layouts and contents are separated from each other. A layout is a structure, or a framework, that is designed to hold the content of XE. A layout skin is used to determine the relative positions of the elements of a common Website, such as the header, global navigation, local navigation, content, and footer, on the screen. Layout skins are not necessary when only specific content including boards and wikis is displayed at a time. If, however, you have to deploy header, global navigation, local navigation, and footer areas to ensure consistency of your Website and its content, you must use layout skins. The following is a typical screen layout using a layout skin. Figure 3-1 Typical Screen Layout Using a Layout Skin XE core includes one or more layout skins. The default layout skins are in the /layouts/ folders in the XE core installation path. You can use the default layout skins provided by XE core, or can create custom layout skins. 38 3. Creating Layout Skins 3.2 Downloading Example Layout Skin To create a new layout skin, you must create directories and files according to the structure of the layout skins. This document provides an example layout skin for the convenience of readers. This example layout skin has the directory structure and files required for making a layout skin - it can be easily modified to suit your preferences. You can download the example layout skin from the following link: • http://doc.xpressengine.com/manual/user_layout.zip 39 3. Creating Layout Skins 3.3 Location and Directory Structure of Layout Skin 3.3.1 Location of Layout Skin If XE has been installed in /xe/ directory, the layout skins can be found in the following directory: /xe/layouts/ Decompress the downloaded archive file (user_layout) and copy it under the /xe/layouts/ directory. /xe/layouts/user_layout/ Note When you modify the layout skins on a local PC, the changes must be applied to the files in the layout skins directory as well. 3.3.2 Structure of the Layout Skin Directory To create a layout skin, you must maintain the following directory structure. The structure of the example layout skin (user_layout) is shown in the figure below. Figure 3-2 Structure of the Layout Skin Directory info.xml The info.xml file contains default information for layout skins, and provides the descriptions and options to be displayed on the administrator screen. The info.xml file must exist in the following path: The names "conf" and "info.xml" cannot be changed. /xe/layouts/user_layout/conf/info.xml layout.html The layout.html file contains information on the HTML, CSS and the JS reference of layout skins. The name "layout.html" cannot be changed. /xe/layouts/user_layout/layout.html thumbnail.png The thumbnail.png file contains a thumbnail image for layout. Save the image of 180 x 120 (width x height) pixel, and it will be displayed as a preview image in the Admin Page. You cannot change the file name, 'thumbnail.png.' 40 3. Creating Layout Skins 는 레이아웃 미리보기용 이미지 파일입니다. 너비 180픽셀, 높이 120픽셀 이상 크기로 제작하여 넣어두면 관리자 화면에서 미리보기 이미지로 출력합니다. 'thumbnail.png'라는 파일 이름은 변경할 수 없습니다. /xe/layouts/user_layout/thumbnail.png CSS, JS, and IMG As CSS, JS, and IMG files are not mandatory elements of a layout skin, they can be created as needed. They can be located anywhere except in the conf directory. It is recommended to create a subdirectory in the /user_layout/ directory for these files for the sake of easy management. 41 3. Creating Layout Skins 3.4 Creating Layout Skin Information Information on layout skins must be written in the info.xml file. The default structure of the info.xml file is as follows: <?xml version="1.0" encoding="UTF-8"?> <layout version="0.2"> <title xml:lang="ko">테스트 레이아웃</title> <title xml:lang="en">Test Layout</title> <title xml:lang="jp">テストのレイアウト</title> <description xml:lang="ko">디자인이 없는 테스트 레이아웃입니다. 새 스킨을 만들 때 이 레이아웃 사본을 사용하면 좋습니다.</description> <description xml:lang="en">Is not designed for testing the layout. When you create a new skin, we recommend you copy the layout.</description> <description xml:lang="jp">デザインがないテストレイアウトです。新しいスキンを作成するときに、レイアウトのコピーを使用し てください。</description> <version>1.0</version> <date>2010-12-24</date> <author email_address="[email protected]" link="http://user-define.com/"> <name xml:lang="ko">제작자 이름</name> <name xml:lang="en">Maker Name</name> <name xml:lang="jp">製作者名</name> </author> <menus> <menu name="main_menu" maxdepth="3" default="true"> <title xml:lang="ko">전역 메뉴</title> <title xml:lang="en">Global Menu</title> <title xml:lang="jp">グローバルメニュー</title> </menu> </menus> </layout> The content of the code above is as follows: Code Description <?xml version="1.0" encoding="UTF-8"?> Declares the type of an XML document <layout version="0.2"> Declares that it is a layout information document. The value of the version must be a version that is supported by XE core. XE core version 1.4.4.2 supports layout version 0.2. <title xml:lang="ko">...</title> Layout name <description xml:lang="ko">...</description> Layout description <version>...</version> Version of the layout skin <date>YYYY-MM-DD</date> Date on which the layout skin was created. It must be in YYYY-MM-DD format. <author email_address="..." link="..."> <name xml:lang="ko">...</name> </author> <menus> <menu name="main_menu" maxdepth="2" default="true"> <title xml:lang="ko">...</title> 42 Information on the author of the layout skin. It should include information such as the e-mail address, Website address and name of the author. The created menu can be connected in the Dashboard of XE Admin Page. A <menu>...</menu> element can contain two or more <menus>...</menus> elements. 3. Creating Layout Skins Code Description </menu> </menus> In addition, many types of custom variables can be included in the <extra_vars> element in the info.xml file. The following is an example of extended code that collects data in select, image, text, or textarea type so that the skin developer can use it as a variable. <?xml version="1.0" encoding="UTF-8"?> <layout version="0.2"> ... <extra_vars> <var name="colorset" type="select"> <title xml:lang="ko">Colorset</title> <description xml:lang="ko">Select colorset.</description> <options value="black"> <title xml:lang="ko">Black (Default)</title> </options> <options value="white"> <title xml:lang="ko">White</title> </options> </var> <var name="logo_image" type="image"> <title xml:lang="ko">Logo Image</title> <description xml:lang="ko">Enter a logo image to display on the upper part of the page.</description> </var> <var name="logo_url" type="text"> <title xml:lang="ko">Logo Image Link</title> <description xml:lang="ko">Enter a URL to which users will redirect when they click the logo image.</description> </var> <var name="title_description" type="textarea"> <title xml:lang="ko">Upper Part of Body</title> <description xml:lang="ko">Enter contents to display on the upper part of body (you can use HTML).</description> </var> </extra_vars> ... </layout> The content of the code above is shown below. Code Description <extra_vars>...</extra_vars> Extended variable container <var name="colorset" type="select">...</var> An extended variable in select type. You can display it in {$layout_info->colorset} type. <var name="logo_image" type="image">...</var> An extended variable in image type. You can display it in {$layout_info->image} type. <var name="logo_url" type="text">...</var> An extended variable in text type. You can display it in {$layout_info->logo_url} type. <var name="title_description" type="textarea">...</var> An extended variable in textarea type. The author of the skin can output it in {$layout_info->description} type. 43 3. Creating Layout Skins The extended variables that are added by the info.xml file appear in the Layout Setting page after the layout is created. When the Website manager enters a value to one of the variables, it will be displayed in the skin. 44 3. Creating Layout Skins 3.5 Creating a Layout Checking User-Defined Layouts Use the following procedure to check whether the info.xml file has been correctly written. 1. Select Extensions > Installed Layout in XE Admin Page. 2. Check if the Test Layout is displayed correctly. Since the info.xml file includes a single <menu> element, Menus is 1. Menus is the number of the <menu> elements that are included in the info.xml file. Creating Layout Copies The Test Layout can be used only when a copy of the layout has been created. It is possible to create a multiple copies of 'user_layout.' Use the following procedure to create a copy of a layout. 1. Click Test Layout from the installed layout list to open the layout page, and click Insert. 2. Enter the name of the copy in the Subject field, and click Insert. Subject must be distinguishable from other copies of "user_layout," so in this example you can enter User defined layout_Copy1. 45 3. Creating Layout Skins 3. Check if a file named "User defined layout_Copy1" is created in the Test Layout page. Now, you can select this layout from the configuration screen of the desired module. Note If you apply the layout whose layout.html has not been created to a module page, an error message reading "Err: "./layouts/user_layout/layout.html" template file does not exist." will appear when you access the module page. 46 3. Creating Layout Skins 3.6 Creating Layout Skins The content of a layout skin is written in layout.html. XE core automatically inserts DOCTYPE, html, head, and body elements into its Web pages. Therefore, you do not need to write these elements in your skin files. If you add these elements to a skin file, they are considered as duplicates, causing an HTML or display error. The basic structure of the Web page, once a layout skin has been applied, is as follows: <!DOCTYPE html PUBLIC "-//W3C//DTD XHTML 1.0 Transitional//EN" "http://www.w3.org/TR/xhtml1/DTD/xhtml1-transitional.dtd"> <html lang=".." xml:lang=".." xmlns="http://www.w3.org/1999/xhtml"> <head> <meta http-equiv="Content-Type" content="text/html; charset=utf-8" /> <!—The contents to be contained here will be created in the layout.html or in the admin mode. --> </head> <body> <!—The code and contents of layout.html will be displayed here. --> </body> </html> The HTML code and its content written in the layout.html are displayed as HTML code in the <body> element. For this reason, you must write layout.html with valid HTML syntax that is available in the <body> element. The content to be included in the <head> element can be written in the <body> element by using the XE template syntax. Document Structure of Layout Skins The example layout skin consists of the header, global navigation bar (gnb), local navigation bar (lnb), content, and footer. The structure of the layout.html document is as follows: <div class="user_layout"> <div class="header"> <h1>Site Logo</h1> <hr /> <div class="gnb">.gnb</div> </div> <hr /> <div class="body"> <div class="lnb">.lnb</div> <hr /> <div class="content">.content</div> </div> <hr /> <div class="footer">.footer</div> </div> To select HTML elements from a CSS file and place them in the desired positions, the class names were specified in the <div> elements that are written in HTML. Displaying the Body by Using the {$content} Variable The layout.html file cannot be seen on the screen yet. This is because no module has selected this layout. A layout skin page cannot exist by itself; it can only be seen when accessing the corresponding page of a specific module to which the skin is applied. Layout skins are dependent on modules. To be able to see the example layout skin on the screen, you must create a specific module including page, board and wiki, and connect it with the layout skin. Before checking the layout skin, you must create a content variable to display the layout skin on the module connected with it correctly. 47 3. Creating Layout Skins In the example layout skin, the content variable is written in the body of the layout using the {$content} variable. <div class="user_layout"> <div class="header"> <h1>Site Logo</h1> <hr /> <div class="gnb">.gnb</div> </div> <hr /> <div class="body"> <div class="lnb">.lnb</div> <hr /> <div class="content"> .content{$content} </div> </div> <hr /> <div class="footer">.footer</div> </div> {$content} is the most important variable of a layout skin. It displays the content of the connected module on the body to whichever module the current layout skin is connected. The Web page can be a static page, a dynamic board, or a wiki page, depending on the connected module. Modules of XE are not mounted on layout skins, but connected to them. Note that module pages created by XE have their own URLs, but the layout skins do not have URLs, and are only displayed when they are connected to modules. Displaying Global Menu You can display the global menu connected to the layout in the <div class="gnb">.gnb</div> element. If you connect a layout and a menu in the XE Admin Page, the layout will always display the connected menu on the screen. You must write code in the layout skin in advance in order to be able to display the connected menu. The example layout skin has the code to display the connected menu on the screen. It displays menus in up to two levels. <div class="gnb"> .gnb <ul> <li loop="$global_menu->list=>$key1,$val1" class="active"|cond="$val1['selected']"><a href="{$val1['href']}" target="_blank"|cond="$val1['open_window']=='Y'">{$val1['link']}</a> <ul cond="$val1['list']"> <li loop="$val1['list']=>$key2,$val2" class="active"|cond="$val2['selected']"><a href="{$val2['href']}" target="_blank"|cond="$val2['open_window']=='Y'">{$val2['link']}</a></li> </ul> </li> </ul> </div> The XE template syntax and the variables used in the code above are as follows. 48 Template Syntax / Variable Description Category loop="$global_menu->list=>$key1,$val1" Displays if there is a list of menus Iteration to connect. cond="$val1['list']" Displays if the menus to connect includes a sub-list. Conditional statement loop="$val1['list']=>$key2,$val2" Displays if the menus to connect includes a sub-list. Iteration 3. Creating Layout Skins Template Syntax / Variable Description class="active"|cond="$val1['selected'] class="active"|cond="$val2['selected']" Adds the class="active" attribute Conditional to the <li> element if the menu to statement connect or its sub-list is identical to that of the current page. Displays target="_blank" if the Category Conditional target="_blank"|cond="$val1['open_window']=='Y'" link option of the menu to connect statement target="_blank"|cond="$val2['open_window']=='Y'" is a new window. {$val1['href']} {$val2['href']} Link URL of menus to connect Variable {$val1['link']} {$val2['link']} Link text of menus to connect Variable Displaying Local Menu You can display the local menu connected to layouts in the <div class="lnb">.lnb</div> element. The syntax to display local menu is similar to that of the global menu. Local menu is different from global menu in that it does not show the first-level menu items. Since the global menu already displays the first and second-level menu items in the <div class="gnb">.gnb</div> element, the local menu displays the second and third-level menu items that are related to the current page. The local menu is displayed only when the page connected to the menu exists - you must enter the URL of a page to be actually connected when creating the menu. In the example layout skin, the code used to display the local menu is as follows: <div class="lnb"> .lnb <h2 loop="$global_menu->list=>$key1,$val1" cond="$val1['selected']"><a href="{$val1['href']}" target="_blank"|cond="$val1['open_window']=='Y'">{$val1['link']}</a></h2> <ul loop="$global_menu->list=>$key1,$val1" cond="$val1['selected'] && $val1['list']"> <li loop="$val1['list']=>$key2,$val2" class="active"|cond="$val2['selected']"><a href="{$val2['href']}" target="_blank"|cond="$val2['open_window']=='Y'">{$val2['link']}</a> <ul cond="$val2['list']"> <li loop="$val2['list']=>$key3,$val3" class="active"|cond="$val3['selected']"><a href="{$val3['href']}" target="_blank"|cond="$val3['open_window']=='Y'">{$val3['link']}</a> </li> </ul> </li> </ul> </div> The XE template syntax and the variables used in the above code are listed in the table below. Template Syntax / Variable Description Category loop="$global_menu->list=>$key1,$val1" Displays if there is a list of menus Iteration to connect. cond="$val1['selected']" Displays if the menu to connect is Conditional identical to that of the current statement page. cond="$val1['selected'] && $val1['list']" Displays if the menu to connect is identical to that of the current menu and includes a sub-list. loop="$val1['list']=>$key2,$val2" loop="$val2['list']=>$key3,$val3" Displays if the menu to connect includes a sub-list. Iteration 49 3. Creating Layout Skins Template Syntax / Variable Description Category cond="$val2['list']" Displays if the menu to connect includes a sub-list. Conditional statement class="active"|cond="$val2['selected']" class="active"|cond="$val3['selected']" Adds the class="active" attribute Conditional to the <li> element if the menu to statement connect or its sub-list is identical to that of the current page. Conditional target="_blank"|cond="$val1['open_window']=='Y'" Displays target="_blank" if the target="_blank"|cond="$val2['open_window']=='Y'" link option of the menu to connect statement target="_blank"|cond="$val3['open_window']=='Y'" is a new window. {$val1['href']} {$val2['href']} {$val3['href']} Link URL of menus to connect Variable {$val1['link']} {$val2['link']} {$val3['link']} Link text of menus to connect Variable Displaying Integrated Search Form The integrated search for Websites searches for all existing modules, not specific modules. If you do not provide the integrated search form, the function will not be available. A layout skin usually provides the integrated form. The code for the integrated search form can be found through Extensions > Installed Module > Integrated Search on XE Admin Page. In the example layout skin, the integrated search form code, <form class="search">...</form>, was added to the <div class="header">...</div> element as shown below. <div class="user_layout"> <div class="header"> <h1>Site Logo</h1> <form action="{getUrl()}" method="get" class="search"> <input type="hidden" name="vid" value="{$vid}" /> <input type="hidden" name="mid" value="{$mid}" /> <input type="hidden" name="act" value="IS" /> <input type="text" name="is_keyword" value="{$is_keyword}" title="{$lang>cmd_search}" class="iText" /> <input type="submit" value="{$lang->cmd_search}" class="btn" /> </form> <hr /> <div class="gnb"> .gnb ... </div> </div> <hr /> <div class="body"> <div class="lnb"> .lnb ... </div> <hr /> <div class="content">{$content}</div> </div> <hr /> <div class="footer">.footer</div> </div> The variables used in the code above are listed in the table below. Variable 50 Description 3. Creating Layout Skins Variable Description {getUrl()} URL of a page to which a user keyword is to be transferred {$vid} Virtual site ID {$mid} Module ID {$is_keyword} Integrated search keyword entered by a user. The user-entered keyword is displayed on the search result page again. {$lang->cmd_search} A language variable. The word "search" is assigned to the variable. Displaying Login Form If you plan to operate a membership-based Website, visitors should be able to register for membership and later log into the site as a member. XE core provides a membership registration page and a login form. It you want to add the login form to your layout skin, add the code for the login form to the desired position. In the example layout skin, the code to display the login widget on top of the <div class="lnb">...</div> element is as follows: ... <div class="lnb"> .lnb <div class="account"> <img widget="login_info" skin="xe_official" /> </div> <h2>...</h2> <ul>...</ul> </div> ... 51 3. Creating Layout Skins 3.7 Creating a Site Map On site map, you can add, edit, and delete menus for your website. You can display a menu along with layouts by creating a site map and connecting it to a desired layout copy on the XE Admin Page. Use the following procedure to create a menu. 1. Select Site > Site Map on the XE Admin Page. 2. Click Add New Site Map on the Site Map page. You can create several sets of site maps, but you must specify their title so that they can be distinguished from one another when connecting them with layouts. 3. Enter user_menu as the title, and click Save. 4. Click Add Menu and create the global menu structure for your website. For more information on creating a menu, see the "XE User Manual." 52 3. Creating Layout Skins 5. After creating the user_menu site map, click Save. You cannot see the user_menu menu on the user page yet. The menu will be displayed on the screen only when the layout refers to it. Note When creating a menu, you must specify a valid module ID or menu URL for the Module or URL. If it is invalid, the menus will not be displayed correctly on the layout. 53 3. Creating Layout Skins 3.8 Connecting Site Map to Layout Since the user_menu site map is created, you can connect this site map to the previously created layout. Use the following procedure to connect user_menu to the layout. 1. Select Extensions > Installed Layout in XE Admin Page. 2. Click Test Layout from the installed layout list, and click Layout Setting of User defined layout_Copy1. 3. Select user_menu from Menu > Global Menu, check Apply Layouts En Bloc check box and click Save. If you select Apply Layouts En Bloc, the layouts of all modules connected through the menu will be changed to the current layout at once. Once this is done, user_menu will always be displayed along with this layout applied. 54 3. Creating Layout Skins 3.9 Connecting Layouts to Page Modules Now you can check if the content of the example layout skin is correctly displayed on the screen when applying a page module to it. Creating Pages 1. Select Site > Site Map from the XE Admin Page. 2. Click Add Menu on the user_menu. 3. On Add Menu page as shown in the figure below, set the fields as follows: − Menu Name: Home − Module or URL: Create Module, Article Page − Create Module ID: home − You can assign it to open a page in a new window when the menu is clicked: Open a self window 4. Check if Home is created on Site Map > user_menu, click Configure at the right side of Home. 55 3. Creating Layout Skins 5. Select User defined layout_Copy1 (user_layout) from Layout, and click Save. 56 3. Creating Layout Skins User defined layout_Copy1 (user_layout) will not be displayed if user_layout has not been copied. For how to create a copy of 'user_layout', refer to "Creating Layout Copies." Confirming Pages If you access the created page, you can check the result of applying the layout skin. As the module name was specified as 'home,' the access to this page should look like what is shown below. The 'example.com' in the path below is the domain address in which your Website is installed. • When using mode_rewrite: http://example.com/home/ • When not using mode_rewrite: http://example.com/?mid=home Open the home page and the following screen will appear. Figure 3-3 Page with a Layout Skin Applied You can see only the layout content outside the body, because nothing has been created for the body. The text "Site Logo, gnb, lnb, content and footer" is created in the layout.html document, a skin file. In addition, you will see the screen display of integrated search form, global menu, login form and local menu previously included in the layout skin. The content area includes a button for editing the body of the page, visible only to administrators. If you cannot see this button, you are either not logged in as an administrator or the {$content} variable for the body has been incorrectly configured. Note If you do not specify a valid module ID or menu URL for the Module or URL while creating the menu, the local menu will not be displayed correctly. Modifying Pages You can add new contents to the page from the screen like Figure 3-3. Use the following procedure to modify the page. 1. On a page to which the layout skin has been applied, click Modify at the bottom right of the screen. 57 3. Creating Layout Skins 2. Enter a title and simple contents, and click Submit. The contents are added to the page. 3. The result page which the users can see is as shown in the following figure. The Configure and Modify buttons at the bottom right side of the page are displayed only to the administrators who have the authority to edit modules, not to the users. 58 3. Creating Layout Skins The layout is not yet complete. You still have to place items in the appropriate places with CSS. 59 3. Creating Layout Skins 3.10 Applying CSS This section describes how to apply CSS code to a layout skin only. Writing CSS code is not covered in this document. You can modify the CSS code as desired. 1. The user_layout.css file of the example layout skin sets the .lnb area and the .content area assigned to the left and right columns respectively, as follows. @charset "utf-8"; /* Layout */ hr{ display:none;} form, fieldset{ border:0; margin:0; padding:0;} .user_layout{ width:960px; margin:0 auto;} .header{ zoom:1; background:#ddd;} .header:after{ content:""; display:block; clear:both;} .header .search{ float:right;} .gnb{ float:left;} .body{ margin:20px 0; zoom:1; background:#eee;} .body:after{ content:""; display:block; clear:both;} .lnb{ float:left; width:200px; background:#ddd;} .account{} .content{ float:right; width:740px; background:#ddd;} .footer{ background:#ddd;} 2. In layout.html, add the following code to attach the user_layout.css to your Website. <load target="user_layout.css" /> For more information, see "Referring to CSS Files." 3. Access the Website below, and check if the CSS code is correctly applied to the page. The 'example.com' in the path below is the domain address in which your Website is installed. − When using mod_rewrite: http://example.com/home/ − When not using mod_rewrite: http://example.com/?mid=home The figure below shows a screen with its elements correctly displayed with user_layout.css applied. Figure 3-4 Page with CSS Applied Correctly 60 3. Creating Layout Skins If the code was not applied to the screen, check if the <load /> template syntax referring to CSS is correct, or the CSS reference path (target) is specified correctly. 61 3. Creating Layout Skins 3.11 Applying JavaScript This section describes how to add JavaScript code to a layout skin. Writing the jQuery execution code is not covered in this document. You can create and add desired code. 1. Write code with jQuery syntax in user_layout.js. // <![CDATA[ jQuery(function($){ // Write jQuery code here. }); // ]]> 2. In layout.html, add the following code to attach user_layout.js to your Website. <load target="user_layout.js" type="body" /> For more information, see "Referring to JS Files." 3. Access the path below to check whether the JavaScript code has been executed correctly. The 'example.com' in the path below is the domain address in which your Website is installed. − When using mod_rewrite: http://example.com/home/ − When not using mod_rewrite: http://example.com/?mid=home If the code was not applied to the screen, check if the <load /> template syntax referring to user_layout.js is correct, or the user_layout.js reference path (target) is specified correctly. Note For basic usage of jQuery in XE, see "Using JavaScript and jQuery." To learn how to implement various effects by using jQuery, visit http://jquery.com/. 62 4. Creating Board Skins This chapter describes how to make and apply board skins by using the example board skin. 4. Creating Board Skins 4.1 What is a Board Skin? A board skin is an interface that displays board modules on the user’s screen. A board skin consists of the list, read, write, delete, write comment, delete comment, delete trackback, permission guide, and input password pages. 64 4. Creating Board Skins 4.2 Installing Board Modules To make a board in XE, you must install board modules separately. You can install the board modules by using the EasyInstall function on the XE Admin Page, or by uploading the source files for the board modules to the server. EasyInstall Select Extensions > Easy Install > Modules on the XE Admin Page, and then install the module to the server directly. If you have installed a board module with EasyInstall, you must download the directory (/modules/board/) where the board module is installed through FTP to your PC in order to make board skins. The structure of the board module directory is shown below. Check if the skins directory is in the board module directory. Figure 4-1 Structure of Board Module Directory Uploading Source Files Download the source files of a board module from the official XE Website, and then upload them to the /modules/ directory of the Web server using an FTP program. If you have installed XE core in the /xe/ directory, you must upload the source files to the /xe/modules/ path. If the board module is successfully uploaded, it can be found in one of the following directories: /modules/board/ or /xe/modules/board/. 65 4. Creating Board Skins 4.3 Downloading Example Board Skin To create a board skin, you must first create the necessary files. This document provides an example board skin with all the required files for the convenience of readers. You can modify this skin according to their preferences. You can download the example board skin from the following link: • 66 http://doc.xpressengine.com/manual/user_board.zip 4. Creating Board Skins 4.4 Location and Required Files of Board Skins 4.4.1 Location of Board Skin The location of the board skin directory is as follows: /modules/board/skins/ Decompress the downloaded archive file (user_board), and copy it to the /modules/board/skins/ directory. /modules/board/skins/user_board Note When you modify the board skin on your local PC, the changes must be applied to the files in the board skin directory of the Website as well. 4.4.2 Required Files for Board Skin To create a board skin, you will need the following files. Table 4-1 Required Files for Board Skins File Description Remarks skin.xml Board Skin Information This file name cannot be changed. list.html Post list This file name cannot be changed. write_form.html Post writing form This file name cannot be changed. delete_form.html Post deletion form This file name cannot be changed. comment_form.html Comment writing form This file name cannot be changed. delete_comment_form.html Comment deletion form This file name cannot be changed. delete_trackback_form.html Trackback deletion form This file name cannot be changed. input_password_form.html Password input form This file name cannot be changed. message.html Notification message This file name cannot be changed. _header.html Displays the header of a board Included in other pages _footer.html Displays the footer of a board Included in other pages _read.html Displays the read post page Included in other pages _comment.html Displays comments Included in other pages _trackback.html Displays trackbacks Included in other pages 67 4. Creating Board Skins 68 File Description user_board.css Board skin style sheet Remarks 4. Creating Board Skins 4.5 Creating Board Skin Information skin.xml contains the basic information of a board skin, and provides descriptions and options to be displayed on the Admin screen. The name "skin.html" cannot be changed. The default structure of skin.xml is as follows: <?xml version="1.0" encoding="UTF-8"?> <skin version="0.2"> <title xml:lang="ko">user_board</title> <title xml:lang="en">user_board</title> <title xml:lang="jp">user_board</title> <description xml:lang="ko">게시판 스킨 제작 실습을 위한 user_board입니다.</description> <description xml:lang="en">This is user_board for creating a board skin.</description> <description xml:lang="jp">掲示板スキン製作実習のためのuser_boardです。</description> <version>1.0</version> <date>2010-12-24</date> <author email_address="[email protected]" link="http://user-define.com/"> <name xml:lang="ko">제작자 이름</name> <name xml:lang="en">Author Name</name> <name xml:lang="jp">製作者名</name> </author> <license>LGPL v2</license> <extra_vars> <var name="title" type="text"> <title xml:lang="ko">게시판 제목</title> <title xml:lang="en">Board Title</title> <title xml:lang="jp">掲示板タイトル</title> write.</description> <description xml:lang="ko">작성하면 화면에 표시됨</description> <description xml:lang="en">This will be displayed on the screen as you <description xml:lang="jp">作成すると画面に表示される</description> </var> <var name="comment" type="textarea"> <title xml:lang="ko">게시판 설명</title> <title xml:lang="en">Board Details</title> <title xml:lang="jp">掲示板詳細説明</title> write.</description> <description xml:lang="ko">작성하면 화면에 표시됨</description> <description xml:lang="en">This will be displayed on the screen as you <description xml:lang="jp">作成すると画面に表示される</description> </var> </extra_vars> </skin> The content of this code is shown below. Code Description <?xml version="1.0" encoding="UTF-8"?> Declares the type of an XML document <skin version="0.2"> Declares that it is a skin information document. The value of the version must be a version that is supported by XE core. XE core version 1.4.4.2 supports layout version 0.2. <title xml:lang="ko">...</title> Board skin name <description xml:lang="ko">...</description> Board skin description <version>...</version> Version of the board skin <date>YYYY-MM-DD</date> Date on which the board skin was created. It must 69 4. Creating Board Skins Code Description be in YYYY-MM-DD format. <author email_address="..." link="..."> <name xml:lang="ko">...</name> It should contain information such as the e-mail address, Website address and name of the author. </author> <license>LGPL v2</license> Information on board skin license. It is recommended to use LGPL v2, which is what XE core uses. <extra_vars>...</extra_vars> To use extended variables supported by board modules, you can add the content in the tag. <var name="title" type="text"> <title xml:lang="ko">Board Title</title> Gets the title of a board and displays it on the screen. <description xml:lang="ko">This will be displayed on the screen as you write. </description> </var> <var name="title" type="textarea"> <title xml:lang="ko">Board Details</title> Gets details of a board and displays them on the screen. <description xml:lang="ko">This will be displayed on the screen as you write. </description> </var> To check whether the skin.xml document of the user_board board skin is correct, create a board and configure it to use the user_board skin. In addition, you can add many types of user-defined variables to the <extra_vars> element in skin.xml. The following is an example of extended code that collects data in select or image type so that the skin developer can use it as a variable. <?xml version="1.0" encoding="UTF-8"?> <layout version="0.2"> ... <extra_vars> <var name="colorset" type="select"> <title xml:lang="ko">Colorset</title> <description xml:lang="ko">Select colorset.</description> <options value="black"> <title xml:lang="ko">Black (Default)</title> </options> <options value="white"> <title xml:lang="ko">White</title> </options> </var> <var name="board_image" type="image"> <title xml:lang="ko">Board Header Image</title> <description xml:lang="ko">Enter an image to display on the upper part of the board. </description> </var> </extra_vars> ... </layout> The extended variables used in the code above are listed in the table below. 70 Variable Description <var name="colorset" type="select">...</var> An extended variable in select type. It can be displayed in {$module_info->colorset} type. 4. Creating Board Skins Variable Description <var name="board_image" type="image">...</var> An extended variable in image type. It can be displayed in {$module_info->image} type. The extended variables added to skin.xml are displayed on the Extensions > Installed Module > Board > Configure > Manage Skins in the XE Admin Page. If the administrator enters a value to a variable, that value is displayed on the skin. 71 4. Creating Board Skins 4.6 Creating Boards and Applying Skins Use the following procedure to create a new board and apply a skin to it. 1. Select Extensions > Installed Module > Board on the XE Admin Page. 2. Click Create on the Board Management page. 3. Fill in each field as shown below, and then click Submit. There are many more options in actual practice, but only a portion of these are used in this example because not all of them are required to create a board. 72 − Module Name: test_board − Browser Title: Board skin creation practice − Theme: user_board 4. Creating Board Skins 4. Click Manage Skins of the created test_board, enter Board Title and Board Details to be displayed on the user’s screen, and then click Submit. − Board Title: XE Practice − Board Details: Temp board for XE board skin creation. 73 4. Creating Board Skins 74 4. Creating Board Skins 4.7 Creating Board Header and Footer 4.7.1 Creating Board Header The board header always displays the same content at the top of the screen regardless of the page that is being accessed. The _header.html of the example board skin is configured as shown below so that the header of the board displays the Board Title, Board Details entered from XE Admin Page, and refers to the CSS file at all times. This _header.html will be included in all pages of the board. <div class="user_board"> <div class="board_header" cond="$module_info->title || $module_info->comment"> <h2 cond="$module_info->title"> <a href="{getUrl('','mid',$mid)}">{$module_info->title}</a> </h2> <p cond="$module_info->comment">{$module_info->comment}</p> </div> Note that the <div class="user_board"> element is still open. The end tag of this element should be included in _footer.html. The <div class="user_board"> element is used to combine all elements of a board in a batch in order to make CSS files easier to manage. The XE template syntax and the variables used in the above code are listed in the table below. Template Syntax / Variable Description cond="$module_info->title || $module_info->comment" Displays the content of Board Title or Board Details, if any. cond="$module_info->title" Displays Board Title, if any. {$module_info->title} Displays Board Title. cond="$module_info->comment" Displays Board Details, if any. {$module_info->comment} Displays Board Details. {getUrl('','mid',$mid)} Board URL The example board skin uses the XE template syntax that has been newly added to XE core version 1.4.4. For more information on the new template syntax for XE core, see "XE Template Syntax." 4.7.2 Creating Board Footer The board footer always displays the same content at the bottom of the screen, regardless of the page that is being accessed. The example board skin does not include any additional content but the end tag of <div class="user_board">, which is not present in _header.html. </div> Every page must include _footer.html and _header.html. 75 4. Creating Board Skins 4.8 Creating a List Page The first page that is displayed when users access a board is called the list page, in which articles are listed. The list page is written in list.html. The following is a screen showing a list page created by the example board skin. As mentioned earlier, the title "XE Practice" and the message "Temp board for XE board skin creation." are shown on the top of the screen at all times. Figure 4-2 Board List Page The board list page shown above is configured to show all available column items. It is recommended to configure it this way, as you are not likely to know what items the board administrator will want to display in advance. Use the following procedure to write list.html. Including _header.html and _footer.html The list.html of the example board skin is designed to include _header.html and _footer.html, as shown below. <include target="_header.html" /> The list of posts will be displayed here. <include target="_footer.html" /> The XE template syntax used in the above code is listed in the table below. XE Template Syntax 76 Description 4. Creating Board Skins <include target="_header.html" /> Includes _header.html and _footer.html <include target="_footer.html" /> Includes _footer.html. The example board skin uses the XE template syntax that has been newly added to XE core version 1.4.4. For more information on the new template syntax for XE core, see "XE Template Syntax." Displaying a Message When There Are No Posts You can display a message when there are no posts, by using a conditional statement. The following conditional statement is included in the list.html of the example board skin, so that it displays "No Articles." when there are no posts on the board. <include target="_header.html" /> <p cond="!$document_list && !$notice_list" class="no_document">{$lang->no_documents}</p> <include target="_footer.html" /> The XE template syntax and the variables used in the above code are listed in the table below. XE Template Syntax / Variable Description cond="!$document_list && !$notice_list" Displays when there are no posts or notices. {$lang->no_documents} A language variable with the message reading "No Articles." The example board skin uses the XE template syntax that has been newly added to XE core version 1.4.4. For more information on the new template syntax for XE core, see "XE Template Syntax." Creating Post Lists as a Table In general, tables are used to create a list of posts. Before including many different conditional statements and variables, the frame of the board should be created using HTML. A table that contains the list of posts generally has the LIST HEADER, NOTICE, and LIST lines, each inserted as a comment for the purpose of code readability. <include target="_header.html" /> <p cond="!$document_list && !$notice_list">{$lang->no_documents}</p> <table width="100%" border="1" cellspacing="0" summary="List of Articles" id="board_list" class="board_list" cond="$document_list || $notice_list"> <thead> <!-- LIST HEADER --> <tr> <th scope="col">No.</th> <th scope="col">Subject</th> <th scope="col">Author</th> <th scope="col">User ID</th> <th scope="col">User Name</th> <th scope="col">Date</th> <th scope="col">Last Update</th> <th scope="col">Last post</th> <th scope="col">Views</th> <th scope="col">Votes</th> </tr> <!-- /LIST HEADER --> </thead> <tbody> <!-- NOTICE --> <tr> <td> </td> <td> </td> <td> </td> 77 4. Creating Board Skins <td> </td> <td> </td> <td> </td> <td> </td> <td> </td> <td> </td> <td> </td> </tr> <!-- /NOTICE --> <!-- LIST --> <tr> <td> </td> <td> </td> <td> </td> <td> </td> <td> </td> <td> </td> <td> </td> <td> </td> <td> </td> <td> </td> </tr> <!-- /LIST --> </tbody> </table> <include target="_footer.html" /> The XE template syntax and the variables used in the above code are listed in the table below. XE Template Syntax / Variable Description cond="$document_list || $notice_list" Displays the table and its content if there are any posts or notices. The example board skin uses the XE template syntax that has been newly added to XE core version 1.4.4. For more information on the new template syntax for XE core, see "XE Template Syntax." Displaying Post List Header A post list header is a title cell that contains contents such as the number, title, author, date and view counts of posts. It is recommended to write most of the contents that are supported by the board, as you are not likely to know what items the board administrator will want to display in advance. For example, the administrator may select Extensions > Installed Module > Board, click Configure and List Setting to set the all items to be displayed. If a skin does not support all items in this case, the board administrator might incorrectly think that the skin has a problem. 78 4. Creating Board Skins Figure 4-3 Configure Board List By default, XE board modules can display 12 types of data on the list screen, as shown in the above. Since both Thumbnail and Summary are usually displayed in the Subject cell, they are not counted toward the number of columns of the post list. For this reason, you have to write conditional statements for only 10 items in order to display all items. If a board administrator allows all items to be displayed, 10 columns will be created in total. The <thead> element of the list.html of the example board skin has conditional statements for the 10 items. ... <thead> <!-- LIST HEADER --> <tr> <block loop="$list_config=>$key,$val"> <th scope="col" cond="$val->type=='no'">{$lang->no}</th> <th scope="col" class="title" cond="$val->type=='title'">{$lang->title}</th> <th scope="col" cond="$val->type=='nick_name'">{$lang->writer}</th> <th scope="col" cond="$val->type=='user_id'">{$lang->user_id}</th> <th scope="col" cond="$val->type=='user_name'">{$lang->user_name}</th> <th scope="col" cond="$val->type=='regdate'"><a href="{getUrl('sort_index','regdate','order_type',$order_type)}">{$lang->date}</a></th> <th scope="col" cond="$val->type=='last_update'"><a href="{getUrl('sort_index','last_update','order_type',$order_type)}">{$lang->last_update}</a></th> <th scope="col" cond="$val->type=='last_post'"><a href="{getUrl('sort_index','last_update','order_type',$order_type)}">{$lang->last_post}</a></th> <th scope="col" cond="$val->type=='readed_count'"><a href="{getUrl('sort_index','readed_count','order_type',$order_type)}">{$lang>readed_count}</a></th> <th scope="col" cond="$val->type=='voted_count'"><a href="{getUrl('sort_index','voted_count','order_type',$order_type)}">{$lang->voted_count}</a></th> </block> </tr> <!-- /LIST HEADER --> 79 4. Creating Board Skins </thead> ... The XE template syntax and the variables used in the above code are listed in the table below. XE Template Syntax / Variable Description <block loop="$list_config=>$key,$val">...</block> Display the specified item. <th scope="col" cond="$val->type=='no'">{$lang->no}</th> Post number <th scope="col" class="title" cond="$val->type=='title'"> Post title {$lang->title} </th> <th scope="col" cond="$val->type=='nick_name'"> Poster {$lang->writer} </th> <th scope="col" cond="$val->type=='user_id'"> User ID {$lang->user_id} </th> <th scope="col" cond="$val->type=='user_name'"> User Name {$lang->user_name} </th> <th scope="col" cond="$val->type=='regdate'"> Date (may change sort order) <a href="{getUrl('sort_index','regdate','order_type',$order_type)}"> {$lang->date} </a> </th> <th scope="col" cond="$val->type=='last_update'"> <a href="{getUrl('sort_index','last_update','order_type',$order_type)}"> Last modified on (may change sort order) {$lang->last_update} </a> </th> <th scope="col" cond="$val->type=='last_post'"> <a href="{getUrl('sort_index','last_update','order_type',$order_type)}"> Last post (may change sort order) {$lang->last_post} </a> </th> <th scope="col" cond="$val->type=='readed_count'"> View counts (may change sort order) <a href="{getUrl('sort_index','readed_count','order_type',$order_type)}"> {$lang->readed_count} </a> </th> <th scope="col" cond="$val->type=='voted_count'"> <a href="{getUrl('sort_index','voted_count','order_type',$order_type)}"> {$lang->voted_count} </a> </th> 80 Vote counts (may change sort order) 4. Creating Board Skins The example board skin uses the XE template syntax that has been newly added to XE core version 1.4.4. For more information on the new template syntax for XE core, see "XE Template Syntax." Displaying Post List There are two types of lists: notice lists and post lists. Unlike post lists, notice lists are displayed on the top of the table. The <body> element in the list.html of the example board skin contains code that displays notice lists and post lists, as shown below. ... <tbody> <!-- NOTICE --> <tr class="notice" loop="$notice_list=>$no,$document"> <block loop="$list_config=>$key,$val"> <td class="notice" cond="$val->type=='no'"> <block cond="$document_srl==$document->document_srl">»</block> <block cond="$document_srl!=$document->document_srl">{$lang->notice}</block> </td> <td class="title" cond="$val->type=='title'"> <a href="{getUrl('document_srl',$document->document_srl, 'listStyle', $listStyle, 'cpage','')}"> {$document->getTitle()} </a> <a cond="$document->getCommentCount()" href="{getUrl('document_srl', $document>document_srl)}#comment" class="replyNum" title="Replies"> [{$document->getCommentCount()}] </a> <a cond="$document->getTrackbackCount()" href="{getUrl('document_srl', $document>document_srl)}#trackback" class="trackbackNum" title="Trackbacks"> [{$document->getTrackbackCount()}] </a> </td> <td class="author" cond="$val->type=='nick_name'">{$document->getNickName()}</td> <td class="author" cond="$val->type=='user_id'">{$document->getUserID()}</td> <td class="author" cond="$val->type=='user_name'">{$document->getUserName()}</td> <td class="time" cond="$val->type=='regdate'">{$document->getRegdate('Y.m.d')}</td> <td class="time" cond="$val->type=='last_update'">{zdate($document>get('last_update'),'Y.m.d')}</td> <td class="lastReply" cond="$val->type=='last_post'"> <block cond="(int)($document->get('comment_count'))>0"> <a href="{$document->getPermanentUrl()}#comment" title="Last Reply"> {zdate($document->get('last_update'),'Y.m.d')} </a> <span cond="$document->get('last_updater')"> <sub>by</sub> {htmlspecialchars($document->get('last_updater'))} </span> </block> <block cond="(int)($document->get('comment_count'))==0"> </block> </td> <td class="readNum" cond="$val->type=='readed_count'">{$document>get('readed_count')>0?$document->get('readed_count'):'0'}</td> <td class="voteNum" cond="$val->type=='voted_count'">{$document>get('voted_count')!=0?$document->get('voted_count'):'0'}</td> </block> </tr> <!-- /NOTICE --> <!-- LIST --> <tr loop="$document_list=>$no,$document"> <block loop="$list_config=>$key,$val"> <td class="no" cond="$val->type=='no'"> <block cond="$document_srl==$document->document_srl">»</block> <block cond="$document_srl!=$document->document_srl">{$no}</block> </td> 81 4. Creating Board Skins <td class="title" cond="$val->type=='title'"> <a href="{getUrl('document_srl',$document->document_srl, 'listStyle', $listStyle, 'cpage','')}"> {$document->getTitle()} </a> <a cond="$document->getCommentCount()" href="{getUrl('document_srl', $document>document_srl)}#comment" class="replyNum" title="Replies"> [{$document->getCommentCount()}] </a> <a cond="$document->getTrackbackCount()" href="{getUrl('document_srl', $document>document_srl)}#trackback" class="trackbackNum" title="Trackbacks"> [{$document->getTrackbackCount()}] </a> </td> <td class="author" cond="$val->type=='nick_name'">{$document->getNickName()}</td> <td class="author" cond="$val->type=='user_id'">{$document->getUserID()}</td> <td class="author" cond="$val->type=='user_name'">{$document->getUserName()}</td> <td class="time" cond="$val->type=='regdate'">{$document->getRegdate('Y.m.d')}</td> <td class="time" cond="$val->type=='last_update'">{zdate($document>get('last_update'),'Y.m.d')}</td> <td class="lastReply" cond="$val->type=='last_post'"> <block cond="(int)($document->get('comment_count'))>0"> <a href="{$document->getPermanentUrl()}#comment" title="Last Reply"> {zdate($document->get('last_update'),'Y.m.d')} </a> <span cond="$document->get('last_updater')"> <sub>by</sub> {htmlspecialchars($document->get('last_updater'))} </span> </block> <block cond="(int)($document->get('comment_count'))==0"> </block> </td> <td class="readNum" cond="$val->type=='readed_count'">{$document>get('readed_count')>0?$document->get('readed_count'):'0'}</td> <td class="voteNum" cond="$val->type=='voted_count'">{$document>get('voted_count')!=0?$document->get('voted_count'):'0'}</td> </block> </tr> <!-- /LIST --> </tbody> ... The XE template syntax and the variables used in the code above are listed in the table below. XE Template Syntax / Variable Description <tr class="notice" loop="$notice_list=>$no,$document"> Iterates the notice list line <tr loop="$document_list=>$no,$document"> Iterates the post list line <block loop="$list_config=>$key,$val"> Iterates the post display item line <block cond="$document_srl==$document>document_srl">»</block> Displays the right-pointing double-angle quotation marks (>>) if the unique numbers of the post and the current page's post match. <block cond="$document_srl!=$document>document_srl">{$lang->notice}</block> Displays "Notice" if the unique numbers of the post and the current page's post do not match. <block cond="$document_srl!=$document>document_srl">{$no}</block> Displays "Post number" if the unique numbers of the post and the current page's post do not match. <td class="title" cond="$val->type=='title'"> Post title cell <a href="{getUrl('document_srl',$documentPost link >document_srl, 'listStyle', $listStyle, 'cpage','')}">...</a> 82 4. Creating Board Skins XE Template Syntax / Variable Description {$document->getTitle()} Displays post title. <a cond="$document->getCommentCount()" href="{getUrl('document_srl', $document>document_srl)}#comment" class="replyNum" title="Replies"> Post comment link [...] </a> {$document->getCommentCount()} Post comment counts <a cond="$document->getTrackbackCount()" href="{getUrl('document_srl', $document>document_srl)}#trackback" class="trackbackNum" title="Trackbacks"> Post trackback link [...] </a> {$document->getTrackbackCount()} Post trackback counts <td class="author" cond="$val>type=='nick_name'">{$document>getNickName()}</td> Alias <td class="author" cond="$val>type=='user_id'">{$document->getUserID()}</td> ID <td class="author" cond="$val>type=='user_name'">{$document>getUserName()}</td> Name <td class="time" cond="$val>type=='regdate'">{$document>getRegdate('Y.m.d')}</td> Date <td class="time" cond="$val>type=='last_update'">{zdate($document>get('last_update'),'Y.m.d')}</td> Last modified on <td class="lastReply" cond="$val>type=='last_post'">...</td> Last post <block cond="(int)($document>get('comment_count'))>0">...</block> Displays if there are one or more comments. <block cond="(int)($document>get('comment_count'))==0">...</block> Displays if there are no comments. <a href="{$document->getPermanentUrl()}#comment" title="Last Reply"> Last commented on + link {zdate($document->get('last_update'),'Y.m.d')} </a> <span cond="$document->get('last_updater')"> Writer of the last comment <sub>by</sub> {htmlspecialchars($document->get('last_updater'))} </span> <td class="readNum" cond="$val>type=='readed_count'"> View counts {$document->get('readed_count')>0?$document>get('readed_count'):'0'} </td> <td class="voteNum" cond="$val>type=='voted_count'"> Vote counts {$document->get('voted_count')!=0?$document- 83 4. Creating Board Skins XE Template Syntax / Variable Description >get('voted_count'):'0'} </td> The example board skin uses the XE template syntax that has been newly added to XE core version 1.4.4. For more information on the new template syntax for XE core, see "XE Template Syntax." Note To change the maximum number of posts to be displayed in a page, select Extensions > Installed Module > Board, click Configue at the right side of the module to change, and then specify Lists in the Board Info page. The default value is 20. Displaying Page Number Link A link that can be used to navigate pages must be provided when the number of past posts exceeds the maximum number of posts displayed in a single page. The list.html of the example board skin contains code that displays a link to the page number at the bottom of the post list, as shown below. The page number is additionally wrapped by <div class="list_footer">...</div>, because the Write button and the Search input form will be inserted into this element at a later time. <table summary="List of Articles" id="board_list" class="board_list"> <!-- LIST HEADER --> <!-- /LIST HEADER --> <!-- NOTICE --> <!-- /NOTICE --> <!-- LIST --> <!-- /LIST --> </table> <div class="list_footer"> <!-- PAGINATION --> <div class="pagination" cond="$document_list || $notice_list"> <a href="{getUrl('page','','document_srl','','division',$division,'last_division',$last_division)}" class="prevEnd">{$lang->first_page}</a> <block loop="$page_no=$page_navigation->getNextPage()"> <strong cond="$page==$page_no">{$page_no}</strong> <a cond="$page!=$page_no" href="{getUrl('page',$page_no,'document_srl','','division',$division,'last_division',$last_division)}">{$pag e_no}</a> </block> <a href="{getUrl('page',$page_navigation>last_page,'document_srl','','division',$division,'last_division',$last_division)}" class="nextEnd">{$lang>last_page}</a> </div> <!-- /PAGINATION --> </div> <include target="_footer.html" /> The XE template syntax and the variables used in the code above are listed in the table below. XE Template Syntax / Variable Description <div class="pagination" cond="$document_list || $notice_list">...</div> Displays the page number if there is at least one post or notice. <a Link to the first page. href="{getUrl('page','','document_srl','','division',$divis ion,'last_division',$last_division)}" class="prevEnd">{$lang->first_page}</a> <a href="{getUrl('page',$page_navigation- 84 Links to the last page. 4. Creating Board Skins XE Template Syntax / Variable Description >last_page,'document_srl','','division',$division,'last_di vision',$last_division)}" class="nextEnd">{$lang>last_page}</a> <block loop="$page_no=$page_navigation>getNextPage()">...</block> Iterates the page number. <strong cond="$page==$page_no">{$page_no}</strong> Displays if the page number matches the number of the current page. <a cond="$page!=$page_no" Displays if the page number does not href="{getUrl('page',$page_no,'document_srl','','divisi matches the number of the current page. on',$division,'last_division',$last_division)}">{$page_ no}</a> The example board skin uses the XE template syntax that has been newly added to XE core version 1.4.4. For more information on the new template syntax for XE core, see "XE Template Syntax." Displaying Write Button list.html is displayed not only in the read page but also in the list page. To move to the write_form.html page, click the Write button. The list.html of the example board skin contains code that implements a link to the write page, as shown below. <div class="list_footer"> <!-- PAGINATION --> <div class="pagination"> ... </div> <!-- /PAGINATION --> <div class="btnArea"> <a href="{getUrl('act','dispBoardWrite','document_srl','')}" class="btn">{$lang>cmd_write}</a> </div> </div> The XE template syntax and the variables used in the above code are listed in the table below. XE Template Syntax / Variable Description <a The write page link button. This is displayed href="{getUrl('act','dispBoardWrite','document_srl','')} in the list and read pages. " class="btn">{$lang->cmd_write}</a> The example board skin uses the XE template syntax that has been newly added to XE core version 1.4.4. For more information on the new template syntax for XE core, see "XE Template Syntax." Displaying Search Input Form The search input form displays a search input form that can be used to search the content of a board. The list.html of the example board skin contains code that implements a search input form, as shown below. <div class="list_footer"> <!-- PAGINATION --> <div class="pagination"> ... </div> <!-- /PAGINATION --> <a ...>{$lang->cmd_write}</a> <!-- SEARCH --> 85 4. Creating Board Skins <form cond="$grant->view" action="{getUrl()}" method="get" onsubmit="return procFilter(this, search)" class="board_search"> <input type="hidden" name="vid" value="{$vid}" /> <input type="hidden" name="mid" value="{$mid}" /> <input type="hidden" name="category" value="{$category}" /> <input type="text" name="search_keyword" value="{htmlspecialchars($search_keyword)}" accesskey="S" title="{$lang->cmd_search}" class="iText" /> <select name="search_target"> <option loop="$search_option=>$key,$val" value="{$key}" selected="selected"|cond="$search_target==$key">{$val}</option> </select> <input type="submit" onclick="xGetElementById('fo_search').submit();return false;" value="{$lang->cmd_search}" class="btn" /> </form> <!-- /SEARCH --> </div> The XE template syntax and the variables used in the above code are listed in the table below. XE Template Syntax / Variable Description <form cond="$grant->view" action="{getUrl()}" Displays the search input form if the user method="get" onsubmit="return procFilter(this, search)" has the right to search posts. id="board_search" class="board_search"> <input type="hidden" name="vid" value="{$vid}" /> Element to send a virtual site ID (hidden type) <input type="hidden" name="mid" value="{$mid}" /> Element to send a module ID (hidden type) <input type="hidden" name="category" value="{$category}" /> Element to send category data (hidden type) <input type="text" name="search_keyword" value="{htmlspecialchars($search_keyword)}" accesskey="S" title="{$lang->cmd_search}" class="iText" /> Search keyword input/output element. The access key 'S' is assigned. <select name="search_target"> Controls search range selection <option loop="$search_option=>$key,$val" Displays search range options value="{$key}" selected="selected"|cond="$search_target==$key">{$v al}</option> <input type="submit" A button that is used to send a search onclick="xGetElementById('board_search').submit();ret input form. urn false;" value="{$lang->cmd_search}" class="btn" /> The example board skin uses the XE template syntax that has been newly added to XE core version 1.4.4. For more information on the new template syntax for XE core, see "XE Template Syntax." Checking Board List Display Results Check the board list screen by accessing the path provided below. The 'example.com' in the path below is the domain address in which your Website is installed. • When using mod_rewrite: http://example.com/test_board/ • When not using mod_rewrite: http://example.com/?mid=test_board If there are no posts, a message reading "No Articles" will be displayed. 86 4. Creating Board Skins Figure 4-4 Board List Screen - No Articles If there is an article, the board list page displays the list of articles, as shown below. Figure 4-5 Board List Screen - Articles Exist 87 4. Creating Board Skins Since the write_form.html page has not been created yet, you cannot write any post in the "test_board" board directly. You can, however, copy the data for test post and paste it in the test_board board. The above figure shows the result of posting the test article to the test_board board. To copy articles from other pages and paste them to the test_board board, select Content > Document on XE Admin Page, select an article to copy and then click Manage selected articles. 88 4. Creating Board Skins 4.9 Creating a Write Page The write page is where users write new posts or edit existing ones. The write page is created in write_form.html. A write page consists of _header.html, _footer.html, board title input window, board contents input window, author info. input box (name, password and Homepage), and the registration button. XE core provides a fully functional WYSIWYG editor. Use this editor module when working with the write page. The following is an example of a page created by using the example board skin. Figure 4-6 Write Page Use the following procedure to write_form.html. Including _header.html and _footer.html The write_form.html of the example board skin is designed to include _header.html and _footer.html, as shown below. <include target="_header.html" /> Write form will be created here. <include target="_footer.html" /> The XE template syntax and the variables used in the above code are listed in the table below. XE Template Syntax / Variable Description <include target="_header.html" /> Includes _header.html <include target="_footer.html" /> Includes _footer.html. The example board skin uses the XE template syntax that has been newly added to XE core version 1.4.4. For more information on the new template syntax for XE core, see "XE Template Syntax." 89 4. Creating Board Skins HTML Structure of Write Screen The HTML structure of the write screen is as follows: <include target="_header.html" /> <form action="" class="board_write"> <div class="write_header">Title Input Window</div> <div class="write_editor">Content Input Window</div> <div class="write_author">Author Information Input Box (name, password, and Homepage)</div> <div class="write_footer">Submit button</div> </form> <include target="_footer.html" /> The content, the number, title, and author of the post, must be written as an element in order to be sent to the server. To send the form to the server, click Submit. Creating Write Form By using the onsubmit attribute, you can inspect whether the content written on the write page has been correct in the client, before it is sent to the server. When a user edits a post in the write page, the existing data is imported. The write_form.html of the example board skin contains the following code for the write form. <include target="_header.html" /> <form action="./" method="post" onsubmit="return procFilter(this, window.insert)" class="board_write"> <input type="hidden" name="mid" value="{$mid}" /> <input type="hidden" name="content" value="{$oDocument->getContentText()}" /> <input type="hidden" name="document_srl" value="{$document_srl}" /> <input type="hidden" name="allow_comment" value="Y" /> <input type="hidden" name="allow_trackback" value="Y" /> ... </form> <include target="_footer.html" /> The XE template syntax and the variables used in the code above are listed in the table below. XE Template Syntax / Variable Description onsubmit="return procFilter(this, window.insert)" Validates user-input data and sends forms. <input type="hidden" name="mid" value="{$mid}" /> Element to send a module ID (hidden type) <input type="hidden" name="content" value="{$oDocument->getContentText()}" /> Element to send content (hidden type) <input type="hidden" name="document_srl" value="{$document_srl}" /> Element to send unique document ID (hidden type) <input type="hidden" name="allow_comment" value="Y" /> Element to allow comments (hidden type). Enter value="N" if you want to disable comments. <input type="hidden" name="allow_trackback" value="Y" /> Element to allow trackbacks (hidden type). Enter value="N" if you want to disable comments. The example board skin uses the XE template syntax that has been newly added to XE core version 1.4.4. For more information on the new template syntax for XE core, see "XE Template Syntax." Creating Title Input Window When creating a title input window, you must consider whether it is for a new post or to edit an existing post. You must allow users to register a post as a notice as well. The write_form.html of the example board skin contains the following code for the title input window. 90 4. Creating Board Skins ... <div class="write_header"> <input cond="$oDocument->getTitleText()" type="text" name="title" class="iText" title="{$lang>title}" value="{htmlspecialchars($oDocument->getTitleText())}" /> <input cond="!$oDocument->getTitleText()" type="text" name="title" class="iText" title="{$lang>title}" /> <input cond="$grant->manager" type="checkbox" name="is_notice" value="Y" checked="checked"|cond="$oDocument->isNotice()" id="is_notice" /> <label cond="$grant->manager" for="is_notice">{$lang->notice}</label> </div> ... The XE template syntax and the variables used in the code above are listed in the table below. XE Template Syntax / Variable Description cond="$oDocument->getTitleText()" Displays when the edit screen already has a title. cond="!$oDocument->getTitleText()" Displays when the input window has no title, which means the post is new. {htmlspecialchars($oDocument->getTitleText())} Displays the title text when the screen is in edit mode. {$lang->title} 'Title' language variable cond="$grant->manager" Displays the confirm notice input window and its label if the user is an administrator. checked="checked"|cond="$oDocument>isNotice()" Displays the checked attribute and its value if the post is a notice and the screen is in Edit mode. {$lang->notice} 'Notice' language variable The example board skin uses the XE template syntax that has been newly added to XE core version 1.4.4. For more information on the new template syntax for XE core, see "XE Template Syntax." Creating Content Input (Edit) Window You may only declare one variable, which is {$oDocument->getEditor()}, as the code related to the content input window. This variable displays the editor (WYSIWYG editor) which you can select from WYSIWYG Editor on the Additional Setup tab after clicking Configure on the Extensions > Installed Module > Board. In write_form.html of the example board skin, the import of the WYSIWYG editor was declared as follows: ... <div class="write_editor"> {$oDocument->getEditor()} </div> ... The XE template syntax and the variables used in the code above are listed in the table below. XE Template Syntax / Variable Description {$oDocument->getEditor()} Output variable of the editor (WYSIWYG editor) Creating Author Information Input Box The author information input box only appears to users who do not log in. The input box is composed of "author, password and Homepage." The password is required to edit or delete posts. 91 4. Creating Board Skins In write_form.html of the example board skin, the author information input box was designed as follows: ... <div class="write_author" cond="!$is_logged"> <label for="userName">{$lang->writer}</label> <input type="text" name="nick_name" id="userName" class="iText userName" value="{htmlspecialchars($oDocument->get('nick_name'))}" /> <label for="userPw">{$lang->password}</label> <input type="password" name="password" id="userPw" class="iText userPw" /> <label for="homePage">{$lang->homepage}</label> <input type="text" name="homepage" id="homePage" class="iText homePage" value="{htmlspecialchars($oDocument->get('homepage'))}" /> </div> ... The XE template syntax and the variables used in the above code are listed in the table below. XE Template Syntax / Variable Description <div class="write_author" cond="!$is_logged"> Displays the author information input box if not logged in. {$lang->writer} 'Author' language variable {htmlspecialchars($oDocument>get('nick_name'))} Displays the author name already registered if the write page is used as the edit page. {$lang->password} 'Password' language variable {$lang->homepage} 'Homepage' language variable {htmlspecialchars($oDocument>get('homepage'))} Displays the Home page address already registered if the write page is used as the edit page. Displaying the Register Button To submit the written form to the server, the Submit button is required. The write_form.html of the example board skin was designed to display the Submit button as follows: ... <div class="btnArea"> <input type="submit" value="{$lang->cmd_registration}" class="btn" /> </div> ... The XE template syntax and the variables used in the above code are listed in the table below. XE Template Grammar/Variable Description {$lang->cmd_registration} 'Submit' language variable We used new template syntax added to XE core 1.4.4 for the example board skin. For details about the new template syntax, see "XE Template Syntax". Confirming the Write Page Display Result Click Write on the board list or access the write post screen through the path below. In the path below, 'example.com' indicates the domain address where your Website was installed. • http://example.com/?mid=test_board&act=dispBoardWrite If you access the write page without logging in, the write information input box will appear as shown in the figure below. 92 4. Creating Board Skins Figure 4-7 Write Page without Logging in If you access the write page after logging in, the screen below will appear. The author information input box does not appear, and, if you have administrator authority, the Notice check box to write notices appears. Figure 4-8 Write Page After Logging in After writing the title and its contents, click Submit and confirm if your writing is displayed on the board list. The mandatory input items for logged-in users are title and contents, and the mandatory items for not-logged-in users are title, contents, author name and password. 93 4. Creating Board Skins 4.10 Creating a Read Page The read page is composed of post body, trackback list, comment list, comment writing and post list screen, and is written in _read.html. The read page is included in the list page to enable the user to navigate posts easily by providing the post list under the read page. The figure below shows the complete screen of the read page created by using the example board skin. 94 4. Creating Board Skins Figure 4-9 Read Page 95 4. Creating Board Skins The method used to write _read.html is as follows: Including _read.html in list.html list.html must include _read.html depending on circumstances. If users call the read page, the list.html must include the _read.html. In the list.html of the example board skin, the include statement including a conditional statement is written as shown in the code below. If users access the read page, the page is displayed along with the post list under the reading area. <include target="_header.html" /> <include cond="$oDocument->isExists()" target="_read.html" /> <p ...>{$lang->no_documents}</p> <table ... summary="List of Articles" id="board_list" class="board_list"> ... </table> <div class="list_footer"> ... </div> <include target="_footer.html" /> The XE template syntax and the variables used in the code above are listed in the table below. XE Template Syntax / Variable Description <include cond="$oDocument->isExists()" target="_read.html" /> Includes _read.html if the read page is called. The example board skin uses the XE template syntax that has been newly added to XE core version 1.4.4. For more information on the new template syntax for XE core, see "XE Template Syntax." Structure of the Read Page As shown in the figure below, the read page is composed of header (title, author, view count, voted count and date), body, footer (uploaded file, list button, modify button and delete button), trackback list, comment list and comment input form. <div class="board_read"> <!-- READ HEADER --> <div class="read_header"> Title, Author, Views, Votes, Date </div> <!-- /READ HEADER --> <!-- READ BODY --> <div class="read_body"> Body </div> <!-- /READ BODY --> <!-- READ FOOTER --> <div class="read_footer"> Uploaded Files, List, Modify, Delete </div> <!-- /READ FOOTER --> </div> Include trackback list Include comment list <!-- WRITE COMMENT --> <form class="write_comment"> Comment input form </form> <!-- /WRITE COMMENT --> 96 4. Creating Board Skins Displaying Title and Author The _read.html of the example board skin was designed to display title and author, as follows: ... <!-- READ HEADER --> <div class="read_header"> <h1><a href="{$oDocument->getPermanentUrl()}">{$oDocument->getTitle()}</a></h1> <a cond="$oDocument->getHomepageUrl()" href="{$oDocument->getHomepageUrl()}" class="author">{$oDocument->getNickName()}</a> <strong cond="!$oDocument->getHomepageUrl()" class="author">{$oDocument>getNickName()}</strong> </div> <!-- /READ HEADER --> ... The XE template syntax and the variables used in the code above are listed in the table below. XE Template Syntax / Variable Description <a href="{$oDocument>getPermanentUrl()}"> Permanent URL of the post {$oDocument->getTitle()} Post title <a cond="$oDocument->getHomepageUrl()" href="{$oDocument->getHomepageUrl()}" class="author">...</a> Displays the link and the nickname if the Homepage address exists. <strong cond="!$oDocument>getHomepageUrl()" class="author">...</strong> Only displays name if the Homepage address does not exist. {$oDocument->getNickName()} Displays the nickname of the author. The example board skin uses the XE template syntax that has been newly added to XE core version 1.4.4. For more information on the new template syntax for XE core, see "XE Template Syntax." Displays Views, Votes and Date. The _read.html of the example board skin was designed to display view count, voted count, and date as follows: ... <!-- READ HEADER --> <div class="read_header"> ... <p class="sum"> <span class="read">{$lang->readed_count} <span class="num">{$oDocument->get('readed_count')}</span> </span> <span class="vote">{$lang->voted_count} <span class="num">{$oDocument->get('voted_count')}</span> </span> <span class="time">{$oDocument->getRegdate('Y.m.d H:i')}</span> </p> </div> <!-- /READ HEADER --> ... The XE template syntax and the variables used in the code above are listed in the table below. XE Template Syntax / Variable Description {$lang->readed_count} "Views" language variable {$oDocument->get('readed_count')} Displays view count. {$lang->voted_count} "Votes" language variable 97 4. Creating Board Skins XE Template Syntax / Variable Description {$oDocument->get('voted_count')} Displays voted count. {$oDocument->getRegdate('Y.m.d H:i')} Displays the written date and time (to display up to the unit of seconds, H:i:s). Displaying the Post Body The _read.html of the example board skin was designed to display the post body, as follows: ... <!-- READ BODY --> <div class="read_body"> {$oDocument->getContent(false)} </div> <!-- /READ BODY --> ... The XE template syntax and the variables used in the code above are listed in the table below. XE Template Syntax / Variable Description {$oDocument->getContent(false)} Displaying the contents of the post body Displaying Uploaded Files The _read.html of the example board skin was designed to display the uploaded files as follows: ... <!-- READ FOOTER --> <div class="read_footer"> <div cond="$oDocument->hasUploadedFiles()" class="fileList"> <button type="button" class="toggleFile" onclick="jQuery(this).next('ul.files').toggle();">{$lang>uploaded_file} ({$oDocument->get('uploaded_count')})</button> <ul class="files"> <li loop="$oDocument->getUploadedFiles()=>$key,$file"><a href="{getUrl('')}{$file>download_url}">{$file->source_filename} <span class="fileSize">[File Size:{FileHandler::filesize($file>file_size)}/Download:{number_format($file->download_count)}]</span></a></li> </ul> </div> </div> <!-- /READ FOOTER --> ... The XE template syntax and the variables used in the code above are listed in the table below. XE Template Syntax / Variable Description <div cond="$oDocument->hasUploadedFiles()" Displays the file list if any uploaded files exist. class="fileList"> 98 {$lang->uploaded_file} "Uploaded" language variable {$oDocument->get('uploaded_count')} Number of uploaded files <li loop="$oDocument>getUploadedFiles()=>$key,$file"> An iteration to receive and display the uploaded file list, if one exists. <a href="{getUrl('')}{$file->download_url}"> Download link for the uploaded files {$file->source_filename} The name of an uploaded file {FileHandler::filesize($file->file_size)} The size of an uploaded file {number_format($file->download_count)} The download count of the uploaded files 4. Creating Board Skins The example board skin uses the XE template syntax that has been newly added to XE core version 1.4.4. For more information on the new template syntax for XE core, see "XE Template Syntax." Displaying the List, Modify and Delete Buttons _read.html of the example board skin was designed to display the List, Modify and Delete buttons, as follows: ... <!-- READ FOOTER --> <div class="read_footer"> ... <div class="btnArea"> <span class="goList"><a href="#board_list" class="btn">{$lang->cmd_list}</a></span> <span class="goEdit"> <a cond="$oDocument->isEditable()" class="btn" href="{getUrl('act','dispBoardWrite','document_srl',$oDocument>document_srl,'comment_srl','')}">{$lang->cmd_modify}</a> <a cond="$oDocument->isEditable()" class="btn" href="{getUrl('act','dispBoardDelete','document_srl',$oDocument>document_srl,'comment_srl','')}">{$lang->cmd_delete}</a> </span> </div> </div> <!-- /READ FOOTER --> ... The XE template syntax and the variables used in the above code are shown below: XE Template Syntax/Variable Description <a href="#board_list" class="btn">...</a> Moves on to the list below. {$lang->cmd_list} 'List' language variable <a cond="$oDocument->isEditable()" ...>...</a> Displays the contents if the user has authority to edit. {getUrl('act','dispBoardWrite','document_srl',$oDocument>document_srl,'comment_srl','')} Displays the URL of the 'modify' page. {$lang->cmd_modify} 'Modify' language variable {getUrl('act','dispBoardDelete','document_srl',$oDocument- Displays the URL of the 'delete' page. >document_srl,'comment_srl','')} {$lang->cmd_delete} 'Delete' language variable The example board skin uses the XE template syntax that has been newly added to XE core version 1.4.4. For more information on the new template syntax for XE core, see "XE Template Syntax." Includes Trackback List and Comment List '_read.html' of the example board skin was designed to include _trackback.html and _comment.html, as shown below: <div class="board_read"> <!-- READ HEADER --> ... <!-- /READ HEADER --> <!-- READ BODY --> ... <!-- /READ BODY --> <!-- READ FOOTER --> ... <!-- /READ FOOTER --> 99 4. Creating Board Skins </div> <include cond="$oDocument->allowTrackback()" target="_trackback.html" /> <include cond="$oDocument->allowComment()" target="_comment.html" /> <!-- WRITE COMMENT --> ... <!-- /WRITE COMMENT --> The XE template syntax and the variables used in the code above are listed in the table below. XE Template Syntax / Variable Description <include target="..." /> Includes files cond="$oDocument->allowTrackback()" Includes the trackback list file (_trackback.html) when the trackback is allowed to write. cond="$oDocument->allowComment()" Includes the comment list file (_comment.html) if the comment is allowed to write. The example board skin uses the XE template syntax that has been newly added to XE core version 1.4.4. For more information on the new template syntax for XE core, see "XE Template Syntax." Displaying the Comment Input Form '_read.html' of the example board skin was designed to display the comment input form for posts, as shown below: Writing a comment to a comment and modifying comment pages should be written in comment_form.html. <div class="board_read"> <!-- READ HEADER --> ... <!-- /READ HEADER --> <!-- READ BODY --> ... <!-- /READ BODY --> <!-- READ FOOTER --> ... <!-- /READ FOOTER --> </div> <include cond="$oDocument->allowTrackback()" target="_trackback.html" /> <include cond="$oDocument->allowComment()" target="_comment.html" /> <!-- WRITE COMMENT --> <form cond="$grant->write_comment && $oDocument->isEnableComment()" action="./" method="post" onsubmit="return procFilter(this, insert_comment)" class="write_comment"> <input type="hidden" name="mid" value="{$mid}" /> <input type="hidden" name="document_srl" value="{$oDocument->document_srl}" /> <input type="hidden" name="comment_srl" value="" /> <textarea name="content" rows="5" cols="50"></textarea> <div class="write_author" cond="!$is_logged"> <label for="userName">{$lang->writer}</label> <input type="text" name="nick_name" id="userName" class="iText userName" /> <label for="userPw">{$lang->password}</label> <input type="password" name="password" id="userPw" class="iText userPw" /> <label for="homePage">{$lang->homepage}</label> <input type="text" name="homepage" id="homePage" class="iText homePage" /> </div> <div class="btnArea"> <input type="submit" value="{$lang->cmd_comment_registration}" class="btn" /> </div> </form> <!-- /WRITE COMMENT --> The XE template syntax and the variables used in the code above are listed in the table below. XE Template Syntax / Variable 100 Description 4. Creating Board Skins XE Template Syntax / Variable Description <form cond="$grant->write_comment && Displays the form of posting comments when $oDocument->isEnableComment()"> ...</form> users have the authority to post comments and this feature is allowed to be used. onsubmit="return procFilter(this, insert_comment)" Check data that a user entered and transmit the form. <input type="hidden" name="mid" value="{$mid}" /> Element to send module IDs (hidden type) <input type="hidden" name="document_srl" value="{$oDocument->document_srl}" /> Element to send the unique document number (hidden type) <input type="hidden" name="comment_srl" value="" /> Element to send the unique comment number (hidden type) <textarea name="content" rows="5" cols="50"></textarea> Comment input box <div class="write_author" cond="!$is_logged">...</div> Displays the included contents (name input box, password input box and homepage input box) when users have not logged in. {$lang->writer} 'Author' language variable {$lang->password} 'Password' language variable {$lang->homepage} 'Homepage' language variable {$lang->cmd_comment_registration} 'Posting comments' language variable The example board skin uses the XE template syntax that has been newly added to XE core version 1.4.4. For more information on the new template syntax for XE core, see "XE Template Syntax." 101 4. Creating Board Skins 4.11 Creating Trackback/Comment Lists 4.11.1 Creating Trackback List Write the trackback list in _trackback.html. '_read.html' includes the trackback list and displays it on the read page. In '_trackback.html' of the example board skin, the trackback list is written as follows: <!-- TRACKBACK --> <div class="feedback" id="trackback"> <div class="fbHeader"> <h2>{$lang->trackback} <em>'{$oDocument->getTrackbackCount()}'</em></h2> <p class="trackbackURL"><a href="{$oDocument->getTrackbackUrl()}" onclick="return false;">{$oDocument->getTrackbackUrl()}</a></p> </div> <ul cond="$oDocument->getTrackbackCount()" class="fbList"> <li class="fbItem" loop="$oDocument->getTrackbacks()=>$key,$val" id="trackback_{$val>trackback_srl}"> <h3 class="author"><a href="{$val->url}" title="{htmlspecialchars($val>blog_name)}">{htmlspecialchars($val->title)}</a></h3> <p class="time">{zdate($val->regdate, "Y.m.d H:i")}</p> <p class="xe_content">{$val->excerpt}</p> <p class="action" cond="$grant->manager"><a href="{getUrl('act','dispBoardDeleteTrackback','trackback_srl',$val->trackback_srl)}">{$lang>cmd_delete}</a></p> </li> </ul> </div> <!-- /TRACKBACK --> The XE template syntax and the variables used in the code above are listed in the table below. XE Template Syntax / Variable Description {$lang->trackback} 'Trackback' language variable {$oDocument->getTrackbackCount()} Displays the number of trackbacks. {$oDocument->getTrackbackUrl()} Displays the URL to connect trackbacks. cond="$oDocument->getTrackbackCount()" Displays the included contents if any trackback exists (conditional). loop="$oDocument->getTrackbacks()=>$key,$val" Displays the included contents if any trackback exists (iteration). {$val->trackback_srl} Unique number of a trackback {$val->url} The URL of a trackback page {htmlspecialchars($val->blog_name)} Name of the trackback site {htmlspecialchars($val->title)} Title of the trackback {zdate($val->regdate, "Y.m.d H:i")} Time of the trackback {$val->excerpt} Content of the trackback cond="$grant->manager" Displays the included contents if the user is the administrator. {getUrl('act','dispBoardDeleteTrackback','trackback_srl',$v URL of the trackback delete page al->trackback_srl)} {$lang->cmd_delete} 102 'Delete' language variable 4. Creating Board Skins The example board skin uses the XE template syntax that has been newly added to XE core version 1.4.4. For more information on the new template syntax for XE core, see "XE Template Syntax." 4.11.2 Creating Comment List Write the trackback list in _comment.html. '_read.html' includes the comment list and displays it on the read page. In _comment.html of the example board skin, the comment list is written as follows: <!-- COMMENT --> <div class="feedback" id="comment"> <div class="fbHeader"> <h2>{$lang->comment} <em>'{$oDocument->getCommentcount()}'</em></h2> </div> <ul cond="$oDocument->getCommentcount()" class="fbList"> <li loop="$oDocument->getComments()=>$key,$comment" class="fbItem" style="paddingleft:{($comment->get('depth'))*15}px"|cond="$comment->get('depth')" id="comment_{$comment>comment_srl}"> <h3 class="author"> <a cond="$comment->homepage" href="{$comment->homepage}">{$comment>getNickName()}</a> <strong cond="!$comment->homepage">{$comment->getNickName()}</strong> </h3> <p class="time">{$comment->getRegdate('Y.m.d H:i')}</p> {$comment->getContent(false)} <p class="action"> <a href="{getUrl('act','dispBoardReplyComment','comment_srl',$comment>comment_srl)}">{$lang->cmd_reply}</a> <a cond="$comment->isGranted()||!$comment->get('member_srl')" href="{getUrl('act','dispBoardModifyComment','comment_srl',$comment->comment_srl)}">{$lang>cmd_modify}</a> <a cond="$comment->isGranted()||!$comment->get('member_srl')" href="{getUrl('act','dispBoardDeleteComment','comment_srl',$comment->comment_srl)}">{$lang>cmd_delete}</a> </p> </li> </ul> <div cond="$oDocument->comment_page_navigation" class="pagination"> <a href="{getUrl('cpage',1)}#comment" class="prevEnd">{$lang->first_page}</a> <block loop="$page_no=$oDocument->comment_page_navigation->getNextPage()"> <strong cond="$cpage==$page_no">{$page_no}</strong> <a cond="$cpage!=$page_no" href="{getUrl('cpage',$page_no)}#comment">{$page_no}</a> </block> <a href="{getUrl('cpage',$oDocument->comment_page_navigation->last_page)}#comment" class="nextEnd">{$lang->last_page}</a> </div> </div> <!-- /COMMENT --> The XE template syntax and the variables used in the code above are listed in the table below. XE Template Syntax/Variable Description {$lang->comment} 'Comment' language variable {$oDocument->getCommentcount()} Displays the number of comments. cond="$oDocument->getCommentcount()" Displays the included contents if any comment exists (conditional). loop="$oDocument>getComments()=>$key,$comment" Displays the included contents if any comment exists (iteration). {($comment->get('depth'))*15} Multiplies the number of comment layers by 103 4. Creating Board Skins XE Template Syntax/Variable Description 15. |cond="$comment->get('depth')" Displays the attribute if a comment has its layer. {$comment->comment_srl} Unique number of the comment cond="$comment->homepage" Displays the included contents if the homepage exists. {$comment->homepage} Homepage URL {$comment->getNickName()} Displays the name of the poster. cond="!$comment->homepage" Displays the included contents if the homepage does not exist. {$comment->getRegdate('Y.m.d H:i')} Displays the date and time of the comment. {$comment->getContent(false)} Displays the comment body. {getUrl('act','dispBoardReplyComment','comment_srl', The URL of the comment to a comment page $comment->comment_srl)} {$lang->cmd_reply} 'Comment' language variable cond="$comment->isGranted()||!$comment>get('member_srl')" Displays the included content (modification and deletion) if you don't have the authority to edit comments or are not a member. {getUrl('act','dispBoardModifyComment','comment_srl' The URL of the comment modification page ,$comment->comment_srl)} {$lang->cmd_modify} 'Modify' language variable {getUrl('act','dispBoardDeleteComment','comment_srl', The URL of the delete page of the post $comment->comment_srl)} 104 {$lang->cmd_delete} 'Delete' language variable cond="$oDocument->comment_page_navigation" Displays page link when it is needed due to excessive comments. {getUrl('cpage',1)} The URL of the first page of the comments {getUrl('cpage',$oDocument>comment_page_navigation->last_page)} The URL of the last page of the comments {$lang->first_page} Comment 'first page' language variable {$lang->last_page} Comment 'last page' language variable <block loop="$page_no=$oDocument>comment_page_navigation>getNextPage()">...</block> Displays the list of the page number of the comment (iteration). cond="$cpage==$page_no" Displays the included contents if the current page number of the comment is the same as the page number. cond="$cpage!=$page_no" Displays the included contents if the current page number of the comment is not the same with the page number. {getUrl('cpage',$page_no)} The URL of the comment page {$page_no} The page number of the comment 4. Creating Board Skins The example board skin uses the XE template syntax that has been newly added to XE core version 1.4.4. For more information on the new template syntax for XE core, see "XE Template Syntax." 4.11.3 Creating the Page for Adding a Comment to a Comment and Modifying a Comment This page appears when a user writes a comment to a comment, or modifies an existing comment. The form of posting comments to the original post is included in the read page (_read.html). Pages to write a comment to a comment and modify comment pages are written in comment_form.html. The figure below shows the page of the writing a comment to a comment created by the example board skin. This page displays the name of the original comment author, the comment post time and the original comment on the top of the page and the modifications for its own comment in the textarea area. Figure 4-10 Add a Comment to a Comment Page In comment_form.html of the example board skin, the page to write a comment to a comment and modify a comment is written as follows: <include target="_header.html" /> <div cond="$oSourceComment->isExists()" class="context_data"> <h3 class="author"> <a cond="$oSourceComment->homepage" href="{$oSourceComment>homepage}">{$oSourceComment->getNickName()}</a> <strong cond="!$oSourceComment->homepage">{$oSourceComment>getNickName()}</strong> </h3> <p class="time">{$oSourceComment->getRegdate('Y.m.d H:i')}</p> {$oSourceComment->getContent(false)} </div> <!-- WRITE COMMENT --> <form action="./" method="post" onsubmit="return procFilter(this, insert_comment)" class="write_comment"> <input type="hidden" name="mid" value="{$mid}" /> <input type="hidden" name="document_srl" value="{$oComment->get('document_srl')}" /> 105 4. Creating Board Skins <input type="hidden" name="comment_srl" value="{$oComment->get('comment_srl')}" /> <input type="hidden" name="parent_srl" value="{$oComment->get('parent_srl')}" /> <textarea name="content" rows="5" cols="50">{htmlspecialchars($oComment>get('content'))}</textarea> <div class="write_author" cond="!$is_logged"> <label for="userName">{$lang->writer}</label> <input type="text" name="nick_name" id="userName" class="iText userName" value="{htmlspecialchars($oComment->get('nick_name'))}" /> <label for="userPw">{$lang->password}</label> <input type="password" name="password" id="userPw" class="iText userPw" /> <label for="homePage">{$lang->homepage}</label> <input type="text" name="homepage" id="homePage" class="iText homePage" value="{htmlspecialchars($oComment->get('homepage'))}" /> </div> <div class="btnArea"> <input type="submit" value="{$lang->cmd_comment_registration}" class="btn" /> </div> </form> <!-- /WRITE COMMENT --> <include target="_footer.html" /> The XE template syntax and the variables used in the code above are listed in the table below. XE Template Syntax / Variable Description <include target="_header.html" /> Includes _header.html. <include target="_footer.html" /> Includes _footer.html. cond="$oSourceComment->isExists()" Displays the original comment if one exists. cond="$oSourceComment->homepage" Displays the included contents, if the homepage address exists. cond="!$oSourceComment->homepage" Displays the included contents, if the homepage address does not exist. {$oSourceComment->homepage} Homepage address {$oSourceComment->getNickName()} Name of the poster who created the original comment {$oSourceComment->getRegdate('Y.m.d H:i')} The posted-time of the original comment {$oSourceComment->getContent(false)} Displays the comment body. onsubmit="return procFilter(this, insert_comment)" Check data that a user entered, and transmit the form <input type="hidden" name="mid" value="{$mid}" /> Element to send board module IDs (hidden type) 106 <input type="hidden" name="document_srl" value="{$oComment->get('document_srl')}" /> Element to send a unique number of the board (hidden type) <input type="hidden" name="comment_srl" value="{$oComment->get('comment_srl')}" /> Element to send a unique number of the comment (hidden type) <input type="hidden" name="parent_srl" value="{$oComment->get('parent_srl')}" /> Element to send a unique number of the original comment (hidden type) <textarea name="content" rows="5" cols="50">{htmlspecialchars($oComment>get('content'))}</textarea> Comment input box or edit window. The variable included inside of textarea displays the original post when modifying the comment. cond="!$is_logged" Displays the included contents if you are not logged in. {$lang->writer} 'Author' language variable 4. Creating Board Skins XE Template Syntax / Variable Description {$lang->password} 'Password' language variable {$lang->homepage} 'Homepage' language variable {htmlspecialchars($oComment->get('nick_name'))} Poster's name {htmlspecialchars($oComment->get('homepage'))} Homepage URL {$lang->cmd_comment_registration} 'Register comment' language variable The example board skin uses the XE template syntax that has been newly added to XE core version 1.4.4. For more information on the new template syntax for XE core, see "XE Template Syntax." 107 4. Creating Board Skins 4.12 Creating Delete Pages 4.12.1 Creating a Delete Post Page This page is used to confirm the deletion again when an authorized person attempts to delete a post. The delete post page is written in delete_form.html. The figure below shows the complete screen for the posting delete page created with the example board skin. Figure 4-11 Delete Post Page In the delete_form.html of the example board skin, the delete page of the post is written as follows: <include target="_header.html" /> <div cond="$oDocument->isExists()" class="context_data"> <h3 class="title">{$oDocument->getTitle()}</h3> <p class="author"> <strong>{$oDocument->getNickName()}</strong> </p> </div> <form action="./" method="get" onsubmit="return procFilter(this, delete_document)" class="context_message"> <input type="hidden" name="mid" value="{$mid}" /> <input type="hidden" name="page" value="{$page}" /> <input type="hidden" name="document_srl" value="{$document_srl}" /> <h1>{$lang->confirm_delete}</h1> <div class="btnArea"> <input type="submit" value="{$lang->cmd_delete}" class="btn" /> <button type="button" onclick="history.back()" class="btn">{$lang->cmd_cancel}</button> </div> </form> <include target="_footer.html" /> The XE template syntax and the variables used in the code above are listed in the table below. XE Template Syntax / Variable 108 Description 4. Creating Board Skins XE Template Syntax / Variable Description <include target="_header.html" /> Includes _header.html. <include target="_footer.html" /> Includes _footer.html. cond="$oDocument->isExists()" Displays the original post if there is any. {$oDocument->getTitle()} Title of the original post {$oDocument->getNickName()} Poster of the original post onsubmit="return procFilter(this, delete_document)" Check data that has been entered, and send the form. <input type="hidden" name="mid" value="{$mid}" /> Element to send module IDs (hidden type) <input type="hidden" name="page" value="{$page}" /> Element to send the page number (hidden type) <input type="hidden" name="document_srl" value="{$document_srl}" /> Element to send a unique number of the document (hidden type) {$lang->confirm_delete} 'Are you sure to delete?' language variable {$lang->cmd_delete} 'Delete' language variable {$lang->cmd_cancel} 'Cancel' language variable The example board skin uses the XE template syntax that has been newly added to XE core version 1.4.4. For more information on the new template syntax for XE core, see "XE Template Syntax." 4.12.2 Creating a Delete Comment Page This page is used to confirm the deletion of the comments again when users press the Delete button. The delete comment page is written on delete_comment_form.html. The figure below shows the delete comment page created with the example board skin. The page displays the poster of the comment to be deleted, the posted time and the original comment, and displays the Delete and Cancel button below. 109 4. Creating Board Skins Figure 4-12 Delete Comment Page In delete_comment.html of the example board skin, the comment delete page is written as follows: <include target="_header.html" /> <div cond="$oComment->isExists()" class="context_data"> <h3 class="author"> <a cond="$oComment->homepage" href="{$oComment->homepage}">{$oComment>getNickName()}</a> <strong cond="!$oComment->homepage">{$oComment->getNickName()}</strong> </h3> <p class="time">{$oComment->getRegdate('Y.m.d H:i')}</p> {$oComment->getContent(false)} </div> <form action="./" method="get" onsubmit="return procFilter(this, delete_comment)" class="context_message"> <input type="hidden" name="mid" value="{$mid}" /> <input type="hidden" name="page" value="{$page}" /> <input type="hidden" name="document_srl" value="{$oComment->get('document_srl')}" /> <input type="hidden" name="comment_srl" value="{$oComment->get('comment_srl')}" /> <h1>{$lang->confirm_delete}</h1> <div class="btnArea"> <input type="submit" value="{$lang->cmd_delete}" class="btn" /> <button type="button" onclick="history.back()" class="btn">{$lang->cmd_cancel}</button> </div> </form> <include target="_footer.html" /> The XE template syntax and the variables used in the above code are listed in the table below. 110 XE Template Syntax/Variable Description <include target="_header.html" /> Includes _header.html. <include target="_footer.html" /> Includes _footer.html. cond="$oComment->isExists()" Displays the original comment, if one exists. cond="$oComment->homepage" Displays the homepage if the homepage of the poster exists in the original comment. 4. Creating Board Skins XE Template Syntax/Variable Description cond="!$oComment->homepage" Displays the homepage if the homepage of the poster does not exist in the original comment. {$oComment->homepage} Home page URL of the poster of the original comment {$oComment->getNickName()} Poster's name {$oComment->getRegdate('Y.m.d H:i')} The posted-time of the original comment {$oComment->getContent(false)} Displays the body of the original comment. onsubmit="return procFilter(this, delete_comment)" Check data that has been entered, and send the form. <input type="hidden" name="mid" value="{$mid}" /> Element to send module IDs (hidden type) <input type="hidden" name="page" value="{$page}" /> Element to send the page number (hidden type) <input type="hidden" name="document_srl" value="{$oComment->get('document_srl')}" /> Element to send a unique number of the original post of the comment (hidden type) <input type="hidden" name="comment_srl" value="{$oComment->get('comment_srl')}" /> Element to send a unique number of the original comment (hidden type) {$lang->confirm_delete} 'Are you sure to delete?' language variable {$lang->cmd_delete} 'Delete' language variable {$lang->cmd_cancel} 'Cancel' language variable The example board skin uses the XE template syntax that has been newly added to XE core version 1.4.4. For more information on the new template syntax for XE core, see "XE Template Syntax." 4.12.3 Creating the Delete Trackback Page This page is used to confirm the deletion of the trackbacks again when users press the Delete button. The delete trackback page is written in delete_trackback_form.html. The figure below shows the complete screen of the delete trackback page created with the example board skin. 111 4. Creating Board Skins Figure 4-13 Delete Trackback Page In delete_trackback.html of the example board skin, the trackback delete page is written as follows: <include target="_header.html" /> <form action="./" method="get" onsubmit="return procFilter(this, delete_trackback)" class="context_message"> <input type="hidden" name="mid" value="{$mid}" /> <input type="hidden" name="page" value="{$page}" /> <input type="hidden" name="document_srl" value="{document_srl}" /> <input type="hidden" name="trackback_srl" value="{$trackback_srl}" /> <h1>{$lang->confirm_delete}</h1> <div class="btnArea"> <input type="submit" value="{$lang->cmd_delete}" class="btn" /> <button type="button" onclick="history.back()" class="btn">{$lang->cmd_cancel}</button> </div> </form> <include target="_footer.html" /> The XE template syntax and the variables used in the code above are listed in the table below. XE Template Syntax / Variable 112 Description <include target="_header.html" /> Includes _header.html. <include target="_footer.html" /> Includes _footer.html. onsubmit="return procFilter(this, delete_trackback)" Check data that has been entered, and transmit the form <input type="hidden" name="mid" value="{$mid}" /> Element to send module IDs (hidden type) <input type="hidden" name="page" value="{$page}" /> Element to send the page number (hidden type) <input type="hidden" name="document_srl" value="{document_srl}" /> Element to send a unique number of the board (hidden type) <input type="hidden" name="trackback_srl" value="{$trackback_srl}" /> Element to send a unique number of the comment (hidden type) {$lang->confirm_delete} 'Are you sure to delete?' language variable 4. Creating Board Skins XE Template Syntax / Variable Description {$lang->cmd_delete} 'Delete' language variable {$lang->cmd_cancel} 'Cancel' language variable The example board skin uses the XE template syntax that has been newly added to XE core version 1.4.4. For more information on the new template syntax for XE core, see "XE Template Syntax." 113 4. Creating Board Skins 4.13 Creating a Permissions Page This page provides a message when users attempt to access unauthorized pages, and provides the button to return to the login screen or go back. The permissions page is written in message.html. The figure below shows the complete screen of the permissions page created with the example board skin. Figure 4-14 Permissions Page In message_.html of the example board skin, the permissions page is written as follows: <include target="_header.html" /> <div class="context_message"> <h1>{$message}</h1> <div class="btnArea"> <a cond="!$is_logged" href="{getUrl('act','dispMemberLoginForm')}" class="btn">{$lang>cmd_login}</a> <button type="button" onclick="history.back()" class="btn">{$lang->cmd_back}</button> </div> </div> <include target="_footer.html" /> The XE template syntax and the variables used in the code above are listed in the table below. 114 XE Template Syntax / Variable Description <include target="_header.html" /> Includes _header.html. <include target="_footer.html" /> Includes _footer.html. {$message} Displays the information message "You do not have permission to access" if the user does not have the authority to access the post. cond="!$is_logged" Displays the included contents if you are not logged in. {getUrl('act','dispMemberLoginForm')} URL of the login page {$lang->cmd_login} 'Sign in' language variable {$lang->cmd_back} 'Go Back' language variable 4. Creating Board Skins The example board skin uses the XE template syntax that has been newly added to XE core version 1.4.4. For more information on the new template syntax for XE core, see "XE Template Syntax." 115 4. Creating Board Skins 4.14 Creating the Input Password Page This page asks the password when you access the page where the confirmation of the password is required. This is needed when non-members attempt to modify or delete their own posts or comments. The input password page is written in input_password_form.html. The figure below shows the complete screen of the input password page created with the example board skin. Figure 4-15 Input Password Page In input_password_form.html of the example board skin, the input password page is written as follows: <include target="_header.html" /> <form action="./" method="get" onsubmit="return procFilter(this, input_password)" class="context_message"> <input type="hidden" name="mid" value="{$mid}" /> <input type="hidden" name="page" value="{$page}" /> <input type="hidden" name="document_srl" value="{$document_srl}" /> <input type="hidden" name="comment_srl" value="{$comment_srl}" /> <h1>{$lang->msg_input_password}</h1> <input type="password" name="password" title="{$lang->password}" class="iText" /> <input type="submit" value="{$lang->cmd_input}" class="btn" /> </form> <include target="_footer.html" /> The XE template syntax and the variables used in the above code are listed in the table below. XE Template Syntax/Variable 116 Description <include target="_header.html" /> Includes _header.html. <include target="_footer.html" /> Includes _footer.html. onsubmit="return procFilter(this, input_password)" Check data that has been entered, and send the form. {$lang->msg_input_password} 'Please input the password' language variable <input type="hidden" name="mid" value="{$mid}" /> Element to send module IDs (hidden type) 4. Creating Board Skins XE Template Syntax/Variable Description <input type="hidden" name="page" value="{$page}" /> Element to send the page number (hidden type) <input type="hidden" name="document_srl" value="{$document_srl}" /> Element to send a unique number of the board (hidden type) <input type="hidden" name="comment_srl" value="{$comment_srl}" /> Element to send a unique number of the comment (hidden type) {$lang->password} 'Password' language variable {$lang->cmd_input} 'Input' language variable The example board skin uses the XE template syntax that has been newly added to XE core version 1.4.4. For more information on the new template syntax for XE core, see "XE Template Syntax." 117 4. Creating Board Skins 4.15 Applying CSS This section describes how to apply CSS codes to board skins. How to write CSS code is not covered in this document. You can modify and use the CSS code as desired. 1. Now, let's look at the CSS file of the example board skin. The code below is an example in which user_board.css provides the structured class list used for the creation of the example board skin. You can add and use the CSS code as desired. @charset "utf-8"; /* User Board */ .user_board{} /* Board Header */ .board_header{} .board_header h2{} .board_header p{} /* Form Control */ /* list.html | _read.html | write_form.html | comment_form.html */ .user_board .iText{} .user_board .iCheck{} .user_board textarea{} /* Button Area */ /* list.html | write_form.html | comment_form.html | _read.html | delete_form.html | delete_comment_form.html | delete_trackback_form.html | message.html */ .user_board .btnArea{} .user_board .btnArea .goList{} .user_board .btnArea .goEdit{} .user_board .btn{} /* Board List */ /* list.html */ .no_document{} .board_list{} .board_list th{} .board_list th.title{} .board_list tr.notice{} .board_list td{} .board_list td.notice{} .board_list td.no{} .board_list td.title{} .board_list td.title a{} .board_list td.title a.replyNum{} .board_list td.title a.trackbackNum{} .board_list td.author{} .board_list td.time{} .board_list td.lastReply{} .board_list td.lastReply a{} .board_list td.lastReply span{} .board_list td.lastReply sub{} .board_list td.readNum{} .board_list td.voteNum{} .list_footer{} .list_footer .pagination{} .list_footer .btnArea{} .list_footer .board_search{} .list_footer .board_search select{} .list_footer .board_search option{} /* Board Write */ /* write_form.html */ 118 4. Creating Board Skins .board_write{} .write_header{} .write_header .iText{} .write_header .iCheck{} .write_header label{} .write_editor{} .board_write .write_author{} .board_write .btnArea{} /* Board Read */ /* _read.html */ .board_read{} .read_header{} .read_header h1{} .read_header h1 a{} .read_header a.author{} .read_header strong.author{} .read_header .sum{} .read_header .sum .read{} .read_header .sum .vote{} .read_header .sum .time{} .read_body{} .read_body .xe_content{} .read_footer{} .read_footer .fileList{} .read_footer .toggleFile{} .read_footer .files{} .read_footer .files li{} .read_footer .btnArea{} /* Feedback (Trackback+Comment) */ /* _trackback.html | _comment.html */ .feedback{} .feedback .fbHeader{} .feedback .fbHeader h2{} .feedback .fbHeader .trackbackURL{} .feedback .fbList{} .feedback .fbItem{} .feedback .author{} .feedback .author a{} .feedback .author strong{} .feedback .time{} .feedback .xe_content{} .feedback .action{} .feedback .action a{} .feedback .pagination{} /* Pagination */ /* list.html | _comment.html */ .user_board .pagination{} .user_board .pagination a{} .user_board .pagination a.prevEnd{} .user_board .pagination a.nextEnd{} .user_board .pagination strong{} /* Write Author */ /* _read.html | write_form.html | comment_form.html */ .write_author{} .write_author label{} .write_author .iText{} .write_author .userName{} .write_author .userPw{} .write_author .homePage{} /* Write Comment */ /* _read.html | comment_form.html */ .write_comment{} .write_comment textarea{} 119 4. Creating Board Skins .write_comment .write_author{} .write_comment .btnArea{} /* Context Data | Context Message */ /* comment_form.html | delete_form.html | delete_comment_form.html | input_password_form.html | message.html */ .context_data{} .context_data h3.author{} .context_data h3.author a{} .context_data h3.author strong{} .context_data h3.title{} .context_data p.author{} .context_data p.author strong{} .context_data .time{} .context_data .xe_content{} .context_message{} .context_message h1{} .context_message .iText{} .context_message .btnArea{} 2. In _header.html, add the following code to attach the user_board.css to your Website. <load target="user_board.css" /> For more information, see "Referring to CSS Files." 3. Access the Website below, and check if the CSS code is correctly applied to the page. The 'example.com' in the path below is the domain address in which your Website is installed. − When using mod_rewrite: http://example.com/test_board/ − When not using mod_rewrite: http://example.com/?mid=test_board If the code was not applied to the screen, check if the <load /> template syntax referring to CSS is correct, or the CSS reference path (target) is specified correctly. 120 4. Creating Board Skins 4.16 Applying JavaScript This section describes how to add JavaScript code to board skins. How to write jQuery execution code is not covered in this document. Skin developers can write and add code as needed. 1. Write JQuery syntax code to user_layout.js. // <![CDATA[ jQuery(function($){ // Write jQuery code here. }); // ]]> 2. In _header.html, add the following code to attach the user_board.js to your Website. <load target="user_board.js" type="body" /> For more information on how to refer to a file, see "Referring to JS Files." 3. Access the Website below, and check if the JavaScript code is executed correctly. The 'example.com' in the path below is the domain address where your Website is installed. − When using mod_rewrite: http://example.com/test_board − When not using mod_rewrite: http://example.com/?mid=test_board If the programmed code was not applied to the screen, check if the <load /> template syntax referring to user_board.js is correct, or the user_board.js reference path (target) is specified correctly. Note For basic usage of jQuery in XE, see "Using JavaScript and jQuery." To learn how to implement various effects by using jQuery, visit http://jquery.com/. 121