1
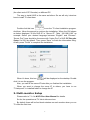
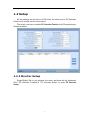
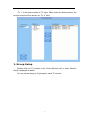
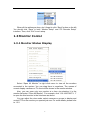
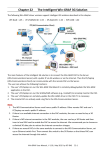
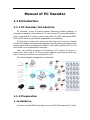
Manual of PC Decoder
1.1 Introduction
1.1.1 PC Decoder Introduction
PC Decoder, a pure IP based network Decoding & Matrix platform, is
integrated to support multi-monitor for TV wall function. By using this platform,
user can decode all IP videos, such as video from PC-DVR, stand alone DVR,
DVS and IP cameras (any brands supported by our software).
PC Decoder is made up of server end and client end. Its sever is added
into NVR to support centralized management, including setting connection port,
setting matrix output and display for each TV client and controling PTZ etc. Its
client ends run on independent computers.
User can connect as many as 24 monitors to TV clients. Of course, it
needs your video card in TV client system supports multi-monitor when you
want to connect more than one monitors on a PC.
The frame diagram of application is as below:
1.1.2 Preparation
1. Installation
You have to install NVR client (the sever end of PC Decoder) and TV client
1
(the client end of PC Decoder) on different PC.
The way to install NVR is the same as before. So we will only introduce
how to install TV client here.
Double click this icon
to run the TV client installation program.
And then, follow the prompt to continue the installation. When the GUI shown
as below displayed, fill the NVR IP in “Server IP”. Take “192.168.0.192” as
example. Select your desired language between “English” and “Chinese”.
“Server Port” here should be the same with “Listen Port” in NVR PC Decoder
Setup. It’s 5001 by default. Then, press “Save” to finish the information filling.
At last, press “Finish” to complete the installation.
When it’s done, this icon
will be displayed on the desktop. Double
click it to run the program.
Also, you can fill the server IP later after you finished the installation.
When you want to change the sever IP to others, you have to run
“TVsetup.exe” in installed folder to change the IP.
2. Multi-monitor Setup
Please refer to 7.1.4 in NVR Client User Manual for details.
So far, the operations at TV client side are done.
By default, there will be four black windows on each monitor when you run
TV client the first time.
2
1.2 Setup
All the settings can be done in NVR client, the sever end of PC Decoder.
Client end is mainly used to view videos.
First of all, user has to enable PC Decoder Funtion in NVR system setup.
Shown as below:
1.2.1 Monitor Setup
Single-Right-Click in any window, the menu as below will be displayed.
Click “PC Decoder Function”Æ “PC Decoder Setup” to enter PC Decoder
Setup.
3
The IP “192.168.0.99” here is one of the PC you installed TV client on.
After you filled the NVR IP “192.168.0.192” (the sever end, mentioned before)
in login interface when running TV client, its IP will be displayed here
automatically.
4
“TV: 1” is the main monitor in TV client. When there are dual monitors, the
second monitor will be shown as “TV: 2” here.
1. Group Setup
Double click one TV monitor in the “Active Monitor List” to enter “Monitor
Setup” displayed as below.
You can set as many as 16 groups for each TV monitor.
5
Select a group from the drop-down list to set it. You can define its name
and partitions. The changed group name will be actived after software
restarted. There are 1, 4, 9 and 16 partitions modes.
You can drag any cameras’ name to the display window. Default stream
type can be selected between “Main Stream” and “Sub Stream”. After that, all
the cameras in this group will display their main stream or sub stream in TV
client. When you want to cancel the display of one camera in one window,
double click it to remove. For example, you can double click “1.3M IP” to
remove it from the 7th window.
Also, you can change the stream type of some cameras, not all. Move
mouse to the stream type, then, there will be a drop-down list displayed. Select
one stream type from the list to display. The other cameras you didn’t change
their stream type will be displayed as “Default Stream Type”.
6
2. Loop Setup
You can display more than one cameras in a window.
The only thing you have to do is setting the interval. You can set it as 5, 10,
15 and 20 seconds etc. The greatest interval here you can set is 60 seconds.
7
When all the settins are done, don’t forget to click “Save” button on the left.
You should click “Save” in both “Monitor Setup” and “PC Decoder Setup”
interface. Then, click “Exit” to exit setup.
1.3 Monitor Contol
1.3.1 Monitor Status Display
Select “Open All Monitor” in right click menu to view all the monitors
connected in the system. You can drag them to anywhere. The names of
current display cameras on TV client will be shown in the monitor window.
Also, you can open only one monitor at a time via selecting it in the
monitor list below “Close All Monitor”. For example, click “192.168.0.99-TV: 1”
to open the third monitor in the list shown as above.
You can adjust the view mode, select cameras or groups to display and
control PTZ on the monitor you opened just now. For more details, please refer
to 1.3.2.
8
1.3.2 Monitor Control
1. View Adjust
Click
on monitor to enter this menu:
User can adjust the window split mode to 1, 4, 9 or 16 views mode.
When you select “Hide”, the windows on TV client will be hidden. Also,
when you select “Restart”, TV client will restart.
2. Display Groups
Click
on monitor window to open the group name list. Select one
group to display on the TV client. And the corresponding cameras’ names will
9
be displayed in the monitor window.
When you select “Close All”, you will close all the groups. At that time,
there will be no camera displayed on TV client. And the monitor windows will
turn to black. But you can drag cameras from “List Connect” panel to monitor
window to display. Also, you can select a group name again to display.
3. PTZ Control
Click
on monitor window to enter PTZ control menu.
PTZ can only be controled when PTZ camera is selected. It’s nearly the
same with the operations on PTZ control panel. But you can only call the
preset you have set. You can’t set the preset here.
10
When there are more than one cameras displayed in a window, you can’t
control PTZ. But you can drag PTZ camera to this window to stop loop in the
window and then control PTZ.
1.3.3 Close/Hide Monitor
Click
on monitor window to hide the window when you finished the
settings.
Also, you can select “Close All Monitor” in right click menu to close all the
monitors you opened.
11