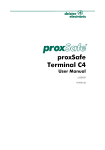
1
AC Power Regulator
TOYO
PARACON
TM
Sheet-key Setting Unit
XP-SK
User's Manual
Please read this manual right now.
●Carefully read this manual before using the
XP-SK unit.
●Be sure to hand over this manual to a new
owner if the XP-SK unit is transferred.
● Keep this manual in good order for
occasional use.
DS4-2346C
Table of contents
Safety precautions
・・・・・・・・・・・・・・・・・・・・・・・・・・・・・・・・・・・・・・・・・・・・・・・・・・・・・・・・・・・・・・・・・・・・・・・・・2
1. To our users ・・・・・・・・・・・・・・・・・・・・・・・・・・・・・・・・・・・・・・・・・・・・・・・・・・・・・・・・・・・・・・・・・・・・・・・・・・・・・・3
2. Useful information
・・・・・・・・・・・・・・・・・・・・・・・・・・・・・・・・・・・・・・・・・・・・・・・・・・・・・・・・・・・・・・・・・・・・・・3
2.1 Package checking ・・・・・・・・・・・・・・・・・・・・・・・・・・・・・・・・・・・・・・・・・・・・・・・・・・・・・・・・・・・・・・・・・・・・・・・・3
2.2 Features ・・・・・・・・・・・・・・・・・・・・・・・・・・・・・・・・・・・・・・・・・・・・・・・・・・・・・・・・・・・・・・・・・・・・・・・・・・・・・・・・・3
3. Names and functions of parts ・・・・・・・・・・・・・・・・・・・・・・・・・・・・・・・・・・・・・・・・・・・・・・・・・・・・・・・・・4
4. Directory of displayed information ・・・・・・・・・・・・・・・・・・・・・・・・・・・・・・・・・・・・・・・・・・・・・・・・・・・4
5. Operating procedure ・・・・・・・・・・・・・・・・・・・・・・・・・・・・・・・・・・・・・・・・・・・・・・・・・・・・・・・・・・・・・・・・・・・・6
5.1 Basic operating procedure ・・・・・・・・・・・・・・・・・・・・・・・・・・・・・・・・・・・・・・・・・・・・・・・・・・・・・・・・・・・・・・・・6
5.2 Description of each mode ・・・・・・・・・・・・・・・・・・・・・・・・・・・・・・・・・・・・・・・・・・・・・・・・・・・・・・・・・・・・・・・・・6
5.3 Setting procedure ・・・・・・・・・・・・・・・・・・・・・・・・・・・・・・・・・・・・・・・・・・・・・・・・・・・・・・・・・・・・・・・・・・・・・・・10
6. External view and installation
・・・・・・・・・・・・・・・・・・・・・・・・・・・・・・・・・・・・・・・・・・・・・・・・・・・・・・・14
6.1 External view・・・・・・・・・・・・・・・・・・・・・・・・・・・・・・・・・・・・・・・・・・・・・・・・・・・・・・・・・・・・・・・・・・・・・・・・・・・・14
6.2 Installation ・・・・・・・・・・・・・・・・・・・・・・・・・・・・・・・・・・・・・・・・・・・・・・・・・・・・・・・・・・・・・・・・・・・・・・・・・・・・・・14
7. General specifications ・・・・・・・・・・・・・・・・・・・・・・・・・・・・・・・・・・・・・・・・・・・・・・・・・・・・・・・・・・・・・・・・16
8. Others ・・・・・・・・・・・・・・・・・・・・・・・・・・・・・・・・・・・・・・・・・・・・・・・・・・・・・・・・・・・・・・・・・・・・・・・・・・・・・・・・・・・・17
8.1 Troubleshooting ・・・・・・・・・・・・・・・・・・・・・・・・・・・・・・・・・・・・・・・・・・・・・・・・・・・・・・・・・・・・・・・・・・・・・・・・17
The term "TOYO PARACON XP series" used in this document is the registered trade mark as well as
the formal identification name of our AC Power Regulator.
1
Safety precautions
Read the following safety precautions to use the XP unit in proper ways.
General precautions
Electric shock
●Always turn off the power of the XP-SK
unit before performing inspection or
maintenance.
Caution
●Do not drop the XP-SK unit when carrying
or installing.
●After wiring work, make sure no foreign
matters such as wire particles are left
inside of the unit housing.
●Perform periodic inspection and maintenance
(every 6 month for example) to ensure
trouble-free operation.
●If any abnormality is detected, immediately
turn off the power and eliminate the cause
thereof.
●Do not use the XP-SK unit for unspecified
purposes, nor remake it without our
permission.
Particular precautions
Caution for door handling
●Be careful not to have your fingers caught
in the door of the XP unit.
Caution for installation
●Do not let the XP-SK unit fall down when
installing.
●Provide the specified number and size of
set-screws and drill holes for installation.
About failsafe mechanism
●Provide failsafe function in the overall system.
●If you let the system keep operating with a
fuse of the XP unit broken, a hazardous
incident may occur in the worst case.
To prevent such accident, the failsafe
function must be provided within the system.
Caution for heat
● Do not touch the cooling fan, fins, and
housing. They become very hot during
operation. Turn off the power and wait for at
least 10 minutes so that the XP unit may
cool down before installing the SP-SK unit.
2
Useful information
1. To our users
Thank you for purchasing our PARACON XP Series sheet-key setting unit (SP-SK). Please read this
manual carefully before installation, operation and maintenance. Also please keep this manual in good
order for occasional use.
2. Useful information
2.1 Package checking
(1)Check the package for any damage given during transportation.
(2)Please contact our office if any defects or deficiencies are detected.
(3)Contact out service department if any abnormality is found.
〈Contents of package〉
・XP-SK sheet-key setting unit・・・・・・・1
・Cables ・・・・・・・・・・・・・・・・・・・・・・・・・・1
・Installation bracket ・・・・・・・・・・・・・・・1
・M3 screws・・・・・・・・・・・・・・・・・・・・・・・4
2.2 Features
(1)It is possible to set the degree of control, gain, soft start time, current limit, etc. without using
internal/external variable resistor or rotary switch.
(2)It is possible to display the load current or % meter. The load voltage, load resistance, and load power
can also be displayed if an optional PT is attached.
(3)Up to 3 error logs are recorded.
(4)If the heater breakage detecting function is selected, the reference resistance and breakage rate can
also be displayed.
(5)The zero-cross cycle setting is possible in the zero-cross control mode.
(6)The setting values, once set, will be stored in the unit if the power is turned off.
(7)The lock mechanism is provided to prevent unexpected change of the settings.
(8)When an error condition is detected, the corresponding error code is displayed.
(9)The sheet-key setting unit can be used handy by the XP unit with optional extension cables (XP-03H:
3m, XP-05H: 5m).
Caution
* Do not turn off the power of the XP-SK unit immediately after a setting operation. Otherwise, the setting
values may not be stored in the memory.
* Do not use the cables other than the attached and optional extension cables.
3
Names and functions of parts
3. Names and functions of parts
Front view
No.
①
②
③
④
⑤
⑥
⑦
⑧
Rear view
Name
Function
Mode display lamp
Indicates the current mode.
7-segment LED display
Displays the setting value, measurement value, or error codes.
Unit display lamp
Display the unit of the displayed data.
UP key
Used to increase the setting value.
DOWN key
Used to decrease the setting value.
Mode selection key (MODE key)
Used to select the setting mode.
Setting registration key (SET key)
Used to permit changing of setting values or to confirm registration thereof.
Cable connector
Used to connect XP-SK unit with XP unit.
* Refer to "5 Operating procedure" for the details of connection.
4
Directory of displayed information
4. Directory of displayed information
Mode display
Power on
Details
(S1)
Setting 1
0
100
%
(S2)
Setting 2
0
100
%
(SOFT)
Soft start time
0
300
0
200
0.5
0
1.0
(HBR)
100
8
(HP)
Heater breakage
reference point
(MON)
1.5
S
%
Heater breakage rate
AU
%
S
(LIMIT)
Current limit
AU
S
%
(CYC)
Zero-cross cycle
AU
%
S
(GAIN)
Gain
AU
%
2.0
S
S
AU
%
50
AU
%
%
Reference
resistance of
U-V
Reference
resistance of
V-W
Reference
resistance of
W-U
Ω
Ω
Ω
Degree
of control
%
Monitored value display
1
Resistance
of U-V
Resistance
of V-W
Ω
2
3
Voltage
of U-V
Ω
Voltage
of V-W
Resistance
of W-U
1
Ω
Voltage
of W-U
2
V
V
V
Current
of phase U
Current
of phase V
Current
of phase W
A
A
A
3
Power
KW
(ERR)
Error log
Log
No.1
Log
No.2
Log
No.3
5
Operating procedure
5. Operating procedure
5.1 Basic operating procedure
(1)Mode selection key (M key)
・Pressing this mode selection key shifts the mode from one to
another as indicated by an arrow in the "4 Directory of
displayed information".
・Select the mode as intended.
(2)Setting registration key (SET key)
・Press this switch once before changing the setting value
displayed, which permits changing of the setting value. As
soon as it is permitted, the setting value starts blinking.
・Display the intended setting value with UP and DOWN keys, and
then press the SET key once to complete the changing operation.
The setting value stops blinking and lights up steadily.
・The SET key is also used in MON mode to change the item to
be displayed.
・Pressing the SET key for a longer time works to set/reset the
key lock function.
・In the ERR mode, the SET key is used to clear the error log.
(3)UP key
・If you press the UP key after selecting a particular mode, the
displayed setting value will count up within the specified range.
・Pressing the UP key for a longer time makes the counting faster.
・Be sure to press the SET key once before changing the setting
value of a particular mode.
・The SET key is also used in MON or ERR mode to change the
item to be displayed.
(4)DOWN key
・If you press the DOWN key after selecting a particular mode, the
displayed setting value will count down within the specified range.
・Pressing the DOWN key for a longer time makes the counting faster.
・Be sure to press the SET key once before changing the setting
value of a particular mode.
・The SET key is also used in MON and ERR mode to change
the item to be displayed.
Basic operating procedure
Press the M key until the intended mode appears.
Press the SET key.
(permission for changing the setting value)
Press the UP or DOWN key until the intended value appears.
Press the SET key
(registration of new setting value)
End
Display
in normal state
(light up)
Display in
permission state
(blinking)
* Press the SET key to get permission for changing the setting value in any mode.
5.2 Description of each mode
(1)S1 mode
・In this mode, the output degree of control in both auto and manual setting procedure can be set.
・If "AU" is selected, the XP unit is controlled with the signals from the adjuster. (Note that the HIGHLOW control mode must be set with the external manual setting unit.)
・The values "0"∼"100" must be set manually with the XP-SK.
・The setting of this mode is effective when the S1-S2 circuit of the XP unit is open.
・If you want to control with external variable resistor, set "AU".
・The unit of the setting value is % (except AU). (by the step of 1 %)
〈Setting range〉
(%)
(%)
* The XP-SK is factory-set to "AU" (for automatic control signals from adjuster).
6
Operating procedure
(2)S2 mode
・In this mode, the output degree of control in manual setting procedure can be set.
・You can select between the external variable resistor and the sheet-key setting unit for manual setting procedure.
・If "AU" is selected, the XP unit is controlled with the external variable resistor in manual setting procedure.
・The values "0"∼"100" must be set manually with the XP-SK.
・The setting of this mode is effective when the S1-S2 circuit of the XP unit is closed.
・If you want to control with external variable resistor, set "AU".
・The unit of the setting value is % (except AU).
〈Setting range〉
(%)
(%)
* The XP-SK is factory-set to "AU" (for manual setting procedure with external variable resistor).
(3)SOFT mode (soft start time)
・In this mode, the soft start time can be set with the internal rotary switch and the sheet-key setting unit.
・If "AU" is selected, the XP unit is controlled by the soft start time set with the internal variable resistor.
・The values "0"∼"300" must be set with the internal variable resistor as in soft start time.
・In the phase control mode, it is impossible to set 4 seconds or less.
・The unit of the setting value is second (except AU). (by the step of 1 second)
〈Setting range〉
(s)
(s)
* The XP-SK is factory-set to "AU" (for soft start time setting with internal rotary switch).
* In the zero-cross control mode, the value can be set from 0 (sec).
(4)GAIN mode
・The gain for both S1 mode and S2 mode can be set in GAIN mode.
・If "AU" is selected, the XP unit is controlled with either the internal variable resistor or external variable
resistor depending on the type of the control unit. Make sure which variable resistor is available.
・The values "0"∼"200" must be set with the SP-SK setting unit.
・The unit of the setting value is % (except AU). (by the step of 1 %)
〈Setting range〉
(%)
(%)
* The XP-SK is factory-set to "AU" (for gain setting with internal or external variable resistor).
(5)CYC mode (zero-cross cycle mode)
・In this mode, the maximum number of cycles for the zero-cross control can be set.
・The values can be set in 0.5, 1.0, 1.5, or 2.0.
・In the phase control mode, "----" will be displayed instead.
・The unit of the setting value is second.
〈Setting range〉
(s)
(s)
(s)
(s)
* The XP-SK is factory-set to "0.5 (sec)".
Cycle setting value
(sec)
0.5 (standard)
1.0
1.5
2.0
Maximum number of cycles
60Hz
50Hz
30
25
60
50
90
75
120
100
7
Operating procedure
(6)LIMIT mode (current limiting mode)
・In this mode, the current limit percentage for the rated current can be set (except XP units with current
regulating functions)
・If "AU" is selected, the XP unit is controlled with either the internal variable resistor or external variable
resistor depending on the type of the control unit. Make sure which variable resistor is available.
・The values "0"∼"200" must be set with the SP-SK setting unit.
・Refer to the User's manual for XP unit for the details.
・The unit of the setting value is % (except AU). (by the step of 1 %)
・In the zero-cross control mode, "----" will be displayed instead.
〈Setting range〉
(%)
(%)
* The XP-SK is factory-set to "AU" (for current limit setting with internal or external variable resistor).
(7)HBR mode (Heater Breakage Rate)
・In this mode, the heater breakage rate can be set. (only when the unit is provided with the optional
heater breakage detecting function.)
・Refer to the User's manual for XP unit for the details.
・If "AU" is selected, the heater breakage rate of the XP unit is controlled with the internal variable resistor.
・The values "8"∼"50" must be set with the SP-SK setting unit.
・Settings out of the above mentioned range cannot be used.
・The unit of the setting value is % (except AU). (by the step of 1 %)
・In the zero-cross control mode, or when the heater breakage detecting function is not selected, "----" will
be displayed instead.
〈Setting range〉
(%)
(%)
* The XP-SK is factory-set to "AU" (for heater breakage rate with internal rotary switch).
(8)HP mode (heater breakage reference point)
・In this mode, the reference resistance for the heater breakage detecting function can be set. The
reference resistance can be changed after setting. (only when the unit is provided with the optional
heater breakage detecting function.)
・Refer to the User's manual for XP unit for the details.
・Refer to "5.3 Setting procedure" for the details.
・The unit of the setting value is Ω. (by the step of 0.01 Ω)
・In the zero-cross control mode, or when the heater breakage detecting function is not selected, "----" will
be displayed instead.
* The XP-SK is factory-set
〈display range〉
to "99.99" (Ω).
(Ω)
(Ω)
(9)MON mode (measurement monitor)
・In this mode, the degree of control, load resistance, load current, and load power are displayed.
・Refer to the "4 Directory of displayed information" for the details.
・The load resistance, load voltage, and load power are displayed only when the optional voltage
regulating, power regulating and heater breakage detection functions are selected.
・With the standard specifications, or when the current regulating function only is selected, the degree
of control and load current will be displayed.
・In the zero-cross control mode, only the degree of control (%) is displayed.
〈display range〉
Degree of
control
Load power
(%)
(%)
(kW)
(kW)
(Ω)
(Ω)
(V)
(V) load power that are displayed in MON mode are not
(A)
(A) use an r.m.s type or moving-iron type instrument.
Resistance
Load voltage
Load current
8
Caution
The load resistance, load voltage, load current, and
accurate measurements. For actual measurement,
Operating procedure
(10)ERR mode (Error Log)
・In this mode, the latest 3 error logs can be displayed.
・If there is no error log, "----" will be displayed.
・The error log will be stored in the memory if the power is turned off.
・The SET button can be used to clear the error log.
〈display range (example) 〉
・The latest error was fuse breakage, the second latest was temperature error, and the third latest was over current error.
Latest
Second
latest
Third latest
(11)Error code display mode
When an abnormality is detected, the corresponding error code is displayed blinking on the 7-segment.
Error code
Name
Action
Output signal
Control mode
Recovery condition
Name
Action
Output signal
Control mode
Recovery condition
Name
Action
Output signal
Control mode
Recovery condition
Name
Action
Output signal
Control mode
Recovery condition
Name
Action
Output signal
Control mode
Recovery condition
Name
Action
Output signal
Control mode
Recovery condition
Name
Action
Output signal
Control mode
Recovery condition
Name
Action
Output signal
Control mode
Recovery condition
Name
Action
Output signal
Control mode
Recovery condition
Description
Inverted phase (3-phase unit only)
Check power line.
Heavy error signal becomes active.
Control stops.
Turn on power again.
Fuse break
Check fuse and replace if necessary.
Heavy error signal becomes active.
Control stops.
Turn on power again.
Thyristor error/load open detected
Check power line, check load, and replace unit if necessary.
Heavy error signal becomes active.
Control stops.
Turn on power again.
Heater breakage (only for the unit with heater breakage detecting function)
Check load (heater) and replace if necessary.
Light error signal becomes active.
Control continues.
Automatically recovers as soon as error is eliminated.
Temperature abnormality (only for the unit with cooling fan)
Improve cooling condition or replace fans.
Light error signal becomes active.
Control stops.
Automatically recovers as soon as temperature lowers.
Communication abnormality
Check and replace XP-SK unit if necessary. Or check XP unit for possible abnormality.
No signal output
Control continues.
Replace the XP-SK unit or XP unit depending on the error.
Instantaneous interruption/phase interruption
Check power line.
Light error signal becomes active.
Control stops.
Automatically recovers as soon as power is supplied.
Over current
Check load.
Heavy error signal becomes active.
Control stops.
Turn on power again.
Frequency discrimination error
Check power line.
Heavy error signal becomes active.
Control stops.
Turn on power again.
9
Operating procedure
5.3 Setting procedure
5.3.1 Automatic setting (input signal from adjuster)
Start
Connect the signal line from adjuster.
Open the S1-S2 circuit.
Short the H1-H2 circuit.
Press the key until
the mode display lamp
of "S1" lights up.
Press the M (Mode) key.
Mode display lamp
S1
The display starts blinking.
Press the SET key.
Normal state
Press the key until
"AU" is displayed.
Press the UP(△)/DOWN key(▽).
7-segment LED display
"AU"
Press the SET key.
The display lights steadily.
The control starts with the input signal
from the adjuster.
5.3.2 Manual setting
Example: Degree of control 80% (with XP-SK unit)
Start
Short the S1-S2 circuit.
Short the H1-H2 circuit.
Press the key until
the mode display lamp
of "S2" lights up.
Press the M (Mode) key.
Mode display lamp
S1
The display starts blinking.
Press the SET key.
Press the key until
"80" is displayed.
Press the UP(△)/DOWN key(▽).
7-segment LED display
"80"
Press the SET key.
The display lights steadily.
The control starts with 80% output.
* For the use of external variable resistor, set "AU" for "S2" mode.
10
Changing state
Operating procedure
5.3.3 Auto/Manual setting
Example: Degree of control 32% for manual setting procdure
Start
Connect the signal line from adjuster.
Short the H1-H2 circuit.
Press the key until
the mode display lamp
of "S1" lights up.
Press the M (Mode) key.
Mode display lamp
S1
Press the SET key.
The display starts blinking.
Press the key until
"AU" is displayed.
Press the UP(△)/DOWN key(▽).
7-segment LED display
"AU"
Press the SET key.
The display lights steadily.
Press the key until
the mode display lamp
of "S2" lights up.
Press the M (Mode) key.
Mode display lamp
S2
The display starts blinking.
Press the SET key.
Press the key until
"32" is displayed.
Press the UP(△)/DOWN key(▽).
7-segment LED display
"32"
Press the SET key.
The display lights steadily.
In case S1-S2 circuit is opened
The control starts with the input signal
from the adjuster.
In case S1-S2 circuit is shorted
The control starts with 32 % output.
* For the use of external variable resistor, set "AU" for "S2" mode.
11
Operating procedure
5.3.4 HIGH-LOW setting (2 position control)
Example: 75% output for HI and 19% output for LOW in manual setting procedure
Start
Connect the signal line from adjuster.
Short the H1-H2 circuit.
Press the key until
the mode display lamp
of "S1" lights up.
Press the M (Mode) key.
Mode display lamp
S1
The display starts blinking.
Press the SET key.
Press the key until
"75" is displayed.
Press the UP(△)/DOWN key(▽).
7-segment LED display
HIGH setting:75%
"75"
The display lights steadily.
Press the SET key.
Press the key until
the mode display lamp
of "S2" lights up.
Press the M (Mode) key.
Mode display lamp
S2
The display starts blinking.
Press the SET key.
Press the key until
"19" is displayed.
Press the UP(△)/DOWN key(▽).
7-segment LED display
"19"
Press the SET key.
The display lights steadily.
In case S1-S2 circuit is opened
The control starts with 75% output.
LOW setting:19%
In case S1-S2 circuit is shorted
The control starts with 19 % output.
* For the use of external variable resistor, set "AU" for both "S1" and "S2" mode.
5.3.5 Key lock setting
Example: 75% output for HI and 19% output for LOW in manual setting procedure
・The sheet keys on the XP-SK unit can be locked to prevent unexpected operation or setting.
・When a particular key is locked, that key cannot be used for setting.
・The locked state is kept in the memory even if the power is turned off.
〈Key lock setting procedure〉
① Select the mode to be locked.
② Press the SET key for a longer time. (about 5 seconds)
③ The MODE display lamp starts blinking.
・・・・・ key lock has been set
〈Key lock resetting procedure〉
① Press the SET key for a longer time.(about 5 seconds)
② The MODE display lamp starts blinking.
・・・・・ key lock has been reset
Setting the key lock mode
12
Resetting the key lock mode
Operating procedure
5.3.6 Setting of heater breakage detecting function
<Summary>
The heater resistance is estimated from the load current and load voltage detected by the current
transformer (C.T.) and power transformer (P.T.). A reference resistance value is first set with the reference
resistance switch. Then the temporary heater resistance is continually monitored. When the difference
between the temporary resistance and the reference resistance exceeds the heater breakage rate
previously set in the HBR mode, the error signal will output. An optional sheet-key setting unit can also be
used to set heater breakage rate. Refer to the user's manual for the XP setting unit.
<Heater breakage reference point setting procedure>
1. Raise the temperature in the furnace until it is stable.
2. Change the mode to "HP" (heater breakage reference point).
3. Press the SET key. (The display starts blinking.)
4. The current resistance is displayed.
5. If the value is appropriate, press the SET key again. (The reference point is registered.)
<Heater breakage rate setting procedure>
1. Change the mode to "HBR" (heater breakage rate).
2. Press the SET key. (The display starts blinking.)
3. Change the heater breakage rate as intended.
4. Press the SET key again. (The heater breakage rate is registered.)
* If you register the reference resistance value before the furnace temperature reaches a stable condition,
the heater breakage will not be detected properly. Also note that the unit will not detect heater breakage
for about 5 minutes after power on.
* If the registration of the reference resistance value fails,the dot light of
the 7-segment LED blinks. If the registration completes, the dot light
Before
After
registration registration
turns on.
* About heater breakage rate
Suppose, a total of 10 heaters of the same resistance are arranged in
parallel, and the breakage of one of them is to be detected. The heater
breakage rate can be estimated as follows.
Blinks
Turns on
● Heater breakage ratea =
Number of heaters to be detected
Number of heaters arranged in parallel
× 100%
<Example> A total of 10 heaters are arranged in parallel and one of them is to be detected.
1
Heater breakage rate =
× 100% = 10(%)
10
Caution
* This setting is disabled in the zero-cross control mode.
* To set the heater breakage reference point, the load voltage and the load current must be higher than
25% of the rated voltage and rated current respectively.
* It is necessary to register the reference resistance value after connecting an optional Sheet-key
Setting Unit. Note that the referene resistance value cannot be registered with the reference
value switch on the XP unit.
* When using a heater made of silicone carbide, set the standard resistance value about 5
minutes after starting the thyristor.
* In case of the XP3 unit, it is necessary to register the reference resistance values for three
phases (between U-V, V-W and W-U).
13
External view and installation
6. External view and installation
6.1 External dimensions
XP-SK installed on panel
(Recommended panel size)
45
48
44
98
90
104
98
16
2-φ4
92
Connector for
input cable
2-M3 hole
6.2 About installation
■Single phase:20∼150A (The following example is the case of 20A.)
4-M3 screws
Cable (accessory)
Upward
Please connect with direction
of a connector carefully.
Connect one end of the cable to the XP unit (4p connector) and the other end to the XP-SK unit (4p connector).
14
External view and installation
■Single phase:200A or higher (The following example is the case of 200A.)
4-M3 screws
Please connect with direction
of a connector carefully.
Cable (accessory)
Upward
Connect one end of the cable to the XP unit (4p connector) and the other end to the XP-SK unit (4p connector).
■Three phase:All type (Form changes with models in part.)
Please connect with direction
of a connector carefully.
2-M3 screws
2×2-M4 screws
insert
Cover
Control board
・Cover is removed and Sheet-key setting unit installed.
・Four M4 screws of the XP unit are removed and a top cover removed.
・Connect one end of the cable to the XP unit (4p connector) and the other end to the XP-SK unit (4p connector).
15
General specifications
7. General specifications
(1)Power source ・・・・・・・・Supplied from XP
(2)Display ・・・・・・・・・・・・・7-segment LED, 4 digits
(3)Setting items ・・・・・・・・・Setting 1, setting 2, soft start time, zero-cross cycle, gain, current limit,
heater breakage rate
(4)Measurement function ・・・Degree of control, load resistance, load voltage, load current, load power
(5)Operating temperature ・・0℃∼50℃
(6)Operating humidity ・・・・35%∼85%RH (without dew condensation)
16
Others
8. Others
8.1 Troubleshooting
If the unit shows abnormal operation when power is supplied, check the following. If the abnormality
persists, turn off the power and contact our service department.
Abnormality
Details in question
Possible cause
Is the power supplied?
Action
Turn on the power.
Is it the rated power source?
Is the cable connected?
Is the connector connected
properly?
Use the rated power source.
No output
Is the error code "9" displayed
on the 7-segment LED?
Is the input signal from
the adjuster proper?
Is the connection to the
operation terminals
of the XP unit correct?
Properly connect the line to
the operation terminals of the
XP unit.
Is the setting of the
adjuster correct?
Are the settings of the adjuster
correct?
Change the setting of the
adjuster.
Is the SET key pressed before
Press the SET key.
changing the setting value?
Output
abnormality
Is the setting of each
mode proper?
Is the power
voltage normal?
Is the input from the
external devices
normal?
Is an error code
displayed?
Isn't the setting of the
sheet-key setting unit "0"?
Raise the setting value.
Isn't the setting of the gain
"0"?
Raise the gain value.
Isn't the setting of the current
limit "0"?
Raise the current limiting.
Is the switching signal line
wired correctly?
Open S1-S2 circuit in auto mode.
Close S1-S2 circuit in manual
mode.
Is the start signal inputted?
Short the start signal.
Refer to Section 5 (10).
17
Inspection and maintenance
The following items must be inspected at regular intervals. If any abnormality is detected, contact our service
department.
(1)Check the unit for dust or stain.
(2)Check the unit for discoloration or rust.
(3)Check the unit for abnormal smell or noise.
(4)Check the unit for proper key operation.
Installation site
Do not install the unit in the environment as described below. Otherwise, malfunction or breakage could result.
◇Place exposed to direct sunlight.
◇Place exposed to extreme heat or humidity.
◇Cold place subject to dew condensation.
◇Place exposed to splashed water, oil, chemical, etc.
◇Place exposed to dust, chip, etc.
◇Place exposed to solvent vapor, corrosive gas, etc.
◇Place exposed to sea wind.
◇Place near fire.
◇Place with poor ventilation.
◇Place near strong magnetism.
◇Place with excessive vibration.
Warranty
(1)Warranty period
1 year after delivery
(2)Limit of warranty
We will repair or replace the unit if any defect is detected within one year after delivery. We shall not be
responsible for any defects resulting from the following causes.
①User's rough handling.
②Caused by a third party priduct.
③Repaired or remade by a third party.
④Natural disasters or other events we are not responsible for.
The term "warranty" used here means the quality assurance of the product. It does not mean our responsibility
for the claim resulting from the defects of a product.
*The specifications are subject to change without our prior notice.
Point of contact
Our Sales development section, Electrical equipment department, Kamiya Factory, TOYO CORPORATION.
Unit model and serial Number are checked in advance.
Head Office/
Kagiya Factory
Tokyo
Sales Office
Kanagawa
Sales Office
Nagoya
Sales Office
Toyota
Sales Office
Osaka
Sales Office
Nishi-nippon
Sales Office
Hikisawa 1-39,kagiya-cho,kasugai,Aichi,480-0393
Phone:+81-568-88-1181 FAX:+81-568-88-3086
No.95, Uchikanda 282 Building Uchikanda 2-15-9,Chiyoda-ku,Tokyo 101-0047
Phone:+81-3-3256-6665 FAX:+81-3-3254-3650
No.203, City Maison Building 1-4-17, Miyata-cho, Hodogaya-ku, Yokohama City, Kanagawa 240-0002
Phone: +81-45-340-1766 FAX: +81-45-340-1767
2-156,Ajiyoshi-cho Kasugai,Aichi 486-8585
Phone:+81-568-35-3456 FAX:+81-568-34-4666
No.AT103, City Height Building 1-15-8 Osaka-honmachi, Toyota City, Aichi 471-0034
Phone: +81-565-37-8830 FAX: +81-565-37-8832
No.805, Osaka Godo Building Doyama-cho 1-5,Kita-ku,Osaka 530-0027
Phone:+81-6-6361-1626 FAX:+81-6-6312-6762
No.301, Abandant 90 Building 3-11-14, Hakataeki-higashi, Hakata-ku, Fukuoka City, Fukuoka 812-0013
Phone: +81-92-413-2300 FAX: +81-92-413-2312
DS4-2346C 07.04 PDF DATA