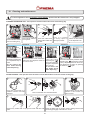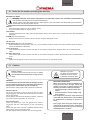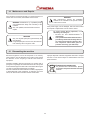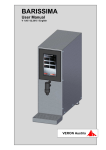
1
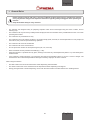
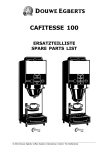
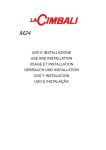
USO E INSTALLAZIONE USE AND INSTALLATION USAGE ET INSTALLATION GEBRAUCH UND INSTALLATION USO Y INSTALACIÓN USO E INSTALAÇÃO CARISMA Code 988-076-020 (rev. 1) Dichiarazione di conformità CE Con la presente il GRUPPO CIMBALI S.P.A. dichiara sotto la propria responsabilità che: EC Declaration of conformity GRUPPO CIMBALI S.P.A., hereby declares, under its own responsibility, that: Certificat de conformité CE Par la présente le GRUPPO CIMBALI S.P.A. déclare sous sa propre responsabilité que: EG-Konformitätserklärung Die GRUPPO CIMBALI S.P.A. hiermit in eigener Verantwortlichkeit wie folgt: Declaraciòn de conformidad CE Con la presente el GRUPPO CIMBALI S.P.A. declara bajo su propia responsabilidad que: Declaração de conformidade • • • • • Com a presente o GRUPPO CIMBALI S.P.A. declara, sob a própria responsabilidade que: Apparecchio - Appliance - Appareil - Gerätes - Aparato - Aparelho Marca - Brand - Marque - Marke - Marca - Tipo Fabbricante - Manufacturer - Fabricant Hersteller - Fabricante - Fabricante Tipo di macchina - Type of machine - Type de la machine Maschinentypen - Tipo de la màquina - Tipo de la màquina N° della macchina - Serial number - N° de la machine Maschinen-Nummer - N° de la máquina - No de la máquina è conforme alle seguenti direttive: est conforme aux normatives suivantes: es conforme a las siguientes directivas: 2006/42/EC 2006/95/EC 97/23/EC 2004/108/EC 2011/65/UE • vedere targa dati • refer to machine data • voir étiquette données • siehe Angaben zum Maschinentyp • ver la placa de la caracterìsticas • ver la plaqueta das características is in compliance with the following directives: entspricht den folgenden Gesetzesbestimmungen: está conforme às seguintes directrizes: Direttiva macchine - EC Machinery Directive - Normes CE Machines EG-Maschinenrichtlinie - Directiva de la maquinaria CE - Directiva sobre as máquinas CE Direttiva bassa tensione - EC Low Voltage Directive - Normes CE Basse-tension EG-Niederspannungrichtlinie - Directiva de la maquinaria CE - Directiva sobre a baixa tensão CE Direttiva attrezzature a pressione (PED) (Vedere art. 1, § 3.6. - Vedere tabella nella pagina successiva) Pressure Equipment Directive (PED) (See art. 1, § 3.6. - See chart in the following page) Directive èquipements sous Pression (PED) (Voir art. 1, § 3.6. - Voir tableau dans la page suivant) Richtlinie-Druckgeräte (PED) (Siehe art. 1, § 3.6. - Siehe Tabelle auf der nächsten Seite) Directiva equipos a presión (PED) (Véase art. 1, § 3.6. - Véase cuadro en la página siguiente) Directiva equipos sobre pressão (PED) (Veja art. 1, § 3.6. - Veja quadro na página seguinte) EMC - EC Electromagnetic Compatibility directive - Normes CE Compatibilité électromagnétique EG-Richtlinie Elektromagnetische Verträglichkeit - Directiva de la maquinaria CE Directiva sobre a compatibilidade el.magn. CE Direttiva RoHS2 - RoHS2 directive - Normes RoHS2 - RoHS2-Richtlinie - Directiva RoHS2 - Directiva RoHS2 e successive modifiche ed integrazioni. et modifications ultérieures et intégrations. y siguientes modificaciones e integraciones. and later modifications and integrations. sowie den nachfolgenden Änderungen und Ergänzungen. e alterações e integrações subsequentes. La presente dichiarazione perde la sua validità nel caso in cui l’apparecchio venga modificato senza espressa autorizzazione del costruttore oppure se installato o utilizzato in modo non conforme a quanto indicato nel manuale d’uso e nelle istruzioni. Il fascicolo tecnico è archiviato da "Product Development Manager" presso la sede legale. This declaration is null and void if the machine is modified without the express authorization of the manufacturer or if improperly installed and used in such a way that does not comply with indications in the users’ manual and the instructions. The technical booklet is archived by the "Product Development Manager" at the company's legal headquarters. La présente déclaration perd toute validité dans le cas où l’appareil est modifié sans l’autorisation du constructeur ou si l’appareil est installé ou utilisé de façon non conforme à ce qui est indiqué dans le manuel et dans le mode d’emploi. Le fascicule technique est archivé par "Product Development Manager" auprès du siège juridique. Die vorliegende Bescheinigung verliert ihre Gültigkeit, falls das Gerät ohne ausdrückliche Genehmigung des Hersteller modifiziert werden sollte oder falls es nicht entsprechend der im Bedienungs- und Wartungshandbuch aufgeführten Anleitungen installiert oder benutzt werden sollte. Die technischen Unterlagen wurden vom "Product Development Manager" am Geschäftssitz archiviert. La presente declaración pierde su validez en el caso de que el aparato sea modificado sin expresa autorización del constructor, o bien si ha sido instalado o utilizado de forma no conforme a lo indicado en el manual de uso y en las instrucciones. El fascículo técnico está archivado por "Product Development Manager" en la sede legal. A presente declaração deixa de ter validade no caso em que o aparelho seja modificado sem autorização do construtor ou se instalado ou utilizado de maneira não conforme ao indicado no manual de uso e nas instruções. O manual técnico foi arquivado pela "Product Development Manager" junto da sede legal. Sede legale - Legal headquarters - Siège juridique Geschäftssitz archiviert - Sede legal - Sede legal: Data - Date - Date Datum - Fecha - Data 20.05.2013 Via A. Manzoni 17, Binasco (Mi), ITALY ........................................................ Product Development Manager 1 ........................................................ Industrial Manager Pmax [ bar ] Caldaia Service boiler Chaudiére Heizkessel Caldera Caldeira Tmax tipo di macchina Type of machine type de la machine Maschinentypen modelo de la machina tipo de la màquina 1 gruppo 1 unit 1 groupe 1 gruppe 1 grupo 1 grupo [ °C ] Fluido - Fluid - Fluide Flüssig - Fluido - Fluido 2 bar 133° C Scambiatore Heat exchanger èchangeur 12 bar 133° C Wrmeaustauscher Intercambiador de calor Trocador de calor Capacità - Capacity - Capacitè [L] Kapazität - Capacidad - Capacidade acqua/vapore water/steam eau/vapeur wasser/dampf agua/vapor água/vapor 1.3 acqua water eau wasser agua água 0.150 x1 2 gb Gruppo Cimbali has voluntarily agreed to submit IT Gruppo Cimbali ha volontariamente deciso di sottoporre dei campioni rappresentativi, relativi alla linea di prodotti documentata in questo manuale, alle prove severe della norma DIN 10531:2010 in vigore da giugno 2011 (Igiene alimentare – Produzione ed erogazione di bevande calde da macchine – requisisti igienici, prova di migrazione di sostanze). representative samples of the product line documented in this manual to the stringent tests of the standard DIN 10531:2010 in force from June 2011 (Food Hygiene Manufacturing and supply of hot drinks machines - hygiene requirements, test the migration of substances). I test di analisi sono stati condotti dal Gruppo Eurofins, gruppo di Laboratori indipendenti, leader mondiale nel settore, che offrono un vasto portfolio di metodi analitici accreditati per verificare la sicurezza, la configurazione, la purezza, la composizione, l’autenticità e l’origine dei prodotti e delle sostanze biologiche. The analysis tests were performed by Eurofins Group, a group of independent laboratories, a world leader in the field, offering a broad portfolio of analytical methods accredited to assess the safety, configuration, purity, composition, authenticity and origin of products and biological substances. I test di analisi eseguiti da Eurofins circa la cessione di piombo e nichel nel liquido erogato, sono stati eseguiti su tutte le utenze di ogni macchina sottoposta a prove. A conclusione delle prove, Eurofins ha verificato che i valori campionati sono risultati tutti al di sotto dei limiti previsti dalla DIN 10531. The test analysis carried out by Eurofins about the release of lead and nickel in liquid delivered, were performed on all the utilities of each coffee machine tested. At the conclusion of the evidence, Eurofins has verified that the sampled values were all below the limits set by DIN 10531. FR Le GRUPPO CIMBALI a décidé de son plein gré de soumettre DE Die GRUPPO CIMBALI hat die Produkte der in diesem Handbuch des échantillons représentatifs, relatifs à la ligne de produits illustrée dans ce Manuel, aux tests rigoureux de la règlementation DIN 10531:2010 en vigueur à partir de Juin 2011 (Hygiène alimentaire – Production et distribution de boissons chaudes par l’intermédiaire de machines – conditions requises d’hygiène, test de migration de substances). beschriebenen Produktlinie freiwillig der strengen Zertifikation nach DIN 10531:2010 gültig ab Juni 2011 (Lebensmittelhygiene Herstellung und Abgabe von Heißgetränken aus Heißgetränkebereitern - Hygieneanforderungen, Migrationsprüfung) unterzogen. Die entsprechenden Tests und Kontrollen wurden in den Labors der Gruppe Eurofins, einem unabhängigen, international anerkannten Institut, unter Einsatz der offiziell anerkannten Analysemethoden zur Kontrolle der Sicherheit, der Konfiguration, der Reinheit, der Zusammensetzung, der Authentizität und des Ursprungs der Produkte und biologischen Substanzen ausgeführt. Les tests d’analyse ont été conduits par le groupe Eurofins, groupe de Laboratoires indépendants, leader mondiale dans le secteur qui propose un large éventail de méthodes analytiques accréditées afin de vérifier la sécurité, la configuration, la pureté, la composition, l’authenticité et l’origine des produits et des substances biologiques. Les tests d’analyses menés par Eurofins concernant la cession de plomb et de nickel dans le liquide distribué ont été effectués sur tous les usagers de chaque machine soumise aux tests. A la fin des tests, Eurofins a contrôlé que les valeurs d’échantillons se situent bien toutes au-dessous des limites prévues par la réglementation DIN 10531. Die von Eurofins durchgeführten Teste zur Präsenz von Blei und Nickel in die abgegebene Flüssigkeit wurden in bezug auf alle Wasser- bzw. Dampfabnahmen der getesteten Kaffeemaschinen durchführt. Die durch diese Teste von Eurofins festgestellen Werte liegen bei allen in Betracht getesteten Kaffeemaschinen unter den lt. DIN 10531 vorgesehenen Grenzwerten. ES GRUPPO CIMBALI ha decidido voluntariamente someter PT O GRUPPO CIMBALI decidiu de própria vontade algunas muestras representativas, relativas a la línea de productos documentada en este manual, a las severas pruebas de la norma DIN 10531:2010 en vigor desde junio 2011 (Higiene alimentaria – Producción y erogación de bebidas calientes de máquinas – requisitos higiénicos, prueba de migración de sustancias). submeter amostras representativas, relativas à linha d e produtos documentada neste manual, às provas severas da DIN 10531:2010 em vigor a partir de junho 2011 (Higiene alimentar – Produção e distribuição de bebidas quentes de máquinas – requisitos higiénicos, prova de migração de substâncias). Os testes de análises foram realizados pelo Grupo Eurofins, grupo de Laboratórios independentes, líder mundial no sector, que proporcionam uma vasta carteira de métodos analíticos creditados para verificar a segurança, a configuração, a pureza, a composição, a autenticidade e a origem dos produtos e das substâncias biológicas. Los tests de análisis han sido realizados por el Gruppo Eurofins, grupo de Laboratorios independientes, líder mundial en el sector, que ofrecen una amplia cartera de métodos analíticos acreditados para verificar la seguridad, la configuración, la pureza, la composición, la autenticidad y el origen de los productos y de las sustancias biológicas. Os testes de análises executados pela Eurofins relativos à cessão de chumbo e níquel no líquido distribuído, foram executados em todos os pontos de utilização de cada máquina submetida a provas. Como conclusão das provas, Eurofins verificou que os valores verificados como amostra resultaram todos abaixo dos limites previstos pela DIN 10531. Los tests de análisis efectuados por Eurofins respecto a la cesión de plomo y níquel en el líquido erogado, han sido realizados en todas las funciones de cada máquina sometida a las pruebas. Para terminar las pruebas, Eurofins ha verificado que todos los valores obtenidos de los tests realizados en las muestras han resultado por debajo de los límites previstos por la norma DIN 10531. in according with DIN 10531 - 2010 Particolare trattamento di rivestimento a garanzia della sicurezza alimentare. Special coating process to ensure food safety. Revêtement spécial pour garantir la sécurité alimentaire. Spezielle Beschichtung zur Lebensmittelsicherheit. Tratamiento especial de recubrimiento para garantizar la seguridad alimentaria. Tratamento especial de revestimento para garantir a segurança alimentar. Study N° 2011/2011 SAM Cert-1 3 4 CARISMA S-1 6 7 8 9 10 5 B A C 4 D 11 12 3 13 14 15 1 2 16 CARISMA A-1 13A 13B 13C 4A 4B 11 3A 14 5 iT LEGENDA gb LEGEND fR LEGENDE 1 Interruttore generale 2 Presa cavo alimentazione 3 Tubo (lancia) vapore orientabile 3A Tubo (lancia) vapore Quicksteam 4 Manopola regolazione vapore 4A Quicksteam: tasto latte "montato" 4B Quicksteam: tasto latte "caldo" 5 Manometro pompa 6 Pannello serbatoio acqua 7 Piano appoggiatazze 8 Tasto regolazione temperatura 9 Tasto programmazione 10 Tasto regolazione temperatura 11 Manopola erogazione acqua calda 12 Display 13 Levetta erogazione caffè 13A Tasto erogazione un caffè 13BTasto STOP-CONTINUO / Prog 13CTasto erogazione due caffè 14 Tubo (lancia) acqua calda 15 Portafiltro 16Bacinella 1 Main ON/OFF switch 2 Power supply socket 3 Swivel steam jet pipe 3A Swivel Quicksteam jet pipe 4 Steam adjustment knob 4A Quicksteam: "frothed" milk key 4B Quicksteam: "hot" milk key 5 Pressure gauge pump 6 Water tank panel 7 Cup holder tray 8 Temperature adjustment key 9 Programming key 10 Temperature adjustment key 11 Hot water dispensing knob 12 Display 13 Coffee dispensing lever 13A One coffee key 13BSTOP-continuous / Prog - push button 13CTwo coffee key 14 Hot water dispensing pipe 15 Filter holder 16 Pan 1 Interrupteur général 2 Prise du câble d’alimentation 3 Tuyau (lance) orientable de la vapeur 3A Tuyau (lance) orientable Quicksteam 4 Poignée de réglage de la vapeur 4A Quicksteam: touche lait "monté" 4B Quicksteam: touche lait "chaud" 5 Manomètre pompe 6 Panneau du réservoir d’eau 7 Plan appui-tasses 8 Touche de réglage de la température 9 Touche de programmation 10 Touche de réglage de la température 11 Poignée de débit de l’eau chaude 12 Display 13 Levier de débit du café 13A Touche de débit de café 13BTouche STOP-CONTINU / Prog 13CTouche de débit de deux cafés 14 Tuyau (lance) d’eau chaude 15 Porte-filtres 16Cuvette A Pressione / Temperatura impostata B Pressione / Temperatura istantanea della caldaia C Icona resistenza caldaia attiva D Icona mancanza acqua nel serbatoio dE LEGENDE 1Hauptschalter 2 Steckbuchse Netzkabel 3 Dampfrohr (beweglich) 3A Quicksteam Dampfrohr (beweglich) 4 Dampfhahn 4A Quicksteam: "Milchaufschäumung" 4B Quicksteam: "Milcherhitzen" 5 Manometer Pumpe 6 Paneel Wassertank 7 Tassenabstellfläche 8 Taste zur Temperatureinstellung 9 Taste zur Programmierung 10 Taste zur Temperatureinstellung 11 Regler Heißwasserabgabe 12 Display 13 Hebel Kaffeeabgabe 13A Taste Abgabe Espresso-Kaffee 13BTaste STOP-kontinuierliche / Prog 13CTaste Abgabe zwei Espresso-Kaffees 14 Rohr Heißwasserabgabe 15 Filterhalter 16 Wanne A Set Pressure / Temperature BInstant boiler Pressure / Temperature C Enabled boiler resistance icon D No water in tank icon eS LEYENDA A Pression / Température programmée BPression / Température instantanée de la chaudière CIcône de résistance de la chaudière enclenchée DIcône indiquant le manque d’eau dans le réservoir pT 1 Interruptor general 2 Toma del cable de alimentación 3 Tubo (lanza) vapor orientable 3A Tubo (lanza) vapor Quicksteam orientable 4 Mando regulación vapor 4A Quicksteam: botón leche "montada" 4B Quicksteam: botón leche "caliente" 5 Manómetro bomba 6 Panel del depósito del agua 7 Bandeja apoya-tazas 8 Botón regulación temperatura 9 Botón programación 10 Botón regulación temperatura 11 Mando erogación agua caliente 12 Display 13 Palanca para erogacion del café 13A Botón erogación un café 13BBotón STOP-CONTINUO / Prog 13CBotón erogación dos cafés 14 Tubo (lanza) agua caliente 15 Portafiltro 16 Bandeja A Presión / Temperatura regulada BPresión / Temperatura instantánea de la caldera A Betriebsdruck / Temperatur, Sollwert C Icono resistencia caldera activa BBetriebsdruck / Temperatur D Icono falta de agua en el depósito Wasserkessel, Istwert C Ikone Heizwiderstand Wasserkessel EIN D Ikone "Kein Wasser im Wassertank" 6 LEGENDA 1 Interruptor geral 2 Tomada do cabo de alimentação 3 Tubo (lança) de vapor orientável 3 Tubo (lança) de vapor Quicksteam orientável 4 Manípulo regulação vapor 4A Quicksteam: tecla leite "batido" 4B Quicksteam: tecla leite "quente" 5 Manómetro da bomba 6 Painel do reservatório da água 7 Tabuleiro de apoio das chávenas 8 Tecla de regulação da temperatura 9 Tecla de programação 10 Tecla de regulação da temperatura 11 Manípulo de distribuição da água quente 12 Display 13 Botão de distribuição do café 13A Botão de distribuição de um café 13BBotão STOP-CONTÍNUO / Prog 13CBotão de distribuição de dois cafés 14 Tubo (bico) da água quente 15 Porta-filtro 16Tabuleiro A Pressão / Temperatura configurada BPressão / Temperatura instantânea da caldeira C Ícone resistência da caldeira activa D Ícone falta de água no reservatório 7 Dear Madam, Dear Sir Congratulations on your new Faema! With this purchase, you have chosen an advanced espresso coffee machine built with the most modern technologies. This machine not only offers you a perfect combination of efficiency and functionality, but also provides you with all the tools you need to do your job in the best possible way. We recommend that you take some time to read this Use and Maintenance Booklet. It will help you become more familiar with your new espresso machine, which we’re sure you are looking forward to using. Wishing you all the best. GRUPPO CIMBALI S.p.A. Index Page Page 1. General Rules 28 2. Installation Rules 29 3. Electrical Installation Rules 29 4. Water Installation Rules 30 5. Installation Check-up 30 USE 1. Preliminary steps before first start-up 31 2. First start-up 32 3. 33 33 33 Beverage preparation Coffee dispensing Cup warmer Steam dispensing – Frothing milk for cappuccinos Hot water dispensing 34 35 4. Setting the boiler temperature Version: Carisma S (wands: steam - water) 35 5. Setting the boiler temperature/steam keys Version: Carisma A Quicksteam (wands: water - Quicksteam) 36 6. Programming coffee measures (only Carisma A version) 37 7. 38 Viewing boiler pressure / temperature 8. Checking the water level in the tank 38 9. Checking the water level in the tray 38 10. Cleaning and maintenance Cleaning dispensing unit Filter-holders Steam and hot water dispensing pipes Grille and Drip Basin Bodywork WATER TANK 39 39 39 40 40 40 40 11. Filter-softener replacement 41 12. Rules for the worker operating the machine 42 13. Caution 42 14. Maintenance and Repairs 43 15. Dismantling the machine 43 16. Defects - Malfunctions 44 ILLUSTRATIONS 117 Service Line 119 These chapters in the manual are to be used by qualified, authorized technical staff. 27 English 1. General Rules Please read the warnings and rules in this User’s Manual carefully before using or handling the machine in any way because they provide important information regarding safety and hygiene when operating the machine. Keep this booklet handy for easy reference. • The machine was designed solely for preparing espresso coffee and hot beverages using hot water or steam, and for warming cups. • The machine must only be used by suitably trained employees who are well aware of the possible risks that can occur when operating the machine. • The machine is for professional use only. • The machine must not be used by children or by people with physical, sensorial, or mental impairments: if such people use the machine, they must be supervised during operation. • The machine must not be left unattended. • The machine must not be used outdoors. • Do not expose the machine to atmospheric agents (rain, sun, and cold). • Noise: assessed acoustic pressure level 79db(A) (+/- 1db). • Keep the machine in a protected and dry place, bearing in mind that very cold temperatures (below 5 °C) could damage the machine boiler. • If the machine is used improperly or for purposes other than those described above, it can be a source of danger. The manufacturer will not be held responsible for damages caused by improper use of the machine. When using the machine: • The filter holder must not be unhooked before coffee dispensing has terminated. • The steam nozzle must not be extracted from the liquid before steam dispensing has stopped. • During prolonged water or steam dispensing, never touch the metal nozzle or the filter holder zone: scalding hazard. 28 English These chapters in the manual are to be used by qualified, authorized technical staff. 2. Installation Rules WARNING Installation, dismantling, and adjustments must only be performed by qualified and authorized technicians. Carefully read the warnings and rules in this manual because they provide important information regarding safe installation, use and maintenance of the machine. Keep this booklet handy for easy reference. • Staff responsible for moving the machine must realize the risks in moving heavy loads. Move the machine carefully, using the correct lifting equipment (fork lift, for example). If moving the machine by hand, make sure: - enough people are available for the task, depending on the machine weight and difficult handling; - to always use the necessary safety gear (shoes/gloves). • After removing the machine from its packing materials, make sure that the machine and its safety devices are intact. • If the power supply cord is damaged, it can only be replaced by qualified and authorized technicians. • Packing materials (plastic bags, polystyrene foam, staples, etc.) must be kept out of the reach of children because they are potentially hazardous. • Before plugging in the machine, make sure that the information on the nameplate (voltage, etc.) matches that of the electrical and water systems. • Completely unwind the power supply cable. • The coffee machine should sit on a flat, stable surface at least 20 mm from walls and from the counter. Keep in mind that the highest surface on the machine (the cup warmer tray) sits at a height of at least 1.2 meters. Make sure there is a shelf nearby for accessories. • Room temperature must range between 10° and 32°C (50°F and 90°F). • An electrical outlet must be in the immediate vicinity. • Do not install in rooms (kitchens) that are cleaned with jets of water. • Do not clean the machine with jets of water. • Do not immerse the machine, power cable, or parts containing electronic components in water or other liquids. • Do not obstruct openings or ventilation and heat vents. • Do not install the machine outdoors. 3. Electrical Installation Rules Prior to installation, make sure there is a circuit breaker installed with a distance between the contacts that allows for complete disconnection when there is a category III overload and that provides protection against current leakage equal to 30 mA. The circuit breaker must be installed on the power supply in compliance with installation rules. The electrical safety of this machine is only ensured when it is correctly connected to an efficient earthing system in compliance with the electrical safety laws in force. This fundamental safety requirement must be verified. If in doubt, request that a qualified electrician inspect the system. The manufacturer cannot be held responsible for any damage caused by the lack of an earthing system on the electrical supply. It is unadvisable to use adaptors, multiple plugs, and/or extension cords. If their use is indispensible, only use simple or multiple adaptor plugs and extension cords that are in compliance with safety laws. Make sure these devices do not exceed the voltage capacity marked on the simple adaptor and on extension cords, and the maximum voltage marked on the multiple adaptor. Check that the type of connection and voltage correspond with the information on the nameplate: see illustrations chapter figure 1. 29 English These chapters in the manual are to be used by qualified, authorized technical staff. 4. Water Installation Rules WATER REQUIREMENTS Water used in coffee machines must be potable and suitable for human consumption (see laws and regulations in force). Check on the machine’s water inlet that: • the pH level complies with the laws in force • the chloride value is less than 100 mg/l If the values do not fall within the limits, an appropriate water treatment device must be inserted (respecting the local laws and compatible with the machine). For correct machine functioning, replace the softener with a frequency based on the water hardness and type of use. WARNING Only use the supplied parts for installation. If other parts are installed, they must be new (not used) and they must be able to come in contact with potable water suitable for human consumption (according to local laws in force). WATER CONNECTIONS Place the machine on a flat surface and stabilize it by adjusting and securing the feet. The machine does not need to be connected to a water supply because if has its own built-in reservoir. therefore, fill the reservoir (see illustrations chapter figure 2) before turning ON the machine and make sure that the softener is attacched to the relative supply tube (see illustrations chapter figure 3). Hook up the water connections as shown, respecting the hygiene, water safety, and anti-pollution laws in the country of installation. 5. Installation Check-up WARNING: AFTER INSTALLATION, CHECK TO SEE IF THE MACHINE IS WORKING PROPERLY (see the Installation Module C) WATER CONNECTIONS • No leaks from the connections or tubes FUNCTIONING • Boiler and operating pressures are normal. • The pressure gauge is working properly. • The self-leveling device is working properly. • The expansion valves are working properly WARNING: ONCE THE MACHINE HAS BEEN INSTALLED AND IS READY FOR USE, BEFORE ALLOWING THE WORKER TO START USING THE MACHINE, WASH THE INTERNAL COMPONENTS ACCORDING TO THE INSTRUCTIONS BELOW: GROUP • Hook up the filter holder to the group (without coffee). • Let group dispense water for about a minute. HOT WATER • Continuously dispense hot water (using the appropriate device) until at least ½ liter of water have been used (See the specific paragraph). STEAM (also with Quicksteam) • Dispense steam from the nozzle for about a minute, using the appropriate device. 30 English USE 1. Preliminary steps before first start-up When using the machine for the first time, you must carry out these steps: Rinse components 1 2 Remove the water tank panel. Remove the lid and extract the machine reservoir. 3 4 5 Carefully rinse the tank and lid with water. Carefully rinse the supplied water filters and filter holders. Reposition the tank in the machine. Fill with water 6 7 MAX 2L Pour still mineral water or good quality potable drinking water into the water tank (*). Reposition the lid and the water tank panel. (*) NOTE: Water naturally contains different concentrations of mineral salts that determine its hardness and, over time, create limescale deposits. To keep the machine working perfectly and to prolong the duration of the softening filter, we recommend using water with a hardness that does not exceed 8°F (4.5°D). Electric connection 8 9 Hook up the machine by inserting the plug into a previously prepared electrical socket. Insert the supplied cable in the socket at the back of the machine. 31 English 2. First start-up After making sure that at least 2 liters of water are in the water tank, follow these steps: 1 2 3 The display will light up with these indications: ~ 3 min Instant boiler pressure OK Set pressure Resistance enabled Press the main on/off switch at the back of the machine. Note: prolonged functioning of the pump during the first start-up is normal because the boiler is filled with water during this phase. The heating phase lasts approximately 3 minutes. Afterwards, the resistance icon is no longer displayed and the “set” and “actual” pressures coincide. Scalding hazard! Warning: Do these steps very carefully. 4 5 Carisma S Carisma A Raise the coffee lever and dispense water for a few seconds. Afterwards, lower the lever to the starting position to stop dispensing. Press the coffee key and dispense water for a few seconds; press the same key again to stop dispensing. Hook the filter holder (without coffee) to the group. That helps the temperature of the group and that of the filter to match and it also rinses the hydraulic circuit. 32 English 3. Beverage preparation Necessary conditions: There must be enough water in the tank – and the machine must be at the correct pressure and right working temperature. During the dispensing phases, do not remove the water reservoir from its seat. Coffee dispensing Scalding hazard! Warning: Do these steps very carefully. 1 3 4 Use the supplied presser to evenly press the ground coffee in the filter. Remove any ground coffee residues from the edge of the filter. Insert and lock the filter holder into place to the group. 5 Select the filter holder for 1 or 2 cups of coffee. 2 Fill the filter holder with 1 or 2 doses of ground coffee, according to the filter holder used. 6 Carisma S Raise the coffee lever to start dispensing. Position the cup (or cups) beneath the nozzle (or nozzles) of the filter holder. Carisma A Press the coffee distribution key ( o ) corresponding to the desired dose. The corresponding led lights up, the coffee will be issued and will stop automatically upon completion. Press the continuous/STOP distribution button for a continuous distribution. The distribution, both dosed and continuous, may be interrupted at any time by pressing the continuous/STOP key . When the desired dose has been reached, stop dispensing by lowering the coffee lever to the initial position. Important advice: Do not remove the coffee filter before the coffee dispensing has completed. Cup warmer The machine has a cup warming tray where the cups can be placed (upside down) before use. Using the cup warmer enhances the organoleptic qualities of the espresso coffee. 7 33 English Steam dispensing – Frothing milk for cappuccinos General instructions Milk is a delicate biological product that can easily sour, and it is modified by heat. When the milk carton is open and for its entire period of use, the milk must be kept at a temperature that does not exceed 5°C (41°F); our milk storage equipment is suitable for that purpose. Note: at the end of the workday (or, at least, no more than 24 hours after the carton is open), any remaining milk must be eliminated. Scalding hazard! Warning: Do these steps very carefully. Use the special insulated devices to move the water and steam wands. Carisma S (wands: steam - water) 1 Carisma A Quicksteam (wands: water - Quicksteam) 2 1 2 4°C 4°C 1/2 1/2 Insert the steam wand in the milk and place the jug on the cup tray. Half-fill a tall narrow pitcher. Insert the steam wand into the milk and gradually turn the knob counterclockwise. Half-fill a tall narrow pitcher. 3 4 3 Once the amount of foam has been reached and the temperature is sufficiently hot, stop steam dispensing by turning the knob clockwise. Press the desired steam key (hot will stop automatically. 6 5 While dispensing steam, lightly turn the pitcher to better froth the milk. 5 After using the wand, carefully clean the tube with a sponge or clean wash cloth. Note: After using the steam nozzle, clean the inside of the wand as follows: turn the steam wand towards the cup warming tray and very carefully dispense steam Important advice: The steam from the steam wand at least wand must never be removed from the liquid before the steam once. has been completely shut off. 34 - frothed ) The steam 6 After using the wand, carefully clean the tube with a sponge or clean wash cloth. Note: After using the steam nozzle, clean the inside of the wand as follows: turn the steam wand towards the cup warming tray and very carefully dispense steam Important advice: the steam from the steam wand at least wand must not be removed from once. the liquid before the steam has stopped. English Hot water dispensing Scalding hazard! Warning: Do these steps very carefully. Use the special insulated devices to move the water and steam wands. 1 Carisma S (wands: steam - water) Carisma A Quicksteam (wands: water - Quicksteam) Place a container beneath the hot water tube and turn the knob counterclockwise. 2 Carisma S (wands: steam - water) Carisma A Quicksteam (wands: water - Quicksteam) When the desired dose has been reached, stop the hot water by turning the knob clockwise. 4. Setting the boiler temperature Version: Carisma S (wands: steam - water) To set the boiler temperature, follow these steps: Scalding hazard! Warning: Do these steps very carefully. 1 2 3 Instant boiler temperature 4 SET SET * To access the programming menu, press and hold the center key OK for at least 4 seconds. * Use the +/- keys on the side to set the boiler temperature (value with large characters). Set temperature An asterisk and the word SET appear on the display. 35 Confirm and exit the programming menu by pressing the center key OK. English 5. Setting the boiler temperature/steam keys Version: Carisma A Quicksteam (wands: water - Quicksteam) In the Quicksteam versions, the programming phase includes setting the boiler temperature and the temperature for the steam keys: 1 2 3 Instant boiler temperature 4 SET SET * To access the programming menu, press and hold the center key OK for at least 4 seconds. 5 01 = Frothed key * Use the +/- keys on the side to set the boiler temperature (value with large characters). Set temperature An asterisk and the word SET appear on the display. 6 Use the +/- keys on the side to set the stop dispensing temperature (40÷85°C). Press the center key OK to pass to the phase for setting the frothed steam key. Note: Each time the center programming key OK is pressed, the next screen appears. 7 The presence of reference marks below the temperature follows this logic: Reference Mark Stop dispensing temperature Start air temperature 1 MARK Setting phase Stop temperature Dispensing 2 MARKS Setting phase Start air temperature 3 MARKS Setting phase Stop air temperature Press the center key OK and use the +/- keys on the side to set the start air temperature (compressor working). 8 Press the center key OK and use the +/- keys on the side to set the stop air temperature (compressor not working). 9 Press the center key OK and proceed to set the hot steam key. 02 = Hot key Stop air temperature Use the +/- keys on the side to set the stop dispensing temperature key (40÷85°C). Start air temperature Stop air temperature Press the center key OK and then use the +/- keys on the side to set the start air and stop air temperatures. The hot steam key must be set at the same temperature. Stop dispensing temperature 10 Confirm and exit the programming menu by pressing the center key OK. 36 English 6. Programming coffee measures (only Carisma A version) How to access the programming function To enter the programming mode, press button and keep it pressed for a few seconds; the buzzer sounds intermittently. To terminate this phase, once the 2 coffee dispensing keys have been set ( ), press the key again. Programming coffee measures “Before programming the coffee dispensing push buttons fill the filter holder with the correct serving of ground coffee. Don’t use coffee grouts for programming servings.” Fit and tighten the filter holder (15) on the coffee dispenser unit, positioning the cup (or cups) under the nozzle (or nozzles) of the filter holder (15). or ) Press the coffee dispensing push button ( corresponding to the required serving to be programmed. When the amount of coffee in the cup reaches the required level, or ) to stop dispensing. press again the button ( Repeat the above operations for both coffee push buttons. 15 Note: if you make a programming mistake, use a new dose of ground coffee and repeat the operation. 37 English 7. Viewing boiler pressure / temperature The boiler temperature or pressure (set and read) can be viewed on the display: Press the center key OK to alternate the display of the temperature / pressure readings. 8. Checking the water level in the tank The lack of water in the tank is signaled by the appearance of the related icon and a different color of the display. Fill the tank with new water to the maximum level. If this operation is delayed, a safety device will intervene and make it impossible to prepare coffee. Carisma S version NOTE: If you should run out of water during coffee dispensing, lower the dispensing lever before you remove the filter holder. 9. Checking the water level in the tray When the tray is filled with water, the words “EMPTY ME” appear in the special slot on the grid. Carefully remove the tray and empty the water. Note: It is advisable to periodically empty the water that collects in the tray and not wait for it to completely fill with water. EMPTY ME 38 English 10. Cleaning and maintenance For correct application of the food safety system (HACCP), please follow the instructions in this paragraph. Cleaning dispensing unit - This operation must be made at the end of each working day 1 Remove the filter holder from the coffee group. 6 2 3 Using a brush, clean the cover gasket. Insert the rubber disk into the filter-holder with its filter. 4 5 Pour in a packet or dosing cupful of detergent powder. Attach the filter-holder to the dispenser unit. Carisma S Carisma A Raise the coffee lever to the starting position after Remove the filter holder. Raise the 10”. Repeat this step 10 coffee lever and dispense water for about 30” to rinse. times. Do not remove the filter holder during coffee dispensing. P r e s s t h e c o ff e e dispensing key , wait 10” and press the key again. Repeat this step 10 times. Do not remove the filter holder during coffee dispensing. Remove the filter holder: press the coffee and perform a rinse dispensing key cycle by dispensing water for about 30”. Stop dispensing the water by pressing the coffee key again. Filter-holders - This operation must be made on all the filter-holders at the end of each working day 1 Put a liter of cold water in a suitable container and add detergent. 2 3 Remove the filters from the filter-holders. Soak the filters and the filterholders in this solution for about 2 hours. 4 5 Remove any residue with a sponge and rinse well with cold water. Place the filters back in the filter holder, making sure that the anchoring spring (A) of the filter is in its slot. 39 A English Steam and hot water dispensing pipes - This operation must be made at the end of each working day Using a clean sponge, wash with hot water removing any organic residue present. Rinse carefully. To clean the inside of the steam nozzle, follow these steps: Turn the nozzle towards the cup tray and carefully activate steam dispensing at least once. Grille and Drip Basin - This operation must be made at the end of each working day 1. Remove the grille from the basin. 2. Extract the basin. 3. Rinse the grid and tray under running water. 1 2 3 Bodywork - This operation must be made at the end of each working day Use a soft cloth and cleaning products WITHOUT ammonia or abrasives, removing any organic residue present in the work area. Note. Do not spray liquids into the panel slots. WATER TANK - Weekly procedures 1. Remove the panel on the water tank. 2. R e m o v e t h e t a n k f o r m i t s compartment. 3. Rinse under running water and use a sponge to remove any organic matter from the tank and lid. Rinse again thoroughly with cold water. 1 2 ATTENTION When the machine has not been used for more than 8 hours, and in any case once a day, the internal components must be washed before use, in accordance to the following instructions: 3 Hot water Dispense hot water repeatedly until at least 1 liter of water has been dispensed. Steam Allow the steam to flow for approximately one minute, using the appropriate commands. Supply Group Insert the filter carriers into the group (without coffee) and dispense for one minute. 40 English 11. Filter-softener replacement Autonomy means the time that the filter is effectively working. Autonomy depends on the local water hardness and machine use. The table, opposite, indicates the total values expressed in liters. Replacing the filter-softener at the scheduled time is fundamental for the quality of the beverages. Moreover, failure to perform maintenance jeopardizes the correct functioning of the machine. Replace the filter at least once every 18 months. French degrees German degrees Autonomy in liters 9° Fr 5° KH 45 18° Fr 10° KH 22,5 27° Fr 15° KH 16 36° Fr 20° KH 11,25 45° Fr 25° KH 9 Follow these steps to replace the water filter-softener: 2 1 Remove the filter from the tank, detaching it from the silicon intake tube, and replace it. Remove the panel and lid to the water tank. 3 4 Place the new filter in the housing inside the tank. Reposition the water tank lid and panel. 5 After the softening filter has been replaced, repeatedly dispense hot water until at least ½ liter has been dispensed (please consult the “hot water dispensing” paragraph for instructions). NOTE: Water naturally contains different concentrations of mineral salts that determine its hardness and, over time, create limescale deposits. To keep the machine working perfectly and to prolong the duration of the softening filter, we recommend using water with a hardness that does not exceed 8°F (4.5°D). 41 English 12. Rules for the worker operating the machine BEFORE YOU START WARNING: BEFORE YOU START OPERATING THE MACHINE, WASH THE INTERNAL COMPONENTS FOLLOWING THE INSTRUCTIONS INDICATED BELOW. THESE STEPS MUST BE REPEATED AT LEAST ONCE A DAY AND WHEN THE MACHINE HAS NOT BEEN OPERATED FOR MORE THAN 8 HOURS. GROUP • Hook up the filter holder to the group (without coffee). • Let group dispense water for about a minute. HOT WATER • Continuously dispense hot water (using the appropriate device) until at least 1 liter of water have been used (See specific paragraph). STEAM (also with Quicksteam) • Dispense steam from the nozzle for about a minute, using the appropriate device. On The Job Steam dispensing (also with Quicksteam) • Before heating the beverage (water, milk, etc.), open the steam nozzle for at least 3 seconds and let the steam escape so that the condensation is eliminated. Coffee dispensing • If the machine has not been used for more than an hour, before making coffee, dispense about 100 cc and discard the liquid. Hot water dispensing • If the machine has not been used for more than an hour, before using the hot water, dispense about 200 cc and discard the liquid. Cleaning • Please read the specific section in the user’s manual to learn how to clean these circuits. 13. Caution WARNING: Hot surface ACHTUNG: Heisse Oberfläche ATTENTION: Surface chaude ATTENZIONE: Superficie calda Danger of burns The areas marked with this sign become hot. Great care should be taken when in the vicinity of these areas. GENERAL Machine Close-Down When the machine remains unattended for a long period of time (at night, during the weekly closing day or during holidays) the following operations shall be performed: - Remove the plug or switch off the main switch. - Remove the water reservoir, empty it and then replace it. Non-compliance with these safety measures exonerates the manufacturer from all liability for malfunctions or damage to persons or items. The manufacturer disclaims all liability for damages to items or persons due to improper use or due to the coffee machine being used for reasons other than its intended use. Never work the coffee machine with wet hands or naked feet. Danger of Burns Do not put your hands or parts of the body near the coffee dispensing group, the steam and hot water wands, or the front part of the machine. Ensure that the machine is not handled by children or persons who have not been instructed in its correct use. Cup-warming plate Place only coffee cups, cups and glasses to be used in conjunction with the coffee machine on the cup-warming plate. Ensure that the coffee cups are completely drained before placing them on the cup-warming plate. No other objects shall be placed on the cup-warming plate. Don’t forget, when using the machine again, to follow the instructions of the “Preliminary steps before the first start-up” and “Cleaning and Maintenance” chapters. 42 English 14. Maintenance and Repairs If the machine is not working properly, turn off the machine, turn off the main off-on switch, and call the service center. WARNING After maintenance, perform the installation CHECK-UP as indicated in the specific section of the user’s manual. WARNING: Maintenance by unqualified people can jeopardize the safety and conformity of the machine. If the power supply cord is damaged, switch off the machine and request a replacement from the service center. Only use qualified, authorized technicians for repairs. To ensure safety during operation, it is absolutely necessary to: -f o l l o w a l l t h e m a n u f a c t u r e r ’ s instructions; - have qualified and authorized technicians periodically check that all safety devices are intact and functioning properly (the first inspection within three years of purchase and every year after that). WARNING Only use original spare parts guaranteed by the manufacturer. If original spare parts are not used, the manufacturer warranty will no longer be valid. 15. Dismantling the machine Electrical equipment cannot be disposed of as ordinary urban waste: it must be disposed of according to the special EU directive for the recycling of electric and electronic equipment. Improper disposal of electric equipment that fails to respect the laws in force will be subject to administrative fines and penal sanctions. GRUPPO CIMBALI electrical equipment is marked with a pictogram of a garbage can inside a barred circle. This symbol means that the equipment was sold on the market after August 13, 2005, and must be disposed of accordingly. Due to the substances and materials it contains, inappropriate or illegal disposal of this equipment, or improper use of the same, can be harmful to humans and the environment. dismantling the machine To protect the environment, please proceed in compliance with the local laws in force. 43 English 16. Defects - Malfunctions Direct action by the customer Before calling service personnel, to avoid useless expense, check whether the machine problem corresponds to one of the cases listed below. PROBLEM CAUSE SOLUTION The coffee machine is not working. No electricity supply. Check the electricity supply. Check that the plug is inserted into the socket and that the line separator switch is closed Check the position of the ON/OFF switch (1). The machine does not dispense coffee. Water reservoir empty. Check the color of the display and if the “no water” Leak from edge of filter-holder. The undercup gasket is dirty with coffee residue. Clean with the supplied brush. Coffee dispensing time too short. Coffee ground too coarse. Coffee too old. Use a finer grind. Use new coffee. Coffee drips out of machine. Filter holes blocked or filter holder outlet hole dirty. Coffee ground too fine. Clean. Loss of water under the machine. Drain tray full. Empty the drain tray. The machine display appears in a different color and the "error" message appears. The water filling phase in the boiler or dispensing phase are particularly prolonged. Check that the dispensing devices are enabled. Use the general on-off switch (1) to turn off the machine and then turn it on again. The enabled boiler resistance symbol ”, remains visible on the display, “ but the coffee machine does not reach its operating pressure. Possible intervention of the safety thermostat. Remove the tray; unscrew the safety cap and check the position of the safety thermostat. icon has appeared. Check the water level in the reservoir. Use a coarser grind. A Thermostat in the correct working position. Thermostat to be reset (*). (*) To reset the thermostat, press the red switch until it returns to its working position (Figure A). If the anomaly continues after the device has been reset, please contact the technical assistance service. 44 English Il Costruttore si riserva il diritto di modificare senza preavviso le caratteristiche delle apparecchiature presentate in questa pubblicazione The Manufacturer reserves the right to modify the appliances presented in this publication without notice Le Fabricant se réserve le droit de modifier sans préavis les caractéristiques des appareils présentés dans cette publication Der Hersteller behält sich das Recht vor, die in dieser Broschüre vorgelegten Geräte ohne Voranzeige zu ändern El Constructor se reserva el derecho de modificar sin preaviso las caracteristicas de las maquinas tratadas en este manual O Constructor reserva-se o direito de modificar sem aviso previo as máquinas tratadas neste manual GRUPPO CIMBALI SpA - 20082 BINASCO (MILANO) ITALY CERT. NR. 50 100 3685