1
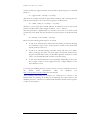
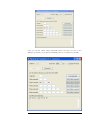
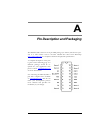
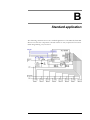
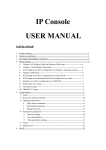
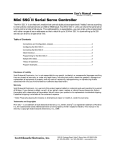
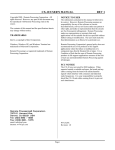
PiKoder/SSC-HP User’s Guide Version 1.0 dated 05/01/15 Gregor Schlechtriem PiKoder/SSC-HP User’s Guide Content Overview 3 Features 5 Daisy Chaining................................................................................................................ 5 Failsafe Position ............................................................................................................. 5 Serial Interface 7 Mini SSC Protocol ......................................................................................................... 7 ASCII Command Interface ........................................................................................ 10 Pin Description and Packaging 13 Description of pins ...................................................................................................... 14 Standard application 15 ii 1 Overview The PiKoder/SSC-HP is a single chip solution for implementing a high precision serial servo controller (SSC) which gives you full control of up to eight servos or electronic speed controls with a resolution of 0.2 µs which is currently the best resolution available in the industry. This User’s Guide covers the features, the programming and the serial interface of the PiKoder/SSC-HP. You can connect e.g. your Arduino or Raspberry Pi without any additional interface hardware directly to the PiKoder’s UART. With the addition of a simple offthe-shelf “USB to UART adapter” you control the servos directly from your computer. The PiKoder/SSC-HP supports two protocols: - MiniSSC protocol representing a very common protocol for controlling SSCs and a two-way ASCII-Protocol designed to support controlling the SSC-HP with standard terminal programs such as (but not limited to) Tera Term and TTY The PiKoder/SSC-HP Serial Servo Controller would automatically detect the protocol used and no user interaction would be required. The PiKoder/SSC-HP also has non-volatile (EEPROM) data storage for retaining application specific operating parameters such as startup position after powering up, neutral position and upper as well as lower limits for servo pulse width. This User’s Guide is based on the most recent hard- and firmware available for the PiKoder/SSC-HP. Please check for updated information and new software releases on www.pikoder.com. PiKoder/SSC-HP User’s Guide Please share with me any comments, improvement ideas or errors you will find or encounter in working with your PiKoder/SSC-HP. I can be reached at [email protected]. Thank you very much! 4 2 Features This section will familiarize you with some specific aspects of the feature set of the PiKoder/SSC-HP allowing you to customize the controller to your specific needs and requirements. Daisy Chaining The PiKoder/SSC does fully support the miniSSC protocol and allows you to daisy chain controllers in order to control up to 255 servos as specified in the miniSSC protocol definition. The latest version of the SSC Control Center provides for setting a miniSSC Offset and thereby defining the channel base address the PiKoder/SSC would respond to. This means, that the PiKoder/SSC can control any contiguous block of eight servo numbers from 0 to 254. Please refer to www.pikoder_ssc_en.htm for more information and an application note detailing the setup for daisy chaining. Failsafe Position The PiKoder/SSC does support a failsafe position for the use in autonomous and rc applications. You can activate a timer for 0.1 s to 99.9 s to monitor the communication. If no message is received within this preset time frame then the PiKoder/SSC would set all servo outputs to the neutral position. If you were to use this function you might want to implement a regular “ping” in your application to make sure that the failsafe function is not triggered by a period of inactivity. PiKoder/SSC-HP User’s Guide - Room for notes - 6 3 Serial Interface The PiKoder/SSC-HP’s serial interface is based on TX and RX lines, which allow the controller to sent and receive non-inverted, TTL (0 – 5V) serial bytes. The parameters for the serial transmission are 9600 Baud, 8 data bits, one stop bit, with no parity. The bytes sent to the PiKoder/SSC-HP are commands which allow you to control the program and control the SSC. The PiKoder/SSC-HP supports two protocols: - MiniSSC protocol representing a very common protocol for controlling SSCs a two-way ASCII-Protocol designed to support controlling the SSC-HP with standard terminal programs such as (but not limited to) TerraTerm, Putty, hyperterm The PiKoder/SSC-HP Serial Servo Controller does automatically detect the terminal protocol; no user interaction would be required. Mini SSC Protocol This protocol allows you to control up to 255 different servos by chaining multiple servo controllers together. It only takes three serial bytes to set the target of one servo, so this protocol is good if need to send many commands rapidly. The Mini SSC protocol is to transmit 0xFF as the first (command) byte, followed by a servo number byte, and then the 8-bit servo target byte for the servo position. A servo target byte of 127 (0x7F) will always indicate the neutral position maintained as a PiKoder/SSC parameter. The actual position taken by sending a servo target byte to the controller is calculated depending on the actual parameters. If you wanted to move the servo from PiKoder/SSC-HP User’s Guide neutral towards the upper limit then the increment in pulse length du is calculated based on: du = (Upper Limit – Neutral) / 127 Steps This meas for example, that with an upper limit of 2008 µs and a neutal position of 1500 µs an increment of one in the servo target byte would result in: du = (2008 – 1500) µs / 127 Steps = 4 µs/Step Therefore, a servo target byte of 0x80, which is an increment of one to the neutral position would result in a pulse length of 1500 µs + 4 µs = 1504 µs. The same procedure is applied when you wanted to move the servo from neutral towards the lower limit; then the decrement in pulse length dl is calculated based on: dl = (Neutral - Lower Limit) / 127 Steps Please note the following with respect to du and dl: du and dl are calculated per channel and may differ per channel allowing for asymmetric ranges and a neutral positon outside of the mechanical central position of the servo du and dl are calculated during controller startup and there is no update when you change the values of neutral, upper or lower limit without resetting the controller. This means, the intended operation would be to set the values, reset the PiKoder/SSC and then verify the setting. du and dl are calculated based on 8 bit arithmetic. Depending on the numbers a slight overrun over the upper limit resp. a slight underrun of the lower limit may occur. For testing the miniSSC protocol you may want to use a byte oriented tool such as the “Pololu Serial Transmitter” utility for Windows (see http://www.pololu.com/docs/0J23 for more details). After installing and starting the software you would have to connect to the PiKoder/SSC by selecting the COM port and pushing the connect button. The miniSSC-protocol is a three byte command and should be entered in the respective column as shown below. 8 Once you hit the “Send 3-byte command”-button the bytes are sent to the PiKoder (see below); as per protocol definition there is no response by the SSC. 9 PiKoder/SSC-HP User’s Guide ASCII Command Interface The ASCII Command Interface (ACI) provides access to all relevant system parameters. All commands are simple ASCII (not case sensitive) and are sent using a Windows based terminal program such as Hyperterm or Tera Term. The commands can be typed in right away and the response of the controller is readable without referring to any specific code tables. Please note that neither 'CR' nor 'LF' is needed to send the command to the controller. There are two basic types of commands: commands for quering parameters and for setting parameters. If a parameter is read the PiKoder/SSC-HP will provide for proper formatting by sending a “CRLF” prior to sending the parameter value and support readability by sending another “CRLF” after the parameter value. If a parameter is set the PiKoder/SSC-HP will acknowledge the proper execution by sending an “!” framed by “CRLF”. If a command could not be interpreted at all then a question mark '?' framed by 'CR' 'LF' would be echoed. Please note that protocol syntax checking is very limited at this point in time. All pulse widths are given in units of 0.2 µs. If you want to calculate the value in µs then simply devide the respective value by 5. E.g. the neutral position of 1,500 µs would be represented by a numerical value of 7,500 (= 5 * 1,500 µs). The following ACI commands are available: - 'i?': query the current pulse width for channel i (i = 1..8); PiKoder will respond 'CR' 'LF' 'xxxxx' 'CR' 'LF' with xxxxx representing the pulse width in multiples of 0.2 µs - 'i=xxxxx': set the pulse width for channel i to xxxxx * 0.2 µs (xxxxx in decimal format, i = 1..8); PiKoder will acknowledge execution of the program by sending an 'CR' 'LF' '!' 'CR' 'LF' - '0': query the firmware version; PiKoder will respond in a format 'n.nn' framed by 'CR' 'LF' - 'S': will save the current parameters to the controller’s EEPROM making the current servo positions the start up positions after powering up; returns a '!' upon successful completion framed by 'CR' 'LF' - 'Ui?': query the upper limit for pulse width for channel i; PiKoder will respond 'xxxxx' with xxxxx representing the pulse width in multiples of 0.2 µs (xxxxx in decimal format, i = 1..8) - 'Ui=xxxxx': set the upper limit for pulse width for channel i to xxxxx * 0.2 µs (xxxxx in decimal format, i = 1..8); PiKoder will acknowledge execution with a '!' framed by 'CR' 'LF'. - 'Li?': query the lower limit for pulse width for channel i; PiKoder will respond 'xxxxx' with xxxxx representing the pulse width in multiples of 0.2 µs (xxxxx in decimal format, i = 1..8) 10 - 'Li=xxxxx': set the lower limit for pulse width for channel i to xxxxx * 0.2 µs (xxxxx in decimal format, i = 1..8); PiKoder will acknowledge execution with a '!' framed by 'CR' 'LF'. - 'Ni?': query the pulse width for the neutral position for channel i; PiKoder will respond 'xxxxx' with xxxxx representing the pulse width in multiples of 0.2 µs (xxxxx in decimal format, i = 1..8) - 'Ni=xxxxx': set the pulse width for the neutral position for channel i to xxxxx * 0.2 µs (xxxxx in decimal format, i = 1..8); PiKoder will acknowledge execution with a '!' framed by 'CR' 'LF'. - 'M?' or ‘m?’: query the current channel offset for the miniSSC-protocol. - 'M=iii' or ‘m=iii’: set the channel offset for the miniSSC-protocol - 'Z?' : query the current zero offset value - 'Z=ii' : set the zero offset - 'T=iii','t=iii': enables the fail safe timer. 'iii' is given in multiples of 0.1 s. Please note that input is always given in three decimal digits ranging from '001' (= 0.1 s) to '999' (= 99.9 s). In the factory default configuration the fail safe timer is not active. You would activate the monitoring by sending a time out value > 0, a value of 0 would disable the timer function. Command execution is acknowledged by the PiKoder with a '!' - 'T?','t?': query the current time out value in multiples of 0.1 s. A response of '000' indicates that the fail safe function is not activated 11 PiKoder/SSC-HP User’s Guide - Room for notes - 12 A Pin Description and Packaging The PiKoder/SSC comes in an 18 pin DIP package (see below). The device operates at 5 Volts. Please refer to the PIC 16F648 data sheet from Microchip (www.microchip.com) for complete electrical and physical specifications. A complete description of the pins is given on the following page. If a different package would be required for your application then please contact [email protected] for more information. For evaluating the PiKoder/SSC a pcb and a complete kit is available at www.pikoder.com. This kit can make your development process more efficient and provides for modularity in your design. 13 PiKoder/SSC-HP User’s Guide Description of pins Pin Symbol Description 1 Servo 3 Output pin with PWM signal for servo channel 3 2 Servo 4 Output pin with PWM signal for servo channel 4 3 NC Not connected (reserved for later use) 4 MCLR/VPP Reset pin, active low. Connects directly to Vss for automatic reset at power up. 5 VSS Supply voltage. Connect to 5 V DC 6 Servo 5 Output pin with PWM signal for servo channel 5 7 RX Serial receive input 8 TX Serial transmit output 9 Servo 6 Output pin with PWM signal for servo channel 6 10 Servo 8 Output pin with PWM signal for servo channel 8 11 Servo 7 Output pin with PWM signal for servo channel 7 12 PGC Clock pin for In-Circuit-Serial-Programming 13 PGD Data pin for In-Circuit-Serial-Programming 14 VDD Ground connection 15 OSC2 Crystal 20 MHz. Please refer to Microchip documentation for details 16 OSC1 Crystal 20 MHz. Please refer to Microchip documentation for details 17 Servo 2 Output pin with PWM signal for servo channel 2 18 Servo 1 Output pin with PWM signal for servo channel 1 14 B Standard application The following schematic shows the standard application of the PiKoder/SSC-HP. Plesase note that the components colored in blue are only required for In-CircuitSerial-Programming on your board. 15