1
IPv6 Lab Manual
For use with the 6Deploy IPv6 Testbeds
Written
Mukom Akong Tamon
AfriNIC Ltd
Mukom Akong Tamon | AfriNIC Ltd | Page 1 of 15
Table of Contents
1 Introduction to The IPv6 Testbeds...................................................................................................................... 3
1.1 General Lab Information........................................................................................................................... 3
1.2 Lab Rules...................................................................................................................................................... 3
1.3 Addresses for Use in Exercises (If none has been explicitly specified)................................................... 3
1.4 How to Access and Use the AfriNIC IPv6 Testbed................................................................................... 4
1.5 How to Access and Use the RENATER IPv6 Testbed................................................................................. 4
1.6 How to Access and Use the BREN IPv6 Testbed...................................................................................... 5
1.7 How to Access and Use the Consulintel IPv6 Testbed............................................................................ 5
2 Practical Scenarios............................................................................................................................................. 6
2.1 IPv6 Subnetting – Carving Out Your IPv6 Allocation................................................................................ 6
2.2 Enabling IPv6 Routing and Configuring IP Addresses............................................................................. 6
2.3 Configuring Static Routing......................................................................................................................... 6
2.4 Configuring OSPF Intra-domain Routing.................................................................................................. 6
2.5 Configuring Manual Tunnels...................................................................................................................... 7
2.6 Configuring Automatic 6to4 Tunnels......................................................................................................... 8
3 Solutions Guide................................................................................................................................................... 9
3.1 IPv6 Subnetting – Carving Out Your IPv6 Allocation................................................................................ 9
3.2 Enabling IPv6 Routing and Configuring IP Addresses........................................................................... 10
3.3 Configuring Static Routing....................................................................................................................... 11
3.4 Configuring OSPF Intra-domain Routing................................................................................................. 12
3.5 Configuring Manual Tunnels.................................................................................................................... 14
3.6 Configuring Automatic 6to4 Tunnels....................................................................................................... 15
Mukom Akong Tamon | AfriNIC Ltd | Page 2 of 15
1
Introduction to The IPv6 Testbeds
1.1
General Lab Information
The practical scenarios in this manual are meant to guide the learner to configure and IPv4 network and
then transition the network to IPv6. The IPv6 testbeds used in this manual exist in three different physical
locations and can be accessed remotely. The IP address indicated in the diagram is that which shall be used
by course participants to access each of the routers in the lab, using either telnet (all test beds) or ssh (AfriNIC
testbed only). Both telnet and/ ssh clients come pre-installed with Mac OS, Linux/Unix. Windows Xp has a
built-in telnet client as well. For Windows Vista/7 which don't have a telnet or ssh client pre-installed PuTTY
and TerraTerm pro are free telnet/ssh clients that you can download from the following urls:
• Putty: http://www.chiark.greenend.org.uk/~sgtatham/putty/download.html
• TerraTerm Pro: http://en.sourceforge.jp/projects/ttssh2/releases/
During our training workshops, an individual or group is assigned to each router and they must work as
a team with the other individuals/teams on the other routers in the testbed to complete the exercise. In other
words, you might have configured your router correctly but you won't get the desired results unless the routers
attached to yours have also finished their scenarios correctly.
1.2
Lab Rules
And now, the thou shall NOTs …
Don't change the management interface configuration.
Don't remove IPv4 static routes.
Don't change login/password information.
Don't change filtering policy on the routers.
Don't change the console line configuration.
Don't change interfaces description.
These are not just rules designed to make your life miserable, but failure to comply might mean you lose
access to the labs, thus ending your practice session.
1.
2.
3.
4.
5.
6.
1.3
Addresses for Use in Exercises (If none has been explicitly specified)
These address blocks are to be used in assigning to various interfaces (e.g. loopbacks) when
configuring exercises for which you have not been directed to use specific addresses.
TestBed
IPv4 Prefix
IPv6 Prefix
AfriNIC
196.216.254.64/26
196.216.254.128/26
2001:43F8:90:9000::/56
2001:43F8:90:ff00::/56
RENATER
194.254.101.128/25
2001:660:3008::/48
BREN
10.200.0.0/16
2001:4b58:42fc::/48
Consulintel
10.250.0.0/16
2001:db8:300::/48
Mukom Akong Tamon | AfriNIC Ltd | Page 3 of 15
to
1.4
How to Access and Use the AfriNIC IPv6 Testbed
Access protocols
1.5
Telnet and SSH [use cypher method 'des' if required]
How to Access and Use the RENATER IPv6 Testbed
Access protocols
Telnet
Mukom Akong Tamon | AfriNIC Ltd | Page 4 of 15
1.6
How to Access and Use the BREN IPv6 Testbed
Access protocols
1.7
Telnet to the given address on port 2005
How to Access and Use the Consulintel IPv6 Testbed
Access protocols
Telnet to the given address and port shown on the diagram.
Mukom Akong Tamon | AfriNIC Ltd | Page 5 of 15
2
Practical Scenarios
2.1
IPv6 Subnetting – Carving Out Your IPv6 Allocation
Objective: Given an IPv6 allocation, subnet it into prefixed to be assigned on various links of your network.
This task is to be done by all the members of the same lab (AfriNIC, Consulintel, RENATER, BREN)
(a) Using the prefix from section 1.3 for your lab, subnet it into appropriate prefixes for assignment to links.
(b) Assign these prefixes to the various links and loopback addresses of all routers in the lab.
2.2
Enabling IPv6 Routing and Configuring IP Addresses
Objective: Enable and verify IPv6 routing on the router and configure IPv6 addresses on interfaces.
(a) Enable IPv6 routing for your device.
(b) Without configuring any IP addresses, enable IPv6 on the interconnecting interfaces of your router.
(c) Still without explicitly configuring and IPv6 address, ensure that you can reach your neighbour via IPv6.
(d) Verify that your assigned router is configured with the IP addresses as shown in the table for your specific
testbed. Make any corrections necessary (Please DO NOT modify the management interfaces)
2.3
Configuring Static Routing
Objective: Configure full reachability over IPv4 and IPv6 using static routes, thus creating a full dual-stack
capable network.
(a) Configure IPv4 static routes to the loopback interfaces of all other routers in the network.
(b) Verify that you can ping the IPv4 addresses of the loopback interfaces on other routers.
(c) Configure IPv6 static routes to enable reachability for the loopback addresses of all other routers.
(d) Verify that you can ping the IPv6 addresses of the loopback interfaces on other routers.
At this point you now have a working dual-stacked router, each router can reach every other router
over both IPv4 and IPv6.
(e) Disable IPv4 routing and verify that IPv6 routing still works.
(f) Remove all static routes configured in steps (a) and (c).
Wait at this point so that all other routers have finished the configurations and can reach the loopbacks
of other routers in the lab.
2.4
Configuring OSPF Intra-domain Routing
Objective: Configure the lab for OSPFv2, and also
OSPFv3 so they run simultaneously (ships-in-thenight).
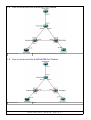
(a) Re-draw the specific OSPF topology for your
assigned lab based on the generic diagram
below and the table.
Generic OSPF topology for all labs (please
re-draw for your specific lab!!)
Mukom Akong Tamon | AfriNIC Ltd | Page 6 of 15
Area
AfriNIC
R1 [Ge 0/0 – 1]
Area 0 R2 [Ge 0/0 – 1]
R3 [Ge 0/0 – 1]
RENATER
Consulintel
BREN
R1 [Ge 0/1]
[vlan 10]
R2 [Ge 0/0 - 1]
R3 [Ge 0/1]
[vlan 10]
12000-1 [Ge 2/1]
R2 [vlan 11 - 12]
[Pos 1/0 – 1]
R2 [vlan 12 - 13] 12000-2 [Pos 1/0 – 1]
R3 [vlan 11 - 13] 12000-3 [Ge 2/1]
[Pos 1/0 – 1]
Area 1
R1 [vlan 14]
R4 [vlan 14]
R1 [vlan 30]
R5 [vlan 30]
R1 [vlan 12]
R2 [vlan 12]
12000-1 [Pos 1/14]
7200-1 [Pos 4/0]
Area 2
R2 [vlan 25]
R5 [vlan 25]
R2 [vlan 20]
R4 [vlan 10]
R3 [vlan 14]
R4 [vlan 14]
12000-2 [Pos 1/15]
7500-1 [Pos 4/1/0]
Area 3
R3 [vlan 36]
R6 [vlan 36]
R3 [Ge 0/0]
R6 [Ge 0/0]
R5 [vlan 15]
R6 [vlan 15]
12000-3 [Ge 2/2]
7200-2 [Ge 0/0]
(b) Configure OSPFv2 on your router according to the topology you drew in step (a)
(c) Re-distribute the loopback interfaces on your router in the OSPFv2 routing process.
(d) Verify that you can ping the loopback interfaces of the other routers in the lab over IPv4.
At this point you have a fully routed OSPFv2 (i.e. OSPF for IPv4) network
(e) Repeat steps (a) to (e) above for IPv6.
(f) Display the IPv6 routing table and list the various types of routes you see. How are these different from
the routes in an IPv4 routing table?
(g) Verify that you can reach (by ping) the loopack interfaces of the other routers over IPv6.
At this point you have both a fully routed OSPFv2 and OSPFv3 network. Note that they each maintain
different routing tables (verify by using show ip protocols & show ipv6 protocols )
(h) Remove all the OSPFv2 configuration from your router.
(i) Verify that you can still reach (via ping) the loopback interfaces of the other routers over IPv6 but not
over IPv4. (What does this tell you about the dependence of IPv4 and IPv6?)
You now have a fully routed OSPFv3 network.
Stop and wait at this point till all routers in your lab have completed the exercise successfully.
2.5
Configuring Manual Tunnels
Objective: Demonstrate how to create manual tunnels to carry IPv6 traffic over an IPv4 only network or link
and thus connect different IPv6 islands.
(a) Remove all of the OSPFv3 configuration you did in task 2.3(e). Verify that you can NOT ping the IPv6
loopbacks of the other routers.
(b) Re-enable OSPFv2 (as in tasks 2.3 (a) – (d)
(c) Verify that there is still IPv4 connectivity between the routers and that you can ping the IPv4 loopbacks
of your neighbouring routers. (If you can't, check your IPv4 routing)
(d) Remove all IPv6 addresses from all inter-connecting links between your router and your neighbouring
routers. (This is ensuring that there is no native IPv6 transit between the various routers). Ensure that
you still have IPv6 addressing on your loopback interfaces.
Now, your router is dual stacked (it has both IPv4 and IPv6 interfaces) and connected to your
neighbours' routers (which are also dual-stacked) only over IPv4 links. This is the situation you find
yourself in when you have configured IPv6 in your organisation but your ISP or REN does not yet
support IPv6 transit.
(e) Make sure that your router is configured to route IPv6 unicast packets.
(f) Create manual tunnels to your neighbours and assign to them an IPv6 from one of the prefixes that
was on the native IPv6 link (refer to the IP addressing table). The tunnel should be sourced from the
loopback address of your router.
Mukom Akong Tamon | AfriNIC Ltd | Page 7 of 15
(g) Enable OSPFv3 over the tunnel interfaces you just created.
(h) Verify that you can ping the IPv6 loopback addresses of all other routers in your lab.
2.6
Configuring Automatic 6to4 Tunnels
Objective: Demonstrate how to create automatic tunnels to carry IPv6 traffic over an IPv4 only network or link
and thus connect different IPv6 islands. Since only one automatic tunnel type is allowed per router, you will
need to select one of your neighbouring routers and work with that group to accomplish this task
(a) Remove the manual tunnels created in task 2.4 and verify that you can no longer ping the IPv6
loopback addresses of the other routers.
(b) Calculate the 6to4 prefix that corresponds to each of the IPv4 addresses on your interfaces. [Hint:
2002:WWXX:YYZZ::/48 where WWXX:YYZZ is the hex equivalent of the IPv4 address.]
(c) Using the IPv6 prefix for the link to your neighbour (as calculated above), create two subnets and
assign an IPv6 address from each of them to two loopback interfaces.
(d) Create a 6to4 tunnel and assign to it an IPv6 address as calculated from step (b) above. Use the IPv4
loopback interface as the tunnel source.
(e) Create a static route so that all 6to4 traffic goes through the tunnel interface.
(f) Verify that you can ping the IPv6 loopback interfaces that your neighbouring group created on their
router in step (c) above.
Mukom Akong Tamon | AfriNIC Ltd | Page 8 of 15
3
Solutions Guide
This section provides guided solutions to the labs scenarios in section 2. Brief explanations are given
where necessary, some terms explained and show commands used to to illustrate that the objective has been
achieved.
3.1
IPv6 Subnetting – Carving Out Your IPv6 Allocation
Objective: Given an IPv6 allocation, subnet it into prefixed to be assigned on various links of your network.
This task is to be done by all the members of the same lab (AfriNIC, Consulintel, RENATER, BREN)
(a) Using the prefix from section 1.3 for your lab, subnet it into appropriate prefixes for assignment to links.
Taking the AfriNIC testbed as an example, section 1.3 and picking the first of the available allocations
2001:43f8:90::/56. We can subnet these into /64s. We have:
2001:43f8:90:[xx]::/64 where xx runs from 00, 01, 02 …. ff (total 256 subnets)
(b) Assign these prefixes to the various links and loopback addresses of all routers in the lab.
To make the lab easier to read, we can pick xx to represent the numbers of the routers being connected by
that subnet. Thus we'd have the following table:
AfriNIC Testbed
Router
R1
R2
R3
R4
R5
R6
Interface
IPv4 Address
IPv6 Address
Connected to
Ge 0/0
196.216.254.197/30
2001:43f8:90:12::1/64
R2 [Ge 0/0]
Ge 0/1
196.216.254.201/30
2001:43f8:90:13::1/64
R3 [Ge 0/0]
Vlan 14
196.216.254.209/30
2001:43f8:90:14::1/64
R4 [vlan 14]
Lo 1
196.216.254.129/32
2001:43f8:90:11::1/128
Ge 0/0
196.216.254.198/30
2001:43f8:90:12::2/64
R1 [Ge 0/0]
Ge 0/1
196.216.254.217/30
2001:43f8:90:23::2/64
R3 [Ge 0/1]
Vlan 25
196.216.254.221/30
2001:43f8:90:25::2/64
R5 [vlan 25]
Lo 1
196.216.254.130/32
2001:43f8:90:22::2/128
Ge 0/0
196.216.254.202/30
2001:43f8:90:13::3/64
R1 [Ge 0/1]
Ge 0/1
196.216.254.218/30
2001:43f8:90:23::3/64
R2 [Ge 0/1]
Vlan 36
196.216.254.193/30
2001:43f8:90:36::3/64
R6 [vlan 36]
Lo 1
196.216.254.131/32
2001:43f8:90:33::3/128
Vlan 14
196.216.254.210/30
2001:43f8:90:14::4/64
Lo 1
196.216.254.132/32
2001:43f8:90:44::4/128
Vlan 25
196.216.254.222/30
2001:43f8:90:25::5/64
Lo 1
196.216.254.133/32
2001:43f8:90:55::5/128
Vlan 36
196.216.254.194/30
2001:43f8:90:36::6/64
Lo 1
196.216.254.134/32
2001:43f8:90:66::6/128
Mukom Akong Tamon | AfriNIC Ltd | Page 9 of 15
R1 [vlan 14]
R2 [vlan 25]
R3 [vlan 36]
3.2
Enabling IPv6 Routing and Configuring IP Addresses
Objective: Enable and verify IPv6 routing on the router and configure IPv6 addresses on interfaces.
(a) Enable IPv6 routing for your device.
On Cisco devices, while IPv6 is installed and enabled on supported platforms (i.e. you can assign IPv6
addresses and can receive and send IPv6 packets), IPv6 routing is not enabled by default as is the case for
IPv4. This means that the router can not forward packets on behalf of other IPv6 hosts. To enable IPv6 routing,
hardware forwarding for IPv6 and stop source routing:
(config)#ipv6 unicast-routing
(config)#ipv6 cef
(config)#no ipv6 source-route
(b) Without configuring any IP addresses, enable IPv6 on the interconnecting interfaces of your router.
The objective of this task is to ensure that you see for yourself that without explicitly giving an IPv6 address, the
router always auto-configures a link local address for each of its interfaces.
First of all let's verify that none of our interfaces currently has an IPv6 address:
#show ipv6 interface brief
Now, let's go on and ask the router to enable IPv6 on the interfaces to its neighbours and in so doing get the
router to auto-configure a link-local address.
(config)#interface type
(config-if)#ipv6 enable
Now let us verify
#show ipv6 interface brief
#show ipv6 interfaces
(c) Still without explicitly configuring an IPv6 address, ensure that you can reach your neighbour via IPv6.
The point here is to further prove that even without explicitly configuring an IPv6 address, a router can speak
to any other IPv6 host to which it is directly connected using their link local addressing. You first need to find
out the link local address of you neighbour's directly connected interface, and then ping it.
#show ipv6 neighbours
The output lists the IPv6 address of several neighbours and the interfaces to reach those addresses. Remember
that a link-local address starts with “fe80”
#ping fe80:x:x:x:x:x:x:x
(When prompted for an output interface, specify the one shown agains the link local
address from the output of show ipv6 neighbors)
(d) Verify that your assigned router is configured with the IP addresses as shown in the table for your specific
testbed. Make any corrections necessary (Please DO NOT modify the management interfaces – vlan 99)
Mukom Akong Tamon | AfriNIC Ltd | Page 10 of 15
First, let us find out what IP addresses (if any) are already configured on the router.
#show ip interfaces brief
#show ipv6 interfaces brief
If the output of any of the above commands shows an IP address that is not listed in the table for your testbed,
remove it using one of the following commands
[IPv4] (config-if)#no ip address ip-address mask
[IPv6] (config-if)#no ipv6 address ipv6-address/length
Now, you need to configure any address on the respective interfaces as appear in the table if they have not
already been pre-configured. Of course to do this, you need to get into interface configuration mode for the
specific interface listed in the table. In the following listing, we'll assign an IPv6 address to the vlan 14
interface of the R4 router in the AfriNIC testbed:
R4(config)#interface vlan 14
R4(config-if)#ipv6 address 2001:43f8:90:c8::4/64
3.3
Configuring Static Routing
Objective: Configure full reachability over IPv4 and IPv6 using static routes, thus creating a full dual-stack
capable network.
(a) Configure IPv4 static routes to the loopback interfaces of all other routers in the network.
(config)#ip route a.b.c.d A.B.C.D next_hop
(b) Verify that you can ping the IPv4 addresses of the loopback interfaces on other routers.
#show ip route
#ping a.b.c.d
(c) Configure IPv6 static routes to enable reachability for all other router's loopback addresses.
A key concept to understand here is that on Cisco, even though the platform might be v6 capable, IPv6
routing functionality is not turned on by default!! So we enable it first before we start adding IPv6 routes.
(config)#ipv6 unicast-routing
(config)#ipv6 cef
(config)#no ipv6 source-route
The command for creating routes in IPv6 is essentially the same as that for doing the same in IPv6, just
replace “ip” with “ipv6”. The general command syntax on Cisco IOS is as follows:
(config)#ipv6 route prefix/length {x:x:x:x:x:x:x:x}[AD][tag tag]
Here, I create a static route to R6's loopback, using the R1's vlan14 ipv6 address as the next hop.
R4(config)#ipv6 route 2001:43F8:90:600::6/128 2001:43f8:90:c8::1
Mukom Akong Tamon | AfriNIC Ltd | Page 11 of 15
(d) Verify that you can ping the IPv6 addresses of the loopback interfaces on other routers.
#ping x:x:x:x:x:x:x:x
(e) Disable IPv4 routing and verify that IPv6 routing still works.
(config)#no ip routing
Verify that IPv4 routing has indeed been disabled
#show ip protocols
#show ipv6 protocols
(there should NOT be an output)
(should have an output)
(f) Remove all static routes configured in steps (a) and (c).
(config)#no ip route a.b.c.d A.B.C.D next_hop
(config)#no ipv6 route prefix/length next_hop
3.4
Configuring OSPF Intra-domain Routing
Objective: Configure the lab for OSPFv2, and also OSPFv3 so they run simultaneously (ships-in-the-night).
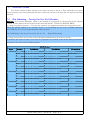
(a) Example diagram for AfriNIC's testbed is shown
(b) Configure your router according to the OSPFv2 topology for your lab according to the topology you drew
in step (a)
To enable OSPF and specify what interfaces participate in it.
(config)#router ospf pid
(config-router)#router-id x.x.x.x
(config-router)#network a.b.c.d A-1.B-1.C-1.D-1 area area-id
•
a.b.c.d = IP address or prefix for a set of interfaces you want to participate in
Mukom Akong Tamon | AfriNIC Ltd | Page 12 of 15
•
A-1.B-1.C-1.D-1 = Wildcard mask (Subtract each octet of the subnet mask from 255)
(c) Re-distribute the loopback interfaces on your router in the OSPFv2 routing process.
Redistribution is the process of taking routes known through one routing protocols and introducing them into
a second routing protocol so that they are propagated through the network by the later protocol. The aim of
this task is just to show that it is essentially the same in IPv6 as it is for IPv4 (it is not necessarily best practice).
We could have propagated routes to these loopback addresses by putting the loopbacks into the OSPF
routing process.
The loopback interfaces are directly connected and so we can use the 'connected' keyword of the distribute
command. If there are other connected interfaces on the router besides the loopbacks that you do not want to
redistribute, you can create an access list that matches the interfaces to redistribute and use it with the
redistribute command.
(config)#router ospf process-id
(config-router)#redistribute connected
(d) Verify that you can ping the loopback interfaces of the other routers in the lab over IPv4.
#show ip protocols
#show ip route ospf
#ping a.b.c.d
(e) Repeat steps (a) to (d) above for IPv6.
In OSPFv3, the only way to specify which interfaces participate in OSPF and in what area is in interface
configuration mode. Also note that OSPFv4 needs a router-id ---which is a 32 bit number and NOT
necessarily an IPv4 address.
(config-if)#ipv6 ospf process-id area area-id
(config)#ipv6 router ospf process-id
(config-router)#redistribute connected
(f) Display the IPv6 routing table and list the various types of routes you see. How are these different from the
routes in an IPv4 routing table?
#show ipv6 protocols
#show ipv6 route ospf
(g) Verify that you can reach (by ping) the loopack interfaces of the other routers over IPv6.
#ping x:x:x:x:x:x:x:x
At this point you have both a fully routed OSPFv2 and OSPFv3 network. Note that they each maintain
different routing tables (verify by using show ip protocols & show ipv6 protocols )
(h) Remove all the OSPFv2 configuration from your router.
(config)#no router ospf pid
Mukom Akong Tamon | AfriNIC Ltd | Page 13 of 15
(i) Verify that you can still reach (via ping) the loopback interfaces of the other routers over IPv6 but not over
IPv4. (What does this tell you about the dependence of IPv4 and IPv6?)
3.5
Configuring Manual Tunnels
Objective: Demonstrate how to create manual tunnels to carry IPv6 traffic over an IPv4 only network or link
and thus connect different IPv6 islands.
(a) Remove all of the OSPFv3 configuration you did in task 2.3(e). Verify that you can NOT ping the IPv6
loopbacks of the other routers.
By removing the OSPFv3, you ensure that you can no longer reach the loopacks of other routers over IPv6.
(config)#no ipv6 router ospf process-id
(config-if)#no ipv6 router ospf process-id area area-id
(b) Re-enable OSPFv2 (as in tasks 2.3 (a) – (d)
Before you can use a v4 network to connect v6 islands, you must first know how to route over that network. By
re-enabling OSPFv2, we are ensuring we have v4 reach-ability across the network.
(c) Verify that there is still IPv4 connectivity between the routers and that you can ping the IPv4 loopbacks of
your neighbouring routers. (If you can't, check your IPv4 routing)
(d) Remove all IPv6 addresses from all inter-connecting links between your router and your neighbouring
routers. (This is ensuring that there is no native IPv6 transit between the various routers). Ensure that you
still have IPv6 addressing on your loopback interfaces.
(config-if)#no ipv6 address x:x:x:x:x:x:x:x/len
(e) Make sure that your router is configured to route IPv6 unicast packets.
#show run | include ipv6 unicast-routing
If you don't see “ipv6 unicast-routing” in the output, then you need to configure it.
(f) Create manual tunnels to your neighbours and assign to them an IPv6 from one of the prefixes that was on
the native IPv6 link (refer to the IP addressing table). The tunnel should be sourced from the loopback
address of your router.
(config)#interface tunnel tunnel-number
(config-if)#ipv6 address x:x:x:x:x:x:x:x/length [eui-64]
(config-if)#tunnel source {a.b.c.d | interface}
(config-if)#tunnel destination w.x.y.z
(config-if)#tunnel mode ipv6ip
(g) Enable OSPFv3 over the tunnel interfaces you just created. Put all the tunnel interfaces in area 0.
(config)#interface tunnel tunnel-number
(config-if)#ipv6 ospf process-id area 0
(h) Verify that you can ping the IPv6 loopback addresses of all other routers in your lab.
Mukom Akong Tamon | AfriNIC Ltd | Page 14 of 15
#show ipv6 protocols
#show ipv6 route
#ping x:x:x:x:x:x:x:x
3.6
Configuring Automatic 6to4 Tunnels
Objective: Demonstrate how to create automatic tunnels to carry IPv6 traffic over an IPv4 only network or link
and thus connect different IPv6 islands. Since only one automatic tunnel type is allowed per router, you will
need to select one of your neighbouring routers and work with that group to accomplish this task
(a) Remove the manual tunnels created in task 2.4 and verify that you can no longer ping the IPv6 loopback
addresses of the other routers.
(config)#no interface tunnel tunnel-number
(b) Calculate the 6to4 prefix that corresponds to each of the IPv4 addresses on your interfaces. [Hint:
2002:WWXX:YYZZ::/48 where WWXX:YYZZ is the hex equivalent of the IPv4 address.]
(c) Using the IPv6 prefix for the link to your neighbour (as calculated above), create two subnets and assign
an IPv6 address from each of them to two loopback interfaces.
(d) Create a 6to4 tunnel and assign to it an IPv6 address as calculated from step (b) above. Use the IPv4
loopback interface as the tunnel source.
(config)#interface tunnel tunnel-number
(config-if)#ipv6 address 2002:WWXX:YYZZ::xx/64
(config-if)#tunnel source {a.b.c.d | interface}
(config-if)#tunnel mode ipv6ip 6to4
(e) Create a static route so that all 6to4 traffic goes through the tunnel interface.
(config)#ipv6 route 2002::/16 tunnel number
(f) Verify that you can ping the IPv6 loopback interfaces that your neighbouring group created on their router
in step (c) above.
Mukom Akong Tamon | AfriNIC Ltd | Page 15 of 15