1
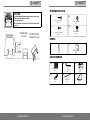
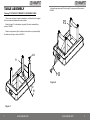
®
CUSTOMER SUPPORT
Should you require any assistance regarding this product please
gather the following information and then contact us using the
details below:
• Product No.: 15019
• Original purchase date
• Place of purchase
• Information about the place and conditions of use
• Precise description of the issue or defect
PT200
6FT POOL TABLE
IMPORTANT!! - Please retain your sales receipt, Viavito
Customer Care may request proof of purchase to validate
eligibility for warranty service. Warranty cover starts from
the date shown on the proof of purchase.
The best way to contact us is via the website: www.viavito.com
Viavito Ltd
42 Clipstone Street
London W1W 5DE
Email: [email protected]
USER MANUAL
www.viavito.com
7
www.viavito.com
Product Code: 15019
VIAVITO MANUFACTURER’S WARRANTY
THANK YOU FOR PURCHASING YOUR NEW PRODUCT FROM VIAVITO.
Everything is included to start playing and we are confident you
will have hours of fun playing with your new Viavito PT200 Pool
Table.
Viavito Ltd warrants this product to be free of defects of material and
workmanship, under normal use and conditions, for a period of 6
months from the date of the original purchase.
TERMS
IMPORTANT!
Please read all instructions carefully before using this product.
Retain this manual for future reference.
The specifications of this product may vary slightly from the illustrations and
are subject to change without notice.
IMPORTANT SAFETY NOTICE: NOTE THE FOLLOWING
PRECAUTIONS BEFORE USING THE PRODUCT.
1. Assemble the product exactly as the descriptions in the instruction manual.
2. Check all the screws, nuts and other connections before using the product for the
first time.
3. Set up the product in a dry level place and keep it away from moisture and water.
4. DO NOT use aggressive cleaning products such as detergents. To clean the
product, only use a clean cloth. Remove drops of sweat from the product immediately
after use.5. This product is for home use only. If used outside, please store indoors
after use.
This warranty extends only to the original purchaser and is not
transferable. The warranty does not cover:
1) Normal wear and tear
2) Any changes to upgrade this product from its normal state or use as
described in the user manual
3) Damage resulting from:
a) Transport
b) Abuse, misuse, failure to follow instructions or improper or
abnormal use
c) Non-home use - including commercial, professional, or rental
purposes
d) Repairs not provided by Viavito Ltd
e) Accidents, lightning, water, fire, or any other causes beyond the
control
of Viavito
f) Improper location including, but not limited to, humid, dusty, or
outdoor environments
Viavito is not responsible or liable for direct, indirect, or consequential
losses arising out of or in connection with the use of this product
or damages with respect to any loss of property, revenue, profits,
enjoyment or use. Nor for any costs of removal or installation of this
product.
This warranty covers products purchased from new inside the United
Kingdom.
1
www.viavito.com
www.viavito.com
6
HARDWARE PACK
CAUTION
1.It is recommended that two adults turn the table over.
2.Take hold of the table as shown.
3.Turn the table over.
4.Place the table on all four feet at the same time on the
ground.
TAKE HOLD OF
THE CABINET
DO NOT HOLD
THE LEGS
DO NOT LEAN THE
TABLE ON ITS LEGS
H2
H1
5/16"x1-3/8" BOLTS
12pcs
5/16" WASHER
12pcs
H3
H4
LEG LEVELERS
4pcs
8#x1-1/4" SCREWS
24pcs
PARTS
P2
P1
LEG END PANELS
4pcs
LEGS
4pcs
ACCESSORIES
BILLIARD BALL
1set
BRUSH
1pc
www.viavito.com
TOOL
1pc
CHALK
2pcs
A6
A5
A4
5
A3
A2
A1
CUE STICK
2pcs
www.viavito.com
TRIANGLE
1pc
2
TABLE ASSEMBLY
4. Attach the leg end panels (P2) to the legs (P1) using screws (H3) as shown in
FIGURE 2.
Warning: TWO ADULTS NEEDED TO ASSEMBLE TABLE
1. Find a clean, level place to begin the assembly of your billiard table. We suggest
that in the bottom of the tables with carton protected.
P2
2. Attach the legs (P1) to the skeleton using bolts (H1) and the washers(H2)as
shown in FIGURE 1.
3. Attach one leg levelers (H4) to the bottom of each Attach one leg levelers(H4)to
the bottom of each legs as shown in FIGURE 1.
H4
P1
H3
Figure 2
H2
H1
Figure 1
3
www.viavito.com
www.viavito.com
4