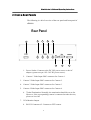
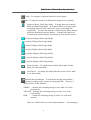
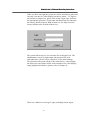
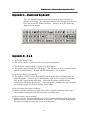
1
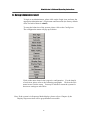
EDR400 4 CHANNEL D I G I TA L V I D E O R E C O R D E R INSTRUCTION MANUAL Before installing and using this unit, please read this manual carefully. Be sure to keep the manual handy for later reference. Administrator’s Guide and Operating Instructions WARNING TO REDUCE RISK OF FIRE OR ELECTRIC SHOCK, DO NOT EXPOSE THIS APPLIANCE TO RAIN OR MOISTURE. CAUTION DO NOT REMOVE COVER. NO USER SERVICEABLE PARTS INSIDE. REFER SERVICING TO QUALIFIED SERVICE PERSONNEL. WARNING: This equipment has been tested and found to comply with the limits for a Class “A” digital device, pursuant to part 15 of the FCC Rules. These limits are designed to provide reasonable protection against harmful interference when the equipment is operated in a commercial environment. This equipment generates, uses and can radiate radio frequency energy and, if not installed and used in accordance with the instruction manual, may cause interference to radio communications. Operation of this equipment in a residential area is likely to cause harmful interference in which case the users will be required to correct the interference at their own expense. Changes or modifications not expressly approved by the party responsible for compliance could void the user’s authority to operate the equipment. This Class A digital apparatus meets all requirements of the Canadian Interference Causing Equipment Regulations. Notice: The information in this manual was current when published. The manufacturer reserves the right to revise and improve its products. All specifications are therefore subject to change without notice. i Administrator’s Guide and Operating Instructions PRECAUTIONS Refer all work related to the installation of this product to qualified service personnel or system installers. Do not block the ventilation opening or slots on the cover. Do not drop metallic parts through slots. This could permanently damage the appliance. Turn the power off immediately and contact qualified service personnel for service. Do not attempt to disassemble the appliance. To prevent electric shock, do not remove screws or covers. There are no user-serviceable parts inside. Contact qualified service personnel for maintenance. Handle the appliance with care. Do not strike or shake, as this may damage the appliance. Do not expose the appliance to water or moisture, nor try to operate it in wet areas. Do take immediate action if the appliance becomes wet. Turn the power off and refer servicing to qualified service personnel. Moisture may damage the appliance and also cause electric shock. Do not use strong or abrasive detergents when cleaning the appliance body. Use a dry cloth to clean the appliance when it is dirty. When the dirt is hard to remove, use a mild detergent and wipe gently. Do not overload outlets and extension cords as this may result in a risk of fire or electric shock. Do not operate the appliance beyond its specified temperature, humidity or power source ratings. Do not use the appliance in an extreme environment where high temperature or high humidity exists. Use the appliance at temperature within 0oC ~ +45oC and a humidity below 90%. The input power source for this appliance is 24V DC. ii Administrator’s Guide and Operating Instructions Table of Contents 1. Product Overview………………….……………………….……... 1.1 Features…………………..……….…………..…………………... 1.2 Technical Overview…….….…….………………………….…….. 2. Front & Rear Panels….…….……………………………….……. 3. System Installation…….…….……………………………….…… 3.1 Before Installation…….……….…………………………….……. 3.2 Basic Connections…………….…………………………….…….. 3.3 Optional Connections…………..…………………………….…… 4. Main Screen…………………………………………..……….…... 4.1 View Display & Print Image…………..………………………….. 5. Basic Operations & Log Display……………………..………..…. 5.1 Version Display……………………………..…………….…….… 5.2 Alarm Message Display……………………...…………………… 6. Setup (Administrator)………………..….………………………... 6.1 Time Type Setup…………………..…….………………………... 6.2 Day Type Setup…………………………………………………… 6.3 Calendar Setup…………………..…………………….………….. 6.4 Alarm Action Setup……………………………………………….. 6.5 Motion Action Setup……………..…………………….…………. 6.6 Video Loss Action Setup………………………………………….. 6.7 Hard Disks Full Action Setup…………………………………….. 6.8 Camera Setup…………...………………………………………… 6.9 Alarm In Setup…………..……………………………….……….. 6.10 Alarm Out Setup……………..………………………………….. 6.11 Display Sequence Setup……………………..………….……….. 6.12 Display Page Setup………………………………………………. 6.13 Motion Setup…………………………………………………….. 6.14 Password Setup…………………………………..……….……... 6.15 System Configurations………...………...…………….………… 6.16 Audio Setup……………………………………………………… 7. PTZ Control Functions…………………………………………… 8. Day/Time Setup (Administrator)………………………………… 9. Image Playback and Archive (Administrator, Supervisor) …… 9.1 Select HDD & Range Dialog Box………………………………… 10. Remote Control..…………………………………..……….……... 1 1 2 4 7 7 8 8 10 13 14 15 15 16 17 18 19 20 23 24 25 27 30 32 33 34 36 38 39 43 44 46 47 50 53 Appendix A – Specifications Appendix B – Time Lapse Mode Recording Time Appendix C – Simulated Keyboard Appendix D – Q & A 56 57 59 59 iii Administrator’s Guide and Operating Instructions 1. Product Overview The PowerPlex eDR400, 4 Channel Digital Video Server, combines the power of triplex multiplexing and digital video recording into one comprehensive unit. The compact design is suitable for conventional surveillance in limited spaces where only 4 cameras are required. The eDR series digital video recorders provide excellent picture quality with comprehensive programming that can be easily configured to meet a customer’s need. Network and internet capabilities enhance the power of remote monitoring. The PowerPlex eDR400 is the only suitable weapon for security surveillance today. 1.1 Features Triplex operation: Recording, Live, & Playback 4 Color or B/W camera inputs (NTSC/PAL) Intelligent motion detection with programmable area and sensitivity for each camera Powerful alarm processor with configurable triggering conditions and reactions Event recording, time-lapse recording or both Up to 5 seconds of pre-record time Built-in MPEG-1 and JPEG compression/decompression, with configurable quality Storage on 3.5” Docking Hard Disk, hot-swappable (DVR option) Versatile display formats: full-screen, 4, 7, 9, 10, 13 & 16 video Alarm history log for Video Loss, Motion, Alarm input, Hard Disk Full and Power. Multi-level password to ensure high degree of security Configurable (Recording/Event) behaviors, up to 16 kinds of date and 16 kinds of time Recording rate: 30 fps for NTSC, 25 fps for PAL Playback rate: up to 30 fps for NTSC, 25 fps for PAL Independent record & playback 2 Fast Ethernet interfaces, 1 for peer-to-peer, 1 for upward communications RS-232 interface for point-to-point or internet communications RS-232 interface for PTZ camera control 2 USB ports for backup devices, printer, USB hub. Built-in CompactFlash memory, power off data protection, power on and run Built-in 4x4 video matrix Graphics User Interface Audio recording capability Stackable architecture (up to 4, reserved) Remote surveillance and playback through WEB Browser such as IE or Netscape Remote alarm notification Remote upload/download of system configurations 1 Administrator’s Guide and Operating Instructions 1.2 Technical Overview 1.2.1 Video Input and Output The digital video recorder is designed to support either NTSC/EIA or PAL/CCIR standard. To make the auto detection of video standard work, at least one camera must be connected to the video input. Camera input impedance termination is set independently for each camera automatically. Synchronizing or phasing cameras is not required to achieve the frame rate of 30 fps for NTSC/EIA or 25 fps for PAL/CCIR. 1.2.2 Video Processing The video processor controls the switching of the built-in video matrix according to the system configurations. The video encoder keeps analyzing the video signal from the cameras, and encoding the incoming pictures in JPEG format or MPEG-1 format that is digitized and smaller in size at 30 fps for NTSC/EIA or 25 fps for PAL/CCIR. During video playback, the video decoder decodes the digitized format, no matter it is JPEG or MPEG-1, and then displays the decoded pictures on the VGA monitor screen. 1.2.3 Video Storage and Retrieval The encoded pictures are stored in the hard disks, with the stored frame rate for each camera set by the administrator. If any event (Alarm, Motion, or Video Loss) happens, all the encoded pictures for the correspondent camera for the preset pre-record duration will be saved to the hard disk, and the recording rate for that camera will be changed to its alarm recording rate afterwards for the preset post-record duration. During video playback, the selected pictures can be saved to ZIP disk, DVD RAM etc. in .MPG format for MPEG-1 encoded video or .MOV format for JPEG encoded video. For Time-Lapse Mode Recording Time, please refer to Appendix B. 1.2.4 Motion Detection The digital video recorder continuously monitors all camera inputs for motion. When motion is detected, the system reacts according to the motion action set by the administrator, including increase of recording frame rate, sounding the buzzer, triggering the alarm output, 2 Administrator’s Guide and Operating Instructions event log, etc. Motion detection options for different time types can be set for each camera input using a 16 (width) by 12 (height) target overlay. You can also enable or disable motion alarms for different time types. However, the recording frame rate is NOT influenced by motion detection for the digital video recorder. 1.2.5 Video Display The VGA monitor displays either live camera pictures or pictures from hard disks. The display resolution is 800x600(NTSC and PAL). As many as 16 million colors can be displayed in the following screen formats: full screen, 4 windows, 7 windows, 9 windows, 10 windows, 13 windows, and 16 windows. All the main displays are window based look and feel for ease of user operations. 1.2.6 Video Playback The user can select a previously recorded hard disk to review the recorded video. Displaying of the recorded video is composed of decoding the JPEG or MPEG-1 encoded video automatically and multiplexing each camera video to its designated video window. With the coded data that was inserted into each recorded picture, the digital video recorder can reconstruct each camera’s tag name, status, date, and time information automatically. The image can be displayed in any multi-window format on the VGA monitor, just like in live video mode. 1.2.7 Non-editable Recorded Images The retrieved images are saved as .MPG files or .MOV files, which can be played by Media Player or QuickTime. Therefore, those files are editable by the video editing packages, just like the recorded images in the other digital video recorders. However, the recorded images in the hard disks are not editable by the video editing packages. (They even cannot be seen by those packages.) That is to say, the recorded images are guaranteed to be the original images. 3 Administrator’s Guide and Operating Instructions 2. Front & Rear Panels The following is a brief overview of the rear panel and front panel of eDR400. Rear Panel 1 2 3 4 5 6 7 8 1. Power Socket: Connects to the DC 24V power source or the AC adapter (system accepts 18V~30V DC power source). 2. Camera 1 Video Input: BNC connector for Camera 1. 3. Camera 2 Video Input: BNC connector for Camera 2. 4. Camera 3 Video Input: BNC connector for Camera 3. . 5. Camera 4 Video Input: BNC connector for Camera 4. 6. 75ohm Termination: Normally, the termination should be set as On. However, if the corresponding camera is connected to other devices, please set it as Off. 7. VGA Monitor Output. 8. RS-232 Connector #2: Connects to PTZ camera. 4 Administrator’s Guide and Operating Instructions Front Panel 15 13 9 10 11 16 17 18 14 19 12 9. Alarm In 1-4: Connects to alarm inputs 1-4 & 1 common ground. 10. Alarm Out: Connects to 2 Normally Closed alarm outputs (1-2), 2 Normally Open alarm outputs (3-4) & 1 common ground. 11. RS232 connector #1: Connects to Modem. 12. Mouse (Y Cable) Connector: Connects to the PS2 mouse or the Y cable (attached) for the mouse and keyboard (optional) connection. The mouse must be connected at system startup. 13. Audio In. 14. Audio Out. 15. 2 USB connectors: Connect to the CD-RW, DVD RAM, ZIP, printer, or USB hub. 16. LAN connector 1: For peer-to-peer connection (reserved). 17. LAN connector 2: Connects to the RJ45 LAN connector. 18. Reset Button. 19. LEDs: LEDs for system active, power and HDD access. 5 Administrator’s Guide and Operating Instructions Side Panel 20 21 20. Hard Disk Tray: Please make sure to set the hard disk as master. To access the hard disk, use the attached key to open the cover and remove the hard disk holder. The key can’t be removed from the cover while the cover is open. 21. Cooling FAN. 6 Administrator’s Guide and Operating Instructions 3. System Installation The installations described below should be made by qualified service personnel or system installers. 3.1 Before Installation Please refer to the following diagram for the system connections. 7 Administrator’s Guide and Operating Instructions 3.2 Basic Connections Cameras Connect each of the camera video input connector to the video output from a camera or other composite video source. At least one camera must be connected before the system is running for the auto detection of video standard to take effect. VGA Monitor Connect the VGA monitor output connector to a VGA monitor. The VGA monitor displays selected live or recorded cameras in any available format. Mouse Connect a PS2 mouse to the mouse connector. Hard Disk Make sure the hard disk is inside the hard disk tray. Power Connect the DC 24V power source or the AC adapter into the power socket. 3.3 Optional Connections Alarm In Connect Alarm In 1-4 to NC or NO type of alarm signals. Please make sure to setup the software configurations of Alarm In accordingly. Alarm Out Connect Alarm Out 1-2 to NC type of alarm signals, Alarm Out 3-4 to NO type. Keyboard Connect the mouse(Y cable) connector to the attached Y cable; plug in the keyboard and mouse connectors to the Y cable connector. DVD RAM, CD-RW, ZIP (USB port) If the user wants to use DVD RAM, CD-RW or ZIP to retrieve important recorded images, connect it to the USB port connector at system startup. 8 Administrator’s Guide and Operating Instructions Printer (USB port) Connect the printer to the USB port connector at system startup. The system can support 2 types of printer: HP Photo Smart P1000 and EPSON Stylus Color 980. Microphone/Speaker Connect the microphone/speaker or other audio devices to the Audio In/Audio out connector. PTZ Camera Connect the PTZ camera to the RS-232 #2 connector. The system can supports Pelco C1487M type camera. Ethernet eDR400 is enabled control from the PC via Ethernet. Connect the LAN connector to a standard RJ45 connector Ethernet cable. Shown in below is an example of connection. Modem eDR400 is enabled control from the PC via modem. Connect the RS 232 connector to a modem. Shown in below is an example of connection. 9 Administrator’s Guide and Operating Instructions 4. Main Screen Camera 1 Live Camera 2 Live Camera 3 Live Camera 4 Live 36% The diagram above is the main screen display. The icons on the lower corner of the screen are mainly for control and configuration, those on the right corner for status indication. If any icon is grayed, it means that the specific function is not accessible in the current mode or login right. The followings are a brief description for each of the icons. System time in military hour format. Move the cursor on it, and the system date will be shown in YYYY/MM/DD format. Shutdown - To shutdown the system. (Note) Playback Controls – To change the control icons to those for playback functions. Alarm Reset – To reset the Alarm Outputs to their normal states and silence the Buzzer. Alarm Event Log – To view the event log. 10 Administrator’s Guide and Operating Instructions Config – To configure (setup) the behaviors of the system. Login – To login the system as Administrator, Supervisor or Operator. Sequence Mode / Static Page Mode – To toggle between Sequence Mode and Static Page Mode. In Sequence Mode, each page in the designated sequence will be shown for its preset dwelling time sequentially. To select the Sequence, click on the Up/Down buttons beside the displayed sequence number. In Static Page Mode, the selected multi-window display will always be shown on the screen. Full Screen Display (Static Page Mode) 4-window Display (Static Page Mode) 7-window Display (Static Page Mode) 9-window Display (Static Page Mode) 10-window Display (Static Page Mode) 13-window Display (Static Page Mode) 16-window Display (Static Page Mode) Pause/Circulate – To toggle between Pause Mode and Circulate Mode for status indication. Next Device – To change the status indication to next device while it’s in Pause Mode. Hard Disk Storage Indicator – To indicate the storage status and the recording percentage of the current recording hard disk. There are 3 different colors of the indicator: 36% GREEN – Normal, the remaining storage is more than 10% of the total capacity. YELLOW – Warning, the remaining storage is below 10% of the total capacity. RED – Alarm, the remaining storage is below 5% of the total capacity . There are 4 kinds of devices in the status indication. The displaying 11 Administrator’s Guide and Operating Instructions order is Camera, Alarm Output, Hard Disk, Alarm Input, then back to Camera. Each status bar stands for the status of one device, the bottommost for ID#1. There are 5 different colors: GRAY/BLACK – Not existent or not installed, GREEN – Normal, YELLOW – Video Loss detected for Camera, Alarm for Alarm Input/Output, and Recording for Hard Disk RED – Motion detected for Camera. Note: To power down the system, turn off the power source or unplug the power cord after the system is completed shutdown and the power down message is shown on the screen. 4.1 View Display & Print Image 12 Administrator’s Guide and Operating Instructions Each display view window can be individually configured by Administrator and Supervisor, including the display camera setup, live/playback mode and print image etc. Operations: Click on the desired view window, the following dialog box will be shown on the screen. The following is a brief description for each item shown above. Camera – Use the down arrow button to select the camera to display on this view window. Live/Playback – To select to show live or playback image on this view window. (Please refer to Chapter 8 for the details of Image Playback and Archive) Print – To print the image shown this view window. Switch To Full Screen – Check on this item to switch the view window to full screen. 5. Basic Operations & Log Display 13 Administrator’s Guide and Operating Instructions If the user does not login the system, he will be treated as a guest and can only view the live video display and device status. To login as an Operator or Supervisor, please click on the Login icon, and enter the appropriate Operator’s Login name and Password (For Operator, the factory default value for both of them is o, for Supervisor, the factory default value for both of them is s). The system allows up to 5 user accounts for each login level. The administrator can set up login name and password for each individual user. (please refer to Chapter 6.14 for detail setting) The Operator can operate all the icons related to live video display; the Supervisor can operate all the icons related to live video display, image playback and archive (please refer to Chapter 4). There are 6 kinds of event logs: Login (including remote login), 14 Administrator’s Guide and Operating Instructions Alarm, Motion, Video Loss, Hard Disk Full, and Power On/Off. To view the event Log display, please click on the Log icon. The screen will be shown as below: If you logged in as Administrator, the Delete button and Delete All button will be enabled. Click on the Delete button to delete the highlighted event log, and click on the Delete All button to delete all the event logs. For the alarm and motion action, if the action happened during the post record time from the previous triggered action, there will be no event record. 5.1 Version Display Click on the logo icon on the upper-right corner, the software version of the system and a serial number will be shown on the screen. 5.2 Alarm Message Display The alarm message will be displayed on the screen if the alarm happened and the alarm message for the corresponding action is on. Please click on the leftmost icon in the alarm message window to clear the alarm message. 15 Administrator’s Guide and Operating Instructions 6. Setup (Administrator) To login as an Administrator, please click on the Login icon, and enter the appropriate Administrator’s Login name and Password (the factory default value for both of them is admin). To setup the behaviors of the system, please click on the Config icon. The configuration menu will pop up as below. Click on the menu item for the respective configuration. For the details of each item, please refer to the following paragraphs. Click on the Exit menu item to exit the setup. You may be asked to restart the system for those new settings to take effect. Note: If the system is in Sequence Mode display (please refer to Chapter 4), the Display Seqs menu item will be grayed and not accessible. 16 Administrator’s Guide and Operating Instructions 6.1 Time Type Setup The behavior for the system is the same when it’s in the same Time Type (or Time Mode). Please refer to Camera Setup and Motion Setup for how they depend on Time Type. There are 2 default Time Types, On duty and Off duty, in the system. However, you may configure up to 16 Time Types to suit your needs. Use the meaningful names no matter they are from human viewpoint or the system’s viewpoint. Some other meaningful names may be: Day, Night, Overtime, Code 1, Normal, Alert, etc. Operations: After the Time Type menu item is selected, the Time Type dialog box will be shown on the screen. Please click on the item in the Time Type List, then click on the Time Type Tag, and then enter the new tag name for the selected Time Type by using the mouse or the keyboard. 17 Administrator’s Guide and Operating Instructions 6.2 Day Type Setup The daily behaviors for the system are the same for those days configured as of the same Day Type. There are 2 default Day Types, WORK DAY (Monday through Friday) and HOLIDAY (Saturday and Sunday), in the system. However, you may configure up to 16 Day Types to suit your needs. For each Day Type, you may configure up to 16 time segments and their corresponding Time Types, beginning time and end time. Operations: After the Day Type menu item is selected, the Day Type Setup dialog box will be shown on the screen. Please click on the item in the Day Type List, then click on the Day Type Tag, and then enter the new tag name for the selected Day Type by using the mouse or the keyboard. The Detail box corresponds to the selected Day Type shown in the Day Type Tag. Please click on the Up/Dn buttons to scroll the 16 time segments, click on the respective Down Arrow buttons to change the settings for the Time Type, beginning time (column From), and end time (column To) of the designated time segment. Note: Any time not in the intervals of all the time segments will be set as of Time Type #1 in the Time Type List (refer to Chapter 6.1). 18 Administrator’s Guide and Operating Instructions 6.3 Calendar Setup The Calendar setup is provided for the administrator to set the Day Type of each calendar day. It’s designed to be a Perpetual Calendar. However, up to 10 years of calendar days can be configured at any specific time. Operations: After the Calendar menu item is selected, the Calendar Setup dialog box will be shown on the screen. 2001 The active month is shown on the upper corner of the screen. The selectable Day Types are shown on the left corner of the screen. Please click on the Day Type button to select the active Day Type (the button will be on the DOWN position). Click on the Calendar Day button to change its Day Type to the active Day Type, or click on the weekday button to change the corresponding weekdays to the active Day Type (ex. Click on Tue button to change all Tuesdays of this month to the active Day Type). Click on the << button to display the calendar days of previous month, >> button next month to the active month. 19 Administrator’s Guide and Operating Instructions 6.4 Alarm Action Setup The Alarm Actions allow the administrator to define how the digital video recorder responds to the triggered alarm from the Alarm Inputs. There are up to 4 Alarm Actions that correspond to 4 (Focus) Cameras for most applications. For each Alarm Action, you may configure its behaviors as shown on the screen and- described below. Operations: After the Alarm Action menu item is selected, the Alarm Action Setup dialog box will be shown on the screen. 05 1 Please click on the item in the Action List, then click on the Action Tag, and then enter the new tag name for the selected Action by using the mouse or the keyboard. All the other settings correspond to the selected Action shown in the Action Tag. The following is a brief description for each item shown above. Duration – Response duration to define how long (in seconds) the Alarm Out relay and the Buzzer will keep after the Alarm Action is triggered (Note 1). Use the Up/Down arrow buttons to adjust the value (0-60 seconds). 20 Administrator’s Guide and Operating Instructions Focus Camera – To define the camera that will respond to this Alarm Action. The default settings are Camera 1 for Alarm Action 1, Camera 2 for Alarm Action 2, and so on. Go to Preset- The option will be available while the focus camera is a PTZ camera. Check the box and enter the desired preset location. The corresponding PTZ camera will automatically go to the preset location while the alarm action is triggered. For more details of the preset location settings, please refer to Chapter 7 PTZ Control Functions. Pre-record – Pre-record time to define how long (in seconds) before the Alarm Action is triggered the Focus Camera shall be intensively recorded (Note 2). Use the Up/Down arrow buttons to adjust the value (0-5 seconds). Post-record - Post-record time to define how long after the Alarm Action is triggered the Focus Camera shall be recorded at Alarm Recording Rate. However, the Post-record time will be prolonged if there is another Alarm Action triggered during the post-record duration from the previous action. Please refer to Camera Setup for Alarm Recording Rate of Camera. Use the Up/Down arrow buttons to adjust the value (0 seconds-60minutes). Enable – Check to enable the Alarm Output when the Alarm Action is triggered. Alarm Out – To define which Alarm Output will be triggered when the Alarm Action is triggered. NC and NO signals are available, please refer to Alarm Out Setup. Click on the Down arrow button to select one of the Alarm Outputs (AO 1-4). Output – Alarm Out output state when the Alarm Action is triggered. For NC signal, it’s always open, for NO signal close. The Normal State above shows whether the selected Alarm Out is NC signal or NO signal. Buzzer On – To activate the internal buzzer or not when the Alarm Action is triggered. Log – Log to event log list or not. Please refer to Log Display for the details. Show Message – To display the alarm message or not when the Alarm Action is triggered. 21 Administrator’s Guide and Operating Instructions Record Audio – To enable audio recording function while the alarm action is triggered. Any Key To Stop – When the Alarm Action is triggered, the internal buzzer and Alarm Out relay may be activated. If you want to stop those actions by pressing any key or moving/clicking the mouse, please check this item. Send Mail - To activate the e-mail notification function or not when the Alarm Action is triggered. The e-mail will be sent to the defined receivers with an attached file, which contains the video graphic file of the alarm triggered moment. (Note 3) However, if the alarm action happened during the post record time from the previous triggered alarm, there will be no notification sending for the corresponding action. Please refer to Chapter 6.15 for e-mail notification setting. Network Alarm (Reserved function) SMS (Reserved function) Note 1: When the Alarm Input that triggered the Alarm Action returns to normal, the internal buzzer and the corresponding Alarm Output will return to normal immediately. Note 2: The processing power for the system is 25 FPS for PAL and 30 FPS for NTSC. So, if the total configured recording rate for all the cameras is 5 FPS, intensive recording means that the actual FPS for the Pre-record time for the Focus Camera is 5 times (for PAL) or 6 times (for NTSC) the configured normal recording rate for the Focus Camera. The formula is: Fp = Fn x 25 / Ft for PAL, Fp = Fn x 30 / Ft for NTSC Fp: Pre-record FPS, Fn: normal FPS for Camera n, Ft: Total configured FPS. Note 3: For general user, the attached video graphic file will be in a QCIF GIF file format (176x120 for NTSC, 176x144 for PAL). For WAP user, the file will be in a Sub-QCIF file format (88x60 for NTSC, 88x72 for PAL). 22 Administrator’s Guide and Operating Instructions 6.5 Motion Action Setup The Motion Actions allow the administrator to define how the digital video recorder responds to the detected motion for the cameras. There are up to 4 Motion Actions that correspond to 4 Alarm Outputs for most applications. The Focus Camera is always the camera with the detected motion. For each Motion Action, you may configure its behaviors as shown on the screen and described below. Operations: After the Motion Action menu item is selected, the Motion Action Setup dialog box will be shown on the screen. 05 Please click on the item in the Action List, then click on the Action Tag, and then enter the new tag name for the selected Action by using the mouse or the keyboard. All the other settings correspond to the selected Action shown in the Action Tag. Please refer to the Alarm Action Setup for the descriptions and operations, except the followings: The response duration and post-record time are as long as the period when the motion is on. So, they are not listed above. The Focus Camera is always the camera with the detected motion. While there’s a motion happened, the text color of the corresponding camera tag will be shown reverse on the screen. 23 Administrator’s Guide and Operating Instructions 6.6 Video Loss Action Setup The Video Loss Actions allow the administrator to define how the digital video recorder responds to the detected video loss for the cameras. There are up to 4 Video Loss Actions that correspond to 4 Alarm Outputs for most applications. The Focus Camera is always the camera with the detected video Loss. For each Video Loss Action, you may configure its behaviors as shown on the screen and described below. Operations: After the VLoss Action menu item is selected, the Video Loss Action Setup dialog box will be shown on the screen. 05 Please click on the item in the Action List, then click on the Action Tag, and then enter the new tag name for the selected Action by using the mouse or the keyboard. All the other settings correspond to the selected Action shown in the Action Tag. Please refer to the Alarm Action Setup for the descriptions and operations, except the followings: There is no post-record time or call display because the video is lost. The Focus Camera is always the camera with the detected video loss. There will be no attached video graphic file for the e-mail notification because the video is lost. There will be only the notification indicate the triggered event. 24 Administrator’s Guide and Operating Instructions 6.7 Hard Disk Full Action Setup The Hard Disk Full Actions allow the administrator to define how the digital video recorder responds when the hard disk drive reaches the maximum storage capacity. Operations: After the HDD Full Action menu item is selected, the HDD Full Action Setup dialog box will be shown on the screen. 30 Alarm A01 Auto Overwrite – Check this item to enable automatically overwrite the recorded data when the hard disk drive capacity reaches the end. While Auto Overwrite is not enabled, the system will not overwrite the recorded data until the Administrator or Supervisor click on the Alarm Reset button. The default setting is Auto Overwrite enabled. (Note) Duration – Response duration to define how long (in seconds) the Alarm Out relay and the Buzzer will keep after the full hard disk capacity is detected. Use the Up/Down arrow buttons to adjust the value (0-60 seconds). Enable – Check to enable the Alarm Output when the full hard disk capacity is detected. 25 Administrator’s Guide and Operating Instructions Note. Alarm Out – To define which Alarm Output will be triggered when the hard disk capacity is full. NC and NO signals are available, please refer to Alarm Out Setup. Click on the Down arrow button to select one of the Alarm Outputs (AO 1-4). Output – Alarm Out output state when the hard disk capacity is full. For NC signal, it’s always open, for NO signal close. The Normal State above shows whether the selected Alarm Out is NC signal or NO signal. Buzzer On – To activate the internal buzzer or not when the full hard disk capacity is detected. Log – Log to event log list or not. Please refer to Log Display for the details. Show Message – To display the alarm message or not when the full hard disk is detected. Send Mail – Check to activate the e-mail notification function. There will be an e-mail notification sent to the defined receivers while the hard disk capacity is less than 10%. Please refer to Chapter 6.15 for e-mail notification setting. If the hard disk capacity reaches the end with the Auto Overwrite function disabled while the user login in as an Operator, the system will show a message to ask the user to login in as an Administrator or Supervisor for the further procedures. 26 Administrator’s Guide and Operating Instructions 6.8 Camera Setup The Camera Setup allows the administrator to define the behaviors for each Camera at each Time Type. There are up to 4 Cameras connected to the system. For each Camera and each Time Type, you may configure the behaviors as shown on the screen and described below. Operations: After the Camera menu item is selected, the Camera Setup dialog box will be shown on the screen. 3 Camera 01 3 Pelco C1487M v 2400 1 8,1,none v Please click on the item in the Camera List, then click on the Camera Tag, and then enter the new tag name for the selected Camera by using the mouse or the keyboard. The Recording Quality and the Compression Method apply to all cameras. For the Behaviors For Each Camera, please click on the item in the Time Type list to select the Time Type. All the other settings correspond to the selected Camera shown in the Camera Tag and the highlighted Time Type in the Time Type list. The following is a brief description for each item shown above. 27 Administrator’s Guide and Operating Instructions Tag Color – To select the text color of the corresponding camera tag name. Use the Up/Down arrow buttons to select, the color will be shown on the screen above. Installed – Check this item if the selected Camera is installed. If the selected Camera is installed, all the items in the Behaviors For Each Camera are settable. The default setting is installed. PTZ / PTZ ID – Check the PTZ item and enter the PTZ ID number if the selected camera is a PTZ camera. The ID number has to be consistent with the camera setting. Please refer to the operating manual of the camera for the IDsetting. PTZ Setting(For all camera) – To define the Model Type, Baud Rate and Data Type of all the installed PTZ camera. Use the Down Arrow button to select the proper items. Please refer to the specification of the camera for the setting. The system now supports Pelco C1487M type camera. Recording Quality For All Cameras – The range is 0-10, with 0 the lowest (rough) quality, 10 the highest (fine) quality. The default value is 8 . Use the Up/Down arrow buttons to adjust the value. Compression Method For All Cameras – MPEG (MPEG-1) or JPEG-CIF (JPEG), resolution – 352x240 for NTSC, 352x288 for PAL. Enable Digital Watermark – Check to enable digital watermark. The system provides up to 64 positions to locate the digital watermark. Click on the Vertical Position and Horizontal Position items to select the desired location. For the vertical position, the number 0 ~ 7 is from up to down, for the horizontal position, the number 0 ~ 7 is from left to right. Time Stamp – Click on the button for the Time Stamp setting menu. The system provides user options to enable/disable Time Stamp function, select the font size, position and color of the time stamp on the playback image. Enable Motion Detection – Check to enable motion detection for the selected Camera at the selected Time Type. Motion Action – The corresponding Motion Action if motion detection enabled. 28 Administrator’s Guide and Operating Instructions Video Loss Action – The corresponding Video Loss Action (always enabled). Normal Record (FPS) – The normal recording rate for the selected Camera at the selected Time Type. Use the Up/Down arrow buttons to adjust the value (0-30). The default value is 0.1 Frame Per Second (or 6 Frame Per Minute). (Note) Alarm Record (FPS) – The alarm-recording rate for the selected Camera at the selected Time Type. Use the Up/Down arrow buttons to adjust the value (0-30). The default value is 5 Frame Per Second (or 300 Frame Per Minute). Note 1 : The maximum recording rate for the system is 25 FPS for PAL, 30 FPS for NTSC. If the total recording rate for all cameras is greater than 25/30 FPS, the system will decrease the recording rate for each camera averagely to make the total 25/30 FPS. Note 2 : The remote end will not be able to view all the camera windows if there’s any camera is set as 0 FPS for the normal recording rate; unless all the cameras are set as 0 FPS. 29 Administrator’s Guide and Operating Instructions 6.9 Alarm In Setup The Alarm In Setup allows the administrator to define the behaviors for each Alarm Input at each Time Type. There are 4 Alarm Inputs connected to the system. For each Alarm Input and each Time Type, you may enable/disable and select its corresponding Alarm Action. Operations: After the Alarm In menu item is selected, the Alarm In Setup dialog box will be shown on the screen. Please click on the item in the Alarm Input List, then click on the Alarm Input Tag, and then enter the new tag name for the selected Alarm Input by using the mouse or the keyboard. For the Alarm Action for each Alarm Input, please click on the item in the Time Type list to select the Time Type. All the other settings correspond to the selected Alarm Input shown in the Alarm Input Tag and the highlighted Time Type in the Time Type list. The following is a brief description for each item shown above. Installed – Check this item if the selected Alarm Input is installed. If the selected Alarm Input is installed, all the items on the right side are settable. The default setting is NOT installed. Normal State – NC or NO, please check the signal types connected 30 Administrator’s Guide and Operating Instructions to the Alarm Input Terminal on the rear panel of the system. Use the Down arrow button to select the signal type. Enable Alarm Action – Check to Enable Alarm Action for the selected Alarm Input at the selected Time Type. Alarm Action – The corresponding Alarm Action if the Alarm Input changes its state from normal to alarm. Up to 4 Alarm Actions are selectable. 6.10 Alarm Out Setup 31 Administrator’s Guide and Operating Instructions The Alarm Out Setup allows the administrator to define the tag name for each Alarm Output. There are up to 2 Normally Closed (NC) signals (AO 1-2) and 2 Normally Open (NO) signals (AO 3-4) for the system. Operations: After the Alarm Out menu item is selected, the Alarm Out Setup dialog box will be shown on the screen. Please click on the item in the Alarm Out List, then click on the Alarm Out Tag, and then enter the new tag name for the selected Alarm Output by using the mouse or the keyboard. Define the behavior of the selected Alarm Output in the Trigger item, click on On to enable, click on Off to disable. 32 Administrator’s Guide and Operating Instructions 6.11 Display Sequence Setup The Display Sequence Setup allows the administrator to define the Sequence Mode display. Please refer to Chapter 4 for Sequence Mode display. For the definition of the Display Pages in each Display Sequence, please refer to Display Page Setup. Operations: After the Display Seqs menu item is selected, the Display Sequence Setup dialog box will be shown on the screen. 2 The following is a brief description for each item shown above. Number of Sequences – Up to 2 sequences can be defined. Use the Down arrow button to select the number. Sequence Number – To select the Sequence you want to modify for the following 2 items. Number of Pages – Number of Pages for the Sequence shown in Sequence Number. Different Display Types have different maximum number of pages. Display Type – The image Display Type for the selected Sequence shown in Sequence Number. 7 image Display Types are available, including full screen, 4-window, 7-window, 9-window, 10-window, 13-window, and 16-window. 33 Administrator’s Guide and Operating Instructions 6.12 Display Page Setup The Display Page Setup allows the administrator to define the Display Pages in Sequence Mode display and Static Page Mode display (please refer to Chapter 4). Operations: After the Display Pages menu item is selected, the Display Page Setup dialog box will be shown on the screen. 1 z 1 5 Camera 01 Please select Sequence Mode or Static Page Mode first. For Sequence Mode, you may select the Sequence No, then set the Page No. and Dwell Time; for Static Page Mode, you may set the Display Type. The following is a brief description for each item shown above. Sequence Mode – To set the Display Pages for Sequence Mode display. Static Page Mode – To set the Display Pages for Static Page Mode display. Sequence No – To select the Sequence Number in Sequence Mode display. Use the Down arrow button to select the number. 34 Administrator’s Guide and Operating Instructions Page No - To select the Page Number for the selected Sequence Number in Sequence Mode display. Use the Down arrow button to select the number. Page Dwell Time – The Dwell Time (in seconds) for the selected Page shown in Page No. Use the Down arrow button to select the number. The default value is 5. Display Type – To select the Display Type in Static Page Mode display. Use the Down arrow button to select the Display Type. The available types are 1-window (Full screen) and 4-window. 35 Administrator’s Guide and Operating Instructions 6.13 Motion Setup The Motion Setup allows the administrator to configure how motion detection works for each Camera at each Time Type. For each Camera and each Time Type, you may configure the Detection Area (16x12 grids) and Sensitivity as shown on the screen and described below. Operations: After the Motion menu item is selected, the Motion Setup dialog box will be shown on the screen. Please select the Camera and the Time Type first. All the other settings correspond to the selected Camera and the selected Time Type shown in their respective fields. For the Detection Area, please click on the Set (Clear) button, then click in the video window and drag the mouse to set (clear) the detection area. To set the Sensitivity, please click on the slider and drag the mouse. The value is shown above – larger value means more sensitive. On the right side is the trend curve showing the continuous snapshots of the detected motion. The following is a brief description for each item shown above. 36 Administrator’s Guide and Operating Instructions Camera – Use the Down arrow button to select the camera. Time Type - Use the Down arrow button to select the Time Type. Set – To set the Detection Area – active at down position. Clear – To clear the Detection Area – active at down position. Video Window – Showing the images for the selected Camera. Dragging the mouse inside to set (clear) the Detection Area. The motion detection is enabled for the area with net on it. The default setting is 16x12 grids all enabled. Sensitivity Value and Its Slider – Showing the sensitivity for the selected Camera and Time Type. Dragging the mouse on the slider to change the value. The default value is 50. Trend Curve Window - Trend curve showing the continuous snapshots of the detected motion, with the bar higher than the horizontal line in the middle as motion detected, lower as no motion detected. Reset All button – To reset all the settings to their defaults for all the Cameras and all the Time Types. Reset button – To reset the settings to their defaults for the selected Camera and the selected Time Type. Note 1: The default settings are selected to meet the requirements of most of the applications. Please try the default settings first before change the settings. 37 Administrator’s Guide and Operating Instructions 6.14 Password Setup The Password Setup allows the administrator to set the new Login names and Passwords for the Administrator, Supervisor and Operator. The system allows up to 5 user accounts for each login level. The default (Login, Password) for the Administrator is (a, a), the Supervisor (s, s), the Operator (o, o). Operations: After the Set Password menu item is selected, the Password Setup dialog box will be shown on the screen. Please click on the item in the User Account list; the information shown in Detail corresponds to the selected item. To modify the user information, simply click on each item and enter the desired login name and password, enter the password again in the confirm field, then click on Modify button to confirm the changes. To setup a new user account, select the proper user level, enter the desired login name and password, enter the password again in the confirm field, then click on Add button to setup the new user account to the system. 38 Administrator’s Guide and Operating Instructions 6.15 System Configurations The System Configurations Setup allows the administrator to set up the communication, printer model, E-Mail notification, daylight saving time, TV system and software upgrade. Operations: After the System menu item is selected, the System Configurations dialog box will be shown on the screen. 061 016 014 255 255 255 001 061 016 014 001 168 095 192 001 015 v EPSON Stylus Color 980 The following is the brief description for each item shown above. ŶҏCommunication - LAN Card Configuration IP address – Enter the desired IP address of the device in the columns. To obtain the IP address, please contact your Internet Server Provider. Subnet Mask – Enter the corresponding Subnet Mask. Enable Gateway – For local network setting, leave the box blank to disable gateway. For Internet connection setting, check the box to enable gateway. 39 Administrator’s Guide and Operating Instructions � � Gateway IP address – Enter the corresponding IP address while the gateway is enabled. Domain Name Server IP Address – Enter the correct Domain Name Server for mapping Domain Names to IP addresses. The default setting is 168.095.001.001. The user can also defines their local Domain Name Sever for name-to address translation, however, please make sure to define a correct Domain Name Server IP Address. - Dial Up Configurations After the Dial up item is selected, the Dial up Configurations dialog box will be shown on the screen. � 192 168 0 1 192 168 0 2 admin admin � � � Dialup Method – Click on the Modem, or None to setup the Dial Up method. Dialin detail – If ISDN is selected as the dialup method, please define EAZ/MSN number and ISDN Channels. The NOTE: defaultIMPORTANT value of Local IP address is 192.168.0.1, Remote IP Australian and New Zealand address is 192.168.0.2, and the default User Name and versions do not support ISDN. Password are both Admin. The IP addresses, User Name and Password are all configurable by the user. Dialout detail – Reserved Function. 40 Administrator’s Guide and Operating Instructions - Mail Setup To define the setting of the E-mail notification function. The following dialog box will be shown on the screen after the Mail item is selected. SMTP server – Enter the address and port number for the SMTP Server. The address can be either domain name or IP address, and the port number for SMTP server is normally 25. If the SMTP server requires authentication, check the item box and enter the effective name and password below. Sender – Enter the sender’s e-mail address which you would like to show on the outgoing notification. E-mail receiver – The system can send e-mail notification to up to 8 receivers for each action. Enter the e-mail addresses in #1 ~ #8 columns. For WAP message, check the box on the right of the e-mail address. - Network Alarm (Reserved Function) - SMS (Reserved Function) 41 Administrator’s Guide and Operating Instructions ҏ Ŷ Printer Model – Select the proper printer model which connected to the system. The system now provides 2 printer drivers, EPSON Stylus Color 980 and HP Photo Smart P1000. ҏ Ŷ Software Upgrade – Click on the button, the system will automatically detect and show the message to inform the user if there’s a later version software available for downloading. To upgrade the software, just click on Yes to confirm the downloading. The system will automatically reboot and upgrade while the downloading is completed. As the processes have to be done over internet, please make sure that the system is well connected to the internet and the communication setting is correct. ҏ Ŷ Factory Setting – Click on the button to revert all the configuration setting to default value. ҏ Ŷ Daylight Saving Time – Check the Enable box to enable Daylight Saving Time. The system provides 2 versions of Daylight Saving Time as described in below; select the proper one while the Daylight Saving Time function is enabled. North America – Clocks are turned forward an hour begins at 2 a.m. on the first Sunday in April, time reverts to standard time at 2 a.m. on the last Sunday in October. European Union – Clocks are turned forward an hour begins at 1 a.m. on the last Sunday in March, time reverts to standard time at 1 a.m. on the last Sunday in October. ҏ ҏ Ŷ TV System – NTSC or PAL, select the proper system by checking the box in front. Basically, the system can detect it automatically, doesn’t require user to define it. However, the system might sometimes misjudge due to the ambiguous signal, which mainly caused be over-length or bad quality cable. In this case, the user can define it manually to meet the local system. 42 Administrator’s Guide and Operating Instructions 6.16 Audio Setup The Audio Setup allows the administrator to define the behavior of the Audio Mode at each Time Type. There is 1 Audio Input connected to the system. Operations: After the Audio item is selected, the Audio Setup dialog box will be shown on the screen. Please check the box on Audio Installed item if it is installed to the system. Click on the item in the action list, the Normal Record option is corresponding to the selected item. Click on ON to enable Normal Record at this selected time type, Click on OFF to disable Normal Record. 43 Administrator’s Guide and Operating Instructions 7. PTZ Control Functions The system supports certain models of PTZ camera, which the user can easily operate the control functions through the user interface. Please refer to Chapter 6.8 for detail settings of the PTZ camera. Operations: While the installed camera is a PTZ camera, there will be an indication icon showing on the upper right corner of the corresponding view window. Click on the icon by mouse, the control panel of the PTZ camera will be shown on the screen. 1 v Low 5 sec The following is the brief description for each item shown above. If any item is grayed, it means the specific function is currently not accessible or the PTZ camera does not support the function. Ŷ Preset – To define the preset position, adjust the camera to the desired position, select the preset number (1~10) by the down arrow button then click Set button to confirm the setting. To direct the camera to the preset position, select the desired preset number by the down arrow button, then click on Goto button. Ŷ Focus – Select Auto to enable automatic focusing or click on Near or Far to adjust it accordingly. Ŷ Auto Pan Position – To define the Start and End position for auto pan function. Adjust the camera to the desired Start/End position, then click on Set Start/Set End button. Use Up/Down/Right/Left button to adjust the camera position, +/- to zoom in/out. 44 Administrator’s Guide and Operating Instructions Ŷ Auto Pan – To enable Auto Pan function. Select the speed (high, Medium or Low) from the above column by using the down arrow button, then click on Auto Pan button to start. The camera will run between the defined start and end position. Click on Auto Pan button again to stop running. Ŷ Sequence – To enable Sequence Mode. In sequence Mode, the camera will go to each preset position sequentially by the preset dwelling time. Select the dwelling time (3-60sec) from the above column by using the down arrow button, then click on Seq button to start the Sequence Mode. Click on Seq button again to stop. Ŷ Iris – To adjust the brightness level of the PTZ camera. Click on Inc. to get brighter picture. Click on Dec. to get darker picture. 45 Administrator’s Guide and Operating Instructions 8. Date/Time Setup (Administrator) If you are an Administrator, please click on the Time displaying on the Main Screen to enter the Date/Time Setup for the system. The date is in YYYY/MM/DD format, whilst the time in military hour format (HH:MM:SS). The built-in real time clock will be updated accordingly. 46 Administrator’s Guide and Operating Instructions 9. Image Playback and Archive (Administrator, Supervisor) On the Main Screen, please click on the Playback Panel icon, the screen will be shown as below: Camera 1 Play Camera 2 Play Camera 3 Play Camera 4 Play 36% x1 The icons on the lower corner of the screen are changed to the icons for video playback and archive, those on the right corner not changed (for status indication). The icons remained the same as in the Main Screen provide the same functions as described in Chapter 4. If any icon is grayed, it means that the specific function is not accessible in the current mode. If you want to playback the recorded video, please click on the Select HDD & Range icon first to select the range of the recorded video for playback. The following is a brief description for each of the icons not described in Chapter 4. Camera Display Controls – To change the control icons to those for camera display functions as described in Chapter 4. 47 Administrator’s Guide and Operating Instructions Select HDD & Range – To select the playback Hard Disk and the playback range in that Hard Disk. Click on it, and the Select HDD & Range dialog box will be shown on the screen as described in the next paragraph. Play Saved Video – To preview the retrieved images in the DVD RAM, ZIP disk (PC format), etc. Stop – To stop playing the video. If the user plays the video again, it will start from the beginning. Play – To play the selected video. Step Forward – The next single image corresponds to one of the selected playback cameras will be played and displayed on its corresponding video window. Reverse Play – To reverse play the selected video. Step Backward – The previous single image corresponding to one of the selected playback cameras will be played on its corresponding video window. Pause – To pause playing the video. Click on Play icon to resume playing. Archive Video – Toggle button to enable/disable retrieving playback video to CD-RW, DVD RAM, ZIP disk, etc. When the video is playing back and Archive is enabled (button at DOWN position), the Retrieval Device and Camera dialog box will be shown, please follow the instructions to retrieve the video. (Note.1, 2) Replay – To repeat playing the selected video over and over again when the button is at DOWN position. Audio – To enable or disable the audio during the video playback. The recorded can only be played under x1 playback speed. There will be no sound if it was set as other types of playback speed. Playback/Live Switch – To switch all the view windows between live and playback mode. Speed – The playing speed, ranging from 1/6 (slowest) through 5 (fastest). For speed 1/6 – 2, each image for the selected playback cameras will be displayed in its respective video window. For speed 3/4/5/6, each image out of 2/3/4/5 images will be displayed. Click on the button to select the desired playback speed. The default value is 1. 48 Administrator’s Guide and Operating Instructions Slider Bar – Showing the current playing position in the selected range. Click on it and drag the mouse to play the video from anywhere in the selected range when it’s playing. The date and time will be shown on the screen and the playback will be temporarily stopped when you drag the slider. To change the playback video window to full screen, please click on the video window, then select the appropriate option in the dialog box shown. To return from the full screen playback, please click on the full-screen video window, and then follow the instructions in the dialog box. Note 1: To archive the video images to CD-RW or DVD RAM, you must format the medium on a PC at the beginning. Normally, the software “Nero Burning” and “In CD” come with CD-RW or DVD RAM in the package, please install them in a normal PC, then you may format the medium by “In CD”. To format the medium, insert the medium to the CD-RW or DVD RAM and run the “In CD” software, follow the step as directed to complete the formatting. As not all the CD-RW/DVD RAM is compatible with the system, please contact your local distributor for the model list. If an IDE port CD-RW/DVD RAM device is used, an USB-BOX will be required to connect the device to the system. Note 2: For MPEG encoded picture, the retrieved images are saved as .MPG files, which are playable in MS-Windows. For JPEG, the retrieved images are saved as .MOV files, which are playable by QuickTime. You may download QuickTime at www.apple.com. The filename of the retrieved file is cam##_YYYYMMDDHHmmSS(.MPG or .MOV): ##: Camera ID. (1-16) YYYY: Year. (2001, 2002…) MM: Month. (1-12) DD: Date in month. (01-31) HH: Hour. (0-23) mm: Minute. (0-59) SS: Second. (0-59) 49 Administrator’s Guide and Operating Instructions 9.1 Select HDD & Range Dialog Box When the user click on the Select HDD & Range icon on the Playback Panel, the Select HDD & Range dialog box will be shown on the screen. The system provides user to search the image either by HDD location or by time. Use the Down arrow of the upper left column in the diagram box to select the desired searching way. To search by location, the diagram will be shown as below. 01-01-01 2001/8/13 Mon, 18:46:50 Search by location V 01 01 01 01 N Y N N N Y Y N N N Y Y N N N N N Y N N N Y Y N N N Y Y N N N N 01 01 N Y N N N Y Y N N N Y Y N N N N 01 N Y N N N Y Y N The following is a brief description for each item shown above. HDD No – The recorded Hard Disk to playback. Start/End Block No – 1 GB/Block or 32 Sections/Block for the system. The maximum End Block No. represents the Block number for the last recorded video or the maximum block number for the Hard Disk. Use the Down arrow button to select the Start/End Block No. Options to Play – To playback all recorded video images, or to playback only motion or alarm detected video images of the assigned location. 50 Administrator’s Guide and Operating Instructions Start/End Section No – 32 MB/Section or 32 Slices/Section for the system. Use the Down arrow button to select the Start/End Section No. Start/End Slice No – 1 MB/Slice for the system. Use the Down arrow button to select the Start/End Slice No. Start/End Date/Time – The recorded date & time for the Start/End Block/Section/Slice. Slider Bar (and the messages above it) – The Slider Bar displays in different colors the status for the recorded video from the Start Block/Section/Slice No. through the End Block/Section/Slice No. The colors are Blue – Video Loss, Green – Motion, Red – Alarm, The messages above displays Block-Section-Slice in BB-SS-ss format, date in YYYY/MM/DD format, and military hour in HH:MM:SS format for the video corresponding to the Slider Bar position. If Block-Section-Slice is shown as nn-XX-XX, the messages are at the Block level, nn-nn-XX Section level, and nn-nn-nn Slice level. Ŷ Ŷ Set Start button – Drag the Slider Bar to the start position you want, then click on the Set Start button to change the Start Block/Section/Slice No. Set End button – Drag the Slider Bar to the end position you want, then click on the Set End button to change the End Block/Section/Slice No. Video Loss Status – Video loss status for the Block-Section-Slice shown above for Camera 1 through 16 – Y for video loss, N for No video loss. Motion Status – Motion status for the Block-Section-Slice shown above for Camera 1 through 16 – Y for motion, N for No motion. Alarm Status – Alarm status for the Block-Section-Slice shown above for Alarm In 1 through 24 – Y for alarm, N for No alarm. To search by time, the diagram will be shown as below. Search by Time 51 Administrator’s Guide and Operating Instructions 01-01-01 2002/6/05 Wed, 14:45:05 V 02 06 05 N Y N N N Y Y N N N Y Y N N N N 14 45 05 N Y N N N Y Y N N N Y Y N N N N 02 06 05 N Y N N N Y Y N N N Y Y N N N N 14 55 05 N Y N N N Y Y N Use the Down arrow to select the desired start/end date and time, click on the Submit button to start searching. Or you may select the Use Duration Time item, there will be a column shown in below to allow the users select the desired duration time instead of entering the End Time. The other items are the same as the above description. To search by event, the diagram will be shown as below. 1-26-7x 2002/6/05 Wed, 14:30:00 Search by Event V N Y N N N Y Y N N N Y Y N N N N N Y N N N Y Y N N N Y Y N N N N N Y N N N Y Y N N N Y Y N N N N N Y N N N Y Y N Select the desired event from the event list. The other items are the same as the above description. 10. Remote Control 52 Administrator’s Guide and Operating Instructions Through Local Network, Intranet, Internet or dial-in functions, users are able to view the live video, image playback, upload/download the configuration file and upgrade the software of eDR400 from any PC in anywhere. The remote computer does not need to have the eDR400 software or any special hardware and software installed. Connecting the Remote PC and Server Before you start, please verify the connection between eDR400 and the modem or network. The procedure for configuring a remote PC depends on the desired type of connection. The user can either dial directly into the server through modem, or connect over a network. You must obtain IP addresses for the remote PC and eDR400, please refer to Chapter 6.15 System Configurations for the details. Remote View After the Remote PC and eDR400 are connected, start your Web browser and enter the system IP address in the Location/Address field. (Note.1) Example: http://61.218.36.252 The main page will be shown on the screen, enter the appropriate Login name and password, then click on the Submit button. (Note. 2) The main control page will be shown as below. The video image can be displayed in full or quad screen mode, and the time shown on each window refers to the time on eDR400 system clock. The following is the brief description of each item above. 53 Administrator’s Guide and Operating Instructions ҏ Ŷ Upgrade – To remote upgrade the system. Click on the button and follow the procedures shown on the screen for remote upgrading. (Note.3) Download – To download the configuration files from eDR400. Upload – To upload the configuration files to eDR400. After the configuration file is uploaded, you must reboot the eDR400 system. Click on the button at the lower panel to reboot the eDR400 system from the remote PC. Guide – To view the introduction of how to operate the remote browser. About – To view the information about eDR400. Ŷ Upper Panel Right Panel W1 ~ W4 Camera / Type – To select the display cameras for Window 1 ~ Window 4. Click on the down arrow button to select the desired camera for each window, and then select Live or Play from the options below for Live Video or Image Playback for each window. Click on the Submit button while the setting is completed. PTZ - Click on the PTZ button, a PTZ control panel will be shown on the screen. Select the camera number, the other control functions are the same as on eDR400. Please refer to Chapter 7 for PTZ Control Functions. Click on PTZ button again to hide the PTZ control panel. Playback Date/Time – To set the searching date/time for Image Playback. Enter the desired date and time in the proper columns, click on the Submit button to change the setting. The Playback Date/Time searching is based on eDR400 system clock please enter the local date/time for searching if there’s time difference between local and remote end. Alarm Out – To enable/disable the alarm out remotely. Ŷ Lower Panel – – / – To reboot the eDR400 system remotely. To view the log file of eDR400. To switch between quad screen and full screen mode. While the camera and date/time settings for image playback have been submitted, operate the following buttons for video playback. 54 Administrator’s Guide and Operating Instructions – To stop the playback image. The playback image will starts from beginning if the user click on the Play button again. / – Click on forward/backward play button to start playing/reverse playing video on its corresponding window. (Note.4) / – The next/previous single image corresponds to the selected playback cameras will be played and displayed on its corresponding video window. – To pause the playback image. Slider Bar – Showing the current playing position for image playback. Click on it and drag the mouse to play the video from anywhere in the selected range. Note. 1 The best viewer’s environment is Internet Explorer 5.0 or above, 1024 x 768 If the PC is protected by the Firewall, please make sure Port 1600 is enabled before accessed. Note. 2 The Login Name and Password are the same as used in eDR400, the Administrator can operate all the functions on remote end, the Supervisor can view the live video and playback image, and the Operator can only view the live video. Note. 3 You must have the upgrading software in your remote PC in order to remote upgrade the system. Please contact your local distributor to obtain the software. Note. 4 The remote end will not be able to view all the camera windows if there’s any camera is set as 0 FPS for the normal recording rate; unless all the cameras are set as 0 FPS. Appendix A – Specifications Video Format Video Input Video Output NTSC/EIA or PAL/CCIR, auto-sensing & manual switch 4 camera inputs (BNC), 1Vp-p/75ohm 1 VGA monitor output, D-Sub 15 pin 55 Administrator’s Guide and Operating Instructions Video Compression Video Resolution Video Display Display Resolution Sequential Switch Alarm Input Alarm Output Hard Disk Storage JPEG and MPEG-1 I Frame 352x240 (NTSC) or 352x288 (PAL) 1/4/7/9/10/13/16 video windows, 16 million colors 800x600 Programmable, with adjustable dwell time 4 inputs (N.C., N.O.) 4 outputs (2N.C., 2N.O.) 3.5” half height, IDE type, hot swappable Recording Rate Up to 30 fps for NTSC, 25 fps for PAL, independent of camera types Recording Mode Playback Rate Playback Search Motion Detection Video Loss Detection Event Log User Interface Setup User Input Device Buzzer Timer Watch Dog Timer Title CompactFlash Memory Security System Recovery Remote Access Remote Notification Network Protocol Fast Ethernet RS232 Audio Archive Power Source Power Consumption Dimension Weight Operating Temperature Continuous, Time-lapse recording, Event recording Up to 30 fps for NTSC, 25 fps for PAL Radar search, Thumbnail search, Time search Yes, with configurable detection area (16x12) & sensitivity Yes Yes Windows look and feel On screen setup Mouse (Keyboard: optional) Yes Built-in real time clock Yes 10-character title generator for each camera, alarm input, and alarm output 64 MB Multi-level password protection Auto power on after power loss recovery Internet Explorer / Netscape with JAVA support By e-mail HTTP, SMTP, TCP/IP, ICMP, ARP RJ45 connector x 2, one for peer-to-peer, one for upward communication 2 x RS232 connectors 1 microphone input, 1 speaker output 2 USB ports: for CD-RW, DVD RAM drive, ZIP, color printer (HP or EPSON), USB hub DC24V 36W 256(Width) x 178(Depth) x 88(Height)mm 2.7KG / 5.94 LB, excludes HDD 0oC ~ +45oC 56 Administrator’s Guide and Operating Instructions Appendix B – Time Lapse Mode Recording Time eDR400 Time Lapse Mode Recording Time (system storage: 60GB) (Estimated with typical image – low noise level) day 1 2 3 5 11 16 28 33 56 112 168 280 337 NTSC / JPEG Fine(10) Normal(5) hour min day hour 2 58 2 14 5 56 5 5 8 54 7 19 14 50 13 1 5 41 26 2 20 32 39 3 2 14 65 5 17 5 78 7 4 28 130 11 8 57 260 23 13 25 391 11 22 23 652 11 2 51 782 23 day 1 3 4 7 15 22 37 45 75 151 227 379 455 NTSC / MPEG-1 Fine(10) Normal(5) hour min day hour 12 24 3 23 0 49 7 22 13 13 11 22 14 2 19 21 4 5 39 18 18 8 59 16 22 13 99 11 12 16 119 8 20 26 198 22 16 53 397 21 13 20 596 20 6 13 994 18 2 40 1193 17 Total Capture Rate (FPS) 30 15 10 6 3 2 1.2 1 0.6 0.3 0.2 0.12 0.1 Total Capture Rate (FPS) 30 15 10 6 3 2 1.2 1 0.6 0.3 0.2 0.12 0.1 57 min 38 16 55 11 23 35 58 10 56 53 50 44 41 day 5 10 15 25 50 75 126 151 252 505 758 1264 1517 Rough(0) hour 1 2 4 6 13 20 10 16 20 16 12 4 0 min 21 43 5 48 37 26 4 53 8 17 26 44 53 min 29 59 29 29 59 28 28 57 56 52 48 40 37 Rough(0) day hour 6 1 12 3 18 4 30 8 60 16 91 0 151 16 182 1 303 9 606 19 910 5 1517 0 1820 10 min 38 16 54 10 21 32 53 4 46 33 20 53 40 Administrator’s Guide and Operating Instructions Total Capture Rate (FPS) 25 12.5 8.3 5 2.5 1.7 1 0.83 0.5 0.25 0.17 0.1 day 1 2 3 5 11 16 28 33 56 112 165 281 Total Capture Rate (FPS) 25 12.5 8.3 5 2.5 1.7 1 0.83 0.5 0.25 0.17 0.1 day 1 3 4 7 15 22 38 45 76 152 224 381 PAL / JPEG Fine(10) Normal(5) hour min day hour 2 59 2 14 5 58 5 5 9 17 7 21 14 57 13 2 5 54 26 5 12 55 38 14 2 45 65 14 20 57 79 0 5 31 131 4 11 2 262 9 9 10 385 21 3 35 656 0 PAL / MPEG-1 Fine(10) Normal(5) hour min day hour 12 35 4 1 1 11 8 2 14 14 12 4 14 59 20 5 5 59 40 10 10 13 59 11 2 59 101 3 22 23 121 20 5 58 202 6 11 57 404 13 6 16 594 21 5 52 1011 8 min 58 57 41 53 46 8 26 54 52 45 24 23 day 5 10 15 25 51 75 127 153 255 511 751 1277 Rough(0) hour 2 5 9 13 2 3 18 21 12 0 11 12 min 38 16 23 12 24 32 0 59 1 2 21 7 min 5 10 26 27 54 47 15 24 31 2 59 35 Rough(0) day hour 6 1 12 3 18 6 30 8 60 16 89 5 151 16 182 18 303 9 606 19 892 8 1517 0 min 38 16 39 10 21 41 53 36 46 33 59 53 Note: The above listed system & capture rates are just taken for example. 58 Administrator’s Guide and Operating Instructions Appendix C – Simulated Keyboard There are situations that the user will be asked to enter a numeric or alphanumeric string. So, a Simulated Keyboard is designed for the user to use the mouse for all the operations. Please refer to the following diagram for the details. Appendix D – Q & A Q: The mouse doesn’t work. A: The mouse must be connected to the system at system startup. Q: The playback images cannot be retrieved to the ZIP disk. A: The system support IOMEGA’s ZIP drives. The ZIP drive must be connected to the system at system startup. Besides, the ZIP disk must be PC formatted. Q: How to get better video quality? A: The quality of JPEG is better than MPEG, and the higher the recording quality, the better the quality. Please login as administrator, click on the Config icon, and then click on the Camera Setup menu item. Select the Recording Quality and the Compression Method as appropriate. After exiting the Config menu, you’ll be asked to restart the system for the new settings to take effect. Q: How to setup time-lapse recording? A: Please setup the Normal Recording rates for the Cameras at different Time Types. The normal recording rates are also time-lapse recording rates. Q: How to setup event recording? A: Please setup the Alarm Recording rates for the Cameras at different Time Types, the different Actions, and the enable/disable items for the Cameras and the Alarm Inputs. The alarm recording rates are also event-recording rates. 59 Administrator’s Guide and Operating Instructions Q: How to black out the live images for the cameras? A: To black out the live images for the cameras, login as Administrator and set those cameras as playback in the Sequence Mode display & Static Page Mode display. There are 7 static display pages and 2 display sequences. Later on, the Operator/Guest will not be able to see the live images for those cameras. Q: There are no pre-recorded images for the camera? A: There must be at least one Action corresponding to that camera, and the pre-record time of those Actions must be non-zero. Besides, the normal recording rate for that camera must be non-zero. (Exception: If the normal recording rates for all the installed cameras are all zero, the pre-record will still be effective.) Please refer to Chapter 6 for the detailed setup. Q: The displayed date and time on the lower-left corner are not correct. A: Please login as administrator, click on the displayed time, then the Date & Time Setup dialog box will be shown. Enter your local time, and then click on the OK button to update the system’s date & time. Q: How to play the retrieved files on a PC? A: Double click on the filename of the .MPG file, the Media Player in MS Windows will be run to play the .MPG file. Download QuickTime from www.apple.com to play the .MOV files. The playback version of QuickTime is free. Q: Why does the system have the confused images in some channel? A: We suggest you to check if there’s any camera with Line Lock function on. The camera frequency is according to AC power if line lock function is set as ON, the instable frequency of power supply will cause the variant frequency to camera. When V-sync frequency is unstable, it affects the next captured camera images. Please set this camera to line lock OFF if you have the problem, the camera frequency will be consistent according to itself if line lock off. Q: How to login to the system if the administrator’s login name and password are lost? A: For the security reason, it’s impossible to retrieve the login name and password once they’re lost. Once the administrator’s login name and password are lost, the only way to re-login to the system is through the backdoor program. Please click the logo icon on the upper right corner of the main screen, there will be a serial number shown on the screen. Contact our worldwide branch offices or your local distributor to give them the serial number you have, you will be given a new set of login name and password once your identification is verified. Make sure you setup your own login name and password after you re-login to the system. Each serial number can be used only once, there will be a new serial number given to the system once you re-login. 60 www.ness.com.au Head Office: Ness Security Products Pty Ltd ABN 28 069 984 372 4 / 167 Prospect Hwy Seven Hills NSW 2147 Australia Ph +61 2 8825 9222 Fax +61 2 9674 2520 [email protected] NSW: 4 / 167 Prospect Highway Seven Hills NSW 2147 Ph 02 8825 9222 Fax 02 9674 2520 [email protected] VIC: 24 Terracotta Drive Blackburn VIC 3130 Ph 03 9875 6400 Fax 03 9875 6422 [email protected] QLD: Unit 3, 471 Lytton Road Morningside QLD 4170 Ph 07 3399 4910 Fax 07 3217 9711 [email protected] WA: Unit 1, 567 Newcastle Street Perth WA 6000 Ph 08 9328 2511 Fax 08 9227 7073 [email protected] ADELAIDE Aquavia Controls 13 Weaver Street Edwardstown S.A. 5039 Ph 08 8277 7255 Fax 08 8276 3028 [email protected] NEW ZEALAND National Fire & Security (NFS) Unit 5, 517 Mt Wellington Highway Mt Wellington Auckland Ph +64 9 573 0401 Fax +64 9 573 0402 [email protected] COPYRIGHT NOTICE All rights reserved. No part of this publication may be reproduced, transmitted or stored in a retrieval system in any form or by any means, electronic, mechanical, photocopying, recording, or otherwise, without the prior written permission of Ness. Ness reserves the right to make changes to features and specifications at any time without prior notification in the interest of ongoing product development and improvement. © 2003 Ness Security Products Pty Ltd ABN 28 069 984 372