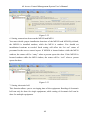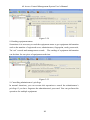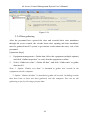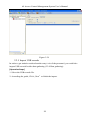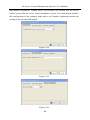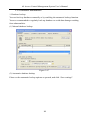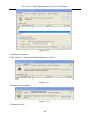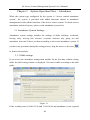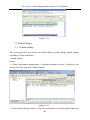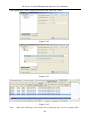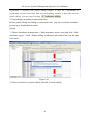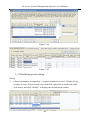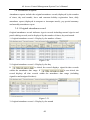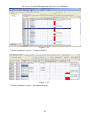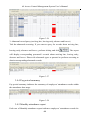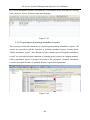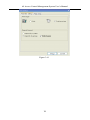
1
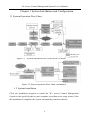
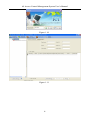
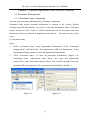
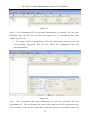
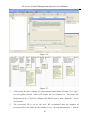
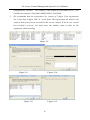
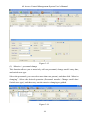
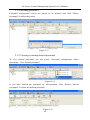
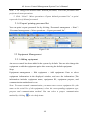
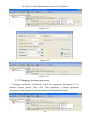
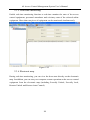
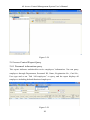
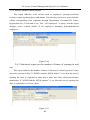
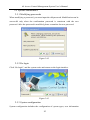
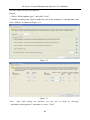
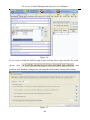
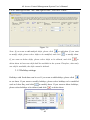
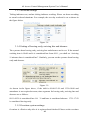
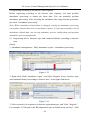
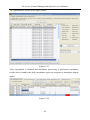
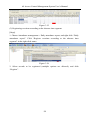
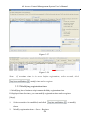
Table of contents
K1 Access Control
Management System
User’s Manual
Aug 2010
1
Table of contents
Table of Contents
Chapter 1 System Installation and Configuration
1.1 System Operation Flow Chart ...................................................... 1
1.2 System Installation ....................................................................... 1
1.3 System Configuration ................................................................... 2
Chapter 2 System Operation Flow (Access Control
2.1 Personnel Management ............................................................... 5
2.1.1 Personnel entry/ importing............................................... 5
2.1.2 Personnel query .............................................................. 10
2.1.3 (Massive)personnel change...................................... 10
2.1.4 Deleting personnel .......................................................... 12
2.1.5 Viewing/ restoring deleted personnel ............................ 12
2.1.6 Export/ printing personnel list ........................................ 13
2.2 Equipment Management ........................................................... 13
2.2.1 Adding equipment........................................................... 13
2.2.2 Changing/ deleting equipment ....................................... 14
2.2.3 Configuring equipment ................................................... 15
2.2.4 Data gathering................................................................. 21
2.3 Access Control Setting................................................................ 22
2.3.1 Managing maps............................................................... 23
2.3.2 Setting time section ........................................................ 25
2.3.3 Setting time group .......................................................... 26
2.3.4 Personnel registration ..................................................... 28
2.3.5. Real-time monitoring ..................................................... 33
2.3.6 Electronic map ................................................................ 33
2.3.7 Downloading all access control parameters.................... 34
2.4 Access Control Report Query ..................................................... 35
2.4.1 Personnel information query .......................................... 35
2.4.2 Access control detail report ............................................ 36
2.4.3 Statistical report on the number of times of passing in
and out ........................................................................... 36
2.5 System Maintenance.................................................................. 37
2
Table of contents
2.5.1 Modifying passwords ...................................................... 37
2.5.2 Re-login ........................................................................... 37
2.5.3 System configuration....................................................... 37
2.5.4 Database maintenance ................................................... 39
2.5.5 Software update.............................................................. 41
2.5.6 About............................................................................... 41
Chapter 3 System Operation Flow – Attendance .................................. 42
3.1 Attendance System Settings....................................................... 42
3.1.1 Shift settings.................................................................... 42
3.1.2 Holiday settings ............................................................... 45
3.1.3 Weekend settings ............................................................ 46
3.1.4 Setting of leaving early, arriving late and absence .......... 46
3.1.5 Overtime system settings ................................................ 46
3.1.6 Business trip system settings .......................................... 47
3.1.7 Outgoing system settings ................................................ 47
3.1.8 Attendance item unit settings ......................................... 47
3.2 Registration of Leaves, Business Trips, Overtime and Common
Holidays ......................................................................... 49
3.2.1 Registering leaves, business trips, common holidays and
overtime......................................................................... 49
3.2.2 Modifying registration time ............................................ 54
3.2.3 Deleting leave/business trip/common holiday/overtime
registration..................................................................... 58
3.2.4 History record query ....................................................... 59
3.3 Punch Editing ............................................................................. 60
3.3.1 Punch editing .................................................................. 60
3.3.2 Modifying punch editing ................................................. 63
3.3.3 Deleting punch editing .................................................... 64
3.4 Attendance Reports ................................................................... 65
3.4.1 Original attendance record ............................................. 65
3.4.2 Leave and common holiday registration form ................ 66
3.4.3 Daily attendance report .................................................. 66
3
Table of contents
3.4.4 Pay period summary ....................................................... 68
3.4.5 Monthly attendance report ............................................ 68
3.4.6 Exporting and printing attendance reports..................... 69
4
K1 Access Control Management System User’s Manual
Chapter 1 System Installation and Configuration
1.1 System Operation Flow Chart
Figure 1.1 System Operation Flow Chart (Access Control)
Figure 1.2 System Operation Flow Chart (Attendance)
1.2 System Installation
Click the installation program to install the "K1 Access Control Management
System to the specified path on your computer according to the setup wizard. After
the installation is complete, the system automatically runs the software.
1
K1 Access Control Management System User’s Manual
Figure 1.3
Figure 1.4
Figure 1.5
Figure 1.6
1.3 System Configuration
For initial running of the system, the initial running wizard will pop up
automatically. Configure the following items of the system based on the wizard:
Company name, system type, equipment type, employee ID length and password.
Steps:
1.
Input company name and select system type (Access control or access control
attendance system).In addition to all functions of the access control system, the
functions of the attendance system also include functions related to attendance.
(Figure 1.6)
2.
Select the equipment type (Figure 1.8).
3.
Set personnel ID length (the default length is 5 digits, and you can enter a
maximum of 99,999 persons).
2
K1 Access Control Management System User’s Manual
Set the log-in password (To successfully set this password, you must ensure
that the new password is the same as the password you confirm. The password
can be English letters (case sensitive) and numbers. Do not forget the password
after the setting (Figure 1.9).
Figure 1.8
Figure 1.9
4.
A system login window will pop up automatically after system configuration.
Enter the password, and then click “OK” to log in the K1 Access Control
Management System. Figure 1.11 shows the main interface of the access
control management.
3
K1 Access Control Management System User’s Manual
Figure 1.10
Figure 1.11
4
K1 Access Control Management System User’s Manual
Chapter 2 System Operation Flow (Access Control)
2.1 Personnel Management
2.1.1 Personnel entry/ importing
You can enter personnel information by entering or importing.
Personnel entry means personal information is entered to the system. Before
entering personal information, you need to enter the department name. Personnel
import means an Excel form in which information on all personnel and their
departments has been entered is imported to the system. You may use any of the
ways.
(1) Personnel entry
Steps:
1. Before personnel entry, enter department information. Click “Personnel
Management”, and then click “Set department>Add new department” in the
department setting window to enter all department information.
2. Click “Personnel entry” to enter all personnel information (Figure 2.4)
(including name, registration/ entry dates, user type and department
name).Items with a blue mark must be filled. You can also manually enter the
personnel ID and registration No. generated automatically by default. )
Figure 2.1
Figure 2.2
5
K1 Access Control Management System User’s Manual
Figure 2.3
Note: 1. The department ID is generated automatically by default. You can also
manually enter the ID, but you may not repeat. So, we recommend that auto
numbering be used.
2. To change/ delete a department, select the department and carry out the
corresponding operation. You can not delete the department that has
sub-departments.
Figure 2.4
Note: 1.We recommend that auto numbering be used for personnel ID and
registration No.. The registration No. must be the same as the ID registered on the
access control. If the access control has registered a person, you need to enter the
6
K1 Access Control Management System User’s Manual
registration No. that is the same as the ID recorded in the system.
2. For a card user, he or she can input card number in the card number frame.
For a user who uses password, he or she can input the password into the frame. For
a user who uses fingerprint, he or she does not need to input any card number or
password.
Figure 2.5
(2) Personnel import
Steps:
1.
Click “Personnel Management > More operations > Import personnel form”.
View the template in the displayed dialog box. Save the template and import
relevant information about the personnel into the Excel (You must import in
the specified format to avoid failure).
2.
Select the personnel from the Excel, and click “Next” as guided, until the
importing is complete.
7
K1 Access Control Management System User’s Manual
Figure 2.6
Figure 2.7
1.
Cells under the four columns of “Department name/Name/ Gender/ User type”
are of regular format, while cells under the six columns in “Personnel ID/
Registration No./ Card No./ Identity ID/ Enroll (entry) date/ Remarks” are in
text format.
2.
The personnel ID is set by the user. We recommend that the number of
personnel ID is the same as the number set in “System maintenance > System
8
K1 Access Control Management System User’s Manual
configuration: ID rules”. For example, if the length of a personnel ID is 5, you
should enter numbers like 00001,00002,00003, and 00004.
3.
We recommend that the registration No. consist of 5 digits. If an registration
No. is less than 5 digits, add “0” at the front. The registration No. must be the
same as that of the person recorded in the access control. If the access control
has enrolled a person, you must enter the number same as that on the
equipment when enrolling.
Figure 2.8
Figure 2.9
Figure 2.10
Figure 2.11
Figure 2.12
9
K1 Access Control Management System User’s Manual
Figure 2.13
2.1.2 Personnel query
You can query a person through the department name, personnel ID, name,
registration No., card No. and user type.
Figure 2.14
2.1.3 (Massive)personnel change
(1) Personnel change
If you have found the person's information, you can change and save to change his/
her information.
10
K1 Access Control Management System User’s Manual
Figure 2.15
(2)(Massive)personnel change
This function allows you to massively call out personnel, change enroll/ entry date,
and switch user type.
Select the personnel (you can select more than one person), and then click “Massive
changing”. Select the desired operation (Personnel transfer/ Change enroll date/
Switch user type), and then carry out the massive changing as guided.
Figure 2.16
11
K1 Access Control Management System User’s Manual
2.1.4 Deleting personnel
Personnel management: Select the person to be deleted, and click “Delete
personnel” to delete the person.
Figure 2.17
2.1.5 Viewing/ restoring deleted personnel
To view deleted personnel, you can access “Personnel management >More
operations > View deleted personnel”.
Figure 2.18
If you have deleted the personnel by mis-operation, click “Restore deleted
personnel” to restore the deleted personnel.
Figure 2.19
12
K1 Access Control Management System User’s Manual
Note: 1. To change the deletion date/ deleted personnel, select the personnel and
perform relevant operations.
2. Click “Print"/ “More operations> Export deleted personnel list” to print/
export the list of deleted personnel.
2.1.6 Export/ printing personnel list
You can print/ export personnel list by clicking “Personnel management > Print" /
“Personnel management > More operations > Export personnel list".
Figure 2.20
2.2 Equipment Management
2.2.1 Adding equipment
An access control has been added in the system by default. You can also change the
equipment or add the equipment again after removing the default equipment.
Steps
Equipment management > Edit equipment > Add equipment: Enter or select
equipment information in the displayed window, and save the information (The
information includes equipment name, equipment ID, equipment purpose, and
communication method and so on.
Note: To ensure normal communication, you must enter correct equipment No. (the
same as the serial No. of the equipment), select the corresponding equipment type,
purpose and communication method. You can select a proper communication
method by clicking
to view help items.
13
K1 Access Control Management System User’s Manual
Figure 2.21
Figure 2.22
Figure 2.23
2.2.2 Changing/ deleting equipment
1. Changing equipment information: Select the equipment information to be
changed (unique option). Then, click “Edit equipment > Change equipment
information”, and change relevant information at the displayed window.
14
K1 Access Control Management System User’s Manual
Figure 2.24
2. Deleting equipment: Select the equipment to be deleted (multiple options), and
click “Edit equipment > Delete equipment”.
Figure 2.25
2.2.3 Configuring equipment
For new equipment used for the first time, you must set the new equipment after it
is added. The configuration items include clearing invalid data, calibrating time,
setting equipment parameters, Logo, shortcut keys, electronic bell, connection
between the MF850 and MF10.
1. Initializing equipment
If no valid data is entered to the new equipment that is used for the first time, you
need to initialize the equipment at first. Equipment initialization will synchronically
set the equipment time to the current time shown on the computer.
Attention: This operation only applies to new equipment without valid data. You
must exercise care when initializing equipment in other situations as this operation
will result in loss of all in/ out records and personnel enroll information.
Figure 2.26
2. Setting equipment parameters
This section describes how to set access control parameters to the equipment.
15
K1 Access Control Management System User’s Manual
Steps
1. Equipment setting > Equipment parameters: Select the equipment, and click
“Obtain access control parameters of equipment” to obtain the access control
parameters of the equipment (Figure 2.27. You can obtain parameters of only one
piece of equipment each time).
2. After setting parameters for the access control, click “Save access control
parameters" to save the parameters to the database.
3. Set access control parameters of the equipment one by one through steps 1 and 2
and save the parameters to the database.
4. Select the equipment for which you will set access control parameters (multiple
options). Then, click “Download access control parameters for equipment” to send
the saved parameters to online equipment.
Figure 2.27
16
K1 Access Control Management System User’s Manual
Figure 2.28
Note: To view access control parameters saved in the database, select the
parameters with high brightness to view (You can get parameters of only one piece
of equipment each time).
3. Equipment time
You can only read the time of single equipment each time. To synchronize
equipment time, you can synchronize the time to the current time of the computer
(You can operate multiple sets of equipment).
Figure 2.29
17
K1 Access Control Management System User’s Manual
Figure 2.30
4. Setting Logo
You can set Logos for multiple pieces of equipment each time. To set the logo, you
need to firstly run the Logo.
Figure 2.31
5. Setting shortcut keys
You can set shortcut keys for equipment when necessary. You can obtain shortcut
keys for only a single piece of equipment. But you can set shortcut keys for multiple
equipment.
18
K1 Access Control Management System User’s Manual
Figure 2.32
6. Setting connections between the MF850 and MF10
You must decide proper installation locations of the MF850 and MF10.By default,
the MF850 is installed outdoor, while the MF10 is outdoor. You should set
installation locations as needed. Such setting will affect the “In/ out” status of
personnel in the access control report. If MF850 is located indoor while the MF10
outdoor, the status will be “entry” when a person opens the door. If the MF850 is
located outdoor while the MF10 indoor, the status will be “exit” when a person
opens the door.
Figure 2.33
7. Setting electronic bell
This function allows you to set ringing time of the equipment. Reading of electronic
bell can only be done for single equipment; while setting of electronic bell can be
done for multiple equipment.
19
K1 Access Control Management System User’s Manual
Figure 2.34
8. Reading equipment status
Sometimes it is necessary to read the equipment status to get equipment information
such as the number of registered users, administrators, fingerprint, cards, passwords,
"In/ out” records and management records. The reading of equipment information
can be done for one piece of equipment each time.
Figure 2.35
9. Cancelling administrator’s privilege
In normal situations, you can execute this operation to cancel the administrator’s
privilege if you have forgotten the administrator's password. You can perform this
operation for multiple equipment.
20
K1 Access Control Management System User’s Manual
Figure 2.36
2.2.4 Data gathering
After the personnel have opened the door and recorded their time attendance
through the access control, the records about door opening and time attendance
must be gathered into K1 system to get statistic results about the entry/ exit of the
personnel.
[Operation Steps]
1.
Equipment management > Gather data: Select the equipment (multiple options),
and click “Online inspection” to verify that the equipment is online.
2.
Select “Gather new data”/ “Gather all data”, and click “Gather data” to gather
data into K1.
Note: 1. Option “Gather new data” is intended to gather new records in the
equipment into the computer.
2. Option “Gather all data” is intended to gather all records, including records
that have been or have not been gathered, into the computer. You can set the
gathering scope by selecting a proper date.
21
K1 Access Control Management System User’s Manual
Figure 2.38
2.2.5 Import USB records
In order to get statistic results about the entry/ exit of the personnel, you could also
import USB records besides data gathering (2.2.4 Data gathering).
[Operation Steps]
1. Select the USB records file.
2. According the guide, Click „Next‟ to finish the import.
22
K1 Access Control Management System User’s Manual
2.3 Access Control Setting
After the equipment is added and set as required, you must set the time section, time
group and personnel information registered in the equipment (including setting
parameters for user control). The registered personnel can normally open the door
and record their time attendance only after these settings have been made. To
remotely control or monitor door status through a computer, you must add the
access control to the corresponding map.
2.3.1 Managing maps
1. Add maps
The system has set a map by default. Please add maps you need based on actual
conditions, and install the equipment on the door.
[Operation Steps]
1.
“Configure access control > Manage maps”: Add maps.
2.
Click “Set the map”, and select the map document to be added (bmp format).
3.
Select the equipment to be added, and move the equipment to desired position.
23
K1 Access Control Management System User’s Manual
Figure 2.39
Figure 2.40
2. Clear map/ Change map name.
“Clear map” allows you to remove the current map document. And “Change map
name” allows you to change the current name of the map.
24
K1 Access Control Management System User’s Manual
Figure 2.41
2.3.2 Setting time section
1. Setting time section
Before setting the time section for the equipment, you can read the time section for
the equipment first, and then download the set time section to the access control
equipment.
Steps:
1.
Setting access control > Setting time section: select one equipment, obtain the
time section (The time section of the equipment will be displayed on the time
section list. You can obtain the time section for only one piece of equipment
each time.)(Figure 2.42).
2.
Set the time section on the time section list (Figure 2.43).
3.
Select single/multi equipment > Confirm the equipment is online by “Online
inspection” > Download the time section. (All time sections in the time section
list are downloaded to the corresponding equipment) (Figure 2.43).
Figure 2.42
25
K1 Access Control Management System User’s Manual
Figure 2.43
2. Initializing time section
Initializing time section is to restore the time section in the database to the default
time section value and is not to initialize the time section in the equipment.
Figure 2.44
2.3.3 Setting time group
1. Setting time group
Before setting the time group for the equipment, you can read the time group for the
equipment first, and then download the set time group to the access control
equipment.
Steps:
1. Setting access control > Setting time group: select one equipment, obtain the time
group (The time group of the equipment will be displayed on the time group list.
You can obtain the time group for only one piece of equipment each time.) (Figure
2.46).
2. Set the time group in the list.
26
K1 Access Control Management System User’s Manual
3. Select single/multi equipment > Confirm the equipment is online by “Online
Inspection” > Download the time group.(All time groups are downloaded to the
corresponding equipment) (Figure 2.47).
图 2.46
图 2.47
2. Initializing time group
Initializing time group is to recover the time group in the database to the default
time group value and is not to initialize the time group in the equipment (Figure
2.48).
27
K1 Access Control Management System User’s Manual
Figure 2.48
2.3.4 Personnel registration
The registration method for fingerprint user is a little different from that for
password/card user. The registration method for ordinary user is a little different
from that for administrator. Please refer to the corresponding personnel registration
steps.
1. Registering ordinary fingerprint user
Steps:
1.
According to the register numbers of personnel in “Personnel Management”,
let the corresponding personnel to register their fingerprints one by one (The
register numbers in the equipment must be the same as that in the software, as
shown in Figure 2.49, Wangwu must register No. 00050 fingerprint in the
equipment.)
Note: If no personnel is enrolled in the K1 system, please enroll personnel first.
2. Access control setting > Personnel registration > Unregistered personnel: Select
the equipment with registered fingerprints > Confirm it is online by “Online
inspection (Figure 2.50).
28
K1 Access Control Management System User’s Manual
3. Select personnel > Click “Obtain registered information”, take the fingerprint
information in the equipment of selected personnel to the computer (Figure 2.50)
(Obtaining operation can be done in one equipment only. After obtaining is
successful, the corresponding personnel is changed to registered personnel).
4. Personnel registration > Registered personnel: Set control parameters of users one
by one.
5. Select the equipment to be downloaded (multiple options) > Select personnel and
then click “Write in registration information/parameter” to write personnel
registration information and user control parameter in the equipment (Figure 2.51).
Figure 2.49
Figure 2.50
29
K1 Access Control Management System User’s Manual
Figure 2.51
2. Registering password/card ordinary user
For registering password/card user, please refer to the relevant registration steps in
“1. Registering fingerprint ordinary user”, in addition, you can refer to the following
steps.
Steps:
1. Personnel management: Enter personnel one by one, please enter password/card
number when entering. (Figure 2.52, take the card as an example) (If entry has been
done, this step can be omitted).
2. Setting access control > Registering personnel > Registered personnel: Set
control parameters of users one by one.
3. Select the equipment to be distributed with registered information (multiple
options) > Confirm it is online by “Online inspection”.
4. Select personnel and then click “Write in registration information/parameter” to
write the registered personnel information and user control parameters in the
selected equipment.
30
K1 Access Control Management System User’s Manual
Figure 2.52
Figure 2.53
Note: 1. “Deleting registered information” is to delete the registered information of
selected personnel from the equipment (multiple options) only, the registered
information is still saved in the database. After selecting equipment, select the
31
K1 Access Control Management System User’s Manual
personnel to be deleted and carry out “Deleting registered information” (Figure
2.54).
2.
The registered information of deleted/resigned personnel in the equipment can
be deleted by “Registering personnel > Deleted/resigned personnel”.(Figure
2.55)
Figure 2.54
Figure 2.55
3. Registering administrator
The steps is the same as the steps in “1. Registering ordinary fingerprint user”.
32
K1 Access Control Management System User’s Manual
2.3.5. Real-time monitoring
Enable real-time monitoring function to real-time monitor the state of the access
control equipment, personnel attendance and exit/entry state of the selected online
equipment. More than one piece of equipment can be monitored simultaneously.
Figure 2.56
2.3.6 Electronic map
During real-time monitoring, you can view the door state directly on the electronic
map. In addition, you can carry out computer remote operation on the access control
equipment from the electronic map (including Forcedly Unlock, Forcedly Lock,
Remote Unlock and Restore Auto Control).
33
K1 Access Control Management System User’s Manual
Figure 2.57
2.3.7 Downloading all access control parameters
Download the parameter of the access control in the database to selected equipment
(multiple options). The parameters to be downloaded include: Open Delay, Open
Overtime Alarm Time, Illegal Open alarm Time, Threatened Function, Wigand
Mode, Wigand Type, Time Section, Time Group.
34
K1 Access Control Management System User’s Manual
Figure 2.58
2.4 Access Control Report Query
2.4.1 Personnel information query
This report indicates undeleted/in-service employees' information. You can query
employees through Department, Personnel ID, Name, Registration No., Card No.,
User type and so on. Tick “All employees” to query, and the report displays all
employees including deleted/dismissed employees.
Figure 2.59
35
K1 Access Control Management System User’s Manual
2.4.2 Access control detail report
This report indicates event records such as employees’ passing-in-and-out
records, remote operating doors and alarms. You can query for access control details
within corresponding time segments through Department, Personnel ID, Name,
Registration No., Event and so on. Tick “All employees” to query, and the report
displays access control details of all employees including deleted/dismissed
employees.
Figure 2.60
2.4.3 Statistical report on the number of times of passing in and
out
This report indicates the number of times of the access control type users’ entry
into and exit from a door. If “MF850 outdoor, MF10 indoor” is set, then the user(s)
opening the door is regarded as entry into a door after data collection/real-time
monitoring. If “MF850 indoor, MF10 outdoor” is set, then the user(s) opening the
door is regarded as exit from a door.
Figure 2.61
36
K1 Access Control Management System User’s Manual
2.5 System Maintenance
2.5.1 Modifying passwords
When modifying a password, you must input the old password. Modification can be
successful only when the confirmation password is consistent with the new
password. After the password is modified, please remember the new password.
Figure 2.62
2.5.2 Re-login
Click “Re-login”, and the system exits and returns to the login interface.
Figure 2.63
2.5.3 System configuration
System configuration includes the configuration of system types, user information
37
K1 Access Control Management System User’s Manual
and number regulations. Among them, system types are divided into the access
control system and the access control attendance system. User information includes
the configuration of the company name and so on. Number regulations include the
setting of the personnel ID length.
Figure 2.64
Figure 2.65
Figure 2.66
38
K1 Access Control Management System User’s Manual
2.5.4 Database maintenance
1. Database backup
You can back up databases manually or by enabling the automatic backup function.
You are recommended to regularly back up database to avoid data damage resulting
from abnormalities.
(1) Manual database backup
Figure 2.67
(2) Automatic database backup
Please set the automatic backup options as quested, and click “Save settings”.
39
K1 Access Control Management System User’s Manual
Figure 2.68
2. Database restoration
Click “Restore”, and select backup databases to restore.
Figure 2.69
3. Database optimization
Figure 2.70
4. Database repair
40
K1 Access Control Management System User’s Manual
Figure 2.71
5. Database initialization
Database initialization restores the system to the new installation state. Please
perform this operation cautiously.
Figure 2.72
2.5.5 Software update
If a new version is available, you can update the software to the new version by
clicking “Online update”.
2.5.6 About
This interface indicates the software version, program installation address, database
address and other information.
Figure 2.73
41
K1 Access Control Management System User’s Manual
Chapter 3
System Operation Flow – Attendance
When the system type configured for the system is “Access control attendance
system", the system is provided with added functions related to attendance
management besides all the functions of the access control system. To obtain correct
attendance statistical reports, please set the attendance system first.
3.1 Attendance System Settings
Attendance system settings includes the settings of shifts, holidays, weekends,
leaving early, arriving late, absence, overtime, business trip, going out and
attendance item unit. Please set them according to the actual attendance system. If
you have any questions during the setting process, drag the mouse to the icon
to obtain relevant help.
3.1.1 Shift settings
If you access the attendance management module for the first time without setting
shifts, the shift setting window is displayed. You can set shifts according to the shift
guide.
Figure 3.1
If the working time is 09:00-12:30 and 13:00-18:00 and attendance is not required
42
K1 Access Control Management System User’s Manual
at noon, shifts can be set as follows:
[Steps]
1. Select “Shift template type”, and click “Next”.
2. Modify working time (time in and time out) as the company’s working time, and
click “Finish”, as shown in Figure 3.3.
Figure 3.2
Figure 3.3
Note:
After shift settings are finished, you can view set shifts by choosing
“Attendance management> Attendance system〉Shift”.
43
K1 Access Control Management System User’s Manual
Figure 3.4
If you want to limit the earliest sign-in time and the latest sign-out time for work,
and
please tick
perform next detailed settings after selecting the shift module during shift setting.
Figure 3.5
44
K1 Access Control Management System User’s Manual
Fill in “Start sign-in time” and “End sign-out time”, and click “Finish”.
Figure 3.6
Note: If you want to add multiple shifts, please click
to add them. If you want
to modify shifts, please select shifts to be modified, and click
to modify them.
If you want to delete shifts, please select shifts to be deleted, and click
to
delete them. At least one shift shall be available in the system. Therefore, when only
one shift is available, the shift cannot be deleted.
3.1.2 Holiday settings
Holidays with fixed dates can be set. If you want to add holidays, please click
to set them. If you want to modify holidays, please select holidays to be modified
such as Labor Day, and click
to modify them. If you want to delete holidays,
please select holidays to be deleted, and click
Figure 3.7
45
to delete them.
K1 Access Control Management System User’s Manual
3.1.3 Weekend settings
Ticking indicates rest, and no ticking indicates working. Please set them according
to actual weekend situations. For example, the two-day weekend is set as shown in
the figure below.
Figure 3.8
3.1.4 Setting of leaving early, arriving late and absence
The systems about leaving early, arriving late and absence can be set. If the normal
working time is 09:00 and it is considered late from 09:11, you shall set “Arriving
11 minutes later is considered late”. Similarly, you can set the systems about leaving
early and absence.
Figure 3.9
As shown in the figure above, if the shift is 09:00-12:30 and 13:30-18:00 and
attendance is not required at noon, time segments for leaving early, arriving late and
absence are as follows:
09:11-09:30 is considered late. 09:31 and later is considered absence. 17:31-17:59
is considered leaving early.
3.1.5 Overtime system settings
Overtime is effective only after it is registered and checked. Please set the overtime
46
K1 Access Control Management System User’s Manual
system according to actual situations.
Figure 3.10
3.1.6 Business trip system settings
Ticking the option indicates business trip that is recorded as attendance.
Figure 3.11
3.1.7 Outgoing system settings
Ticking the option indicates outgoing that is recorded as attendance.
Figure 3.12
3.1.8 Attendance item unit settings
Attendance item units are the units indicated on the attendance reports (the daily
attendance report and the pay period summary). Please set attendance item units
required.
47
K1 Access Control Management System User’s Manual
Figure 3.13
Figure 3.14
Figure 3.15
Figure 3.16
48
K1 Access Control Management System User’s Manual
Note:
After attendance systems are set, please click
to save
settings.
3.2 Registration of Leaves, Business Trips, Overtime and Common
Holidays
3.2.1 Registering leaves, business trips, common holidays and
overtime
The system provides two modes to register leaves, business trips, common holidays,
overtime and so on.
1.
Registering leaves, business trips, common holidays and overtime
[Steps]
1.
Choose Attendance management > Leave and common holiday registration
form, and click “Register” to display the registration window.
2.
Select personnel to be registered, select the registration type and the
registration date/time, and click “Save” to finish registration. For example, the
employee Li Xiaoyan took a private affair leave on July 9, 2009. This is
registered as shown in the figure below.
3.
4.
Figure 3.17
49
K1 Access Control Management System User’s Manual
5.
6.
Figure 3.18
8.
Figure 3.19
7.
Figure 3.20
Note:
After registration is successful, the system pops up a success prompt. After
registration is finished, the registration window is kept for continuation of
registration. If you do not hope that the registration window is kept after the next
registration, you can cancel ticking
. If you want to exit the
registration window, please click “Cancel” or directly turn it off.
50
K1 Access Control Management System User’s Manual
2. Registering according to the absence time segment
Before registering according to the absence time segment, you must perform
attendance processing to obtain the latest data. You can manually perform
attendance processing. After selecting the attendance date range and the personnel,
just click “Attendance processing”.
Note: When attendance-related data is changed, starting up automatic processing
can update relevant data such as attendance reports. If you want to modify a lot of
attendance-related data, you can stop automatic process, modify them, and perform
attendance processing manually.
(1) Registering leaves, business trips and common holidays according to absence
time
[Steps]
1. Attendance management > Daily attendance report > Attendance processing
Figure 3.21
2. Right click “Daily attendance report”, and click “Register leaves, business trips
and common holidays according to absence time” in the right click menu.
Figure 3.22
3. Select records to be registered, selected a registration type, and "click “Register”.
For example, Li Xiaoyan in the HR department was on business trip on July 1, 2009.
51
K1 Access Control Management System User’s Manual
The registration is shown in the figure below.
Figure 3.23
After registration is finished and attendance processing is performed, attendance
results can be found in the daily attendance report (in compact or incompact display
mode).
Figure 3.24
52
K1 Access Control Management System User’s Manual
Figure 3.25
(2) Registering overtime according to the absence time segment
[Steps]
1. Choose Attendance management > Daily attendance report, and right click “Daily
attendance report”. Click “Register overtime according to the absence time
segment" in the right click menu.
Figure 3.26
2. Select records to be registered (multiple options are allowed), and click
“Register”.
53
K1 Access Control Management System User’s Manual
Figure 3.27
Figure 3.28
Note:
If overtime time is in error before registration, select records, click
, modify time and re-register.
3.2.2 Modifying registration time
1. Modifying leave/business trip/common holiday registration time
If displayed time deviates, you can modify registration time and re-register.
[Steps]
1.
Select records to be modified, and click
them.
2.
Modify registration time > Save > Register
54
to modify
K1 Access Control Management System User’s Manual
Figure 3.29
Figure 3.30
55
K1 Access Control Management System User’s Manual
Figure 3.31
2. Time segment adjusted according to 30 minutes sharp
If the absence time segment is 16:06 -18:00 for an employee and adjusted according
to 30 minutes sharp, it is changed to 16:00-18:00.
If the absence time segment is 09:00-09:56 for an employee and adjusted according
to 30 minutes sharp, it is changed to 09:00-10:00.
Please check the necessity of adjustment according to actual situations.
[Steps]
1. Select records to be modified, right click the right click menu displayed, and
click “Time segment adjusted according to 30 minutes sharp”.
2. Select records to be registered, select a registration type, and Click “Register”.
56
K1 Access Control Management System User’s Manual
Figure 3.32
Figure 3.33
3. Modifying leave/business trip/common holiday/overtime registration
[Steps]
1. Select records to be modified, and click “Modify” to modify them.
2. Modify registration contents (For example, modify private affair leave as sick
leave), and click “Save” to finish modification.
57
K1 Access Control Management System User’s Manual
Figure 3.34
Figure 3.35
3.2.3 Deleting leave/business trip/common holiday/overtime
registration
[Steps]
1. Select records to be deleted (multiple options are allowed).
2. Right click to display the right click menu, and click “Delete” to delete records.
(Or after selecting records, directly click “Delete”.)
58
K1 Access Control Management System User’s Manual
Figure 3.36
3.2.4 History record query
Before querying history records, please perform attendance processing to obtain the
latest data.
[Steps]
1. Choose Attendance management > Leave and common holiday registration form,
and select the personnel.
2. Click “History record query” to display the query window.
Figure 3.37
3. Input a query date range, select a registration type, and query.
59
K1 Access Control Management System User’s Manual
Figure 3.38
3.3 Punch Editing
3.3.1 Punch editing
The system provides two modes for punch editing: punch editing; punch editing
according to unrecorded time.
1 Punch editing
[Steps]
1. Choose Attendance management > Original attendance record > Display by the
number of times, and click “Punch editing”.
Figure 3.39
2. At the punch editing window: Select the personnel to be punch edited, input the
60
K1 Access Control Management System User’s Manual
card signing date, punch editing time and so on, and click “Save”.
Figure 3.40
Figure 3.41
Figure 3.42
Note:
After punch editing is successful, the system pops up a success prompt. After
61
K1 Access Control Management System User’s Manual
registration is finished, the punch editing window is kept for continuation of
registration. If you do not hope that the punch editing window is kept after the next
.
punch editing, you can cancel ticking
2. Punch editing according to unrecorded time
Before punch editing according to unrecorded time, you must perform attendance
processing to obtain the latest data.
[Steps]
1. Choose Attendance management > Daily attendance report, and right click “Daily
attendance report”. Click “Punch editing according to unrecorded time" in the right
click menu.
Figure 3.43
2. Select recorded to be punch edited, and click “Punch editing”.
62
K1 Access Control Management System User’s Manual
Figure 3.44
Figure 3.45
3.3.2 Modifying punch editing
[Steps]
1.
Choose Attendance management > Original attendance record > Display by the
number of times. Select records to be modified, right click to display the right
click menu, and click “Modify” to display the modification window.
63
K1 Access Control Management System User’s Manual
Figure 3.46
2. After modifying records, click “Save” to finish modification.
Figure 3.47
3.3.3 Deleting punch editing
[Steps]
1. Choose Attendance management > Original attendance record > Display by the
number of times. Select records to be deleted, right click to display the right click
menu, and click “Delete” to delete records. (You can also perform deletion by
selecting records to be deleted and directly clicking “Delete”.)
Figure 3.48
2. Click “Yes” to finish deletion.
Figure 3.49
64
K1 Access Control Management System User’s Manual
3.4 Attendance Reports
Attendance reports include the original attendance record (displayed by the number
of times, day and month), leave and common holiday registration form, daily
attendance report (displayed in compact or incompact mode), pay period summary
and monthly attendance report.
3.4.1 Original attendance record
Original attendance record indicates sign-in records including normal sign-in and
punch editing records, and is displayed by the number of times, day and month.
1. Original attendance record > Display by the number of times
Figure 3.50
2. Original attendance record > Display by the day
If
is ticked, the record displays signed-in date records
within the attendance date range. If
is not ticked, the
record displays all date records within the attendance date range (including
signed-in and unsigned-in dates).
Figure 3.51
3. Original attendance record > Display by the month
65
K1 Access Control Management System User’s Manual
Figure 3.52
3.4.2 Leave and common holiday registration form
Leave and common holiday registration form indicates registered records about
leaves, business trips, common holidays, outgoing and overtime.
Figure 3.53
3.4.3 Daily attendance report
Daily attendance report indicates employees’ attendance situations within the
attendance date range, including working time, leaves, business trips, common
holidays, overtime and so on. Daily attendance report is displayed in compact and
incompact modes. You can select a display mode as requested. For records about
arriving late, leaving early and absence, the report identifies and differentiates them
in different colors.
66
K1 Access Control Management System User’s Manual
Figure 3.54
1. Daily attendance report > Compact display
Figure 3.55
2. Daily attendance report > Incompact display
67
K1 Access Control Management System User’s Manual
Figure 3.56
3. Abnormal record query (arriving late, leaving early, absence and leaves)
Tick the abnormal screening. If you want to query for records about arriving late,
leaving early, absence and leaves, perform ticking and click
. The report
will display corresponding personnel’s records about arriving late, leaving early,
absence and leaves. Please tick abnormal types as quested to perform screening to
obtain corresponding abnormal records.
Figure 3.57
3.4.4 Pay period summary
Pay period summary indicates the summary of employees' attendance results within
the attendance date range.
Figure 3.58
3.4.5 Monthly attendance report
Each row of Monthly attendance report indicates employees’ attendance records for
68
K1 Access Control Management System User’s Manual
the current attendance month, and identifies information about arriving late, leaving
early, absence, leaves, business trips and outgoing.
Figure 3.59
3.4.6 Exporting and printing attendance reports
The system provides the functions of exporting and printing attendance reports. All
reports are provided with the function of printing standard reports. Among them,
“Daily attendance report” and “Display-by-the-month report of Original attendance
record” are provided with the function of printing group reports in a paging manner.
(Daily attendance report is grouped in terms of the personnel. Original attendance
record is grouped in terms of monthly display report and department.
Figure 3.60
69
K1 Access Control Management System User’s Manual
Figure 3.61
70