Transcript
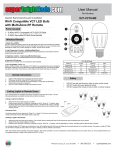
User Manual
Part Number:
Important: Read and understand all instructions before installation. Check the kit
hardware against the kit contents shown below to ensure you have all necessary parts.
ORBC-MB1
WIFI-CON
GM 50” Curved LED Light Bar Mount
Parts Included
1 - Driver Side Bracket
1 - Passenger Side Bracket
2 - Rubber Adhesive Pads
Tools Needed
1 - 5/16” x 1” Bolt
1 - 3/8” Washer
1 - 3/8” Nut
6 - Nut Inserts
6 - 5/16” x 1” Button
Head Screw
1/2” Wrench • 9/16” Wrench • Drill • Center Drill or 1/4” Drill Bit •
33/64” Drill Bit • 3/16” Allen Wrench • 6mm Allen Wrench • Tape
Measure • Masking Tape • Sharpie or Center Punch
Installation Instructions
1. Before installing the light bar and brackets, disconnect the positive battery connection.
2. Open the doors, and pull back the weather stripping above the windshield line on both
sides. See Photo 1.
3. Put masking tape on the painted surface where the brackets will mount so you do not
scratch the paint while marking hole locations.
4. Install the driver and passenger brackets on the 50” curved LED light bar using the
mounting hardware that was supplied with the light. Hand tighten.
5. Place the brackets on top of the door jam 1/2” up from the windshield line, and mark
the 3 holes with a marker or a center punch on both sides. See Photo 2.
6. Remove the brackets from the truck, and drill pilot holes using a center drill or 1/4” drill
bit. Then drill those holes out to 33/64” (.515” dia.) See Photo 3.
7. Slide the 3/8” nut and washer over the supplied 5/16” x 1” bolt, and screw them into a
nut insert. See Photo 4. Place the assembled bolt and nut insert into a drilled hole in
the door jam.
8. Using a 1/2” wrench and a 9/16” wrench, tighten the bolt while holding the nut with the
9/16” wrench. This will compress the nut insert and lock it into place in the drilled hole.
See Photo 5.
9. Install all 6 nut inserts this way.
10. Install the rubber pads on the inside of each light bracket.
11. Remove the masking tape from both sides of truck.
12. Hold the LED light bar, with the brackets attached, up to the door-jam and align the 3
holes on each side. Secure with the supplied 5/16” x 1” button-head screw, and tighten
with a 3/16” Allen wrench.
13. Finally, tighten each side of the LED light bar to the bracket with a 6mm Allen wrench
so the light is positioned as desired in the bracket. See Photo 6.
14. Reapply the factory rubber door seal securely in the track.
15. Complete wiring of light bar, and connect positive lead back to the battery post.
Super Bright LEDs
St. Louis, MO 63045
LED Lighting For Everything
866-590-3533 USA
superbrightleds.com