1
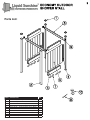
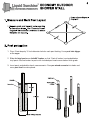
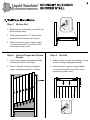
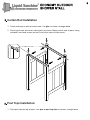
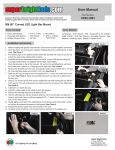
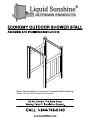
Please Read Installation Instructions Completely Before Starting.
*Shower Curtain and Plumbing Sold Separately
Before You Begin:
Check Local Zoning Laws. Zoning laws may restrict the location and height of your
enclosure. Permits may also be required.
Underground Utilities. Dial 811 to have underground utility lines marked.
Even at shallow depths, utility lines can be present.
Tools and Materials. Check that all tools and materials are present to properly
assemble your enclosure.
Tool List:
•
•
•
•
•
•
•
•
•
•
•
Circular Saw / Hand Saw / Chop Saw
Post Hole Digger / Auger
Line Level
Post Level
Tape Measure
Ratchet Set
Drill Gun #2, #3, Phillips
Driver Bit Extender (Recommended)
Hammer
Safety Glasses
Black Sharpie or Carpenter’s Pencil
Additional Materials:
•
•
•
•
Rags and Spray Cleaner
4x4x96" Lumber
Pre-Mixed Concrete
Glue / Post Top Clips
Enclosure Parts and Assembly:
Please take a complete inventory of all parts prior to enclosure assembly. Do not attempt to
assemble if parts are missing or damaged.
Parts List:
ITEM # DESCRIPTION
1
2
3
4
5
6
7
8
9
10
4"x4" Post Pyramid Top
4"x4"x96" Vinyl Post White
41.75"x5.47"x42.125" Privacy Panel Rail
1.02"x1.379"x47.5" U-Channel
0.875"x6"x52" - 0.35W Tongue & Groove Board
0.875"x1.5"x44.125" Curtain Rod
1.75"x5.5" Bracket Kit (Screws Included)
0.875"x1.5" End Cap
Pan Head Screw
Screw Head Cap
QTY.
4
4
4
2
14
2
4
4
8
8
1. Dig a 3 foot deep by 10 inch diameter hole for each post footing. Use a post hole digger
or an auger.
2. Slide 4x4 vinyl posts over 4x4x96" lumber so that 2 feet of lumber is extended below
vinyl posts. Secure lumber to posts with included pan head screws below finish grade.
3. Insert posts and double-check measurements. Pour pre-mixed concrete into holes and
use a post level to make plumb.
Step-1
Bottom Rail
1. Slide brackets onto bottom rail and lift into
place between posts.
2. Offset bottom brackets 10" above finish
grade and center bottom rail on posts.
3. Mount brackets to posts using included
4 screws per bracket. Insert white screw
head caps to hide screws.
Step-2
Vertical Tongue and Groove
Boards
Step-3
Top Rail
1. Insert vertical tongue and groove boards
into bottom rail from left to right.
1. Slide brackets onto top rail and place on top
of vertical tongue and groove boards.
2. Place U-Channel vertically on edge of
tongue and groove board #7 as shown.
2. Mount brackets to posts using included
4 screws per bracket. Insert white screw
head caps to hide screws.
Curtain Rod Installation
1. Attach end caps to ends of curtain rods. Use glue to create a stronger bond.
2. Place curtain rods on interior side of posts as shown. Mount curtain rods to posts using
included 2 pan head screws per rod. Insert white caps to hide screws.
Post Tops Installation:
1. Place post tops on top of posts. Use glue or post top clips to create a stronger bond.