1
Oracle® Fusion Middleware
Developing Business Processes with Oracle Business Process
Composer
12c (12.1.3)
E39996-03
October 2015
Provides information for process analysts and developers
interested in using Oracle Business Process Composer.
Oracle Fusion Middleware Developing Business Processes with Oracle Business Process Composer, 12c
(12.1.3)
E39996-03
Copyright © 2001, 2015, Oracle and/or its affiliates. All rights reserved.
Primary Author:
Oracle Corporation
This software and related documentation are provided under a license agreement containing restrictions on
use and disclosure and are protected by intellectual property laws. Except as expressly permitted in your
license agreement or allowed by law, you may not use, copy, reproduce, translate, broadcast, modify, license,
transmit, distribute, exhibit, perform, publish, or display any part, in any form, or by any means. Reverse
engineering, disassembly, or decompilation of this software, unless required by law for interoperability, is
prohibited.
The information contained herein is subject to change without notice and is not warranted to be error-free. If
you find any errors, please report them to us in writing.
If this is software or related documentation that is delivered to the U.S. Government or anyone licensing it on
behalf of the U.S. Government, then the following notice is applicable:
U.S. GOVERNMENT END USERS: Oracle programs, including any operating system, integrated software,
any programs installed on the hardware, and/or documentation, delivered to U.S. Government end users are
"commercial computer software" pursuant to the applicable Federal Acquisition Regulation and agencyspecific supplemental regulations. As such, use, duplication, disclosure, modification, and adaptation of the
programs, including any operating system, integrated software, any programs installed on the hardware,
and/or documentation, shall be subject to license terms and license restrictions applicable to the programs.
No other rights are granted to the U.S. Government.
This software or hardware is developed for general use in a variety of information management applications.
It is not developed or intended for use in any inherently dangerous applications, including applications that
may create a risk of personal injury. If you use this software or hardware in dangerous applications, then you
shall be responsible to take all appropriate fail-safe, backup, redundancy, and other measures to ensure its
safe use. Oracle Corporation and its affiliates disclaim any liability for any damages caused by use of this
software or hardware in dangerous applications.
Oracle and Java are registered trademarks of Oracle and/or its affiliates. Other names may be trademarks of
their respective owners.
Intel and Intel Xeon are trademarks or registered trademarks of Intel Corporation. All SPARC trademarks are
used under license and are trademarks or registered trademarks of SPARC International, Inc. AMD, Opteron,
the AMD logo, and the AMD Opteron logo are trademarks or registered trademarks of Advanced Micro
Devices. UNIX is a registered trademark of The Open Group.
This software or hardware and documentation may provide access to or information about content, products,
and services from third parties. Oracle Corporation and its affiliates are not responsible for and expressly
disclaim all warranties of any kind with respect to third-party content, products, and services unless
otherwise set forth in an applicable agreement between you and Oracle. Oracle Corporation and its affiliates
will not be responsible for any loss, costs, or damages incurred due to your access to or use of third-party
content, products, or services, except as set forth in an applicable agreement between you and Oracle.
Contents
Preface ............................................................................................................................................................. xvii
Intended Audience ...................................................................................................................................
xvii
Related Documents...................................................................................................................................
xvii
Conventions...............................................................................................................................................
xvii
What's New in This Guide........................................................................................................................ xix
New and Changed Features for 12c Release 1 (12.1.3) ......................................................................... xix
Other Significant Changes in this Guide for 12c Release 1 (12.1.3) ..................................................... xx
Part I
1
Introduction to Oracle Business Process Composer
Introduction to Oracle Business Process Composer
Signing On to Oracle Business Process Composer ..............................................................................
1-1
Introduction to the Oracle Business Process Composer Application Welcome Page ....................
1-2
Introduction to the Oracle Business Process Composer Toolbar ..............................................
1-3
Introduction to the Spaces Browser...............................................................................................
1-4
Introduction to the Project List.......................................................................................................
1-6
Introduction to Project Panels.................................................................................................................
1-7
Creating a New Empty Project with the BA Project Panel.........................................................
1-8
Creating a New Populated Project with the BA Project Panel ..................................................
1-8
Creating a New Empty Project with the BPM Project Panel......................................................
1-9
Creating a New Populated Project with the BPM Project Panel ...............................................
1-9
Recent Projects Panel ..................................................................................................................... 1-10
Part II
2
Performing Administrative Tasks Using Oracle Business Process Composer
Performing Administrative Tasks
Accessing the Oracle Business Process Composer Administrator View..........................................
2-1
How to Grant Administrator Privileges to a Business Process Composer User.....................
2-2
How to Access the Administration View .....................................................................................
2-3
Managing Business Process Composer Spaces ....................................................................................
2-3
iii
Configuring Access to a BPM Space..............................................................................................
2-3
Removing Users from a BPM Space ..............................................................................................
2-4
How to Delete a BPM Space and Its Content ...............................................................................
2-4
Managing Projects ....................................................................................................................................
2-5
How to Release the Lock on a Shared Project ..............................................................................
2-5
How to Delete a Project ...................................................................................................................
2-6
How to Configure Sharing for a Project........................................................................................
2-6
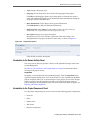
Defining SOA Administrator Credentials to Enable Process Player.................................................
2-6
How to Enable Process Player ........................................................................................................
2-7
What Happens When You Enable Process Player.......................................................................
2-7
How to Disable Process Player.......................................................................................................
2-8
Administering Business Architecture Reports .....................................................................................
2-8
How to View Reports.......................................................................................................................
2-8
How to Delete a Report ...................................................................................................................
2-8
Part III
3
Creating and Working With BA and BPM Projects
Creating and Managing BA and BPM Projects
Introduction to Project Sharing and Collaboration..............................................................................
4
iv
3-1
Private and Public Projects..............................................................................................................
3-1
Edit Mode ..........................................................................................................................................
3-1
Project Roles ......................................................................................................................................
3-1
Creating and Working with Projects......................................................................................................
3-2
How to Open a Project Using the Application Welcome Page..................................................
3-2
How to Share a Project with Other Users .....................................................................................
3-2
Managing Project Changes .............................................................................................................
3-3
How to Discard Changes to a Project............................................................................................
3-3
How to Close a Project.....................................................................................................................
3-4
Working with Project Snapshots ............................................................................................................
3-4
How to Create a New Project Snapshot ........................................................................................
3-4
How to View Contents of a Project Snapshot ..............................................................................
3-5
How to Return to the Active Version of a Project .......................................................................
3-5
How to Delete a Project Snapshot..................................................................................................
3-5
How to Export a Project Snapshot .................................................................................................
3-5
How to Deploy a Project Snapshot ................................................................................................
3-6
Importing and Exporting Projects ..........................................................................................................
3-6
How to Import a Project from your Local File System ...............................................................
3-6
How to Export a Project from the Application Welcome Page .................................................
3-7
How to Export a Project or Project Snapshot from the Project Welcome Page .......................
3-7
Performing Process Analysis and Discovery with Business Architecture
Introduction to Business Architecture ...................................................................................................
4-1
Introduction to Enterprise Maps....................................................................................................
4-1
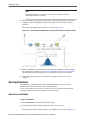
Introduction to Value Chain Models.............................................................................................
4-3
Introduction to Strategy Models ....................................................................................................
4-3
Using KPIs to Analyze Performance .............................................................................................
4-4
Introduction to the BA Project Welcome Page .....................................................................................
4-5
Introduction to the Project Toolbar................................................................................................
4-5
Introduction to the Project Information Panel .............................................................................
4-6
Introduction to the Recent Activity Panel ....................................................................................
4-7
Introduction to the Project Component Pane...............................................................................
4-7
Introduction to the Quickstart Menu ............................................................................................
4-7
Working with Enterprise Maps......................................................................................................
4-8
Working with Value Chain Models............................................................................................. 4-10
Working with Strategy Models .................................................................................................... 4-11
Working with Key Performance Indicators (KPIs).................................................................... 4-12
Working with Business Architecture Reports .................................................................................... 4-14
How to Publish Report Data......................................................................................................... 4-14
How to Generate BA Reports ....................................................................................................... 4-15
5
Creating and Working with BPM Projects
Introduction to Oracle BPM Projects .....................................................................................................
5-1
Introduction to Project Components and Resources...................................................................
5-1
Introduction to the Oracle BPM Repository .................................................................................
5-4
Introduction to the Project Welcome Page............................................................................................
5-5
Introduction to the Project Toolbar................................................................................................
5-5
Introduction to the Project Information Panel .............................................................................
5-6
Introduction to the Recent Activity Panel ....................................................................................
5-7
Introduction to the Project Component Panel..............................................................................
5-7
Introduction to the Quickstart Menu ............................................................................................
5-8
Introduction to the Oracle Business Process Composer Editors ...............................................
5-8
Introduction to the Supporting Browsers and Editors ...............................................................
5-9
Creating and Working with Projects......................................................................................................
5-9
How to Create a New Project ....................................................................................................... 5-10
How to Validate a Project.............................................................................................................. 5-10
How to View the History of Changes Made to a Project.......................................................... 5-10
How to View and Edit Project Properties................................................................................... 5-11
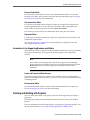
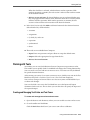
Using Guided Business Processes to Create Project Milestones...................................................... 5-11
Introduction to Guided Business Processes ............................................................................... 5-11
How to Configure the Activity Guide......................................................................................... 5-12
Creating Project Milestones .......................................................................................................... 5-13
Adding Milestones to User Tasks ................................................................................................ 5-13
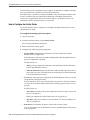
Defining Project Roles, Business Parameters, and Organization Units .......................................... 5-13
Defining Project Roles.................................................................................................................... 5-13
Defining Business Parameters ...................................................................................................... 5-14
Defining Organization Units ........................................................................................................ 5-15
v
Generating Process Reports for Your Project ..................................................................................... 5-16
6
Documenting BPM Projects
Understanding Project-Level Documentation......................................................................................
6-1
Project Description ...........................................................................................................................
6-1
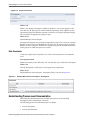
Role Description ...............................................................................................................................
6-2
Understanding Process-Level Documentation.....................................................................................
6-2
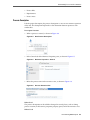
Process Description ..........................................................................................................................
6-3
Process Documentation ...................................................................................................................
6-4
Process Links.....................................................................................................................................
6-5
Requirements ....................................................................................................................................
6-5
Process Note ......................................................................................................................................
6-6
Understanding Activity-Level Documentation....................................................................................
6-6
Activity Description .........................................................................................................................
6-7
Activity Links....................................................................................................................................
6-7
Activity Documentation ..................................................................................................................
6-8
Activity Comments ..........................................................................................................................
6-9
Activity Note................................................................................................................................... 6-10
General ............................................................................................................................................. 6-11
Activity Issues................................................................................................................................. 6-11
RACI ................................................................................................................................................. 6-12
Part IV
7
Modeling and Testing Business Processes
Creating and Working with Business Processes
Introduction to Business Processes ........................................................................................................
7-1
Introduction to the Project Toolbar ........................................................................................................
7-2
Introduction to the Narrative View .......................................................................................................
7-2
Working with the Narrative View .........................................................................................................
7-3
Moving an Activity ..........................................................................................................................
7-4
Narrative View Options ..................................................................................................................
7-4
Introduction to the Process Editor Graphical View.............................................................................
7-4
Introduction to the Process Editor Toolbar ..................................................................................
7-5
Introduction to the Process Editor Canvas ...................................................................................
7-6
Introduction to the BPMN Component Palette............................................................................
7-6
Introduction to the Business Catalog ............................................................................................
7-8
Working with Business Processes ..........................................................................................................
7-9
How to Create a New Business Process........................................................................................
7-9
How to Open a Business Process ...................................................................................................
7-9
How to Delete a Business Process................................................................................................ 7-10
Using Swimlanes to Organize Your Process....................................................................................... 7-10
Introduction to Roles ..................................................................................................................... 7-10
Introduction to Swimlanes............................................................................................................ 7-11
vi
Adding Swimlanes to Your Process ............................................................................................ 7-12
Adding a Swimlane and a Flow Object to Your Process .......................................................... 7-12
How to Edit Swimlane Properties................................................................................................ 7-13
Sharing Roles Between Business Process Composer and BPM Studio .................................. 7-13
Working with Flow Elements ............................................................................................................... 7-13
How to Add a Flow Object from the Component Palette ........................................................ 7-14
How to Cut, Copy, or Delete a Flow Object ............................................................................... 7-14
How to Paste a Flow Object in a Process .................................................................................... 7-14
How to Add a Sequence Flow to a Process ................................................................................ 7-15
How to Delete a Sequence Flow................................................................................................... 7-15
How to Edit the Properties of a Flow Object.............................................................................. 7-15
How to Assign a Custom Icon to a Flow Object ........................................................................ 7-16
Working with Business Catalog Components.................................................................................... 7-16
How to Assign a Business Catalog Component to a Flow Object........................................... 7-16
How to Create New Human Tasks in the Business Catalog.................................................... 7-17
Working with Draft Processes .............................................................................................................. 7-17
How to Mark a Flow Object as Draft........................................................................................... 7-17
Documenting Your Process ................................................................................................................... 7-18
Importing and Exporting Process Models .......................................................................................... 7-18
Importing Process Models into Oracle BPM .............................................................................. 7-18
8
Simulating Process Behavior
Introduction to Simulations ....................................................................................................................
8-1
Simulation Models and Simulation Definitions...........................................................................
8-1
Simulation Parameters.....................................................................................................................
8-2
Creating and Running a Simulation ......................................................................................................
8-6
Working with Simulation Definitions ...................................................................................................
8-6
How to Create a Simulation Definition.........................................................................................
8-7
What Happens When You Create a Simulation Definition .......................................................
8-8
How to Edit a Simulation Definition.............................................................................................
8-9
How to Associate a Simulation Model to a Simulation Definition ......................................... 8-10
Working with Simulation Models ........................................................................................................ 8-10
How to Create a New Simulation Model.................................................................................... 8-11
How to Edit a Simulation Model ................................................................................................. 8-11
Running Simulations.............................................................................................................................. 8-12
How to Run a Simulation.............................................................................................................. 8-12
Analyzing the Results of a Simulation ................................................................................................ 8-13
How to Analyze the Results of a Simulation Using a Chart .................................................... 8-13
9
Using Process Player
Introduction to Process Player................................................................................................................
9-1
How Process Player Handles the Flow Objects of Your Process...............................................
9-2
Enabling Process Player in Oracle Business Process Composer ...............................................
9-3
vii
Using Process Player to Test the Behavior of Business Processes .....................................................
9-3
How to Map the Roles Defined in Your Process to Users in Your Organization ...................
9-3
How to Use Process Player to Run a Business Process...............................................................
9-4
Part V
10
Defining How Users Interact with Your Business Processes
Working with Web Forms
Introduction to Forms in Oracle BPM.................................................................................................. 10-1
Introduction to Web Forms........................................................................................................... 10-2
Form First and Data First Design................................................................................................. 10-2
Introduction to the Web Forms Designer............................................................................................ 10-3
Introduction to the Web Forms Component Palette ................................................................. 10-4
Introduction to the Web Form Editor Toolbar ........................................................................... 10-4
Introduction to the Property Editor............................................................................................. 10-5
Introduction to the Data Source Panel ........................................................................................ 10-5
Introduction to the Form Canvas................................................................................................. 10-6
Introduction to Web Form Controls..................................................................................................... 10-7
Input Controls................................................................................................................................. 10-7
Selection Controls......................................................................................................................... 10-11
Group Controls ............................................................................................................................. 10-12
Other Controls .............................................................................................................................. 10-16
Introduction to Data Sources .............................................................................................................. 10-18
Web Form Controls Generated by Payload Data Types......................................................... 10-18
Modifying Web Form Controls Generated From Data Elements ......................................... 10-19
Introduction to the Display As Property .................................................................................. 10-20
Walkthrough: Creating a Web Form Using the Form First Method ............................................. 10-20
Walkthrough: Creating a Web Form Using the Data First Method .............................................. 10-21
Working with Web Forms ................................................................................................................... 10-23
How to Add Controls to a Web Form ....................................................................................... 10-23
Creating Multi-Column Forms................................................................................................... 10-24
How to Add Controls Based on Data Sources ......................................................................... 10-25
Adding Business Objects to a Web Form.................................................................................. 10-26
How to Show Which Web Controls Were Created from a Data Source .............................. 10-27
How to Edit the Properties of a Web Form .............................................................................. 10-27
How to Edit the Properties of Web Form Controls ................................................................. 10-28
How to Delete a Web Form......................................................................................................... 10-28
How to Remove a Control from a Web Form .......................................................................... 10-28
How to Test a Web Form............................................................................................................. 10-29
About Localization in Web Forms ............................................................................................. 10-30
11
Working with Web Form Rules
Introduction to Form Rules ................................................................................................................... 11-1
Form Rule Javascript Syntax......................................................................................................... 11-1
viii
Using Dynamic Content in Form Rules ...................................................................................... 11-7
Using Data and Built-in Methods in a Form Rule ..................................................................... 11-9
Understanding How Form Rules Work at Runtime ............................................................... 11-10
Debugging Form Rules................................................................................................................ 11-11
Working with Form Rules ................................................................................................................... 11-12
How to Create a Form Rule ........................................................................................................ 11-12
How to Test a Form Rule............................................................................................................. 11-12
12
Working with Human Tasks
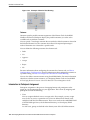
Introduction to Human Tasks............................................................................................................... 12-1
Introduction to Participant and Routing Types......................................................................... 12-2
Introduction to Participant Assignment ..................................................................................... 12-4
Introduction to Duration ............................................................................................................... 12-5
Introduction to the Human Task Editor.............................................................................................. 12-5
Working with Human Tasks................................................................................................................. 12-6
Walkthrough: Creating and Configuring a Human Task ........................................................ 12-6
How to Create New Human Task ............................................................................................... 12-6
How to Open a Human Task........................................................................................................ 12-7
How to Configure Basic Task Properties .................................................................................... 12-7
How to Configure the Deadline (Duration) for a Human Task .............................................. 12-8
How to Specify the Presentation of a Human Task .................................................................. 12-9
How to Change the Default Participant.................................................................................... 12-10
How to Add Participants and Routing to a Human Task ...................................................... 12-10
How to Assign Users, Groups, and Roles to a Participant..................................................... 12-11
How to Configure the Outcome for Parallel Routing ............................................................. 12-13
How to Create and Configure the Data Payload for a Human Task.................................... 12-14
Assigning a Human Task to a User Task .......................................................................................... 12-14
Part VI
13
Handling Data in Your Business Application
Working with Data Objects and Data Associations
About Handling Data Used by Your Business Processes ................................................................. 13-1
How to Define the Data Used by an Oracle BPM Application................................................ 13-1
Introduction to Data Objects ................................................................................................................. 13-2
Introduction to Basic and Complex Data Objects...................................................................... 13-2
Introduction to Process and Project Data Objects...................................................................... 13-3
Working with Data Objects ................................................................................................................... 13-4
How to Create a Data Object ........................................................................................................ 13-4
How to Edit or Delete a Data Object ........................................................................................... 13-5
What Happens When You Delete or Edit a Data Object .......................................................... 13-6
Introduction to Data Associations........................................................................................................ 13-6
Introduction to the Data Associations Editor............................................................................. 13-7
How to Configure Data Associations for a Flow Object........................................................... 13-8
ix
14
Using Complex Data Types to Define Data Structures
Introduction to Complex Data Types .................................................................................................. 14-1
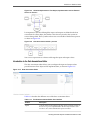
Working with Complex Data Types .................................................................................................... 14-2
How to Create a Complex Data Type Manually ....................................................................... 14-2
What Happens When You Create a Complex Data Type ........................................................ 14-6
How to Edit a Complex Data Type.............................................................................................. 14-6
How to Delete a Complex Data Type, Module, or Attribute................................................... 14-7
15
Using Expressions to Control Data
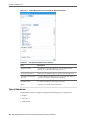
Introduction to Expressions .................................................................................................................. 15-1
Introduction to the Expression Editor ......................................................................................... 15-1
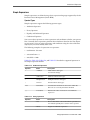
Types of Expressions...................................................................................................................... 15-2
Simple Expressions ........................................................................................................................ 15-3
Working with Expressions .................................................................................................................... 15-5
How to Define a Simple Expression for a Conditional Sequence Flow ................................. 15-5
How to Define a Simple Expression in Data Associations....................................................... 15-5
16
Tracking Business Data in Your Application
Working with Key Performance Indicators (KPIs) ............................................................................ 16-1
Introduction to Key Performance Indicators.............................................................................. 16-1
Working with Business Indicators and Counter Marks.................................................................... 16-2
Introduction to Business Indicators and Counters.................................................................... 16-2
Introduction to Counter Marks .................................................................................................... 16-3
How to Add a New Counter Mark to a Process ........................................................................ 16-3
How to Delete a Counter Mark .................................................................................................... 16-4
Measuring Process Performance Using Measurement Marks ......................................................... 16-5
How to Add a Measurement Mark to a Process........................................................................ 16-6
Part VII
17
Implementing and Deploying a BPM Project
Using Oracle Business Rules
Introduction to Oracle Business Rules................................................................................................. 17-1
Working with Oracle Business Process Composer Rules Editor ..................................................... 17-3
Introduction to Decision Points.................................................................................................... 17-4
Working with Business Rule Dictionaries........................................................................................... 17-4
How to Create a New Business Rule Dictionary ....................................................................... 17-5
Viewing and Editing Dictionary Settings ................................................................................... 17-6
Synchronizing Business Objects................................................................................................... 17-7
Comparing and Merging Oracle Business Rules Dictionaries ................................................ 17-7
Working with Dictionary Links............................................................................................................ 17-8
Working with Rulesets........................................................................................................................... 17-9
How to Add and Edit a Ruleset ................................................................................................. 17-10
x
How to Add General Rules and Verbal Rules to a Ruleset.................................................... 17-11
Working with Decision Tables............................................................................................................ 17-12
How to Add a Decision Table to a Ruleset ............................................................................... 17-14
Exporting and Importing Decision Tables to and From Microsoft Excel ............................ 17-15
Working with Facts .............................................................................................................................. 17-18
Working with Value Sets ..................................................................................................................... 17-20
How to Add a Value Set.............................................................................................................. 17-20
How to Edit an Existing Value Set............................................................................................. 17-21
Working with Global Variables .......................................................................................................... 17-21
How to Add a Global Variable................................................................................................... 17-21
How to Edit Globals..................................................................................................................... 17-23
Working with Verbal Rules and Business Phrases .......................................................................... 17-23
How to Create Business Phrases ................................................................................................ 17-23
Draft Business Phrases and Verbal Rules ................................................................................. 17-24
Choosing or Adding Business Phrases in Verbal Rules ......................................................... 17-25
Working with Decision Functions...................................................................................................... 17-25
Working with Tests .............................................................................................................................. 17-27
Creating and Managing Test Suites and Test Cases ............................................................... 17-27
Creating Test Templates.............................................................................................................. 17-29
How to Run Test Suites or Test Cases ....................................................................................... 17-29
Working with Explorer ........................................................................................................................ 17-29
Working with Translations.................................................................................................................. 17-30
Assigning a Rule to a Business Rules Task ....................................................................................... 17-31
Editing Oracle Business Rules at Run Time...................................................................................... 17-31
18
Communicating with Other Processes and Services
Defining Process Input and Output ..................................................................................................... 18-1
How to Define the Input Arguments for a Process ................................................................... 18-1
How to Define Data Associations for a Message Start Event .................................................. 18-2
How to Define the Output Arguments for a Process................................................................ 18-2
How to Define Data Association for a Message End Event ..................................................... 18-2
Using the Send and Receive Tasks to Communicate Between Processes ...................................... 18-3
Using Message Throw and Catch Events to Communicate Between Processes ........................... 18-4
Defining Conversations ......................................................................................................................... 18-5
Introduction to Conversations...................................................................................................... 18-5
Working with Conversations........................................................................................................ 18-6
Working with Services ........................................................................................................................... 18-7
How to Create New Services in the Business Catalog .............................................................. 18-7
19
Deploying a BPM Project
Deploying a Project ................................................................................................................................ 19-1
Who Can Deploy Projects?............................................................................................................ 19-1
How to Deploy a Project to Runtime........................................................................................... 19-1
xi
How to Edit a Deployed Project................................................................................................... 19-3
How to Generate a Project SAR File ............................................................................................ 19-3
How to Generate a Deployment Plan.......................................................................................... 19-4
Part VIII
A
Appendices
BPMN Flow Object Reference
Defining the Start and End Point of a Process .............................................................................................. A-1
Introduction to Start and End Events .................................................................................................... A-1
Defining How a Process Instance is Triggered..................................................................................... A-3
Introduction to the None Start Event..................................................................................................... A-4
Introduction to the Message Start Event ............................................................................................... A-4
Introduction to the Signal Start Event ................................................................................................... A-5
Introduction to the Timer Start Event.................................................................................................... A-6
Introduction to the Error Start Event ..................................................................................................... A-6
Introduction to the None End Event...................................................................................................... A-7
Introduction to the Error End Event ...................................................................................................... A-7
Introduction to the Message End Event ................................................................................................ A-8
Introduction to the Terminate End Event ............................................................................................. A-8
Adding User Interaction to Your Process...................................................................................................... A-8
Introduction to Human Workflow......................................................................................................... A-8
Introduction to the User Task ................................................................................................................. A-9
Introduction to the Manual Task.......................................................................................................... A-11
Introduction to the Update Task .......................................................................................................... A-11
Communicating With Other Processes and Services................................................................................. A-12
Introduction to the Service Task........................................................................................................... A-12
Introduction to the Notification Task .................................................................................................. A-13
Introduction to the Call Activity .......................................................................................................... A-14
Introduction to the Send Task............................................................................................................... A-14
Introduction to the Receive Task .......................................................................................................... A-15
Introduction to the Message Throw Event.......................................................................................... A-15
Introduction to the Message Catch Event ........................................................................................... A-16
Adding Business Logic Using Oracle Business Rules................................................................................ A-17
Introduction to Oracle Business Rules................................................................................................. A-17
Introduction to the Business Rule Task ............................................................................................... A-17
Controlling Process Flow Using Sequence Flows ...................................................................................... A-18
Introduction to Sequence Flows ........................................................................................................... A-18
Introduction to Unconditional Sequence Flows................................................................................. A-18
Introduction to Conditional Sequence Flows ..................................................................................... A-18
Introduction to Default Sequence Flows ............................................................................................. A-19
Controlling Process Flow Using Gateways ................................................................................................. A-19
Introduction to Gateways ...................................................................................................................... A-19
Introduction to the Exclusive Gateway ............................................................................................... A-20
xii
Introduction to the Inclusive Gateway ................................................................................................ A-21
Introduction to the Parallel Gateway................................................................................................... A-22
Introduction to the Complex Gateway ................................................................................................ A-23
Introduction to the Event-Based Gateway .......................................................................................... A-23
Controlling Process Flow Using Intermediate Events............................................................................... A-25
Introduction to Intermediate Events.................................................................................................... A-25
Introduction to the Timer Catch Event................................................................................................ A-25
Introduction to the Error Catch Event ................................................................................................. A-26
Using Subprocesses in Oracle BPM.............................................................................................................. A-27
Introduction to Reusable Processes (Reusable Subprocesses) ......................................................... A-27
Introduction to Embedded Subprocesses (Inline Subprocesses) ..................................................... A-27
Introduction to Event Subprocesses (Event Handlers) ..................................................................... A-29
Changing the Value of Data Objects in Your Process................................................................................ A-29
Introduction to the Script Task ............................................................................................................. A-29
B
Web Form and Web Form Control Property Reference
Web Form Properties........................................................................................................................................ B-1
Settings Tab................................................................................................................................................ B-1
Style Tab ..................................................................................................................................................... B-2
Web Form Control Properties ......................................................................................................................... B-3
Web Form Control Properties - Settings Tab........................................................................................ B-3
Web Form Control Properties - Style Tab .......................................................................................... B-11
C
Web Form Rules Examples
Calculate a Total ................................................................................................................................................ C-2
Show/Hide a Billing Address ......................................................................................................................... C-3
Show/Hide Message ........................................................................................................................................ C-3
Enable/Disable a Question.............................................................................................................................. C-3
Compute Subtotals for Repeating Items ........................................................................................................ C-4
Compute an Invoice Total................................................................................................................................ C-4
Textarea Max Length ........................................................................................................................................ C-5
Textarea Newline and Break ........................................................................................................................... C-5
Dropdown Options ........................................................................................................................................... C-5
Finding a Selected Options Index ................................................................................................................... C-6
Synchronized Selects ........................................................................................................................................ C-7
Clearing Dropdown Options........................................................................................................................... C-7
Default Option ................................................................................................................................................... C-7
Check Box Options - Assigning Color to Check Box Choices .................................................................... C-8
Check Box Options - Making a Control Visible/Invisible Based on Check Box Choices....................... C-8
Check Box Initialization ................................................................................................................................... C-9
Displaying Selected Check Box Labels .......................................................................................................... C-9
Repeating Check Boxes .................................................................................................................................... C-9
Display a Message Control Inside a Repeat Control ................................................................................
C-10
xiii
String Concatenation .....................................................................................................................................
C-10
Visible/Invisible.............................................................................................................................................
C-11
Visible/Invisible Section ...............................................................................................................................
C-11
Select Tab.........................................................................................................................................................
C-12
Next Tab ..........................................................................................................................................................
C-12
Expand/Collapse Section .............................................................................................................................
C-12
Multiple Choice ..............................................................................................................................................
C-13
Dynamic Options ...........................................................................................................................................
C-13
Triggers and Dynamic Options....................................................................................................................
C-13
Value Change and Dynamic Options..........................................................................................................
C-14
Dynamic Control Initialization ....................................................................................................................
C-14
Verify User ......................................................................................................................................................
C-15
Calculate Net Worth ......................................................................................................................................
C-15
Dates and Times .............................................................................................................................................
C-16
Duration ..................................................................................................................................................
C-16
Today's Date and Time .........................................................................................................................
C-16
Date/Time Stamp ..................................................................................................................................
C-17
Invalid if Before Today .........................................................................................................................
C-17
Date Less than 14 Days from Today ...................................................................................................
C-17
Date Less than 30 Days Ago.................................................................................................................
C-18
Central Timezone adjusted for Daylight Savings .............................................................................
C-18
Hours > = 4 and < = 6 Apart ................................................................................................................
C-19
Times........................................................................................................................................................
C-19
Tenants, Roles and Users ..............................................................................................................................
C-19
Repeat Item Added ........................................................................................................................................
C-20
Repeat Item Added - Collapse Other Items ...............................................................................................
C-21
Tables ...............................................................................................................................................................
C-21
form.load .........................................................................................................................................................
C-22
form.unload.....................................................................................................................................................
C-22
Unique ID ........................................................................................................................................................
C-23
Repeat Item Initialization..............................................................................................................................
C-23
ItemAdded by Init Doc..................................................................................................................................
C-24
D
Preparing Processes for Import into Oracle BPM
Preparing a Visio File to Import as a BPMN Process................................................................................... D-1
Working of Visio Shape Mapping .......................................................................................................... D-2
Visio Modelling Tips ................................................................................................................................ D-5
Updating VisioUserMap.XML................................................................................................................ D-5
Valid BPMN Element Values .................................................................................................................. D-6
BPMN Element Attributes....................................................................................................................... D-7
Handling Extraneous Text....................................................................................................................
D-10
Customizing XPDL Import Using XSLT.....................................................................................................
D-10
Common Transformation Requirements ...........................................................................................
D-10
xiv
Overview of Transformation Logic.....................................................................................................
D-11
Special Attributes...................................................................................................................................
D-12
xv
xvi
Preface
This guide describes the Oracle Business Process Composer application.
Intended Audience
This guide is intended for process analysts who use the Business Process Composer
application to create and edit the business processes and Oracle Business Process
Management (Oracle BPM) projects used to created process-based applications using
the Oracle Business Process Management Suite.
This manual assumes that you have basic knowledge of business process design and
are familiar with Business Process Management Notation (BPMN) 2.0.
Related Documents
For more information, see the following Oracle resources:
Oracle Business Process Management
See the following for more information about the Oracle BPM Suite:
• Managing and Monitoring Processes with Oracle Business Process Management
• Developing Business Processes with Oracle Business Process Management Studio
• Designing Business Rules with Oracle Business Process Management
• Rules Language Reference for Oracle Business Process Management
• Managing and Monitoring Processes with Oracle Business Process Management
Oracle SOA and BPM Suite
• Developing SOA Applications with Oracle SOA Suite
• Developing SOA Applications with Oracle SOA Suite
• Installing SOA Suite and Business Process Management Suite Quick Start for Developers
Conventions
The following conventions are also used in this manual:
xvii
xviii
Convention
Meaning
...
Vertical ellipsis points in an example mean that information not
directly related to the example has been omitted.
...
Horizontal ellipsis points in statements or commands mean that parts
of the statement or command not directly related to the example have
been omitted
boldface text
Boldface type in text indicates a term defined in the text, the glossary,
or in both locations.
<>
Angle brackets enclose user-supplied names.
[]
Brackets enclose optional clauses from which you can choose one or
none.
What's New in This Guide
This topic introduces the new and changed features of Oracle Business Process
Composer for Business Process Management 12c (12.1.3) and provides pointers to
additional information.
Screens shown in this guide may differ from your implementation, depending on the
skin used. Any differences are cosmetic.
For a list of known issues (release notes), see the "Known Issues for Oracle SOA
Products" at http://www.oracle.com/technetwork/middleware/docs/soaaiafp-knownissuesindex-364630.html.
New and Changed Features for 12c Release 1 (12.1.3)
For Oracle Business Process Composer Release 12c Release 1 (12.1.3) this guide has
been updated to include the following new and changed features:
• Support for the navigating to Business Process Management (BPM) processes
through Business Architecture (BA) projects. See Working with Value Chain
Models.
• Support for monitoring Key Performance Indicators (KPIs) within BA projects. See
Working with Key Performance Indicators (KPIs).
• Support for generating process criticality reports, which are based on the Value
Chain Models within a BA project. See Working with Business Architecture
Reports.
• Support for strategy maps, which help to define the corporate objectives and goals
of an organization and create a strategy for achieving them. See Introduction to
Strategy Models.
• Support for a narrative view of business processes, which provides a way of
creating business processes by entering text rather than dragging graphical icons
onto a palette. See Introduction to the Narrative View.
• Support for documenting the properties of business processes through a new
Business properties tab located in the lower pane of the process editor page. See
Understanding Process-Level Documentation.
• Support for generating many different reports that lists each process in your project
and shows detailed information about each process. See Generating Process
Reports for Your Project.
xix
Other Significant Changes in this Guide for 12c Release 1 (12.1.3)
For Oracle Business Process Composer 12c Release 1 (12.1.3), this guide has been
updated in the following ways:
• Oracle Business Process Composer processes documentation from the project-level,
process-level, and activity-level. A new chapter describes each feature in detail. See
Documenting BPM Projects .
• Oracle Business Process Composer 12c Release 1 (12.1.3) does not support project
templates so in this version of the guide, all references to project templates have
been removed.
• The Oracle Business Process Composer UI has been significantly changed so
procedures on how to perform various actions and tasks have also been changed.
xx
Part I
Introduction to Oracle Business Process
Composer
This part describes Oracle Business Process Composer concepts.
This part contains the following chapter:
• Introduction to Oracle Business Process Composer
1
Introduction to Oracle Business Process
Composer
This chapter provides an overview of Oracle Business Process Composer. It describes
the most common scenarios for using Oracle Business Process Composer to design,
implement, and deploy Oracle Business Process Management (Oracle BPM) projects to
create process-based business applications. It also provides a general overview of the
application user interface.
This chapter includes the following sections:
• Signing On to Oracle Business Process Composer
• Introduction to the Oracle Business Process Composer Application Welcome Page
• Introduction to Project Panels
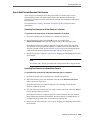
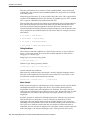
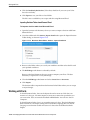
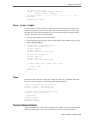
Signing On to Oracle Business Process Composer
Before signing on to Oracle Business Process Composer your business administrator
must provide the URL and your username and password.
• URL: The location of your Oracle Business Process Composer installation.
• Username: The username you use to access Oracle Business Process Composer.
• Password: The security credential you use to access Oracle Business Process
Composer.
Note:
Oracle Application Server Single Sign-On is enabled by default in Oracle BPM
Suite. OracleAS Single Sign-On allows you to use one sign-on session to access
multiple web-based applications. If OracleAS Single Sign-On is enabled and
you have previously signed on to another application, the Oracle Business
Process Composer sign on screen may not appear.
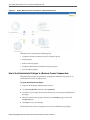
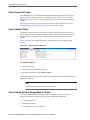
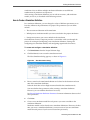
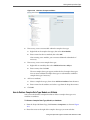
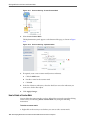
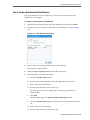
To sign on to Oracle Business Process Composer
1. Go to the Oracle Business Process Composer URL.
2. Enter your username and password, then click Login to display the Application
Welcome page.
Introduction to Oracle Business Process Composer 1-1
Introduction to the Oracle Business Process Composer Application Welcome Page
Note:
You can only sign on to Oracle Business Process Composer from one browser
session. Concurrent sessions for the same user are not supported.
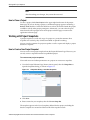
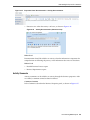
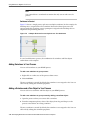
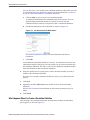
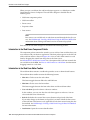
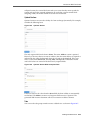
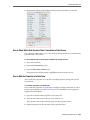
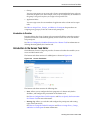
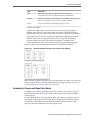
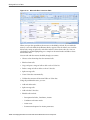
Introduction to the Oracle Business Process Composer Application
Welcome Page
The Oracle Business Process Composer application is designed to allow you to easily
create, edit, and manage BPM projects. A BPM project is the core component of an
Oracle BPM application, which contains all the required resources of the application,
including business processes.
See Creating and Working with BPM Projects for more information.
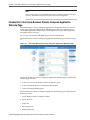
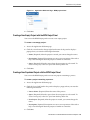
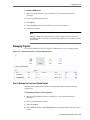
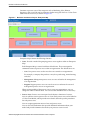
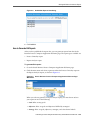
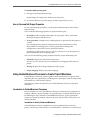
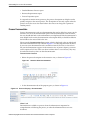
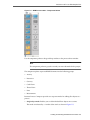
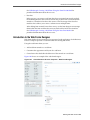
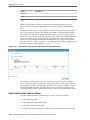
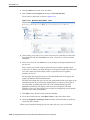
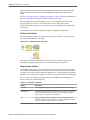
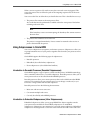
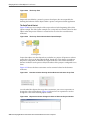
The Oracle Business Process Composer Application Welcome page is shown in Figure
1-1.
Figure 1-1
The Oracle Business Process Composer Application Welcome Page
Use the Oracle Business Process Composer Application Welcome page to perform the
following types of tasks:
• Create and view Oracle Business Process Composer spaces
• Create and manage Business Architecture (BA) projects
• Create and manage BPM projects
The Oracle Business Process Composer Application Welcome page is divided into the
following sections:
• Oracle Business Process Composer toolbar
• Spaces browser
• Project list
• BA Project panel
• BPM project panel
1-2 Developing Business Processes with Oracle Business Process Composer
Introduction to the Oracle Business Process Composer Application Welcome Page
• Recent projects panel
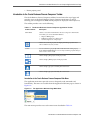
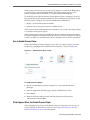
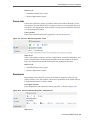
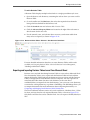
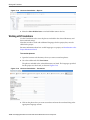
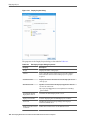
Introduction to the Oracle Business Process Composer Toolbar
The Oracle Business Process Composer toolbar is located across the top of page and
provides access to the Oracle Business Process Composer main menu as well as
allowing you to configure how BPM and BA projects are displayed in the Project List.
The toolbar provides access to the following:
Table 1-1
The Oracle Business Process Composer Application Toolbar
Toolbar element
Description
Main Menu
Click to access the Oracle Business Process Composer's main menu.
From here you can use the Main Menu to:
• Import a BPM project
• Publish report data for a BA project
• Generate reports for a BA project
Click to choose how projects are displayed in the project browser.
Choose either List, Grid, or Table.
Search
Use to search for a project by name. Enter the name of the project,
then click the Search button. You can only search for projects that you
have access to view or edit.
Click to display BA projects in the project list.
Click to display BPM projects in the project list.
Click to display projects owned by the current user.
Click to display projects shared by the current user.
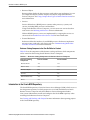
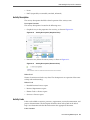
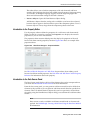
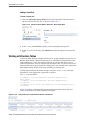
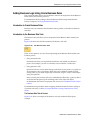
Introduction to the Oracle Business Process Composer Main Menu
The application main menu provides access to frequently used commands and
functionality. This menu is accessible from the Application Welcome page as shown in
Figure 1-2.
Figure 1-2
The Application Welcome Page Main Menu
The main menu provides access to the menu items described in Table 1-2.
Introduction to Oracle Business Process Composer 1-3
Introduction to the Oracle Business Process Composer Application Welcome Page
Table 1-2
Main Menu Items
Menu item
Description
Open
Allows you to open a project stored in the Oracle BPM
repository.
Import
Provides functionality for importing projects and process models
into Oracle Business Process Composer. Imported projects are
stored in the Oracle BPM repository. See Working with Project
Snapshots for more information.
Export
Allows you to export projects to the local file system. See
Importing and Exporting Projects for more information.
Reports
Provides functionality to publish report data for a BA project and
generate reports for a BA project. See Working with Business
Architecture Reports for more information.
Introduction to the Spaces Browser
Oracle Business Process Composer spaces group related BA and BPM projects
together. An Oracle Business Process Composer space contains all of the project and
resources for your organization, from high-level value chain models down to the
lower level technical details required by your process-based application. Oracle
Business Process Composer spaces are also used to control permissions on the projects
they contain. You can specify which users or groups have permission to view or edit
BA or BPM projects stored in that space.
The spaces browser is located on the left-hand side of the Application Welcome page
and can be used to create, view, and edit Oracle Business Process Composer spaces, as
shown in Figure 1-3. You can only view or edit the Oracle Business Process Composer
spaces you created or have permission to view.
Figure 1-3
Spaces Browser
The different types of actions you can perform using the spaces browser are described
in Table 1-3
1-4 Developing Business Processes with Oracle Business Process Composer
Introduction to the Oracle Business Process Composer Application Welcome Page
Table 1-3
Spaces Browser Elements
Spaces Browser Element Description
Click to display the New Space dialog and create a new space.
See How to Create a new Oracle Business Process Composer
Space for more information.
All
Click to display all the projects in the project list that are
contained in the spaces that you have permissions to view or
edit.
Click to display your private spaces.
Private spaces are spaces that can only be viewed or edited by
the owner.
Click to display shared spaces that are owned by you.
Click to display shared spaces that are owned by others.
Space icon
Click a specific space, as shown in Figure 1-3 to only display the
projects contained in that space in the projects list.
Hover over the space to display the Delete and Edit icons, as
shown in Figure 1-3. See How to Share a Space with Other Users
or Groups and How to Delete an Oracle Business Process
Composer Spacefor more information.
How to Create a new Oracle Business Process Composer Space
You can create a new Oracle Business Process Composer space from the Application
Welcome page.
To create a new Oracle Business Process Composer space:
1. Access the Application Welcome page.
2. Click the New Space button as shown in Figure 1-4.
Figure 1-4
The New Space Dialog
3. Enter a name, then click Save.
Introduction to Oracle Business Process Composer 1-5
Introduction to the Oracle Business Process Composer Application Welcome Page
How to Share a Space with Other Users or Groups
After creating an Oracle Business Process Composer space, you share the space with
other users or groups. Sharing an Oracle Business Process Composer space also shares
all of the Business Architecture and BPM projects within the space.
To share an Oracle Business Process Composer space:
1. Access the Application Welcome page.
2. Move the mouse over the space you want to share, then click the Edit Space
button.
3. Click Participants.
4. Click Choose.
5. In the drop down list, select whether you want to search in users, groups, or both.
6. Enter the name of the user or group in the text field, then click Search.
Click Search without entering a name in the text field to return a list of all users or
groups.
7. Click the check box next to the name of the users or groups you want to add. You
can click Select All to select all the users in the search results.
8. Click OK.
9. Select a role from the drop down list. This role determines the changes a user or
group can make to a product.
10. Click Share.
The user or group appears in the table along with the role assigned to them.
11. Click Close.
How to Delete an Oracle Business Process Composer Space
Administrators or users who are assigned the owner role can delete a space. Deleting a
space removes it from the Oracle BPM repository and also removes all of the projects it
contains.
To delete an Oracle Business Process Composer space:
1. Access the Application Welcome page.
2. Move the mouse over the space you want to delete, then click the Delete button.
3. Click Yes to confirm.
For more information about how administrators manage spaces, see Managing
Business Process Composer Spaces.
Introduction to the Project List
Use the project list to view and work with projects contained in all spaces you have
permission to view or edt, privately owned spaces, shared spaces owned by you, or
1-6 Developing Business Processes with Oracle Business Process Composer
Introduction to Project Panels
shared spaces owned by others. The projects displayed in the project list are based on
the option you choose in the spaces browser. By default, projects contained in all
spaces you have permission to view or edit are displayed, as shown in Figure 1-1.
You can change how Oracle Business Process Composer displays the projects (List,
Grid, or Table) by clicking the Views icon located on the Application Welcome page
toolbar. Table 1-4 describes the elements displayed in the default List view, as shown
in Figure 1-5.
Figure 1-5
Table 1-4
Project List - Project in List View
Project Views
Project view
Description
Name
Displays the name of the project. Click to open the project and go
to the Project Welcome page.
Click the space name in the breadcrumb located at the top of the
Project Welcome page to return back to the Application
Welcome page.
Click to download the project to your local file system.
Click to delete the project.
When you click this icon, a confirmation message appears. Click
Yes to delete the project or click No to abort the action.
Locked /Unlocked
The lock icon displays either locked or unlocked for shared
projects to inform users if the project is currently locked by
another user.
Space
Displays the name of the space where the project is stored. Click
to display more details about the space to the right of the project
list.
Created
Displays the time and date the project was created.
Creator
Displays the user who created the project.
Type
Displays the type of project. (BPM project or BA project).
Introduction to Project Panels
The Application Welcome page displays three project panels: the BA Project Panel, the
BPM Project Panel, and the Recent Projects panel.
• BA Project Panel: Allows you to create a new project.
• BPM Project Panel: Allows you to create a new project for BPM.
Introduction to Oracle Business Process Composer 1-7
Introduction to Project Panels
• Recent Projects Panel: Lists the projects you have accessed.
Creating a New Empty Project with the BA Project Panel
You can use the BA Project panel to create a new empty project.
To create a new empty project:
1. Access the Application Welcome page.
2. Click the + icon located in the top right-hand corner of the panel to display a
popup where you enter the following information:
• Name: (Required) After the project is created, you cannot change the name.
• Description: (Optional) Descriptions are one or two expansions of the title to
help a user distinguish between projects of similar or same titles.
• Space: (Required) Select the space where the new project is to be stored. To
create a new space, select New Space from the drop down list.
3. Click Save.
Creating a New Populated Project with the BA Project Panel
You can use the BA Project panel to create new projects containing an enterprise map,
strategy model, or value chain model.
To create a project containing either an enterprise map, strategy model, or value
chain model:
1. Access the Application Welcome page.
2. Click either the Enterprise Map, Strategy Model, or Value Chain Model link listed in
the panel to display a popup where you enter the following information:
• Model Name: (Required) Enter the name of the enterprise map, strategy model,
or value chain model.
• Space: (Required) Select the space where the new project is to be stored. To
create a new space, select New Space from the drop down list.
• New Project: (Required) After the project is created, you cannot change the
name.
• Description: (Optional) Descriptions are one or two expansions of the title to
help a user distinguish between projects of similar or same titles.
1-8 Developing Business Processes with Oracle Business Process Composer
Introduction to Project Panels
Figure 1-6
Application Welcome Page - BPM project Panel
3. Click Save.
Creating a New Empty Project with the BPM Project Panel
You can use the BPM Project panel to create a new empty project.
To create a new empty project:
1. Access the Application Welcome page.
2. Click the + icon located in the top right-hand corner of the panel to display a
popup where you enter the following information:
• Name: (Required) After the project is created, you cannot change the name.
• Description: (Optional) Descriptions are one or two expansions of the title to
help a user distinguish between projects of similar or same titles.
• Space: (Required) Select the space where the new project is to be stored. To
create a new space, select New Space from the drop down list.
3. Click Save.
Creating a New Populated Project with the BPM Project Panel
You can use the BPM Project panel to create new projects containing a process.
To create a project containing a process:
1. Access the Application Welcome page.
2. Click the Process link listed in the panel to display a popup where you enter the
following information:
• Process Name: (Required) Enter the name of the process.
• Space: (Required) Select the space where the new project is to be stored. To
create a new space, select New Space from the drop down list.
• New Project: (Required) After the project is created, you cannot change the
name.
• Description: (Optional) Descriptions are one or two expansions of the title to
help a user distinguish between projects of similar or same titles.
3. Click Save.
Introduction to Oracle Business Process Composer 1-9
Introduction to Project Panels
Recent Projects Panel
The Recent Projects panel lists the projects you have accessed during the session.
When you start your session, the message No recent projects is displayed in the panel.
1-10 Developing Business Processes with Oracle Business Process Composer
Part II
Performing Administrative Tasks Using
Oracle Business Process Composer
This part describes how to perform administrative tasks using Oracle Business Process
Composer.
This part contains the following chapter:
• Performing Administrative Tasks
2
Performing Administrative Tasks
This chapter describes how to perform administrative tasks using Oracle Business
Process Composer. Users who are assigned administration privileges can perform
administrative tasks including managing Oracle Business Process Composer spaces,
managing projects, and enabling the process player feature.
Note:
The procedures described in this chapter can only be performed by users who
have been granted the Project Administrator security role. For more
information, see How to Grant Administrator Privileges to a Business Process
Composer User.
This chapter includes the following sections:
• Accessing the Oracle Business Process Composer Administrator View
• Managing Business Process Composer Spaces
• Managing Projects
• Defining SOA Administrator Credentials to Enable Process Player
• Administering Business Architecture Reports
Accessing the Oracle Business Process Composer Administrator View
Oracle Business Process Composer allows you to assign administrator privileges to a
user.
When a user has administrator privileges, they have access to the Administration view
accessible from the Oracle Business Process Composer application welcome page, as
shown in Figure 2-1.
Performing Administrative Tasks 2-1
Accessing the Oracle Business Process Composer Administrator View
Figure 2-1
Oracle Business Process Composer - Administrative View
Administrators can perform the following tasks:
• Configure and remove Business Process Composer spaces.
• Delete projects.
• Release locks on projects.
• Configure administrator credentials for process player.
• View and delete reports.
How to Grant Administrator Privileges to a Business Process Composer User
Administrator privileges are granted by assigning the Administrators group to an
Oracle Business Process Composer user.
To grant administrator privileges:
1. Log in to the WebLogic Administrator Console.
2. Go to Security Realms and then select myRealms.
3. Go to the Users/Groups tab and select the user you want to grant administrative
privileges.
4. Move the Administrators group from the list of Available groups to the list of
Assigned groups.
5. Click Save to save your changes.
The Oracle Business Process Composer user now has administrator privileges.
2-2 Developing Business Processes with Oracle Business Process Composer
Managing Business Process Composer Spaces
How to Access the Administration View
Users who have been granted administrator privileges can access the Administration
view from the application welcome page.
How to access the administrator view:
1. Sign in to Oracle Business Process Composer as a user with administrator
privileges.
2. In the upper right-hand corner of the application window, click Modeler View.
3. Select Administrator View from the drop-down list.
4. Click the icon for the administration functionality you want to access.
Managing Business Process Composer Spaces
Spaces enable you to define which Oracle Business Process Composer users have
permission to view and edit Business Architecture (BA) and Business Process
Management (BPM) projects.
Figure 2-2.
Figure 2-2
Administrative View - Spaces Administration
Use the spaces administration feature to perform the following:
• View the status of a BPM space.
• Share a BPM space.
• Delete a BPM space.
Configuring Access to a BPM Space
Using the Spaces Administration dialog you can define which users or groups of users
can view or edit a BPM space.
To add users to a BPM space:
1. Ensure that you have created at least one BPM space from the application welcome
page.
Performing Administrative Tasks 2-3
Managing Business Process Composer Spaces
2. Sign in to Oracle Business Process Composer as a user with administrator
privileges.
3. Access the Administrative view.
4. Click Spaces.
5. Click the Share icon in the Actions column for the space where you want to add
users.
6. Click Choose, then select Users or Groups from the drop-down menu.
7. Enter the name of the user or group you want to search for, then click Search.
To see a list of all users or groups, leave the text area empty and click Search.
8. Click the check box next to the users or groups you want to add to the BPM space.
Each user or group you select appears in a list.
9. Click OK.
Each of the users or groups you selected appear in the text area.
10. Select a role from the drop-down list.
The role determines what changes the user or groups can make to the contents of a
BPM space.
11. Click Share.
12. Click Close.
Removing Users from a BPM Space
Use the Spaces Administration dialog to remove users from a BPM space.
To remove users from a BPM space:
1. Sign in to Oracle Business Process Composer as a user with administrator
privileges.
2. Access the Administrative View.
3. Click Spaces.
4. Click the Share icon in the Actions column for the space where you want to
remove users.
5. Select the user or group from the list.
6. Click Delete, then click Yes.
How to Delete a BPM Space and Its Content
Use the Administrative View to delete a BPM space from the Oracle BPM repository.
2-4 Developing Business Processes with Oracle Business Process Composer
Managing Projects
To delete a BPM space:
1. Sign in to Oracle Business Process Composer as a user with administrator
privileges.
2. Access the Administrative View.
3. Click Spaces.
4. Click the Delete icon in the row of the space you want to delete.
5. Click Yes to confirm.
Note:
Deleting a BPM space deletes the space and all of the business architecture
and BPM projects it contained. After deleting a BPM space, its contents cannot
be recovered.
Managing Projects
Use the Oracle Business Process Composer administrative view to manage projects.
Figure 2-3
Administrative View - Projects Administration
How to Release the Lock on a Shared Project
Administrators can release the locks on shared projects that have been locked by
another user.
To release the lock on a shared project:
1. Sign in to Oracle Business Process Composer as a user with administrator
privileges.
2. Access the Administrative View.
3. Select the Project.
4. In the Actions column, click Unlock project for the project whose lock you want to
release.
Performing Administrative Tasks 2-5
Defining SOA Administrator Credentials to Enable Process Player
Note:
If you release the lock of a project that has unpublished changes, those
changes are lost and cannot be recovered.
5. Click Yes.
How to Delete a Project
Administrators can delete projects.
Note:
Administrators cannot perform tasks on private projects. Only the project
owner has access to private projects.
To delete a shared project:
1. Sign in to Oracle Business Process Composer as a user with administrator
privileges.
2. Access the Administrative View.
3. Select Project.
4. Under the Actions column, click Delete project in the row of the project you want
to delete.
Note:
Administrators cannot delete locked projects. To delete a project you must
unlock it, then delete it.
5. Click Yes to confirm that you want to delete the project.
After deleting a project, it is removed from the Oracle BPM repository.
How to Configure Sharing for a Project
To configure which users and groups have access to a project, you must configure
sharing on the Oracle Business Process Composer space containing the project. You
cannot configure sharing on a specific project. See Configuring Access to a BPM Space
for more information.
Defining SOA Administrator Credentials to Enable Process Player
Process player enables you to test the behavior of a business process at design time
using Oracle Business Process Composer. You can test a process as different user IDs
without having to deploy the BPM project and test the processes using Oracle
Business Process Workspace.
See Using Process Player for more information.
2-6 Developing Business Processes with Oracle Business Process Composer
Defining SOA Administrator Credentials to Enable Process Player
When testing a business process, process player deploys a version of the BPM project
to runtime using a special runtime partition. This allows process player to run a
process using the same environment as a normally deployed BPM project.
To enable the process player feature in Oracle Business Process Composer, you must
first provide the service-oriented architecture (SOA) administrator credentials. Oracle
Business Process Composer uses the SOA administrator credentials to:
• Deploy a version of the project at runtime.
• Perform tasks on the process instance as different users.
After you provide the SOA administrator credentials, any user who has edit privileges
on a project can run process player.
When starting process player, Oracle Business Process Composer deploys the project
to runtime using these credentials. When the current user wants to perform an activity
or task as another user, Oracle Business Process Composer also uses these credentials.
How to Enable Process Player
Before Oracle Business Process Composer users can access process player, you must
enable it by providing the SOA administrator credentials, as shown in Figure 2-4.
Figure 2-4
Administrative View - Player
To enable process player:
1. Sign in to Oracle Business Process Composer as a user with administrator
privileges.
2. From the Application Welcome page, select the Administrative View.
3. Select Player.
4. Enter the username and password, and then the password for the SOA
administrator, then click Save.
What Happens When You Enable Process Player
After enabling process player, Oracle Business Process Composer users can use it to
test the behavior of their business processes. See Using Process Player to Test the
Behavior of Business Processes for information.
Performing Administrative Tasks 2-7
Administering Business Architecture Reports
Enabling process player makes it available to all Oracle Business Process Composer
users. Any user who has edit privileges on a BPM project can run process player.
How to Disable Process Player
After you have enabled process player, you can disable it when necessary.
To disable process player:
1. Sign on to Oracle Business Process Composer as a user with administrator
privileges.
2. From the Application Welcome page, select the Administrative View.
3. Select Player.
4. Click Clear.
Administering Business Architecture Reports
Use the Administrative view information about each of the reports created within a
Oracle Business Process Composer installation.
You can also use the Administrative View to delete reports.
How to View Reports
You can use the Administrative View to view a list of reports.
To view reports:
1. Sign on to Oracle Business Process Composer as a user with administrator
privileges.
2. Access the administrative View.
3. Select Reports.
Oracle Business Process Composer displays a list of reports in a table containing
information about each report. See the Oracle Business Process Composer contextsensitive online help for information about each column in the table.
How to Delete a Report
Use the Administrative View to delete a report.
To delete a report:
1. Sign on to Oracle Business Process Composer as a user with administrator
privileges.
2. Access the administrative View.
3. Select Reports.
4. Click the Delete Report button in the row of the report you want to delete.
2-8 Developing Business Processes with Oracle Business Process Composer
Part III
Creating and Working With BA and BPM
Projects
This part contains information about creating and working with Business Architecture
(BA) and Business Process Management (BPM) projects in Oracle Business Process
Composer.
This part contains the following chapter:
• Creating and Managing BA and BPM Projects
• Performing Process Analysis and Discovery with Business Architecture
• Creating and Working with BPM Projects
• Documenting BPM Projects
3
Creating and Managing BA and BPM
Projects
This chapter provides an introduction to project sharing and collaboration and
discusses some of the basic functions available to create and manage Business
Architecture (BA) and Business Process Management (BPM) projects.
This chapter includes the following sections:
• Introduction to Project Sharing and Collaboration
• Creating and Working with Projects
• Working with Project Snapshots
• Importing and Exporting Projects
Introduction to Project Sharing and Collaboration
Oracle Business Process Composer provides features for sharing BA and BPM projects
among its users.
You can control who has access to view or edit projects.
Private and Public Projects
BA and BPM projects are defined as either private or public. Only the project owner
can view or edit private projects. The project owner and other users who have the
correct permissions can edit and view public projects.
For information about how to share projects, see How to Share a Project with Other
Users.
Edit Mode
Shared projects have an edit mode, which determines whether you can make changes
or not. You can determine the current edit mode for a project in the project
information pane.
In Read-only mode, the project is open for viewing only, and some project
functionality is unavailable. In Edit mode, you can make changes to the project. Only
you can make changes; other users can view it, but cannot make changes.
Project Roles
Project roles define who has access to view and make changes to a project. There are
three types of project roles: owner, editor, and viewer.
Creating and Managing BA and BPM Projects 3-1
Creating and Working with Projects
• Owner: When a user creates a project, they are defined as the owner of the project.
You can also define another user as the owner of a project. The owner of a project
can perform the following:
– Edit a project
– Deploy a project
– Create a project snapshot
– Share a project with other users
– Delete a project
• Editor: An editor can make changes to a project.
When a user with the editor role opens a project, by default it is in read mode. If no
other users are editing the project, the user can begin editing it.
• Viewer: A viewer can view a project, but cannot make any changes to it.
Creating and Working with Projects
New BA and BPM projects are created from the Application Welcome page. These
projects contain only basic information created by process analysts.
For more information about how to create new BA and BPM projects, see Introduction
to Project Panels.
How to Open a Project Using the Application Welcome Page
To open a project directly from the Application Welcome page, find the required
project in the project list and then click on the name of the project.
The BA Project Welcome Page is displayed by default when you open a BA project
from the Application Welcome page. For more information about the BA Project
Welcome Page, see Introduction to the BA Project Welcome Page.
The BPM Project Welcome Page is displayed by default when you open a BPM project
from the Application Welcome page. For more information about the BPM Project
Welcome Page, see Introduction to the Project Welcome Page.
When you are editing a component within a project, you can return to the Project
Welcome Page by clicking the Project Home tab.
How to Share a Project with Other Users
You share projects with other Oracle Business Process Composer users at the space
level. Projects stored in a specific space share the same permissions. Only owners can
change permissions at the project-level.
For more information about sharing projects, see How to Share a Space with Other
Users or Groups
How to Edit a Shared Project
Shared projects open in view mode by default. If you have permissions to edit a
project and the project is not locked by another user, you can edit it.
3-2 Developing Business Processes with Oracle Business Process Composer
Creating and Working with Projects
To begin editing a project:
To begin editing, click Edit at the top of the Project Welcome Page.
After you have enabled edit mode for a project, you can begin making changes to it.
Managing Project Changes
You can save changes to your project as you are editing project components. You must
switch to edit mode to make changes.
To save changes to a private project:
To save changes to a private project, click Save in the project toolbar. The project is
saved and you can continue making changes to the project as necessary.
To save changes to a shared project:
• If you want to save your changes and continue editing the project, click Save in the
process editor toolbar.
All unsaved changes for each project component are saved. The project continues
to be locked and you can continue editing.
• To release the lock on the project, click Save and Release in the process editor
toolbar.
All unsaved changes for each project component are saved. If project sharing is
enabled, other Oracle Business Process Composer and Oracle BPM Studio users
who have permissions can begin editing the project. However, these changes are
not available to other participants until they are published.
Caution:
If the project has not been published before you save and release, then it asks
for whether you want to publish. If you do not publish before you release,
your changes are lost.
To publish changes:
If you want to make your changes available to other participants, you must publish
them. To do this you click the publish icon located on the Project toolbar.
Published changes are recorded in the Recent Activity pane in the Project Welcome
page.
How to Discard Changes to a Project
While editing project elements, you can revert your changes and return to the most
recent published version of a project.
To discard changes made to the current project:
1. From the Project toolbar, click the discard changes icon.
2. Click OK to confirm discarding changes to the current project.
Creating and Managing BA and BPM Projects 3-3
Working with Project Snapshots
Note:
After discarding your changes, they cannot be recovered.
How to Close a Project
To close a project, click Close Project in the upper right hand corner of the project
home page. If you are sharing a project, a confirmation popup appears containing a
Release Lock check box. Select this check box to release the lock and make the project
available to edit by other project participants. Alternately, you can select the space
name located at the top-right corner of the project welcome page to return to the
application welcome page.
Working with Project Snapshots
A project snapshot is a read-only copy of a project at a particular moment. Since
snapshots are read-only, they cannot be modified or opened for editing.
You can view the contents of a project snapshot as well as export and deploy a project
based on a snapshot.
How to Create a New Project Snapshot
You can create a new project snapshot from the Project Welcome Page. However, you
can only create a snapshot from the last published project.
To create a new project snapshot:
Users with owner and editor permissions on a project can create new snapshots.
1. Go to the Project Welcome Page, Recent Activity panel, then click Snapshots to
open the Snapshots dialog, as shown in Figure 3-1.
Figure 3-1
Snapshots Dialog - Add New Snapshot
2. Click New.
3. Enter a name for your snapshot, then click Create Snapshot.
The snapshot appears in the list of snapshots defined for this project, including the
date the snapshot was created and the user ID of the snapshot creator.
3-4 Developing Business Processes with Oracle Business Process Composer
Working with Project Snapshots
How to View Contents of a Project Snapshot
Viewing the contents of a project snapshot allows you to view and compare previous
versions of a project with the current one.
To view the contents of a project snapshot:
1. Go to the Project Welcome Page, Recent Activity panel.
2. Click Snapshots to open the Snapshots dialog.
3. Click the name of the snapshot you want to view.
Within the snapshot view, you can view the state of the processes, rules, and human
tasks associated with the project.
How to Return to the Active Version of a Project
To return to the active version of a project from a project snapshot, click the active
versions' project name located in the bread-crumb at the top of the Project Welcome
Page.
How to Delete a Project Snapshot
Using Oracle Business Process Composer, a user who is granted the editor role of a
project can delete the snapshots they created. A user who is granted the owner or
administrator role of a project can delete any snapshot created by any user.
1. Open your project.
2. From the Project Welcome Page, Recent Activity panel, click Snapshots.
3. Select the snapshot you want to delete from the list, then click Delete.
4. Click Yes to confirm that you want to delete the project snapshot.
After you delete a project snapshot, it cannot be recovered.
How to Export a Project Snapshot
You can use Oracle Business Process Composer to export a project snapshot. Project
snapshots are exported as normal BPM projects, which you can deploy, share with
other users, and so on.
To export a project snapshot:
1. Open your project.
2. View the project snapshot you want to export.
For more information, see How to View Contents of a Project Snapshot.
Creating and Managing BA and BPM Projects 3-5
Importing and Exporting Projects
3. From the main menu, select Export, then Export Project.
4. Choose a location on your local file system and click Save.
The exported project snapshot is saved as an .EXP file on your file system.
How to Deploy a Project Snapshot
You can use Oracle Business Process Composer to deploy a project snapshot directly
to runtime. This allows you to test or revert back to an older version of a project.
To deploy a project snapshot:
1. Open your project.
2. View the project snapshot you want to deploy.
For more information, see How to View Contents of a Project Snapshot.
3. From the main menu, select Deploy Project.
4. Provide the information as described in How to Deploy a Project to Run Time.
5. Click Deploy.
Alternatively, a user with an open project may select a snapshot from the Deploy
popup. The default option is Current Project; however, if one is available, the user can
select a snapshot.
Importing and Exporting Projects
Oracle Business Process Composer allows you to import and export BPM projects
as .EXP files.
This allows you to share projects directly with other Oracle Business Process
Composer and Oracle BPM Studio users directly through the file system without
having to use the Oracle BPM repository.
Note: To migrate projects from releases prior to 12c, import them into BPM
Studio. You can then deploy the composite, or export the project and import it
using Business Process Composer.
How to Import a Project from your Local File System
You can import a BPM 12c project that was previously exported and saved as an .EXP
file. The imported project is stored in the Oracle BPM repository.
Note: To migrate projects from releases prior to 12c, import them into BPM
Studio. You can then deploy the composite, or export the project and import it
using Business Process Composer.
To import a project:
1. Access the application welcome page.
3-6 Developing Business Processes with Oracle Business Process Composer
Importing and Exporting Projects
2. From the main menu, select Import, then select Import Project.
The main menu is accessible from the upper left-hand corner of the Oracle Business
Process Composer user interface as shown in Figure 3-2.
Figure 3-2
Application Welcome Page Main Menu
3. Select the space where you want to store your imported project.
You must create or choose a space before you can import a project.
4. Click Browse, then select the project file you want to import.
5. Click OK to import the project into the Oracle BPM repository.
How to Export a Project from the Application Welcome Page
Projects exported from Oracle Business Process Composer can be imported into Oracle
BPM Studio. Exporting a project to your local file system allows you to share projects
without using Oracle Process Asset Manager (PAM).
For information on importing a project into Oracle BPM Studio see the Developing
Business Processes with Oracle Business Process Management Studio.
You can export a project from the application welcome pages' project list.
To export a project as an EXP file:
1. Find the project you want to export from the list of projects located in the project
list, as shown in Figure 3-3.
Figure 3-3
Project List - Project in List
2. Click the Download icon (
), which is located in the top right-hand corner.
3. Choose a location on your local file system and click Save.
Your exported project is saved as a.EXP file on your local file system.
How to Export a Project or Project Snapshot from the Project Welcome Page
Projects or project snapshots can be exported from Oracle Business Process Composer
to your local file system from the Project Welcome page. Exporting a project or project
Creating and Managing BA and BPM Projects 3-7
Importing and Exporting Projects
snapshot to your local file system allows you to share projects without using Oracle
Process Asset Manager (PAM).
To export a project as an EXP file:
1. Open the project or project snapshot you want to export.
2. From the main menu select Export, then choose either to export the current project
or the last published project, as shown in Figure 3-4.
Note that only the Last Published Project option is available for project snapshots.
Figure 3-4
Project Main Menu - Export
3. Choose a location on your local file system and click Save.
Your exported project is saved as a.EXP file on your local file system.
3-8 Developing Business Processes with Oracle Business Process Composer
4
Performing Process Analysis and
Discovery with Business Architecture
Using Oracle Business Process Composer, you can perform process analysis and
discovery to determine how to improve the efficiency of processes within your
organization. This chapter describes how to work with Business Architecture (BA)
projects and generate reports based on them.
This chapter includes the following sections:
• Introduction to Business Architecture
• Introduction to the BA Project Welcome Page
• Working with Business Architecture Reports
Introduction to Business Architecture
Business Architecture is a methodology for performing high-level analysis of the
business processes within your organization. These processes can be high-level
processes that span an entire organization or specific, low-level processes performed
within a specific group.
Business Architecture uses a top-down approach that allows for discovery of your
organization's processes. You can define and evaluate high-level goals and map them
to specific strategies for achieving them. You can also run reports on Business
Architecture components to evaluate performance.
Oracle Business Process Composer provides a full-feature tool for performing analysis,
refinement, and optimization of your business processes. This allows the business
model to drive the IT development process by translating requirements into specific
Business Process Model and Notation (BPMN) processes.
To create high-level models of your organization's processes, Oracle Business Process
Composer provides capabilities for creating and editing the following:
• Enterprise Maps
• Value Chain Models
• Strategy Models
These components are described in the following sections.
Introduction to Enterprise Maps
Enterprise Maps provide a bird's eye view of your organization. They are models that
show key process areas that reflect key business functions or services. The Enterprise
Map is the entry point for process decomposition. Generally, there is only one
Enterprise Map for the entire organization.This level defines the top-level business
Performing Process Analysis and Discovery with Business Architecture 4-1
Introduction to Business Architecture
functions or process areas of the enterprise such as Marketing, Sales, Human
Resources, and so on. Each top-level business further navigates down to a Value Chain
Model into the next level, as shown in Figure 4-1.
Figure 4-1
Business Architecture Project - Enterprise Map
Enterprise Maps contain the following elements:
• Lanes: Provide a method for grouping process areas together within an Enterprise
Map.
Each Enterprise Map is created with three default lanes. These correspond to
common divisions of process areas within an organization. The default lanes are:
– Core: Core process areas are the areas that are essential to an organization.
For example, a company that produces x may have purchasing, manufacturing,
and sales.
– Management: Management process areas are areas related to the management
of an organization.
– Support: Support process areas are areas that assist or enhance the core and
management process areas in an organization.
When creating models of the process areas in your own organization, you can
change the names of default lanes. You can also add additional lanes as necessary.
• Process Areas: Process areas correspond to the business functions of services.
You can add one or more process areas to a lane. Each process area can be linked to
a Value Chain Model, which provides more details about the specific procedures
for each process area.
You can assign organization units to lanes and process areas.
You can also add attachments that provide additional information about your
model and provide comments that make your processes easier to read.
4-2 Developing Business Processes with Oracle Business Process Composer
Introduction to Business Architecture
Introduction to Value Chain Models
Value Chain Models allow you to specify more detail about your process. A Value
Chain Model is a series of activities within an organization that perform a specific task.
Value Chain Models contain a series of value chain steps, which represent different
stages of the process, as shown in Figure 4-2.
Figure 4-2
BA Project - Value Chain
Each value chain step corresponds to a more detailed process performed by a smaller
group. Each value chain step can be broken down into a separate Value Chain Model,
creating a hierarchical group of value chain models. Alternatively, a sub-step can be
linked to a BPMN process. BPMN processes define process flows that outline the IT
requirements for implementing a process.
Within a Value Chain Model, you can also define key performance indicators (KPIs).
KPIs are metrics that allow you to track important business information for an
organization. For more information about using KPIs to track business data, see
Tracking Business Data in Your Application .
Value Chain Models are not required to have a start or an end step. In fact, they are
not required to have any step at all (they can be blank).
Each link within a Value Chain Model can be linked to the following:
• Another Value Chain Model. This can be a Value Chain Model within the current
BA project.
• A BPMN process. This process must be within a Business Process Management
(BPM) project that you have permission to edit.
Note:
You can only link to a BA or BPM project within the space containing the
current project.
Introduction to Strategy Models
Strategy Models help to define the corporate objectives and goals of an organization
and create a strategy for achieving them. Strategy Models allow you to break a goal
down into a series of actionable steps. They allow you to map high-level goals down
Performing Process Analysis and Discovery with Business Architecture 4-3
Introduction to Business Architecture
to low-level business processes and tasks performed and implemented by an IT
organization, as shown in Figure 4-3.
Figure 4-3
BA Project - Strategy Model
Strategy Models contain the following components:
• Goal: Defines the desired end result specified by the strategy model.
• Objective: A goal can be broken down into one or more objectives.
For example, the goal of achieving faculty excellence in an educational institute can
be broken down into impacted objectives such as size and quality of the faculty,
faculty compensation, and so on. The objectives are hierarchial, which means that
an objective can be broken down into child objectives.
• Strategy: Defines the plan to achieve an objective.
For example, the objective of financial compensation can be achieved by using
strategies for faculty salaries and perk benefits. Although strategies define how
objectives are achieved, they are still high-level. The specific details for achieving
an objective can be further refined by linking to a Value Chain Model.
• Value Chain: This is a reference to a Value Chain in this or another BA project.
It references (or links) to the value chain that defines the details of how this
strategy is implemented. The Value Chain reference can also reference a BPMN
process within a BPM project.
Using KPIs to Analyze Performance
KPIs define how an organization's performance is tracked against its objectives.
Working with Key Performance Indicators (KPIs) describes how to use KPIs.
4-4 Developing Business Processes with Oracle Business Process Composer
Introduction to the BA Project Welcome Page
Introduction to the BA Project Welcome Page
The BA Project Welcome Page provides access to information about a BA project and
access to common project-related features. Figure 4-4 shows the Project Welcome Page
for the Business Architecture for Education example project.
Figure 4-4
Business Architecture Project Welcome Page
Use the Oracle Business Process Composer BA Project Welcome page to perform the
following types of tasks:
• Edit and view a project's general information
• Create and manage project components
• Edit and publish BA projects
• Access the Quickstart menu
For more information about sharing projects, saving projects, discarding changes, and
other general functions, see Creating and Managing BA and BPM Projects.
The Oracle Business Process Composer BA Project Welcome page is divided into the
following sections:
• Project toolbar
• Project Information panel
• Recent Activity panel
• Project Component pane
• Quickstart menu
Introduction to the Project Toolbar
The Oracle Business Process Composer BA project toolbar is located across the top of
page and provides access to the Oracle Business Process Composer BA projects main
menu as well as allowing you to save and publish your projects.
The toolbar provides access to the functions listed in Table 4-1.
Performing Process Analysis and Discovery with Business Architecture 4-5
Introduction to the BA Project Welcome Page
Table 4-1
Oracle Business Process Composer BA Project Welcome Page - Toolbar
Toolbar Element
Description
Main Menu
Click to access the BA Project Welcome Page's main menu. From
here you can use the Main Menu to:
•
•
•
•
•
•
Viewing Mode
Edit
Editing Mode
Save
Publish
Discard
Participants
Close Project
Export a project
Publish report data
Generate BA project reports
Discard changes made to a project
Share a project
Close the current project
-Click this icon to toggle to the edit mode.
When you first open a shared project, it opens in view mode. If
the project isn't locked by another participant, you can click this
icon to change to the edit mode if you have the correct
permissions.
-Click to save the current project and continue editing.
Click to publish the project data.
Publishing a project makes the changes you have recently made
available to other participants.
Click to discard changes made to this project since the last
publication.
Displays the project type. In this case the project type is Private.
Click to close the current project and return to the Oracle
Business Process Composer Application Welcome page.
Introduction to the Project Information Panel
The project information panel displays general information about the project, as
shown in Figure 4-5.
Figure 4-5
BA Project Welcome Page- Information Panel
This pane displays the following information:
• Title Bar: Displays the name, creation date, and name of the user who created the
project.
Click the icon located below the user name to publish reports data.
4-6 Developing Business Processes with Oracle Business Process Composer
Introduction to the BA Project Welcome Page
• Lock: Displays the time and name of the user who is currently editing the project
and has locked the project.
• Type: Displays the project type.
If the project is shared, it displays a link to the Team dialog where you can change
the roles of team members.
• More Information: Click to display more general information.
Click Hide Details to hide the additional information.
• Description: Displays the project description.
Descriptions are one or two sentence expansions of the title to help a user
distinguish between projects of similar or same titles.
Click the link to edit the description.
Introduction to the Recent Activity Panel
The recent activity browser provides a history of the major changes made to the
current BA project.
Snapshots
Snapshots are created from the latest published project. Click the Snapshots link to
open the Snapshot dialog where you can create and view the snapshots for this BPM
project. Snapshots allow you to create backups of your projects and view the changes
made to a project over time.Snapshots provide a record of the changes made to a
project during the development life-cycle. For more information about snapshots, see
Working with Project Snapshots.
Introduction to the Project Component Pane
Use the project component pane to view and create the following project components:
• Enterprise Maps
• Strategy Models
• Value Chain Models
Listed to the right-hand side of each of the project components is the number of
components created for this project. Located below the list of project components is
the number for All.
Introduction to the Quickstart Menu
Use the Quickstart menu to quickly access the following common functionality within
Oracle Business Process Composer:
• Organization Unit: Opens the Organization Units dialog, which allows you to
create and browse the organization units defined for a project.
• Documentation: Opens the Documentation tab within the project properties panel,
which allows you to view and edit project-level documentation.
Project documentation can be a one or two sentence an expansion of title or
information that is required for comprehension.
Performing Process Analysis and Discovery with Business Architecture 4-7
Introduction to the BA Project Welcome Page
• Attachments: Opens the Attachments tab within the project properties panel,
which you can use to attach supplementary documents that are important to your
BA project.
From the attachments tab, you can view, add or delete attachments.
• Comments: Opens the Comments tab within the project properties panel and can
be used to add brief comments.
Comments are permanently attached to a project and should be used when it is
important to keep a record.
Working with Enterprise Maps
Create and edit Enterprise Maps from the Project Welcome page.
You can create an Enterprise Map:
• for an existing BA project
• for a new project
Creating an Enterprise Map for an Existing BA Project
Use the Enterprise Map link on the BA Project Welcome page to create an Enterprise
Map for and existing project.
To create an Enterprise Map for an existing BA project:
1. Open your BA project.
2. From the BA Project Welcome page, click the Enterprise Map link.
3. Click New, then enter a name and description for the Enterprise Map.
4. Click Save.
To open an Enterprise Map, click the name of the Enterprise Map in the Business
Architecture Welcome page.
Creating an Enterprise Map for New BA Project
Use the Enterprise Map dialog to create an Enterprise Map for a new project.
To create an Enterprise Map for a new BA project:
1. Access the Application Welcome page.
2. Click Enterprise Map from the BA Project panel, as shown in Figure 4-6.
4-8 Developing Business Processes with Oracle Business Process Composer
Introduction to the BA Project Welcome Page
Figure 4-6
BA Project - Enterprise Map Dialog
3. Enter a name for the Enterprise Map.
4. Select the Oracle Business Process Composer space where you want to create the
enterprise map.
5. Enter a name for the new BA project.
6. Enter a description.
Descriptions are one or two sentence expansions of the title to help a user
distinguish between projects of similar or same titles.
7. Click Create.
How to Add Lanes and Process Areas to an Enterprise Map
Using the Enterprise Map editor, you can add lanes and process areas to an Enterprise
Map.
To add a lane to an Enterprise Map or process area:
1. From the component palette, click and drag a lane or process area to the position in
the Enterprise Map editor canvas.
2. To resize the lane or process area, click it, then click and drag one of the corners.
3. To reposition the lane or process area, click and drag it to the new position.
4. To rename the lane or process area, double click the name, then enter a new one.
How to Assign and Organization Unit to a Lane or Process Area
Organization units enable you to define the groups within your organization that
perform the work defined in your process models. You can assign an organization unit
to a lane or process area.
To assign an organization unit to a lane or process area:
1. Move the mouse over the lane or process area.
2. Move the mouse over the edit (pencil) icon, then click the properties icon.
The Properties Editor appears in the lower area of the application.
3. In the Properties Editor, click Search next to the Organization Unit field.
Performing Process Analysis and Discovery with Business Architecture 4-9
Introduction to the BA Project Welcome Page
How to Assign a Value Chain Model to a Process Area
You can assign a Value Chain Model to a process area.
To assign a Value Chain Model to a process area:
1. Move the mouse over the process area.
2. Move the mouse over the edit (pencil) icon, then click the properties icon.
The Properties Editor appears in the lower area of the application.
3. In the Properties Editor, click the Search icon next to the Value Chain field.
4. Select a BA project from the list.
5. Click Next.
6. Select a Value Chain Model from the list.
7. Click Finish.
Working with Value Chain Models
Using the Value Chain Editor, you can create and edit Value Chain Models.
If you intend to have a strategy implemented through a value chain, you must create
an empty value chain model and link to it from the value chain in the strategy model.
If you link the value chain model to the strategy, the value chain model does not
display in the impact analysis report.
How to Create a Value Chain Model
To create a Value Chain Model:
1. Open your BA project.
2. Select the Value Chain Model tab.
3. Click New, then enter a name.
The new model appears in the Value Chain Model tab. By default, the list appears
with icons for each Value Chain Model.
4. Optionally, to select a different view, click the View button, then select Grid.
5. To open a Value Chain Model, click its name.
How to Assign BPM Projects or Value Chain Models to a Step within a Chain
To assign a BPM Project or Value Chain Model to a step within a chain:
1. Open your Value Chain Model.
2. Move the mouse over the appropriate step.
3. Move the mouse over the edit icon, then click Edit.
4-10 Developing Business Processes with Oracle Business Process Composer
Introduction to the BA Project Welcome Page
4. In the Properties Editor tab, click the Browse button next to BPM or Value Chain.
5. Select a BPM or BA project from the list, then click Next.
6. If you selected a BPM project in the previous step, click a business process from the
list.
If you selected a BA project in the previous step, select a Value Chain Model from
the list.
7. Click Finish.
How to Edit the Properties of a Value Chain Model Step
To edit the properties of a Value Chain Model step:
1. Move the mouse over the step whose properties you want to edit.
2. Click the edit properties icon.
The Properties tab displays in the lower portion of the screen.
3. Click Edit Properties.
The Property Editor dialog appears.
4. Edit the properties as necessary, then click OK.
Working with Strategy Models
New Strategy Models can be created from the Oracle Business Process Composer
Application Welcome Page or the BA Project Welcome page. You can then use the
Strategy Model Editor to edit Strategy Models.
Creating a Strategy Model from the Business Architecture Welcome Page
To create a Strategy Model from the Business Architecture Welcome page:
1. Open your BA project.
2. Go to the Project Component pane and click Strategy Models.
3. Click New, then enter a name for the Strategy Model.
4. Click Save.
Creating a Strategy Model from the Application Welcome Page
To create a Strategy Model from the Application Welcome page:
1. Access the Application Welcome page.
2. Click Strategy Model from the BA Project panel.
3. Enter a name for the Strategy Model.
4. Select the Oracle Business Process Composer space where you want to create the
Strategy Model.
Performing Process Analysis and Discovery with Business Architecture 4-11
Introduction to the BA Project Welcome Page
5. Enter a name for the new BA project.
6. Click Create.
How to Edit a Strategy Model
To edit a Strategy Model:
1. Access the BA Project Welcome Page
2. Go to the Project Component pane and click Strategy Models.
3. Click the name of the Strategy Model you want to edit.
The selected Strategy Model opens in the Strategy Model Editor.
4. Drag and drop a Goal, Objectives, Strategies and Value Chain references to the
canvas, as shown in Figure 4-3.
A goal can be linked to one or more Objectives, an Objective can be linked to ore or
more Strategies, and a Strategy can be linked to one or more Value Chain
references.
Creating Value Chain References
To create a Value Chain reference:
1. Drag and drop a Value Chain reference to the canvas.
2. Right click on the Value Chain reference and select properties.
3. In Properties dialog there is a field called Link, click on browse button and select
an already created Value Chain Model.
Working with Key Performance Indicators (KPIs)
Use Oracle Business Process Composer to create, edit, and delete KPIs. For more
information about working with KPIs see Working with Key Performance Indicators
(KPIs).
How to Create a KPI
You can create KPIs within a BA project on:
• Strategy Model: Objective, Strategy, or Value Chain Model
• Value Chain Model: Value Chain Step
To create a KPI:
1. Open a BA project.
2. Open a Strategy Model or Value Chain Model.
3. Right-click on a Strategy Model object (Objective, Strategy, or Value Chain) or a
Value Chain Model object (Value Chain Step), then select KPIs.
4. In the KPI tab, click Add KPI to display the New KPI dialog.
4-12 Developing Business Processes with Oracle Business Process Composer
Introduction to the BA Project Welcome Page
5. Enter the following information:
• Name: Enter a name for the KPI. This name cannot be changed.
• Display Name: Enter a display name.
This is the name that users see in BAM dashboards.
Description: Enter a description. This field is optional.
Type: Specify the type of KPI. Choose External, Manual, or Rollup.
For more information about creating KPIs, see Tracking Business Data in Your
Application .
6. Click OK to create the KPI.
How to Edit the Properties of a KPI
After creating a KPI, you can edit its properties.
To edit the properties of a KPI:
1. Open a BA project.
2. Open a Strategy Model or Value Chain Model.
3. Right-click the object that contains the KPI.
4. Select the KPI link.
5. Click the edit icon for the KPI that you want to edit to display the Edit KPI dialog,
as shown in Figure 4-7.
Performing Process Analysis and Discovery with Business Architecture 4-13
Working with Business Architecture Reports
Figure 4-7
Edit KPI Dialog
6. Edit the KPI as necessary, then click OK.
Working with Business Architecture Reports
Oracle Business Process Composer also allows you to run reports on a BA project to
view how the various components work together.
Business Architecture allows you to model the processes within your organization
using Enterprise Maps, Value Chain Models, and Strategy Models.
How to Publish Report Data
Before you can generate a Business Architecture report, you must publish the report
data for your BA project. Additionally, you must publish any changes you have made
to your project before publishing the report data.
To publish report data:
You can publish report data from the Oracle Business Process Composer Application
Welcome page.
1. From the Main Menu, select Publish Report Data.
2. Select a project.
You can select any project that you own or have permission to edit. The projects
selected can be in different spaces.
4-14 Developing Business Processes with Oracle Business Process Composer
Working with Business Architecture Reports
Figure 4-8
Publish BA Reports Data Dialog
3. Click Publish.
How to Generate BA Reports
After you have published the report data, you can generate reports from the Oracle
Business Process Composer Application Welcome page. The report types available are:
• Process Criticality report
• Impact Analysis report
To generate BA reports:
1. Go to the Oracle Business Process Composer Application Welcome page.
2. Click the main menu and select to generate either the Process Criticality report or
the Impact Analysis report, as shown in Figure 4-9.
Figure 4-9 Oracle Business Process Composer Application Welcome Page Main Menu
When you select to generate an impact analysis report, you must choose to base
your report on one of the following:
• Goal: What are my goals?
• Objective: How are goals and objectives fulfilled by strategies?
• Strategy: How are goals, objectives, strategies, and value chains linked?
Performing Process Analysis and Discovery with Business Architecture 4-15
Working with Business Architecture Reports
• Value Chain: How are goals, objectives, strategies, value chains, and processes
linked?
3. Business Architecture reports are displayed in a report browser.
Interpreting the Impact Analysis and Process Criticality Reports
Impact Analysis Report
The Impact Analysis report is based on Strategy Model that shows different properties
and hierarchy of BA components, as shown in Figure 4-10.
Figure 4-10
Sample Impact Analysis Report
The Impact Analysis report uses published data stored in the Oracle BPM repository.
Process Criticality Report
The Process Criticality report is based on the Value Chain Models within a project.
Oracle Business Process Composer displays a row for each Value Chain Model, as
shown in Figure 4-11.
Figure 4-11
Sample Process Criticality Report
4-16 Developing Business Processes with Oracle Business Process Composer
Working with Business Architecture Reports
Business Architecture leverages Oracle Business Activity Monitoring (Oracle BAM) for
KPI evaluation, which is an important feature of Process Criticality report. Therefore,
the Process Criticality report uses published data stored in the Oracle Business
Activity Monitoring (Oracle BAM) repository.
In order to publish data for this report, you must have the Oracle BAM server running.
To enable Oracle BAM, the processMetrics system bean must be also enabled.
For more information about enabling the processMetrics system bean in Oracle
BAM, see Monitoring Business Activity with Oracle BAM, "Integrating with Oracle
Business Process Management", Enabling Process Metrics.
Performing Process Analysis and Discovery with Business Architecture 4-17
Working with Business Architecture Reports
4-18 Developing Business Processes with Oracle Business Process Composer
5
Creating and Working with BPM Projects
This chapter describes how to create and use Business Process Management (BPM)
projects using Oracle Business Process Composer.
This chapter includes the following sections:
• Introduction to Oracle BPM Projects
• Introduction to the Project Welcome Page
• Creating and Working with Projects
• Using Guided Business Processes to Create Project Milestones
• Defining Project Roles_ Business Parameters_ and Organization Units
• Generating Process Reports for Your Project
Introduction to Oracle BPM Projects
A BPM project is the core element of an Oracle BPM application. BPM projects contain
the resources used to create and support a business application. These include
business processes and components of the business catalog, including data objects,
services, Business Rules, Human Tasks, and roles.
You can create new projects directly in Oracle Business Process Composer.
BPM projects promote collaboration between process analysts and process developers.
Oracle Business Process Composer and Oracle BPM Studio users can share projects
using the Oracle BPM repository. See Introduction to the Oracle BPM Repository for
more information.
You can validate BPM projects and deploy them to runtime using Oracle Business
Process Composer. See Deploying a BPM Project for more information.
Introduction to Project Components and Resources
Each project contains one or more business processes and may include other resources
used by the business processes or application. These include reusable resources that
allow you to connect your application to other applications and systems or define the
user interface of your application.
Oracle Business Process Composer enables you to create, test, and deploy a fullyfunctioning BPM application. However, there are some advanced features that can
only be performed using Oracle BPM Studio. These include:
• Configuring advanced human task parameters
• Creating and viewing ADF forms
• Creating external references
Creating and Working with BPM Projects 5-1
Introduction to Oracle BPM Projects
• Creating exceptions
Editable Project Resources
Using Oracle Business Process Composer, you can create and edit the following
project resources:
• Processes
A business process is the core element of a business application. A process is
defined as a related set of tasks or activities. An Oracle BPM application can
contain one or more processes. Oracle Business Process Composer allows you to
create and edit Business Process Model and Notation (BPMN) processes.
From the BPM Project Welcome page you can create new processes and edit
existing ones. See Creating and Working with Business Processes for information
on creating and working with processes.
• Oracle Business Rules
Oracle Business Rules are statements that describe business policies or describe key
business decisions. Using Oracle Business Process Composer you can create and
edit business rules. Business rules are editable components of a project, but they
also appear as part of the business catalog.
See Using Oracle Business Rules for information.
• Human Tasks
Oracle Business Process Composer allows you to create and edit human tasks.
Human tasks are used to define how users interact with your process-based
applications.
From the BPM Project Welcome page, you can create new human tasks and edit
existing ones. See Working with Human Tasks for more information. After creating
a human task, it is accessible within the business catalog.
• Web Forms
Web forms define the interface that your application users see in Process
Workspace. Oracle Business Process Composer allows you to create this interface
from the ground up, or you can create a web form based on the existing data
structure of a human task.
See Working with Web Forms for more information.
Note:
Although web forms are a resource of a BPM project, they can only be created
and edited in Oracle Business Process Composer. They cannot be viewed or
edited in Oracle BPM Studio.
• Business Components
Business components represents real world concepts or objects such as a ticket,
request, or employee. Business components are complex data types that you use to
create the data structures required in your Oracle BPM application. You can use
Oracle Business Process Composer to create complex data types manually or based
on an XML schema.
See Using Complex Data Types to Define Data Structures for more information.
5-2 Developing Business Processes with Oracle Business Process Composer
Introduction to Oracle BPM Projects
• Key Performance Indicators (KPIs)
KPIs represent the result of a business measure such as product sales or operational
costs, evaluated against a target for that measure. KPIs can be created for a process
or a specific activity within a process.
See Tracking Business Data in Your Application .
• Business Indicators
Business indicators are project data objects you use to store the value of the KPIs.
Business indicators can be an attribute, counter, dimension, or measure.
See Tracking Business Data in Your Application .
• Simulation Definitions and Models
Use simulations to test the performance of your business processes. Simulations
definitions and models define parameters used in a simulation and are stored as
part of a BPM project.
See Simulating Process Behavior for more information.
• Activity Guides
An activity guide is a part of Guided Business Processes that allows you to define
milestones for a project. Each project contains one activity guide where you can
define multiple project milestones. Oracle Business Process Composer allows you
to create and configure milestones.
See Using Guided Business Processes to Create Project Milestones for more
information about creating and using project milestones.
The Business Catalog
You can use Oracle Business Process Composer to create and edit business catalog
components. The business catalog is a container of reusable, shared implementation
assets available to all the processes within a BPM Project.
After creating these elements, you can assign them to specific BPMN artifacts.
Business catalog components are accessible from the component palette. The reusable
resources in the business catalog are:
• Human Tasks
Human tasks define how end users interact with your BPMN processes. You can
add human tasks to your business process by using the user task. You can assign a
human task from the business catalog to each user task in your business process.
See Adding User Interaction to Your Process for information about using human
tasks within a BPMN process.
• Oracle Business Rules
Oracle business rules are statements that describe business policies or describe key
business decisions. Business rules are integrated into a process using the business
rules task.
See Using Oracle Business Rules for information about working with Oracle
Business Rules using Oracle Business Process Composer. See Introduction to the
Business Rule Task for more information about using the business rules task within
a BPMN process.
Creating and Working with BPM Projects 5-3
Introduction to Oracle BPM Projects
• Business Objects
Business objects define the data structures used within your application. You can
use simple data objects to define complex data objects using Oracle Business
Process Composer. See Using Complex Data Types to Define Data Structures for
more information.
• Services
Services define how a BPMN process connects other processes, systems, and
services, including BPEL processes and databases.
Using Oracle Business Process Composer, you can create new services based on
web services. See Working with Services for more information.
Within a BPMN process, services are implemented by assigning the service to a
service task. See Introduction to the Service Task for more information.
• External References
References define the interface of your BPMN processes. References implement
message events, send tasks, and receive tasks. See Communicating With Other
Processes and Services for more information.
Business Catalog Components that Can Be Edited or Created
Table 5-1 lists the components of the business catalog and shows which components
can be created or edited using Oracle Business Process Composer.
Table 5-1
Business Catalog Components in Business Process Composer
Business Catalog
Component
Can be created?
Can be edited?
Business Rules
Yes
Yes
Human Tasks
Yes
Yes
Business Objects
Yes
Yes
Services
Yes
No
External References
Yes
No
Errors
Yes
Yes
Introduction to the Oracle BPM Repository
The Oracle BPM repository is based on Process Asset Manager (PAM), which serves as
the design time repository to which projects are saved and shared between Oracle
Business Process Composer and Oracle Business Process Management Studio.
Your system administrator installs and configures the Oracle BPM repository when
installing Oracle Business Process Composer.
See Creating and Working with Projects for more information about opening projects
in the Oracle BPM repository.
5-4 Developing Business Processes with Oracle Business Process Composer
Introduction to the Project Welcome Page
Introduction to the Project Welcome Page
The Project Welcome Page provides access to information about a BPM project and
access to common project-related features.
Figure 5-1 shows the Project Welcome Page for the Travel Request Application
example project.
Figure 5-1
The Project Welcome Page
Use the Oracle Business Process Composer Project Welcome page to perform the
following types of tasks:
• Edit and view a project's general information
• Create and manage project components
• Edit, validate, and publish BPM projects
• Access the Quickstart menu
For more information about sharing projects, saving projects, discarding changes, and
other general functions, see Creating and Managing BA and BPM Projects.
The Oracle Business Process Composer Project Welcome page is divided into the
following sections:
• Project toolbar
• Project Information panel
• Recent Activity panel
• Project Component panel
• Quickstart menu
Introduction to the Project Toolbar
The Oracle Business Process Composer project toolbar is located across the top of page
and provides access to the Oracle Business Process Composer projects main menu as
well as allowing you to save, publish, and validate your projects.
The toolbar provides access to the following:
Creating and Working with BPM Projects 5-5
Introduction to the Project Welcome Page
Table 5-2
Oracle Business Process Composer Project Welcome Page - Toolbar
Toolbar Element
Description
Main Menu
Click to access the Project Welcome Page's main menu. From
here you can use the Main Menu to:
•
•
•
•
•
•
•
•
Viewing Mode
Edit
Editing Mode
Save
Publish
Discard
Player
Validate
Participants
Close Project
Create a new simulation or service
Import a project model
Export a project
Generate a process report
Save a project
Discard changes made to a project
Validate a project
Close the current project
-Click this icon to toggle to the edit mode.
When you first open a shared project, it opens in view mode. If
the project isn't locked by another participant, you can click this
icon to change to edit mode.
-Click to save the current project and continue editing.
Click to publish the project data.
Publishing a project makes the changes you have recently made
available to other participants.
Click to discard changes made to this project since the last
publication.
Click to run the process player.
This icon is only visible if the process player has been
configured. For more information about the process player, see
Using Process Player.
Click to validate this project.
Displays the project type. In this case the project type is Private.
Click to close the current project and return to the Oracle
Business Process Composer Application Welcome page.
Introduction to the Project Information Panel
The project information panel displays general information about the project.
This pane displays the following information:
• Title Bar: Displays the name, creation date, and name of the user who created the
project.
Click the icon to the right-hand side of the name to change the localized name.
• Creation: Displays the creation date and name of the user who created the project.
5-6 Developing Business Processes with Oracle Business Process Composer
Introduction to the Project Welcome Page
• Type: Displays the project type.
• Language: Use the drop-down list to choose the language for this project.
Click Edit to add language options to the drop-down list. Note that in order to
work with additional languages in the Web Forms Internationalization dialog the
languages must be added here first.
• More Information: Click to display more general information.
Click Hide Details to hide the additional information.
• Sampling Point: Click Change to select either: Generate for All, Generate for
Interactive(s), Do not generate, or Generate for process(es) only.
• Description: Displays the project description.
Descriptions are one or two sentence expansions of the title to help a user
distinguish between projects of similar or same titles, as shown in Figure 5-2.
Figure 5-2
Project Description
Click the link to edit the description.
Introduction to the Recent Activity Panel
The recent activity browser provides a history of the published changes made to the
current BPM project.
See How to View the History of Changes Made to a Project for information about
viewing recent project activity.
Snapshots
Snapshots are created from the latest published project. Click the Snapshots link to
open the Snapshot dialog where you can create and view the snapshots for this BPM
project. Snapshots allow you to create backups of your projects and view the changes
made to a project over time.Snapshots provide a record of the changes made to a
project during the development life-cycle. For more information about snapshots, see
Working with Project Snapshots.
Introduction to the Project Component Panel
Use the project component pane to view and create the following project components:
• Processes
• Rules
• Human tasks
• Web forms
• Business components
Creating and Working with BPM Projects 5-7
Introduction to the Project Welcome Page
• Simulations
• Business Indicators
• KPIs
Listed to the right-hand side of each of the project components is the number of
components created for this project. Located below the list of project components is
the number for All.
Introduction to the Quickstart Menu
Use the Quickstart menu to quickly access the following common functionality within
Oracle Business Process Composer:
• Organization: Opens the organization editor which allows you to create and
browse the roles and business parameters defined for a project.
See Defining Project Roles_ Business Parameters_ and Organization Units for more
information.
• Activity guide: Launches the activity guide editor that enables you to manage
milestones within your project.
Introduction to the Oracle Business Process Composer Editors
You can use editors to work with various elements of a BPM project, including
processes and components of the business catalog.
The following sections describe the different types of editors available in Oracle
Business Process Composer.
Process Editor
You can use the process editor to view and edit business processes. You can access the
process editor by opening a process from the Project Welcome page.
The editor window also contains a component palette. The exact components available
depend on the following:
• In new projects created in Oracle Business Process Composer, the component
palette displays BPMN flow objects and business catalog components that you
have created.
You can create services and human tasks directly in Oracle Business Process
Composer.
See Creating and Working with Business Processes for more information.
Activity Guide Editor
Use the Activity Guide editor view, create, and edit milestones within an activity
guide. You can access the Activity Guide editor by clicking the Activity Guide link in
the Quickstart menu. See Using Guided Business Processes to Create Project
Milestones.
Human Task Editor
Use the Human Task editor to create and edit human tasks included as part of the
business catalog. See Working with Human Tasks for more information.
5-8 Developing Business Processes with Oracle Business Process Composer
Creating and Working with Projects
Business Rules Editor
Use the business rules editor to create, view and edit Business Rules. To access the
business rules editor, open a business rule from the project Welcome page. See Using
Oracle Business Rules for more information.
Data Associations Editor
Use the data associations editor to define the input and output for flow objects that
contain implementations. To access the data associations editor, right-click a flow
object within your business process and select Data Associations.
See Working with Data Objects for information about using data associations.
Expression Editor
Use the expression editor to define the expressions used within data associations and
conditional sequence flows.
See Using Expressions to Control Data for information on using expressions and
accessing the expression editor.
Introduction to the Supporting Browsers and Editors
Oracle Business Process Composer contains additional editors for viewing and editing
other project components. These appear in the lower portion of the application
window.
Note:
These editors are not displayed by default. They appear after performing
actions related to each window. However, to display them manually click the
Restore Pane icon in the lower right corner of Oracle Business Process
Composer.
Project and Process Validation Browser
The project and process browsers display any validation errors for each individual
process or the whole project. See How to Validate a Project for more information about
validating projects.
Documentation Editor
Use the documentation editor to create and edit documentation for your processes.
See Documenting Your Process for more information.
Creating and Working with Projects
You can create and validate a new project, and view the change history and project
properties.
The following sections provide information on how to create and use Oracle BPM
projects.
For more information about sharing projects, saving projects, discarding changes, and
other general functions, see Creating and Managing BA and BPM Projects.
Creating and Working with BPM Projects 5-9
Creating and Working with Projects
How to Create a New Project
New BPM projects are created from the Application Welcome page. These projects
contain only basic business processes created by process analysts. You can use the
BPM Project panel to create a new empty project or create new projects containing a
process.
See Creating a New Empty Project with the BA Project Panel and Creating a New
Populated Project with the BA Project Panel for more information.
How to Validate a Project
Validating a project allows you to check your project and processes for any errors.
Oracle Business Process Composer displays these errors in the error browser. Oracle
Business Process Composer has an error browser for the project and one for each
process.
Figure 5-3 shows an example of the types of errors displayed in the project error
browser.
Figure 5-3
The Project Error Browser
To validate a project:
1. Open your project.
2. Ensure that you are editing the project.
3. From the main menu, select Validate Project.
After validating your project, any errors found are displayed in the error browser for
the project or process.
Note:
You cannot deploy projects that contain errors.
How to View the History of Changes Made to a Project
To view the history of major changes made to a project, use the recent activity
browser. This browser displays these changes, including the following:
• Creating the project
• Modifying resources
• Creating processes or human tasks
5-10 Developing Business Processes with Oracle Business Process Composer
Using Guided Business Processes to Create Project Milestones
To view the history of a project:
1. Navigate to the Project Welcome Page.
Project changes are displayed in the Recent Activity pane.
2. To view the details of a specific change, click the expand icon next to it.
How to View and Edit Project Properties
To view and edit project properties, use the project information pane of the Project
Welcome Page.
You can edit the following properties of a project from this pane:
• Description: Adds an optional description of your project. This is useful when
sharing your project with other users.
• Event generation: Configures how sampling points are generated for the project as
a whole.
Use sampling points to generate information about the performance of a flow
object within in a running process. The data generated according to this
configuration is stored in the Process Analytics Database.
See Managing and Monitoring Processes with Oracle Business Process Management for
general information about sampling points.
You can view the following project properties from the project information pane:
• Edit mode: Displays the edit mode for the project.
See How to Edit a Shared Project for information on changing the edit mode of a
project.
• Sharing: Displays the sharing configuration of the project.
• Project Language: Displays the project language.
Using Guided Business Processes to Create Project Milestones
Guided Business Processes provide a guided visual representation of a process flow,
improving the user experience by providing process participants with an encapsulated
hierarchical view of the business process.
The following sections describe how to use Guided Business Processes and project
milestones.
Introduction to Guided Business Processes
Process designers can use Guided Business Processes to direct process participants to
complete a business process through a set of guided steps associated with the process.
By following the steps outlined in a Guided Business Process, process participants
require less training to complete a business process, and the results of the process are
more predictable.
Introduction to Activity Guides and Milestones
A Guided Business Process is modeled as an activity guide based on a business
process. The Activity Guide includes a set of milestones. A milestone is a contained set
Creating and Working with BPM Projects 5-11
Using Guided Business Processes to Create Project Milestones
of tasks that the process participant must complete. A milestone is complete when the
user successfully runs a specific set of tasks in the milestone.
Each milestone is a specific set of human workflow tasks. Each human workflow task
is itself a task flow that may require the collaboration of multiple participants in
various roles. Depending on the nature of the task flows, a participant can save an
unfinished task flow and go back to it at a later time.
How to Configure the Activity Guide
Use Oracle Business Process Composer to configure Guided Business Processes and
add milestones to them.
To configure the activity guide for a project:
1. Open your project.
2. From the Quickstart menu, select Activity Guide.
The activity guide editor is displayed.
3. Enter a title for the activity guide.
4. Configure the following optional properties:
• Display Mode: Determines how milestones and tasks within the Guided
Business Process display links.
If the milestones and tasks use another configuration, then the guided business
process configuration is ignored.
Possible values are:
– Always: Always displays the milestone and task links for all the milestones
in this Guided Business Process.
– When Instantiated: Displays the milestone and task links only when one or
more of the user tasks in the milestone are instantiated, for all the milestones
in the Guided Business Process.
• Task Access: After the task is completed, the Guided Business Process uses this
configuration to display the links.
If the task mode is active only, the tasks links are grayed out. If the task mode is
any state, the tasks links remain enabled and a message appears when you run
the task.
Possible values are:
– Active Only: The link to the task is enabled only when the task is active and
the user can update it.
When you complete the task the link to the task, is grayed out.
– Any State: After you instantiate a task, the link to it is always enabled, even
after you complete it.
• Root Process: Determines the process used for this Activity Guide.
You can only define one Guided Business Process per BPM project. This process
is the root process.
5-12 Developing Business Processes with Oracle Business Process Composer
Defining Project Roles, Business Parameters, and Organization Units
• Description: Provides an optional description for the Activity Guide.
5. Click Save in the project toolbar.
Creating Project Milestones
Use Oracle Business Process Composer to add milestones to Guided Business
Processes.
To create a new milestone:
1. Click New Milestone.
2. Select the milestone you just created from the list.
3. Configure the milestone as necessary.
4. Click Save in the project toolbar.
Adding Milestones to User Tasks
Use Oracle Business Process Composer to add milestones to user tasks in a Guided
Business Processes.
To add a user task to a milestone:
1. Open the process to which you want to add a milestone.
2. Right-click the user task to which you want to add a milestone.
3. Select a milestone from the list and click OK.
Defining Project Roles, Business Parameters, and Organization Units
Use project roles to model the users or groups that perform the work your business
process represents. Roles define functional categories that correspond to job functions
or responsibilities within your organization. Use Oracle Business Process Composer to
create and edit the required roles within your process and assign them to swimlanes.
This section describes how to create and manage project roles and business
parameters.
Defining Project Roles
Use Oracle Business Process Composer to define the roles used by your BPM project.
To perform more advanced mapping and configuration of project roles, including
assigning users to the roles, use Oracle BPM Studio or Oracle Business Process
Management Workspace. When a project is deployed to runtime, project roles can be
mapped to the real-world users and groups of your organization.
Project roles are defined for the entire project. They can be shared by all the processes
in your project. Within a process, roles are assigned to the horizontal swimlanes.
The following procedures describe how to create and delete project roles.
To create a project role:
1.
Access the Project Welcome page.
Creating and Working with BPM Projects 5-13
Defining Project Roles, Business Parameters, and Organization Units
2.
Click Organization, then click the Add icon.
3.
Provide a name for the new role, then click Add Role, as shown in Figure 5-4.
Figure 5-4
Organization - Roles: Add Role
To delete a project role:
1. Access the Project Welcome Page.
2. Expand Organization.
3. Select the role you want to delete, then click the Delete icon.
Defining Business Parameters
Business Parameters are used for setting business specific constants and can be
overridden for an Organization Unit. If there is no override value for Org Unit, the
returned value is the default value.
To create a business parameter:
1. Access the Project Welcome page.
2. Click Organization, then select the Business Parameters tab.
3. Click the Add icon to create a new business parameter.
4. Provide a Name for the new business parameter.
This name must be in capital letters with no spaces.
5. Select a Type for the new business parameter.
Choose from the list shown in Figure 5-5.
5-14 Developing Business Processes with Oracle Business Process Composer
Defining Project Roles, Business Parameters, and Organization Units
Figure 5-5
Organization - Business Parameters
6. Specify the Default Value.
This is the value used for the business parameter if no other value is defined.
7. Click Add Business Parameter.
Defining Organization Units
An organization unit represents departments or divisions within an organization.
Organization units can contain child organization units creating a hierarchy that
corresponds to your organization.
To create an organization unit:
1. Access the Project Welcome page.
2. Click Organization, then select the Organization Units tab.
3. Click the Add icon to create a new organization unit, as shown in Figure 5-6.
Creating and Working with BPM Projects 5-15
Generating Process Reports for Your Project
Figure 5-6
Organization - Organization Units
4. Enter a Name for the new organization unit.
5. Enter a Description. This field is optional.
6. Click Create.
Generating Process Reports for Your Project
You can generate reports that list each process in your project and show detailed
information about each process.
• Detailed Business Process
• Business Requirements
• Issues and Comments
• Data Objects
• Process vs Data
• Data vs Process
• Human Tasks vs Process
• Service vs Process
• User Tasks
• Process image
• RACI (responsible, accountable, consulted, and informed)
To generate a process report:
1. Open your project.
2. From the Project Main menu, select Process Report.
5-16 Developing Business Processes with Oracle Business Process Composer
Generating Process Reports for Your Project
The Process Report dialog is displayed, as shown in Figure 5-7.
Figure 5-7
Process Report Dialog
3. Select the following report details, then click OK:
• Select report type
• Show Documentation - Select to show descriptions
• Show Business Properties
• Select output file type
For more information about these reports, see Documenting BPM Projects .
Creating and Working with BPM Projects 5-17
Generating Process Reports for Your Project
5-18 Developing Business Processes with Oracle Business Process Composer
6
Documenting BPM Projects
Oracle Business Process Composer processes documentation from the project-level,
process-level, and activity-level. This chapter describes each feature in detail. None of
the documentation fields are required, and users can use any, some, or none of the
fields.
This chapter includes the following sections:
• Understanding Project-Level Documentation
• Understanding Process-Level Documentation
• Understanding Activity-Level Documentation
Understanding Project-Level Documentation
Both project and role descriptions are available at the project level.
A project description is one or two sentences that help a user distinguish between
projects of similar or same titles. A role may require more explanation as it can be an
acronym that is not commonly used.
Project Description
A project description is one or two sentences that help a user distinguish between
projects of similar or same titles.
Description Location
• When a project is created, as shown in Figure 6-1.
Figure 6-1
New Project Description
• Within a project, click on More Information to add, edit, or delete the description, as
shown in Figure 6-2.
Documenting BPM Projects 6-1
Understanding Process-Level Documentation
Figure 6-2
Project Information
When Used
When a user displays all projects available in all spaces, one or more projects of the
same title may be displayed. In a multi-national corporation, there might be several
Operations projects for different countries or divisions. The project description helps
the user choose the appropriate project to open.
Where Used
Detailed Business Process Report
The project description also provides the appropriate context for a report on a project.
Reports are often saved and distributed to viewers who do not have access to Oracle
Business Process Composer, therefore it is important to provide detailed information
on the project for which the report was created.
Role Description
A role may require more explanation as it can be an acronym that is not commonly
used.
Description Location
Within the Narrative View below the role. You can add, edit, or delete the description.
When Used
The role description is used when a role requires more explanation.
Where Used
Detailed Business Process Report - Participants Table, as shown in Figure 6-3.
Figure 6-3
Detailed Business Process Report - Participants
Understanding Process-Level Documentation
Several kinds of documentation are available at the process level, including
descriptions, links, requirements, and notes.
The following process-level documentation is available:
• Process description
• Process documentation
6-2 Developing Business Processes with Oracle Business Process Composer
Understanding Process-Level Documentation
• Process links
• Requirements
• Process notes
Process Description
Like the project description, the process description is a one or two sentence expansion
of the title. The description helps make a clear distinction between processes with
similar titles.
Description Location
• When a process is created, as shown in Figure 6-4.
Figure 6-4
New Process Description
• In the General tab of the Business Properties pane, as shown in Figure 6-5.
Figure 6-5
Business Properties - General
• Below the process name in the narrative view, as shown in Figure 6-6.
Figure 6-6
Process Narrative View
When Used
The process description can be added or changed in several places, such as during
process creation, in the business properties property panel, and in the narrative view.
Where Used
Documenting BPM Projects 6-3
Understanding Process-Level Documentation
• Detailed Business Process report
• Business Requirements report
• Process Properties report
In a report that contains many processes, the process description can help the reader
quickly navigate to the correct process. The description can not only explain what the
process covers, but it can also detail what it does not cover along with a pointer to
another process.
Process Documentation
Process documentation is rich text documentation that can be added to a process in the
narrative view or in the documentation panel. If the documentation exists elsewhere,
the user should add links so that information is not duplicated. If the documentation is
more helpful in the activity documentation or description fields, it should be added to
the field that is the most useful to the user.
Please note the Documentation Type option, which is displayed at the top right-hand
side of the Documentation tab, as shown Figure 6-8. Use the drop-down list to choose
if you want your documentation to be created for external (End User) or Internal use.
For your documentation to appear in the narrative view or process reports, you must
set this option to End User. If the user doesn't realize that it is set to Internal, they may
be confused when they don't see their documentation.
Documentation Location
• Below the process description in the narrative view, as shown in Figure 6-7.
Figure 6-7
Narrative View Documentation
• In the documentation tab of the property pane, as shown in Figure 6-8.
Figure 6-8
Process Property - Documentation
When Used
Documentation is added to a process when the information is important for
comprehension or following the process, or when the information does not exist
elsewhere.
6-4 Developing Business Processes with Oracle Business Process Composer
Understanding Process-Level Documentation
Where Used
• Detailed Business Process report
• Business Requirements report
Process Links
If the name of the link is generic or could be confused for another document, use the
description to provide more detail. For example, if there are several checklists that are
used by the sales organization, the description can help the user determine if the link
is to the appropriate checklist.
Links Location
In the Links tab within the business properties, as shown in Figure 6-9.
Figure 6-9
Process: Business Properties - Links
When Used
Links can be added to activities, processes, requirements, activity documentation, and
process documentation. The description should be short and expand on the title to
help a user determine whether the link contains the appropriate document.
Where Used
• Detailed Business Process report
• Business Requirements report
Requirements
Requirements can be added to a process in the business properties. There are two
plain text fields - notes and solution - where more explanation can be added. Links to
existing documentation can also be added.
Description Location
In the Requirements tab within the business properties, as shown in Figure 6-10.
Figure 6-10
Process: Business Properties - Requirements
When Used
Documenting BPM Projects 6-5
Understanding Activity-Level Documentation
The requirements feature tracks the status, priority, and difficulty of the requirements
of a process. Multiple requirements can be added to a process and they can be sorted
by the various components, such as date, status, and so on.
Where Used
• Detailed Business Process report
• Business Requirements report
Process Note
A process note is the equivalent of a sticky note - impermanent and to be used more as
a reminder. They are deleted as soon as the information is used.
Note Location
In the graphical view, a note can be dragged from the palette to the process, as shown
in Figure 6-11.
Figure 6-11
Process Note
When Used
Notes are useful when collaborating with others while creating or editing a process.
They are highly visible and can be easily added and deleted.
Where Used
Notes do not appear in the narrative view or in process reports.
Understanding Activity-Level Documentation
Documentation available at the activity level includes descriptions, links, comments,
and notes.
The following activity-level documentation is available:
• Activity description
• Activity links
• Activity documentation
• Activity comments
• Activity notes
• General
6-6 Developing Business Processes with Oracle Business Process Composer
Understanding Activity-Level Documentation
• Issues
• RACI (responsible, accountable, consulted, informed)
Activity Description
The activity description should be a brief expansion of the activity name.
Description Location
The activity description is located in the following areas:
• Graphical view, in the properties of an activity, as shown in Figure 6-12.
Figure 6-12
Activity Description (Graphical View)
• Narrative view, below the activity name, as shown in Figure 6-13.
Figure 6-13
Activity Description (Narrative View)
When Used
Names of activities tend to be very short. The description is an expansion of the name
to help with understanding.
Where Used
• Detailed Business Process report
• Business Requirements report
• Human Tasks vs Process report
• Services vs Process report
Activity Links
Links can be added to activities, processes, requirements, activity documentation, and
process documentation. The description should be short and expand on the title to
help a user determine whether the link contains the appropriate document.
Links Location
Documenting BPM Projects 6-7
Understanding Activity-Level Documentation
In the Links tab within the business properties, as shown in Figure 6-14.
Figure 6-14
Activity Links
When Used
Customers often have a rich store of existing documentation that can be referenced
from the process. Multiple links can be added to an activity, and these links are active
in the process reports.
Where Used
• Detailed Business Process report
• Business Requirements report
Activity Documentation
Activity documentation is rich text documentation that can be added to an activity in
the narrative view or in the documentation panel. If the documentation exists
elsewhere, the user should add links so that information is not duplicated. If the
documentation is more explanatory elsewhere, for example, in the description fields or
as a comment, it should be added there. In other words, add it to the place that is most
useful to the user.
Please note the Documentation Type option, which is displayed at the top right-hand
side of the Documentation tab, as shown Figure 6-8. Use the drop-down list to choose
if you want your documentation to be created for external (End User) or Internal use.
For your documentation to appear in the narrative view or process reports, you must
set this option to End User. If the user doesn't realize that it is set to Internal, they may
be confused when they don't see their documentation.
Documentation Location
The activity documentation is located in the following areas:
• Documentation tab of the property panel, as shown in Figure 6-15.
6-8 Developing Business Processes with Oracle Business Process Composer
Understanding Activity-Level Documentation
Figure 6-15
Properties Panel: Documentation - Activity Documentation
• Narrative view when the activity is in focus, as shown in Figure 6-16.
Figure 6-16
Activity Documentation (Narrative View)
When Used
Documentation should be added to an activity when the information is important for
comprehension or following the process, or the information does not exist elsewhere.
Where Used
• Detailed Business Process report
• Business Requirements report
Activity Comments
Activity comments can be added to an activity through the business properties. After
it is added, a comment cannot be edited or deleted.
Comments Location
In the Comments tab within the Business Properties panel, as shown in Figure 6-17.
Documenting BPM Projects 6-9
Understanding Activity-Level Documentation
Figure 6-17
Activity Comments
When Used
Activity comments are like notes in that they are brief, but, unlike notes, they are
permanently attached to the process, and they are displayed in several process reports.
Use comments when it is important to keep a record.
Where Used
• Detailed Business Process report
• Business Requirements report
• Issues and Comments report
Activity Note
An activity note is the equivalent of a sticky note - impermanent and to be used more
as a reminder. They are deleted as soon as the information is used.
Note Location
A note can be dragged from the palette to the activity in the graphical view, as shown
in Figure 6-18.
Figure 6-18
Activity Note
When Used
Activity notes are useful while collaborating with others when creating or editing a
process. They are highly visible and can be easily added and deleted.
Where Used
6-10 Developing Business Processes with Oracle Business Process Composer
Understanding Activity-Level Documentation
Notes do not appear in the narrative view or in process reports.
General
The General tab tracks the cost, organization unit, application system, and time to
complete an activity.
General Location
In the General tab within the Business Properties panel, as shown in Figure 6-19.
Figure 6-19
Business Properties - General
When Used
General information is used for process improvement and discovery; it can be
important to track the cost of performing the activity as well as how long it takes to
complete.
Where Used
• Detailed Business Process report
• Business Requirements report
Activity Issues
The activity issues should be used to track specific issues including their severity,
priority, and resolution status.
Issues Location
In the Issues tab within the Business Properties panel, as shown in Figure 6-20.
Figure 6-20
Business Properties - Issues
When Used
Documenting BPM Projects 6-11
Understanding Activity-Level Documentation
Issues can be used during process improvement, testing, and discovery; it can be
important to track the issues that are discovered. The issues can be sorted by severity,
priority, resolution status, and date.
Where Used
• Detailed Business Process report
• Business Requirements report
• Issues and Comments report
RACI
The RACI feature tracks who is responsible, accountable, consulted, and informed on
an activity.
RACI Location
In the RACI tab within the Business Properties panel, as shown in Figure 6-21.
Figure 6-21
Business Properties - RACI
When Used
The RACI data can be used during process improvement, testing, and discovery to
ensure the proper roles are involved in the activity.
Where Used
RACI report
6-12 Developing Business Processes with Oracle Business Process Composer
Part IV
Modeling and Testing Business Processes
This part describes how to use Oracle Business Process Composer to model your
business processes. It includes a general overview of the application.
This part contains the following chapters:
• Creating and Working with Business Processes
• Simulating Process Behavior
• Using Process Player
7
Creating and Working with Business
Processes
This chapter provides information about creating and using business processes in
Oracle Business Process Management (Oracle BPM). It provides a general introduction
to business processes, describes the process editor window, and provides procedural
information for creating and using processes.
For information about using Business Process Model and Notation (BPMN) 2.0 to
design a business process, see BPMN Flow Object Reference.
This chapter includes the following sections:
• Introduction to Business Processes
• Introduction to the Project Toolbar
• Introduction to the Narrative View
• Working with the Narrative View
• Introduction to the Process Editor Graphical View
• Working with Business Processes
• Using Swimlanes to Organize Your Process
• Working with Flow Elements
• Working with Business Catalog Components
• Working with Draft Processes
• Documenting Your Process
• Importing and Exporting Process Models
Introduction to Business Processes
A business process is a sequence of tasks that result in a well-defined outcome.
Business processes are the core components of process-based business applications
created with the Oracle BPM Suite.
Although projects are higher level wrappers that contain all the resources of a business
application, the processes within the project determine how the application works.
Within a business process, BPMN flow objects define the flow and behavior.
Business processes are generally created by process analysts who determine the
business requirements that must be addressed and define the corresponding process
flow.
Creating and Working with Business Processes 7-1
Introduction to the Project Toolbar
Table 7-1 describes how the type of a process determines how it behaves in relation to
other business processes.
Note:
By default, new business processes are synchronous. After creating a new
process, you can change the type by editing the process.
Table 7-1
Types of Business Processes
Process Type
Description
Synchronous Service
Synchronous services are a type of business process that is
invoked from another process or service synchronously. In a
synchronous service, the calling process waits until the process
completes before continuing.
Asynchronous Service
Asynchronous services are a type of business process that is
invoked from another process or service asynchronously. In an
asynchronous service, the calling process does not wait until the
process completes before continuing.
Manual Process
Manual processes are those that require user interaction. Manual
processes must begin with a none start event. They must end
with a none end event.
Reusable Process
(Reusable Subprocess)
Reusable processes are processes that can be called by a BPMN
process. In BPMN terminology, reusable processes are often
called reusable subprocesses. See Using Subprocesses in Oracle
BPM for more information about the different types of
subprocesses supported by Oracle BPM.
Use the call activity to call reusable subprocesses within your
business process. See Introduction to the Call Activity for
information about calling reusable processes.
Introduction to the Project Toolbar
The process editor opens as a tab on the BPM Project Welcome page. Therefore, the
project toolbar remains visible when the process editor is open in either the narrative
or graphical view.
The functions displayed on the project toolbar are available for use while editing
processes.
For more information about the project toolbar options, see Introduction to the Project
Toolbar.
Introduction to the Narrative View
The narrative view provides a way of creating business processes by entering text
rather than dragging graphical icons onto a palette. This is useful for process designers
who are not familiar with BPMN.
When you add an item to your process textually, Oracle Business Process Composer
automatically converts it to the correct underlying BPMN. The auto layout feature in
the graphical view automatically formats the BPMN process.
7-2 Developing Business Processes with Oracle Business Process Composer
Working with the Narrative View
Both views contain the same information, meaning that you can edit the same process
in both views if necessary. When editing a process in one pane, it is automatically
updated in the other.
The narrative view provides an alternate way of creating and editing business
processes. However, it is not intended to be a replacement for the graphical editor. The
following BPMN elements are visible in narrative view, but cannot be edited:
• script tasks
• business rules tasks
The following elements do not appear in the narrative view:
• Notes
• Measurement
Working with the Narrative View
Use the narrative view to manage activities, roles and documentation in a process.
Access the narrative view in a business process by clicking the Narrative tab at the
bottom of the process editor, as shown in Figure 7-1.
Figure 7-1
Process Editor - Narrative View
You can use the narrative view to perform the following tasks:
• Add activities to a process by clicking the Add (+) icon in the activity directly
above where you want to add a new one. You can add documentation about the
activity, if required.
Creating and Working with Business Processes 7-3
Introduction to the Process Editor Graphical View
• Delete a selected activity by clicking its Delete (
deletion.
) icon and confirming the
• Move an activity to a different position in the process flow
• Assign roles to a selected activity by clicking the Change Role drop down to either
add a new role or change the current role to a different role.
• View and edit documentation
Moving an Activity
To move an activity:
1. Select the activity you want to move.
2. Click the Move (
) icon.
The Drop Activity (
) now appears on the left-hand side of the activities.
3. Click the Drop Activity icon in the location where you want to move the original
activity.
Narrative View Options
You can customize how the narrative view is displayed.
Click the Expand all documentation check box located at the top right-hand corner of
the view, as shown in Figure 7-2 to show all documentation.
Click the Show Icons check box located at the top right-hand corner of the view, as
shown in Figure 7-2 to view activities as icons.
Figure 7-2
Process Editor: Narrative View - Options
Introduction to the Process Editor Graphical View
The process editor allows you to quickly create and edit BPMN processes.
The process editor appears as a tabbed pane in the Business Process Composer
application and is divided into four areas, as shown in Figure 7-3.
7-4 Developing Business Processes with Oracle Business Process Composer
Introduction to the Process Editor Graphical View
Figure 7-3
Process Editor - Graphical View
• Process Editor Toolbar: Provides quick access to menu items related to process
design.
See Introduction to the Process Editor Toolbar for more information.
• Process Editor Canvas: Provides a work area for creating your process flow.
See Introduction to the Process Editor Canvas for more information.
• BPMN Component Palette: Enables you to quickly access the flow objects,
sequence flows, and other elements that comprise a BPMN process.
You can drag and drop these elements from the BPMN component palette onto the
process editor canvas. See Introduction to the BPMN Component Palette for more
information.
• Business Catalog Palette: Provides a list of the business catalog elements that you
can use within your BPM project.
See Introduction to the Business Catalog for more information.
You can open multiple processes within the same project simultaneously in Business
Process Composer. Each process opens in its own tab within the editor window.
Introduction to the Process Editor Toolbar
The process editor window contains a toolbar enabling access to the Business Process
Composer features described in Table 7-2.
Table 7-2
Process Editor Menu
Menu Item
Description
Undo
Reverts the last change made to your process.
Redo
Reverses the last undo action you performed.
Cut
Cuts the selected items and copies them the clipboard.
Copy
Copies the selected items to the clipboard.
Paste
Pastes the items currently in the clipboard.
Delete
Deletes the selected elements from the process.
Creating and Working with Business Processes 7-5
Introduction to the Process Editor Graphical View
Menu Item
Description
Autolayout
Automatically adjusts the layout of your process.
Toggle grid visibility
Shows or hides a grid in the process editor window.
Snap to grid
Centers the flow objects in your process on the nearest grid axis.
Existing flow objects are automatically centered. New flow objects are
automatically be centered when added.
This menu item is active only when toggle grid visibility is enabled.
Print
Prints the process using your browser's printer setup.
Edit conversations
Opens the conversations editor. Use this editor to define the interface
that determines the input and output data objects.
Find process usage
Determines which other processes within the current project call the
current process.
View collaboration
Switches the process editor to collaboration view.
Data objects
Opens the data objects editor. See Working with Data Objects for
more information.
Business indicators
Opens the business indicator editor.
Player
Launches the process player. See Using Process Player for more
information.
Zoom slider
Zooms in and out of your process.
Introduction to the Process Editor Canvas
The process editor canvas is the central area of the process editor window. Use the
process editor canvas to create the graphical representation of your process using the
elements available in the BPMN component palette. In addition to a process flow, the
process editor canvas also displays swimlanes.
For more information about swimlanes, see Using Swimlanes to Organize Your
Process.
Introduction to the BPMN Component Palette
Use the BPMN component palette to add flow objects, sequence flows and business
catalog elements to your process. Figure 7-4 shows the component palette.
7-6 Developing Business Processes with Oracle Business Process Composer
Introduction to the Process Editor Graphical View
Figure 7-4
BPM Process editor - Component Palette
Use the component palette to drag and drop artifacts to the process editor window.
Note:
The component palette is greyed-out until you enter edit mode for the project.
The component palette separates BPMN elements into the following groups:
• Activity
• Interactive
• Gateway
• Catch Event
• Throw Event
• Note
• Measurement
Business Process Composer provides two separate modes for adding flow objects to a
process:
• Single object mode: Enables you to add individual flow objects one at a time.
This mode is indicated by a 1 within a blue circle as shown in Figure 7-5.
Creating and Working with Business Processes 7-7
Introduction to the Process Editor Graphical View
Figure 7-5
Single Object Entry Mode
• Multiple object mode: Enables you to quickly add multiple flow objects of the
same type.
This mode is indicated by an N within a blue circle.
Click the blue circle, shown in Figure 7-5, to toggle between the two entry modes.
Introduction to the Business Catalog
Use this panel to select reusable services from the business catalog. Figure 7-6 shows
the business catalog.
Figure 7-6
BPM Process Editor - Business Catalog
These services are grouped as follows:
• Services
• External references
• Human tasks
• Business rules
7-8 Developing Business Processes with Oracle Business Process Composer
Working with Business Processes
Note:
You cannot create external references using Oracle Business Process
Composer. Create external references using Oracle BPM Studio.
Share projects containing references using the Oracle BPM repository or
include them as part of a project template.
You can use Oracle Business Process Composer to create services based on
web services. However, you must create other services based on adapters and
other service-oriented architecture (SOA) components in Oracle BPM Studio.
You can use Oracle Business Process Composer to assign reusable services from the
business catalog to the corresponding flow objects.
See The Business Catalog for more information.
Working with Business Processes
You create business processes within an Oracle BPM project. You can add one or more
processes to your project.
The following sections describe how to create, open, and delete business processes.
How to Create a New Business Process
To create a new business process
1. Go to the Project Welcome Page.
2. If you are editing a shared project, ensure that you are currently editing the project.
3. Click Processes, then click New Process.
4. Enter a name for the process, then click Create.
The new process appears in the list of processes.
When you create a new business process it contains a start and end event connected by
a default sequence flow. By default, both the start and end events are none events. You
can change the type as required by your business process.
See Defining the Start and End Point of a Process for more information.
How to Open a Business Process
After opening an Oracle BPM project, you can open any of the processes it contains.
To open a business process
1. Go to the Project Welcome Page.
2. Click Processes.
3. Click the name of the process you want to open.
The process opens in the process editor window. Before you can begin editing the
process, you must ensure that you are in edit mode.
Creating and Working with Business Processes 7-9
Using Swimlanes to Organize Your Process
How to Delete a Business Process
You can delete processes from your project.
To delete a business process for a project:
1. Open your project.
2. Go to the Project Welcome Page.
3. Click Processes.
4. Move the cursor over the name of the process you want to delete.
5. Click the Delete icon, then click OK.
What You Need to Know About Deleting a Business Process
When deleting a process, ensure that there are no remaining references to the deleted
process elsewhere in your project. For example, if the deleted process was invoked
from another process through a message throw event, you must ensure that you have
reconfigured the invoking process so it is no longer referring to the deleted process.
An error is displayed during validation if any remaining references to the deleted
process still exist.
Using Swimlanes to Organize Your Process
Swimlanes help you organize your process. They appear as horizontal lines across the
process editor. All flow objects must be placed in a swimlane.
Roles are assigned to swimlanes and determine which members of your business
organization are responsible for performing the work of your process-based
application.
Introduction to Roles
The key to design a business process is to determine the people and roles required to
complete each of the tasks that require user interaction. Within your process, roles are
used to decide who is responsible for performing the work that is performed within
your business processes. Roles allow you to define functional categories that represent
job functions or responsibilities within your organization.
The roles defined in your process are also referred to as logical roles. When your
Oracle BPM project is deployed to the runtime environment, these roles are mapped to
LDAP roles that correspond to the users in your real-world organization.
Roles are assigned to the horizontal swimlanes that display the roles responsible for
completing activities and tasks within your process. Oracle Business Process
Composer allows you to create and edit the required roles within your process and
assign them to swimlanes.
Oracle BPM Studio or Oracle BPM Workspace, you can also map roles to specific users
using LDAP. Oracle BPM Studio also allows you to create more robust organizational
models using organizational units, calendars, and holidays.
For more information, see the Developing Business Processes with Oracle Business Process
Management Studio and Managing and Monitoring Processes with Oracle Business Process
Management.
7-10 Developing Business Processes with Oracle Business Process Composer
Using Swimlanes to Organize Your Process
Roles in Context
Process analysts are responsible for determining what roles are required when
designing a business process.
The LoanProcess example, shown in Figure 7-7 defines the following roles:
Figure 7-7
BPM Process Editor - Swimlanes
• Loan Officer: Loan officers are responsible for creating the loan request and
forwarding it to the loan processor.
• Loan Processor: Loan processors are responsible for reviewing the loan application
and checking the credit history of the loan applicant before forwarding the
application to the underwriter for approval.
• Underwriter: This role represents users who are responsible for reviewing and
approving the loan application.
Additionally, they disburse the loan if it is approved.
Introduction to Swimlanes
Swimlanes are the horizontal lines that run across the process editor. All flow objects
must be placed within a swimlane.
Swimlanes can also be used to group flow objects based on the roles defined within
your process. Swimlanes that contain user tasks must have roles assigned to them.
Swimlanes visually display the role responsible for performing each flow object within
your process. Additionally, you can have multiple swimlanes that are assigned to the
same role.
Swimlanes can make your process more readable when you must use the same role in
different parts of the same process.
When you create a new process, Oracle BPM Studio and Oracle Business Process
Composer create a default swimlane. You can add additional swimlanes to your
process as necessary. When adding interactive and manual activities to a process, you
must assign a role to the swimlane.
Creating and Working with Business Processes 7-11
Using Swimlanes to Organize Your Process
Note:
You cannot delete a swimlane that contains the only start or end event of a
process.
Swimlanes in Context
Figure 7-8 shows a simple process split across multiple swimlanes. In this example, the
SalesRep role is assigned to the first swimlane. Because the Enter Quote user task
appears inside this swimlane, process participants assigned to the SalesRep role are
responsible for performing this task.
Figure 7-8
A Simple Business Process Split Across Two Swimlanes
In a real-world business process, the combination of swimlanes and flow objects
within them can be complex.
Adding Swimlanes to Your Process
You can add swimlanes to your BPMN process.
To add a new swimlane to your process:
1. Right-click on a white area of the process editor canvas.
2. Select Add Lane.
The new swimlane is created. By default, the swimlane is not assigned a role. You can
add a role by editing the swimlane properties.
Adding a Swimlane and a Flow Object to Your Process
You can add a new swimlane and flow object to your BPMN process.
To add a new swimlane to your process by adding a new flow object:
1. Open the process where you want to add a swimlane.
2. From the component palette, select a flow object, then drag and drop it on the
process canvas below an existing swimlane.
The new swimlane is created. By default, the swimlane is not assigned a role. You can
add a role by editing the swimlane properties.
7-12 Developing Business Processes with Oracle Business Process Composer
Working with Flow Elements
How to Edit Swimlane Properties
You can edit the properties of a swimlane in the process editor.
To edit swimlane properties:
1.
Move the cursor over the role name for the swimlane.
2.
Click the Edit icon.
3.
Determine if you want to use an existing role, or create a new one:
To assign an existing role to a swimlane:
a.
Click the Use button.
b.
Select a role from the drop-down list.
To assigning a new role to a swimlane:
a.
Click the Create button.
b.
Enter the name of the new role in the text field.
4.
If you want to optionally add a custom icon to a swimlane, click Change, then
select the icon you want to use.
5.
If you want to optionally change the background color of a swimlane:
a.
Click Implementation.
b.
In the implementation properties editor, enter the RGB value of the color or
select a color from the color palette.
c.
Click Apply Changes.
Sharing Roles Between Business Process Composer and BPM Studio
Oracle BPM Studio allows you to integrate roles within complex organization models
based on organizational units, calendars and holidays.
When editing a project in Oracle Business Process Composer, you can access the roles
defined within the project. However, you cannot view or edit the organizational
information defined within the project.
Additionally, you can create new roles using Oracle Business Process Composer.
These roles are incorporated as part of the overall organization information of the
project.
Working with Flow Elements
This section describes the basic mechanics of using the process editor to add flow
elements to a process.
See BPMN Flow Object Reference for information about designing your business
process using BPMN 2.0.
Creating and Working with Business Processes 7-13
Working with Flow Elements
How to Add a Flow Object from the Component Palette
To add flow objects to your process drag them from the component palette onto the
process editor canvas.
To add a flow element from the component palette:
1. Open the process where you want to add flow elements.
2. Ensure you are in edit mode.
3. In the component palette, double-click the type of flow object you want to add.
4. Select the object entry mode you wish to use.
You can choose to enter a single flow object or multiple flow objects of the same
type. See Introduction to the BPMN Component Palette for more information.
5. Click and drag the flow object you want to add to the area in process editor canvas
where you want to place it.
The cursor displays the icon associated with the type of flow object.
6. Position the cursor at the point in your process where you want to add the flow
object, then click the mouse.
If you are in multiple object mode, you can continue clicking within the process
editor canvas to add additional flow objects of the same type.
Note:
If you position the cursor over a sequence flow, Oracle Business Process
Composer automatically creates incoming and outgoing sequence flows for
the new flow object.
How to Cut, Copy, or Delete a Flow Object
Within the process editor window, you can cut, copy, or delete flow objects.
To cut, copy, or delete a flow object:
1. Select the flow object or sequence flow that you want to cut, copy, or delete.
2. Select Cut, Copy, or Delete from the process editor toolbar.
Note:
When you cut or delete a flow object that contains incoming and outgoing
sequence flow, Oracle Business Process Composer automatically connects it to
the outgoing sequence flow. However, you may have to manually reconfigure
the surrounding flow objects.
How to Paste a Flow Object in a Process
You can paste the flow object that you previously cut or copied.
7-14 Developing Business Processes with Oracle Business Process Composer
Working with Flow Elements
To paste a flow object in a process:
1. Right-click in the area of the process editor canvas where you want to paste a flow
object.
2. Select Paste.
How to Add a Sequence Flow to a Process
Sequence flows define the order or sequence which the work is performed within a
process. For more information, see Controlling Process Flow Using Sequence Flows
To add sequence flows to your process:
1. Open your process.
2. Move the cursor over the flow object where you want to create the outgoing
sequence flow.
3. Click the Add Sequence flow button.
This button only appears for flow objects that do not have outgoing sequence
flows.
4. Move the cursor to the flow object you want to connect to, then left-click.
How to Delete a Sequence Flow
You can delete a sequence flow from a BPMN process.
To delete a sequence flow from a process:
1. In the process editor canvas, right-click the sequence flow you want to delete.
2. Select Delete.
What You Need to Know About Deleting a Sequence Flow
When you delete a sequence flow from a process, any implementation details you may
have configured for the sequence flow are lost.
How to Edit the Properties of a Flow Object
You can edit the basic properties of a sequence flow.
To edit the properties of a flow object:
1. Right-click on the flow object.
2. Select Properties.
3. Edit the properties of the flow object.
4. When you are finished editing the properties, click the down arrow located at the
top right-hand corner of the Properties pane.
Creating and Working with Business Processes 7-15
Working with Business Catalog Components
How to Assign a Custom Icon to a Flow Object
Use Oracle Business Process Composer to select a custom icon to replace the default
BPMN icon of a flow object. You can select from a list of custom icons provided by
Oracle BPM.
To assign a custom icon to a flow object:
1. Right-click the flow object, then select Properties.
2. Click Change, then select the icon you want to use.
3. Click outside the properties window to apply your changes.
Working with Business Catalog Components
The following sections provide information about working with the business catalog
in Oracle Business Process Composer.
See The Business Catalog for more information about the business catalog.
How to Assign a Business Catalog Component to a Flow Object
Use Oracle Business Process Composer to configure implementation details for a flow
object by assigning business catalog components to it.
You can assign business catalog components to these flow objects:
• Business rule task
• Service task
• User task
• Message events and the receive task
To assign a business catalog component to a flow object:
1. Open your process.
2. Right-click on the flow object where you want to add the business catalog
component.
3. Select Implementation.
4. Select Browse, then select the business catalog component from the list.
5. Click OK.
6. Click Apply Changes.
Note:
You must click Apply Changes to save any changes you make to the
implementation of a flow object. Even if you save the project, implementation
changes are not saved until you click Apply Changes.
7-16 Developing Business Processes with Oracle Business Process Composer
Working with Draft Processes
How to Create New Human Tasks in the Business Catalog
You can create new human tasks within the business catalog. See Working with
Human Tasks for more information.
After creating human tasks, you can then assign them to the user tasks within your
process. See Adding User Interaction to Your Process for information about using
human tasks within a BPMN process.
Working with Draft Processes
Oracle BPM allows you to create and deploy draft processes. A draft process has one
or more flow objects, which do not have their implementation defined. By deploying a
draft process, you can test the parts of your process that have been completed without
having to wait until all flow objects have been implemented.
To create a draft process, mark one or more flow objects within the process as draft.
However, a draft process must be valid before it can be deployed.
When a flow object is marked as draft, you cannot configure data associations for it. If
you mark a flow object as draft that has previously had data associations configured,
these are lost.
You can define the implementation details of a draft flow object. However, it is not
required. A draft flow object with no implementation defined does not generate errors
during project validation.
When a project containing a draft flow object is deployed, implementation details for
those flow objects are ignored. For example, if your process contains a user task
marked as draft, the runtime engine does not create instances of the associated human
task.
How to Mark a Flow Object as Draft
To mark a flow objects as draft, edit the implementation properties, as shown in
Figure 7-9.
Figure 7-9
Activity Properties - Implementation
To mark a flow object as draft:
1. Open your process.
2. Right-click on the flow object, then select Implementation.
3. Select the check box next to Is Draft.
Creating and Working with Business Processes 7-17
Documenting Your Process
4. Click Apply Changes.
Documenting Your Process
You create documentation for your process using the documentation editor. You can
add documentation for an entire process or for individual flow objects within a
process.
Using Oracle BPM you can create two different types of documentation:
• End User: Documentation visible to end users of your process-based application
using Process Workspace.
• Internal (Use Case): Documentation for process analysts and developers who are
collaborating on a business process or who may revise it later.
You can define use-case documentation for each of the activities, events, and
gateways within your process.
Note:
You cannot create documentation for sequence flows or measurement marks.
For more information about documenting your process, see Understanding ProcessLevel Documentation and Understanding Activity-Level Documentation.
Importing and Exporting Process Models
Use Oracle Business Process Composer to import and export external process models
created in other programs.
Use the BPM Process Model Converter wizard to import external process models and
convert them to BPMN.
Importing Process Models into Oracle BPM
Use the BPM Process Model Converter wizard to import external process models and
convert them to BPMN. Oracle BPM supports importing and converting process
models in the following formats, as shown in Figure 7-10.
• Oracle Tutor (docx)
• Visio (vdx)
• Oracle Workflow (wft)
• BPMN 2.0 (bpmn)
• XPDL (xpdl)
7-18 Developing Business Processes with Oracle Business Process Composer
Importing and Exporting Process Models
Figure 7-10
BPM Process Model Converter Wizard
You may have to modify Visio and XPDL processes before conversion to ensure that
they are converted accurately. See Preparing Processes for Import into Oracle BPM for
more information.
Note:
If the original file contains properties and artifacts that are not supported by
BPMN, the unsupported elements are not converted and are omitted from the
final BPMN process.
For example, if the original file contains loop characteristics on a regular
activity, which is not supported in Oracle BPM, the BPMN process does not
contain the loop characteristics after conversion.
To import a process model:
1. From the main menu, select Import, then Import Model to open the BPM Process
Model Converter wizard.
The wizards' welcome page is displayed. Click Next.
2. On your local file system, highlight the format type of your file and then browse to
the file you want to import. Click Next.
3. If you are importing a Visio or XPDL file, select one of the following:
• Create a separate model from each pool
• Merge pools into a single model
This dialog appears even if the original file does not contain multiple pools.
4. Click Finish.
You can view the newly created BPMN processes from the Project Welcome Page.
Creating and Working with Business Processes 7-19
Importing and Exporting Process Models
7-20 Developing Business Processes with Oracle Business Process Composer
8
Simulating Process Behavior
This chapter provides information about using Oracle Business Process Composer to
run simulations to improve the performance of your business processes. It describes
how to create simulation models and simulation definitions. It also describes how to
run a simulation and analyze the results.
This chapter includes the following sections:
• Introduction to Simulations
• Creating and Running a Simulation
• Working with Simulation Definitions
• Working with Simulation Models
• Running Simulations
• Analyzing the Results of a Simulation
Introduction to Simulations
Oracle Business Process Management (Oracle BPM) provides functionality for
simulating the behavior and performance of Business Process Model and Notation
(BPMN) processes. Using Oracle Business Process Composer, process designers can
run simulations during the design phase.
After creating and configuring a simulation, you run it in Oracle Business Process
Composer to determine the efficiency of the process using the resources allocations
you have defined. Using simulations, you can:
• Define multiple simulation models for a given process so that different conditions
can be analyzed.
• Run multi-process simulations to learn how working in different business
processes can affect shared resources such as human participants.
Note:
In Oracle Business Process Composer you can only run simulations based on
test data you define using Oracle Business Process Composer. You can run
simulations on real-world data using Oracle BPM Studio.
Simulation Models and Simulation Definitions
Before running a simulation, you must define the simulated behavior of the project
and the processes you want to include in the simulation. To define a simulation you
must create and configure the following in your BPM Project:
Simulating Process Behavior 8-1
Introduction to Simulations
• Simulation definition
Simulation definitions define the processes and resources for a specific scenario. In
a simulation definition you specify the processes included in the simulation by
selecting the simulation models associated to those processes. A process can have
multiple simulation models defined for it. If a process has multiple simulation
models defined, then you must select one of those models to use in the simulation
definition.
Within a BPM project you can define multiple simulation definitions, each with its
own parameter definitions and simulation models. This allows you to compare
multiple scenarios.
• Simulation model
Simulation models define the simulated behavior of an individual process model.
You can have multiple simulation models for each business process, allowing you
to simulate different scenarios.
Simulations do not call each individual task within a process. For example, they do not
run the service associated to a service task, variables are not assigned values, and
external resources are not updated.
Simulation Parameters
In addition to the general parameters defined for a simulation definition and a
simulation model, you can also define simulation parameters for the start events and
activities within a BPMN process.
General Simulation Definition Parameters
The following parameters define the general behavior of a simulation definition.
• Simulation definition: Defines the name of the simulation definition.
• Duration: Defines the period the simulation runs.
This interval is specified in months, days, hours, minutes, and seconds.
• Start time: Defines the start time for the simulation.
This time is used only for logging. It is not used for scheduling purposes.
• Let in-flight instances finish before simulation ends: If selected, simulation ends
only when the specified number of instances completes.
If deselected, simulation stops after the simulation duration is completed. At that
point, all incomplete instances are shown in either in-process or queue status.
You must define these parameters when creating a simulation definition. However,
you can redefine them later if necessary.
Simulation Model Parameters
The following parameters define the general behavior of a simulation model:
• Model name: Defines the name of the simulation model.
• Specify number of process instances to be created: Specifies the number of
simulated instances that are created during simulation.
• Interactive tasks: Defines the distribution type used for interactive tasks.
8-2 Developing Business Processes with Oracle Business Process Composer
Introduction to Simulations
The available distribution types are:
– Constant
– Uniform
– Exponential
– Normal
These are identical to the distribution methods defined for specific activities within
a process. When you change distribution type or other parameters for a specific
activity within a process, these values override the general values defined in the
simulation model. See Activity Parameters for more information.
• Automatic tasks: Defines the number of simulated threads available when
performing an automatic task.
This parameter is identical to the Threads parameter you can define for individual
activities within your process. See Activity Parameters for more information.
Resource Parameters
Resources define the simulated resources within your organization. Resources are
defined in a simulation definition and can be shared between each of the process
models that are included. These resources can be associated with a specific role within
your project. You can use these parameters together to create a resource profile that
determines the expense, time, and efficiency of a person or group.
The following resource parameters are supported:
• Name: Defines the name of the resource.
• Cost per hour: Specifies the cost of the resource per hour when performing an
activity.
• Efficiency: Specifies how efficient the resource is when performing an activity.
This parameter is used when selecting the Maximum efficiency policy when
defining how organizational resources are allocated.
See Activity Parameters for more information.
• Capacity: Specifies how many activities can be performed at one time.
• Availability: Specifies the percentage of time this resource is available.
• Roles: Specifies the roles associated to this resource.
Start Event Parameters
To simulate the behavior and performance of start events, Oracle BPM uses a
statistical model that simulates the probability of a certain behavior. You must select
the statistical distribution that Oracle BPM uses.
The following distribution types are available:
• Constant: Triggers the start event at a specific interval.
For example, if you specify a period of 1 minute and 15 seconds, the event is
triggered every 1 minute and 15 seconds. Each time the event is triggered, a new
instance of the process is created.
Simulating Process Behavior 8-3
Introduction to Simulations
• Uniform: Triggers the start event at intervals within a specific margin specified by
the mean and delta parameters.
For example, if you define the mean as 30 seconds and the delta as 3 seconds, the
start event creates a new instance in intervals between 27 and 33 seconds, with an
equal probability.
• Exponential: Triggers the start event a specified number of times within a certain
interval.
For example, if you define the frequency as 10 and the interval as 1 hour, the event
is triggered 10 times per hour. The distribution of events is based on exponential
distribution.
• Normal: Triggers the start event based on normal, or Gaussian, distribution.
This is a continuous probability distribution that is based on a bell curve. For
example, if you define a mean of 10 minutes and a standard deviation of 2 minutes,
the event triggers according to the probabilities shown in Figure 8-1.
Figure 8-1
Simulation - Normal Distribution in a Start Event
In this example, the event has a 62.8 percent probability of triggering in an interval
between 8 and 12 minutes.
• Real: Triggers the start event based on user-specified intervals: hourly, daily,
weekly, or monthly.
You can define the mean and standard deviation for each interval. Using these
parameters, the start event creates new process instances using normal distribution.
For example, you can specify a daily distribution with a mean of 5 minutes and a
standard deviation of 1 minute for weekdays and a mean of 1 hour and a standard
deviation of 10 minutes for weekends.
Activity Parameters
In addition to start events, you can define parameters that determine the simulated
behavior or interactive and automatic activities within a process. You define these
parameters using the tabbed panes of the simulation editor. Figure 8-2 shows an
example of the tabbed panes of an interactive activity.
8-4 Developing Business Processes with Oracle Business Process Composer
Introduction to Simulations
Figure 8-2
Simulation Parameters for an Interactive Activity
The simulation parameters for activities are:
• Duration: Defines the statistical model used to determine the amount of time
required to perform an activity.
The statistical models used are similar to those defined for start events except,
instead of defining how often an event is triggered, they define how long it takes to
perform the work of a specific activity.
See Start Event Parameters for a description of each distribution type.
• Resources (interactive activities only): Defines how many interactive activities can
be performed simultaneously.
You can define how simulated resources are allocated to this activity.
– Organizational resources: Resources shared between all the processes within a
simulation definition.
You must specify the policy that determines how the simulated participants are
selected to perform the activity.
◆ Minimum cost: Selects less costly resources first.
◆ Maximum efficiency: Selects the most efficient resources first.
◆ Random: Randomly selects between Minimum cost and Maximum
efficiency.
See Resource Parameters for information on defining organization resources
within a simulation definition.
– Fixed resources: explicitly defines the number of resources available to perform
the interactive activity.
• Threads (available only for automatic activities): Defines the number of simulated
threads that are used to perform an automatic activity.
• Cost per hour: Defines the cost required to perform the activity.
Use this parameter to create cost-base reports.
– Activity Cost Type: Can be defined as a base cost or as a base cost plus the cost
of resources assigned to perform the activity.
– Activity Fixed Base Cost: Defines the value (specified as a decimal number) of
the fixed base cost.
See Resource Parameters for information on defining organization resources within
a simulation definition.
Simulating Process Behavior 8-5
Creating and Running a Simulation
• Queue info: Specifies the maximum size of the queue for this activity.
This is the number of instances that are currently waiting at this activity. When this
number reaches the maximum size, the simulation issues a warning.
• Outgoing flows: Specifies the probability (defined as a decimal number) of a
process instance continuing along each of the outgoing sequence flow.
If only one outgoing sequence flow is defined, the probability is specified as 1 and
cannot be changed.
Creating and Running a Simulation
To run a simulation, you must first define a simulation model for your project and at
least one simulation definition for each of the processes you want to include in your
simulation. You can create multiple simulation definitions to test and compare the
performance of your processes.
To create and run a simulation:
1. Create the BPMN processes you want to include in your simulation.
See Working with Business Processes for information about creating and working
with business processes.
2. Create a simulation definition and simulation models.
The initial simulation model for a process can only be created in the simulation
definition editor. After you have created at least one simulation model for a
process, you can create additional simulation models for a process.
See How to Create a Simulation Definition for information about running the
simulation wizard to create simulation definitions and simulation models.
3. Configure parameters to define the simulated behavior of your processes.
See Simulation Parameters for information about the different parameters you can
define for a simulation definition and simulation model. See How to Edit a
Simulation Modelfor information about how to configure parameters for the flow
objects within your process.
4. Run the simulation.
After creating and configuring a simulation definition and simulation model, you
can run your simulation.
See Running Simulations for more information.
5. Analyze the results of the simulation.
After running a simulation you can analyze the results of the simulation and make
adjustments to the parameters to determine how to improve the performance of
your process. See Analyzing the Results of a Simulation for more information.
Working with Simulation Definitions
Simulation definitions define the simulated behavior of your BPM project as a whole.
Within a simulation definition, you can define general parameters, including the
organizational resources, and select which simulation models to include in a
8-6 Developing Business Processes with Oracle Business Process Composer
Working with Simulation Definitions
simulation. You can define multiple simulation definitions to test different
combinations of parameters and processes.
After creating a simulation definition, you can edit its resources, add simulation
models, and so on, as described in the following sections.
How to Create a Simulation Definition
In a simulation definition, you can change the values of different parameters to see
how they influence the performance of a project. The parameters you can define
include:
• The start time and duration of the simulation
• Which process simulation models you want to include in the project simulation
• Participant resources you want to include in the simulation
Oracle Business Process Composer provides a wizard that walks you through the
process of creating and configuring a new simulation definition, creating and
configuring new simulation models, and configuring organizational resources.
To create and configure a simulation definition:
1.
Click Simulations from the Project Welcome Page.
2.
Click the New (+) icon to start the simulation wizard.
The New Simulation dialog appears, as shown in Figure 8-3.
Figure 8-3
3.
New Simulation Dialog
Enter a name for the simulation definition and values for the duration and start
time of the simulation definition.
Select the check box to let in-flight instances finish before simulation ends.
You must define these parameters when creating a simulation definition.
However, you can redefine them later if necessary.
See General Simulation Definition Parameters for more information about each of
these parameters.
4.
Click Next.
5.
Create a new simulation model for each process you want to include in the
simulation definition.
Simulation models can be shared across simulation definitions. However, the first
time you create a simulation definition, you must create at least one simulation
model for each process if you have not created one previously.
Simulating Process Behavior 8-7
Working with Simulation Definitions
You can also create a new model in the simulation definition editor when you add
an association between a model and a process. For more information, see How to
Associate a Simulation Model to a Simulation Definition.
a.
Click the Add (+) icon to create a new simulation model.
A simulation model defines the simulated behavior of a process. You can
define multiple simulation models for a process, however only one
simulation model is used for each process within a simulation definition.
b.
Provide information for each of the fields as shown in Figure 8-4.
Figure 8-4
The New Simulation Model Editor
See Simulation Model Parameters for more information about these
parameters.
c.
Click Add.
Create additional simulation models as necessary. You should create at least one
simulation model for each process in your project even if you do not include it in
the simulation definition. This allows you to create additional simulation models
later and add them to other simulation definitions.
6.
Select the check box next to each process whose simulation model you want to
include in the simulation definition.
If you have not created a simulation model for a process, you cannot select the
process.
7.
Click Next.
8.
Optionally, click the Add resource icon to add resources to the simulation
definition.
See Resource Parameters for information on the resource parameters you can
define.
9.
Click Finish.
What Happens When You Create a Simulation Definition
After creating a new simulation definition and simulation models, the simulation
panel appears as shown in Figure 8-5.
8-8 Developing Business Processes with Oracle Business Process Composer
Working with Simulation Definitions
Figure 8-5
Project Welcome Page - Simulations: After Creating Simulation Definitions
This panel displays all the simulation definitions defined in your project.
From this panel you can open a simulation definition and perform the following tasks:
• Edit a simulation definition.
See How to Edit a Simulation Definition for more information.
• Run a simulation.
See How to Run a Simulation for more information.
• Edit a simulation model.
See How to Edit a Simulation Model for more information.
How to Edit a Simulation Definition
After creating a simulation definition, you can edit it from the simulation panel.
To edit a simulation definition:
1. Click Simulations from the Project Welcome Page.
After clicking Simulations, the simulation panel appears, as shown in Figure 8-5.
2. Click the name of the simulation definition you want to edit.
The simulation definition editor appears in a tabbed pane as shown in Figure 8-6.
Figure 8-6
Simulation Definition Editor
From this editor, you can add or remove simulation models from a simulation
definition, add resources, and run simulations.
3. Edit the Start Time, Duration, and End Time as necessary.
Simulating Process Behavior 8-9
Working with Simulation Models
See General Simulation Definition Parameters for more information about these
parameters.
4. To add resources to a simulation definition, click the Add Resource icon, then edit
the fields of the Resources table as necessary.
See Resource Parameters for more information about the parameters you can
define for a resource.
How to Associate a Simulation Model to a Simulation Definition
Before creating a new simulation model, you must create at least one simulation
definition. See How to Create a Simulation Definition for more information.
To associate a simulation model to a simulation definition:
1. Click Simulations from the Project Welcome Page.
2. Click the name of the simulation definition where you want to associate a
simulation model.
New simulation models are created from the simulation definition editor. After
creating a simulation model for a process, it can be shared with multiple simulation
definitions.
3. Click the Associate Model Simulation icon in the Model pane to display the
Associate Model dialog.
4. Select a process from the drop down list, then select a simulation model or click the
Add icon to create a new model, as shown in Figure 8-7.
Figure 8-7
Associating a simulation model to a simulation definition
5. Click OK.
6. The simulation model appears in the list.
Working with Simulation Models
Simulation models allow you to simulate the behavior of an individual process. They
allow you to define how a process behaves as part of a simulation definition.
You can define multiple simulation models for each process, creating different
simulations based on different combinations of resource allocation and activity
behavior.
8-10 Developing Business Processes with Oracle Business Process Composer
Working with Simulation Models
How to Create a New Simulation Model
You can create multiple simulation models for a process. Different models can be
included in different simulation definitions to determine performance based on
different parameter settings.
Note:
You cannot directly create the first simulation model for a process. The first
simulation model for a process must be created using the simulation definition
wizard. After creating the initial simulation model, you can create additional
models using the following procedures.
See How to Create a Simulation Definition for information about creating a
simulation model when creating a simulation definition.
To create a new simulation model for a process
1. Click Simulate from the toolbar of the Project Welcome Page.
2. Select a simulation definition that contains the process where you want to create a
new simulation definition.
3. Click the edit icon next to the simulation model.
The process opens in the simulation canvas. This canvas is similar to the process
editor canvas. You can toggle back and forth between the process designer and
simulation canvases using the drop down list in the process editor toolbar
4. In the process editor toolbar, click the Add icon.
5. Enter a name, then click Create.
The new simulation model is created. You can use this model when creating a new
situation definition or editing an existing one. See How to Associate a Simulation
Model to a Simulation Definition for more information.
How to Edit a Simulation Model
To edit a simulation model
1. Click Simulate from the toolbar of the Project Welcome Page.
2. From the drop down list, select the name of the simulation definition containing
the simulation model you want to edit.
3. Click the Edit icon next to the simulation model you want to edit.
The process displays in the simulation canvas. This canvas is similar to the process
editor canvas. You can toggle back and forth between the process designer and
simulation canvases using the drop down list in the process editor toolbar.
Simulating Process Behavior 8-11
Running Simulations
Note:
This drop down list only appears after you have defined at least one
simulation model for a process.
4. Hover the mouse over the flow object whose simulation information you want to
configure, then click the Edit icon of the flow object where you want to define
resources.
The simulation definition pane appears as shown in Figure 8-8.
Figure 8-8
The Simulation Model Editor Showing the Resource Definition Panel
5. Edit the simulation parameters for the flow object by clicking the tab and editing
the appropriate parameters. See Start Event Parameters and Activity Parameters
for information on the parameters you can configure for specific flow objects.
6. After editing the parameters, click outside the popup window to save your
changes.
Running Simulations
After defining a simulation model and simulation definitions, you can run the
simulation to view the performance of your BPM project.
To run a simulation, you must have created at least one simulation definition and
simulation model for each of the processes you want to test.
How to Run a Simulation
To run a simulation:
1. Click Simulations from the Project Welcome Page.
2. Click the name of the simulation definition that you want to run.
The simulation definition editor appears in a tabbed pane as shown in Figure 8-6.
8-12 Developing Business Processes with Oracle Business Process Composer
Analyzing the Results of a Simulation
3. Click the Run icon, which displays as a green arrow at the top right-hand corner.
Analyzing the Results of a Simulation
The results of the simulation are displayed in a bar chart.
You can configure the results of the simulation by configuring the following:
• Activities
• Indicators
How to Analyze the Results of a Simulation Using a Chart
To analyze the results of the simulation using a bar chart:
1. From the Indicators list, select the type of indicators to monitor.
The available types of indicators are:
• Cost
• Time
• Units
2. From the list to the right of the indicators list, select the indicator options to
monitor. Choose from the options listed in Table 8-1.
Table 8-1
Simulation Results - Indicator Options
Indicator
Options
Cost
Total Cost
-
Average Total Cost
-
Resource Busy Cost
-
Resource Total Cost
Time
Cycle Time
-
Waiting Time
-
Working Time
-
Total Working Count
-
Average Process Time
Units
Queue Size
-
Working Count
-
Resource Utilization
-
Average Performance
-
Completed Operations
Simulating Process Behavior 8-13
Analyzing the Results of a Simulation
Indicator
Options
-
Completed Instances
-
Total Cost
3. Click the Activities Only check box to only include activities in the simulation
results.
The chart displays the indicator options you selected.
4. Click on any bar or process to view detailed activity results.
8-14 Developing Business Processes with Oracle Business Process Composer
9
Using Process Player
This chapter describes how to use process player to test the business processes within
a Business Process Management (BPM) project.
This chapter includes the following sections:
• Introduction to Process Player
• Using Process Player to Test the Behavior of Business Processes
Introduction to Process Player
Process player provides an efficient way of testing the Business Process Model and
Notation (BPMN) processes in your process-based business application. It uses a
runtime environment, accessible from Oracle Business Process Composer, that
emulates the real-world behavior of business processes. As the application runs,
process player displays a visual representation of a BPMN process showing the path
the process instance follows through the process flow. This allows process designers to
easily create, test, and revise processes without having to save and deploy the BPM
project and view it in Process Workspace.
Process player displays a BPMN process within the process editor as shown in Figure
9-1.
Figure 9-1
Process Player User Interface
As a process instance progresses through a process flow, process player displays an
animated view of the behavior of your process. The outline shows the path the process
instance takes through the flow objects and sequence flows of your process. The
specific path an instance takes through your process depends on the input data you
provide for various flow objects. See How Process Player Handles the Flow Objects of
Your Process for more information.
When running process player on a business process, Oracle Business Process
Composer validates the project and deploys the current draft version of the BPM
project to a player partition of the Oracle Business Process Management (Oracle BPM)
Using Process Player 9-1
Introduction to Process Player
runtime environment. When using process player, you do not have to publish or
manually deploy the project to view changes while designing a process.
You can use process player to test the creation and behavior of process instances. You
can create multiple instances of each process within your project
Note:
You can only run process player if you are currently editing the BPM project.
How Process Player Handles the Flow Objects of Your Process
As the process player runs through a process, it emulates the runtime behavior of
some of the flow objects in your process.
• User tasks
When the process player reaches a user task in a process, it shows the role or user
to select on its behalf. It shows all the possible outcomes as actions and if the web
form is associated to the task it also gives you the option of launching the web form
or manually selecting the outcome. If you choose to launch the web form, Oracle
Business Process Composer deploys the web form and displays it in a separate
viewer.
If no form is assigned, process player pauses to allow you to select the role you
want to perform the task. It prompts you to select one of the outcomes defined for
the human task. Approve and Reject are defined as default outcomes.
However, the list of possible outcomes depends on how outcomes are defined in
the human task. See How to Configure Basic Task Properties for more information
on defining the outcomes for a human task. After selecting an outcome, process
player continues to the next flow object of your process.
If an Oracle Application Development Framework (Oracle ADF) form is assigned
to the human task, you must deploy it to the run time environment using Oracle
JDeveloper to be able to view it using process player. If the Oracle ADF form is
deployed, Oracle Business Process Composer is able to access it when deploying to
the process player partition.
After viewing the web form or Oracle ADF form, you must manually close the
form viewer window to continue running your process.
• Message send events and send tasks
When process player reaches a message send event or a send task within a process,
it performs these automatically. It then continues to the instance of the process
being called and pauses at the corresponding message catch event or receive
task.In both cases, you must manually return to the parent process. For example, if
the send and receive pair is creating an instance on a different process of the same
project you can return to the process player home, select the new instance for this
process, run the child process, then return to the parent process.If the send and
receive pair calls an external web-service you must manually enter the required
web service message to continue running the process.
• Timer events
When process player reaches a timer event within a process, it pauses and waits
until you click the Run icon of the flow object. Process player moves to the next
flow object in the process.
9-2 Developing Business Processes with Oracle Business Process Composer
Using Process Player to Test the Behavior of Business Processes
• Call activities
When process player reaches a call activity, it calls the child process and creates a
new instance of the process. Click the drill-down icon to view the child process.
• End events
When process player reaches an end event, it pauses and displays the drill-up icon.
Clicking this icon causes process player to return to the parent process. If the
current process has no parent, process player returns to the process player home
and deletes the process instance.
• Other flow objects
When process player reaches another flow object that causes the instance to wait
for some operation or external event, process player pauses. To continue running
the process click the Refresh icon located at the top of the process player home.
Enabling Process Player in Oracle Business Process Composer
Before process modelers can use process player to test the processes of a BPM project,
an administrator must enable process player. See Defining SOA Administrator
Credentials to Enable Process Playerfor more information.
Using Process Player to Test the Behavior of Business Processes
After the process player feature is enabled, you can access process player from the
Project Welcome page and use it to test process behavior.
Process player is accessible from the main menu and the toolbar in the Project
Welcome page. When project player is enabled and you are editing the project, the
project toolbar displays an icon for accessing process player.
How to Map the Roles Defined in Your Process to Users in Your Organization
Before using process player, you must map the roles defined in your process to the
users or groups of the organization infrastructure defined in your runtime
environment. Process player uses the information of your organization to mimic the
behavior of your business processes in real-world situations.
To map roles to users in your organization:
1.
Open your project.
2.
Start process player.
3.
In the Organization pane, select the role of your process you want to map from
the drop down list.
The drop down list displays all the roles defined in your process, as shown in
Figure 9-2.
Using Process Player 9-3
Using Process Player to Test the Behavior of Business Processes
Figure 9-2
4.
Process Player - Organization Pane
Select the user or group you want to map.
a.
Click Choose.
b.
Select User or Groups from the drop down list.
c.
Enter the name of the user or group you want to search for, then click Search.
To see a list of all users or groups, leave the text area blank, then click Search.
d.
In the table, select the user or group you want to map.
After selecting a user or group, it appears at the bottom of the chosen
window.
e.
5.
Click OK.
Click Add Mapping.
The users or groups you mapped to the process role appear in the mappings table.
Note:
You must map at least one user or group for each role in your process. If
process player encounters a user task with an unmapped role, it cannot
continuing running the process beyond the human task.
How to Use Process Player to Run a Business Process
Before using process player to test the behavior of your business processes, ensure that
you have mapped all the roles in your process to at least one user or group within
your organization. See How to Map the Roles Defined in Your Process to Users in
Your Organization for more information.
To use process player:
1.
Open your project.
2.
Access process player.
3.
Select a process.
4.
Click the Play icon located on the start event of your process.
Process player begins running the process. As it passes through each flow object
and sequence flow, it outlines the path it takes through the process.
9-4 Developing Business Processes with Oracle Business Process Composer
Using Process Player to Test the Behavior of Business Processes
As process player continues running through your process, it stops when the
process instance reaches one of the following flow objects:
• User tasks
• Call activities
• Message events
• Timer events
You must provide input for each of theses flow objects before process player
continues running the process. See How Process Player Handles the Flow Objects
of Your Process for more information.
5.
If process player pauses on a user task:
a.
Click the Play icon on the user task.
b.
Select the user you want to perform the task.
Note:
If the list of users appear empty, you must ensure that you have correctly
mapped all of the roles of your process.
c.
Click Run, then select the outcome from the list.
The possible outcomes are defined by the human task associated with the
current user task.
After you select the outcome, process player continues to the next flow object in
your process.
6.
If process player pauses on a message catch event or a receive task, it creates an
instance of the child process.
a.
Click the Run icon.
b.
Select the Project Player tab.
c.
In the Instances table, select the newly created instance.
Oracle Business Process Composer prompts if you want to close the process
player tab for the original process. Closing this tab has no effect on the
process instances.
d.
Click OK.
Process player opens the new process instance and begins running the
process from the message start event called from the parent process.
e.
Click the Run icon for any flow objects that pause process player, as outlined
in previous steps.
f.
When process player reaches the message end event of the process, click the
drill-up arrow to return to the parent process, as shown in Figure 9-3.
Using Process Player 9-5
Using Process Player to Test the Behavior of Business Processes
Figure 9-3
The Drill-up Icon on a Message End Event
Process player closes the tab for this process and removes the process instance
from the list of instances.
g.
From the list of process instances, open the process instance of the parent
process.
After reopening the process instance of the parent process, process player
continues running through the process from the point where the child process
was called.
7.
When process player reaches an end event in your process, click the drill-up icon,
as shown in Figure 9-3, to finish the process instance.
Process player returns to the process player editor and deletes the process
instance.
9-6 Developing Business Processes with Oracle Business Process Composer
Part V
Defining How Users Interact with Your
Business Processes
This part describes how to use Oracle Business Process Composer to define how users
interact with your business processes. It contains chapters for creating and using web
forms, creating form rules, and defining human tasks.
This part contains the following chapters:
• Working with Web Forms
• Working with Web Form Rules
• Working with Human Tasks
10
Working with Web Forms
This chapter describes how to create web forms using Oracle Business Process
Composer. It provides an introduction to the web forms designer and describes
procedures for creating web forms, adding web form controls, and editing web form
control properties.
This chapter includes the following sections:
• Introduction to Forms in Oracle BPM
• Introduction to the Web Forms Designer
• Introduction to Web Form Controls
• Introduction to Data Sources
• Walkthrough: Creating a Web Form Using the Form First Method
• Walkthrough: Creating a Web Form Using the Data First Method
• Working with Web Forms
Introduction to Forms in Oracle BPM
Oracle Business Process Management (Oracle BPM) provides functionality that defines
how end users interact with the applications defined by Business Process Model and
Notation (BPMN) processes. There are three components within Oracle BPM that
work together to define this user interaction: user tasks, human tasks, and forms.
• User tasks: BPMN flow objects that specify where user interaction is required in
process.
Oracle BPM supports different types of user tasks that determine the approval
process required.
• Human tasks: Define how users interact with a process-based application.
They define the user interface, data structures, and connectivity information. See
Working with Human Tasks for more information.
• Forms: Define the interface that allow users to interact with your application.
For business applications created with Oracle BPM these forms are displayed in
Oracle Business Process Management Workspace.
Oracle BPM supports the following types of forms:
• Web forms: Define the user interface for a human task.
They are based on standard technologies, including XHTML, CSS, and Javascript.
Web forms are created by process analysts using Oracle Business Process
Working with Web Forms 10-1
Introduction to Forms in Oracle BPM
Composer. They are included within a BPM project. This chapter describes how to
create and use web forms.
• Oracle Application Development Framework (ADF) task forms: ADF
components that define the user interface for a human task.
ADF task forms are generally designed by process developers. They are created in
Oracle JDeveloper and can be added to a BPM project using Oracle BPM Studio.
See "Getting Started with Human Workflow" in the Developing Business Processes
with Oracle Business Process Management Studio for more information.
Introduction to Web Forms
Web forms define the user interface that allow end users to interact with your business
processes. Oracle Business Process Composer provides an editor for creating web
forms. This enables process analysts to design the way users interact with a business
process and also define the underlying data structure required by the application.
Web forms are based on standards, including XHTML, CSS, and Javascript which
ensures compatibility across multiple platforms and browsers. At its core, a web form
is an XHTML file. However, the form designer allows you to create and design a web
form without interacting directly with the XHTML code. After creating a new form,
use the web form designer to customize the form's appearance and behavior.
You can add the following to a web form:
• Form controls: Components that you can add directly to a form.
Form controls define the graphical elements of a web form and their layout. They
also display data to users and receive data input. See Introduction to Web Form
Controls for information about the types of form controls supported by Oracle
BPM.
When you add, arrange, or remove a form control from a web form, the form editor
automatically updates the underlying XHTML code.
• Form rules: Pieces of Javascript code that define the behavior of a web form or web
form controls.
Oracle Business Process Composer provides a form rules editor that allows you to
create and edit form rules. See Working with Web Form Rules for more
information.
Form First and Data First Design
There are two use cases for creating web forms in Oracle BPM:
• Form first
In this use case, you create a web form first before any data elements are defined.
This allows a business user to define the required user interface using Oracle
Business Process Composer. In this use case, user-interface elements are created
first without considering the required underlying data model.
After the form is created, Oracle BPM automatically generates the schema that
defines the data required by the web form. This data schema is based on the web
form controls added to the web form. When you assign the web form to a human
task, this schema is automatically used to define the human task payload.
10-2 Developing Business Processes with Oracle Business Process Composer
Introduction to the Web Forms Designer
See Walkthrough: Creating a Web Form Using the Form First Method for
procedural information about this use case.
• Data first
In this use case, you create a web form based on an existing human task payload.
Oracle BPM generates data sources based on the payload. You can add web form
controls to a form based on these data sources. One advantage of the data first
model is that it allows you to reuse a schema across multiple forms.
After adding form controls from a data source, use the form designer to rearrange
them within the form to define the necessary look and feel of the user interface.
See Walkthrough: Creating a Web Form Using the Data First Method for
procedural information about this use cases.
Introduction to the Web Forms Designer
Web forms define the user interface of your process based application. Oracle Business
Process Composer provides a web form editor for creating web forms.
Using the web forms editor you can:
• Add web form controls to a web form.
• Customize the appearance and layout of a web form.
• Create form rules that define the behavior of the controls on a web form.
Figure 10-1 shows an example of the web form designer.
Figure 10-1
Oracle Business Process Composer - Web Form Designer
Working with Web Forms 10-3
Introduction to the Web Forms Designer
When you open a web form, the web form designer appears as a tabbed pane within
Oracle Business Process Composer. The web forms designer is divided into the
following areas:
• Web forms component palette
• Web form toolbar
• Forms canvas
• Properties editor
• Data sources
Note:
Data sources are available only in web forms created through the data first use
case. See Walkthrough: Creating a Web Form Using the Data First Method for
information about creating web forms based on a human task payload.
Each area of the web forms designer is described in the following sections.
Introduction to the Web Forms Component Palette
The component palette contains the controls you can add to a form to define how your
users interact with your business application. The form palette appears on the left side
of the web form editor as shown in Figure 10-1. You can add a form control to a web
form by dragging the control from the palette to the form canvas.
See Introduction to Web Form Controls for a description of the web form controls that
are available in Oracle BPM. See How to Add Controls to a Web Form for information
dragging controls to a web form.
Introduction to the Web Form Editor Toolbar
The web form editor contains a toolbar that provides access to form-related features.
The web form editor toolbar contains the following buttons:
• Edit rules: Click to access the rules editor.
This button toggles between Edit rules and Edit form.
• Edit form: Click to access the form editor.
This button toggles between the form rules editor and the web form editor.
• Test web form: Opens the form in a browser window.
In this window, you can view how the web form appears to end users. You can
also test the behavior of form rules.
• Refresh: Refreshes the external data source (human task payload) of the form.
If you make changes to the human task payload, you must refresh the data source
of the web form. This button is only applicable to web forms created using the data
first method. See Walkthrough: Creating a Web Form Using the Data First Method
for more information.
• Localization: Opens the resource bundle editor.
10-4 Developing Business Processes with Oracle Business Process Composer
Introduction to the Web Forms Designer
This editor allows you to localize components of the web form and web form
controls. Only languages that have been added using the project's Language setting
are available. To configure language support, select the target language in the
editor and add translation strings for the form's elements.
• Business Objects: Opens the Form Business Objects dialog.
Add business objects from the catalog to be available in your form. Once selected,
business objects appear in the Data Sources part of the component palette. To use a
business object in a form, drag it from the component palette to the form.
Introduction to the Property Editor
Use the property editor to define the properties of a web form or web form control.
When you click on a control in your form, the Properties area displays the control's
properties so you can view and edit them.
The properties editor contains tabbed panes that display the properties of the web
form or web form control grouped by function. Figure 10-2 shows an example of the
properties editor.
Figure 10-2
Web Form Designer - Properties Editor
See How to Edit the Properties of a Web Form for procedures about editing a web
form and web form control properties. See Web Form and Web Form Control Property
Reference for information about each property.
Introduction to the Data Source Panel
The Data Source panel displays the list of data elements that can be incorporated into
your form. See Introduction to Data Sources for more information.
From the data source panel, you can generate web form controls based on all the data
elements in the payload or you can generate web form controls based on specific data
elements. These can include business objects that you have previously selected from
the catalog using the Form Business Objects dialog, accessed from the web form editor
toolbar.
Note:
Data sources are only available in web forms created based on a human task
payload. See Walkthrough: Creating a Web Form Using the Data First Method
for information.
Working with Web Forms 10-5
Introduction to the Web Forms Designer
Figure 10-3 shows how the data source panel appears in a web form created based on
a human task payload.
Figure 10-3
Data Source Panel
See Introduction to Data Sources for more information about data sources in Oracle
BPM. See Walkthrough: Creating a Web Form Using the Data First Method for
information on creating a web form based on a human task payload.
See Adding Business Objects to a Web Form for information on loading business
objects from a catalog, and placing them on a web form.
Introduction to the Form Canvas
The right side of the web form designer is the form canvas. You can create a web form
by dragging controls from the component palette to the form designer canvas. Figure
10-4 shows an example of the form canvas containing several controls.
10-6 Developing Business Processes with Oracle Business Process Composer
Introduction to Web Form Controls
Figure 10-4
Form Canvas
Introduction to Web Form Controls
Web form controls are the user interface components that you add to a form to define
the user interface of your business application. Web form controls are defined in
HTML, but using the web form editor, you do not have to edit any of the underlying
code.
Web form controls are described in the following sections. For information on the
properties that you can configure for each web form control, see Web Form Control
Properties.
Input Controls
Input controls allow users to enter data (text, dates, numbers, and so on) into a form.
Input controls automatically prevent users from entering the wrong data types. For
example, if a user enters letters into a number control, the form displays an error
message. This validation happens automatically. The function of each input control is
described below.
Working with Web Forms 10-7
Introduction to Web Form Controls
To validate the content in each input control, Oracle BPM assigns a default XML
schema data type to each control. Table 10-1 shows the default data types for each
input control.
Table 10-1
Input Controls - Default Data Types
Input Control
XML Schema Type
Text
xsd:string
Date
xsd:date
EMail
types:emailType, an xsd:string restriction pattern defined in
types.xsd.
Money
types:number, an xsd:double restriction defined in types.xsd.
Phone
types:phoneType, an xsd:string restriction pattern defined in
types.xsd.
Quantity
xsd:integer
Number
types:number, an xsd:double restriction defined in types.xsd.
Boolean
xsd:boolean
Text
The text control allows users to enter text and is primarily intended for short, one-line
entries.
TextArea
The textarea control allows users to enter any text and is designed for longer, multiline submissions. When a user enters data, a scroll bar appears, if necessary, to
accommodate the text. The textarea control uses a property called # of Rows that
controls the default number of lines visible in the input area.
In HTML there is no property for setting the maximum length on a textarea control.
Therefore, this control does not have the maxlength property like the text control. If
you must specify a maximum length, you should use the text control, or use a form
rule to limit the amount of text a user can enter. See Working with Web Form Rules for
more information.
Date, Time, Date/Time
The Date control allows users to enter information as a date, time or date plus time
control. To use Date, Time and Date/Time controls, add a Date control to your form
and use the Control Type property to choose from date, time or date/time. The control
is configured accordingly.
The Date Control
Use the date control type to display the date input field with a calendar icon.
The default Date Format is Automatic. When Automatic is selected, both entry and
display formatting of dates are locale specific. You still have the option to specify a
particular date format that is independent of the locale by using the format field, but
this is not recommended.
10-8 Developing Business Processes with Oracle Business Process Composer
Introduction to Web Form Controls
If a user clicks the calendar to choose the date, the date selected is displayed in the
default mm-dd-yyyy format, for example 09-01-2014. Users can manually enter dates
in any format, but they are then reformatted to mm-dd-yyyy.
Valid date formats use three different separators (. / -) and three date formats
(dd/mm/yyyy, mm/dd/yyyy, and yyyy/mm/dd). The following examples show
how dates can be specified:
• mm-dd-yyyy (07-26-1966)
• mm/dd/yyyy (07/26/1966)
• mm.dd.yyyy (07.26.1966)
• dd-mm-yyyy (26-07-1966)
• dd/mm/yyyy (26/07/1966)
• dd.mm.yyyy (26.07.1966)
• yyyy-mm-dd (1966-07-26)
• yyyy/mm/dd (1966/07/26)
• yyyy.mm.dd (1966.07.26)
The date is converted to the standard xsd:date format of yyyy-mm-dd in the
submissions XML document using the following format:
<Order Date>2012-03-06</Order Date>
Dates are adjusted to be within 80 years before or 20 years after if the date is expressed
with a two digit year. For example, using a pattern of "mm/dd/yy" and the current
date/time of Jan 1, 1997, the string "01/11/12" would be interpreted as Jan 11, 2012
while the string "05/04/64" would be interpreted as May 4, 1964. During parsing, only
year strings consisting of exactly two digits, will be parsed into the default century.
Any other numeric string, such as a one digit string, a three or more digit string, or a
two digit string that isn't all digits, is interpreted literally. The dates "01/02/3" or
"01/02/003" are parsed using the same pattern as Jan 2, 3 AD. Similarly, "01/02/-3" is
parsed as Jan 2, 4 BC. Web forms will always format for 4 digit years.
The Time Control
Use the time control type to display only the time input field on your form. The Time
Format property drop down menu appears, allowing a user to select between four
variations of military and standard conventions. The Time Format control defaults to
hh:mm using military time, for example 18:30. Other format options include standard
time (AM/PM).
Changing the control type to Time does not display the date picker.
The default Time Format is Automatic. When Automatic is selected, both entry and
display formatting of times are locale specific. You still have the option to specify a
particular time format that is independent of the locale by using the format field, but
this is not recommended.
In addition to Automatic, the Time Format control has four standard formats using
both military and standard time. There are two separators, the dot and the colon.
Examples are shown below:
Working with Web Forms 10-9
Introduction to Web Form Controls
• hh:mm (18:30)
• hh.mm (18.30)
• hh:mm - AM/PM (06:30 PM)
• hh.mm - AM/PM (06.30 PM)
• hh:mm:ss (18:30:15)
• hh.mm.ss (18.30.15)
• hh:mm:ss - AM/PM (06:30:15 PM)
• hh.mm.ss - AM/PM (06.30.15 PM)
The local time is converted to UTC format in the submissions XML document. Here is
an example: <Order Time>15:42:00Z</Order Time>. The capital "Z" after the
time is necessary for proper initialization.
The Date/Time Control
Use the Date/Time control to display two input fields: one for the date and another for
the time.
The default Date/Time Format is Automatic. When Automatic is selected, both entry
and display formatting of dates and times are locale specific. You still have the option
to specify a particular date/time format that is independent of the locale by using the
format field, but this is not recommended.
A property drop down menu allows you to select from nine valid formats for the date
of the control and four choices in military and standard time for the time. See The Date
Control and The Time Control for more information.
Default formats for date and time remain mm-dd-yyyy and hh:mm.
• When you enter a date in the date part (or select with the picker), it automatically
completes the time portion of the control with a value for 12:00 AM.
The value displayed depends on the time format selected:
– 00:00 displays if the selected time format is hh:mm
– 12:00 AM displays if the selected time format is hh:mm - AM/PM
– 00:00:00 displays if the selected time format is hh:mm:ss
– 12:00:00 AM displays if the selected time format is hh:mm:ss - AM/PM
• You cannot enter a time value without a date value.
• Changing the Control Type to Time does not display the date picker.
• The time input field cannot be labeled. You must ensure that the label for the date
portion is descriptive enough to include the time portion.
If date and time labels for the appropriate input fields are required, two separate
controls must be used or the label for the date portion should be extended over the
time input field.
10-10 Developing Business Processes with Oracle Business Process Composer
Introduction to Web Form Controls
The local time is converted to and saved in UTC format and the date is converted to
the standard xsd:date format of yyyy-mm-dd In the submission XML document, for
example:
<OrderDate>2012-01-01TO05:00:00Z</OrderDate>
The capital Z after the time is necessary for proper initialization.
Form rules can be applied to the Date/Time control in all variations. Form rules
should execute in the form time zone.
Email
The Email form control allows users to enter a valid EMail address. The address must
conform to the following syntax: <name>@<name>.<string>.
Money
Use the money form control to allow users to enter U.S. currency. Users can enter
commas or decimal point. If a user does not enter them, the form displays these
symbols automatically. For example if a user types 4000, the form will display the
value as 4,000.00. The form also rounds all entries to two decimal places.
If a user types more than two digits after the decimal place the XML submissions
document stores as many digits as the user entered but does not include the dollar
symbol, decimal point, or commas.
Phone
The phone web form control allows users to enter a phone number using any of the
following formats: xxx.xxx.xxxx, xxx-xxx-xxxx, xxx.xxxx, or xxx-xxxx. To enforce one
of the 10-digit formats (to require an area code), edit the control's Pattern property.
Quantity
The quantity web form control allows users to enter quantities or any whole numbers
(integers). The form displays an error message if users enter decimal points, commas,
or anything other than an integer.
Number
The number web form control allows users to enter decimal numbers. Users may enter
any number of digits after the decimal place.
Selection Controls
Selection controls allow users to select from a list of several options. Oracle BPM
supports the following selection controls:
• Dropdown
• Radio
• check box
• True/False
Working with Web Forms 10-11
Introduction to Web Form Controls
Note:
The web form control palette does not include a combo box control which is a
drop down list in which a user can type a new value or option. Combo boxes
are not part of standard XHTML.
However, it is possible to use a combination of drop downs, radio buttons, or
check boxes with an "other" option in combination with form rules. If a user
selects "other," the rule then displays a text control (such as details or new
entry that the user can enter.
Dropdown
The dropdown control adds a drop down list to a form. By default the first choice in
the drop down list is blank. You must define the other choices by editing the control's
Options properties.
Radio
The radio control adds mutually exclusive radio buttons. You must define the number
of radio buttons and the specific choices by editing the control Options properties.
After selecting a radio option as the default, to change it, you must remove that option
from the control and tab out of the options property so that it is removed from the
control. You can then add the option back to the control's option list.
Check Box
The check box control adds a set of check boxes allowing the user to select one or more
options. Like other selection controls, you edit the control's Options properties to
define the number of check boxes and define the options available.
Booleancheckbox
The booleancheckbox control allows a user to select a true or false value in a control
instead of entering data. The control options default to "true=Yes" and "false=No". You
can change the option labels to other values if necessary. However, the option values
cannot be changed and remain true or false.
Selecting the Yes check box sets the value to true in the XML document for the control
data while leaving it deselected defines a false value. No value appears in the XML
document.
Group Controls
Use group controls to organize your forms based on the types of information you
require to present to your users.
Sections
Use the sections control to create groups of controls that users can expand and
collapse.
In a web form, users can click the expand icon to expand and collapse sections. You
can specify a default value to determine if the section is initially expanded or
collapsed.
After dragging a section control into your form, you can drag any other controls inside
it, including panels and other section controls. If you have a required control inside a
10-12 Developing Business Processes with Oracle Business Process Composer
Introduction to Web Form Controls
collapsed section, the section label turns red to cue users that they must expand the
section and supply the required information. If you delete a section control while
designing a form, all controls within the section are also deleted.
Optional Sections
Optional sections can cause the validity of a form to change dynamically. For example,
consider the following form:
Figure 10-5
Optional Section
The only required field in the form is Name. The entire Address section is optional.
However, if the user chooses to enter an address, then the entire address is required as
indicated by the yellow background when the user tabs to the City field. If the user
enters a value in the Street field, the City, State and Zip fields will become invalid
until valid values are entered in the three newly required fields.
Figure 10-6
Optional Section With Incomplete Data
If the user removes the value from the Street field, the form validity is automatically
recalculated. The Address section is no longer invalid because it is optional. The
generated XML instance document will also not contain an address element.
Tabs
You can use the tabs group control to create a tabbed view as shown in Figure 10-7.
Working with Web Forms 10-13
Introduction to Web Form Controls
Figure 10-7
Web Form Containing Multiple Tabs
By default, when you drag the tab control into a form there are three individual tabs.
To add or remove a tab, click the tab and then click the Add (+) or Delete (-) icon.
Additional tabs are added to the right of the tab from which you clicked the add icon.
To rearrange the tab order, drag one tab on top of another tab. The tab you dragged
moves to the right of the tab upon which it was dropped. You can drag in other
controls, including other group controls, into any individual tabs. Users see only those
controls in the currently selected tab.
To move a group of tabs to another area of a form, click the area to the right of the tab
drag the entire group to the desired location.
Panels
The panels control creates columns within a web form. You can add multiple columns
to a form by dragging in as many panels as necessary.
By default a panel's width is set to 49%. When you drag two panels into your form, the
second panel is automatically aligned with the first panel. Panels have a 1px border to
make their boundaries visible. Therefore, in a two-column layout you cannot make
both widths 50%.
Since panels are group controls, you can drag other controls inside them. If you want
to rearrange the order of your panels, you should remember that the drag-and-drop
restriction that prevents you from dropping a control below a group control. If you
have three columns and want the middle column at the far right, you must drag the
middle column above whichever control is directly beneath the panel.
In a three or four column layout, to move one of the middle columns or the right-most
column to the far left, you must drag and drop it above your left-most column.
Although panels have labels you can edit during design, the panel labels and panels
themselves are not visible to users at runtime or when testing a form. Only the
controls inside a panels are visible. These controls are organized visually according to
the width of the panels.
If you delete a panel, any controls you've dragged inside it are automatically deleted.
Tables
Use the tables layout control to conserve space within a web form. This control allows
you to arrange the form controls in a grid pattern.
10-14 Developing Business Processes with Oracle Business Process Composer
Introduction to Web Form Controls
You can edit the table name and column names. You can also drag and drop new
controls from the palette, and set the widths of the columns. You can control the
minimum and maximum number of rows in the table. The Add and Remove icons
automatically appear to the left. You can also use form rules to calculate values, enable
or disable fields, show or hide fields, and so on.
When you drag the table control into a form, by default, it has three rows and three
columns. The columns contain the default names col 0, col 1 and col 2. All of the cells
in the table are defined as required. The Add and Delete icons are displayed for each
row in the table, allowing you to add and delete rows, depending on the Min/Max
property values.
It is strongly recommended that column names in a table be unique.
Rearrange table columns by clicking on the arrow that appears when you click in the
column heading of the column that you wish to move. Columns move to the right
until the last column position in the table is reached.
Table controls have the following limitations:
• Table controls cannot be used in a repeat control.
• Table cell borders are not shown in print view.
• Table column names cannot be edited from the work area. Use the property editor.
Repeats
Repeating controls dynamically display multiple copies of a web form control. This is
useful when you want to allow users to enter multiple information of the same type,
for example, a phone number. A repeat control can dynamically display as many
controls as required rather than having to explicitly add extra input controls. Repeat
controls are used to repeat data elements and sections within a form.
You can add a repeat control to a web form, then drag and drop additional controls
into the repeat control in the same way that you add controls to a tab, panel, or
section. You can surround an individual control with a repeat control, or it can include
an entire section control. This section control should contain all of the web form
controls that must be repeated.
After adding a control to a repeat control, you can select the control to view and edit
its properties. Web form controls added to a repeat control contain two additional
properties:
• Min#: Specifies the minimum number of times the control can be repeated.
The default value for Min# is 0
• Max#: Specifies the maximum number of times the control can be repeated.
The default value of Max# is 1.
You must edit this value to define how many times the control is repeated. If you do
not edit the value, the control does not repeat.
These properties define how the control appears to end users. When the value of these
properties is greater than one, the user sees an add icon that automatically creates
another control. In the form editor, clicking on the control automatically increments
the property.
The Min# value defines the minimum number of controls that must be added and
filled-in by the end user.
Working with Web Forms 10-15
Introduction to Web Form Controls
If a user adds controls beyond the number defined by Min#, they must fill in the data
for the first controls up to the value of Min#. For example, if Min# is defined as 3 and
the user adds 5 controls, the first 3 controls, in order starting from the top of the form,
must contain data. If a user adds controls up to the number defined by Max#, the add
icon is no longer displayed.
To explain to users how to add additional data elements, you can provide a message
using a message control The following example shows one way of doing this:
<center>Click on the <img src="/frevvo/images/icons/add.gif"/> icon to addmore phone
numbers to the list.<br/></center>
When you edit the label or any properties of a control inside a repeat control, your
changes are applied to every instance of the control inside the repeat control. If you
delete a control inside the repeat control, all instances of the control are deleted.
Like panel controls, repeat controls are hidden when testing or using forms. Only the
controls within the repeat control are visible.
There are some key differences between repeat controls and the other grouping
controls:
• You cannot add button, message, or image controls.
• You cannot drag in message, image, link, tab, or table controls.
• A repeat control can contain only one web form control.
You cannot add tab controls, panels, or other repeat controls. To add multiple
controls to a repeat control, you can add multiple controls to a section control, then
add the section to a repeat control.
If you must add more controls to the section, you must drag the section out of the
repeat control, add the additional controls, then drag the section control back into
the repeat control. However, you can add a section control to a panel control
without having to remove the section out of the repeat control.
When adding a repeat data element that is part of a data source, Oracle Business
Process Composer automatically generates a repeating item in the control The schema
of the repeat control automatically enforces the minimum and maximum
requirements.
Changing a Repeat Control to a Table
You can change a repeat control to a table control through the Control Type or Display
As properties, depending on whether the repeat was dragged and dropped from the
palette or added from schema. Refer to this documentation for the details.
When you change a repeat to a table or vice versa and there are referencing rules, it is
recommended that you check the rules for the correct syntax and section names.
Other Controls
In addition to input, selection, and group controls, Oracle BPM provides other web
form controls to define how users interact with a web form.
Message Control
Use the message control to add static text on your form. You must provide the text in
the control's Message property. You can include XHMTL with your text. For example
you may want two lines with different font sizes or colors.
10-16 Developing Business Processes with Oracle Business Process Composer
Introduction to Web Form Controls
The browser formats the XHMTL when users access the form. For example, if you
want to create a header in a web form, you can use a combination of panels and
message controls as shown below.
<center style="font-weight:bold;">
Connecticut Surgeons, LLC
</center>
<center style="line-height:1.2em;">
82 Anderson Road<br/>
Branford, CT 06180<br/>
</center>
You can choose a message type to display different pre-defined background colors,
decorators or a border from the Message Type dropdown on the Setting tab of the
property panel. These settings can override the values you have specified for BG Color
and Label Color. For these values to take effect, select None for the Message Type.
Message Type values include:
• Default
• None
• Bordered
• Success
• Info
• Warning
• Error
Link Control
Use the Link Control to include a URL in your form. When a user clicks the link, the
target URL opens in a separate browser window.
Button Control
Use the button control to add a button to your form. This control is primarily used in
conjunction with form rules.
Note:
The button control does not work in repeating items.
Image Control
Use the image control to include an image (picture, logo, and so on) in your form. The
image control allows you to add JPG, GIF, and PNG files or any other image type that
your browser supports.
When you drag in the image control, a Browse button and an Upload Image button
appear. Click Browse, navigate to the image you want, and click Upload Image. After
uploading the image, the Browse and Upload Image buttons are no longer available.
To change the image you must delete the image control and drag in a new one.
Before uploading images, you must ensure that they are sized to fit within a form. The
standard form size is 600 pixels. You can resize an uploaded image by selecting the
Working with Web Forms 10-17
Introduction to Data Sources
image control in the designer, clicking on the style tab in the properties panel, and
setting the width.
Units are px, % or em. You must include the units. For example, specifying a value of
50% resizes the image to half the width of the form or panel.
Trigger Control
The trigger control adds a button to your form and is used in conjunction with rules.
See Using Dynamic Content in Form Rules.
Caution:
Triggers do not work in repeating items.
You can change the color of the Trigger button on the Setting tab of the properties
panel. You cannot center the text on a Trigger or remove the decorator. The New Line
property is checked by default. The Button Color can be changed by selecting one of
the choices in the Button Color dropdown on the Style tab.
Introduction to Data Sources
Data sources allow you to create web form controls based on existing data structures.
In Oracle BPM these data structures are defined by a Human Task payload.
After creating a human task payload, you can create a new web form based on the
payload data. See Walkthrough: Creating a Web Form Using the Data First Method for
information about creating a web form based on payload data.
Web Form Controls Generated by Payload Data Types
Table 10-2 shows the type of web form control generated for each data type supported
by human task payloads.
Table 10-2
Human Task Data Types and Their Corresponding Web Form Control
Data type
Web form control
String
Text control
Binary
Text control
Boolean
Booleancheckbox.
If checked, the value is set to true and if unchecked it is set to false if the
element is required. No value is specified if the control is optional. You
can set the label of the true and false options through the Labels property.
However only the first option, which maps to the true choice is displayed.
If you add more then two labels the extra labels are automatically
removed.
Int / Int64
Text control
Real / Decimal
Text control
Interval
Text control
Time
Date control
10-18 Developing Business Processes with Oracle Business Process Composer
Introduction to Data Sources
Data type
Web form control
Components
Section
Human task payload data created based on a business object is added to a
section form control. Individual data elements within the component
generate the same form controls as other data types. These are added to
the section control. After adding them to a form, you can rearrange them
as necessary.
Most of the controls generated from a human task payload are created as text controls.
However, all validation for the controls are based on the original data type datatype.
For example an xsd:integer type only allows numeric values.
Schema elements that specify element restrictions are generated as selection controls.
The control is created as a dropdown if there are four or more valid choices and a
radio button if there are fewer than four valid values. You can change the display type
between radio, dropdown, and check box using the Display As property.
Modifying Web Form Controls Generated From Data Elements
After generating web form controls from data elements you can:
• Update the data payload of the human task and recreate the web form.
• Edit the controls in the web forms editor.
What You Can Edit Using the Web Form Editor
You can perform the following on a web form control after generating it from a data
element:
• Edit the web form control's name.
You can edit the name that is displayed in the web form editor. However, the
underlying XSD is not changed.
• Create or edit web form rules used by the web form control.
• Set default values for the web form control.
• Edit the layout of the web form controls within the web form.
You can move controls in sections or panels as required. However, you cannot add
or remove a generated web form control from a repeat control.
• Edit the Display As property of the web form control.
See Introduction to the Display As Property for more information.
• Edit the web form control's label.
What You Cannot Edit Using the Web Form Designer
The following changes cannot be made when generating web form controls based on
data elements:
• Make edits to web form controls that alter how the web form or web form controls
are validated.
• Alter the number of repeats of a repeating control.
Working with Web Forms 10-19
Walkthrough: Creating a Web Form Using the Form First Method
• Add additional web form controls that require changes to the underlying data
source.
Introduction to the Display As Property
The Display As property is only supported by web form controls generated from a
data source. Use the Display As property to change the way your control appears on a
web form. For example, a text control can be changed to a dropdown control or vice
versa. This changes the control's appearance on the form, but does not change how the
control validates data. To modify how the control is validated, you must redefine the
human task payload data and recreate the web form.
To see the control's underlying data type and the global element to which it is bound,
hover over the property tab. The expanded Data Source displays the XSD path as a
tool tip.
If you set the Display As property to a select web form control (radio, dropdown, or
check box), the Label property is enabled. By adding strings into the labels property
you can restrict the values allowed to be entered into this control when users use your
form. When the form is submitted the value is equivalent to the selected option label.
Another way to set the labels is through a rule to dynamically initialize the options
when the form loads. See Working with Web Form Rules for more information.
The Display As property is not available for the following controls when based on a
data type:
• Message
• Repeat
• Date, Time, or Date/Time
• Boolean
Walkthrough: Creating a Web Form Using the Form First Method
You can use Oracle Business Process Composer to create a web form that is not based
on pre-existing data.
See Introduction to Web Forms for information about the use cases for creating web
forms.
To use the form first use case, you create a web form directly from the Project Home
Page. After creating the web form, you use the web form designer to rearrange the
form controls as required.
To create and edit a web form with no previously defined data:
1.
2.
Create a new web form using the Project Welcome Page.
a.
Ensure that you are editing the project.
b.
From the Project Welcome Page, select Web Forms.
c.
Click the New Web Form icon, then enter a name.
d.
Click Create.
Add controls to a web form.
10-20 Developing Business Processes with Oracle Business Process Composer
Walkthrough: Creating a Web Form Using the Data First Method
After creating a new web form, you can add form controls as necessary to define
how users interact with your application. See How to Add Controls to a Web
Form for more information.
3.
Edit the web form and web form control properties.
You can edit the properties of your web form and its controls to determine their
behavior and appearance. See How to Edit the Properties of a Web Form for more
information.
4.
Add form rules to a web form.
You can add form rules to your web form to further customize and control its
behavior. See Working with Form Rules for more information.
5.
Test your web form.
You can use the web form designer to preview how your web form appears to end
users. See How to Test a Web Form for more information.
6.
Save your web form.
To save a web form, you must save the entire project. See Managing Project
Changes for more information.
7.
Assign your web form to a human task.
After completing your web form, you can assign it to a human task using the
human task editor. When you assign the web form to a human task, the human
task editor automatically generates the payload information based on the controls
you added to the web form. If the human task already has an existing payload
defined, it is replaced by a new payload defined by the web form.
See How to Specify the Presentation of a Human Task for information about
assigning a web form to a human task.
Walkthrough: Creating a Web Form Using the Data First Method
You can use Oracle Business Process Composer to create a new web form based on an
existing human task payload.
See Introduction to Web Forms for information about the use cases for creating web
forms.
Human task payloads are created using the human task editor. When creating web
forms based on a payload, the payload becomes read-only. The following conditions
apply:
• You cannot update the payload signature after you create the web form.
In other words you cannot add or remove data objects nor change their type.
However, if you have defined complex data types in the human task payload, you
can modify them by editing the underlying business object.
• After creating a web form based on a human task payload, you cannot add web
form controls to a form that require underlying data structures.
Any additional data required by adding web form controls to the web form using
the form editor is not be added to the underlying schema and is not available in the
human task payload.
If you have not created the human task payload based on complex data objects, to
modify the payload you must disassociate the human task from the web form, make
Working with Web Forms 10-21
Walkthrough: Creating a Web Form Using the Data First Method
the modifications to the payload, and create a new web form based on this new
payload.
To create and edit a new web form based on an existing payload:
1.
Create a new human task and define its payload.
a.
Create a new human task.
See How to Create New Human Task for more information.
b.
Create the payload you want to use as the base for the new web form.
See How to Create and Configure the Data Payload for a Human Task for
more information.
c.
Open the human task.
See How to Open a Human Task for more information.
d.
Select the Basic tab.
e.
In the Presentation area, select Web Form, then click the Add icon.
f.
Enter the name of the web form, then select Based on payload.
g.
Click Create.
The web form is created and assigned to the current human task.
h.
Click Edit to edit the web form.
The web form editor displays a blank form.
2.
Generate web form controls from payload data.
After creating a web form based on a payload, you can use the payload data to
generate the corresponding web form controls. The payload data appears in the
Data Structures pane on the left side of the web form editor.
See How to Add Controls Based on Data Sources for more information.
3.
Add additional web form controls.
You can add additional form controls as necessary to define how users interact
with your application. See How to Add Controls to a Web Form for more
information.
Note:
You can add additional controls to refine the look and feel of your web form.
However, any data controls that you add are not reflected in the underlying
payload.
4.
Edit web form and web form control properties.
You can edit the properties of your web form and its controls to determine their
behavior and appearance. See How to Edit the Properties of a Web Form for more
information.
5.
Add form rules to a web form.
10-22 Developing Business Processes with Oracle Business Process Composer
Working with Web Forms
You can add form rules to your web form to further customize and control its
behavior. See Working with Form Rules for more information.
6.
Test your web form.
As you are designing a web form, you can test its appearance and the behavior of
form rule. See How to Test a Web Form for more information.
7.
Save your web form.
To save a web form, you must save the entire project. See Managing Project
Changes for more information.
Working with Web Forms
After creating a new web form, you can use the web form editor to add web form
controls, edit form control properties, and test the web form.
The following sections describe how to add various types of controls to the form.
How to Add Controls to a Web Form
You can add controls to a web form by dragging and dropping from the web form
control palette to the web form canvas. You can drag/drop above, below, to the left
and right of most controls. If you are not dragging your control over a group control,
your control will be placed at the top of your form.
As you drag a control, the position cursor changes to indicate its status.
Table 10-3
Web Form Position Cursor Icons
Position Cursor
Icons
Do Not Drop
Drop
Drop over
Drop under
Drop right
Drop under
Description
The control you are dragging can’t be dropped over the area.
Your cursor is over an area on the canvas where dropping a control is
allowed.
Your control will be placed above the control over which you are
hovering. You’ll see this icon when you drag the control over the top half
of an area into which the control can be dropped.
Your control will be placed below the control over which you are
hovering. You’ll see this icon when you drag the control over the bottom
half of an area into which the control can be dropped.
Your control will be placed to the right of the control over which you are
hovering. You'll see this icon when you drag the control over the right half
of another control.
Your control will be placed will be placed to the left of the control over
which you are hovering. You'll see this icon when you drag the control
over the left half of another control.
Other important drag-and-drop rules:
Working with Web Forms 10-23
Working with Web Forms
• If you let go of a control while the Do Not Drop icon is showing, your control goes
back to where it was - either back to the Palette or where it was in your form before
you tried to move it.
• You can drag and drop above, below, to the left and right of most controls.
• You can drop controls above and below the Section, Tab, Table, Repeat and
Panel.group controls.
• Panels can be dropped to the left or right of other panels, however, you cannot
drop other controls in a similar manner to the left/right of panels.
• You can never drop two different controls into a repeat control—for example, you
cannot drag in a quantity control if your repeat control already contains an EMail
control.
If you require multiple controls inside a repeat control, first drag the controls into a
section, then drop the section into the repeat. After the section is inside your repeat
you may not add anything else to the section, so build the section first in this case.
You also may never drop a panel, tab or another repeat control inside a repeat
control.
To add controls from the component palette:
1. Open the web form where you want to add controls.
2. In the component palette click the control you want to add, then drag it to the form
canvas.
As you begin to drag a control from the component palette, the position cursor
changes depending on its position in the form canvas.
3. Release the mouse button to add the new control.
Creating Multi-Column Forms
You can create forms with multiple columns.
All control widths are specified in columns. The width is selected by clicking on a grid
in the style tab.
When dropping controls from the palette on an empty canvas or above or below an
existing control, the newly dropped control is 12 columns wide.
If you drag a control from the palette and drop it to the left or right of a control, the
newly dropped control will take the width of the control you dropped on. The width
of a control that is already in your form must be adjusted manually by the designer if
the position of the control is changed.
To create a multi-column form:
Drag and drop panels from the palette and then drop additional controls inside of the
panels. Panels can be dropped to the left or right of other panels. A newly dropped
panel dropped to the left/right of another panel will take the width of the panel it was
dropped on.
Alternatively, drag and drop the first control onto the canvas, modify the width to
your specification and then drag and drop additional controls to the right of the
previously dropped one. The controls will "wrap around" and line up in columns.
10-24 Developing Business Processes with Oracle Business Process Composer
Working with Web Forms
How to Add Controls Based on Data Sources
After creating a web form based on the payload data of a human task, you can
automatically generate web form controls for the data elements defined in the
payload. You can generate form controls from all of the data elements or individual
data elements.
See Walkthrough: Creating a Web Form Using the Data First Method for more
information.
Generating Form Controls for all Data Elements in a Payload
To generate form controls for all the data elements in a payload:
1. Open the web form you created based on a human task payload.
2. In the Data Sources pane, click the Add (+) icon to the right of the
HumanTaskPayload node in the data elements tree as shown in Figure 10-3.
Oracle Business Process Composer generates a web form control for each of the
data elements in the payload. The controls are added to the web form above the
currently selected control. See Introduction to Data Sources for information about
which web form control is generated for each data type of the payload.
3. Edit the layout of the controls as necessary by dragging and dropping them within
the web form.
Note:
You cannot add a control generated from a data element into a repeat control.
Generating Form Controls for Individual Data Elements
To generate form controls for individual data elements in a payload
1. Open the web form you created based on a human task payload.
2. In the Data Sources pane, click the bullet to the left of the HumanTaskPayload
node as shown in Figure 10-3.
Oracle Business Process Composer displays a tree showing a list of the data
elements within the payload.
3. For each of the data elements that you want to add to your form, select the Add (+)
icon to the left of the data element.
Oracle Business Process Composer generates a form control for the data element.
When adding data elements individually, the form controls are added directly at
the beginning of the form. They are not added to a form panel.
4. Edit the layout of the controls as necessary by dragging and dropping them within
the web form.
Working with Web Forms 10-25
Working with Web Forms
Note:
You cannot add a control generated from a data element into a repeat control.
Adding Business Objects to a Web Form
Add business objects to a form from the Data Sources panel. The Data Sources panel
includes business objects that you have added from the catalog using the Form
Business Objects dialog, accessed from the web form editor toolbar.
To add business objects to a web form:
1. Edit your web form and click the Business Objects control on the web form editor
toolbar.
The Forms Business Objects dialog displays.
2. Select the business objects to include as data sources by using the controls on the
dialog to move them to the Selected panel.
3. Click OK to close the Forms Business Objects dialog.
10-26 Developing Business Processes with Oracle Business Process Composer
Working with Web Forms
4. Drag business objects from the Data Sources panel of the palette to your form.
How to Show Which Web Controls Were Created from a Data Source
The web forms editor allows you to view which web form controls were automatically
generated from a data source.
To show which web controls were created from a data source:
1. Open your web form.
2. Expand the Data Sources panel.
3. Click the Show Form Controls icon.
Each generated web form control is highlighted in the web form canvas.
How to Edit the Properties of a Web Form
You can edit the properties of a web form to configure general settings and style for
the web form.
To edit the properties of a web form:
You can edit the properties of a web form to configure settings for the form as well as
general style properties. See Web Form Properties for information on the properties
supported by Oracle BPM.
1. Open the web form whose properties you want to edit.
2. Click the web form header at the top of the form canvas.
The properties tabs for the web form appear in the properties editor.
3. Edit the properties for the web form in the properties editor.
Working with Web Forms 10-27
Working with Web Forms
How to Edit the Properties of Web Form Controls
You can edit the properties of a web form control to configure how the control appears
in your web form.
To edit the properties of a web form control:
You can edit the properties of individual form controls to configure its behavior and
style. See Web Form Control Properties for information on the properties available for
each form control.
1. Open the web form containing the control you want to edit.
2. In the form canvas, select the control.
When you select a control in the form canvas, it is highlighted.
3. In the properties editor select either the Settings or Style tab, then edit the
properties as necessary.
See Web Form Control Properties for a description of each supported web form
control property.
How to Delete a Web Form
You can delete a web form your BPM project from the Project Home Page.
Note:
You cannot delete a web form that is associated with a human task. If you
want to delete a web form associated with a human task, you must first
disassociate it using the human task editor.
To delete a web form:
1. Go to the Project Home Page.
2. Select Web Forms, then position the cursor over the web form you want to delete.
3. Click the Delete icon, then click OK to confirm that you want to delete the web
form.
4. Save your project.
How to Remove a Control from a Web Form
You can remove form controls from a web form using the web forms designer.
Note:
After deleting a control it cannot be undone. You must add a new control to
the web form and configure its properties.
10-28 Developing Business Processes with Oracle Business Process Composer
Working with Web Forms
Removing Controls
To remove a control from a web form or organizational control:
1. Open the web form whose control you want to delete.
2. Click on the control to select it.
When you select a control, it is highlighted.
Note:
Ensure that you select the individual control you want to delete and not the
organizational control.
3. Click the Click to remove button.
Removing Organizational Controls from a Web Form
To remove an organizational control from a web form:
1. Open the web form containing the organizational control you want to delete.
2. Click on the organizational control you want to delete.
When you select an organizational control, the control and all of the controls it
contains are selected.
3. Click the Delete button.
Note:
When you delete an organizational control, all the controls it contains are also
deleted.
How to Test a Web Form
While designing a web form, you can test its behavior directly in the web form editor.
Each time you supply a value in a control, the form sends an asynchronous request to
the server to validate the data. You do not have to complete the entire form before
discovering data was entered incorrectly—try to type letters in a number control, for
example, and you'll immediately see an error message. If your form includes rules that
are associated with a particular control, the server applies these rules as soon as users
enter data in the control.
For example, perhaps your form has a rule that enables the Guest Name control when
you select the Yes radio button in the Are You Bringing a Guest?. In this case the
Guest Name control is enabled immediately--while you are still completing the form.
To test a web form:
1. Open your web form.
Working with Web Forms 10-29
Working with Web Forms
2. Click the Test Form button in the web form editor toolbar.
3. Test your web form by entering a date, selecting items from dropdown controls,
and so on.
4. Click the Close (x) button when you are done testing.
About Localization in Web Forms
Web Forms can be localized to support multiple additional languages.
In order for a language to be supported, it must be added at the project level first. See
Introduction to the Project Information Panel.
After a language has been added at the project level, translation strings for web form
elements can be added in the web form editor. See Introduction to the Property Editor.
10-30 Developing Business Processes with Oracle Business Process Composer
11
Working with Web Form Rules
This chapter describes how to create and edit form rules within a web form using
Oracle Business Process Composer. Form rules are pieces of Java-script code that
allow you to define how users interact with your web forms. This chapter assumes
that you are familiar with the basics of Javascript.
This chapter includes the following sections:
• Introduction to Form Rules
• Working with Form Rules
Introduction to Form Rules
Form rules are pieces of server-side Javascript code that allow you to define how users
interact with your web forms by defining how web form controls are displayed and
defining the types of data users can enter.
You can use form rules to define the behavior of a web form. Typical uses of form
rules include:
• Adding dynamic behavior to a web form, including showing or hiding elements or
enabling or displaying elements.
For example, you can add form rules that show or hide certain form controls or
entire sections based on the state of other form controls. Displaying form fields in a
context-sensitive manner reduces clutter and makes it easier for users to navigate
your forms.
• Performing complex calculations.
For example, you can compute the total invoice price on an order form from values
of other form fields such as item quantity and price.
• Performing complex validations.
• Populating a dynamic drop down list.
The following sections describe the basic functionary of Javascript within form rules.
See Web Form Rules Examples for information about specific use cases of form rules.
Form Rule Javascript Syntax
In Oracle Business Process Management (Oracle BPM), a form rule is expressed in
JavaScript code. Form rules are saved and can be run after you save your BPM project.
Form rules generally have the following form:
if (condition)
{
true actions;
Working with Web Form Rules 11-1
Introduction to Form Rules
}
else
{
false actions;
}
You can create more advanced form rules primarily for the purpose of looping over
repeating items. Following are some basic characteristics of JavaScript that you should
be aware of when writing form rules:
• Case-sensitivity: Javascript commands are case-sensitive.
For example, var color1 and var Color1 are two different variables
• Loosely typed variables: In Javascript variables are loosely typed.
Variable types do not have to be explicitly declared. For example, var color = 'red';
and var num = 33 cause the variable color to be a string type and num to be a
numeric type.
• End of line semicolons: End-of-line semicolons are optional.
However, you should use semicolons to terminate lines as part of good coding
practice. This often prevents mistakes.
• Comments: You can add comments to your code using either // or /* */ syntax
Oracle BPM does not support the following Javascript syntax:
• switch statement
Additionally, Oracle BPM supports the following syntax with some limitations:
• try-catch
For example, in the following example, the value of the control named FN is set to 'got
exception' because the JavaScript variable named x is undefined in this form rule.
if (form.load) {
try {
x.randomproperty = 'blah';
} catch (e) {
FN.value = 'got exception';
}
}
However, catching an exception when a form control is not defined is not supported
and may behave unexpectedly. This is because Oracle BPM catches the problem while
parsing the form rule before the JavaScript interpreter catches the error.
In the following example, the control named Color does not exist in the form.
if (form.load) {
try {
Color.value = "red";
} catch(e) {
msg1.value = "error caught: " + e;
}
}
11-2 Developing Business Processes with Oracle Business Process Composer
Introduction to Form Rules
Control Name
Form rules often must reference form controls. You must assign a control a name
using the control's name property.
Names are case sensitive. If your control is named FirstName then you must write the
form rule as FirstName.value. firstname.value does not work.
When using a control in a form rule, you must ensure that the control has a unique
name. If multiple controls have the same name, the run time environment cannot
determine which control the form rule refers. Form controls added to a form from the
palette are usually guaranteed to have a unique name. The web form editor does not
allow you to change the name of a control to one that already exists in your form.
However, there are several contexts where you can have multiple controls with the
same name:
• Controls added from XSD data sources
• Controls added from the custom palette
• Controls nested in sections
If there are two controls with the same label and at the same level, the control name is
automatically made unique. If you try to edit the name such that it is no longer
unique, the web forms designer prevents you from making the change.
When a control is dropped inside a section control, it is at a different nesting level then
a control dropped outside a section. Two controls, one inside a section and another
outside the section, are also at different nesting levels. The web form designer allows
you to provide identical names to the controls.
If non-uniquely named controls are used in form rules there may unexpected results.
If you encounter errors in a form, you can edit the names of control names to make
them unique.
Note:
Editing the name of a from xsd schema control has no effect on the xml
instance document created when the form is submitted nor on the xml
validation
Form Rule Identifiers
Form rules refer to form controls using the Name property. If you have a control
where the Name property is defined as MyControl, you can refer to properties of this
control in form rules using the name as an identifier.
Form rule identifiers must always be of the following form:
Name.<property>
The following form rule identifier properties are supported:
• visible: Set to false to hide a control and true to make the control visible.
• value: Read or set the value of a control.
Working with Web Form Rules 11-3
Introduction to Form Rules
This property is not applicable to sections, tabs and other controls that do not have
values displayed to the user.
• enabled: Set to false to disable a control so that a user can not change its value and
true to enable it.
This is not applicable to sections and tabs.
• expanded: Set to false to collapse a group control (sections controls only) and true
to expand a group control.
• selected: Set to true to designate a tab as the selected tab. (tab controls only).
• valid: The value of this property is true if the control contains a valid value
otherwise its value is false.
Validity is based on the control's type. For instance a numeric control is invalid if
the user enters a string value that cannot be converted to a number. This property
can be set and read.
• required: Set to true to make a control required and display the red asterisk.
This property only affects palette controls and not controls generated from XSD
schema data source.
This property is also valid for section controls. Setting a section required to false
automatically sets all inner controls to not required.
• options: Enables dynamic setting select control options (radio, dropdown and
check box controls only).
• label: Sets the label seen on any control including sections.
• help: Sets the help text.
• hint: Sets the hint seen on hover.
• status: Sets the error message display whenever the control's value is invalid.
• clicked: Used by the trigger controls. Its initial state is false.
When a user clicks a trigger its state turns true.
• printable: Set to false to remove the control from both the printable view and PDF
submission document.
• itemAdded: Used by repeat controls. Its initial state is false.
When a user clicks "+" to add a repeat item AND when a repeat item is added
through a Document URI as the form loads its state turns true.
• itemRemoved: Used by repeat controls. Its initial state is false.
When a user clicks "-" to delete a repeat item its state turns true.
• itemIndex: Used by repeat controls.
When an itemAdded or itemRemoved event fires, the value of itemIndex is set. For
itemRemoved events itemIndex returns -1. For itemAdded events itemIndex gives
you the index of the added item.
• form.load: This property is true when the form is first loading.
11-4 Developing Business Processes with Oracle Business Process Composer
Introduction to Form Rules
It is useful for setting default values through form rules that must be set before the
user starts interacting with the form.
• form.unload: This property is true when the users clicks the form's submit button.
It is useful for setting control values just prior to the form's Doc Actions and Form
Actions are executed.
Examples of identifiers used in form rules are:
• FirstName.value
• BillingAddress.visible
• Email[1].value
• Email[i].visible
The latter two are examples of repeating controls. repeating controls are discussed in
more detail later. Note that the case of the properties is important.
FirstName.value is a valid form rule identifier but FirstName.Value or
FirstName.vAlUe are not.
Strings and Numbers
Because Javascript is a loosely typed language, there may be situations where you
must add field values and the form rule performs string concatenation. There are
several ways to tell the form rule to perform mathematical calculations instead of
string manipulation. One simple way is by adding a *1 to the variable. id = id*1 +
1; ensures that id equals the current value plus one rather than the current value with
a 1 appended. For example, if the current value was 4 and you didn't write id*1 the
result would be "41" rather than 5.
You might encounter a situation in a form rule in which money controls perform a
string concatenation rather than an addition. To correct this:
• Open the form with the form rule in the designer, change the money controls to
text controls, and then save the form.
• Open the form, change the text controls back to money controls, and then save the
form again.
Dates and Times
To initialize a date control, the data must be in the correct format.
Here are some examples of correct date formats:
• d1.value = "2012-01-13"; //yyyy-mm-dd
• d2.value = "01-13-2014"; //mm-dd-yyyy
• d3.value = "jan 13 2014"; //using string for month
In general, it is not recommended to rely on either the browser's locale or the server's
locale when writing date, time (time of day) and date/time literals in rules.
An example date and time rule follows:
if (form.load) {
date.value = "2014-02-29";
timeofday.value = "13:10:02";
datetime.value = "2014-02-29T18:10:02Z";
Working with Web Form Rules 11-5
Introduction to Form Rules
This rule will initialize a date control in a form with 02-29-2014, a time control with
1:10 PM and a date and time control with 02-29-2014 in the date portion and 1:10 PM
in the time portion.
Notice the special character "Z" at the end of the date/time value. This is equivalent to
an offset of UTC-00:00 and indicates that the time of 18:10:02 is given in UTC. 18:10:02
UTC is equal to 1:10 PM Eastern Standard time.ind UTC.
Time and date/time controls also require correct formatting and an understanding of
how web forms manages time zones. Web forms converts times into the browser's
local time zone before displaying them in the form. However, if time data is not
correctly formatted web forms will make multiple attempts to parse the time but will
always display the time with NO time zone conversion. Here are examples of correct
time formats:
• t1.value = "20:30:00";
• d2t2.value = "20:30:00Z";
• t3.value = "20:30:00-04:00";
• dt1.value = "2012-08-23T20:30:00";
Writing Conditions
One of the most common conditions is a form rule that executes as soon as the user
enters a value in the control. The test for this condition depends on if the field is a
string type or a numeric type.
String Types: text, textarea, date, phone
if (name.value.length > 0)
Numeric Types: money, quantity, number
if (name.value != null) or if (name.value > 0)
are both common test conditions.
Many times the condition name.value.length > 0 can be dropped altogether and the
form rule can be simplified. This form rule executes whenever a user enters a value
into either the control named firstname or lastname.
fullname.value = firstname.value + ' ' + lastname.value;
Select Controls
Radio controls, dropdowns, and check boxes are all examples of select controls. Radio
and dropdown controls are single select. That is, if one item in the dropdown is
selected then all other items in the dropdown are deselected. The same is true for a
radio. Only one radio button can be depressed at any time. Thus the ID.value of radios
and dropdowns are similar to the other input and output controls. The value is a
single item.
check box controls are multi-select. Multiple items can be selected at any given time.
Thus the ID.value of a check box is an array. Therefore on check boxes a valid
expression is ID.value.length which returns the number of items in the value array.
And ID[0].value would retrieve the 1st item in the list and ID[1].value the 2nd and so
on. If you have a check box control with only one check box and that check box is
unchecked, the array contains no elements. For a check box control a useful expression
is ID.value.length == 0. Note that ID.length is not a valid expression. Also since a
11-6 Developing Business Processes with Oracle Business Process Composer
Introduction to Form Rules
check box control is an array it is not a valid expression to write ID[0].value == .
Because if at option in the check box control is unchecked, its value is not be an empty string. It
simply does not exist in the array.
Initial Control State
Every control in your form has an initial default property state for the visible,
expanded, value, valid, and enabled properties. However, you can change controls in
the initial state in the form designer Edit tab. An initial state of a control can be
modified several ways. One way is by simply tying a value into an input control. This
sets the default value for the control when the form is first opened in use mode.
Another way is by expanding or collapsing group controls. This sets the initial
expanded state. The default state for the visible and enabled properties is set through
the controls edit property panel. The edit property contains check boxes for visible and
enabled for controls on which those properties make sense like input controls.
Form Rules and Repeating Controls
If you have a repeating control in a form that itself contains a repeating control, you
cannot apply a form rule to the inner repeating control, since there's no way to tell
which of the inner repeating items goes with which outer repeating item.
Using Dynamic Content in Form Rules
Real forms often require dynamic content in dropdown lists. Often based on the value
entered into one form field, the values in other fields or options available in select
controls must be dynamic.
Dynamic Content
Form rules enable invocation of http gets that return X-JSON headers with JSON
objects. This allows complete flexibility in assignment of default values populated into
form fields such as text controls and select (radios, dropdown, check box) controls.
You can also use http.post(), http.delete(), and http.put() in form rules, although you
must use URL parameters with them, as they do not all support payloads.
Here is an example that shows the syntax of the http.get. This form rule invokes the
http get, which must return a JSON object. The method on the servlet can do whatever
necessary such as querying a database given the itemName to retrieve the itemPrice.
In this example the JSON object returned contains a field called price. The eval
converts and assigns the JSON object to the javascript variable x. Then x can be used in
the form rule as necessary. In this case it is used to set a value to the form field called
Price.
eval('x=' + http.get('http://<webhost>/test/json/getPrice?itemName=' +
itemName.value));
Price.value = x.price;
Another example is where the JSON object returned in the http.get response contains
an array called clients. This array can then be used to set the options in a dropdown
list.
eval('x=' + http.get('http://<webhost>/test/json/getClients'));
Clients.options = x.clients;
Here is another example of a servlet that returns a JSON object after authenticating a
user and password.
Working with Web Form Rules 11-7
Introduction to Form Rules
@Override
public void doGet (HttpServletRequest request, HttpServletResponse response)
throws ServletException, IOException
{
try {
String u = request.getParameter("username");
String p = request.getParameter("password");
if (authenticate(u, p) == null)
response.addHeader("X-JSON", "{auth:false}");
else
response.addHeader("X-JSON", "{auth:true}");
} catch (Exception e) {
throw new ServletException(e);
}
}
This servlet can be used in a form rule as follows:
if (signForm.clicked)
{
eval('x=' + http.get('http://<webhost>/MYservices/signForm?username=' + u.value
+ '&password=' + p.value));
if (x.auth)
{
m.value = "<center>Authenticationn Succeeded</center>";
} else
{
m.value = "<center>Invalid username or password</center>";
}
}
It is important to note that the http.get is accessing your http service through a URL.
Certain characters must be encoded in order to correctly pass through an HTTP URL
You may not always be able to control the values your users enters into your form
fields. If the value may contain one of these characters that value must be encoded.
For example, this http.get contains a password parameter. Since user passwords may
contain characters such as '#' you should encode the value. The built-in javascript
method encodeURIComponent() makes this easy.
eval('x=' + http.get('http://<webhost>/MYservices/signForm?username=' +
u.value + '&password=' + encodeURIComponent(p.value)));
You may also have to decode the URL parameter in your HTTP service. For example:
import java.net.URLDecoder;
String p = request.getParameter("password");
p = URLDecoder.decode(password, "UTF-8");
Reusing Dynamic Content
Fetching dynamic content from your back end system can be the source of degrading
form performance. If your form must use the dynamic content multiple times you can
improve performance by fetching the content once from the http.get() and saving the
returned JSON string in a hidden text form control. You can then later read the text
control value and eval it again rather than having to call your back end system
multiple times.
11-8 Developing Business Processes with Oracle Business Process Composer
Introduction to Form Rules
For example, add a hidden text control to your form named jsonUserData. Add a
single line to the form rule that retrieves the user data from your back end system
through the http.get():
jsonUserDate.value = x;
In other form rules that also require the user data, rather than calling http.get() to your
back end system again, add the following line to your form rule:
var val = jsonUserDate.value;
eval('x' = val);
This has the affect of setting x to the same string as if you had again fetched content
from your back end system.
Using Data and Built-in Methods in a Form Rule
You can access built-in data and methods within your web form rules.
Built-in Data
Oracle BPM provides certain data to your form rules. This includes information about
the person currently using your form, the tenant and form information. You retrieve
this data in your form rule using the _data.getParameter('<data name>') syntax.
The following is a list of the available data:
• subject.id - logged in user's username
• subject.first.name - logged in users's First Name
• subject.last.name - logged in users's Last Name
• subject.roles - list of all the roles for the logged in user (available in v4.1.5)
You can use a form.load form rule to pre-populate fields in your form with
information about the currently logged in user. For example, if you have controls in
your form named ID, FirstName, LastName, Email and Roles.
Note:
Setting the value of a control to an array or to a random JavaScript object is not
allowed.
Built-in Methods
Oracle BPM provides built-in helper methods for common functionality required by
form rules. Here is the list of available methods for working with dates and times:
• Time frevvo.currentTime(form) - returns the current time in the user's local time
zone.
This method should only be used to set the value of a Time control.
• Date frevvo.currentDate(form) - returns the current date in the user's local time
zone.
This method should only be used to set the value of a Date control.
Working with Web Form Rules 11-9
Introduction to Form Rules
• DateTime frevvo.currentDateTime(form) - returns the current date and time in the
user's local time zone.
This method should only be used to set the value of a Date/Time control.
Here is an example of setting a Time control named Tm, a Date control named Dt, and
a Date/Time control named DtTm.
Tm.value = frevvo.currentTime(form);
Dt.value = frevvo.currentDate(form);
DtTm.value = frevvo.currentDateTime(form);
The currentTime(), currentDate() and currentDateTime() does not work in a form.load
form rule unless you specify a time zone on the form's Url through the _formTz Url
parameter. This is because the form server must know the time zone in which to
return the date and time. If you do not specify a _formTz the methods return null and
the control values remain blank. For example, to specify Eastern time:
&_formTz=America/NewYork.
Use the following methods to work with users and roles:
• boolean isUniqueUserId (String userId, String tenantId) - returns true if this user
does not exist in the tenant and false if it does
• boolean isUniqueRoleId (String roleId, String tenantId) - returns true if this role
does not exist in the tenant and false if it does
Understanding How Form Rules Work at Runtime
When using form rules within a web form, it is important to understand how form
rules behave at runtime.
When are Form Rules Executed?
When you create or edit a form rule, Oracle BPM determines the list of controls and
properties of those controls that the form rule depends upon. The form rule is
automatically executed whenever there is a state change that is relevant to the form
rule. Form rules are also executed sequentially in a top to bottom order as they are
seen in the form rules panel.
Note that form rules can trigger the execution of other form rules. So, if a form rule,
R1, sets the value of a control with Name A, and there is a form rule R2, that depends
on A.value, then form rule R2 is triggered and executed.
A form rule typically refers to one or more form controls and their properties, and it is
executed if any of those properties change value. Note that form rules are not fired
when the page is loaded. For example, the following form rule is only executed when
N1.value changes its value.
if (N1.value > 0 || N2.value > 0) {
T.value = N1.value + N2.value;
}
Now assume a use case where you want to show a message when a user enters an
invalid email. The form has a required Email input control (Name=E) and an action
should be executed if the email control 'valid' property is 'false'. You can write the
form rule as:
if (!E.valid) {
// code to show message here.
}
11-10 Developing Business Processes with Oracle Business Process Composer
Introduction to Form Rules
The previous code does not work as expected as E is a required field and therefore
E.valid initial value is 'false' since the field is in initially empty. When the user enters
an invalid Email address, E.valid still has the value 'false' and the form rule can not
execute since there is no state change. The following code works properly.
if ((E.value.length > 0) && (!E.valid)) {
// code to show message here.
}
The form rule depends on both the value of E.valid and E.value.length and therefore,
when a string longer than zero characters is entered the form rule is executed and the
message is shown.
Infinite Loops
It is easy to create form rules that enter a loop condition. For example, a form rule that
updates A.value based on B.value and another form rule that updates B.value based
on A.value. They can continually trigger each other.
The Oracle BPM server prevents this from happening by setting an execution time
limit for each form rule. Any form rule that takes longer than 5 seconds to execute is
forcibly stopped. Note that this is a very lengthy period of time for most
computational tasks and the vast majority of form rules are not impacted by this
constraint. However, since Oracle BPM is a hosted site that may be simultaneously
used by numerous users, there is a time limit imposed on these computations.
Debugging Form Rules
This section describes ways of debugging forms.
Debugging Duplicate Control Names
When you're designing forms, the forms designer generally prevents you from giving
controls duplicate names, but you can give controls the same name if the controls are
contained within different section controls. For example, you can have two sections in
a form named Home and Office, and each section can have a text control named
Address. However, if you want to use either of the Address controls in a form rule,
you have to give them unique names.
One way to tell if a form rule is breaking because of duplicate names is to look at the
log in the Tomcat console. If you see a message similar to the following, it is probably
a duplicate control name problem.
16:50:35,390 WARN RuleObserver:455 - Error evaluating rule [Translate.Translate
Form Rule]: Java arrays have no public instance fields or methods named "value."
([Translate.Translate Form Rule]#2) if (form.load) {Name.value = 'Nancy';}
The phrase Java arrays have no public instance fields or methods... means Java is
interpreting the controls with the same name as an array, not single controls.
Form Rule Profiling
Form rule execution can be profiled to determine how much time each form rule takes
to execute. This can help you tune and improve performance in forms that use a lot of
form rules. To turn on profiling set the rule-debug=profile on the url.
If your form rules are executing database queries to populate dynamic select controls
(dropdown, radio, check box), form rule profiling can help you identify if the database
queries are taking too long. You may see HTTP calls taking a long time to execute.
Working with Web Form Rules 11-11
Working with Form Rules
Working with Form Rules
Oracle Business Process Composer provides an editor that allows you to create and
edit a form rule.
The following procedures describe how to create and test form rules.
How to Create a Form Rule
To create a new form rule:
1. Open the form where you want to create a new form rule.
2. In the form toolbar, click the Rules button.
3. Click Create New Rule.
4. Click Edit, then edit the fields in Table 11-1 as required:
Table 11-1
Form Rule Fields
Element
Description
Name
Defines the name of the form rule. Change this to something
meaningful.
Enabled
Select to enable the form rule within your form. If you deselect this
option, the form rule is not applied to the form at runtime.
Description
Provides a description of the form rule. Modify the default to
describe the behavior of the form rule and how it functions within
the context of the form controls and other form rules within the
form.
Rule
Defines the form rule.
5. After you have finished creating and editing the form rules, click Edit in the toolbar
to return to the web forms designer.
How to Test a Form Rule
You can test the behavior of form rules while testing a web form. See How to Test a
Web Form for more information.
11-12 Developing Business Processes with Oracle Business Process Composer
12
Working with Human Tasks
This chapter describes how to use human tasks to define how end users interact with
your process-based application. It describes how to create and edit human tasks using
Oracle Business Process Composer.
This chapter includes the following sections:
• Introduction to Human Tasks
• Introduction to the Human Task Editor
• Working with Human Tasks
• Assigning a Human Task to a User Task
Introduction to Human Tasks
Human tasks are a component of Oracle Human Workflow. Oracle Human Workflow
is a component of the Oracle Service-Oriented Architecture (Oracle SOA) and Oracle
Business Process Management (Oracle BPM) Suites that provides a runtime
environment for managing user interaction with a process-based application. Human
tasks define the user interaction, including the user interface and workflow.
Using Oracle Business Process Composer you can create new human tasks and
configure its basic properties. However, for more advanced configuration of human
tasks, you must use Oracle BPM Studio.
For more information about configuring human tasks using Oracle BPM Studio, see
"Getting Started with Human Workflow" in Developing Business Processes with Oracle
Business Process Management Studio.
Human tasks are defined as services within a BPM project and are stored in the
business catalog.
Human tasks define the following:
• Participants: Specifies the users or groups of users that perform the work of the
human task.
• Approval patterns: Specifies the order the work that is performed by the human
task.
• Access privileges: Determines who has access to a task.
• Payload: Defines the data structures used by the human task.
The payload data is passed from the user task of a Business Process Model and
Notation (BPMN) process to the human task.
• Expiration: Defines the duration of a human task.
Working with Human Tasks 12-1
Introduction to Human Tasks
• Presentation: Defines the user interface participants who are used to interact with a
BPMN process. Presentations are defined by a form.
Oracle BPM supports two types of forms: web forms and Oracle Application
Development Framework (ADF) task forms.
For more information about creating and using web forms using Oracle Business
Process Composer, see Working with Web Forms. For more information about
creating ADF task forms using Oracle BPM Studio, see "Getting Started with
Human Workflow" in Developing Business Processes with Oracle Business Process
Management Studio.
Introduction to Participant and Routing Types
Human tasks allow you to determine the order in which users perform different tasks
within your application. This order is defined by the routing of the human task.
Participants are the users or groups that are responsible for performing each task. You
can use the routing slip section of the human task editor to specify the routing flow
and participant for a human task.
Participant Types
Human tasks support the following patterns for common routing scenarios:
• Single approver
This is the simple case where a participant maps to a user, group, or role. See
Introduction to Participant Assignment for more information.
For example, a vacation request is assigned to a manager. The manager must act on
the request task three days before the vacation starts. If the manager formally
approves or rejects the request, the employee is notified with the decision. If the
manager does not act on the task, the request is treated as rejected. Notification
actions that are similar to the formal rejection are taken.
• Parallel
This participant indicates that a set of people must work in parallel. This pattern is
commonly used for voting.
For example, multiple users in a hiring situation must vote, to hire or reject an
applicant. You specify the voting percentage that is required for the outcome to
take effect, such as a majority vote or a unanimous vote.
• FYI
This participant also maps to a single user, group, or role, just as a single approver.
However, this pattern indicates that the participant just receives a notification task
and the business process does not wait for the participant's response. FYI
participants cannot directly impact the outcome of a task, but in some cases can
provide comments or add attachments.
For example, a regional sales office is notified that a candidate for employment has
been approved for hire by the regional manager and their candidacy is being
passed onto the state wide manager for approval or rejection.
• Serial
This participant indicates that a set of users must work in sequence. While working
in sequence can be specified in the routing policy by using multiple participants in
sequence, this pattern is useful when the set of people is dynamic. The most
12-2 Developing Business Processes with Oracle Business Process Composer
Introduction to Human Tasks
common scenario for this is management chain escalation, which is done by
specifying that the list is based on a management chain within the specification of
this pattern.
When you create a human task, it contains a default simple participant. You can use
the human task editor to change the participant type or add additional participants.
See How to Change the Default Participant for more information.
Routing Types
Figure 12-1 shows a basic routing that contains only one participant.
Figure 12-1
Basic Routing with a Single Participant
In addition to participant types, human tasks support more complex types of routing
that give you more control. These routing types are:
• Sequential
In sequential routing different participants act on a task sequentially. Figure 12-2
shows an example of sequential routing. In this example, Participant_1 is the first
participant in the routing flow. After Participant_1 finishes acting on a task, the
task is passed to Particpant_2. After Participant_2 finishes acting on the task, the
human task is completed.
Figure 12-2
Example of Sequential Task Routing
• Parallel
In parallel routing, participants act on a task simultaneously. Figure 12-3 shows an
example of parallel routing. In this example, both Participant_1 and Participant_2
act on the task at the same time.
Parallel routing allows you to define an outcome for the routing that determines
how the task flow continues to the next participant after the parallel block. See
Outcome for more information.
Working with Human Tasks 12-3
Introduction to Human Tasks
Figure 12-3
Example of Parallel Task Routing
Outcome
Outcome specifies possible outcome arguments of the Human Task. Oracle BPM
Worklist and Process Workspace display the possible outcomes you select as the
available tasks to perform at runtime.
You can specify a voted-upon outcome that overrides the default outcomes selected in
the Default Outcomes list. This outcome takes effect if the required percentage is
reached. Outcomes are evaluated in a specific order.
You can define the following outcomes for a human task:
• Defer
• Yes
• Approve
• Accept
• Reject
• No
For more information about configuring the outcome for a human task, see How to
Configure Basic Task Properties. For more information about configuring outcomes in
a parallel routing, see How to Configure the Outcome for Parallel Routing.
You can also define custom outcomes using Oracle BPM Studio. For more information
about how to define custom outcomes, see "Designing Human Tasks in Oracle BPM"
in Developing Business Processes with Oracle Business Process Management Studio.
Introduction to Participant Assignment
Participant assignment is the process of mapping human task participants to the
people in your organization that use your application. This is done by mapping each
participant to one of the following:
• Users
You can assign individual users to act upon tasks. For example, you may assign
users jlondon or jstein to a particular task. Users are defined in an identity store
configured with the SOA Infrastructure. These users can be in the embedded LDAP
of Oracle WebLogic Server, Oracle Internet Directory, or a third-party LDAP
directory.
As with users, groups are defined in the identity store of the SOA Infrastructure.
12-4 Developing Business Processes with Oracle Business Process Composer
Introduction to the Human Task Editor
• Groups
You can assign groups to act upon tasks. Groups contain individual users who can
claim and act upon a task. For example, users jcooper and fkafka may be members of
the group LoanAgentGroup that you assign to act upon the task.
• Application Roles
You can assign users who are members of application roles to claim and act upon
tasks.
See How to Assign Users_ Groups_ and Roles to a Participant for procedures on
assigning users, groups, or roles to a human task participant.
Introduction to Duration
Duration defines how long a human task can remain idle before some other action is
performed. Duration can be defined globally for the human task or for each human
task participant.
See How to Configure the Deadline (Duration) for a Human Task for information on
defining duration globally for a human task.
Introduction to the Human Task Editor
Oracle Business Process Composer provides a human task editor that enables you to
create and edit human tasks.
The human task editor consists of a tabbed pane as shown in Figure 12-4.
Figure 12-4
Human Task Editor
The human task editor contains the following tabs:
• Basic: Allows you to configure the basic properties of a human task, define
deadlines, and configure the presentation of the human task.
See How to Configure Basic Task Properties and How to Specify the Presentation
of a Human Task for more information.
• Routing slip: Allows you to define and configure the participants and routing
types of the human task.
See How to Change the Default Participant and How to Assign Users_ Groups_
and Roles to a Participant for more information.
Working with Human Tasks 12-5
Working with Human Tasks
• Data: Defines the data payload used by the human task.
See How to Create and Configure the Data Payload for a Human Task for more
information.
Working with Human Tasks
Oracle Business Process Composer enables you to create new human tasks directly
from the Project Welcome Page. Human tasks are defined as services and stored in the
business catalog of a BPM project.
The following sections describe how to create, configure, and edit human tasks.
Walkthrough: Creating and Configuring a Human Task
The following procedures describe the general steps required to create and configure a
human task.
1. Create a new human task.
You can create a new human task directly from the Project Welcome page. See
How to Create New Human Task for more information.
2. Open the human task.
See How to Open a Human Task for more information.
3. Configure the basic properties and deadline for the human task.
4. Define the payload data for a human task.
5. Assign a form to the human task.
6. Assign the human task to a user task.
How to Create New Human Task
To create a new human task:
1. Open the project where you want to create a new human task.
2. Ensure the project is in edit mode.
3. From the Project Welcome page, select the Human Tasks tab.
4. Click the New icon.
5. Provide a name for the new human task, then click Create.
The new human task is displayed in the list of human tasks, as shown in Figure 12-5.
12-6 Developing Business Processes with Oracle Business Process Composer
Working with Human Tasks
Figure 12-5
Project Welcome Page - Human Tasks
How to Open a Human Task
You can open an existing human task for viewing or editing.
To open an existing human task:
1. Open the project containing the human task you want to view or edit.
2. From the Project Welcome Page, select Human Tasks, as shown in Figure 12-5.
3. Click the name of the human task you want to open.
The human task is opened in the human task editor. See Introduction to the Human
Task Editor for more information.
How to Configure Basic Task Properties
Use the Basic area of the Human Task editor to configure the basic properties of the
human task, including the task title, task priority and outcomes.
To configure basic task properties:
1.
Open the human task.
2.
In the human task editor, select Basic.
3.
From the drop down list next to Task Title, select one of the following:
• Plain text: Defines the task title using a text box.
After selecting this option, enter the task title in the text box.
• XPath: Defines the task title based on an XPath function.
• Translation: Defines a translated version of the task title.
The task title defines the title of the human task that is displayed in Process
Workspace.
4.
From the drop down list next to Priority, select a priority for the human task.
Working with Human Tasks 12-7
Working with Human Tasks
Valid values are between 1 (highest) and 5 (lowest). This value is displayed in
Process Workspace.
5.
Define the outcome for the human task:
a.
Click the magnifying glass icon next to the Outcomes field.
b.
Select the outcomes you want to configure.
You must select at least one outcome. See Outcome for more information.
c.
6.
Click OK.
Save the project to save your changes.
How to Configure the Deadline (Duration) for a Human Task
Use the task editor to define the duration for
To configure the deadline (duration) for a human task:
1. Open the human task.
2. In the human task editor select the Basic tab.
3. From the drop down list under Deadlines, select one of the following:
• Never expire: Indicates that the human task has no deadline or expiration.
• Expire after: Indicates that the human task expires after a specified duration.
When the option is selected, you can configure the following:
– Fixed duration: Defines the duration of the human task.
When this option is selected, you can define a specific number of days,
hours, and minutes.
– By expression: Allows you to use an expression to define the duration of the
human task.
– Base expiration on Business Calender: Select this option to base the
duration of the human task on a business calendar.
• Renew after: Extends that expiration date of a human task.
When this option is selected, you can configure the following:
– Fixed duration: Defines how long the expiration of the human task is
extended.
When this option is selected, you can define a specific number of days,
hours, and minutes.
– By expression: Allows you to use an expression to define how long the
expiration of the human task is extended.
– Maximum renewals: Defines the number of times the expiration deadline
can be renewed.
– Base expiration on Business Calender: If selected, this option bases the
duration of the human task on a business calendar.
12-8 Developing Business Processes with Oracle Business Process Composer
Working with Human Tasks
• Escalate after: Escalates the task to a manager after the duration expires.
When this option is selected, you can configure the following:
– Fixed duration: Defines the duration of the human task.
When this option is selected, you can define a specific number of days,
hours, and minutes.
– By expression: Allows you to use an expression to define the duration of the
human task.
– Maximum escalation levels: Defines the number of levels the task can
escalate after expiration.
– Highest approval title: Defines the title of the highest level in the
management chain the escalation reaches.
– Base expiration on Business Calender: If selected, this option bases the
duration of the human task on a business calendar.
4. Save the project to save your changes.
How to Specify the Presentation of a Human Task
The presentation of a human task defines the user interface of your application.
Presentations are associated with a form which define the user interface, data
structures and connectivity information for a human task. Oracle BPM supports two
types of forms: web forms and ADF task forms.
For more information about creating, editing, and using forms, see Introduction to
Forms in Oracle BPM.
Specifying the Presentation of a Human Task with an ADF Task Form
To specify the presentation of a human task using an ADF task form:
1. Open the human task.
2. Select the Basic tab.
3. Under Presentation, select ADF Form.
4. Enter the following connectivity information for the ADF form:
• Hostname: Specifies the hostname of the server where the presentation is
deployed.
• HTTP Port: Specifies the port of the server where the presentation is deployed.
• HTTPS Port: Specifies the secure port of the server where the presentation is
deployed.
• URI: Specifies the Uniform Resource Indicator of the presentation.
5. Click OK.
Working with Human Tasks 12-9
Working with Human Tasks
Specifying the Presentation of a Human Task with a Web Form
To specify the presentation of a human task using a web form:
1. Open the human task.
2. Select the Basic tab.
3. Under Presentation, select Web Form.
4. Click the Browse button.
The web form browser appears.
5. Click the name of the web form you want to select.
How to Change the Default Participant
When you create a new human task, it contains a default simple participant. Use the
human task editor to change the type of the default participant.
To change the default participant of a human task:
1. If you are working on a shared project, ensure that you are in edit mode.
2. Open the human task, then select Routing Slip.
3. Click the participant, then click the Delete (X) icon as shown in Figure 12-6 to
delete the participant.
Figure 12-6
The Add and Remove Icons of a Participant
4. Click the routing slip box.
5. Click the Add (+) icon, then select a participant type.
See Introduction to Participant and Routing Types for information about each
participant type.
The new participant appears in the routing slip box. See the following procedures for
information about adding additional participants to a human task.
How to Add Participants and Routing to a Human Task
Use the human task editor to add participants or routing types to a human task.
To add participants to a human task:
1. If you are working on a shared project, ensure that you are in edit mode.
2. Open the human task, then select Routing Slip.
12-10 Developing Business Processes with Oracle Business Process Composer
Working with Human Tasks
3. Click on the routing slip block.
4. Click the + icon, then select a participant type.
See Introduction to Participant and Routing Types for information about each
participant type.
The new participant is added to the routing slip in the far right position.
How to Assign Users, Groups, and Roles to a Participant
Within a human task, participants abstractly define the users who are responsible for
performing the work of a human task and its work flow. You can define how the
participants and routing defined in the human task are mapped to the real-world
participants of your organization by configuring participant selection.
The following ways of selecting participants are available:
• Names and expressions
• Lane participants
• Parametric roles
Note:
Although you can configure a human task to use parametric roles, you cannot
create or configure the parametric roles using Oracle Business Process
Composer. These must be created and assigned to the human task using
Process Workspace or Oracle BPM Studio.
Each of these is covered in the following procedures.
Selecting Participants using Names and Expressions
To select participants using names and expressions:
1.
If you are editing a shared project, ensure that you are in edit mode.
2.
Open the human task, then select Routing Slip.
3.
Double click on the participant.
4.
In the drop down box next to Build a list of participants using: select Names and
Expressions.
5.
Under Participant Names, click the Add icon, then select one of the following:
• Add user:
• Add group:
• Add application role:
After selecting one of these options, it appears in the table. You can change the
value, if necessary, using the drop down list in the table.
Working with Human Tasks 12-11
Working with Human Tasks
6.
In the Data Type column, select either By name or By Expression from the drop
down list.
7.
Select a value for the participant:
a.
Click the Search icon in the Value column.
b.
From the drop down list select either User, Groups, or Application Roles.
c.
Enter the name you want to search, then click Search.
To view a list of all names, groups, or roles, leave the text field empty, then
click Search.
d.
Select the check boxes next to the users, groups, or roles you want to add.
e.
Click OK.
The name appears in the Value column.
Selecting Participants using Lane Participants
To select participants using lane participants:
1. If you are editing a shared project, ensure that you are in edit mode.
2. Open the human task, then select Routing Slip.
3. Double click on the participant.
4. From the drop down box next to Build a list of participants using, select Lane
Participants.
5. Select one of the following:
• Previous lane participants
• Current lane participants
Selecting Participants using Parametric Roles
To select participants using parametric roles:
1.
Ensure that you have created parametric roles for the project using Oracle BPM
Studio.
2.
If you are editing a shared project, ensure that you are in edit mode.
3.
Open the human task, then select Routing Slip.
4.
Double click on the participant.
5.
From the drop down box next to Build a list of participants using, select
Parametric roles.
6.
In the Data Type column, select either By name or By Expression from the drop
down list.
7.
Select a value for the participant:
12-12 Developing Business Processes with Oracle Business Process Composer
Working with Human Tasks
a.
Click the Search icon in the Value column.
b.
From the drop down list select either User, Groups, or Application Roles.
c.
Enter the name you want to search, then click Search.
To view a list of all names, groups, or roles, leave the text field empty, then
click Search.
d.
Select the check boxes next to the users, groups, or roles you want to add.
e.
Click OK.
How to Configure the Outcome for Parallel Routing
You can configure the routing outcome for parallel blocks.
To configure the outcome for parallel routing:
1. If you are editing a shared project, ensure that you are in edit mode.
2. Open the human task, then select Routing Slip.
3. In the Participants editor, double-click on one of the intersections of the parallel
block.
The Voted Outcomes editor appears as shown in Figure 12-7.
Figure 12-7
Voted Outcomes Editor
4. Click the Add icon, the select one of the following outcomes:
• Approve
• Reject
5. In the table, enter a value for the outcome.
6. Select a value for Default Outcome from the drop-down list.
7. Click OK.
Working with Human Tasks 12-13
Assigning a Human Task to a User Task
How to Create and Configure the Data Payload for a Human Task
Using the human task editor, you can define the data types used within the human
task. This data is used to store the information entered during user interaction.
To create task data for a human task:
1. If you are editing a shared project, ensure that you are in edit mode.
2. Open the human task.
3. Select the Data tab.
4. Click the Add button.
5. Select an element or type from the list of primitives and components, as shown in
Figure 12-8.
Figure 12-8
Human Task: Data - Add Element Dialog
The task data appears in Task Data table.
6. Enter a name for the new task data in the table and select whether the new task
data is editable or not.
Assigning a Human Task to a User Task
After creating a human task, it becomes part of the business catalog of a BPM project.
To incorporate a human task within a BPMN process, you must assign it to a user task
within the process.
To assign a human task to a user task:
1. If you are editing a shared project, ensure that you are in edit mode.
2. Open your business process.
3. Add a user task to the process.
4. Right-click on the user task, then select Implement.
5. Click the Browse icon next to the Human Task text box.
The human task browser appears.
12-14 Developing Business Processes with Oracle Business Process Composer
Assigning a Human Task to a User Task
6. Click the name of the human task you want to select.
After clicking the name, the human task appears in the human task text box.
7. Click Apply Changes in the Implementation editor.
Working with Human Tasks 12-15
Assigning a Human Task to a User Task
12-16 Developing Business Processes with Oracle Business Process Composer
Part VI
Handling Data in Your Business Application
This part defines how to handle the data required within a process-based business
application.
This part contains the following chapters:
• Working with Data Objects and Data Associations
• Using Complex Data Types to Define Data Structures
• Using Expressions to Control Data
• Tracking Business Data in Your Application
13
Working with Data Objects and Data
Associations
This chapter describes how to use data objects to store the data used in a processbased business application. It also describes how to use data associations to define
how data is handled within a business process.
This chapter includes the following sections:
• About Handling Data Used by Your Business Processes
• Introduction to Data Objects
• Working with Data Objects
• Introduction to Data Associations
About Handling Data Used by Your Business Processes
Most business applications require users to create and manipulate data. In a sales
quote application, for example, a user enters data related to the quote which includes
information about the customer, quote, and other types of data. Additionally, an
application may have to create and manipulate other data that is only used internally
as part of the overall function of the application.
When creating business processes you must define the data the application uses. In
Oracle Business Process Management (Oracle BPM), data is stored within a data
object. Data objects are defined based on simple types that are similar to those found
in most programming languages.
Data objects can also be defined based on complex data types. In Oracle BPM, a
business object is a complex data type. Complex data types allow you to group
together related data. For example, if you are creating an application that must store
information about an employee, you may have to create a complex data type that
stores the name, address, salary, and other information about the employee. Complex
data types are similar to the concept of classes used in object-oriented programming
languages like Java. For more information about complex data types, see Using
Complex Data Types to Define Data Structures.
How to Define the Data Used by an Oracle BPM Application
Defining how data is stored and manipulated is part of the overall design and
development of an Oracle BPM application. The following high-level task outlines the
typical process for defining the data used within an Oracle BPM application.
To Define the Data Used by Your Oracle BPM Application
1. Define the complex data types required by your project.
Working with Data Objects and Data Associations 13-1
Introduction to Data Objects
The first step in defining the data used within an Oracle BPM application is to
define the required complex data types. Complex data types allow you to define
the data structures used within your application. For more information about using
complex data types, see Using Complex Data Types to Define Data Structures.
2. Create the data objects used within your project.
For more information about creating data objects, see How to Create a Data Object.
3. Define the expressions used to manipulate the data in your process.
For more information about defining expressions, see Using Expressions to Control
Data .
4. Define how information is passed between Business Process Model and Notation
(BPMN) flow objects using data associations.
For more information about data associations, see How to Configure Data
Associations for a Flow Object.
5. Define the input and output for your process.
Introduction to Data Objects
Data objects are, in general, the variables used to store the information used by your
business processes and Oracle BPM application. They are defined during the design
and implementation stage of a process. Before deploying a BPM project you must
define all of the data objects that the running application requires.
At runtime, new data objects are not created, but the value of the information they
store is altered as users interact with your application. Running processes can store,
access, and manipulate data. The values of data can also determine process branching.
Introduction to Basic and Complex Data Objects
Oracle BPM supports two types of data objects: basic and complex. Which type of data
object you use depends on the type of data it must handle.
• Basic data objects
Basic data objects are based on simple data types. These are the core data types
common in most programming languages. Table Table 13-1 lists the basic data
types supported by Oracle BPM.
Table 13-1
Simple Data Objects
Type
Description
Bool
Represents the logical values true or false.
Int
Represents an integer. For example: 23, -10, 0.
Decimal
Represents a number than can be expressed in decimal notation. For
example: 3.14, 62, 0.023.
Real
Represents a floating-point numeric value. For example: 2e-1, 2.3E8.
String
Represents a sequence of characters. For example: "This is a string."
13-2 Developing Business Processes with Oracle Business Process Composer
Introduction to Data Objects
Type
Description
Time
Represents a specific time expressed as: year-month day
hour:minute:second. For example: 1995-02-03 13:30:28-08:00.
Interval
Represents a duration of time expressed as a number in years, months,
days, hours, minutes, and seconds. For example: 1d3h30m.
Binary
Used to store binary data, including images or videos.
• Complex data objects
Complex data objects allow you to create data structures that group together
different types of data. Complex data objects are based on complex data types.
Complex data types allow you to create data structures based on basic data objects.
For example, you can create a complex data object called employee that contains
different types of data for employee like id, name, and age. The relationship
between complex data types and complex data objects is analogous to the
relationship between classes and instances in the Java programming language.
Figure 13-1 shows the relationship between basic and complex data objects.
Figure 13-1
Relationship Between Basic and Complex Data Objects
Before creating a complex data object, you must first define the complex data type that
defines the data structure. For more information about using complex data types, see
Using Complex Data Types to Define Data Structures.
Introduction to Process and Project Data Objects
In addition to specifying a data object's data type, you must also select its scope. In
Oracle BPM, the scope refers to from where in the process or project the data object
can be accessed.
In Oracle BPM, there are two types of data object scope: process and project. Process
data objects are data objects that are defined for a specific process. Similarly, project
data objects are defined for an entire BPM project. Both project and process data
objects can be created from both basic and complex types.
Working with Data Objects and Data Associations 13-3
Working with Data Objects
Process Data Objects
Process data objects allow you to define data objects that are used only within a single
process. Process data objects can be used only within the process where they are
defined.
When designing a process-based application, if you know that a data object is required
only within a single process, it is better to define it as a process data object in order to
conserve system resources.
Project Data Objects
Project data objects allow you to share data between processes. For example, within an
Oracle BPM application, both a purchase order process and an approval request
process may track the data of the employee that created the request. The data created
or modified in one process can be accessed by the other.
Project data objects can be used to ensure that all processes within an application have
access to the same data. However, each process must assign and update the value of
its data.
Although project data objects allow you to define data objects that are used by all
processes in a project, they are not global data objects. Each process within your
project uses its own version of the data object. Project data objects are not used to
share data between processes. To share data between processes, you must create data
associations. For more information about data associations, see Introduction to Data
Associations.
Another benefit of defining project data objects is that after publishing your project
you can configure Oracle Business Process Management Workspace views to display
the values of the variables. This is possible only when using project data objects.
Working with Data Objects
Data objects can also be defined based on complex data types. In Oracle BPM, a
business object is a complex data type. Complex data types allow you to group
together related data.
This section describes the procedures for working with data objects, including how to
create new data objects and edit or delete existing ones.
How to Create a Data Object
The procedures in this section describe how to create a new process or project data
object. If you must create a data object based on a complex data type, you must create
the complex data type first. For more information about complex data types, see Using
Complex Data Types to Define Data Structures.
To create a data object from the Project Welcome Page:
1. Ensure that you are editing your project.
2. Go to the Project Welcome Page.
3. Open the process for which you want to create a data object.
4. Click the Data Objects icon in the toolbar to open the Data Objects dialog.
Click the name of the project or process, then select Add as shown in Figure 13-2.
13-4 Developing Business Processes with Oracle Business Process Composer
Working with Data Objects
Figure 13-2
Process Editor - Data Objects
5. Enter a unique name for your data object.
• If you are creating a basic data object, select any of the basic types from the
drop-down list.
• If you are creating a complex data object, select <object> from the drop-down
list, then select the complex data type on which you want to base the complex
data object.
For information about data object types supported by Oracle BPM, see Introduction
to Basic and Complex Data Objects.
6. Click OK.
How to Edit or Delete a Data Object
You can edit or delete process or project data objects.
To edit or delete a data object:
1. Ensure you are editing the project.
2. Open the process where you want to delete a data object.
3. Click the data objects icon in the process editor toolbar.
4. In the list of data objects, select the project or process data object you want to delete
or edit, then:
• To edit the data object, click Edit, then provide new name and change the data
type as necessary.
• To delete the data object, click Delete.
5. Click OK.
Working with Data Objects and Data Associations 13-5
Introduction to Data Associations
What Happens When You Delete or Edit a Data Object
After editing or deleting data objects, validate your project to verify that there are no
references to the changed or deleted data objects.
After editing a data object, you must ensure that all references to it are still valid. For
example, if you change a data object from type int to type string, you must verify
that all of the expressions that use the data objects still function correctly.
After deleting a data object, you must ensure that all references to it are removed. This
includes any data associations and expressions that use the data object. If you do not
remove references to the deleted data object, the project does not validate.
Introduction to Data Associations
Data associations determine how information stored in data objects is handled.
These are the contexts in which data associations can be used:
• To and from another process or service invoked from a BPMN process.
• To and from a Human Task service.
• To and from an Oracle Business Rule.
• To and from a script task.
This BPMN flow object is used to pass data objects through data associations.
Table Table 13-2 lists the flow objects where you can define data associations. It also
lists the objects implemented.
Table 13-2
Flow Objects that Accept Data Associations
Flow Objects
Implementation
Message start and end
events
Services and other BPMN processes
Message throw and catch
events
Services and other BPMN processes
Send and receive tasks
Services and other BPMN processes
Script tasks
Do not contain an implementation, are used to pass data objects
through data associations.
User tasks
Oracle Human Tasks
Business rule tasks
Oracle Business Rules
Service Tasks
Services and BPMN processes
Data associations are used to define the input and output arguments from a flow
object to an external service or process. Figure 13-3 shows the relationship between a
flow object, its corresponding implementation, and external processes or services.
The arrows represent the input and output arguments to the external process or
service. These are defined using data associations.
13-6 Developing Business Processes with Oracle Business Process Composer
Introduction to Data Associations
Figure 13-3 Relationship between a Flow Object, Implementation and an External
Service or Process
It is important to note that although the inputs and outputs are defined in the data
associations for a flow object, they define values that are passed to the systems or
services being called. These systems and services exist outside of the business process
as shown in Figure 13-4.
Figure 13-4
Data Associations within a process
You can use expressions to evaluate and change the input and output values
Introduction to the Data Associations Editor
The data associations editor allows you to configure the input and output values
passed between a flow object and its implementation, as shown in Figure 13-5.
Figure 13-5
Data Association Editor
Table 13-3 describes the different areas of the data associations editor.
Table 13-3
The Data Associations Editor User Interface
UI Area
Description
Inputs
Contains text boxes that display the data objects assigned as inputs to
the service or process implemented in the flow object. Next to each
text box is an icon that launches the expression editor.
Working with Data Objects and Data Associations 13-7
Introduction to Data Associations
UI Area
Description
Flow Object Interface
Lists the expected input arguments for the service or process
implemented. The flow object interface also contains an expandable
list of the data objects supplied as input and output. Within the flow
object area, you can expand complex data objects to map to specific
basic data objects within a complex data object.
Outputs
Contains text boxes that display the data objects assigned as outputs
from the service or process implemented in the flow object.
Data Objects
Displays a list of all the data objects. This list is divided between
process and project data objects.
How to Configure Data Associations for a Flow Object
You can configure data associations for flow objects.
To configure a data association for a flow object:
1. Open the process where you want to configure data associations.
2. Right-click a flow object that enables data associations, then select Data
Associations.
See Table 13-2 for the list of sequence flows that allow data associations.
3. From the data objects column on the right, select the data object you want to map
as an input argument.
4. Click and drag the data object to an input text field.
13-8 Developing Business Processes with Oracle Business Process Composer
14
Using Complex Data Types to Define Data
Structures
This chapter describes how to use complex data types to define the data structures
required by your process-based business application. In Oracle Business Process
Management (Oracle BPM), a business object is a complex data type. You define
complex data types as part of the business catalog of a BPM project. After defining
complex data types, you can use that to define complex data objects to store the data
within your application.
This chapter includes the following sections:
• Introduction to Complex Data Types
• Working with Complex Data Types
Introduction to Complex Data Types
You can use complex data types to create the data structures required in your Oracle
BPM application. Complex data types allow you to group related types of data
together. This can help make your processes more manageable and readable to other
users.
You can use Oracle Business Process Composer to create complex data types manually
or based on an XML schema.
The structure of a complex data type is composed of three components:
• Modules
Modules are containers that allow you to create a hierarchical structure in your
complex data type. Each complex data type must contain one top-level module.
Within a module, you can create complex data types or other modules.
• Complex data types
Within a module you can define one or more complex data types. A complex data
type can contain other complex data types or modules.
• Attributes
Attributes are the lowest level component of a complex data type. Attributes define
the data types of the complex data type.
You can also add documentation to your complex data types and attributes. Adding
documentation makes your data structures more understandable to other users who
are collaborating on your BPM project.
The following example process defines two different complex data types to handle the
required data. Figure 14-1 shows how these appear in the business component editor.
Using Complex Data Types to Define Data Structures 14-1
Working with Complex Data Types
Figure 14-1
Complex Data Types Defined in the Example Project
Working with Complex Data Types
Using Oracle Business Process Composer you can create, edit, and delete complex data
types and their modules and attributes.
You can use Oracle Business Process Composer to create complex data types manually
or based on an XML schema.
How to Create a Complex Data Type Manually
You can manually create complex data types from the business components editor.
When manually creating a complex data type, you can define the hierarchical
relationship between modules and objects and the attributes used in the complex data
type. A complex data type can include the following:
• Simple data types
• Arrays of data types
• Complex data types that use other complex data types as a component
Note:
After creating a module, complex data type, or attribute, you cannot change
their names.
You can create the following new business components from the project components
panel located on the Project Welcome page, as shown in Figure 14-2:
• Business object
• Business exception
14-2 Developing Business Processes with Oracle Business Process Composer
Working with Complex Data Types
• Enum object
Figure 14-2
Project Welcome Page - Business Components
Creating a New Business Object
To create a new business object:
1.
From the Project Welcome Page, click Business Components.
2.
Click the New icon, then select New Business Object to open the New Business
Object wizard, as shown in Figure 14-3.
Figure 14-3
New Business Object Wizard
3.
Enter a name for the new complex data type (business object).
4.
Select a parent module from the drop down list.
You must select a parent module when creating a new complex data type. If no
module currently exists, you must create a new one. To create a new module:
a.
Click the + icon.
b.
Enter a name for the new module, then click OK.
5.
Select the schema from the drop down list that appears when you select the From
XSD check box.
6.
Click Finish to create your new business object or continue to the next step if you
want to add attributes and methods.
Using Complex Data Types to Define Data Structures 14-3
Working with Complex Data Types
7.
Click Next to add an attribute.
The Attributes dialog appears, as shown in Figure 14-4.
Figure 14-4
8.
New Business Object Wizard - Attributes Dialog
Click the new icon to add an attribute.
Enter the name and then click Change Type if you want to change the type from
the default String.
9.
Click Finish to create your new business object or continue to the next step if you
want to add a method.
10. Click Next.
The Methods dialog appears. Click the new (+) icon to add a new method.
11. Click Finish.
The new complex data type appears in the Project Welcome Page under Business
Components, as shown in Figure 14-2.
Creating a New Exception
To create a new exception:
1.
From the Project Welcome Page, click Business Components.
2.
Click the New icon, then select New Business Exception to open the New
Business Exception dialog, as shown in Figure 14-5.
Figure 14-5
New Business Exception Dialog
3.
Enter a name for the new business exception.
4.
Select a parent module from the drop down list.
You must select a parent module when creating a new complex data type. If no
module currently exists, you must create a new one. To create a new module:
14-4 Developing Business Processes with Oracle Business Process Composer
Working with Complex Data Types
a.
Click the + icon.
b.
Enter a name for the new module, then click OK.
5.
Click Change Type if you want to change the type from the default String.
6.
Click Create to create your new exception.
Creating a New Enum Object
To create a new Enum object
1.
From the Project Welcome Page, click Business Components.
2.
Click the New icon, then select New Enum Object to open the New Enum Object
wizard, as shown in Figure 14-6.
An enum object (enumeration) is a special data object that enables a variable to be
a set of predefined constants.
Figure 14-6
New Enum Object Wizard
3.
Enter a name for the new enum object.
4.
Select a parent module from the drop down list.
You must select a parent module when creating a new complex data type. If no
module currently exists, you must create a new one. To create a new module:
a.
Click the + icon.
b.
Enter a name for the new module, then click OK.
5.
Click Change Type if you want to change the type from the default String.
6.
Click Finish to create your new enum object or continue to the next step if you
want to add enum items.
7.
Click Next to add enum items.
The Enum Items dialog appears.
8.
Click the new icon to add an Enum item. Enter the name and value, then click
OK.
9.
Click Finish to create your new enum object.
Using Complex Data Types to Define Data Structures 14-5
Working with Complex Data Types
What Happens When You Create a Complex Data Type
After you define a complex data type, it appears in the list of complex data types
under business components in the project components panel, as shown in Figure 14-2.
You can use the complex data type to create new complex data objects that are based
on it. You can also use the complex data type to define other complex data types.
How to Edit a Complex Data Type
After creating a complex data type, you can add or change the type of its attributes
and methods, or add documentation. You can also add exceptions, Enum objects and
Enum items. The components you can add are based on the component you have
highlighted in the hierarchy, as shown in Figure 14-7
Figure 14-7
Add New Business Component Example
When you highlight a business component in the hierarchy, its details appear on the
right-hand side of the business components editor. You can edit the details or add
documentation.
If you right-click on a component in the hierarchy you can select to delete the
component, move the component, or collapse a section of the hierarchy.
To add a new module, a new complex data type, or attribute:
1.
Click the complex data type you just created.
The business components editor opens, as shown in Figure 14-8.
14-6 Developing Business Processes with Oracle Business Process Composer
Working with Complex Data Types
Figure 14-8
2.
Business Component Editor
If necessary, create a new module within the complex data type:
a.
Right click on the complex data type, then select New Module.
b.
Enter a name for the new module, then select OK.
After creating a new module, you can create additional sub-modules if
necessary.
3.
If necessary, create a new complex data type:
a.
Right-click on a module, then select Add New Business Object.
b.
Enter a name, then click OK.
The new complex data type appears within the list of complex data types.
You can create additional complex data types or sub-modules within the
complex data type if necessary.
4.
5.
Add a new attribute.
a.
Select a complex data type, then select Add New Attribute from the menu.
b.
Enter a name for the attribute and select a type from the drop down menu.
Click OK.
How to Delete a Complex Data Type, Module, or Attribute
You can use the business component editor to delete a complex data type or its
modules or attributes.
To Delete a Complex Data Type, Module, or Attribute:
1. From the Project Welcome Page, click Business Components as shown in Figure
14-2.
2. Hover the cursor to the right of the complex data type you want to delete.
Using Complex Data Types to Define Data Structures 14-7
Working with Complex Data Types
3. Click the Delete icon, then click OK.
Note:
When you delete a complex data type, module, or attribute it cannot be
recovered. When deleting a module or complex data type that contains other
components, the components are also be deleted. However, if the deleted
complex data type or module contains an attribute based on a complex data
type, that complex data type is not deleted.
14-8 Developing Business Processes with Oracle Business Process Composer
15
Using Expressions to Control Data
This chapter describes how to use expressions to evaluate and change the data stored
in a data object.
This chapter includes the following sections:
• Introduction to Expressions
• Working with Expressions
Introduction to Expressions
Expressions allow you to perform calculations on data objects.
Using Oracle Business Process Composer, you can define and edit expressions in the
following contexts:
• Conditional sequence flows
• Complex gateways
• Timer events
• Data associations
• Notification tasks
Expressions do not allow you to directly reassign the values to data objects. However,
you can use expressions to change the values passed to and from the implementation
of a sequence flow. See Introduction to Data Associations for more information.
Introduction to the Expression Editor
The expression editor provides a simple way of creating expressions by allowing you
to select data objects and operators from a list and insert them into your expression.
You can also enter the expression manually if necessary.
Figure 15-1 shows the expression editor user interface.
Using Expressions to Control Data 15-1
Introduction to Expressions
Figure 15-1
Table 15-1
Oracle Business Process Composer Expression Editor
The Expression Editor User Interface
Area
Description
Expression field
Contains the text of the expression. You can edit this field
directly, or use the Insert Into Expression tool.
Insert Into Expression
Inserts the selected data object or operator into the expression.
Data Object and Operator
Chooser
Contain tabbed panes that allow you to select the data object or
operator you want to insert into the expression.
Description tab
Provides a description of the selected operator.
Errors
Displays errors in the current expression.
Types of Expressions
Oracle Business Process Composer supports the following types of expressions:
• Simple
• Plain text
• XML Literal
15-2 Developing Business Processes with Oracle Business Process Composer
Introduction to Expressions
Simple Expressions
Simple expressions are defined using a basic expression language supported by Oracle
Business Process Management (Oracle BPM).
Operator Types
Simple expressions support the following operator types:
• Arithmetic Operators
• Unary Operators
• Equality and Relational Operators
• Conditional Operators
You can use these operators to write expressions and conditions to define your process
flow. Generally these expressions perform their calculations based on the data objects
in your process. You can write expressions and conditions using the value of the data
objects, but you cannot modify their value.
The following examples of expressions use operators:
• totalAmount - discount
• activationCount > 3
• unitsSold <= 1200
Table 15-2, Table 15-3, Table 15-4, and Table 15-5 describe the supported operators in
the simple expression builder.
Table 15-2
Arithmetic Operators
Operator
Name
Description
+
Addition
Adds numeric data types.
Concatenates Strings.
-
Subtraction
Subtracts numeric data types.
*
Multiplication
Multiplies numeric data types.
/
Division
Divides numeric data types.
rem
Remainder
Calculates the remainder of a division in which the
divisor does not exactly divide the dividend.
()
Precedence
Indicates the order of evaluation of an arithmetic
expression.
Table 15-3
Unary Operators
Operator
Name
Description
+
Plus
Has no effect in the value of the numeric operand. Use
it to indicate explicitly that a certain value is positive.
-
Minus
Negates an arithmetic expression.
Using Expressions to Control Data 15-3
Introduction to Expressions
Operator
Name
Description
*
Not
Logical complement operator. Negates the value of a
boolean expression.
Table 15-4
Equality and Relational Operators
Operator
Name
Description
= or ==
Equal
Returns true is the first operand equals the second
operand.
!=
Not Equal
Returns true is the first operand is not equal to the
second operand.
>
Greater Than
Returns true if the first operand is greater than the
second operand.
>=
Greater Than or
Equal to
Returns true if the first operand is greater than or equal
to the second operand.
<
Less Than
Returns true if the first operand is less than the second
operand.
<=
Less Than or
Equal to
Returns true if the first operand is less than or equal to
the second operand.
Table 15-5
Conditional Operators
Operator
Name
Description
and
Conditional And
Returns true if both operands evaluate to true.
or
Conditional Or
Returns true if either operand evaluates to true.
Operator Precedence
Operator precedence indicates the order in which the compiler evaluates them. You
can change operator precedence in an expression by using parenthesis.
In Oracle BPM the operator precedence is:
• Addition, Subtraction
• Multiplication, Division, Remainder
• Plus and Minus
• Less than, Greater Than, Less Than or Equal to, Greater Than or Equal to
• Equal, Not Equal
• Not
• Conditional And
• Conditional Or
15-4 Developing Business Processes with Oracle Business Process Composer
Working with Expressions
Working with Expressions
Using Oracle Business Process Composer, you can create and edit expressions for
conditional sequence flows and for data associations.
The following sections describe how to define expressions using Business Process
Composer.
How to Define a Simple Expression for a Conditional Sequence Flow
Using Oracle Business Process Composer, you can create and edit expressions for
conditional sequence flows. Conditional sequence flows use expression to determine
the flow of your process.
To define an expression for a conditional sequence flow:
1.
Open your process.
2.
Ensure that the project is in edit mode.
3.
Click the edit icon for the conditional sequence flow you want to edit.
4.
Click Implementation.
5.
Click Edit.
The expression editor window displays.
6.
Add any required data objects and operators.
To add a data object to an expression:
a.
Select the Data Objects tab.
b.
Select a data object from the list.
If you add a basic data object that is part of a complex data objects, expand
the complex data object and select the basic data object.
c.
Click Insert Into Expression
To add an operator to an expression:
a.
Select the Operators tab.
b.
From the expandable list, select the operator you want to add.
c.
Click Insert Into Expression.
7.
Click the Error tab, then verify that there are no errors in your expression.
8.
Click OK.
9.
Click Apply Changes in the Implementation tab.
How to Define a Simple Expression in Data Associations
Using Oracle Business Process Composer, you can create and edit expressions for data
associations. Data associations use expressions to alter the values of data objects
passed as inputs and outputs.
Using Expressions to Control Data 15-5
Working with Expressions
To define an expression within a data association input or output:
1.
Open your process.
2.
Ensure that the project is in edit mode.
3.
Right-click a flow object within your process then select Data Associations.
4.
Click Launch Expression Builder.
5.
Add any required data objects and operators.
To add a data object to an expression:
a.
Select the Data Objects tab.
b.
Select a data object from the list.
If you add a basic data object that is part of a complex data object, expand the
complex data object and select the basic data object.
c.
Click Insert Into Expression
To add an operator to an expression:
a.
Select the Operators tab.
b.
From the expandable list, select the operator you want to add.
c.
Click Insert Into Expression.
6.
Click the Error tab, then verify that there are no errors in your expression.
7.
Click OK.
15-6 Developing Business Processes with Oracle Business Process Composer
16
Tracking Business Data in Your Application
This chapter describes the different types of business data that Oracle Business Process
Management (Oracle BPM) supports.
This chapter includes the following sections:
• Working with Key Performance Indicators (KPIs)
• Working with Business Indicators and Counter Marks
• Measuring Process Performance Using Measurement Marks
Working with Key Performance Indicators (KPIs)
Oracle BPM allows you to define key performance indicators (KPIs) within a BPM or a
Business Architecture (BA) project. KPIs evaluate a specific activity or process within
your organization.
You can define one or more KPIs to determine if the requirements of your processes
are being met.
Introduction to Key Performance Indicators
KPIs evaluate a specific activity or process within your organization. You can define
one or more KPIs to determine if the requirements of your processes are being met.
Within Oracle BPM, a KPI defines the following:
• Measure, Counter, and running time defined within a Business Indicator
• Threshold
• Visualization
For example, a sales organization may define a KPI to track the total number of orders
processed. If your target is 1000 orders per month, the measure is defined as 1000. If
the orders are less than 1000, you can configure the KPI to show red (danger), where
as any other range equal or above 1000 shows green.
KPI Lifecycle
You can create KPIs at design time using Oracle Business Process Composer. KPIs are
available in both BPM and BA projects. Each has its own considerations:
• Business Architecture: You can create and configure KPIs with a BA project.
When you publish your project, the KPIs are stored within the Oracle Business
Activity Monitoring (Oracle BAM) repository along with other components of the
BA project. After publishing, the KPI is available within BA reports and Oracle
BAM dashboards.
Tracking Business Data in Your Application 16-1
Working with Business Indicators and Counter Marks
KPIs can be defined at all levels of a business architecture hierarchy: objectives,
strategies, value chain models and value chain steps. If a value chain step is
defined by a Business Process Model and Notation (BPMN) process, KPIs can also
be defined at the process level. Oracle BPM process KPIs can be rolled-up to
Strategies.
For information on how to create KPIs in a BA project, see Working with Key
Performance Indicators (KPIs).
• BPM Projects: You can also create and configure KPIs within a BPM project.
KPIs defined in a BPM project contain a measure or business indicator defined for
the BPMN process. When you deploy a BPM project, the KPI is also deployed to
the runtime environment. The KPIs are created in Oracle BAM when the BPM
project is deployed. Oracle BAM Process Analytics collate the runtime data and
stores it in Oracle BAM data objects. These KPIs can be attached to a KPI watch-list
in Oracle BAM or they can be used as part of BA roll-up KPIs. Actual value
calculations are performed in Oracle BAM based on business process data objects.
Types of Key Performance Indicators
Oracle BPM supports different types of KPIs
• External KPI: Defines values based on data that is imported into Oracle BAM.
Data is imported into the ORACLE_BUSINESSARCHITECTRURE_ENTITY_DATA
data object. This imported data is used to calculate the actual value of the KPI
within a given date range. This calculated value is then compared to the threshold
defined for the KPI.
• Manual KPI: Allows users to enter explicit values at design time.
Business Architecture and Oracle BAM do not perform calculations on the value of
the KPI. The value is compared to the threshold for this KPI.
• Roll-up KPI: Defines a parent child relationship between two entities.
A roll-up KPI is composed of multiple child KPIs. The value of the parent is
calculated based on the values of the child KPIs. These values are compared to the
threshold defined for the roll-up KPI.
Working with Business Indicators and Counter Marks
Business Indicators are project data objects you use to store the value of the KPIs of
your process. Counter marks allow you to update the value of the counter business
indicators defined for your process.
This section describes how to create business indicators and counter marks using
Oracle Business Process Composer.
Introduction to Business Indicators and Counters
Business Indicators are project data objects you use to store the value of the KPIs of
your process. Although Oracle BPM allows you to create business indicators using
different types of data objects, within Oracle Business Process Composer you can only
create business indicators that are used as attributes, counters, dimensions, and
measures.
Counters keep track of the number of times an instance completes a certain activity.
You must use them with counter marks. The counter variable does not store the actual
16-2 Developing Business Processes with Oracle Business Process Composer
Working with Business Indicators and Counter Marks
value, its value is always 1. The value that specifies the number of times an instance
completes an activity is updated directly in the Process Analytics databases. To
monitor the value of a counter business indicator, you must create a dashboard based
on a counter mark that is configured to track this counter business indicator.
Introduction to Counter Marks
Counter marks allow you to update the value of the counter business indicators
defined for your process. A counter mark may update multiple counter mark business
indicators. When a token arrives at an activity that has a counter mark defined, the
Oracle BPM Service Engine updates the value of its associated counters in the Process
Analytics databases. Each time the Oracle BPM Service Engine updates a counter
business indicator, it adds one unit to the current value.
Note:
The actual value of the counter variable is stored in the Process Analytics
databases. You must not use the counter variable in your process to perform
any calculations because its default value never changes. The value of the
counter variable is always equal to 1.
You can use counter marks for the following:
• Auditing: The number of activities the instance completed combined with other
performance measurements are important information for auditing the process.
• Identifying performance issues: You can use a counter to identify performance
issues within your process.
Your process might be taking longer than expected because the instances are
following a different path than expected or because the loop in an activity is
running more times than it should. You can identify these situations by comparing
the actual number of completed activities to the number expected.
• Identifying the process path the instance followed: You can mark different paths
using different counter business indicators.
When the instance reaches the end of the process, the path the instance followed
has the greatest number of completed activities.
Typically you define one counter business indicator for each of the process paths you
want to monitor. Then you add counter marks in all the activities that are part of that
process path. Finally you associate the counter business indicators that correspond to
the paths that activity is part of, to the counter mark.
How to Add a New Counter Mark to a Process
You can add new counter marks to activities and tasks within your process.
To add a new counter mark to a process
1.
Right-click on the task or activity where you want to add a counter mark, as
shown in Figure 16-1.
Tracking Business Data in Your Application 16-3
Working with Business Indicators and Counter Marks
Figure 16-1
2.
Process Activity - Create Counter Mark
Select Create Counter Mark.
The Implementation panel appears at the bottom of the page, as shown in Figure
16-2
Figure 16-2
3.
Process Activity - Implementation
If required, create a new counter mark (business indicator).
a.
Click the Add button.
b.
Provide a name for the counter mark.
c.
Click OK.
4.
In the list of business indicators, select the check box next to the indicators you
want to use for this flow object.
5.
Click Apply Changes.
How to Delete a Counter Mark
You can delete the counter marks you have defined for a project by just right-clicking
on the activity and choosing Delete Counter Mark or by using the following
instructions.
To delete a counter mark:
1. Right-click on the activity or task where you want to edit a counter mark.
16-4 Developing Business Processes with Oracle Business Process Composer
Measuring Process Performance Using Measurement Marks
2. Select Data Associations.
3. In the list of Data Objects, expand the name of the project.
This contains a list of all the project data object, as shown in Figure 16-3
Figure 16-3
Process Activity: Data Association - Data Objects
4. Select the counter mark you want to delete.
5. Click the delete icon.
6. Click OK to confirm the deletion.
7. Click Apply.
Measuring Process Performance Using Measurement Marks
You can measure process performance using measurement marks. Measurement
marks allow you to measure a business indicator of type measure at a certain point in
the process or in a section of the process.
For more information about using measurement marks and the Process Analytics
database, see "Using Process Analytics" in the Developing Business Processes with Oracle
Business Process Management Studio.
A measurement mark stores the following data into the Process Analytics databases:
• The value of the process default measures
• The value of the measure business indicators associated with that measurement
mark
• The value of the dimensions defined in the process
You can use one measurement mark to measure multiple business indicators
When storing the value of a measure business indicator, the BPMN service engine also
stores the value of the dimensions you defined in your process. Later, when you build
the dashboards to monitor your process, you can use these dimensions to group the
values into different categories. For example, you might want to view the total number
of loan applications approved by region.
The types of measurement marks you can define are:
• Single measurement
Tracking Business Data in Your Application 16-5
Measuring Process Performance Using Measurement Marks
• Interval start
• Interval stop
How to Add a Measurement Mark to a Process
You can add measurement marks to your business processes by dragging it from the
component palette to the process editor canvas.
To add a single measurement mark to a process:
1. Open the BPMN process.
2. In the Component Palette, double-click the Measurement icon, then click and drag
one of the following.
• Measurement mark (Snapshot)
• Start measurement mark
• End measurement mark
3. Place the measurement mark near the sequence flow where you want to add a
business indicator.
When the sequence flow turns blue, release the mouse measurement mark, as
shown in Figure 16-4.
Figure 16-4
Sequence Flow with Measurement Mark
4. Right-click the measurement mark and select Implement.
5. In the Name field, enter a name to identify the measurement mark.
6. In the Business Indicators section, select a business indicator from the list of
available business indicators and move it to the Selected list using the arrows
between the two lists.
Note:
You can measure multiple business indicators in the same measurement mark.
16-6 Developing Business Processes with Oracle Business Process Composer
Measuring Process Performance Using Measurement Marks
Note:
If you do not select a business indicator, the measurement mark only stores
the value of the default business indicators. If you want to add a business
indicator without leaving the Measurement Mark Properties dialog, then click
the New button under the Selected list.
7. Click OK.
Tracking Business Data in Your Application 16-7
Measuring Process Performance Using Measurement Marks
16-8 Developing Business Processes with Oracle Business Process Composer
Part VII
Implementing and Deploying a BPM Project
This part describes advanced functionality of Business Process Composer that is
targeted towards process developers who must make changes to the implementation
details of a BPM project.
This part contains the following chapters:
• Using Oracle Business Rules
• Communicating with Other Processes and Services
• Deploying a BPM Project
17
Using Oracle Business Rules
This chapter describes how to use Oracle Business Process Composer to create and
edit business rules. It contains a general introduction to Oracle Business Rules and
provides tasks for working with them.
This chapter includes the following sections:
• Introduction to Oracle Business Rules
• Working with Oracle Business Process Composer Rules Editor
• Working with Business Rule Dictionaries
• Working with Dictionary Links
• Working with Rulesets
• Working with Decision Tables
• Working with Facts
• Working with Value Sets
• Working with Global Variables
• Working with Verbal Rules and Business Phrases
• Working with Decision Functions
• Working with Explorer
• Working with Translations
• Assigning a Rule to a Business Rules Task
• Editing Oracle Business Rules at Run Time
Introduction to Oracle Business Rules
Oracle Business Rules allow process analysts to change policies that are expressed as
business rules, with little or no assistance from a process developer. Applications
using Oracle Business Rules support continuous changes that allow the applications to
adapt to new government regulations, improvements in internal company processes,
or changes in relationships between customers and suppliers.
Use business rules to define key decisions and policies for a business, including:
• Business policies such as spending policies and approval matrices.
• Constraints such as valid configurations or regulatory requirements.
Using Oracle Business Rules 17-1
Introduction to Oracle Business Rules
• Computations such as discounts or premiums.
• Reasoning capabilities such as offers based on customer value.
For example, a car rental company might use the following business rule:
IF
Rental_application.driver age < 21
THEN
modify Rental_application(status: "Declined")
An airline might use a business rule such as the following:
IF
Frequent_Flyer.total_miles > 10000
THEN
modify Frequent_Flyer (status : "GOLD")
A financial institution could use a business rule such as:
IF
Application_loan.income < 10000
THEN
modify Application_loan (deny: true)
These examples represent individual business rules. In practice, you can use Oracle
Business Rules to combine many business rules or to use more complex tests.
Oracle Business Rules provides multiple approaches to writing rules:
• IF/THEN rules - expressed as IF/THEN statements.
There are two ways of modeling IF/THEN rules. General rules use a pseudo-code
language to express rule logic. Verbal rules use natural language statements to
express rule logic.
• Decision Tables, which display multiple related rules in a single spreadsheet-style
view.
Business phrases are used to provide a natural language vocabulary for the
construction of verbal rules' tests and actions. They are not used in general rules.
General rules, verbal rules, and Decision Tables are grouped in an Oracle Business
Rules object called a ruleset. (See Working with Rulesets.)
You group one or more rulesets and their facts and valuesets in an Oracle Business
Rules object called a dictionary.
For a complete discussion of the concepts behind general and verbal rules, Decision
Tables, and business phrases, see the "Working with Rulesets and Rules" chapter in
Designing Business Rules with Oracle Business Process Management
Rules
Rules follow an IF-THEN structure and consist of two parts:
• IF part: A condition or pattern match.
The rule IF part is composed of conditional expressions and rule conditions that
refer to facts. For example:
IF Rental_application.driver age < 21
17-2 Developing Business Processes with Oracle Business Process Composer
Working with Oracle Business Process Composer Rules Editor
The conditional expression compares a business term (Rental_application.driver
age) to the number 21 using a less than comparison.
The rule condition activates the rule whenever a combination of facts makes the
conditional expression true. In some respects, the rule condition is like a query over
the available facts in the Rules Engine, and for every row returned from the query
the rule is activated.
• THEN part: A list of actions.
The rule THEN part contains the actions that are run when the rule is fired. A rule is
fired after it is activated and selected among the other rule activations using
conflict resolution mechanisms such as priority. A rule might perform several
kinds of actions. An action can add facts, modify facts, or remove facts. An action
can run a Java method or perform a function which may modify the status of facts
or create facts.
Rules fire sequentially, not in parallel. Rule actions often change the set of rule
activations and therefore change the next rule to fire.
Decision Tables
A Decision Table is an alternative business rule format that is more compact and
intuitive when many rules are required to analyze many combinations of property
values. You can use a Decision Table to create a set of rules that covers all
combinations or where no two combinations conflict.
For more information about decision tables, see Working with Decision Tables. and
the "Working with Rulesets and Rules" chapter in Designing Business Rules with Oracle
Business Process Management
Working with Oracle Business Process Composer Rules Editor
The Business Rules Editor allows you to create, view and edit facts, functions, globals,
value sets, links, decision functions, and business phrases within a business rules
dictionary.
From the Project Welcome Page, go to the Components pane and select Rules. Click
the name of the dictionary you want to open.
When you open a business rules dictionary, Oracle Business Process Composer
displays the Rulesets page, as shown in Figure 17-1.
A ruleset is an Oracle Business Rules container for rules and Decision Tables. A ruleset
provides a namespace, similar to a Java package, for rules and Decision Tables. In
addition you can use rulesets to partially order rule firing.
Figure 17-1
Business Rules Editor - Rulesets
The Business Rules Editor page provides the tools for you to view rulesets and the
data model, including:
Using Oracle Business Rules 17-3
Working with Business Rule Dictionaries
• Value Sets
• Globals
• Business Phrases
• Explorer
• Facts
• Decision Functions
• Links
• Translations
To edit elements such as the value sets, and globals contained within the opened
business rule dictionary, ensure that the project is in edit mode.
The Business Rules Editor page also provides the tools for you to perform the
following actions:
• Comparing and Merging Oracle Business Rules Dictionaries
• Viewing and Editing Dictionary Settings
• Synchronizing Business Objects
These are accessed from the Actions menu, shown in Figure 17-2
Figure 17-2
Business Rules Editor - Actions
Introduction to Decision Points
Oracle Business Rules SDK (Rules SDK) provides APIs for writing applications that
access, create, modify, and run rules in Oracle Business Rules dictionaries (and all the
contents of a dictionary). The Rules SDK provides the Decision Point API to access and
run rules or Decision Tables from a Java application.
Working with Business Rule Dictionaries
A business rule dictionary is an Oracle Business Rules container for facts, functions,
globals, value sets, links, decision functions, and rulesets. A business rule dictionary is
an XML file that stores the application's rulesets and the data model.
Dictionaries can link to other dictionaries. Using Oracle Business Process Composer
you can create as many dictionaries as you require. A dictionary may contain any
number of rulesets.
17-4 Developing Business Processes with Oracle Business Process Composer
Working with Business Rule Dictionaries
How to Create a New Business Rule Dictionary
Using Oracle Business Process Composer you can create as many business rule
dictionaries as you require.
To create a new business rule dictionary:
1.
From the Project Welcome Page, go to the Components pane and select Rules.
2.
Click the new icon to display the New Business Rule dialog, as shown in Figure
17-3.
Figure 17-3
3.
New Business Rule Dialog
Enter a name and a package for the business rule dictionary.
These fields are required fields.
4.
Select the Expose Composite Service check box if required.
5.
Define the input and output data objects.
a.
Click the Add data object button.
b.
Select Input from the drop down list on the right side of the window.
c.
Enter a name for the data object.
d.
From the drop down list, select a data type.
The data type must not be a simple type, it must be a type defined as a
business object.
e.
Click Add.
The data object appears in Input and Output Data Objects table.
f.
Click the Add data object button and then select Output from the drop down
list.
g.
Enter a name for the data object.
h.
From the drop down list, select a data type.
Using Oracle Business Rules 17-5
Working with Business Rule Dictionaries
The data type must not be a simple type, it must be a type defined as a
business object.
i.
Click Add.
The data object appears in Input and Output Data Objects table.
6.
Click OK.
Viewing and Editing Dictionary Settings
You can view and edit dictionary settings using the Dictionary Settings dialog The
Settings dialog has three areas: Execution, Choices, and Data Model, as shown in
Figure 17-4.
Figure 17-4
Actions - Dictionary Settings
Use the Execution area to select the execution algorithm. Select either RETE or NonRETE.
Oracle Business Rules uses the Rete algorithm to optimize the pattern matching
process for rules and facts. The Rete algorithm stores partially matched results in a
single network of nodes in working memory.
By using the Rete algorithm, Oracle Business Rules avoids unnecessary rechecking
when facts are deleted, added, or modified. To process facts and rules, the Rete
algorithm creates and uses an input node for each fact definition and an output node
for each rule.
The Rete algorithm provides the following benefits:
• Independence from rule order: Rules can be added and removed without affecting
other rules.
• Optimization across multiple rules: Rules with common conditions share nodes in
the Rete network.
• High performance inference cycles: Each rule firing typically changes just a few
facts and the cost of updating the Rete network is proportional to the number of
changed facts, not to the total number of facts or rules.
The Non-Rete algorithm (NRE) is an alternative to the Rete algorithm that consumes
less memory than the Rete algorithm. For many business rules use cases it also results
in improved performance. The core of NRE algorithm is a new rule condition
evaluation approach.
17-6 Developing Business Processes with Oracle Business Process Composer
Working with Business Rule Dictionaries
Use the Choices area to specify phrase suggestions that appear when you are using
Verbal Rules. You can choose to see auto suggestions only, business phrases only, or
both.
Use the Data Model area to specify the global qualifier pattern, also for Verbal Rules.
The pattern must contain two fragments: {member}, {fact}. For example, {member} of
{fact}.
To view or edit dictionary settings:
1. Open the business rule dictionary where you want to view or edit the dictionary
settings.
2. Go to the toolbar and click Actions, Dictionary Settings, as shown in Figure 17-4.
3. Make the required changes and then click Save.
Synchronizing Business Objects
If you change one of the business objects you used when you created your business
rule dictionary then you must refresh or synchronize the business object in the
Business Rules Editor for the changes to take effect.
To synchronize business objects:
1. Open the business rule dictionary where you want to synchronize business objects.
2. Go to the toolbar and click Actions, Sync Business Objects, as shown in Figure
17-2.
The system automatically synchronizes the business objects used in the selected
business rules dictionary.
Comparing and Merging Oracle Business Rules Dictionaries
The Diff Dictionary feature allows you to review any differences in the latest revision
of a dictionary against any previous revision and be able to roll back any changes since
then. The differences are viewed from the perspective of the latest revision.
The Merge Dictionary feature allows you to review any differences between the base
version and up to 3 changed versions and be able to resolve or merge the differences
among them. The differences are viewed from the perspective of the changed versions.
The Merge Dictionary and Diff Dictionary options are available in the Business Rules
Editor, as shown in Figure 17-2.
You can compare up to three different dictionaries and merge into a fourth at designtime in Oracle Business Process Composer.
In the Business Rules Editor, you can compare a base version (which you must be
editing) with two independently changed versions (relative to the base), and then
merge selected changes into the base version (which must be saved as a new version).
To compare and merge business rules dictionaries:
When you want to compare dictionaries, you open the newer dictionary first in the
Business Rules Editor, then use the Dictionary Version dialog to select the older
dictionary to compare with. Anything missing from the newer dictionary is flagged as
a deletion from the newer version.
Using Oracle Business Rules 17-7
Working with Dictionary Links
When you want to merge dictionaries, you open the older dictionary first in the
Business Rules Editor, then use the Dictionary Version dialog to select the newer
dictionary to merge with. Anything missing from the old dictionary is flagged as an
addition in the latest version.
1. Open the business rule dictionary where you want to compare and merge
dictionaries.
2. Go to the toolbar and click Actions, Diff Merge, as shown in Figure 17-5.
Figure 17-5
Business Rules Editor: Actions - Diff Merge
3. Click Browse to select the appropriate dictionary based on whether you want to
compare or merge dictionaries.
4. Click OK.
All differences between the two dictionaries are flagged with change icons.
5. Accept or reject the changes.
Differences can be accepted or rejected at any level in the dictionary by clicking on
the appropriate change icon. Alternatively, you can accept or reject all.
Working with Dictionary Links
Using a dictionary with links to another dictionary is useful for data model sharing.
• Data Model Sharing: Share portions of a data model within a project. When you
link to a dictionary in another project it is copied to the local project.
For example, consider a project where you would like to share some Oracle
Business Rules functions. You can create a dictionary that contains the functions,
and name it DictCommon. Then, you can create two dictionaries, DictApp1 and
DictApp2 and link them both to DictCommon. Both can use the same Oracle
Business Rules functions and when you want to change one of the functions, you
only change the version in DictCommon. Both dictionaries uses the updated
function the next time RL Language is generated from either DictApp1 or DictApp2.
In Oracle Business Rules a fully qualified dictionary name is called a
DictionaryFQN and this consists of two components:
• Dictionary Package: The package name.
• Dictionary Name: The dictionary name
A dictionary refers to a linked dictionary using its DictionaryFQN and an alias.
Oracle Business Rules uses the DictionaryFQN to find a linked dictionary.
The following are the naming constraints for combined dictionaries:
17-8 Developing Business Processes with Oracle Business Process Composer
Working with Rulesets
• The full names of the dictionaries, including the package and name, must be
distinct.
In addition, the dictionary aliases must be distinct.
• The aliases of data model definitions of a particular kind, for example, function,
Oracle RL class, or value set, must be unique within a dictionary.
• A definition may be qualified by the alias of its immediately containing dictionary.
Definitions in the top and built-in dictionaries do not have to be qualified.
Definitions in other dictionaries must be qualified and this qualification is
controlled by the prefix linked names property of the dictionary link.
• Ruleset names must be unique within a dictionary.
When RL Language for a ruleset is generated, the dictionary alias is not part of any
generated name. For example, if the dictionary named DictApp1 links to DictApp2
to create a combined dictionary, and DictApp1 contains ruleset_1 with rule_1
and DictApp2 also contains ruleset_1 with rule_2, then in the combined
dictionary both of these rules, rule_1 and rule_2 are in the same ruleset
(ruleset_1).
• All rules and Decision Tables must have unique names within a ruleset.
For example, within a combined dictionary that includes dictionary DictApp1 links
to DictApp2, dictionary DictApp1 may have a ruleset named Ruleset_1 with a
rule rule_1. If dictionaryDictApp2 also has a ruleset named Ruleset_1 with a
rule_2, then when Oracle Business Rules generates RL Language from the
combined, linked dictionaries, both rules rule_1 and rule_2 are in the single
ruleset named Ruleset_1. If you violate this naming convention and do not use
distinct names for the rules within a ruleset in a combined dictionary, a validation
warning is reported, similar to the following:
RUL-05920: Rule Set Ruleset_1 has two Rules with name rule_1
To view linked dictionaries:
Figure 17-6
1.
Open the business rule dictionary where you want to view dictionary links.
2.
Go to the toolbar and click Links, as shown in Figure 17-6.
Business Rules Editor - Links
Working with Rulesets
Using Oracle Business Process Composer you can edit, add, and delete rulesets.
Note that when you create a new business rule dictionary, a default ruleset is
automatically created
Using Oracle Business Rules 17-9
Working with Rulesets
How to Add and Edit a Ruleset
Using the Business Rules Editor, you can edit, add, or delete rulesets contained in a
business rule dictionary.
To add and edit a ruleset:
1. From the Project Welcome page, go to the Components pane and select Rules.
2. Click the name of the business rule dictionary you want to open.
The dictionary appears in the Business Rules Editor, as shown in Figure 17-1.
Ensure that the project is in edit mode.
3. Go to the toolbar and click Rulesets if the Business Rules Editor is not already
displaying the Rulesets page.
4. Click the add button located at the top left-hand side of the page.
This action automatically creates a ruleset with a name similar to Rule Set 1, Rule Set
2, and so on.
5. Click the Advanced Property Editor icon to edit the ruleset properties, as shown in
Figure 17-7.
Figure 17-7
Business Rules Editor: Rulesets - Advanced Property Editor
6. Edit the name and add a description.
Descriptions are one or two sentence expansions of the name to help a user
distinguish between rulesets.
7. Click the Active check box to activate this ruleset.
8. Define an effective date for this ruleset. Select
• Always
• Range: Define an effect start and end date and time
• From: Define an effective start date and time
• To: Define an effective end date and time
9. Click OK.
17-10 Developing Business Processes with Oracle Business Process Composer
Working with Rulesets
How to Add General Rules and Verbal Rules to a Ruleset
Use the Business Rules Editor to add, edit, and delete rules in a ruleset.
You author general rules, verbal rules and business phrases in Business Process
Composer in the same fashion as in Oracle Business Process Management Studio.
There are some differences in the way you interact with the GUI, such as the use of the
keyboard when creating business phrases.
For a complete description of the concepts behind the configuration of general rules
and verbal rules, see "Working with Rules" in Designing Business Rules with Oracle
Business Process Management.
Adding a Rule to a Ruleset
To add a rule to a ruleset:
1. Open the business rule dictionary containing the ruleset where you want to add a
rule.
2. Go to the toolbar and click Rulesets, then select the required ruleset from the
listing of rulesets defined for this business rule.
3. Click the New Rule icon and select to add either a General Rule, or Verbal Rule.
Adding a General Rule
To add a general rule:
1. Click the Advanced Property Editor icon located to the right of the rule name to
edit the name for this new rule, as shown in Figure 17-8.
Figure 17-8
Business Rules Editor: Rulesets - New General Rule
2. In the IF area, use the controls, icons, and selection boxes, including the Left Value
expression icon, drop-down list for an operator, and Right Value expression icon to
modify the condition.
3. In the THEN area for the rule, next to the rule action click Add Action.
Using Oracle Business Rules 17-11
Working with Decision Tables
Adding a Verbal Rule
To add a verbal rule:
1. Click the Advanced Property Editor icon located to the right of the rule name to
edit the name for this new rule, as shown in Figure 17-9
Figure 17-9
Business Rules Editor: Rulesets - New Verbal Rule
2. In the IF area, click Add Test. specify tests by entering business phrases.
3. In the THEN area for the rule, click Add Action to add the required action for this
rule.
Working with Decision Tables
A Decision Table displays multiple related rules in a single spreadsheet-style view. In
Business Rules Editor, a Decision Table presents a collection of related business rules
with condition rows, rules, and actions presented in a tabular form that is easy to
understand. Business users can compare cells and their values at a glance and can use
Decision Table rule analysis features by clicking icons and selecting values in Business
Rules Editor to help identify and correct conflicting or missing cases.
To help understand Decision Table concepts, consider a set of IF/THEN rules that
determine if a loan application is approved or rejected.
The IF/THEN rules follow:
if loanAmount < 10,000 and creditRating = poor then loanApprovalStatus =
manual_approval
if loanAmount < 10,000 and creditRating = good then loanApprovalStatus =
auto_approved
if loanAmount [100,000..500,000] and creditRating = poor then loanApprovalStatus =
auto_rejected
Figure 17-10 shows a Decision Table representation that includes these rules and
shows areas for Decision Table conditions and actions.
Figure 17-10
Sample Decision Table with Conditions and Actions
17-12 Developing Business Processes with Oracle Business Process Composer
Working with Decision Tables
A ruleset contains a Decision Table; this provides a way to group the Decision Table
along with IF/THEN rules. When rules and Decision Tables are grouped in a ruleset,
the IF/THEN rules and the Decision Table rules all execute as a set of interrelated
rules.
A rule in a Decision Table is not named. Although Business Rules Editor shows rules
in a Decision Table with labels, for example, R1, R2, and R3, these rule labels are not
names for individual rules but are labels derived from the current ordering of the rules
in the Decision Table. Therefore, a rule with the label R1 can be moved to position 3
and then Business Rules Editor relabels this rule R3.
Decision Table Conditions
The Conditions area in a Decision Table includes one or more condition rows. Each
condition row has a condition expression and, for each rule, a condition cell. A
condition expression is an expression that you build in Business Rules Editor. The
condition expression is often a fact property or a function result, but it can be any
expression that has a type that can be associated with a value set. The value or the
range for a given condition cell takes its value or its range from one or more values or
ranges in the associated LOV or Ranges value set.
Decision Tables show rules in value order, and to change the order of rules you must
change the order of values in the value sets. Therefore, the order of the values in the
value set associated with a condition row determines the order of the condition cells,
and therefore the order of the rules. You can control rule ordering in a Decision Table
by changing the relative position of the values in an LOV value set associated with a
condition row; however, you cannot reorder range values.
By default, when you create a condition row, Business Rules Editor creates a single
condition cell and assigns the "?" value to the cell. A condition cell with the value "?"
indicates that the value of the cell is undefined in the value set.
Decision Table Actions
Actions are associated with rules in a Decision Table. At runtime, when facts match for
condition cells, the Rules Engine prepares to run the actions associated with the rule.
Table 17-1 shows the types of actions you can choose in the Actions area. Therefore, in
an action you can call a function, assert a new fact, retract a fact, or modify a fact, and
so on. In the Actions area the cells corresponding to an individual action for a rule are
called action cells.
Table 17-1
Decision Table Actions
Action
Description
assert new
Assert a new fact
assign
-
call
Call a function
modify
Modify a data value associated with a matched fact
retract
Retract a fact
assert
-
assert tree
-
assign new
-
Using Oracle Business Rules 17-13
Working with Decision Tables
Action
Description
expression
-
return
-
throw
-
When you add multiple actions the actions that you add in the Actions area are
ordered; actions appearing in the higher rows run before actions in the following
rows.
The Decision Table actions such as modify can refer to facts matched in the condition
cells. Certain types of actions in the Actions area include a Parameterized check box.
This check box specifies that a property from the action can have its value set in the
action cell associated with a rule in the Decision Table. When the parameterized check
box is selected, the value you supply for the expression value in the action, in the
Actions area, becomes the default value for the property if a value is not supplied in
the action cell. For example, see Figure 17-11 where the value GOOD is assigned as the
default value for the action property loanApprovalStatus.
Figure 17-11
Action Editor Showing Paramaterized Action with Default Value
In the Decision Table Actions area you can specify that an action cell do nothing. In
this case, clear the action cell. When the action cell check box is cleared, this means do
not perform this action when the pattern matches for the specified condition values in
the Decision Table. Therefore, for each action cell you can specify whether the rule
associated with the action cell should activate the action, or do not perform the action.
How to Add a Decision Table to a Ruleset
You add a Decision Table by performing several steps. These steps include:
• Create a Decision Table.
• Add conditions to the Decision Table.
• Add actions to the Decision Table.
• Use Decision Table operations to validate, correct, and modify the Decision Table.
17-14 Developing Business Processes with Oracle Business Process Composer
Working with Decision Tables
To add a Decision Table:
A Decision Table displays multiple related rules in a single spreadsheet-style view.
1. Open the business rule dictionary containing the ruleset where you want to add a
Decision Table.
2. Go to the toolbar and click Rulesets, then select the required ruleset from the
listing of rulesets defined for this business rule.
3. Click the New Rule icon and select to add a Decision Table.
4. Click the Advanced Property Editor icon located to the right of the rule name to
edit the name for this new rule.
5. Use the controls, icons, and selection boxes to create your decision table when
many rules are required, as shown in Figure 17-12.
Figure 17-12
Business Rules Editor: Rulesets - New Decision Table Rule
For more detailed information about how to create Decision Tables and the tools
available, see Designing Business Rules with Oracle Business Process Management,
"Working with Decision Tables".
Exporting and Importing Decision Tables to and From Microsoft Excel
Business users may find that editing Decision Tables is easier to do in Microsoft Excel.
New functionality allows you to export and edit Decision Tables in Excel and then
import the Decision Tables back into the dictionary.You can export and edit Decision
Tables at design-time in Oracle Business Process Composer. You can export one or
more Decision Tables from a business rules dictionary to the same Excel
workbook.When you import back into the dictionary, you can create a new dictionary,
overwrite the existing dictionary, or perform a Diff-Merge. The Diff-Merge allows you
to compare dictionaries.For more information about comparing dictionaries, see
Comparing and Merging Oracle Business Rules Dictionaries.
The Excel workbook structure consists of several worksheets: a Readme sheet, a Value
Set sheet, and one sheet for each exported Decision Table, as shown in Figure 17-13.
Only Rules and Value Sets can be edited in Excel. You can export to XLSM (default) or
XLS.
Using Oracle Business Rules 17-15
Working with Decision Tables
Figure 17-13
Microsoft Excel - Decision Table
When you open the spreadsheet, the macros are disabled by default. If you enable the
macros, a new tab called Oracle Business Rules, appears. This tab allows you to add or
delete rules, merge or split cells, and add or remove values from value sets. You can
also disable or enable highlighting, use a simple or advanced mode and hide or show
the Readme sheet.
You can edit with the macros disabled, though you cannot:
• Choose values from drop lists for restricted cells.
• Edit free form cells.
• Copy and paste a range of cells to add a rule or Value Set.
• Delete a range of cells to delete a rule or Value Set.
• Split or merge cells.
• Create Value Sets automatically.
• Validate the structure of Decision Tables or Value Sets.
Using the predefined macros, you can:
• Add and delete rules.
• Split or merge cells.
• Add or delete Value Sets.
• Editable cells include:
– Description for Rules, Conditions, Actions
– Condition and Action nodes
– Action state
– Parameterized options for Action parameters.
17-16 Developing Business Processes with Oracle Business Process Composer
Working with Decision Tables
• Non-editable cells include:
– Condition expressions
– Action expressions
– Action parameters
If you try to edit these cells, you will get an error message.
In Excel there are no shared Value Sets; each condition has its own Value Set so you
can only export a Value Set if it is modifiable in Excel. The Value Sets that are nonmodifiable include:
• Linked Dictionary Value Sets
• Enums
• Internal Value Sets, for example, boolean Value Sets
In the worksheet, you can only select values from the drop down for the conditions
associated with non-modifiable Value Sets. A highlighting mechanism informs you
which conditions are associated with non-modifiable Value Sets.
Exporting Decision Tables to Microsoft Excel
To export decision tables to Microsoft Excel:
1. Open the business rule dictionary where you want to export a decision table to
Microsoft Excel.
2. Go to the toolbar and click Actions, Export to Excel to open the Export Decision
Tables dialog, as shown in Figure 17-14.
Figure 17-14
Business Rules Editor: Actions - Export to Excel
3. Provide a name for the file and choose to save the file as either an XLS or XLSM
file.
4. Highlight the decision tables that you want to export.
Using Oracle Business Rules 17-17
Working with Facts
5. Click the Read-Only Bucket Sets (Value Sets) check box if you want your Value
Sets to be read-only.
6. Click Export to save your file to a local folder.
The file is now available for you to open and edit using Microsoft Excel.
Importing Decision Tables from Microsoft Excel
To import a decision table from Microsoft Excel:
1. Open the business rule dictionary where you want to import a decision table from
Microsoft Excel.
2. Go to the toolbar and click Actions, Import from Excel to open the Import Decision
Tables dialog, as shown in Figure 17-15.
Figure 17-15
Business Rules Editor: Actions - Import from Excel
3. Browse to the folder where you saved your worksheet and then select the file with
your updated worksheet.
4. The Diff-Merge radio button is selected by default.
Browse to the Base Dictionary that you want to compare your file to. The base
dictionary is required for a 3 way diff-merge.
5. Clear the Diff-Merge radio button and select Create New or Overwrite.
6. Click Import.
The decision table is imported into the Business Rules Editor where you can accept
or reject changes.
Working with Facts
In Oracle Business Rules, facts are the objects that rules reason on. Each fact is an
instance of a fact type. You must import or create one or more fact types before you
can create rules. Facts are created and edited in BPM Studio. You can view facts in
Composer.
In Oracle Business Rules a fact is an asserted instance of a class. The Oracle Business
Rules runtime or a developer writing in the Oracle Rule Language (RL) uses the RL
Language assert function to add an instance of a fact to the Oracle Business Rules
Engine.
17-18 Developing Business Processes with Oracle Business Process Composer
Working with Facts
Note:
Oracle Rule Language (RL) is the native language for Oracle Business Rules
Using the Business Rules Editor you can view facts, as shown in Figure 17-16.
Figure 17-16
Business Rules Editor - Facts
Fact types can be based on the following:
• XML Facts: XML Facts are imported from existing sources by specifying XML
Schema.
In BPM Studio, you can add aliases to imported XML Facts or use XML Facts with
RL Facts to change the data model according to your business requirements.
• Java Facts: Java Facts are imported from existing sources.
In BPM Studio, you can add aliases to Java Facts or use them with RL Facts to
target the data model to business requirements. Java Facts are also used to import
supporting Java classes for use with the rules or Decision Tables that you create.
• RL Facts: RL Facts are the only kind of facts that you can create directly and do not
have an external source.
All other types of Oracle Business Rules facts are imported. An RL Fact is similar to
a relational database row or a JavaBean with properties. An RL Fact contains a set
of named, typed properties. Property values can be primitives such as String,
another structured fact, or a list. RL Facts are useful for rapid and independent
development and testing of decision logic. Input data that ultimately comes from
an imported fact type (for example, an XML Schema) can be modeled using RL
Facts before the imported schema is available or stable. Intermediate decisions that
should not be returned to the application (for example, sub-decisions that
categorize a customer as GOOD or BAD). It is usually best to import the fact types
that are used for the input and output data of a decision. You can use RL Facts to
extend a Java application object model by providing virtual dynamic types.
• ADF Business Components Facts: ADF Business Components Facts allow you to
use ADF Business Components as Facts in rules and in Decision Tables.
By using ADF Business Components Facts you can assert view object graphs
representing the business objects upon which rules should be based, and let Oracle
Business Rules deal with the complexities of managing the relationships between
the various related view objects in the view object graph.
In the Oracle Business Rules runtime such fact type instances are called facts.
Using Oracle Business Rules 17-19
Working with Value Sets
Working with Value Sets
You can create value sets to define a list of values or a range of values of a specified
type. After you create a value set you can associate the value set with a fact property
of matching type. Oracle Business Rules uses the value sets that you define to specify
constraints on the values associated with fact properties in rules or in Decision Tables.
You can also use value sets to specify constraints for variable initial values and
function return values or function argument values.
Using Business Rules Editor you can add, edit, or delete value sets to a business rule
dictionary.
How to Add a Value Set
Using the Business Rules Editor, you can edit, add, or delete value sets contained in a
business rule dictionary
To add a new value set:
1. From the Project Welcome page, go to the Components pane and select Rules.
2. Click the name of the dictionary you want to open.
The dictionary appears in the Business Rules Editor, as shown in Figure 17-1.
Ensure that the project is in edit mode.
3. Go to the toolbar and click Value Sets.
This displays a table listing the value sets in the selected business rule, as shown in
Figure 17-17.
Figure 17-17
Business Rules Editor - Value Sets
4. Click the Add Value Set drop-down list, then select the type of value set you want
to create.
• Value Set
• Range Value Set
5. Select the value set from the list, then edit the value set as required.
Depending on the type of the value set, this displays a corresponding Edit value set
page. Figure 17-17 shows an example of a range value set.
17-20 Developing Business Processes with Oracle Business Process Composer
Working with Global Variables
How to Edit an Existing Value Set
In the Business Rules Editor, selecting Value Sets shows you a table listing the value
sets in the dictionary. To edit a value set, select the appropriate row and click the edit
icon. Depending on the type of the value set, Range, Enum, or LOV, this displays a
corresponding Edit value set page.
You can create a range value set by clicking Add in the menu bar and selecting a type.
This adds a new row in the value sets table. Adding a value automatically adds an end
point for a range value and a value for an LOV value based on the data type. You can
modify the newly added value end point or value. Note that the alias is modified
when an end point or value is changed.
To delete a value set, select a row and click Delete.
To edit a value set:
1. Open the business rule dictionary where you want to edit the value set.
2. Go to the toolbar and select Value Sets.
This displays a table listing the value sets in the dictionary.
3. Select the appropriate value set row and click the edit value set icon.
4. Use the Value Set Editor to edit the appropriate fields in the value set.
5. Click OK to confirm the changes.
Working with Global Variables
Using Business Rules Editor you can add, edit, or delete global variables to a business
rule dictionary. You can use global definitions to share information among several
rules and functions.
For example, if a 10% discount is used in several rules you can create and use a global
Gold Discount, so that the appropriate discount is applied to all the rules using the
global.
How to Add a Global Variable
Using the Business Rules Editor, you can edit, add, or delete global variables
contained in a business rule dictionary
To add a new global:
1. From the Project Welcome page, go to the Components pane and select Rules.
2. Click the name of the dictionary you want to open.
The dictionary appears in the Business Rules Editor, as shown in Figure 17-1.
Ensure that the project is in edit mode.
3. Go to the toolbar and click Globals.
This displays a table listing the globals in the selected business rule dictionary, as
shown in Figure 17-18.
Using Oracle Business Rules 17-21
Working with Global Variables
Figure 17-18
Business Rule Editor - Globals
4. In the Name field, enter a name or accept the default value.
5. In the Value field, enter a value, select a value from the list, or click the Expression
Builder icon to enter an expression.
For more information about using expressions, see Using Expressions to Control
Data .
6. Optionally, in the Value Set field, select a value from the list.
7. In the Type field, select the type from the list.
8. If the global is a nonfinal, then deselect the Final check box.
When unselected, this option specifies that the global is modifiable, for instance, in
an assign action.
9. If the global is a constant, then select the Constant check box.
When selected, this option specifies that the global is a constant value. For more
information, see About Final and Constant Options.
About Final and Constant Options
The Globals variable includes the Constant and Final options that you can select.
Consider the following when you use global variables:
• When you deselect Final, this specifies that the global is modifiable, for instance, in
an assign action.
• When you select Final, this specifies that you can use the globals in a test in a rule
(nonfinal globals cannot be used in a test in a rule).
• When you select Final, this specifies that the global is initialized one time at
runtime and cannot be changed.
When you select the Constant option, this specifies the global is a constant. In Oracle
Business Rules a constant is a string or numeric literal, a final global whose value is a
constant, or a simple expression involving constants and +, -, *, and /.
Selecting the Constant option for a global has three effects:
• You do not have to surround string literals with double quotes.
• Only constants appear in the expression value choice list.
• The expression value must be a constant to be valid.
Selecting the Constant option is optional. Note that values, value range endpoints, and
ruleset filter values are always constant.
17-22 Developing Business Processes with Oracle Business Process Composer
Working with Verbal Rules and Business Phrases
How to Edit Globals
In the Business Rules Editor, selecting the Globals tab shows you a table listing the
globals in the dictionary.
To edit a global variable, select the appropriate row and variables. You can edit the
Name, Description, and Value fields. For the Value field, you can use the expression
builder to set the value.
Working with Verbal Rules and Business Phrases
Verbal rules work hand in hand with business phrases to provide a flexible way
author rules using natural language statements to express rule logic in domain specific
sentences that are similar to spoken language. Business phrases provide the logic
behind conditions that are used in the composition of the verbal rule.
You can write verbal rule tests and actions using derived business phrases as well as
user-defined business phrases. Derived business phrases are automatically created
using facts, globals and other information in the dictionary while user-defined phrases
can be explicitly authored to augment derived phrases. Further, user-defined phrases
can either be pre-created or created as required while composing the verbal rule.
As you write a verbal rule, you can use suggested business phrases, or instantiate your
own on the fly and provide their implementation details later. Alternatively, you can
create the business phrases you require for your verbal rule first, and then complete
the verbal rule.
For more information about business phrases and how they work with verbal rules, as
well as sample scenarios, see the "Working with Rulesets and Rules" chapter in
Designing Business Rules with Oracle Business Process Management.
How to Create Business Phrases
In the Business Rules Editor, selecting the Globals tab shows you a table listing the
globals in the dictionary.
To edit a global variable, select the appropriate row and variables. You can edit the
Name, Description, and Value fields. For the Value field, you can use the expression
builder to set the value.
To create a Business Phrase
1. Open the business rule dictionary where you want to add a Business Phrase.
2. Go to the toolbar and click Business Phrases.
3. Click the Add Phrase icon to add a Test business phrase.
Alternatively, you can create either a Test or Action business phrase from the
dropdown.
4. Enter the business phrase details as shown in Figure 17-19.
Using Oracle Business Rules 17-23
Working with Verbal Rules and Business Phrases
Figure 17-19
Business Rule Editor - Business Phrases
5. In the Phrase panel, enter the definition of the business phrase.
Placeholders for parameters that have not yet been defined can be included by
typing their name wrapped in curly braces. For example:
{customer} is single
The corresponding parameters are added to the Parameters panel.
6. Define parameters in the Parameters panel.
Click Create (+) to add a new parameter. Specify its Name, Form, and Type.
Optionally, specify a Value Set.
7. To add a parameter to the business phrase value, click Insert Parameter in the
Phrase panel, and select the parameter from the dropdown list.
8. Define the mapping for the business phrase in the Mapping panel by adding Tests
or Actions, depending on the type of business phrase.
Mappings are constructed by searching for and specifying conditions, facts,
operands and so on, in the same fashion to how you construct a general rule test or
action in 34Business Process Composer. See “How to Add General Rules and
Verbal Rules to a Ruleset”.
9. Mark the business phrase as draft if required.
Draft Business Phrases and Verbal Rules
Business phrases can be marked as being in draft status.
You can set or override the draft status of a business phrase by clicking Make Draft or
Clear Draft.
The draft status of a verbal rule is derived from the business phrases it references and
can not be manipulated directly. If a verbal rule contains business phrases marked
draft, the rule is also marked draft. The verbal rule description panel indicates that the
verbal rules is in draft mode. When all business phrases referenced by the verbal rule
are no longer marked draft, the verbal rule is taken out of draft mode.
Draft business phrases and verbal rules are not validated and are not included in the
dictionary for execution. This allows you to continue to use or test a dictionary as you
refine your business phrases and verbal rules.
As you write a verbal rule you can compose business phrases that do not yet exist in
the dictionary. These are automatically added to the list of business phrases and
marked draft, and the verbal rule is marked draft as well.
17-24 Developing Business Processes with Oracle Business Process Composer
Working with Decision Functions
Choosing or Adding Business Phrases in Verbal Rules
Verbal rules use business phrases to specify the IF and THEN tests and actions.
When defining a test or action in a verbal rule, you enter text which triggers a dropdown list of choices. From the list, you can select existing business phrases from the
dictionary, automatically generated business phrases, or you can instantiate your a
new business phrase based on what you typed, provide its implementation details
later in the Business Phrases tab.
Instantiating New Business Phrases While Authoring a Verbal Rule
You can instantiate new business phrases while authoring a new verbal rule simply by
typing them into a test or action and clicking <Add New Business Phrase>, instead of
selecting one from the dropdown list. These business phrases are marked draft, and
the verbal rules which use them are also marked as draft.
Click Goto Phrase to access the business phrase in the Business Phrases tab.
Choosing Business Phrases While Creating a Verbal Rule
A robust list including both previously user-defined and auto-generated derived
business phrases, sorted by relevancy, is automatically provided as you author a test
or action.
User-defined and derived business phrases are not visually distinguished from one
another in the dropdown list.
You can refine the list if required. To display more choices, select a business phrase
and press the right arrow key. The list is populated with business phrases related to
the one you selected.
Working with Decision Functions
A decision function is a mechanism for publishing rules and rulesets as a reusable
service that can be invoked from multiple business processes. It is the only gateway
into the business logic held in business rules because neither business rules nor
rulesets are accessible from the outside.
A decision function is a function that is configured declaratively. A decision function
performs the following operations:
• Asserts inputs as rule facts into the Oracle Business Rules Engine working memory.
• Runs rulesets configured in the current decision function and in nested decision
functions in order.
• Returns output facts from the Oracle Business Rules Engine working memory.
A decision function provides a contract for invoking rules from Java or ServiceOriented Architecture (SOA) (from an SOA composite application or from a BPEL
process). The contract includes input fact types, rulesets to run, and output fact types.
To view and modify a Decision Function:
1. Open the business rule dictionary.
2. Go to the toolbar and click Decision Properties.
Using Oracle Business Rules 17-25
Working with Decision Functions
3. Select a decision function, as shown in Figure 17-20.
Figure 17-20
Business Rules Editor - Decision Functions
4. Enter a name for the Decision Function in Name field.
5. If desired, modify a description in the Description field.
6. Select unlimited or an integer value in the Rule Firing Limit field.
In some cases when you are debugging a decision function, you may want to enter
a value for the rule firing limit. The Rule Firing Limit can also be used in primary
rules processing when you want the execution to stop after a specified number of
rules fire.
7. Enter the service name in the Service Name field if this decision function is to be
invoked as a rule service.
8. The following controls are not editable from Composer:
• Name
• Rule Firing Limit
• Service Name
• Invoke as a rule service: Is the decision function is to be invoked as a rule
service.
• Check rule flow: Verifies the following to generate validation warnings:
Types required by rules executed by the decision function are either inputs to
the decision function or asserted by other rules.
Types generated by rules executed by the decision function are either inputs to
other rules or outputs to the decision function.
Note that rule flow checking might not identify rule flow issues spanning Java
code that is used in rules. In such cases, the warnings can be ignored by turning
off rule flow checking.
• Stateless: Specifies that the decision function is stateless
17-26 Developing Business Processes with Oracle Business Process Composer
Working with Tests
When this check box is selected, which indicates stateless operation. With
stateless operation, at runtime, the rule session is released after each invocation
of the decision function.
• Rulesets are on stack once: If selected, Rulesets are not evaluated further once
they are popped from the Ruleset stack. When this check box is selected, which
indicates stateless operation. With stateless operation, at runtime, the rule
session is released after each invocation of the decision function.
9. In the Initial Actions tab, click Add to add initial actions for the decision function.
Select from the list, which includes:
• assertions
• assignations
• if, while, for, and so on
• expression
• synchronized
• throw
10. These tabs are not editable from Composer:
• Inputs Enter an input name and press Enter or accept the default name.
• Outputs Select the appropriate fact type from the list.
• Rulesets Decision Fucntions
Working with Tests
At runtime, you can use Oracle Business Process Composer to regression test rules.
This enables you to quickly check if a modified rule changes the existing functionality.
You can create a test suite with one or more test cases. Test suites can only be defined
for specific decision functions.
After creating a test suite, if you want to create test cases, click the test suite in the Test
Model tree and click + to create a Test Case or a Test Case from Templates.
You can Save Changes in Current Tab to save data at any time or click Publish if you
are done with changes.
You can also click a test case in the Test Model tree to see the Input and Output
documents for the test case. This is where you can edit values to specify the input and
the expected output.
Creating and Managing Test Suites and Test Cases
To create and manage test suites and test cases:
1. Open the business rule dictionary where you want to add test suites and test cases.
2. Go to the toolbar and click Tests.
Click the Draft Tests check box if you want to turn off test validation.
Using Oracle Business Rules 17-27
Working with Tests
3. Click the Add icon to create a new Test Suite.
4. Enter a Name and Description, then choose a Decision Function.
The test suite is displayed, as shown in Figure 17-21.
Figure 17-21
Business Rules Editor - Tests
5. After creating a test suite, if you want to create test cases, click the test suite in the
Test Model tree and click the Add icon to create a Test Case or a Test Case from
Templates.
6. Click a test case in the Test Model tree to see the Input and Output documents for
the test case.
This is where you can edit values to specify the input and the expected output.
In the Test Case editor, you define the inputs and expected output values for a Test
Case. The values here can be simple values or expressions that use globals,
functions, and so on.
The test input and output Fact trees are auto-initialized based on the inputs and
outputs specified for the Decision Function.
The input and output Fact trees are also auto-synchronized with any changes to the
Decision Function (if you add, delete, modify inputs or outputs) or fact types (if
you add, delete or modify properties). The auto-synchronization flags and
highlights invalid Facts or Property values that were changed in a Decision
Function or Fact type. These flags in the test input and output help you to identify
and fix issues in your test definitions.
7. Click Edit to make all of the nodes in the tree editable.
8. If you edit a field in the tree, click Show Values to show only those values.
9. Check the Flag Rules not Firing as Error check box if un-fired rules are treated as
errors from the execution.
When you have finished setting up your test suites and cases, you can run them.
17-28 Developing Business Processes with Oracle Business Process Composer
Working with Explorer
Creating Test Templates
To create a test template:
Test templates allow you to reuse input and output values to repeat tests on those
fields and values.
1. Open the business rule dictionary where you want to add test suites and test cases.
2. Go to the toolbar and click Tests.
3. Click Test Model in the navigation tree.
In the Test Templates region, click the Add icon to create a new test template.
4. Enter a Name and Description, and then choose a Decision Function.
How to Run Test Suites or Test Cases
When you run a test, a new tab is opened, and you can see the diagnostic comments,
exceptions and test results. Tests can be run either as a suite, multiple test cases, or as
individual test cases. Tests are executed through RL generation.
To run a test suite or test template:
1. Select a Test Suite or Test Template to run, and click the Execute icon.
The Execute icon is enabled only when a test suite or test case (or test template) is
selected from the table and as long as there are no validation warnings in the
current dictionary.
2. A new Results tab appears. Click it to see the test results.
For test suite execution, the tab shows a summary of the test results by default, but
you can double-click each test case to see its test results. For test case execution, the
tab shows the test results.
If a test fails, the test results show diagnostic comments and output differences or
exceptions depending on the cause of the failure.
Working with Explorer
Use the Explorer tab to view business rules dictionary items.
To view items using Explorer:
1. Open the business rule dictionary where you want to edit items.
2. Go to the toolbar and click Explorer.
The items included in the selected business rules dictionary are listed, as shown in
Figure 17-22.
Using Oracle Business Rules 17-29
Working with Translations
Figure 17-22
Business Rules Editor - Explorer
3. Select the Show Hidden Items to include hidden items in the list.
Working with Translations
Use the Translations tab to view the phrases included in the selected dictionary and
their translated strings.
Note that in order to work with additional languages for this project, they must be
added to the project.
For more information about how to add languages to a project, see Introduction to the
Project Information Panel.
To translate phrases:
1. Open the business rule dictionary where you want to translate phrases.
2. Go to the toolbar and click Translations.
The phrases included in the selected dictionary are listed. The languages specified
for this project are also listed, as shown in Figure 17-23.
Figure 17-23
Business Rules Editor - Translations
3. Click on the phrase that you want to translate and enter the translated sling in the
appropriate language column.
17-30 Developing Business Processes with Oracle Business Process Composer
Assigning a Rule to a Business Rules Task
Assigning a Rule to a Business Rules Task
The business rules task is an Oracle BPMN element that enables you to incorporate
Oracle Business Rules within a process model.
When editing a project based on a project template containing business rules in the
business catalog, you can assign business rules to business rules task.
To assign a business rule to a business rules task:
1. Open the process containing the business rules task you want to edit.
2. Right-click the business rules task, then select Properties.
3. Select the Implementation tab.
4. Click Change. The displays the business rules browser containing a table of
available business rules.
5. Double-click a rule from the table.
6. Click OK.
Editing Oracle Business Rules at Run Time
You can use Business Process Composer to open deployed Oracle BPM projects.
Opening a deployed project enables you to edit the Oracle Business Rules contained in
the project and deploy your changes back to Oracle BPM runtime.
Note:
When editing a deployed project, you can only edit the Oracle Business Rules
for that project. You can view other project resources, but cannot edit them.
To open a deployed project:
1. From the Project menu select Open a Deployed Project.
If you are currently editing a project, your changes are automatically saved.
2. Select Deployed Projects, then select the project you want to open from the project
list.
3. Expand Repository, then select the deployed project you want to open.
4. Click Ok.
5. In the Project Navigator, expand Business Rules then expand the rules dictionary
where whose Oracle Business Rules you want to edit.
6. Click Edit in the rules editor.
7. Edit the rules as required, then click Save.
8. Click Validate to ensure the changes you made to the business s made are valid.
Using Oracle Business Rules 17-31
Editing Oracle Business Rules at Run Time
9. Click Commit to commit the changes to Oracle BPM runtime.
10. Click Yes.
11. From the Project menu, select Close Project.
17-32 Developing Business Processes with Oracle Business Process Composer
18
Communicating with Other Processes and
Services
This chapter describes how to design your business processes to communicate with
other processes and services.
This chapter includes the following sections:
• Defining Process Input and Output
• Using the Send and Receive Tasks to Communicate Between Processes
• Using Message Throw and Catch Events to Communicate Between Processes
• Defining Conversations
• Working with Services
Defining Process Input and Output
When you add operations to a Business Process Model and Notation (BPMN) process,
you are defining points in the process that other processes or services can use to
communicate with it. The communication between processes and other processes or
services generally requires an input and returns an output.
The flow events that you use to define the BPMN process operations allow you to
define input and output arguments. These input and output arguments define the
process input and output.
How to Define the Input Arguments for a Process
When you create a process that begins with a message Start event, you must define the
input arguments that are passed to the process.
To define the input arguments for a process:
1. Add a message Start event to your process.
2. Right-click on the message Start event, then select Properties.
3. Select the Trigger type as Message.
Oracle Business Process Composer creates a start event by default with a Trigger
type of None so in order to implement it as a Message start event you must set the
trigger in the Properties dialog.
4. Click the Implementation link to go to the Implementation tab.
5. Select Define Interface.
Communicating with Other Processes and Services 18-1
Defining Process Input and Output
6. Click the Add icon.
7. Determine the name and type of the argument.
8. Click Apply Changes.
How to Define Data Associations for a Message Start Event
After you have defined the input arguments to your process, you must map them to
data objects in your process.
To define data associations for a message start event:
1. Select the message Start event of your process.
2. Right click on the Start event and then click Data Associations.
3. Drag the data objects from the list on the right-hand side to the text boxes listed
under Outputs.
4. Click Apply.
How to Define the Output Arguments for a Process
When you create a process that contains message End events, you must define the
output arguments for each End event. These are the output arguments for the process.
To define the output arguments for a process:
1. Add a message End event to your process.
2. Right-click on the message End event, then select Properties.
3. Click the Implementation tab.
4. Select Define Interface.
5. Click the Add icon.
6. Determine the name and type of the argument.
7. Click Apply Changes.
How to Define Data Association for a Message End Event
After you have defined the output arguments for your process, you must map them to
the data objects in your process.
To define data associations for a message end event:
1. Select a message End event in your process.
2. Right click on the End event and then click Data Associations.
3. Drag the data objects from the list on the right-hand side to the text boxes listed
under Inputs.
4. Click Apply.
18-2 Developing Business Processes with Oracle Business Process Composer
Using the Send and Receive Tasks to Communicate Between Processes
Using the Send and Receive Tasks to Communicate Between Processes
You can use the send and receive tasks to invoke another BPMN process and receive
messages back from it. Processes that begin with a receive task and contain a send task
are exposed as services that can be used by other process and services within an
Oracle Business Process Management (Oracle BPM) application.
Figure 18-1 outlines the basic behavior when using send and receive tasks to invoke a
process and receive a response.
Figure 18-1
Processes
Using the Send and Receive Tasks to Communicate Between
The following steps outline a possible scenario when using the send and receive tasks
to communicate between processes.
1.
Process A is invoked.
2.
A token of Process A reaches the send task.
3.
The send task invokes Process B.
This is defined by the implementation for the send task.
4.
The token of process A proceeds to the next flow object in the process.
5.
The receive task initiates a process instance of Process B.
The receive task must have the Create Instance property defined. See Starting a
Process with the Receive Task..
6.
The newly created token proceeds through process B.
7.
Depending on the specific behavior of your process, the following scenarios may
occur:
a.
If the token of Process A reaches a receive task paired with a send task from
Process B, the token of Process A waits until a response is received.
After the response is received, the token of Process A continues to the next
flow object.
b.
If the token of Process B reaches a send task paired with a receive task in
Process A, Process B sends a response to Process A.
The token of Process B continues to the next flow object.
8.
Both processes continue running.
You can use subsequent send and receive pairs to define subsequent
communication between the two processes.
Communicating with Other Processes and Services 18-3
Using Message Throw and Catch Events to Communicate Between Processes
Using Message Throw and Catch Events to Communicate Between
Processes
You can use combinations of throw and catch events to invoke and communicate with
other BPMN processes.
When using a throw event to invoke another process, the following conditions must be
met:
• The process being invoked must be an asynchronous process.
Although you can use a message throw event to invoke a synchronous process,
there is no mechanism for catching messages synchronously from the process.
If you invoke a synchronous process use the service task. See Introduction to the
Service Task for more information.
• The first time you use a message throw event it must be paired to the message start
event of the other process.
This is required to trigger the process instance. After the instance has been
triggered, you can use subsequent message throw events that are caught by the
second process.
Processes that begin with a message start event and end with a message end event are
exposed as services that can be used by other processes and services within an Oracle
BPM application.
Processes invoked from another process are not considered child processes. This is
important to consider when designing processes that use the terminate end event as a
process end point. For example, a terminate event in the calling process does not stop
a processes invoked with a message throw event.
Figure 18-2 shows the basic behavior when using message throw and catch events to
invoke a process and receive a response.
Figure 18-2
Using Message Throw and Catch Events Between Processes
The following steps outline a possible scenario when using the message throw and
catch events to communicate between processes.
1.
Process A is invoked.
2.
The token of Process A reaches a message throw event that is configured to
invoke Process B.
3.
The message throw event sends a message to the message start event of Process B.
4.
The token of Process A proceeds to the next flow object.
5.
The message start event triggers an instance of Process B.
18-4 Developing Business Processes with Oracle Business Process Composer
Defining Conversations
6.
The newly created token proceeds through Process B.
7.
Depending on the behavior of your process, the following scenarios may occur:
a.
If the token of Process A reaches a catch event paired with a throw event from
Process B, the token of Process A waits until the message is received.
After the message is received, the token of Process A continues to the next
flow object.
b.
If the token of Process B reaches a throw event paired with a catch event in
Process A, Process B throws a message to Process A.
The token of Process B continues to the next flow object.
8.
Both processes continue running.
You can use subsequent catch and throw event pairs to define subsequent
communication between the two processes.
Defining Conversations
Conversations group the message exchange between two or more processes. The
message exchange between processes is called collaboration. Within a project you can
define multiple conversations that you can reuse amongst the processes in that project.
The following sections describe how to edit conversations using Oracle Business
Process Composer. For complete information, see Developing Business Processes with
Oracle Business Process Management Studio.
Introduction to Conversations
Conversations group the message exchange between two or more processes. The
message exchange between processes is called collaboration. Within a project you can
define multiple conversations that you can reuse amongst the processes in that project.
Collaboration diagrams allow you to view the process flow together with the
interactions your process has with other participants in the conversation.
Your BPM project defines a conversation by default. If you do not want to define
multiple conversations you must use this default conversation to gather all the
message exchanges amongst the processes in your project.
You can only define one default conversation per project. However you can modify
your project to use a different default conversation than the one it uses by default.
The different types of conversations allow you to specify the different types of
interaction your process can establish with other processes or services. The following
list describes the different types of conversations:
• Define Interface: Use to define the operations that other services and processes can
invoke to interact with a BPMN process.
• Use Interface: Use to configure your process to use an interface from a component
in the Business Catalog.
• Process Call: Use to invoke another BPMN process.
• Service Call: Use to invoke a service defined in your BPM project.
Communicating with Other Processes and Services 18-5
Defining Conversations
Working with Conversations
The following sections describe how to define and configure conversations using
Oracle Business Process Composer.
How to Define a Conversation
1. Open your process.
2. Click the Edit Conversation button in the process editor toolbar.
3. Click the Add Conversation button.
4. Provide a name for the conversation.
5. Select the type of conversation you want to define.
6. Click OK.
How to Set the Default Conversation
1. Open your process.
2. Click the Edit Conversation button in the process editor toolbar.
3. Select a conversation from the list, then click the Edit button.
4. Click the Default Conversation check box.
5. Click OK.
How to Define a Conversation for a BPMN Flow Object
1. Open your process.
2. Right-click one of the following types of BPMN flow objects:
• Message events (throw and catch)
• Send and receive tasks
• Service tasks
You can only define conversations for these BPM flow objects.
3. Select Implement.
4. In the Implementation tab, click the Browse button next to the Conversation text
field.
5. Select a conversation from the list, then click OK.
How to View a Collaboration Diagram
To view the collaboration diagram for a process, click the View Collaboration button
in the process editor toolbar.
18-6 Developing Business Processes with Oracle Business Process Composer
Working with Services
Note:
In the collaboration view, you cannot make changes to the process. To return
to normal process editing, click the View Collaboration button again.
Working with Services
Oracle Business Process Composer allows you to create new services in the business
catalog. These services are based on standard web services.
The following sections describe how to create services using Oracle Business Process
Composer.
How to Create New Services in the Business Catalog
Services based on web services are defined using a Web Services Description
Language (WSDL) file. A WSDL file is an XML file used to describe how web services
are implemented. When creating a new service using Oracle Business Process
Composer, you can specify a WSDL file stored locally on your machine or one that is
available online.
Process developers are responsible for providing a WSDL file or a URL location.
Creating New Services
To create a new service:
1. Open the project where you want to create a new service.
2. From the main menu, select New then New Service.
3. Provide the following information:
• Name: Defines the name of the service as it appears in the business catalog.
• Type: Defines the type of service being created.
• WSDL: The source of the WSDL used to create the new service can be one of the
following:
– URL: Specifies the remote URL of the WSDL.
– File: Specifies either a WSDL or ZIP file on your local file system.
If using a ZIP file, it can include only WSDL and XSD files. The WSDL file
should have valid references.
• Port Type: Port type specifies the service used.
A WSDL file exposes one or more port types.
• Callback Type: Determines the call back type used for this web service.
This is only applicable to asynchronous services.
• Transaction Participation.
• Version.
Communicating with Other Processes and Services 18-7
Working with Services
4. Click OK.
Creating New Services in the Process Editor
To create a new service in the process editor:
1. Change the palette from BPMN to business catalog.
2. Click the + button located near services.
The New Service dialog appears.
3. Provide the required information.
4. Click OK.
18-8 Developing Business Processes with Oracle Business Process Composer
19
Deploying a BPM Project
This chapter describes how to deploy a Business Process Management (BPM) project
from Oracle Business Process Composer. Users who have been granted permission can
deploy projects directly to runtime.
This chapter includes the following section:
• Deploying a Project
Deploying a Project
You can use Oracle Business Process Composer to deploy a project to the Oracle BPM
runtime.
Deployment is available only within the same environment where the Oracle Business
Process Composer application is installed.
Who Can Deploy Projects?
Users who are granted project owner permissions can use Oracle Business Process
Composer to deploy projects directly to Oracle BPM runtime.
How to Deploy a Project to Runtime
Project owners can deploy projects directly to Oracle BPM runtime.
To deploy a project to runtime:
1. Save any changes to your project.
2. Publish your project.
You do not want to deploy a project that has unpublished changes.
3. From the main menu select Deployment, then select Deploy Project.
Oracle Business Process Composer validates the project. If there are no errors in the
project, the deployment process continues.
4. Provide the required information in the Deploy Project dialog, shown in Figure
19-1.
Deploying a BPM Project 19-1
Deploying a Project
Figure 19-1
Deploy Project Dialog
The properties in the Deploy Project dialog are described in Table 19-1.
Table 19-1
The Deploy Project Dialog Properties
Property
Description
Project
Displays the name of the project.
Version
Use to select the version of the project you want to deploy.
This can be the current version of the project or a project
snapshot.
Last Revision ID
Displays the revision ID of the most recent deployed version
of the project.
New Revision ID
Specifies a revision ID for the deployed application. This ID
can must be of the form:
n0[.n1[.n2[.n3[.n4]]]][-milestone-name[milestone-number]/
_patch-number.
Override the default
deployment version
Overrides the default deployment version.
Deployer Username
Used for deploying the Oracle BPM project to runtime.
Password
Specifies the password corresponding to the Deployer
Username defined above.
Mark composite revision
as default
Defines the current revision as the default revision.
19-2 Developing Business Processes with Oracle Business Process Composer
Deploying a Project
Property
Description
Deploy target
Enables you to select the folder in Oracle MDS where the SOA
composite application is deployed.
Deployment plan
Use to select a deployment plan. Click Browse to select a
deployment plan on your local file system.
5. Click Deploy.
Oracle Business Process Composer deploys the project to runtime. This may take a
few minutes.
6. After the deployment is complete, click OK.
The project is deployed to Oracle BPM runtime. The project is available from the list of
deployed projects in the project browser.
How to Edit a Deployed Project
You cannot use Oracle Business Process Composer to edit deployed Oracle BPM
projects. To edit a deployed project you must be granted the SOA Designer role and
use SOA Composer.
For more information about editing deployed projects, see "Using SOA Composer
with Oracle Business Rules at Runtime" in Designing Business Rules with Oracle Business
Process Management.
How to Generate a Project SAR File
You can generate a project as a SOA archive (SAR) file from Oracle Business Process
Composer. Your system administrator can use this file to deploy a project using the
Oracle Enterprise Manager administration console.
To generate a project SAR file:
1. From the main menu, select Deployment, then select Generate Project SAR file.
Business Process Composer validates the project. If the project contains errors,
these are displayed in the project validation tab.
2. Provide the required information in the Generate Project SAR File dialog, shown
in Figure 19-2.
Figure 19-2
Generate Project SAT File Dialog
• Select the project version you want to use to generate the SAR file.
Deploying a BPM Project 19-3
Deploying a Project
This can be the current version of the project or a project snapshot.
• Enter a revision ID.
• If required, select to override the default deployment version.
3. Click OK.
4. If the project contains no errors, click OK to save the SAR file to your local file
system.
How to Generate a Deployment Plan
A deployment plan is an XML configuration file that is used when deploying a BPM
project from Oracle BPM Studio. Oracle Business Process Composer generates any
unexpected errors when generating the XML file of the deployment plan.
Note:
You should validate your project before creating a deployment plan. Oracle
Business Process Composer does not perform any validation when generating
the deployment plan.
To generate a deployment plan:
1. From the main menu, select Deployment.
2. Select Generate Deployment Plan.
3. Select a location on your local file system, then click OK.
19-4 Developing Business Processes with Oracle Business Process Composer
Part VIII
Appendices
This part describes flow object references, web form and web form control property
references, examples of web form rules, and describes how to prepare processes to
import into Oracle Business Process Management (Oracle BPM).
Part VII contains the following appendices:
• BPMN Flow Object Reference
• Web Form and Web Form Control Property Reference
• Web Form Rules Examples
• Preparing Processes for Import into Oracle BPM
A
BPMN Flow Object Reference
This appendix provides a detailed description of the Business Process Model and
Notation 2.0 (BPMN 2.0) flow objects that are supported in Oracle Business Process
Management (Oracle BPM). It describes Oracle BPM's implementation of the BPMN
2.0 standard. For information about the BPMN standard, including the formal
specification, see http://www.bpmn.org.
The BPMN 2.0 flow objects described in this appendix are organized by the different
types of tasks your business process must perform.
This appendix includes the following sections:
• Defining the Start and End Point of a Process
• Adding User Interaction to Your Process
• Communicating With Other Processes and Services
• Adding Business Logic Using Oracle Business Rules
• Controlling Process Flow Using Sequence Flows
• Controlling Process Flow Using Gateways
• Controlling Process Flow Using Intermediate Events
• Using Subprocesses in Oracle BPM
• Changing the Value of Data Objects in Your Process
Defining the Start and End Point of a Process
Start events are BPMN flow objects that define the starting point of a process. End
events, in contrast, define the end point of a process.
This section describes the BPMN 2.0 flow objects that define the start and end of a
process.
Introduction to Start and End Events
Start events are BPMN flow objects that define the starting point of a process. There
are different types of start events that determine how process instances are created.
End events, in contrast, define the end point of a process. There are different types of
end events that determine what happens when the process instance is completed.
BPMN Flow Object Reference A-1
Defining the Start and End Point of a Process
Note:
In Oracle BPM, all BPMN processes must have at least one start and one end
event.
Because start events define the beginning of a process, they do not have incoming
sequence flows. Likewise, end events cannot have outgoing sequence flows.
However, except for the none end and start events, start and end events can have
input to and output from other business processes and services.
Specifying the Start Events for Different Types of Processes
When you create a new process, Oracle Business Process Composer creates a message
start and message end event by default. You can change these defaults depending on
the type of business process you want to create. Table A-1 shows the default start and
end events for each type of process.
Table A-1
Start and End Events for Each Process Type
Process Type
Default Start and End Event Types
Asynchronous service
Message start and end event
Synchronous service
Message start and end event
Manual process
None start and end event
See Introduction to Business Processes for more information on the different types of
processes supported by Oracle BPM.
Subprocesses contain none start and end events by default. These are the required
start and end events and cannot be changed.
Event subprocesses contain a message start and none end event by default. However,
you can change the start event to reflect the type of event you are handling.
Using Multiple Start Events in a Process
You can define multiple start points in a BPMN process. Multiple start points allow
you to specify multiple ways of creating a process instance, depending on which start
event is used.
Figure A-1 shows an example process that contains both a message start and timer
start event.
Figure A-1
Using Multiple Start Events within a Process
This process can be invoked using a message event when called from another process
or service. It can also be started based on a time interval, invoking the timer start
event, if the process instance must be created automatically.
A-2 Developing Business Processes with Oracle Business Process Composer
Defining the Start and End Point of a Process
Using multiple start events allows you to have multiple ways of starting a process
without having to create two separate processes.
Using Multiple End Events in a Process
End events mark the end of a process path. When you have only one end event in your
process and the token reaches the end event, the process is stopped when the end
event is reached.
Note:
Message end events can only be used to terminate processes initiated by a
message start event. Additionally, if you have multiple message end events
associated with a message start event, each of these message end events must
have the same quantity and type of output arguments.
When using multiple end events, it is possible for different tokens to take different
paths within a process. In typical cases, all parallel paths must reach an end event
before the process is completed.
However, in the following special cases, a process instance can be stopped before all
process paths have completed:
• Error end event: When an error end event is reached, all process activity is
stopped.
Like the error throw event, the error end event stops the flow of a process. See
Introduction to the Error End Event for more information.
• Terminate end event: The terminate end event causes all work on a process to stop
immediately.
There is no error handling or other clean up of the running process. See
Introduction to the Terminate End Event for more information.
Defining How a Process Instance is Triggered
Oracle BPM supports the following ways of triggering a process instance:
• Using a message, signal, or timer start event.
See the following sections for more information:
– Introduction to the Message Start Event
– Introduction to the Signal Start Event
– Introduction to the Timer Start Event
• Using a none start event followed by a receive task.
The receive task must be configured to create a process instance. See Introduction
to the Receive Task for more information.
• Using a none start event followed by a user task defined with the initiator pattern.
See Introduction to the User Task for more information.
• Using an event-based gateway that is configured to create a new process instance.
BPMN Flow Object Reference A-3
Defining the Start and End Point of a Process
See Using Guided Business Processes to Create Project Milestones for more
information.
Introduction to the None Start Event
Use the none start event when no instance trigger is specifically defined. The none
start event can be used as a placeholder when the required start event of a process is
unknown, not yet defined, or implemented later by process developers.
Figure A-2 shows the default notation for the none start event
Figure A-2
The None Start Event
None start events also specify the beginning of a process where the process instance is
created by another flow object. In general, the none start event does not trigger a new
process instance.
However, when used with the following, the none start event does trigger a new
process instance:
• Receive task: The receive task must have the Create Instance property set to true.
• User task: The user task implemented with the initiator pattern
Similar to other start events, the none start event cannot have incoming sequence
flows. It can only have default out-going sequence flows.
Note:
None events are always used to define the beginning of subprocesses.
The None Start Event in Context
Figure A-3 shows an example of the none start event within the Sales Quote example
project. In this example, the none start event defines the start of the process.
Additionally, since the process contains a user task implemented with the initiator
pattern, the none start event triggers a process instance.
Figure A-3
The None Start Event within the Sales Quote Example Process
Data Associations
The none start event does not accept process input arguments.
Introduction to the Message Start Event
The message start event triggers a process instance when a message is received. This
message can be sent from another BPMN or BPEL process or from a service.
A-4 Developing Business Processes with Oracle Business Process Composer
Defining the Start and End Point of a Process
Messages are types of data used to exchange information between processes. Just as
data objects are used to define the data used within a project, messages are used to
define the data used between processes or between a process and a service.
Figure A-4 shows the default notation of the message start event.
Figure A-4
The Message Start Event
Similar to other start events, the message start event cannot have incoming sequence
flows. Message start events require a default outgoing sequence flow.
You can expose a BPMN process as a service that allows other processes and
applications to invoke the process. To expose a process as a service, your process must
begin with a message start event. Additionally, you must define the input arguments
to the process, which are the data objects passed to the message start event. See
Defining Process Input and Output for more information.
The Message Start Event in Context
Figure A-5 shows a modified version of the Sales Quote process. Here, the process
begins with a message start event that initiates the process instance.
Figure A-5
Message Start Event Within the Sales Quote Example Process
Using Process Input and Output Arguments
The message start event allows you to specify input and output arguments to a
process. These arguments define the message that other processes or services must
send to the process during invocation. See Defining Process Input and Output for
information on how to configure process input and output arguments.
Introduction to the Signal Start Event
The signal start event is similar to a message start event in that it is based on
communication from another process or service. However, the message start event
responds to a message sent to a specific process. In contrast, the signal start event is a
response to a signal broadcast to multiple processes.
Signals can be broadcast from a BPMN process using the signal throw event. Using a
combination of signal throw events and signal start events, you can invoke multiple
processes simultaneously.
The signal start and throw events are added to a process by process developers. For
information on implementing the signal throw event, see "Introduction to
BPMN Flow Object Reference A-5
Defining the Start and End Point of a Process
Communicating Between Processes Using Signal Events" in the Developing Business
Processes with Oracle Business Process Management Studio.
Figure A-6 shows the default notation for the signal start event.
Figure A-6
The Signal Start Event
The Signal Start Event in Context
The signal start and throw events are added to a process and implemented by process
developers.
Introduction to the Timer Start Event
The timer start event triggers the creation of a process instance based on a specific time
condition. You can configure the timer start event to trigger a process instance based
on the following:
• A specific date and time.
For example, a process could be triggered on December 31, at 11:59 P.M.
• A recurring interval.
For example, a process could be triggered every 10 hours, 5 minutes, 32 seconds.
Figure A-7 shows the default notation for the timer start event.
Figure A-7
The Timer Start Event
Introduction to the Error Start Event
The error start event is used as the start event of an inline handler. Using inline
handlers you can define a separate process flow to handle errors that occur within
your process.
Figure A-8 shows the default notation for the none end event.
Figure A-8
The Error Start Event
Note:
Error start events can only be used within inline handlers. They cannot be
used within normal process flows.
You can define multiple inline handlers to handle error conditions. However, you
cannot define multiple inline handlers that use the same exception.
A-6 Developing Business Processes with Oracle Business Process Composer
Defining the Start and End Point of a Process
Introduction to the None End Event
The none end event is used to mark the end of a process path. When a token reaches a
none end event, it is consumed. If there are no other tokens within the process
instance, the instance is complete.
The none event is used when your process is not required to perform any action after
it completes. It can also be used as a placeholder by process analysts, to be changed
later during implementation by a process developer.
Figure A-9 shows the default notation for the none end event.
Figure A-9
The None End Event
The none end event is always used to mark the end of a subprocess and event
subprocess.
The None End Event in Context
Figure A-10 shows an example of the none end event within the Sales Quote example.
In this example, the Sales Quote service task is used to save information about the
sales quote to a database.
Figure A-10
The None End Event Within the Sales Quote Example
Because no other work can be performed when the token reaches the end of a process,
a none end event is used. After all process tokens reach the none end event, the
process instance completes.
Introduction to the Error End Event
The end error event is used when the end of a process is the result of an error
condition.
Errors end events are typically used with the error boundary event. The error
boundary event is used to change the process flow based on a specific error. This flow
usually ends using an error end event. See Introduction to the Error Catch Event for
more information on using the error intermediate event.
Figure A-11 shows the default notation for the error end event.
Figure A-11
The Error End Event
For information implementing the error end event, see the Developing Business
Processes with Oracle Business Process Management Studio.
BPMN Flow Object Reference A-7
Adding User Interaction to Your Process
Introduction to the Message End Event
The message end event is used to send a message to another process or service when
the process is completed. The message end event is always used with either a message
start event or message catch event.
Note:
When creating a process that has multiple end events, you must ensure that
any tokens that reach a message end event were created by a message start
event. For example, you cannot use a message end event to end a process
instance initiated by a timer start event.
Figure A-12 shows the default notation for the message end event.
Figure A-12
The Message End Event
For information on how to configure process output arguments using message end
events, see Defining Process Input and Output.
Introduction to the Terminate End Event
The terminate end event is used to immediately stop a process. When a terminate end
event is reached, the process stops immediately. There is no error handling or
additional cleanup performed.
Adding User Interaction to Your Process
Many business applications require interaction from process participants within your
organization. This interaction can be as simple as entering information into a form or
can involve multiple work flows and multiple users.
This section describes the BPMN 2.0 flow objects that are used to model how process
participants interact with your business processes. It contains the following sections:
• Introduction to Human Workflow
• Introduction to the User Task
• Introduction to the Manual Task
Introduction to Human Workflow
Many end-to-end business processes require manual interaction with the process. For
example, users may be required for approvals, exception management, or performing
activities required to advance the business process.
Oracle Human Workflow provides comprehensive support for user participation by
providing the following features:
• Manual interactions with processes, including assignment and routing of tasks to
the correct users or groups
A-8 Developing Business Processes with Oracle Business Process Composer
Adding User Interaction to Your Process
• Deadlines, escalations, notifications, and other features required for ensuring the
timely performance of a task.
• Organization, filtering, prioritization, and other features required for process
participants to productively perform their tasks.
• Reports, reassignments, load balancing, and other features required by supervisors
and business owners to manage the performance of tasks.
For more information, see "Getting Started with Human Workflow" in the Developing
SOA Applications with Oracle SOA Suite.
Introduction to Human Tasks
Human tasks are a component of Oracle Human Workflow. Human tasks allow you to
interleave manual interactions with connectivity to systems and services within an
end-to-end process flow. Human tasks are responsible for handling all interactions
with users or groups participating in the business process. They do this by creating
and tracking tasks for the appropriate users in the organization. Users typically access
tasks through a variety of clients, including the worklist application, e-mail, portals, or
custom applications.
Human tasks allow process developers to define how process participants interact
with process-based applications created using Oracle BPM Suite and Oracle ServiceOriented Architecture (SOA) Suite.
Using human tasks, process developers can define the interface and workflow for end
user interaction by creating the following:
• Roles and assignments
• Deadlines and escalations
• Presentations
Human tasks are reusable services that can be used within other processes that require
the same UI. Human tasks are created using Oracle BPM Studio.
Introduction to the User Task
The user task represents a part of your process where a process participant is required
to perform work. This can be a simple interaction, such as entering a form, or part of a
more complicated workflow that requires input from multiple process participants.
Figure A-13 shows the default notation for the user task.
Figure A-13
The User Task
In the Oracle BPM Suite, process participants interact with your business application
using the Process Workspace. The specific user interface elements, including the
screens and panels that process what participants see, are created using human tasks.
When designing a process, process analysts often add the user task to a process
diagram. Process developers then create the necessary human tasks and implement
them as part of creating the overall process-based business application.
BPMN Flow Object Reference A-9
Adding User Interaction to Your Process
When a token reaches a user task, the corresponding human task is performed. The
token waits until the human task is completed before continuing to the next flow
object.
See How to Assign a Business Catalog Component to a Flow Object for procedures on
how to assign elements from the business catalog to a user task.
For information about implementing user tasks, see "Using Human Tasks" in the
Developing Business Processes with Oracle Business Process Management Studio.
Similar to other flow objects, the user task may contain incoming and outgoing data
associations.
User tasks may also contain incoming and default outgoing sequence flows.
The User Task in Context
In the Sales Quote example, the Enter Quote task, shown in Figure A-14, represents
entering information about the quote.
Figure A-14
The Enter Quote User Task
After the user enters information about the sales quote, the process flow passes
through the outgoing sequence flow to the next flow object in the process.
Using Interactive Activities
Oracle BPM Studio allows you to add interactive activities to a process directly from
the component palette. Interactive activities are short cuts based on the task routing
and approval features of Oracle Human Workflow. See " Getting Started with Human
Workflow" in Developing SOA Applications with Oracle SOA Suite for more information.
Table A-2 shows the interactive activities that are available in the Oracle Business
Process Composer component palette.
Table A-2
Interactive Activities
Pattern
Description
Complex
Uses a complex routing flow that is defined within the human task.
Management
Uses the management chain pattern where the assignee is set to the
management chain pattern for the process participant belonging to
the group or role assigned to the swimlane.
FYI
Bases assignment on the participant, role, or group defined in the
swimlane. Similar to the user interactive activity, but the FYI activity
does not wait until completion before continuing.
A-10 Developing Business Processes with Oracle Business Process Composer
Adding User Interaction to Your Process
Pattern
Description
Group
Uses the group vote pattern. The assignee for the task is automatically
set to the role or group associated with the lane. This interactive
activity can only be added to swimlanes that are assigned to roles or
groups.
Initiator
The initiator pattern is used to create a process instance.
Introduction to the Manual Task
The manual task represents a task performed by process participants that is outside
the scope of Oracle BPM. Manual tasks are used as placeholders within your process
to show work that is not managed by the BPMN service engine at runtime.
Additionally, manual tasks do not appear in the Process Workspace application.
Note:
Manual tasks are not managed by Oracle BPM. The Oracle BPM runtime does
not track the start and completion of the manual task.
Figure A-15 shows the default notation for the manual task.
Figure A-15
The Manual Task
Manual tasks can only have one default incoming and one default outgoing sequence
flow.
Unlike most BPMN 2.0 flow objects, the manual task does not allow you to manipulate
data objects. Data objects associated with the previous flow element are passed
through as is to the next flow element.
The Manual Task in Context
In the context of the Sales Quote example, a manual task can be added for printing and
signing a copy of a formal contract as shown in Figure A-16.
Figure A-16
Example of a Manual Task
In this example, signing the formal contract is something that you may want to
explicitly show as part of your business process. However, because it is not managed
by the BPMN Service Engine, a manual task is used.
Introduction to the Update Task
The update task is used to perform an operation on one or more Human Tasks. For
example, you can use the update task to perform actions like reassigning a task to
another user.
Figure A-17 shows the default notation for the update task.
BPMN Flow Object Reference A-11
Communicating With Other Processes and Services
Figure A-17
The Update Task
For more information on using the update task, see Developing Business Processes with
Oracle Business Process Management Studio.
Communicating With Other Processes and Services
Oracle BPM allows you to define interactions across business processes within a
process-oriented application. The following sections describe the BPMN flow objects
used to model communication between processes.
This section describes how to use these flow objects to create process models using
Oracle Business Process Composer. For information on how to implement these flow
objects within a process-based application, see Developing Business Processes with Oracle
Business Process Management Studio.
Introduction to the Service Task
The service task allows you to communicate with other processes and services. Process
analysts can add the service task when they know that a process must invoke an
external service or process.
Process developers can then implement the necessary services. You can use the service
task to invoke the following:
• Other BPMN processes
• BPEL processes
• SOA service adapters
• Mediators that are exposed as services
See How to Assign a Business Catalog Component to a Flow Object for information for
procedures about to assign elements from the business catalog to a service task.
The service task has similar behavior to the send and receive task pair and the message
throw and catch event pair. The primary difference is that the service task is used to
invoke processes and services synchronously. When the service task invokes a process
or service, the token waits at the service task until a response is returned. After the
response is received, the token continues to the next sequence flow in the process.
See "Using Service Tasks to Invoke Synchronous Operations in Services and BPMN
Processes" in Developing Business Processes with Oracle Business Process Management
Studio for more information on how to implement the service task with these types of
processes and services.
Figure A-18 shows the default notation for the service task.
Figure A-18
The Service Task
A-12 Developing Business Processes with Oracle Business Process Composer
Communicating With Other Processes and Services
The Service Task in Context
Figure A-19 shows an example of the service task used to save the finalized sales quote
to a database.
Figure A-19
The Service Task within the Sales Quote Example Process
Introduction to the Notification Task
The notification task is similar to the service task. It uses a predefined service to
perform different types of notification. You can use expressions to determine the users
or groups who receive notifications generated by the notification task.
For more information on implementing the notification task, see Developing Business
Processes with Oracle Business Process Management Studio.
These different types of notification are:
• IM: Send an instant message to a user or group.
Figure A-20 shows the default notation of the IM notification task.
Figure A-20
The Instant Message Notification Task
• Email: Sends an email a user or group.
You can also include email attachments. Figure A-21 shows the default notation of
the email notification task
Figure A-21
The Email Notification Task
• SMS: Sends an SMS message to a user.
Figure A-22 shows the default notation of the SMS notification task
Figure A-22
The SMS Notification Task
• Voice: Sends a voice mail to a user.
Figure A-23 shows the default notation of the voice mail notification task.
BPMN Flow Object Reference A-13
Communicating With Other Processes and Services
Figure A-23
The Voicemail Notification Task
• User: Sends a notification to a user based on the available notification types.
For example, if a user has both a voice mail and email configured, the notification
task sends both. Figure A-24 shows the default notation of the User notification
task.
Figure A-24
The User Notification Task
Introduction to the Call Activity
The call activity allows you to call a reusable process from within the current process.
The process being called becomes a child process of the calling process. When calling a
reusable process, the call activity of the parent process waits until the child process
completes before continuing.
Figure A-25 shows the default notation for the call activity.
Figure A-25
The Call Activity
See Introduction to Reusable Processes (Reusable Subprocesses) for more information.
Data objects of the parent process are not automatically available to the reusable
process. Data objects must be passed to and from the child process using argument
mapping of the call activity.
Introduction to the Send Task
The send task sends a message to a system or process outside the current process.
After this message is sent, the task is complete and the running of the process
continues to the next task in the process flow.
The send task is frequently paired with the receive task to invoke a process or service
and receive a response in return. The send and receive tasks are used to invoke
processes and services asynchronously. If you are invoking a process or service
synchronously, use the service task.
Note:
The send and receive tasks perform functions similar to the throw and catch
message events. However, you cannot use the send task to invoke a process
that is initiated with a message start event.
Figure A-26 shows the default notation for the send task.
A-14 Developing Business Processes with Oracle Business Process Composer
Communicating With Other Processes and Services
Figure A-26
The Send Task
For information on implementing the send task to invoke a process or service, see
"Using Send and Receive Tasks to Define a Synchronous Operation in a BPMN
Process" in Developing Business Processes with Oracle Business Process Management Studio.
For information about using the send and received tasks to communicate between
processes, see Using the Send and Receive Tasks to Communicate Between Processes.
Introduction to the Receive Task
In contrast to the send task, the receive task waits for a message from a system or
process outside the current process. After this message is received, the task is complete
and the running of the process continues to the next task in the process flow.
Figure A-27 shows the default notation for the receive task.
Figure A-27
The Receive Task
For information about implementing the send task to invoke a process or service, see
"Using Send and Receive Tasks to Define a Synchronous Operation in a BPMN
Process" in Developing Business Processes with Oracle Business Process Management Studio.
For information about using the send and receive tasks to communicate between
processes, see Using the Send and Receive Tasks to Communicate Between Processes.
Starting a Process with the Receive Task
You can use the receive task to trigger the start of a process. This is useful when you
want to invoke a process from another process using a send task.
To start a process using the receive task, the following conditions must be met:
• The receive task is preceded by an none start event.
• Your process does not contain any other start events.
• The Create Instance property is enabled.
Introduction to the Message Throw Event
The message throw event allows you to send a message to another process or service.
Figure A-28 shows the default notation for the message throw event.
Figure A-28
The Message Throw Event
The throw message event is used to invoke the following types of processes and
services:
• Other BPMN processes
BPMN Flow Object Reference A-15
Communicating With Other Processes and Services
• BPEL processes
• SOA service adapters
• Mediators that are exposed as services
Process analysts may add message throw events to a process to define where a process
must invoke another process or service. However, process developers are typically
responsible for implementing the connectivity with other processes. Additionally, they
are typically responsible for creating and implementing the services invoked by the
message throw event.
For information about how to implement message throw events, see "Communicating
With Other BPMN Processes and Services Using Message Events" in Developing
Business Processes with Oracle Business Process Management Studio.
Message throw events are often used to invoke other BPMN processes by calling the
message start event of another process. See Introduction to the Message Start Event for
more information.
Message throw events are also frequently used with message catch events to receive a
response from the process or service invoked. However, they are always used
asynchronously. After the message throw event sends a message to another process or
service, the token immediately moves to the next flow object of the process.
If your process receives a response synchronously, use the service task to invoke the
process or service. See Introduction to the Service Task for more information.
Note:
The send and receive tasks perform functions similar to the throw and catch
message events. However, you cannot use the message throw event to invoke
a process that is initiated with a message receive task.
Introduction to the Message Catch Event
The message catch intermediate event allows you to receive a message from another
process or service.
Figure A-29 shows the default notation for the message catch event.
Figure A-29
The Message Catch Event
The message catch event is frequently used with the message throw event to
communicate with another BPMN process. See Using Message Throw and Catch
Events to Communicate Between Processes for information on how message throw
events with message catch event.
For information about how to implement message throw events, see "Communicating
With Other BPMN Processes and Services Using Message Events" in Developing
Business Processes with Oracle Business Process Management Studio.
A-16 Developing Business Processes with Oracle Business Process Composer
Adding Business Logic Using Oracle Business Rules
Adding Business Logic Using Oracle Business Rules
This section describes how to use the business rule task to incorporate Oracle Business
Rules within your business processes.
For information about working with Oracle Business Rules using Oracle Business
Process Composer, see Using Oracle Business Rules.
Introduction to Oracle Business Rules
Business rules are statements that describe business policies or describe key business
decisions.
Introduction to the Business Rule Task
The business rule task allows you to incorporate Oracle Business Rules within your
process.
Figure A-30 shows the default notation for the business rule task.
Figure A-30
The Business Rule Task
There are two primary use cases for incorporating Oracle Business Rules within your
business process.
• Using structural rules
Structural rules allow you to perform calculations used within your business
process. For example, you can use a business rule to calculate a credit score.
• Using operative rules
Operative rules are used to make changes to the flow of your process. A typical use
of an operative rule is to perform a check of the rule conditions within the rules
catalog. Then, as part of the output data association, assign a value to a data object
using an expression.
In this scenario, the business rule task is immediately followed by a gateway that is
used to branch the process path according to the value of the data object.
for information about how an operation rule is used, see The Business Rule Task in
Context.
For information on procedures about assigning elements from the business catalog to
a business rule tasks, see How to Assign a Business Catalog Component to a Flow
Object.
The Business Rule Task in Context
Figure A-31 shows an example of the business rule task within the Sales Quote
example.
BPMN Flow Object Reference A-17
Controlling Process Flow Using Sequence Flows
Figure A-31
The Business Rule Task within the Sales Quote Example Process
Controlling Process Flow Using Sequence Flows
Sequence flows define the order or sequence that work is performed within a process.
Sequence flows connect the flow objects within your process and determine the path a
process token follows through your process.
This section describes how to use sequence flows to define the behavior of your
business process.
Introduction to Sequence Flows
Incoming sequence flows are the sequence flows that lead into a flow object. Outgoing
sequence flows are the sequence flows that determine the process path out of a flow
object.
Most flow objects contain both incoming and outgoing sequence flows. Exceptions to
this are start and end events. Start events can only contain outgoing sequence flows.
End events can only contain incoming sequence flows. Additionally, event
subprocesses do not have either incoming or outgoing sequence flows.
Introduction to Unconditional Sequence Flows
Unconditional sequence flows represent the typical path between two flow objects.
Default sequence flows are displayed as a line with and arrow as shown in Figure
A-32.
Figure A-32
The Unconditional Sequence Flow
Most flow objects can contain only one default out going sequence flow. Only parallel
gateways can contain multiple unconditional sequence flows, which represent the
parallel paths of your process.
Exclusive, inclusive, and conditional gateways cannot have unconditional outgoing
sequence flows. These gateways use conditional and default sequence flows to
determine the flow of your process.
Introduction to Conditional Sequence Flows
Conditional sequence flows are used to control the flow of a process based on certain
conditions. Like unconditional sequence flows, conditional sequence flows are
displayed by an arrowed line.
Figure A-33 shows two outgoing conditional sequence flows and a default sequence
flow.
A-18 Developing Business Processes with Oracle Business Process Composer
Controlling Process Flow Using Gateways
Figure A-33
Conditional and Default Sequence Flows
Not all flow objects can use outgoing conditional sequence flows. Only the following
types of gateways can have outgoing conditional sequence flows:
• Exclusive gateways
• Inclusive gateway (split)
The conditions used within a conditional sequence flow are defined using expressions.
For information about using the expression editor to define expressions, see Using
Expressions to Control Data .
Introduction to Default Sequence Flows
Like conditional sequence flows, default sequence flows are used as outgoing
sequence flows to exclusive, inclusive, and conditional gateways. Default sequence
flows represent the path your process takes out of these gateways when none of the
conditions evaluate to true.
Default sequence flows are represented by an arrow with a tic mark on one end, as
shown in Figure A-33.
Controlling Process Flow Using Gateways
Gateways are flow elements that define the flow of your process. Gateways determine
the path a token takes through a process. They define control points within your
process by splitting and merging paths.
This section describes how to use gateways to control process flow and behavior.
Introduction to Gateways
Gateways define control points within your process by splitting and merging paths.
When possible, gateways are used for paths that are exceptions to or deviate from the
default path of the process.
Split-Merge Pairs
The following gateways require a split-merge pair:
• Parallel gateway
• Inclusive gateway
• Complex gateway
When you add one of these gateways to a BPMN process, Oracle BPM Studio
automatically creates the split and merge flow objects.
Although the merge portion of the gateway is required, you do not have to ensure that
all paths out of the split return to the merge.
BPMN Flow Object Reference A-19
Controlling Process Flow Using Gateways
Although it is possible to have process paths that split at a gateway without merging
through the gateway, this is not usually good practice. For more details on the merge
behavior of gateways, see the following sections for each gateway type.
Note:
If you delete the merge gateway from a process, the corresponding split
gateway is also deleted.
Introduction to the Exclusive Gateway
The exclusive gateway allows you to split your process into two or more paths.
However, the process only continues down one of these paths even if multiple
outgoing sequence flows are present. Exclusive gateways can have conditional
outgoing sequence flows and must have at least one default outgoing sequence flow.
You can define expressions that are used to determine if your process continues down
a conditional sequence flow. See Using Expressions to Control Data for more
information.
If your process has multiple outgoing sequence flows for an exclusive gateway, you
can define the order in which they are evaluated. The order of evaluation is configured
in the properties of the exclusive gateway.
If you have an exclusive gateway where more than one conditional sequence flow
evaluates to true, the process continues down the first conditional sequence flow
determined by this order.
Unlike other gateways, the exclusive gateway does not require a corresponding merge
to be explicitly defined in your process after splitting.
Figure A-34 shows the default notation for the exclusive gateway.
Figure A-34
The Exclusive Gateway
The Exclusive Gateway in Context
Figure A-35 shows an example of the exclusive gateway used within the Sale Quote
example. Here, the exclusive gateway is used to evaluate whether a review of business
practices is required.
Figure A-35
The Exclusive Gateway within the Sales Quote Example Process
A-20 Developing Business Processes with Oracle Business Process Composer
Controlling Process Flow Using Gateways
This evaluation is determined by the expression defined for the outgoing conditional
sequence flow. If this evaluates to true, then the process flow proceeds down the Yes
path. If it evaluates to false, then the process flow proceeds down the path of the
default outgoing sequence flow.
Splitting and Merging Exclusive Gateways
When a token reaches an exclusive gateway the outgoing conditional sequence flows
are evaluated until one of them evaluates to be true. You can define the specific order
in which these are evaluated by configuring a property for the exclusive
gateway.Based on this configuration, when the first conditional sequence flow
evaluates to true, the token moves down this outgoing sequence flow to the next flow
object. If you have multiple outgoing conditional sequence flows, you can determine
the order in which they are evaluated.If none of the outgoing conditional sequence
flows evaluate to true, then the token moves down the default outgoing sequence
flow. Therefore, you must define a default outgoing sequence flow for the exclusive
gateway.
The exclusive gateway can also merge incoming sequence flows. However, there is no
synchronization with other tokens that may be coming from other paths within the
process flow.
Note:
If other tokens arrive at an exclusive gateway merge, then they are also passed
through as is. If you are synchronizing tokens or perform evaluations on
incoming sequence flows, you should use a different type of gateway.
Introduction to the Inclusive Gateway
The inclusive gateway allows you to split your process into two or more paths. Unlike
the exclusive gateway, however, a token may flow down one or more of these paths
depending on how the outgoing conditional sequence flows are evaluated.
You must define at least one default sequence flow for the inclusive gateway split. You
can have multiple outgoing conditional sequence flows for an inclusive gateway split.
The token proceeds along only those sequence flows that evaluate to true. If none of
the sequence flows evaluate to true, then the token passes along the default sequence
flow.
Figure A-36 shows the default notation for the inclusive gateway split.
Figure A-36
The Inclusive Gateway (Split)
Figure A-37 shows the default notation for the inclusive gateway merge.
Figure A-37
The Inclusive Gateway (Merge)
BPMN Flow Object Reference A-21
Controlling Process Flow Using Gateways
Splitting and Merging Inclusive Gateways
The inclusive gateway splits a process similar to the exclusive gateway, but allows
tokens to proceed down multiple outgoing sequence flows. When a token arrives at an
inclusive gateway, the expressions of its conditional sequence flows are evaluated.
Next, a token is generated for each of the conditional sequence flows that evaluate to
true. A token is generated for the default sequence flow only if none of the conditional
sequence flows evaluate to true.
These tokens are joined at the merge of the inclusive gateway. When a token reaches
the merge gateway, it waits until all of the tokens generated by the split have reached
the merge. After all of the tokens have reached the merge of the inclusive gateway, the
merge is complete, and the token continues to the next sequence flow after the
gateway.
Introduction to the Parallel Gateway
The parallel gateway allows you to split your process into two or more paths when
you want your process flow to follow all paths simultaneously. The parallel gateway is
useful when your process must perform multiple tasks in parallel.
Figure A-38 shows the default notation for the parallel gateway split.
Figure A-38
The Parallel Gateway (Split)
Figure A-39 shows the default notation for the parallel gateway merge.
Figure A-39
The Parallel Gateway (Merge)
The Parallel Gateway in Context
The Sales Quote example uses a parallel gateway during the approval stage of the
process. Figure A-40 shows how the parallel gateway is used to perform two process
paths simultaneously.
Figure A-40
Example of a Parallel Gateway
In this example, two different process paths are executed at the same time.
A-22 Developing Business Processes with Oracle Business Process Composer
Controlling Process Flow Using Gateways
Splitting and Merging Parallel Gateways
When a token reaches a parallel gateway, the parallel gateway creates a token for each
outgoing sequence flow. The split of the parallel gateway does not evaluate outgoing
sequence flows.
You can also use the parallel gateway to merge process paths split by the parallel
gateway. The merge of the parallel gateway waits for a token to arrive from each of the
incoming sequence flows. After all tokens arrive, only one token is passed to the
outgoing sequence flow.
Note:
Design your process so that a token arrives for each incoming sequence flow
for the merging parallel gateway. If you do not, your process can freeze if the
merge is expecting tokens that do not arrive.
Introduction to the Complex Gateway
The complex gateway splits a process similar to an inclusive gateway. However, it
allows you to define an activation condition that determines if the instance can
continue even if not all of the tokens have arrived at the complex gateway merge.
For example, you can configure a complex gateway to continue after two or more
tokens have arrived. If only two out of the possible conditions in the inclusive gateway
evaluate to true the process instance continues to the next activity. However, because
the inclusive gateway immediately evaluates all the conditional sequence flows, all of
the flow objects in these process paths are also run.
Figure A-41 shows the default notation for the complex gateway split.
Figure A-41
The Complex Gateway (Split)
Figure A-42 shows the default notation for the complex gateway merge.
Figure A-42
The Complex Gateway (Merge)
Introduction to the Event-Based Gateway
The event-based gateway allows you to branch your process flow based on the
possibility that an event may occur. Depending on the context, this may be one of
several types of events.
The event-based gateway allows you to anticipate the possibility that several types of
events may occur at a specific point in your process. It is similar to the exclusive
gateway, but instead of choosing a path based on expressions, the event-based
gateway chooses a path based on the occurrence of an event within your process.
For example, in an order processing process, you may reach a point in your process
when there is no stock currently available. The process may have to wait until stock is
available, but cannot wait indefinitely. By using an event-based gateway, your process
BPMN Flow Object Reference A-23
Controlling Process Flow Using Gateways
can wait for a message saying new stock has been received (using a message catch
event) or it can continue if no message is received after a certain amount of time has
passed (using a timer event).
Figure A-43 shows the default notation for the event-based gateway.
Figure A-43
The Event-based Gateway
The event-based gateway is different from other gateways in that decisions about
process flow are based on an event rather than data-specific conditions.
The event-based gateway is composed of the following:
• The event-based gateway
• Two or more target events
These can be of the following types:
– Message catch events
When initiating a process using a message catch event, the process must be
invoked using a message throw event.
– Timer catch events
Generally only one timer event is used following an event-based gateway.
– Receive tasks
You can use the receive task to initiate a process instance following an eventbased gateway. However the process must be invoked from a send task within
the calling process.
Note:
You cannot mix message events and receive tasks within the same eventbased gateway.
The target elements can only have incoming sequence flows from the event-based
gateway. They cannot have sequence flows from other parts of the process.Although
the event-based gateway allows you to plan that multiple events may occur in your
process, within the process instance, only one event is triggered. When the first event
in the event-based gateway is triggered, the path that comes after that event is
followed.
When you add an event-based gateway to a process, by default it is created with a
timer and message catch event.
Note:
If you delete an event-based gateway, any outgoing sequence flows are also
deleted. The associated events are not deleted.
A-24 Developing Business Processes with Oracle Business Process Composer
Controlling Process Flow Using Intermediate Events
Starting a Process with an Event-Based Gateway
You can also use an event-based gateway at the beginning of a process to create a new
process instance. This is similar to having multiple start events within a process.
To allow an event-based gateway to create a new process instance, you must ensure
the following:
• You have enabled the Initiate property of the event-based gateway.
• There are no incoming sequence flows to the event-based gateway.
Although the event-based gateway can be used to create a new process instance, it
does not accept data input from another process. Any data that must be passed to the
process instance must be configured using the target events.
Controlling Process Flow Using Intermediate Events
Unlike start and stop events, intermediate events occur during the flow of your
process.
This section describes intermediate events and describes how to use them to control
the flow and behavior of your process.
Introduction to Intermediate Events
There are two types of intermediate events:
• Normal flow events
Normal flow events occur within the typical flow of your process.
• Boundary events
Boundary events trigger an interruption with your process. Boundary events are
associated with flow objects and can be configured to interrupt their usual
behavior.
Boundary events behave similar to sequence flows in that they are used to
determine the path a process takes between flow objects.
Boundary events can be divided into two types: interrupting and non interrupting.
Introduction to the Timer Catch Event
Timer catch events allow you to control the flow of your process using a time
condition. Possible uses of the time catch event include:
• Creating a delay before running an activity
• Configuring a deadline for an activity
• Configuring a deadline for a process
• Triggering additional activities after an elapsed time
Figure A-44 shows the default notation for the timer catch event.
BPMN Flow Object Reference A-25
Controlling Process Flow Using Intermediate Events
Figure A-44
The Timer Catch Event
You can use timer events as boundary events on an activity. Timer events can be
defined as either interrupting or non interrupting boundary events.
When an interrupting timer event fires, the token leaves the main process flow to
follow the flow the timer event defines. The flow that an interrupting timer event
defines can return directly to the main process flow.
When a non interrupting event fires, a copy of the token is created and passes through
the flow the timer event defines. The flow that a non interrupting event defines cannot
return to the main process flow.
Introduction to the Error Catch Event
Error catch events are intermediate events used to handle an error that occurs within
your process flow.
Note:
You can also use inline handlers to handle error conditions that occur within
your process.
Error catch events are always used as boundary events and can be attached to the
following:
• Service Tasks
• Call Activities
• User Tasks
• Send Tasks
• Receive Tasks
• Script Tasks
• Rules Tasks
• Subprocesses
Error catch events are always interrupting, meaning that they interrupt the usual flow
of a process.
Figure A-45 shows the default notation for the error catch event attached as a
boundary event on a service task.
Figure A-45
The Error Catch Event as a Boundary Event on a Service Task
A-26 Developing Business Processes with Oracle Business Process Composer
Using Subprocesses in Oracle BPM
When a service or process fails with an error, the error catch event is triggered. This
causes the process flow to follow the path of the outgoing sequence flow of the error
catch event.
You can use this flow to define how you handle the error. This is handled in two ways:
• The process flow returns to the main process flow.
Any work that must be performed is handled within the error process flow before
returning to the main flow.
Note:
If the boundary event is non-interrupting, the boundary flow cannot return to
the main flow.
• The process flow continues to an end event.
The process is stopped immediately. Process control is returned to the service or
process that initiated the process.
Using Subprocesses in Oracle BPM
You can use subprocesses to organize you business processes. Subprocesses allow you
to group functional areas of your process together and also make your processes more
readable.
Oracle BPM supports the following types of subprocesses:
• Reusable processes
• Embedded (also called inline) subprocesses
• Event subprocesses (also called inline handlers)
Introduction to Reusable Processes (Reusable Subprocesses)
Oracle BPM supports a type of process called reusable process. In BPMN terminology,
this is sometimes referred to as a reusable subprocess. Reusable processes allow you to
create processes that can be called from other BPMN processes.
Reusable processes allow you to create processes that can be called from other BPMN
processes. For example, all your processes may have to charge a credit card, so you
can create a charge credit card reusable subprocess
Reusable processes have the following characteristics:
• Must start with one none start event.
• Can contain multiple end events.
• Can only be called by other BPMN processes.
Introduction to Embedded Subprocesses (Inline Subprocesses)
Embedded subprocesses allow you to group BPMN flow objects together to make
your process more readable. In Oracle BPM, subprocesses are embedded
subprocesses. Subprocesses are contained as part of the parent subprocess. Embedded
subprocesses must begin with a start none event and must end with a none end event.
BPMN Flow Object Reference A-27
Using Subprocesses in Oracle BPM
Embedded subprocesses can be expanded or collapsed. Figure A-46 shows how a
collapsed subprocess appears within a process.
Figure A-46
Example of a Collapsed Embedded Subprocess
Figure A-47 shows how an expanded embedded subprocess appears within a process.
When an embedded subprocess is expanded, you can edit the flow objects within it.
You can also click and drag the edge of the embedded subprocess window to make the
window larger or smaller.
Figure A-47
Example of an Expanded Embedded Subprocess
Similar to other types of processes, embedded subprocesses can have start and end
events and contain a separate process flow. An embedded subprocess must begin with
a none start event and end with a none end event. Embedded subprocesses cannot
contain swimlanes.
Embedded subprocesses also behave similar to activities. They can have incoming and
outgoing sequence flows. They also contain data associations that define the data
objects used within the embedded subprocesses.
Embedded subprocesses can also contain timer, message, and error boundary events.
If necessary, your process can contain nested embedded subprocesses. However, use
nested embedded subprocesses only when necessary to make your process more
readable.
Embedded Subprocesses and Sequence Flows
The flow objects within an embedded subprocess cannot have sequence flows that
connect to flow objects outside the subprocess.
Similar to other flow objects, embedded subprocesses have incoming and outgoing
sequence flows.
Embedded Subprocesses in Context
Figure A-48 shows an example of a embedded subprocess. In this example, an
embedded subprocess is used to group the service task used to process a sales quote.
Figure A-48
Example of an Embedded Subprocess
A-28 Developing Business Processes with Oracle Business Process Composer
Changing the Value of Data Objects in Your Process
Looping Embedded Subprocesses
You can configure a subprocess to numerous times within the context of a process
flow. This is something that a process analyst should consider when designing a
process, but the implementation is performed by process developers.
Note:
Looping cannot be configured using Oracle Business Process Composer. You
must used Oracle BPM Studio to configure the looping property of an
embedded subprocess. See Developing Business Processes with Oracle Business
Process Management Studio for more information.
Introduction to Event Subprocesses (Event Handlers)
An event subprocess are a type of subprocess that allows you to model possible
conditions that happen outside of a normal process flow. Event subprocesses are also
called event handlers.
Event subprocesses can have the following start events:
• Error start
• Timer start
• Message start
When you add an inline handler to your process, by default it is created with a
message start event. You can change the type of start event if necessary.
Note:
Inline handlers can only contain one start event. However, you can have
multiple inline handlers within your process.
Changing the Value of Data Objects in Your Process
This section describes how to use the script task to change the values of data objects
within your process.
See Working with Data Objects and Data Associations for general information about
data objects.
Introduction to the Script Task
The script task is used to change values of data objects within your process. The script
task is used when you want to show this change explicitly within your business
process or when you must change the values of data objects outside of another flow
object. It is often used to set initial values of data objects at the beginning of a process.
Figure A-49 shows the default notation for the script task.
BPMN Flow Object Reference A-29
Changing the Value of Data Objects in Your Process
Figure A-49
The Script Task
Script tasks are added to a process by process developers who are responsible for
defining the behavior of data objects within a process and process-based application.
The Script Task in Context
Figure A-50 shows two examples of the script task used at the beginning of the Sales
Quote example. The Sales Quote example uses a script task to set initial values for data
objects when the process instance is created and to set values for several business
indicators.
Figure A-50
The Script Task within the Sales Quote Example
Project data objects are data objects that you define in a project. All processes within a
project have access to the data object defined, though the value changes according to
the process using them. In addition, the engine stores the value of those marked as
business indicators to the process analytics databases if the project is configured to use
them.
Figure A-51 shows the data associations used to set initial values for the business
indicators.
Figure A-51
Data Associations Used by the Set Business Indicators Script Task
As with other flow objects that accept data associations, you can use expressions to
change the values of data objects. Figure A-52 shows how an expression is used to
change the value of the discount project variable.
Figure A-52
Expression Used to Change the Value of Discount Project Variable
A-30 Developing Business Processes with Oracle Business Process Composer
Changing the Value of Data Objects in Your Process
Note:
If you implemented the script task using transformations using BPM Studio,
they are not visible when opening the BPM project in Oracle Business Process
Composer.
BPMN Flow Object Reference A-31
Changing the Value of Data Objects in Your Process
A-32 Developing Business Processes with Oracle Business Process Composer
B
Web Form and Web Form Control Property
Reference
This appendix provides a description of the properties available for web forms and
web form controls.
This appendix includes the following sections:
• Web Form Properties
• Web Form Control Properties
Web Form Properties
You can control the behavior and appearance of the web form by changing its
properties.
Properties are edited using the properties editor which contains tabbed panes that
group the web form properties by function.
Settings Tab
The properties listed in Table B-1 are shown on the Properties control's Settings tab
when a web form is selected in the designer.
Table B-1
Properties
Property
Description
Form Name
Defines the name of the form.
Description
Provides a description of the web form. By default all forms use the
description "Edit the form to change this description." Change this
description to something specific to your form.
The description appears as a tool tip when you mouse over the area
just to the right of the form's share icon in the forms editor. The
description is also visible when you view individual submission
documents.
Element Name
Specifies the root element name in the submission xml of a form
created from the designer palette. Must be a valid XML name.
The name of the form is decoupled from the element name.
If you want a form name with international characters, you must
enter the international chars into the Element Name field.
Note: If you change the element name, all existing submissions
become invalid. The error message. "Submission is not valid. An
incompatible change was made to the form/flow." is displayed.
Web Form and Web Form Control Property Reference B-1
Web Form Properties
Property
Description
Save
Causes all submissions for this form to be stored in forms' submission
repository. This property is enabled by default.
If you deselect this check box, the form submission is still logged in
the submission repository and you are able to view the metadata
about the submission (time/date submitted, success/failure
conditions) but no form field data is saved.
Printable
Displays a print icon at the top of your form. If you do not want users
to print your form, disable this check box. You can control which
form fields are visible in the PDF print view through the printable
property in each web form control of your form.
Save PDF
Enables the user to save the file as a PDF. This property can only be
enabled if the save property is enabled.
When selected a PDF image of the file is also saved in the forms
submission repository.
Decorated
Controls whether newly added controls have their control level
decorator property set or unset. Does not affect controls already in the
form.
Style Tab
The elements listed in Table B-2 are shown on the Properties control Settings tab when
a web form is selected in the designer.
Table B-2
Elements
Property
Description
Width
Specifies how wide your form is. The default "regular" width is
600px, but the drop down also includes thin (400px) and wide
(800px). The custom option enables the box to the right of the Width
drop down in which you can specify a width.
Height
Specifies an initial height for your form as it is loading into the
browser. It does not dictate the actual height. In general, you do not
have to edit the form's height property since the form can resize
dynamically. However, if your form is very small it can improve the
appearance as your form loads if you set height to the actual height of
your form.
Controls
Determines whether the options you define for check box and radio
controls are displayed vertically or horizontally.
Layout
Select a layout. The layout changes the appearance of your form.
Layouts include:
• Nouveau - takes advantage of newer browsers supporting
modern CSS and is extremely well-suited to forms or flows
running on mobile devices.
• Compact - This is very similar to the Nouveau layout except for
the reduction of vertical space between controls.
• Tight - Vertical and horizontal space is dramatically reduced.
Controls are positioned up against each other.
B-2 Developing Business Processes with Oracle Business Process Composer
Web Form Control Properties
Property
Description
Style
Apply a style to your form by selecting a choice from the Style drop
down. Styles are mainly concerned with colors but you can also
specify other properties such as font name, size and color. Choices
include Blue, Neutral, Green or Aqua.
You can create custom styles. Customized styles also appear in the
drop down list along with the pre-defined options.
Print Font
Use this property to optionally select the font used when rendering
PDFs.
Web Form Control Properties
You can control the behavior and appearance of each web form control by changing its
properties.
Properties are edited using the properties editor which contains tabbed panes
grouping the properties by function.
Web Form Control Properties - Settings Tab
The settings tab defines the general properties of a control. Table B-3 provides an
alphabetical list of all the control properties that appear on the settings tab.
Note:
Not all of the properties on the settings tab are used by every web form
control.
Table B-3
Control Properties - Settings Tab
Property
Description
Control Type
Defines the type for this web form control. You can change the type of
the web form control by selecting the type from the drop-down list.
This property applies to the following web form controls:
• Selection controls (drop down lists, radios, and check boxes).
• Most input controls (text, text area, Email, phone, quantity and
number).
• Date controls (Date, Time, or Date/Time).
This property is populated automatically when you first add a control
to a web form. You can change this property if you want to switch a
control in your form to a different type of control. This saves you
from having to remove the original control and drag in a new one.
You cannot change a selection control to an input control or vice
versa. You can switch a check box to a drop down list, but you cannot
use this property to change a check box to a text control.
This property is also useful for verifying what kind of controls are in
your form. You assign new labels to your controls after dragging
them in. This property confirms what kind of controls are in your
form regardless of the labels.
Controls generated from schema elements have a Display As
property instead of a Control Type property.
Web Form and Web Form Control Property Reference B-3
Web Form Control Properties
Property
Description
CSS Class
Defines the control's XHTML markup class name. You can use this
CSS class to reference the control in any CSS when customizing
themes.
Use the built-in CSS class name 'f-page-break' to add a page break to
the printed view of the form's PDF, or tiff by adding it to the control
that should be at the top of a new page.
Date Format
Defines the date format used in the form.
This property applies only to Date controls and the Date portion of
the Date/Time control. It supports European date formatting. Dates
entered into the form are translated according to the chosen format
and are reformatted to match the selected format.
• A date entered into a form field is reformatted to match the
selected Date Format
• A date entered into a form field is translated according to the
selected format. For example, if you choose a European format of
DD-MM-YYYY and enter 10-05-2009 the date value is translated
as May 10, 2009. If you choose a US format of MM-DD-YYY the
date value is translated as October 5, 2009.
• If you choose a format of MM-DD-YYYY using either "-" "/" or "."
as the separator, either separator is valid for that format but is
translated to the selected separator.
• Users can still enter dates such as Feb 3, 2001. They are translated
into the specified format
Decorator
If decorators are turned on for the form, when you drag an input
control from the palette, it shows a default decorator icon on the left
side of the control. The default depends on the type of control being
dragged in. You can change the decorator for individual controls by
selecting one from the dropdown list.
The Textarea control is the only input control that does not have a
decorator
Display As
Enables you to change the way your control looks on your form. For
example, to change a text control to a drop down, select drop down
from the list of allowable controls. This changes the control's
appearance but does not affect how the control handles data. If you
must modify the control's validation behavior, you must update the
schema. The Display As property is not available for the following
schema controls: Message, Upload, Image, Video, Link, Date, Time, Date/
Time.
This property applies only to controls generated from XSD schema
elements. (If the control was dragged in from the palette, it has a
Control Type property).
Enable if Valid
Enables the user to submit the form even if all of the data has not
been validated.
By default the form's submit button is unavailable until all required
fields are filled and contain valid data. Deselect this property to allow
the user to submit a form even if it is invalid.
This property applies only to Submit controls.
B-4 Developing Business Processes with Oracle Business Process Composer
Web Form Control Properties
Property
Description
Enabled
Determines whether the control is enabled or disabled when users
first access your form. If you clear the Enabled check box, users may
not enter a value in the control until the control is enabled. (You can
enable the control using a Rule.)
For example, you are creating a wedding invitation form and want to
know if the people completing your form are bringing a guest. Your
form includes a text control for the guest's name that becomes
enabled only after users indicate (in another control) that they are
coming to the wedding.
Grouping controls cannot be disabled.
Error Msg
Specifies an error message to be displayed if the user does not supply
a valid value in the control. If you leave this property blank users
receive generic feedback (an "invalid value" message, for example) if
they supply an invalid value.
For example, if you are using a pattern that requires the user to enter
an area code of 203 or 860 in a phone control, you can use the Error
Message property to let users know this explicitly if they try to enter a
different area code.
Help
Specifies detailed help about a specific control. If help text is
provided, an icon appears next to the control on your form. When the
user clicks, the icon, the help text you supplied in the Help property
is displayed in a floating box.
Hide Label
Determines whether the control's label is displayed on your form.
Check to hide the label on your form; clear to show the control's label.
Hint
Enables you to create a tool tip that displays in your form when the
user mouses over the control.
Label
Defines the label of the currently selected web form control. This label
is displayed in your form beside or above the control. You can hide
the label in the form by enabling the Hide Label property
When you add a control to a web form, it is assigned an arbitrary and
unique name. After creating a control, you can change this to the text
you want to appear to the end-user of your web form.
You can a control's label either on the form itself (by clicking the
control and selecting the label) or by overlaying the arbitrary name in
the Properties Label field.
Message controls are the only controls without labels-they are used
for static text, so a label is not required in addition to the static text.
You can use plain text or arbitrary XHMTL for the label name.
Labels
Enables you to change the control's labels. However, the XSD values
for the control in the schema do not change. In other words, you can
change what a user sees in the form, but not the underlying values.
You cannot use the [value=label] syntax you use for palette controls
to change the element values.
This property applies only to controls generated from schema
elements. (If you drag a control in from the palette, it has an Options
property; if the control was generated from a schema element, it has a
Labels property.)
Web Form and Web Form Control Property Reference B-5
Web Form Control Properties
Property
Description
Max Length
Limits how many characters, expressed as a positive integer, users
can supply in the control. Text area controls do not support this
property due to an HTML limitation. However, it is very easy to add
this functionality to the TextareaMaxLength text area control using
a business rule.
This property is available for text controls and other input controls
Message
Enables you to include a message in your form. In addition to regular
text, you may include in this property field arbitrary XHTML markup
that is formatted and displayed by the browser. This property applies
only to message controls and is where you enter the static text that
appears on your form.
Message Type
You can choose a message type to display different pre-defined
background colors, decorators or a border from the Message Type
dropdown on the Setting tab of the property panel. These settings can
override the values you have specified for BG Color and Label Color.
For these values to take effect, select None for the Message Type.
Message Type values include:
•
•
•
•
•
•
•
Min # and Max #
(Repeat)
Default
None
Bordered
Success
Info
Warning
Error
Specifies the minimum and maximum times the control can be
repeated when inside a Repeat control. expressed as positive integers.
The Min# value defines the minimum number of controls that must
be added and filled-in by the end user. If the user does not fill in data
for the minimum number of controls, the Submit button is not
enabled.
Min # and Max #
Enables you to define the minimum and maximum values, expressed
as positive integers, a user can input in a control.
These properties appear as part of a Table Control or when your form
has an input control inside a control and apply to the input control. If
you specify a minimum value of 1 and maximum value of 10, users
must enter values in at least one input control or they are unable to
submit the form. They may enter values in up to ten input controls.
The minimum and maximum properties for the Table Control allow
the user to add or delete table rows in a form as required.
Min # and Max # properties are not editable for controls generated
from an uploaded schema, since the schema already specifies this
through the minOccurs and maxOccurs attributes.
B-6 Developing Business Processes with Oracle Business Process Composer
Web Form Control Properties
Property
Description
Name
Defines the name of the currently selected control. This name is
automatically generated and defaults to the control's label less any
spaces and special characters. Spaces and special characters are
removed in order to make the name valid for use in rules. For XML
users, this makes the name valid as an XSD schema element name.
Control names are truncated to 32 characters for all the controls
except triggers and panels.
If you have two controls at the same level with identical labels, the
control's names are automatically made unique. If you try to edit the
name such that it is no longer unique, Oracle Web Forms prevents the
edit. In order to use a control in a rule the name must be unique in
your form. When a control is dropped inside a section control, it is at
a different nesting level than a control dropped outside a section.
For example, two controls, one inside a section called Car and another
in a section called Boat are also at different nesting levels. In both
cases the form designer allows you to name the controls identically.
Both Car and Boat can contain a control named VIN.
The Name property is used in several different contexts in Oracle
BPM. It:
• determines how you reference the control within form rules.
• is used when initializing form fields through the
Web_Forms_data URL parameter for controls added from the
palette. Note: For controls added from XSD schema, you must use
the underlying element name to initialize the control via _data.
• determines how you refer to form fields from document URIs.
• is used in Form Action Display Message and Go to URL
templates.
• is used in Doc Action Email Address templates.
• is the name given to the XML element corresponding to the
control you drag into your form from the palette.
You can change the names of controls from the schema, although
schema controls maintain their underlying XSD element name. For
example, suppose you are using controls from two schemas in a form
and both contain a control named ''FName''. You can change the
name of one of these controls to ''FirstName'' to make them unique
within the form. This is helpful if you are adding rules to the form, or
if you want to use the form as a template.
Except for _data, controls from XSD use the same rules (as above) as
controls from palette.
New Line
The New Line Property will be present for all controls that have the
12 column width selector. Selecting New Line causes the control to
appear on a new line in the rendered form.
Trigger and Link controls have this property checked by default.
Web Form and Web Form Control Property Reference B-7
Web Form Control Properties
Property
Description
Options
Defines how to populate the choices the user sees in the control. This
property appears for drop down, radio and check box controls.
You may have option labels different from option values. The syntax
for the options is <value>=<label>. The <label> specifies what is
displayed on your form and the <value> specifies what is saved as
the selected value when the user submits the form.
When you first drag one of these controls into your form they have
generic values: Option 1, Option 2 and Option 3. This matches the
generic text you see in the Properties area. To supply your own
values, simply replace the values in the Options property with the
values you want. Add or remove options as required.
If you do not enter both <value> and <label> using the
<value>=<label> syntax, then the value defaults to the label. As soon
as you move the focus away from the options property, options
without values are automatically converted to the syntax.
In this case the options are entered without values. In this case Oracle
Web Forms defaults the value to the label.
The order of choices in your control matches the order in the
Properties area. If you have choices that require a logical order,
ensure the order is correct in the Properties area. You can not sort the
text you enter in the Options property field but you can cut and paste.
In addition to the generic Option 1, 2 and 3 choices, a drop down
control also includes a blank option that by default appears first in
the list. This blank option appears regardless of the text you supply in
the Options property. You cannot remove the blank option but you
can make one of the other options the default.
To specify an option string that includes the "=" character, precede the
string with "a=". For example, to specify the label "good = gold"
specify "a=good = gold" for the option string.
Choices cannot be changed if they have been generated from an
uploaded schema, because the schema specifies the choices. On
controls generated from schema, you can not see the Options
property in the Properties area. However, you can change the option
Labels.
Password
Causes the text entered in the field to be blocked out as it is entered,
in a way suitable for entry of a password.
This property applies only to text controls and other input controls. If
you check the Password check box, the text the user enters appears on
the form as asterisks. However, it is submitted as normal text.
B-8 Developing Business Processes with Oracle Business Process Composer
Web Form Control Properties
Property
Description
Pattern
Enables you to define additional restrictions on the type of data a user
inputs into a control.
Most controls automatically ensure that users provide the correct data
type, but patterns give you the flexibility to impose additional
restrictions on what users enter in a particular control.
In the Pattern field in the Properties area, type your pattern using
XML schema regular expressions. A simple example is a pattern that
restricts a text control to only allow strings formatted as a US zip
code: \d{5}|\d{5}-\d{4}. If you type this expression in the Patterns
property, your form permits values entered into this field only if they
are five digits or five digits followed by the '-' character, followed by 4
digits.
When you define patterns, you don't have to restrict what the control
handles automatically. It is not necessary to enter a pattern [a-z] for a
Number control, since users can not type letters in a number field.
Since essentially you would be attempting to expand the allowed data
types in the control, Oracle Web Forms ignores this pattern if you
enter it.
You must first save the form before the pattern takes effect. Therefore,
patterns cannot be tested in the form designer, only in use mode
Placeholder
Text entered in this field appears in your input control until data is
entered. If data is removed, the placeholder text reappears. This
feature does not work in IE8 or IE9.
Printable
Determines whether or not this form field appears in the in the PDF
document view of the form. If unchecked, the field does not appear in
either view.
You can set the property on a section control and it automatically
applies to all controls inside the section control. This is often used in
web form rules.
Web Form and Web Form Control Property Reference B-9
Web Form Control Properties
Property
Description
Required
Specifies that a control is required. The Submit button is disabled and
the form cannot be submitted until all required fields contains a valid
value.
Required controls are marked with a yellow gradient.
You cannot mark grouping controls (tabs, sections, panels and s)
required. However, sections can be marked required. If a Section has
the required property checked, required controls within it show a
yellow background in design and Use mode. If the Section has
required unchecked, required controls within it do not show the
yellow background color in design and Use mode. The yellow
background color appears only when one of the required controls in
the section is filled making it mandatory to fill other required controls
within the section.
Input controls that are direct children (directly inside) of controls also
cannot be marked required, nor should they be, since the minimum
and maximum properties define this. You may, however, make
controls required when they are inside sections, tabs and panels.
You cannot edit the required property for controls that have been
generated from an uploaded schema, since the schema already
specifies this through the minOccurs attribute. If a control from a
schema appears as required and you don't want it to be required, edit
the XSD and set minOccurs=0. Re-upload the XSD. Then the control
no longer appears required.
This property is useful when using rules to hide or show sections
depending on something else in the form. If you hide the section you
may have to set the required property to false.
Sensitive
Controls whether the value saved in the submissions repository is
hidden when viewed in the forms in the web submissions user
interface. The value is not currently encrypted in the database. Click
the check box if the data users enter into this field contains sensitive
data that should not be visible when viewed in the user interface.
Time Format
Specifies the time format used by the control.
This property applies only to the Time control created by selecting the
Time or Date/Time option from the Date control drop down. It
supports standard and military time formats. Time entries entered
into the form are translated according to the chosen format and are
reformatted to match the selected format.
• A time entry typed into a form field is reformatted to match the
selected Time Format.
• A time entered into a form field is translated according to the
selected format. For example, if you choose a military time format
of hh:mm:ss and enter 2:00 PM the time value is translated as
14:00:00.
Visible
Specifies whether the control is visible or hidden when users first
access your form. To dynamically show or hide the control, write a
Rule that controls its visibility based on the data entered in another
control.
# of Rows
Defines the initial size of the text area. This property applies only to
text area controls. Scroll bars appear automatically when the user
reaches the # of rows specified.
B-10 Developing Business Processes with Oracle Business Process Composer
Web Form Control Properties
Web Form Control Properties - Style Tab
Use the Style tab to define display-specific properties of the currently selected control.
Table B-4 provides an alphabetical list all of the properties available on the Style tab.
Note:
Not all of the properties listed below are available for every web form control.
Table B-4
Properties - Style Tab
Property
Description
BG Color
Enables you to specify the color that appears behind the control. Enter
any valid CSS color name or its hexadecimal RGB equivalent. For
example, if you want a red background, you can type the word RED
or #aa2211.
Bold
Causes the control's label to be bold.
Button Color
Selects the color of a button control.
Center
Causes the content of the control to be centered. Applies to Message
controls.
Date Picker
Enables an date picker control which pops up an interactive calendar.
Applies to Date controls.
Expand/Collapse
Enables an expand/collapse control. Applies to Section controls.
Italic
Displays the controls label in italics.
Item Width
Enables you to change the layout of the options from vertical (one
radio or check box button below the next) to horizontal. This is useful
to save vertical space on long forms. It is also useful to improve ease
of use for forms with questions that each have the same set of options.
This property is used by the radio and check box controls
Label Color
Enables you to change the font size and color for any specific control
on the form. Specify the color by typing any valid CSS color name or
its hexadecimal equivalent.
These properties work well when you want your entire label to have
the same size and color, but for more sophisticated labels you can
type XHMTL in the control's label property field. For instance, use
XHMTL if you want to apply two different font colors inside the same
label. Typing XMHTL also gives you more font precision, since the
label size property lets you pick generic font sizes only--small,
medium, and so on. There may be controls for which you want a font
size somewhere between the small and medium options in the drop
down, for example.
Label Size
Defines the size (in pixels) of the label.
Web Form and Web Form Control Property Reference B-11
Web Form Control Properties
Property
Description
Width
Used to specify the width of the control.
For input controls, the property specifies the width of the area in
which users enter data; for example, you might narrow a control used
for entering zip codes or widen a control for a full first, middle, and
last name.
All control widths are specified in columns, from a minimum of one
column to a maximum of 12 columns wide. You can have any
combination of controls widths on one line - (e.g. Three controls: 3, 4
and 5 grid columns wide respectively or four controls 2, 2, 4,and 4
grid columns wide.).
The width is selected by clicking on a grid in the Style tab. When you
drag and drop most controls from the palette on to the canvas, the
control will be 12 columns wide. The trigger, link and panel controls
are the exception - the default width of the trigger and link controls is
3 columns while the panel is 6. To change the width, click the number
of divisions on the grid corresponding to how wide you want the
control to be.
When you make a control n columns wide (6, for example), the entire
control takes up 6 columns. As a result, if there is space, controls will
float up next to other controls. You can prevent this using the New
Line property.
The decorator does not affect the visible control width. The visible
width of controls which add up to the same width of another control
is exactly the same. For example, a control that is 2 grid columns wide
+ a control that is 4 grid columns wide is the same width as a control
that is 6 columns wide.
There is no Width property for sections or tables controls - they are
always 12 columns wide. Repeats are also always 12 columns wide.
For tab controls, you access the width property by clicking the
unlabeled area to the right of the last tab in your tab group; the width
you specify will be applied uniformly to each tab in group.
When setting a control's width property you may use standard CSSrelative values; for example, 5%, 5em, 5ex or 5px.
Note that control widths are ignored on the iPhone and the iPad even
if you have explicitly specified them.
B-12 Developing Business Processes with Oracle Business Process Composer
C
Web Form Rules Examples
This appendix provides multiple examples and use cases for using web form rules
within a web form. For general information about form rules, see Working with Web
Form Rules .
This appendix includes the following sections:
• Calculate a Total
• Show/Hide a Billing Address
• Show/Hide Message
• Enable/Disable a Question
• Compute Subtotals for ing Items
• Compute an Invoice Total
• Textarea Max Length
• Textarea Newline and Break
• Dropdown Options
• Finding a Selected Options Index
• Synchronized Selects
• Clearing Dropdown Options
• Default Option
• Check Box Options - Assigning Color to Check Box Choices
• Check Box Options - Making a Control Visible/Invisible Based on Check Box
Choices
• Check Box Initialization
• Displaying Selected Check Box Labels
• ing Check Boxes
• Display a Message Control Inside a Control
• String Concatenation
• Visible/Invisible
• Visible/Invisible Section
Web Form Rules Examples C-1
Calculate a Total
• Select Tab
• Next Tab
• Expand/Collapse Section
• Multiple Choice
• Dynamic Options
• Triggers and Dynamic Options
• Value Change and Dynamic Options
• Dynamic Control Initialization
• Verify User
• Calculate Net Worth
• Dates and Times
• Tenants_ Roles_ Users
• Item Added
• Item Added - Collapse Other Items
• Tables
• form.load
• form.unload
• Unique ID
• Item Initialization
• ItemAdded by Init Doc
Calculate a Total
The following example assumes you have a form with three controls and you have
assigned them Names N1, N2 and T respectively. When a user enters a value in either
N1 or N2 you want to set the value of T to the sum of N1 and N2.
The rule would be written as
if (N1.value > 0 || N2.value > 0) {
T.value = N1.value + N2.value;
}
This rule will automatically run whenever the user types something in N1 or N2 and
will set the value of T appropriately. You can use any legal JavaScript operators in the
expression such as subtraction or multiplication. However, it is important to ensure
that the calculated value is valid in the context of type of T. For example, if T was of
type integer and the computed value of the expression was decimal (such as 1.5), then
the rule would be attempting to set an invalid value in T. This will generate an error.
The rule will set the value as requested, but will mark the field as invalid and take
appropriate action such as disabling the submit button, displaying the control with a
red background, and so on.
C-2 Developing Business Processes with Oracle Business Process Composer
Show/Hide a Billing Address
Also, if controls are added to the form from the palette, it is important to ensure they
have the correct type. For example, for a numeric calculation as described above, the
controls should be of type Numeric.
Show/Hide a Billing Address
The following example assumes you have a form with two controls and you have
assigned them names B and S respectively. B is a check box with a single option whose
value is Yes. If checked the user wishes to enter a different billing address in S and you
want to display S.
The form rule would be written as
if (B[0].value == 'Yes') {
S.visible = true;
} else {
S.visible = false;
}
This form rule will automatically run whenever the user checks or unchecked B and
will show/hide the billing address section S. You can use any valid JavaScript
expression to compute the visible property of S as long as it evaluates to a boolean true
or false value. In this example, you would typically set the check box B to be initially
unchecked and the section S to be initially hidden.
Show/Hide Message
In the following example, the form has a radio control named Facility and makes a
message visible depending on the selected options.
if (Facility.value == 'Boston' ||
CompanyFacility.value == 'New York')
{
Msg.visible = true;
} else {
Msg.visible = false;
}
Enable/Disable a Question
This example assumes you have a form with two controls and you have assigned them
Names B and Q respectively. B is a check box with a single option - Yes. If checked the
user is a smoker and you wish to ask an additional question in Q.
The rule would be written as
if (B[0].value == 'Yes') {
Q.enabled = true;
} else {
Q.enabled = false;
}
This rule will automatically run whenever the user selects or deselects B and will
enable/disable the question in Q. Again, you could use any legal JavaScript expression
to compute the enabled property of Q as long as it evaluates to a boolean true or false
value.
In this example, you would typically set the check box B to be initially unchecked and
the control Q to be initially disabled.
Web Form Rules Examples C-3
Compute Subtotals for Repeating Items
Compute Subtotals for Repeating Items
The following form rule is an example of working with repeating items. For example,
if you have a form with a repeating section representing an Item that the user may
purchase. Each section has a Price (with Name P), a Quantity (Name Q) and a Subtotal
(Name S). There are multiple items on the page and the number of items on any given
page is unknown. The price field is filled in automatically. When the user enters a
value in the quantity field for any item, you wish to compute the subtotal.
The rule is written as follows:
for (var i = 0; i < S.value.length; i++) {
if (Q[i].value > 0) {
S[i].value = Q[i].value * P[i].value;
} else {
S[i].value = 0;
}
}
This rule will automatically run whenever the user enters a value in the quantity field
for any item. It will compute the subtotal for each item, for which the quantity is
greater than 0 and fill in the subtotal field for that item with the computed value. If a
particular item does not have a quantity, the subtotal is not computed.
Compute an Invoice Total
The following form rule is an example of working with repeating items. It assumes
you have a control named Total with Name T. You want to set the value of Total to be
the total invoice price, which is the sum of all the computed subtotals above.
This rule is written as:
var tot = 0;
for (var i = 0; i < S.value.length; i++) {
tot = tot + S[i].value;
}
T.value = tot;
This rule runs whenever a subtotal is updated, for example, when it is updated
through the rule above. It adds the values of all the subtotals to arrive at an invoice
total. You must use a temporary variable to compute the total.
If you write the rule as:
T.value = 0;
for (var i = 0; i < S.value.length; i++) {
T.value = T.value + S[i].value;
}
it will not work correctly. This is due to internal limitations in the way rules are
evaluated. Note that this rule is working with controls inside a repeat control. To
handle the case of a item being deleted from the repeat you require the following
addition, assuming that the repeat control is named ExpenseRepeat. Table controls are
repeats with a different layout. The same applies to the table controls. If your table is
named Expense then the repeat is automatically named ExpenseRepeat.
if (ExpenseRepeat.itemRemoved) {;}
C-4 Developing Business Processes with Oracle Business Process Composer
Textarea Max Length
Textarea Max Length
This example form has a textarea control named 'Desc' where the user can enter up to
a 500 character description. In HTML there is no way to set a maxLength on a textarea
control. Due to this limitation, the textarea control does not have a maxlength property
like the text control does.
It is possible to do this using a form rule. On this control we also set the ErrorMsg
property to the string 'You must limit your description to 500 characters'. This message
is automatically displayed when the description control is set to invalid by the
following business rule.
if (Desc.value.length > 500) {
Desc.valid = false;
} else {
Desc.valid = true;
}
You can customize the error message by adding the following line to your rule.
Desc.status = 'Invalid. Max 20 chars allowed and you have ' + Desc.value.length;
The error message will tell the user how many characters they are over the maximum
allowed
Textarea Newline and Break
Users typically enter multi-line text into textarea controls. If you want to display that
text in an HTML context, for example on a web page or in an html formatted email or
in your form's form action display message you must replace newline characters with
HTML breaks. This is due to the fact that line breaks entered into a web form textarea
are represented by a single newline character \n while line breaks in an html context
are represented by the html break characters.
The following example has a textarea control named Description and a hidden control
named DF. The user types into the visible control named Description and a business
rules converts the newline characters \n into html breaks.
var x = Description.value;
x = x.replace(/\\n/g,"<br/>");
DF.value = x;
Dropdown Options
The following example automatically sets the option selected in one dropdown based
on the option selected in another. This is often useful when you have a form with
choices that were dynamically populated.
For example, imagine product choices which are descriptive text. When the user
selects a product, your form must perform an action based on a product ID rather than
the descriptive product text. A nice way to do this is to have the rule that dynamically
populates the product choices dropdown also populate a product ID dropdown which
remains an invisible control in the form. The product choices dropdown control was
named P and the product ID dropdown control was named ID
The 1st rule "Load Products" populates both the visible and hidden dropdowns with
options from a database.
Load Products:
--------------
Web Form Rules Examples C-5
Finding a Selected Options Index
if (form.load) {
eval('x=' + http.get('http://localhost:8082/database/products'));
var opts1 = [];
var opts2 = [];
for (var i=0; i < x.resultSet.length; i++) {
if (x.resultSet[i]) {
opts1[i] = x.resultSet[i].description;
opts2[i] = x.resultSet[i].productId;
}
}
Products.options = opts1;
PID.options = opts2;
Products.value = opts1[0]; // default to 1st product option
PID.value = opts2[0];
}
Finding a Selected Options Index
The 2nd rule Select Product ID keeps the hidden PID dropdown synchronized with the
visible Product description dropdown.
Select Product ID Rule:
----------------------if (Products.value.length > 0)
{
var i;
for (x in Products.options) {
if (Products.value == Products.options[x])
i = Products.options.indexOf(Products.options[x]);
}
PID.value = PID.options[i] + '';
}
In v4 rules using hidden dropdowns to keep descriptive option labels visible to the
user while keeping cryptic database values hidden are often no longer necessary.
Dropdown options have values distinct from the human visible option labels. The
above can now be achieved with a single simpler rule:
for (var i=0; i < x.resultSet.length; i++) {
if (x.resultSet[i]) {
opts1[i] = x.resultSet[i].productId+ '=' + x.resultSet[i].description;
}
}
Rdocnum.options = opts1;
Here is another rule that dynamically populates both the product choices and product
ID dropdowns. This rule calls a REST Service which returns an object rather than the
result set returned by the database connector as shown above. See the section on
dynamic content for more details.
if (S.value.length > 0) {
eval('x=' + http.get('http://localhost:8182/products/?category=' + S.value));
P.options = x.products;
ID.options = x.ids;
}
C-6 Developing Business Processes with Oracle Business Process Composer
Synchronized Selects
Synchronized Selects
The Product Search example above is often used in conjunction with a hidden select
control.
Imagine that your database table contains a list of products. Each product has product
description also a unique product ID. The user must select a product from a
dropdown on your form. You want to populate the dropdown with the product
descriptions. The users do not have to see or know the product IDs but you must use
the ID as the key into the database for other selects. To do this add another hidden
dropdown to the form and populate it with the IDs. This example has a visible
dropdown name Products and an invisible dropdown named PID. See the rule above
that populates these dropdowns dynamically from the database.
This rule below keeps the PID selected option in sync with the selected Product.
var i;
for (x in Products.options) {
// Determine the index of the selected product in the Products dropdown options
if (Products.value == Products.options[x])
i = Products.options.indexOf(Products.options[x]);
}
// Changed the selected PID to match the selected Product
PID.value = PID.options[i] + '';
Clearing Dropdown Options
This sample resets a dropdown option to the automatically added blank option.
For dropdowns added from palette controls and from schema, Oracle Web Forms
automatically adds a blank option so the dropdown initially shows no choice by
default. To reset the dropdown, set the dropdown control's value to null not the empty
string. The empty string will not work since the empty string is not a valid option.
This form resets the dropdown named size whenever the value of the product option
changes.
if (product.value.length > 0) {
size.value = null;
}
Default Option
When your options are set dynamically as shown below in a business rule, you cannot
set a default in on the form designer. You must set the default in the rule.
If your options have <value>=<label> where value is different from label, make sure
you set the <control>.value to <value> not <label> and not <value>=<label>
if (form.load) {
var cc = ['R=Red', 'B=Blue', 'G=Green'];
Colors.options = cc;
Colors.value = 'B';
}
Web Form Rules Examples C-7
Check Box Options - Assigning Color to Check Box Choices
Check Box Options - Assigning Color to Check Box Choices
Check box controls are different from all other Oracle Web Forms palette controls in
that they are multi-select. Therefore the way to write rules with check box controls are
in many ways similar to rules with repeat controls.
This rule has a check box controls with name colorPalette with the options: purple,
green, blue, yellow, orange. The form also contains a text control with name
colorChoice. This rule assigns colorChoice the choices selected from colorPalette.
var choices = '';
for (var i = 0; i < colorPalette.value.length; i++)
{
choices = choices + colorPalette[i].value;
}
colorChoice.value = choices;
Notice that similar to repeat controls, due to an internal evaluation limitation, you
must collect the choices in a variable inside the for loop. And then assign that control
Name.value to that variable outside the for loop.
This rule is another example showing how check box controls are array types.
if (colorPalette.value.length > 0)
{
colorChoice.value = 'Thank you for choosing colors';
}
else
{
colorChoice.value = 'Please choose colors...';
}
Check Box Options - Making a Control Visible/Invisible Based on Check
Box Choices
This rule makes visible/invisible a control based on which check box options a user
selects.
This form contains a multi select check box named Structures. If the user selects the
option "Detached Garage" or "House", we want to make visible a text field named
Details.
Again since a check box is multi select, it is handled as an array. The array will contain
all selected (checked) options.
It is important to note that when a check box is added to the form from the palette and
its options are multiple words containing spaces, the option array has converted each
space character to the '_' character. We must make the comparison as shown below.
Check box controls from schema do not have space replaced with '_'.
var found = false;
for (var i = 0; i < Structures.value.length; i++)
{
if (Structures[i].value == 'Detached_Garage' ||
Structures[i].value == 'House') {
found = true;
break;
}
}
if (found == true) {
Details.visible = true;
C-8 Developing Business Processes with Oracle Business Process Composer
Check Box Initialization
} else {
Details.visible = false;
Details.value = null;
}
Note that when we hide Details we also clear its value. This is because the user may
have selected one of the Structures check boxes that made Details visible AND entered
a value into Details. And then they may have changed their minds and deselect the
option that caused Details to become visible. If you don't want the value entered into
Details to be in your form submission, clear the value when hiding it.
Check Box Initialization
Since check box options are multi-select, in order to select multiple options using a
rule you must use this syntax.
In this example CB is the name of a check box controls with the following options: red,
green, blue. This rule selects all of the options.
CB.value = ['red', 'green', 'blue'];
To clear all checked option in the control named CB:
CB.value = [];
Displaying Selected Check Box Labels
In this example, the rule displays the labels of the check boxes the user selects.
var selectedcolors = '';
for (var i = 0; i < RGB.value.length; i++)
{
var v = RGB[i].value;
for (x in RGB.options) {
var opt = RGB.options[x];
var val= opt.split('=')[0];
var lab= opt.split('=')[1];
if (v == val) {
selectedcolors = selectedcolors + ' ' + lab;
}
}
}
Repeating Check Boxes
Check boxes inside controls must be treated as an array (each check box control's
values) of check box option values which is inside another array (the repeating check
box control itself).
This form example has a repeating section containing two controls -- Message, which
is a text control and AreYouAttending, which is a check box control with a single
option 'yes'. To access the selected options the syntax is:
AreYouAttending[i].value[0] == 'yes'
for (var i = 0; i < AreYouAttending.value.length; i++)
{
if (AreYouAttending[i].value[0] == 'yes') {
Message[i].value = Name.value +
' is attending event #' + i;
Web Form Rules Examples C-9
Display a Message Control Inside a Repeat Control
}
}
Display a Message Control Inside a Repeat Control
If you put a message control inside a repeat control, you must add a rule to the
message control to have the message repeat when a user clicks to add a new repeat
item.
In the example below, the messages appear correctly in the first item, but a rule is
necessary to have them appear when the user adds a second, third, or more items.
In the example below, the rule repeats both dynamic text (Contest Nomination For:
[Name]) in the first message control and static text (By signing this consent form...) in the
second message control.
if (Consent.itemAdded)
{
var index = Consent.itemIndex;
ConsentNominationForMsg[index].value = 'Contest Nomination For: ' +
ClubName.value + ' by ' + NominatorSName.value;
ConsentMsg[index].value = 'By signing this consent form you hereby agree that it
is acceptable to use a photo or video with your image.';
}
String Concatenation
Message controls can be used in business rules to create summary information on your
form from values entered into earlier form fields.
This rule uses javascript variables to concatenate form field values, text strings and
html to format a nice summary page:
var totalAssets = TotalAutoValue.value + TotalBankValue.value +
TotalRealEstateValue.value;
BasicSummaryMsg.value =
"<b>Name:</b> " + FirstName.value + " " + LastName.value + "<br/>" +
"<b>Phone:</b> " + Phone.value + "<br/>" +
"<b>Email:</b> " + EmailAddress.value;
if (MilitaryOrCivilian.value == 'Military') {
//Military
DetailedSummaryMsg.value =
"<b>Military Info:</b><br/>" + "Military ID: " + MilitaryID.value + "<br/>" +
"Rank: " + Rank.value + "<br/>" +
"CurrentTitle: " + CurrentTitle.value + "<br/>" +
"Years of Service: " + YearsOfService.value + "<br/>";
} else if (MilitaryOrCivilian.value == 'Civilian') {
//Civilian
DetailedSummaryMsg.value =
"<b>Civilian Info:</b><br/>" +
"SSN: " + SSN.value + "<br/>" +
"Current Employer: " + CurrentEmployer.value + "<br/>" +
"Current Title: " + CurrentTitle2.value + "<br/>" +
"Start Date: " + StartDate.value + "<br/>";
}
FinancialSummaryMsg.value =
"<b>Total Assets:</b> $" + totalAssets +
"<br/>" + "Total Bank Assets: $" + TotalBankValue.value + "<br/>" +
C-10 Developing Business Processes with Oracle Business Process Composer
Visible/Invisible
"Total Real Estate Value: $" + TotalRealEstateValue.value + "<br/>" +
"Total Auto Value: $" + TotalAutoValue.value + "<br/>";
Note when using field values from repeat controls you must use a javascript var and
assign the concatenation to the var and then the var to the Oracle Web Forms message
control value. For example imagine you have a message control named Summary and
a repeat control named Account:
var acctSummary;
for (var i = 0; i < Account.value.length; i++) {
if (Q[i].value > 0) {
acctSummary = acctSummary + 'Account #' + i + ': ' + Account[i].value + '<br/
>';
}
}
Summary.value = acctSummary;
Visible/Invisible
This rule makes the message control nickNameThankYou visible when the user enters
a value into the nickName input text control, and then hides the message control if the
user deletes the value in nickName.
if (nickName.value.length > 0 )
{
nickNameThankYou.visible = true;
}
else
{
nickNameThankYou.visible = false;
}
Visible/Invisible Section
Often section controls contain many inner controls. For example imagine a form that
contains a person's medical history. One of the questions on the form asks if the
patient uses a hearing aid. If they answer yes, then you want to collect more details on
their hearing aid usage such as left ear, right ear, bilateral; hearing aid brand; and so
on. If they answer no then you want to hide all the questions specific to hearing aids.
Also when they answer yes you want them to answer all the hearing aid related
questions.
Avoid using message control inside of a section that contains other controls that you
may want to make invisible. Since a message control always contains a value, it can
cause a section, or other controls in a section, to become required, and this can disable
the form's Submit button. If you must include a message control, place it outside the
section. Another alternative is to write rules for the individual controls within a
section to set them to visible/invisible or required/not required
Imagine this example form has a section named HearingAid. By default HearingAid
visible is set to false in the form designer.
When they answer yes, you must set HearingAid.visible=true AND also each required
field inside the section to field.required = true. If they then change the answer to no
then another rule makes the HearingAid.visible=false also must set all
field.required=true again. If the HearingAid section contains many child controls this
rule becomes very long and tedious to write
We can simplify this by using the required property for sections. In the designer
default all controls that must be answered inside HearingAid to required. Default the
HearingAid section to not required and not visible. Your rule can be much simpler. By
Web Form Rules Examples C-11
Select Tab
setting HearingAid.required=false all the inner controls recursively also become
required=false.
if (useAid.value == 'no') {
// Hide
HearingAid.visible = false;
HearingAid.required = false;
} else {
// Show
HearingAid.visible = true;
HearingAid.required = true;
}
Select Tab
This rule makes a specific tab the selected tab based on the choice of a radio control.
The radio is named SelectTab and has three options: person, auto, home. The tabs are
named personTab, autoTab and homeTab. Tabs also can be select based on trigger
controls or other input controls using the same method.
if (SelectTab.value.length > 0)
{
autoTab.selected = false;
homeTab.selected = false;
personTab.selected = false;
if (SelectTab.value == 'Auto')
autoTab.selected = true;
else if (SelectTab.value == 'Home')
homeTab.selected = true; else personTab.selected = true;
}
Next Tab
This form contains a trigger control at the bottom of each tab labeled "Next". When
"Next" is clicked the trigger rule executes and makes the next tab the selected tab.
This assists the user in navigating through the form. The Tabs are named T1, T2, T3,
T4. The trigger controls are named C1, C2, C3
// Navigate Tabs
if (C1.clicked) {
T2.selected = true;
} else if (C2.clicked) {
T3.selected = true;
} else if (C3.clicked) {
T4.selected = true;
}
Expand/Collapse Section
This form has three sections. The first section is expanded and the 2nd and 3rd are
collapsed. When the user files in the 1st section they click a "Next" trigger control
which causes that section to collapse and the next section to expand.
The trigger controls are named next1 and next2 and the sections are named: step1,
step2, step3. Try this membership form to see the rule in action.
if(next1.clicked)
{
step1.expanded = false;
step2.expanded = true;
C-12 Developing Business Processes with Oracle Business Process Composer
Multiple Choice
}
if(next2.clicked)
{
step2.expanded = false;
step3.expanded = true;
}
Multiple Choice
This rule makes the appropriate input text controls visible depending on the choice a
user makes in a radio option controls searchChoice.
if (searchChoice.value == 'Organizations')
{
orgname.visible = true;
firstname.visible = false;
lastname.visible = false;
clientId.visible = false;
}
else if (searchChoice.value == 'Individuals')
{
orgname.visible = false;
firstname.visible = true;
lastname.visible = true;
clientId.visible = false;
} else if (searchChoice.value == 'Client ID')
{
orgname.visible = false;
firstname.visible = false;
lastname.visible = false;
clientId.visible = true;
}
Dynamic Options
Select control options (radios, check boxes, dropdowns, T/F) can be set dynamically
using rules rather than statically using the control's options property. However if the
control comes from an XSD schema data source rather than one of the standard palette
controls, then the designer must take care to not set the options to something outside
of what is valid for that schema element.
For example if your XSD has a string enumeration and list valid options as 'red',
'green', and 'blue', then you should not use a rule to dynamically set the options to
'small', 'medium', 'large'. If you do then your form will not work correctly in use mode.
If a user selects the option 'small' they will get a validation error on the form. This is
because 'small' is not one of the options allowed by your underlying XSD schema.
Triggers and Dynamic Options
This rule is executed when the user clicks the trigger controls with Name ''search''.
It then dynamically sets options on a dropdown list control with Name coffeeShopList.
if (search.clicked)
{
coffeeShopList.options = ['Koffee', 'Starbucks', 'Willoughbys', 'Dunkin
Donuts']; }
Now replace the hard coded list of coffee shops with a rule that invokes an http.get.
This must return an X-JSON header which containing a JSON object. The object is
Web Form Rules Examples C-13
Value Change and Dynamic Options
evaluated and assigned to the variable x. In this case the JSON object contains an
options field of type array.
if (search.clicked)
{
eval('x=' + http.get('http://<webhost>/getCoffeeShopList'));
coffeeShopList.options = x.options;
}
Note:
Triggers do not work in repeating items.
Value Change and Dynamic Options
This rule dynamically sets the options in a dropdown list based on the value selected
in another form field. This form contains three fields named Products, Series and
Model. The series options are set dynamically based on the product selection.
Also when a new product is selected we enable the series dropdown and both clear
and disable the model dropdown. This form contains other rules which set the models
based on the selected series. Look for the Oracle Web Forms Gallery form named HP
Support - 2 under the dynamic forms keyword.
if (product.value == 'Laserjet Printers')
{
series.options = [' ', 'Laserjet5 series', 'Laserjet6 series'];
series.enabled = true;
model.options = [];
model.enabled = false;
}
Dynamic Control Initialization
This rule handles the case of setting multiple control values based on the selection of a
single dropdown control. It handles this case better than using a long if/else construct.
First add options to the dropdown named SalesRep in the format <value>=<label>
where <value> will be used as an index key into an array of details about each person.
Megan=Megan Smith
Jim=Jim Brown
Nancy=Nancy Jones
Brian=Brian Jones
Next write a rule that first sets up a javascript array with the contact information for
each person. The rules then uses the dropdown value to index into the contantInfo
array to set the details for the selected person into four other form controls.
var contactInfo = {
"" : {
name : "",
email : "",
phone : "",
cell : ""
},
"Megan" : {
name : "Megan Smith",
email : [email protected],
phone : "(203) 694-2439 Ext. 516",
C-14 Developing Business Processes with Oracle Business Process Composer
Verify User
cell : "(203) 337-3242"
},
"Jim" : {
name : "Jim Brown",
email : [email protected],
phone : "203-208-2999",
cell : ""
},
"Nancy" : {
name : "Nancy Jones",
email : [email protected],
phone : "203-208-2991",
cell : ""
},
"Brian" : {
name : "Brian Jones",
email : [email protected],
phone : "203-748-6502",
cell : ""
}
};
var repId = SalesRep.value;
SalesRepName.value = contactInfo[repId].name;
SalesRepEmail.value = contactInfo[repId].email;
SalesRepPhone.value = contactInfo[repId].phone;
SalesRepCell.value = contactInfo[repId].cell;
Verify User
This rule executes when the user enters a value into the Username text field. It invokes
a URL that returns a JSON object that has a boolean field name ''exists'' that is set to
true if the user already exists. If the user already exists, this rule then sets the value of
a message control, makes that message control visible on the form and sets the
Username valid property to false so that Username field displays as invalid to guide
the user to make a correction.
if (U.value.length > 0) {
eval('x=' + http.get('http://<webhost>/uniqueUser?username=' + U.value));
if (x.exists) {
M.value = 'User: ' + U.value + ' already exists';
M.visible = true;
U.valid = false;
} else {
M.visible = false;
}
}
Calculate Net Worth
This form contains two rules. One is adding values entered into a column of assets and
a column of liabilities and calculating netWorth. The 2nd rule is checking the value of
netWorth and displaying an error message and marking netWorth invalid if liabilities
exceed assets since the form designer does not want the form to be submitted in that
state.
if (netWorth.value < 0)
{
assetsExceedLiabilitiesMsg.visible = true;
netWorth.valid = false;
}
Web Form Rules Examples C-15
Dates and Times
else
{
assetsExceedLiabilitiesMsg.visible = false;
netWorth.valid = true;
}
When a rule sets <control>.invalid the control background turns red and the submit
button greys out just as if the user had entered an invalid value into a phone control.
Oracle Web Forms treats it exactly the same way. This is a good way to dynamically
control your form's valid state.
Dates and Times
Working with dates and times is very common in most forms. The samples below
show you how to create the most common business logic with dates and times.
Oracle Web Forms dates can be set in the user's local timezone by using the built-in
date, time and date/time methods such as frevvo.currentDateTime(form). Some of the
samples below use the javascript Date() object. Since business rules run on the form
server these dates will be in the timezone where the form server was installed. There
are techniques below to convert to different timezones as necessary.
The Date/Time control must be initialized using array syntax from a business rule. For
example to initialize a Date/Time control named DtTm to January 1st, 2012 at 4:20 am.
DtTm.value = ['5/15/2012', '4:20']
Rules initializing dates and time will not work in a form.load rule unless you specify a
timezone on the form's Url using the _formTz URL parameter. This is because the
form server must know the timezone in which to return the date and time. If you do
not specify a _formTz the methods will return null and the control values will remain
blank. For example, to specify Eastern time: &_formTz=America/NewYork.
Duration
This form initializes the hospital discharge date using a rule, and when the user enters
the admission date a 2nd rule calculates the number of days the patient stayed in the
hospital.
// Calculate Hospital Stay Duration
if (A.value != '' && D.value != '') {
var da = A.value.split('-');
var Ams = new Date(da[2],da[0]-1,da[1]);
da = D.value.split('-');
var Dms = new Date(da[2],da[0]-1,da[1]);
if (Ams > Dms) {
Days.value = 'Discharge date must be after Admission Date';
} else {
Days.value = (Dms - Ams) / (1000*60*60*24) + ' days';
}
}
Today's Date and Time
Use Oracle Web Forms's built-in date and time methods to set your date, time, and
date/time controls to the current date and time in the user's local timezone.
if (form.load) {
Tm.value = frevvo.currentTime(form);
C-16 Developing Business Processes with Oracle Business Process Composer
Dates and Times
Dt.value = frevvo.currentDate(form);
DtTm.value = frevvo.currentDateTime(form);
}
The currentTime(), currentDate() and currentDateTime() will not work in a form.load
rule unless you specify a timezone on the form's Url using the _formTz Url parameter.
This is because the form server must know the timezone in which to return the date
and time. If you do not specify a formTz the methods will return null and the control
values will remain blank. For example &formTz=America/New_York will set the
control values to the current date and time in the eastern timezone.
Date/Time Stamp
This rule sets a control named Signature to the value of a control named Name plus a
date/time stamp. Note that it is better to use the Oracle Web Forms built-in date and
time methods if you want to set the date to the user's local timezone. The following
method will set the date to the form server's timezone.
var today=new Date()
var m = today.getMonth() + 1;
var d = today.getDate();
var y = today.getFullYear();
var h = today.getHours(); var min = today.getMinutes(); var todayStr = m + '-' + d +
'-' + y + ' ' + h + ':' + min; Signature.value = 'Signed by ' + Name.value + ' on '
+ todayStr;
Invalid if Before Today
This rule makes the date control invalid if the date entered isn't before today's date.
var today = new Date();
var bd = DOB.value.split('-');
var bd_date = new Date(bd[0],bd[1]-1,bd[2]);
if (bd_date.getTime() > today.getTime()) {
MyMsg.value = 'Birth Date must be earlier than today!!!!';
DOB.valid = false;
} else {
MyMsg.value = 'This is a good Birth Date: ' + DOB.value;
DOB.valid = true;
}
Date Less than 14 Days from Today
This rule checks that the date entered into a control named AppointmentDate is no
more than 14 days greater than today's date.
var date1 = DateUtil.today();
var date2 = Appointment.value;
date1 = date1.split("-");
date2 = date2.split("-");
var sDate = new Date(date1[0]+"/"+date1[1]+"/"+date1[2]);
var eDate = new Date(date2[0]+"/"+date2[1]+"/"+date2[2]);
var DaysApart = Math.round((eDate-sDate)/86400000);
if (DaysApart > 14) {
Appointment.status = "Date should be within 14 days from today's date.";
} else if (DaysApart < 0) {
Appointment.status = "Date should not be earlier to today's date.";
}
Web Form Rules Examples C-17
Dates and Times
Date Less than 30 Days Ago
This rule checks that the date entered into a control named EventStartDate is 30 days
or less from today.
if (EventStartDate.value != "") {
var date1 = DateUtil.today();
var date2 = EventStartDate.value;
date1 = date1.split("-");
date2 = date2.split("-");
var sDate = new Date(date1[0]+"/"+date1[1]+"/"+date1[2]);
var eDate = new Date(date2[0]+"/"+date2[1]+"/"+date2[2]);
var days = Math.round((eDate-sDate)/86400000);
if (!eval(parseInt(days) > parseInt(-30))) {
EventStartDate.valid = false;
EventStartDate.status = "The date entered can only go back a maximum of 30 days
from the current date. Please try again.";
} else {
EventStartDate.valid = true;
}
Central Timezone adjusted for Daylight Savings
This rule adjust today's date in UTC timezone to Central timezone and adjust for
daylight savings time. This additional conversion is most commonly required for
Online users as the javascript Date() and Oracle Web Forms' DateUtil.today() both
return today's date in UTC timezone.
// Converts UTC to either CST or CDT
if (form.load)
{
var today = new Date();
var DST = 1; // If today falls outside DST period, 1 extra hr offset
var Central = 5; // Minimum 5 hr offset from UTC
// Is it Daylight Savings Time?
//
var yr = today.getFullYear();
// 2nd Sunday in March can't occur after the 14th
var dst_start = new Date("March 14, "+yr+" 02:00:00");
// 1st Sunday in November can't occur after the 7th
var dst_end = new Date("November 07, "+yr+" 02:00:00");
var day = dst_start.getDay(); // day of week of 14th
// Calculate 2nd Sunday in March of this year
dst_start.setDate(14-day); day = dst_end.getDay(); // day of the week of 7th
// Calculate first Sunday in November of this year dst_end.setDate(7-day);
// Does today fall inside of DST period?
if (today >= dst_start && today < dst_end) { DST = 0;
}
// Adjust Date for Central Timezone
today.set Hours(today.getHours() - Central - DST);
var m = today.getMonth() + 1;
var d = today.getDate();
var da = today.getDay();
var y = today.getFullYear();
var h = today.getHours();
var min = today.getMinutes();
if (min < 10) { min = '0' + min;}
C-18 Developing Business Processes with Oracle Business Process Composer
Tenants, Roles and Users
var timezone = ['CDT', 'CST'];
var dom = ['Sunday', 'Monday', 'Tuesday', 'Wednesday',
'Thursday', 'Friday', 'Saturday'];
var todayStr = dom[da] + ' ' + m + '-' + d + '-' + y + ' ' + h + ':' + min + ' '
+ timezone[DST];
DateTime.value = todayStr;
}
Hours > = 4 and < = 6 Apart
This rule makes sure the end time is at least 4 hours great then the start time but no
more then 6 hours later then the start time. Also start time must be on or after 1:00.
The times must be entered in military units. TS is the name of the Time Start control
and TE is the name of the Time End control.
• Use Text controls for the start and end times
• Use this pattern in the control to ensure valid military times 1:00 or greater: ([1-9]|
1[0-9]|2[0-4]):([0-5][0-9])
if (TS.value.length > 0 && TE.value.length > 0) {
var sTime = TS.value.split(':');
var sHour = sTime[0];
var sMin = sTime[1];
var sMins = sHour * 60 + parseInt(sMin);
var
var
var
var
eTime = TE.value.split(':');
eHour = eTime [0];
eMin = eTime [1];
eMins = eHour * 60 + parseInt(eMin);
if ((eMins - sMins) < 4*60 || (eMins - sMins) > 6*60)
{
TE.valid = false;
} else {
TE.valid = true;
}
}
Times
The date control can be set to either just a date, just a time, or a combined date/time.
Here are several examples of initializing a time control name Tm;
// Both set the control name Tm to the same time
Tm.value = '8:30 pm'; // uses am/pm notation
Tm.vallue = ' 20:00'; // uses military time
// Initialize a date/time requires an array syntax
DtTm.value = ["Aug 1, 2001", "10.00"];
// Copying values
Tm2.value = Tm.value;
Dt2.value = Dt.value;
DtTm2.value = DtTm.value;
Tenants, Roles and Users
Oracle Web Forms has several built-in methods that enable you to access information
about your form server such as the list of tenants; users in a tenant; and roles in a
Web Form Rules Examples C-19
Repeat Item Added
tenant. Some of these methods return a boolean true/false value. Others return a JSON
string. Here is a sample of how to use these methods.
if(form.load)
{
eval('x=' + frevvo.listTenants());
Tenants.options = x.tenants; // Init a dropdown list of all tenants on this form
server
}
if(tenant.value.length > 0)
// Check if a tenant already exists
if (frevvo.isUniqueRoleId(role.value, tenant.value) == true) {
ErrMsg.value = 'The role ' + role.value + ' already exists in tenant ' +
tenant.value;
}
// Init dropdown with all tenant users
eval('x=' + frevvo.listUsers(tenant.value));
Users.options = x.users;
// Init dropdown with all tenant roles
eval('x=' + frevvo.listRoles(tenant.value));
Roles.options = x.roles;
// Init dropdown will all tenant roles except admin roles
eval('x=' + frevvo.listRoles(tenant.value, false));
RolesNA.options = x.roles;
}
// Verify that a role already exists in the tenant
if(role.value.length > 0)
{
t.value = frevvo.isUniqueRoleId(role.value, tenant.value);
if (frevvo.isUniqueRoleId(role.value, tenant.value) == false) {
ErrMsg.value = 'The role ' + role.value + ' already exists in tenant ' +
tenant.value;
}
}
Repeat Item Added
This rule executes when a new item is added to a form.
Imagine your form contains a repeating section named Employee with name E. Note
that the name E is set on the control and not on the Section control. The Employee
section control contain many controls such as Name, Phone, and so on, as well as a
dropdown control labeled Manager with named M. It also contains a radio control
labeled Employee Shift named ES whose options have been set to 'Day' and 'Evening'.
Oracle Web Forms will execute this rule each time a user clicks "+" on the form to add
a new item. We want to the Employee Shift ES to default to the value 'Day', and to
populate the Manager dropdown dynamically with values from the Oracle Web
Forms Database Connector.
Typically, a form will have a form.load rule to initialize dropdown options for the first
item visible on your form.
if (form.load)
{
var baseURL = 'http://www.myhost.com:8080/database/';
C-20 Developing Business Processes with Oracle Business Process Composer
Repeat Item Added - Collapse Other Items
// Manager Dropdown
eval('x=' + http.get(baseURL + 'Manager'));
var opts = ['']; // default 1st option to blank
for (var i=0; i < x.resultSet.length; i++) {
if (x.resultSet[i]) {
opts[i+1] = x.resultSet[i].lastname+ ", " + x.resultSet[i].firstname;
}
}
// item index 0 is on the form by default
M[0].options = opts;
ES[0].value = 'Day'; // default the employee shift to Day
}
When a new item is added as a result of a user clicking the "+" icon, we save the
overhead of going back to the database to retrieve dynamic options.
if (E.itemAdded)
{
var index = E.itemIndex; // which item is this in the list
// No need to go back to the database for options.
// We already retrieved them in form.load rule for item index 0
M[index].options = M[0].options; ES[index].value = 'Day'; // default the employee
shift to day }
Tables are repeats. The same rule can be written for a table control. The name of a
table's repeat is always <TableName>Repeat. For example if you name your table
Children, the repeat is named ChildrenRepeat.
Repeat Item Added - Collapse Other Items
This rule executes when a new item is added to a form. This form contains a repeating
section with a templatized label.
You can collapse the other items when adding a new item to keep the list small and
grid-like. Medrepeat is the name of the repeatcontrol. Medication is the name of the
section control inside the repeat.
if (MedRepeat.itemAdded)
{
var index = MedRepeat.itemIndex;
for (var i = 0; i < Medication.value.length; i++) {
if (i != index)
Medication[i].expanded = false;
else
Medication[i].expanded = true;
}
}
Tables
Tables are identical to controls when referenced in business rules. Tables are a grid
layout of repeating items
. All the rule examples in this chapter that discuss s apply also to tables. The one
important note is that you cannot explicitly name the control inside your table. The
control inside a table is automatically named as <TableName>. For example a table
named Expense automatically has a control named Expense. The rule
Expense.itemAdded and Expense.itemIndex references an item added to your table
and that item's index respectively.
Web Form Rules Examples C-21
form.load
form.load
Rules can be used to initialize field values. This is a very useful feature and is often
used to dynamically populate dropdown options from a database. Rules using
form.load are triggered when a form first loads and when a workflow is loaded from a
task list.
Rules using itemAdded only execute for repeat items added when the user clicks +,
and for those added from an initial instance document (See Document URIs). It does
'''not''' execute for those items that you have added to your form in the Form Designer.
You can either add defaults directly through the form designer or add a 2nd rule to
your form as follows.
These two rules together initialize the dropdown fields inside a control that is already
in the form through the Form Designer, as well as those added each time a user clicks
"+" on the control to add a new item. These controls are initialized based on a value set
in another field.
'''1st Rule - Default Items'''
if (form.load)
{
// The form contains two repeat items by default.
if (department.value == 'Marketing') {
Managers[0].options = ['Joe', 'Mary', 'Stan', 'Cindy'];
Managers[1].options = ['Joe', 'Mary', 'Stan', 'Cindy'];
}
if (department.value == 'Sales') {
Managers[0].options = ['Lou', 'George', 'Wendy'];
Managers[1].options = ['Lou', 'George', 'Wendy'];
}
}
'''2nd Rule - Items Added'''
if (Erepeat.itemAdded)
{
var index = Erepeat.itemIndex; // which item is this in the list
ES[index].value = 'Day'; // default the employee shift to day
// Use options already selected in form.load rule
Managers[index].options = Manager[0].options;
}
This rule is useful in a workflow where you want to make a the tab named Review
visible only for the workflow activity named Manager Review.
if (form.load) {
if (_data.getParameter('flow.activity.name') == 'Manager Review') {
Review.visible = true;
}
}
form.unload
Rules can be used to finalize field values after the users clicks the form's submit button
but before the Form and Doc Action execution. Rules using form.unload are triggered
C-22 Developing Business Processes with Oracle Business Process Composer
Unique ID
when the form user clicks the submit button and for workflows when the user clicks
continue to go to the next activity or finish to complete the flow.
One common example use is for an order form order number. You may only want to
assign a unique sequential order number to each order submission. You could
initialize the form's order number when the form loads using form.load. However if
someone starts filling in the order form but never submit it you do not want to
consume the next order number in sequence if it will never be used. Using
form.unload you can assign the number after the submit button click but before the
form data is submitted.
Here OrderNum is the name of a invisible control.
if (form.unload)
{
eval('x=' + http.get('http://<webhost>/json/getNextOrdernum'));
OrderNum.value = x.num;
}
Unique ID
Forms such as invoices, bills of lading, and so on often must be stamped with a unique
ID. The Sequential Number example is one approach, however it has some limitations.
One is that you must guarantee that only one person at a time is filling out your form.
Here is a simpler method if your unique IDs do not have to be sequential. The data
named form.id is guaranteed to be unique for every new form instance. You can just
use it as follows:
if (form.load)
{
InvoiceNum.value = _data.getParameter('form.id');
}
Repeat Item Initialization
The rule above was one example of initializing a newly added repeating control with a
default list of options. This same concept is useful if you want to initialize a repeating
control's value.
When you add a repeat control to your form in the Form Designer you can set a
default value in any of those repeating controls visible in the designer. However when
the user clicks "+" while using the form to add an additional item the default entered
in the Form Designer is not automatically used in this new item. In order to
accomplish this you can add a simple rule as follows:
This rule initializes the value of one of the fields in the repeat control to a default of '0'.
RepeatTrack is the name of the repeat control contained the input control named
albumOnly. This rule executes each time a new RepeatTrack item is added when the
user clicks "+".
Note:
ItemAdded and itemIndex are properties of the Repeat control.
if (RepeatTrack.itemAdded)
{
var index = RepeatTrack.itemIndex;
Web Form Rules Examples C-23
ItemAdded by Init Doc
albumOnly[index].value = 0;
}
To initialize repeat items already on your form in the Form Designer by default, either
enter your initial default values directly into the in the Form Designer or add this rule.
if (form.load)
{
for (var i=0; i < albumOnly.value.length; i++) {
albumOnly[i].value = 0;
}
}
This rule takes into account a repeat where min > 1. If min is 0 or 1, you can simplify
this further by removing the from loop and simply have albumOnly[0].value = 0
inside the if (form.load).
ItemAdded by Init Doc
ItemAdded also executes when Oracle Web Forms adds items found in an init doc.
You may want to only initialize items added when the user clicks "+" on the form and
not those added from an initial document.
This form contains a Mailing Label that repeats. Each label requires a unique ID
assigned. However, after the form is submitted the assigned IDs are saved in the
database through the form's Doc URI. When the form loads it adds items
automatically from rows in the database. They already have assigned IDs. We only
have to assign new IDs in the sequence when the user manually adds a new Mailing
Label by clicking the "+" button on the form. MLrepeat is the name of the Mailing
Label repeat. MLmid is the name of the ID field in the form.
if (MLrepeat.itemAdded)
{
var index = MLrepeat.itemIndex;
// This rule is fired both when the user clicks "+"
// and when frevvo adds items found in the init doc.
// Need to assign new mid only when user clicks "+"
// New items added via "+" will have a zero length value.
if (MLmid[index].value.length == 0) {
// Assign unique ID to label so it can be referenced
// in RI Mailing Labels field
// Count the number of existing mailing labels on the form
var maxId = 0;
for (var i=0; i < MLmid.value.length; i++)
{
if (MLmid[i].value > maxId) {
maxId = MLmid[i].value;
}
}
var next = parseInt(maxId) + 1;
MLmid[index].value = next.toFixed(0);
}
}
C-24 Developing Business Processes with Oracle Business Process Composer
D
Preparing Processes for Import into Oracle
BPM
This appendix describes how to improve the results of importing process models
created in Microsoft Visio and tools that support XPDL (Process Definition Language).
This appendix includes the following sections:
• Preparing a Visio File to Import as a BPMN Process
• Customizing XPDL Import Using XSLT
Preparing a Visio File to Import as a BPMN Process
You can import Visio files directly into Business Process Composer. Business Process
Composer maps Visio elements to Business Process Model and Notation (BPMN) flow
objects using special mapping files named VisioMasterMap.xml and VisioUserMap.xml.
However, Oracle only supports modifying the Visio mapping when using Business
Process Management (BPM) Studio within Oracle JDeveloper.
The instructions in this section describe how to customize the mapping for BPM
Studio. After importing models into BPM Studio, you can move the models to
Business Process Composer by exporting your project and then importing it into
Business Process Composer.
The mapping files define the target BPMN flow object for each Visio element. These
files are located in the following directory within the Fusion Middleware home
directory:
.../soa/plugins/jdeveloper/extensions/oracle.bpm.converter.
Note:
Do not edit VisioMasterMap.xml directly because this file may be overwritten
during an upgrade. You can override the mappings in this file by creating and
editing a separate file called VisioUserMap.xml.
To change the default mapping defined in VisioMasterMap.xml:
1. Locate the VisioUserMap_SAMPLE.xml file and rename it to VisioUserMap.xml.
2. Edit the renamed file with your changes.
This file extends or overrides the master map.
Preparing Processes for Import into Oracle BPM D-1
Preparing a Visio File to Import as a BPMN Process
Note:
The file must be named VisioUserMap.xml and must be placed in the same
directory as the VisioMasterMap.xml file.
3. After parsing VisioMasterMap.xml, Business Process Composer checks to see if
VisioUserMap.xml exists.
It then modifies its rules accordingly.
VisioUserMap.xml must have the same root element as the default defined in
VisioMasterMap.xml file, including the reference to the VisioMasterMap.xsd.
VisioUserMap.xml must have the same format as the master map, which may be
used as a reference.
Entries added to the user map must either add new mappings or overwrite existing
entries in the main map. For example:
<?xml version = '1.0' encoding = 'UTF-8'?>
<Masters xmlns:xsi="http://www.w3.org/2001/XMLSchema-instance"
xsi:schemaLocation="http://www.oracle.com/oracle/tutor/visio/masterMapElements
VisioMasterMap.xsd"
xmlns="http://www.oracle.com/oracle/tutor/visio/masterMapElements">
<!— custom <Master/> elements go here -- >
</Masters>
Note:
VisioUserMap.xml should contain only the extended or overridden entries
and should not contain all the original entries.
Working of Visio Shape Mapping
Microsoft Visio is a diagramming tool that allows users to draw any kind of diagram.
However, only process models can be imported into Business Process Composer. Since
Visio includes several different process modeling templates and stencils and there are
many more available from third parties, the converter attempts to map each Visio
shape object (rectangles, lines, polygons, and so on) to an appropriate BPMN symbol.
It does this by using the VisioMasterMap.xml and VisioUserMap.xml files.
Each shape added to a Visio drawing page from a stencil is tagged with the name of
the master object from which it was created. For example, if a Visio user drags several
rectangle shapes named Task from a stencil onto the page and then renames them,
each shape still has the master name Task associated with it. You can see this in Visio
by selecting a shape and then choosing Format > Special from the menu.
Note:
If you don't see the menu item Format > Special, select Tools > Options >
Advanced, and check the box Run in developer mode. This option may be in
a different location depending on your version of Visio.
If a shape does not have a master, which is the case for objects drawn directly from the
Drawing toolbar (such as plain rectangles and circles), the converter looks at the shape
Name field, which you can also see in the Format > Special dialog.
D-2 Developing Business Processes with Oracle Business Process Composer
Preparing a Visio File to Import as a BPMN Process
Oracle Business Process Composer then looks for an entry in VisioUserMap.xml and
VisioMasterMap.xml that matches the shape master name. For example, if the shape
master is Task, the converter finds the following map entry:
<Master Name="task">
<BPMNObject>Task</BPMNObject> </Master>
This tells the converter that all shapes with a master of Task should be imported as a
BPMN Task symbol.
Note:
Master names are not case sensitive, so task matches Visio masters task, Task,
and TASK.
Master map entries can also define additional BPMN properties. The following entry
maps the Visio master named gateway to the BPMN Gateway symbol, but also sets
some BPMN attribute values:
<Master Name="gateway">
<BPMNObject>Gateway</BPMNObject>
<Attributes>
<Attribute Name="ExclusiveType" Value="Data"/>
<Attribute Name="GatewayType"
Value="Exclusive"/>
<Attribute Name="MarkerVisible" Value="false"/>
</
Attributes> </Master>
Attributes can be set to a text, numeric, or boolean value (true and false) depending on
what the BPMN standard requires.
Attribute values can also be derived from properties defined in the Visio shape itself.
The following master map entry for a task shape in the Visio 2010 BPMN stencil sets
the BPMN attributes TaskType and Implementation from corresponding shape
properties.
<Master Name="Vis2010 Task" Extends="Vis2010 Activity">
<BPMNObject>Task</
BPMNObject>
<Attributes>
<Attribute Name="TaskType"
Value="Prop.BpmnTaskType" SrcType="visio" />
<Attribute Name="Implementation"
Value="Prop.BpmnImplementation" SrcType="visio" />
</Attributes> </Master>
The XML attribute "srcType" tells the converter how to interpret the attribute value.
Setting srcType to visio indicates that the value is defined in the Visio object's
"ShapeSheet". To view the ShapeSheet of a Visio shape, select the shape and choose
Window > Show ShapeSheet. The most common properties are defined in the
Custom Properties and User-defined Cells sections, which correspond the Prop and
User prefixes respectively. Property names can also be derived from the XML tag
hierarchy in Visio files saved in the *.vdx format.
Conditional Mapping
The master map files also support conditional mapping. This is useful when two
different Visio stencils use the same master names, but use different Visio properties
to store BPMN attribute values. For example, the following entry uses a condition to
detect whether an Intermediate Event shape from the TrisoTech BPMN stencil is a
Throwing or Catching event:
<Master Name="Intermediate Event" Extends="Triso Object">
<BPMNObject>IntermediateCatchEvent</BPMNObject>
<Conditions>
<Condition
Name="Direction" Value="Prop.direction" SrcType="visio" Equals="Catching" />
</
Conditions>
<Attributes>
<Attribute Name="Trigger"
Value="Prop.IntermediateEvent_trigger" SrcType="visio" />
</Attributes>
</
Master>
Preparing Processes for Import into Oracle BPM D-3
Preparing a Visio File to Import as a BPMN Process
A special condition attribute of NotNull (not case sensitive) can be used to test if a
specific Visio property exists. The following master map entry is matched if the master
name is Start Event and it contains a property named Prop.StartEvent_Trigger:
<Master Name="Start Event">
<BPMNObject>Event</BPMNObject>
<Conditions>
<!-- this condition confirms that this is from Trisotech stencil -->
<Condition
Name="Is Triso shape" Value="Prop.StartEvent_Trigger" SrcType="visio"
Equals="NotNull" />
</Conditions>
<Attributes>
<Attribute
Name="EventType" Value="Start" SrcType="bpmn" />
<Attribute Name="Trigger"
Value="Prop.StartEvent_Trigger" SrcType="visio" />
<Attribute
Name="isInterrupting" Value="Prop.StartEvent_Interrupting" SrcType="visio" />
</
Attributes>
</Master>
If there are more than one master map entry with the same name, the first one
encountered with conditions that are all true is used. If no conditional entries match,
the first unconditional master map entry for the master name is used. The
VisioUserMap.xml file is processed first, so any matching master map entries in this
file supersedes all other entries with the same name in VisioMasterMap.xml.
A special master map entry name of "*" is used to match all masters. This must only be
used with conditions. This is useful for Visio templates that allow the user to change
the BPMN object type (such as from Task to Sub Process) after adding the shape to the
diagram. In this scenario, the shape master is set to the original master, even though
the shape has been changed to look like a different symbol. For example, the following
entries use the "*" wildcard to match entries based only on a shape property value:
<Master Name="*" Extends="Vis2010 Task">
<Conditions>
<Condition
Name="Activity Type" Value="Prop.BpmnActivityType" SrcType="visio" Equals="Task" /
>
</Conditions> </Master> <Master Name="*" Extends="Vis2010 Subprocess">
<Conditions>
<Condition Name="Activity Type" Value="Prop.BpmnActivityType"
SrcType="visio" Equals="Sub-Process" />
</Conditions> </Master>
If a Visio master name or shape name is not matched by any entry in
VisioUserMap.xml or VisioMasterMap.xml, the BPMN object type is determined by
examining the shape attributes. The basic rules are:
• If a shape is a connector (usually a line used to connect other shapes), it is imported
as a SequenceFlow.
• A rectangle shape that contains text, but has no border and no fill color is imported
as a Text Annotation.
• A shape that is a circle or an ellipse is imported as an event.
• A rectangle that encloses other shapes is imported as an expanded Sub Process if
no sequence flows cross the boundary of the shape.
If a sequence flow connects to a shape inside the boundary of the rectangle, it is
treated as a BPMN Group symbol, but since Oracle BPM does not support the
Group symbol, it will be ignored.
• Any shape that does no match the above rules is imported as a Task.
D-4 Developing Business Processes with Oracle Business Process Composer
Preparing a Visio File to Import as a BPMN Process
Note:
Be careful when using the Visio Group command to combine shapes. This is
sometimes convenient when moving and rearranging shapes in Visio, but
confuses the converter since a group of shapes is treated as a single object
during import and does not have a master, so is likely be imported as a single
task.
Visio Modelling Tips
Consider the following tips when you create your Visio files:
• Use a good stencil.
• Ensure all shapes are based on a master shape.
• Glue all connectors to other shapes on both ends.
• Do not create flows by connecting shorter lines end-to-end.
Use one continuous connector for each flow.
• Do not group objects manually.
• Always label shapes and lines by selecting and typing.
Do not create separate text boxes.
• Do not invent new symbols that do not cleanly map to BPMN objects.
• Verify that all masters that you use are defined in VisioMasterMap.xml or
VisioUserMap.xml.
• Do not use on-page and off-page connectors or link events.
They are not supported by BPM.
Updating VisioUserMap.XML
This section describes a possible scenario for importing a Visio file into a BPMN
process.
To update VisioUserMap.xml:
In this example, the original Visio file contains a shape with the master Report that we
want to map to a Send task. Since Report is not currently mapped in
VisioMasterMap.xml, the shape is being imported as an abstract task. By default,
VisioMasterMap.xml maps this shape to a Send task. If you use it strictly as an input
or output object, it is more accurate to map it to a BPMN data object.
1. In the VisioMasterMap.xml file, find the master definition, which appears as:
<Master Name="document" Extends="task">
<Attributes>
<Attribute Name="TaskType" Value="Send"/>
</Attributes>
</Master>
Preparing Processes for Import into Oracle BPM D-5
Preparing a Visio File to Import as a BPMN Process
This definition is followed by additional master elements that use the Like attribute
to clone the first definition and map additional Visio objects as mentioned below:
<Master Name="sequential data" Like="data object"/>
<Master Name="data" Like="data object"/>
<Master Name="report" Like="report" />
2. To add or modify a mapping for a Visio Report element, add the following code to
the VisioUserMap.xml file:
<Master Name="Report" Like="report"/>
An object can be mapped to an existing BPMN object with additional or different
attributes by using the Extends attribute, as shown here:
<Master Name="flow">
<BPMNObject>SequenceFlow</BPMNObject>
</Master>
<Master Name="conditional flow" Extends="flow">
<Attributes>
<Attribute Name="ConditionType" Value="Expression"/>
</Attributes>
</Master>
In this example, the Visio object conditional flow is mapped to the SequenceFlow BPMN
flow object, but has added the attribute ConditionType to the value Expression.
Valid BPMN Element Values
The following are valid values for the <BPMNObject> element:
• Task:
– UserTask
– ManualTask
– ReceiveTask
– SendTask
– ServiceTask
– ScriptTask
– BusinessRuleTask
• Subprocess:
– AdHocSubprocess
– CallActivity
• Event:
– StartEvent
– EndEvent
– IntermediateCatchEvent
D-6 Developing Business Processes with Oracle Business Process Composer
Preparing a Visio File to Import as a BPMN Process
– IntermediateThrowEvent
– BoundaryEvent
• Gateway:
– ExclusiveGateway
– InclusiveGateway
– ParallelGateway
– ComplexGateway
– EventBasedGateway
• DataObject:
– DataObjectReference
• Group:
• Annotation
– TextAnnotation
• Lane
• Pool:
– Participant
• MessageFlow
• SequenceFlow
• Association
• null
Note:
When you assign the null value to a Visio element, no BPMN flow object is
created.
BPMN Element Attributes
The following tables show valid values for BPMN attributes based on the basic BPMN
types of BPMN flow objects:
Task attributes and values
Table D-1 shows the valid attributes and values for BPMN tasks.
Table D-1
Task Attributes and Values
Attribute
Values
TaskType
None, Script, Reference, Service, User, Manual, Send, Receive
Preparing Processes for Import into Oracle BPM D-7
Preparing a Visio File to Import as a BPMN Process
Attribute
Values
LoopType
Standard, MultiInstance
isForCompensation
true, false
Implentation
Any text
OperationRef
Any text
Subprocess attributes and values
Table D-2 shows the valid attributes and values for BPMN subprocesses
Table D-2
Subprocess Attributes and Values
Attribute
Values
isExpanded
true, false
isATransaction
true, false
LoopType
Standard, MultIinstance
isForCompensation
true, false
AdHoc
true, false
IsCollapsed
true, false
SubprocessType
Embedded, Reusable, Reference
ExpandedWidth
number
ExpandedHeight
number
ModelReference
text
CalledElement
text
TriggeredByEvent
true, false
LoopMaximum
number
LoopCounter
number
LoopCondition
text
MultiInstanceCondition
text
MultiInstanceIsSequential
true, false
Event attributes and values
Table D-3 shows the valid attributes and values for BPMN events.
Table D-3
Event Attributes and Values
Attribute
Values
EventType
Start, Intermediate, End
D-8 Developing Business Processes with Oracle Business Process Composer
Preparing a Visio File to Import as a BPMN Process
Attribute
Values
Trigger
Escalate, None, Message, Timer, Conditional, Signal, Multiple,
Error, Cancel, Compensation, Link, Terminate
EventDirection
Throw, Catch
IsInterrupting
true, false
CancelActivity
true, false
TimeCycle
text
TimeDate
text
Gateway attributes and values
Table D-4 shows the valid attributes and values for BPMN gateways.
Table D-4
Gateway Attributes and Values
Attribute
Values
GatewayType
Parallel, Inclusive, Exclusive, Complex
ExclusiveType
Event, Data
MarkerVisible
true, false
Sequence flow attributes and values
Table D-5 shows the valid attributes and values for BPMN sequence flows.
Table D-5
Sequence Flow Attributes and Values
Attribute
Values
ConditionType
None, Expression, Default
ConditionExpression
text
Association attributes and values
Table D-6 shows the valid attributes and values for BPMN data objects.
Table D-6
Association Attributes and Values
Attribute
Value
Direction
None, One, Both
AssociationDirection
None, One, Both
Pool attributes and values
Table D-7 shows the valid attributes and values for BPMN pools.
Preparing Processes for Import into Oracle BPM D-9
Customizing XPDL Import Using XSLT
Table D-7
Pool Attributes and Values
Attribute
Values
BoundaryVisible
true, false
IsHorizontal
true, false
Lane Attributes and Values
Table D-8 shows the valid attributes and values for BPMN Lanes.
Table D-8
Lane Attributes and Values
Attribute
Values
BoundaryVisible
true, false
IsHorizontal
true, false
Handling Extraneous Text
When Business Process Composer imports a Visio file, it creates a separate process for
each pool that it finds in the source file. Since BPMN models can also depict a process
without a visible pool boundary, Visio shapes that are not inside a pool or lane,
including legends, titles, and so on, are added to a separate process. This may result in
a BPM process containing only extraneous elements that are not process objects. To
avoid converting these shapes, you can add entries to the VisioUserMap.xml file that
map the corresponding shape masters to null, which causes the converter to ignore the
shape. If the shape doesn't have a master, the converter looks for an entry that matches
the shape name as defined in Visio's Format Special dialog. For example, if your Visio
file contains an object named SheetName, mapping that value to null in
VisioUserMap.xml causes it to be ignored during import:
<Master Name="SheetName">
<BPMNObject>null</BpmnObject>
</Master>
Customizing XPDL Import Using XSLT
XPDL is an interchange format created by the Workflow Management Coalition for
exchanging process model information between workflow automation tools. BPM
supports importing XPDL revisions 1.0, 2.0, 2.1, and 2.2.
There are currently many process modeling tools that support XPDL, but not all tools
implement the standard in the same way. Oracle BPM supports XPDL files that adhere
strictly to the official XPDL specification (available at http://www.xpdl.org) and
uses Extensible Stylesheet Language Transformation (XSLT) to transform nonconforming formats into the format that BPM expects. The XPDL importer also
recognizes several extended attributes that triggers special transformation logic for
common differences so that complex XSLT logic is not required.
Common Transformation Requirements
The most common transformations include the following:
• Adjust object coordinates from being relative to a parent container to being relative
to the upper-left corner of the drawing page.
D-10 Developing Business Processes with Oracle Business Process Composer
Customizing XPDL Import Using XSLT
• Adjust object coordinates to represent the upper-left corner of the object.
• Recreate sequence flow routing.
• Create missing elements and attributes.
• Removing elements.
• Move element and attribute values from a vendor-specific namespace to the XPDL
namespace.
Overview of Transformation Logic
This section includes instructions on handling some of the common requirements. The
examples can help you create your own transformation rules to handle any other
requirements you may encounter.
When importing XPDL files using BPM Studio, the import process uses special files
located in the following folder:
ORACLE_HOME>/soa/plugins/jdeveloper/extensions/oracle.bpm.converter
The file XSLFilePaths.xml serves as map between various vendor formats and the
appropriate XSL file to use for the transformation. Following is a sample entry in this
file:
<XSLFilePath Vendor="Bizagi Process Modeler">BizagiPatch.xsl</XSLFilePath>
The Vendor attribute must match the value of the XML element /Package/
PackageHeader/Vendor in the source file. Following is an example fragment from a
Bizagi XPDL file that matches the line above:
<?xml version="1.0" encoding="utf-8"?><Package xmlns:xsd=http://www.w3.org/2001/
XMLSchema
xmlns:xsi=http://www.w3.org/2001/XMLSchema-instance
Id="bf8a25f5-275d-4546-8d07-dfa02666c51d"
Name="Sample" xmlns="http://
www.wfmc.org/2009/XPDL2.2"> <PackageHeader>
<XPDLVersion>2.2</XPDLVersion>
<Vendor>Bizagi Process Modeler</Vendor>
<Created>2013-07-29T19:17:31.931003-07:00</Created>
<ModificationDate>2013-07-29T19:18:53.207857-07:00</ModificationDate>
<Description>Phases</Description>
<Documentation /> </PackageHeader>
As an alternative to the Vendor attribute, you may specify a Condition attribute that
contains a valid XPATH expression. If the expression evaluates to true for a source file,
the corresponding XSL file is used. Following is an example that uses the Condition
attribute:
<XSLFilePath Condition="substring(/Package/PackageHeader/Vendor/text(), 0,
22)='Metastorm ProVision 6'">ProvisionPatch.xsl</XSLFilePath>
This expression compares the first 22 characters of the Vendor attribute to the string
"Metastorm ProVision 6". This technique may be used to match a combination of
Vendor and Version, for example.
After a specific XSL file is identified, the importer applies the XSLT transformation
against the source file and then imports the transformed XML. If no Vendor or
Condition matches the source file, the importer uses the file patch.xsl.
Preparing Processes for Import into Oracle BPM D-11
Customizing XPDL Import Using XSLT
Special Attributes
The XPDL importer looks for optional attributes, defined using XPDL's extensibility
feature, that serve as instructions to the importer for handling special cases that are
difficult to code as XSLT. These attributes must be located in the /Package/
ExtendedAttributes section as follows:
<Package>
<Extended Attributes>
Name="attribute name" Value="value" />
Table D-9
<ExtendedAttribute
<Extended Attributes></Package>
Extended Attributes and Valid Values
Attribute Name
Valid Values
Default Values
Description
redrawConnecti
ons
true, false
false
Ignore sequence flow path
attributes and create new paths
programmatically.
activitiesObjectP
in
Upperleft
Upperleft
Indicates that the X, Y coordinates
of an activity (flow node)
correspond to either the upper-left
corner of the rectangular bounds of
the symbol, the lower-left corner, or
the center of the symbol.
Lowerleft
Center
lanesRelativeTo
Pools
true, false
false
Indicates that the X, Y coordinates
of lane objects are relative to their
parent pool.
activitiesRelativ
eToLanes
true, false
false
Indicates that the X, Y coordinates
of activities are relative to their
parent lane.
activitiesRelativ
eToPools
true, false
false
Indicates that the X,Y coordinates of
activities are relative to their parent
lane. NOTE:
activitiesRelativeToLanes and
activitiesRelativeToPools cannot
both be set to true.
subProcessChild
PositionRelative
true, false
false
Indicates that the X, Y coordinates
of activities that are inside of a
subprocess are relative to the
subprocess.
recalculatePools
AndLanesPositi
ons
true, false
false
Forces the importer to calculate the
X, Y coordinate of pools and lanes
based on the position and height of
the pools and lanes that precede it.
This must be set to true if the source
model does not include positional
coordinates for pools and lanes.
Object Coordinates
The XPDL specification states that all object coordinates specify the upper-left corner
of the object's bounding rectangle on a page coordinate system with the origin (0,0) in
the upper-left corner of the page. For the purposes of this example, the height of pool 1
in Figure D-1 is 100 units, pool 2 is 200 units tall, and each lane in Pool 2 is 100 units
tall.
D-12 Developing Business Processes with Oracle Business Process Composer
Customizing XPDL Import Using XSLT
Figure D-1
Example BPMN Process
Using the global coordinate system of the XPDL specification, the X, Y coordinates of
the objects depicted in the diagram are as follows:
Pool 1 - (0,0)
Pool 2 - (0, 200)
Lane 1 - (40, 200)
Lane 2 - (40, 300)
Task 1 - (175, 15)
Task 2 - (175, 215)
Task 3 - (325, 315)
A source file specifying these coordinates is imported correctly into BPM with no
transformation required, since all coordinates are relative to the upper-left corner of
the page.
Consider a tool where object coordinates stored in the XPDL are relative to their
parent pool and lane. In this case, the coordinates are:
Pool 1 - (0,0)
Pool 2 - (0, 200)
Lane 1 - (40, 0)
Lane 2 - (40, 100)
Task 1 - (175, 15)
Task 2 - (175, 15)
Task 3 - (325, 15)
Note that lane 1 in Pool 2 has a Y coordinate of 0. Since this tool stores lane positions
relative to their parent pool, a value of 0 indicates that the top edge of the lane
coincides with the top edge of the pool. Likewise, the Y coordinate of Lane 2 is 100,
indicating that it is 100 units below the top edge of the pool.
Each task has a Y coordinate of 15, indicating that its upper-left corner is 15 units
below the top edge of its respective lane.
In order for this diagram to be correctly imported into Oracle BPM, the following
extended attribute values must be set:
Preparing Processes for Import into Oracle BPM D-13
Customizing XPDL Import Using XSLT
Table D-10
Extended Attribute Values
Attribute Name
Value
lanesRelativeToPools
true
activitiesRelativeToLanes
true
The XSLT code to add these attributes to the XPDL are as follows:
<xsl:template match="Package/ExtendedAttributes">
<xsl:copy>
<xsl:copy-of select="@*"/>
<ExtendedAttribute
Name="lanesRelativeToPools" Value="true"/>
<ExtendedAttribute
Name="activitiesRelativeToLanes" Value="true"/>
<xsl:apply-templates/
>
</xsl:copy> </xsl:template>
A minor variation is when lanes are relative to their parent pools, but activities are
relative to their parent pool, not their parent lane. In this scenario, the object
coordinates may be as follows:
Pool 1 - (0,0)
Pool 2 - (0, 200)
Lane 1 - (40, 0)
Lane 2 - (40, 100)
Task 1 - (175, 15)
Task 2 - (175, 15)
Task 3 - (325, 115)
Pool 1 - (0, 0)
The only difference is that the Y value of Task 3 is 115 instead of 15. In this scenario,
the extended attributes must be set to:
Table D-11
Extended Attributes and Values
Attribute Name
Value
lanesRelativeToPools
true
activitiesRelativeToPools
true
Activity Local Coordinate System
The XPDL specification dictates that activity positions represent the location of the
upper-left corner of the bounding rectangle on the page coordinate system. However,
some tools use the center of the object as the location on the page. This is known as the
local coordinate system of the object.
The easiest way to understand this is to imagine pinning a postcard onto a cork board
with a push pin. The hole that the pin makes in the board represents the position of
the card on the board. Measuring from the left edge of the board to the pin provides
the X coordinate and measuring from the top edge of the board to the pin provides the
Y coordinate. However, the placement of the pin in the card itself also contributes to
the correct positioning of the card. If the pin is placed in the extreme upper-left corner
of the card, the position will be different than when the pin is directly in the center of
the card.
Using the BPMN example in Figure D-1, an XPDL tool that uses the center of an
activity as the local pin location have task coordinates as follows:
D-14 Developing Business Processes with Oracle Business Process Composer
Customizing XPDL Import Using XSLT
Task 1 - (220, 50)
Task 2 - (220, 250)
Task 3 - (370, 350)
The X coordinates are shifted to the right by 45 units (task boxes are 90 units wide) and
the Y coordinates are in the vertical center of each lane, (which are 00 units high).
When an XPDL tool uses the center of activities as the basis for their position on the
page, after importing into BPM they are shifted down and to the right by half their
width and height because the importer is expecting all coordinates to represent the
position of the upper-left corner. To correct this, you must set the following attribute:
activitiesObjectPin CENTER
The XSLT code for this is:
<xsl:template match="Package/ExtendedAttributes">
<xsl:copy>
<xsl:copyof select="@*"/>
<ExtendedAttribute Name="activitiesObjectPin"
Value="CENTER"/>
<xsl:apply-templates/>
</
xsl:copy> </xsl:template>
Removing Invisible Elements
Oracle BPM considers all graphical elements of the source XPDL file to be visible
elements, even if their visibility is set to false. Therefore, you may find some
differences as formerly invisible elements are visible in the converted BPMN process,
like the activity elements shown here:
<xpdl:Activity Name="ProcessGroup" Id="ProcessGroup">
<xpdl:NodeGraphicsInfos>
<xpdl:NodeGraphicsInfo ToolId="XYZ"
LaneId="PMCoE"
IsVisible="false">
<xpdl:Coordinates XCoordinate="7740.0"
YCoordinate="80.0"/>
</xpdl:NodeGraphicsInfo>
xpdl:NodeGraphicsInfos>
…</xpdl:Activity>
</
In this example the activity's visibility is set to false, but when this model is imported
into Oracle BPM, you can see this activity. To eliminate invisible elements include a
style sheet template to remove them:
<xsl:template match="xpdl:Activity">
<xsl:variable
name="isVisible">
<xsl:choose>
<xsl:when
test="xpdl:NodeGraphicsInfos/xpdl:NodeGraphicsInfo/@IsVisible =
'false'">
<xsl:text>false</xsl:text>
</
xsl:when>
<xsl:otherwise>
<xsl:text>true</
xsl:text>
</xsl:otherwise>
</xsl:choose>
</
xsl:variable>
<xsl:if test="$isVisible = 'true'">
<xsl:copy>
<xsl:copy-of select="@*"/>
<xsl:applytemplates/>
</xsl:copy>
</xsl:if></xsl:template>
Handling Proprietary Namespaces
Some XPDL tools use a proprietary namespace in addition to the standard XPDL
namespace. This is often to support special features and attributes of their tool, but
sometimes information is stored in a proprietary namespace that should be in the
XPDL namespace.
Considering the following XPDL file header, which defines multiple namespaces:
<?xml version="1.0" encoding="UTF-8"?>
<Package Id="1"
xsi:schemaLocation="http://www.wfmc.org/2004/XPDL2.0alpha http://www.wfmc.org/
Preparing Processes for Import into Oracle BPM D-15
Customizing XPDL Import Using XSLT
standards/docs/TC-1025_bpmnxpdl_24.xsd"
xmlns="http://www.wfmc.org/2004/
XPDL2.0alpha"
xmlns:xs="http://www.w3.org/2001/XMLSchema"
xmlns:xpdl="http://
www.wfmc.org/2004/XPDL2.0alpha"
xmlns:ix="http://www.igrafx.com/2007/igrafxdocument"
xmlns:xsi="http://www.w3.org/2001/XMLSchema-instance"
xmlns:igxpdl="http://www.igrafx.com/2008/igrafx-xpdl2">
The body of the XML document uses the default namespace for standard XPDL
elements, but uses the igxpdl namespace for defining document pages.
<igxpdl:Page Name="Update Spreadsheet" ID="Page1" IgnorePools="true">
<PageLayout xmlns:i="http://www.igrafx.com/2007/igxmldoc" xmlns="http://
www.igrafx.com/2007/igrafx-document">
<Page UseDocumentSettings="false"
Orientation="Landscape" Width="16837" Height="11905">
<FitTo PagesWide="1"
PagesTall="1" />
</Page>
</PageLayout>
</igxpdl:Page>
<igxpdl:Page
Name="Submit Instructions" ID="Page2" IgnorePools="true">
<PageLayout
xmlns:i="http://www.igrafx.com/2007/igxmldoc" xmlns="http://www.igrafx.com/2007/
igrafx-document">
<Page UseDocumentSettings="false" Orientation="Landscape"
Width="16837" Height="11905">
<FitTo PagesWide="1" PagesTall="1" />
</Page>
</PageLayout>
</igxpdl:Page> </igxpdl:Pages>
The XPDL importer does not recognize any namespace other than the XPDL
namespace and expects to find a Pages element in that namespace. To support this
requirement, create an XSLT template that creates the XPDL Pages element and
children by copying the information from the custom namespace elements.
<xsl:template match="//xpdl21:Package">
<xsl:copy>
<xsl:copy-of select="@*"/>
<xsl:if
test="child::igxpdl:Pages">
<xsl:element
name="Pages">
<xsl:for-each select="//igxpdl:Pages/
igxpdl:Page">
<xsl:element
name="Page">
<xsl:attribute
name="Id">
<xsl:value-of select="./@ID"/
>
</xsl:attribute>
<xsl:attribute name="Name">
<xsl:value-of
select="./@Name"/>
</
xsl:attribute>
</xsl:element>
</
xsl:for-each>
</xsl:element>
</
xsl:if>
<xsl:apply-templates/>
</xsl:copy>
</
xsl:template>
The result is a new section in the default namespace as shown below:
<Pages>
<Page Id="Page1" Name="Update Spreadsheet" />
Name="Submit Instructions" /></Pages>
<Page Id="Page2"
Supporting Multiple XPDL Versions
If you are using a tool that has been upgraded to support newer versions of XPDL,
you may have models that have been saved using different XPDL formats. When
creating XSLT templates for multiple XPDL versions, you may have to include rules
for each namespace.
For example, consider a tool that saved files in XPDL 2.1 format and later in XPDL 2.2
format and used different namespace values of xpdl21 and xpdl22 respectively. The
XSLT file must define both namespaces and they must match the namespaces that
appear in the tool's XPDL files.
<xsl:stylesheet version="1.0"
xmlns:xsl="http://www.w3.org/1999/XSL/
Transform"
xmlns:xpdl21="http://www.wfmc.org/2008/
XPDL2.1"
xmlns:xpdl22="http://www.wfmc.org/2009/XPDL2.2">
D-16 Developing Business Processes with Oracle Business Process Composer
Customizing XPDL Import Using XSLT
You then define separate templates for each namespace, such as:
<!-- Set extended Attribute for xpdl 2.1 -->
<xsl:template
match="xpdl21:Package/xpdl21:ExtendedAttributes">
<xsl:copy>
<xsl:copy-of
select="@*"/>
<xpdl21:ExtendedAttribute
Name="subProcessChildPositionRelative" Value="true"/>
<xpdl21:ExtendedAttribute Name="activitiesObjectPin" Value="CENTER"/>
<xsl:apply-templates/>
</xsl:copy> </
xsl:template>
<!-- Set extended Attribute for xpdl 2.2 -->
<xsl:template
match="xpdl22:Package/xpdl22:ExtendedAttributes">
<xsl:copy>
<xsl:copy-of
select="@*"/>
<xpdl22:ExtendedAttribute Name="redrawConnections"
Value="true"/>
<xpdl22:ExtendedAttribute
Name="subProcessChildPositionRelative" Value="true"/>
<xpdl22:ExtendedAttribute Name="activitiesObjectPin" Value="CENTER"/>
<xsl:apply-templates/>
</xsl:copy> </
xsl:template>
The logic for each XPDL format can be the same or different depending on the
requirements.
Testing and Debugging XSLT
Oracle highly recommends that you create and test your custom XSLT using a
programming IDE (Interactive Development Environment), such as Oracle
JDeveloper, that supports validation of the XSLT and interactive execution so that you
can view the output XPDL and fix issues easily. To view a demonstration explaining
how to edit and debug XSLT in Oracle JDeveloper, open the following link in your
browser:
http://www.oracle.com/technetwork/developer-tools/jdev/xml-viewlet-swf-089240.htmlhttp://
www.oracle.com/technetwork/developer-tools/jdev/xml-viewlet-swf-089240.html
Preparing Processes for Import into Oracle BPM D-17
Customizing XPDL Import Using XSLT
D-18 Developing Business Processes with Oracle Business Process Composer