1
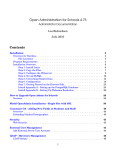
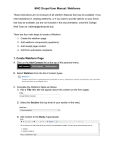
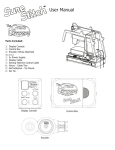
School account creation guide
Contents
Your welcome email
The CSV file
Uploading the CSV and creating the accounts
Retrieving staff usernames and passwords
Retrieving student usernames and passwords
Retrieving student details in Pearson Places
Adding new student or staff accounts
Changing student or staff accounts
Deleting accounts
What happens next year?
ETX and the Pearson product range
Need help or have a question?
Page 1
Page
Page
Page
Page
Page
Page
Page
Page
Page
Page
Page
Page
2
3
5
8
9
10
11
11
11
12
12
12
Your welcome email
Once you have purchased Stretch, our Customer Care department will send your
school a set-up email that looks like this:
Welcome to Stretch!
Hi *your name*,
Your Stretch administration account has been created.
These are your details:
School name: *your school name*
Username: *your ETX admin username*
Password: *your ETX admin password*
School ID: *your school ID*
Please use the following link to create accounts for your staff and students:
http://etx.pearsonplaces.com.au/vippass/
You can find the manual that will help you through the process of creating
accounts for students and teachers here. Also, please find attached a
spreadsheet template, which you use to enter the necessary information
required to set up the accounts. If you have any problems, please do not
hesitate to contact us for assistance, or to arrange a time for us to guide
you through the set-up process.
A Stretch user manual can be downloaded or, alternatively, it can be found
on the introductory page of the Stretch platform.
Your Stretch membership will expire on *date*.
Thank you and we hope you enjoy the fantastic digital world of Stretch.
Regards,
Daniel Rice
Customer Care – Schools Division
Pearson Australia
Page 2
The CSV file
In order to create all the individual Stretch accounts for your students and staff,
we need to fill a CSV file with essential information. This file is then used to create
the accounts.
What is a CSV file?
CSV stands for comma separated values. It’s basically a text file in which each
entry is separated from the next by a comma. A CSV file can be read by a
spreadsheet program, like Excel, and can be viewed and changed like a normal
spreadsheet. Each row in the CSV is a new account that the database will create
for you. Although it can take one person some time to fill out the CSV, it’s a lot
easier than having individual students create their own accounts.
The student_staff.csv file
This file is attached to the welcome email you received. There are nine columns
that can be filled out, some of which are optional. For each account that is
created, the database needs to know the user type, school ID, user ID, first
name, last name and, for students, year level. The table below explains each of
these columns. Do not change the order of the columns in the CSV or rename the
columns.
Fields/Columns What to do
User Type
Enter the word Staff or Student
School ID
Enter the school number provided in the set-up email. This
number will be the same for each row.
User ID
Enter a unique ID for each user. It’s easiest to do this
numerically, beginning at 1, then 2 for the next row and so
on.
First Name
Enter first or preferred name. Please do not use any
punctuation marks – letters only.
Last Name
Enter last or family name. Please do not use any punctuation
marks; letters only.
Email Address
This is optional, however should be included so teachers can
recieve their own passwords and we can keep them informed
of important changes to Stretch and Pearson Places.
Gender
Optional field; enter M or F
Date of Birth
Optional field; enter date of birth (mm/dd/yy).
Job Code/Year Leave blank for staff. Enter year level for students (0, 1, 2,
Level
3...)
K/Prep/Reception = 0
Level/Year/Grade 1 = 1
Level/Year/Grade 2 = 2
Page 3
Tips
• You can usually export information from your student management software.
You can then copy and paste information, such as names, into this CSV.
• By default, only teachers have access to Stretch. Unless you request that
students have access, there is no need to create student accounts.
• If you have already followed this process for another Pearson digital product,
such as Reader or Bug Club, there is no need to create new accounts for
those teachers or students.
• Including the teachers’ email addresses makes the process easier for
admins, because the teachers are automatically emailed their usernames and
passwords. They can also retrieve student usernames and passwords and give
them to their students.
• Do not change the order of the columns or their headers in the CSV file.
• You can rename the CSV file to anything you like, such as
Stretch_YourSchool.csv
• When you save the CSV, you may get a message like the one below. Click Yes.
• Your CSV should look like the one below, but with a different school ID.
Page 4
Uploading the CSV and creating the accounts
Go to the website: http://etx.pearsonplaces.com.au/vippass/ and log in using the
administrator account details that are in the welcome email. The username starts
with your school number, and finishes with ‘.admin’. Don’t forget, these account
details are only valid for the EduTone login page, not for Pearson Places or
Stretch.
Example
Once you have logged in, the page should look like the image below. Click the
Browse button. 1
Locate the CSV file you filled with all the account information. When you find the
CSV file, highlight it with your cursor and press the Open button. 2
Page 5
The file upload window should disappear and a file path will appear next to the
Browse button, telling the database where to get your CSV. Click Confirm to
upload the CSV to the database. 3
Your Name (Your School)
When the CSV is uploaded, you should receive a success message, just like the
one in the image below. 4
If you receive an error message, there is a problem with the CSV file that needs
to be rectified before you can create the accounts. The error message will give
you an indication of what the problem is.
Now that you have uploaded the account details and the database has checked
those details for errors, you need to ask the system to create the accounts. This is
called ‘provisioning’. Click Provision Accounts in the left menu. 5
Your Name (Your School)
Page 6
Click the Start Provision Process button.
6
Your Name (Your School)
The progress bar may take a while to reach 100%, but it is important not to close
the browser window until you receive the ‘Operation is complete’ message. 7
Your Name (Your School)
The accounts have now been created for Pearson Places and Stretch. The next
step is to retrieve the usernames and passwords for the accounts.
Page 7
Retrieving staff usernames and passwords
If you have included staff email addresses in the CSV, they will soon receive an
automatic email informing them of their username and password. If you haven’t
included staff email addresses, then you need to produce a report.
Click the Reports button in the left menu.
1
Click either the PDF or the CSV link for details of new staff accounts.
2
If you intend to print the report, choose PDF; if you intend to copy and paste the
usernames and passwords into an email or mail-merge program, choose CSV.
To select your school, click the little triangle. 3 A small drop down menu will open
and your school will appear. Select your school and press the OK button.
If you created the accounts on the same day you are producing the report, there
is no need to change the dates. Otherwise, click the ellipsis button. 4 A calendar
window will open. Select a date before the day you created the accounts.
Next click Run to produce the report.
open the CSV or PDF.
5 You should now get the option to save or
Page 8
Retrieving student usernames and passwords
There are two ways to retrieve student usernames and passwords. You can do it
via Pearson Places or by producing a report. Pearson Places gives you all the
students’ details. The report only gives you the details of the student accounts you
have just created. See page 10 to retrieve usernames and passwords via Pearson
Places.
To produce a report, click the Reports button in the left menu.
1
Click either the PDF or the CSV link for details of new student accounts.
The screen should look like the
image to the right. To select your
school, click the little triangle. 3
In the window that opens, select
your school and click OK.
Click the Next button.
4
The screen should now look like the
image below. To select the grades or
year levels, click the little arrow. 5
In the window that opens, select the
grade(s) of the students, then click
OK.
If you had just created the accounts
today, there is no need to change
the date. Otherwise, click the ellipsis
button. 6 A calendar window will
open. Select a date before the day
you created the accounts.
To produce the report, click the Run
button. 7
You should now have the option to
open or save your report.
Page 9
2
Retrieving student details in Pearson Places.
Any teacher can retrieve student usernames and passwords in Pearson Places.
Go to pearsonplaces.com.au and your screen should look like the one below. Click
the School members log in here link. 1
You will have the same password for Pearson Places and Bug Club. However,
your ETX admin username and password are different. Enter your Pearson Places
username and password, which you should have received via email or in the staff
report. 2 Click Submit. 3
If this is your first time logging into Pearson Places, you may need to change
your password and enter a security question. Otherwise you should see the Student
Password Recovery widget in My Place. You may need to scroll down to see it.
With this widget, you can
download all of your school’s
student account details. 4
You can also enter a username 5
and click View Password 6 to
see individual student passwords.
Page 10
Adding new student or staff accounts.
The process for adding new student or staff accounts is exactly the same as the
process explained in pages 3–7. You can simply add the new accounts into the
same CSV that you uploaded previously. New accounts will not be created for
existing users. You can also use a new CSV. Just ensure that the new accounts have
a unique user ID.
Changing student or staff accounts.
You can change names and add, change or remove details such as gender, date
of birth, year level and email address. Changing the name will not change the
username. The year level will automatically go up a level before the start of the
school year. You can reuse a CSV you had uploaded previously by simply entering
the changes into that CSV. When you upload the CSV, all duplicate accounts that
are the same will be ignored. Just follow the same process outlined on pages 3–7.
Deleting accounts.
Log in to http://etx.pearsonplaces.com.au/vippass/ (as on page 5).
Click User Accounts in the left menu.
below.
1 The screen should look like the image
2 or browse through the pages of users. 3
When you find the user you want to delete, click the username. 4
You can search for users by surname,
The screen should look like the image to the
right.
If you want to delete the account, click the
Delete button. 5
Remember, this cannot be undone and you
can not re-use a deleted user ID.
Page 11
What happens next year?
For new students, all you need to do is upload and provision the same CSV
template. Just follow the process outlined in pages 3-7. Remember, user IDs have
to be unique and cannot be reused, even if the previous student is no longer using
Stretch.
Thank you for taking the time to complete these steps.
ETX and the Pearson product range
If you purchase other Pearson digital products that run on the EduTone platform,
such as Bug Club and Primary Places, you will not need to create accounts for
the same students again. Please call or email Customer Care (information below) if
you have any problems or queries.
Need help or have a question?
Customer Care
Free Phone 1800 656 685
Free Fax 1800 642 270
Email [email protected]
Page 12